


The IP Endpoint Company
Installation Quick Reference
Push-to-Talk V2 Ceiling Speaker
011180, RAL 9002, Gray White, Standard
011181, RAL 9003, Signal White, Optional
Quick Reference 930467B © 2012, CyberData Corpora tion, ALL RIGHTS RESERVED© 2012, CyberDa ta Corporation, ALL RIGH TS RESERVED 930467B Quick Reference
4.00 [101.6]
120°
VoIP Speaker
Mounting Template
Speaker Hole Diameter:
7.50 [190.5]
Screw Hole Diameter:
0.1875 [4.75]
Dimensions are in inches [millimeter]
Typical System Installation
Getting Started
• Download the Push-to-Talk V2 Ceiling Speaker Operations G uide PDF file from the Documentation page at:
http://www.cyberdata.net/products/voip/digitalanalog/ce ilingspkr2ptt/docs.html
• Create a plan for the locations of your speakers.
• Prior to installation, consult local building and electrical code requirements.
Parts
Param eter Factory Default Setting
IP Addressing DHCP
IP Address
a
a. Default if there is not a DHCP server present.
10.10.10 .10
Web Access Username admin
Web Access Password admin
Subnet Mask
a
255.0.0.0
Default Gateway
a
10.0.0.1
802.3af Compliant Ethernet Switch
IP Phone
123 4 56
IP Talkback IP PBX ServerIP SpeakerRemote Call Button
Speaker
(1) Template for Speaker
and Screw Holes*
(3) #8 Nylon Thumb Nuts
(3) #8 Fender Washers
(3) 8-32 x 1 1/4” Mounting
Screws
(1) Call Button Assembly
(1) Wall Mounting Kit
(2) Mounting screws
(1) Speaker Assembly (1) Drop Ceiling Mounting Kit (1) Drywall Mounting Kit
(3) Plastic Ribbed Anchors
(3) #8 Sheet Metal Screws
* See the last page
of this document
© 2012, CyberD ata Corporation, ALL RI GHTS RESERVED 930467B Quick Reference Quick Referenc e 930467B © 2012, Cyb erData Corporation, ALL RIGHTS RESERVED
Mounting
Contacting CyberData
*Ceiling Tile or Dry Wall
VoIP V2 Speaker
Assembly
#8 Fender Washer (3x)
#8 Nylon Thumb Nut (3x)
#6 Screw (3x)
Dry Wall Mounting Kit
Template
Plastic Ribberd Anchor (3x)
Dry Wall Mounting Kit
#8-32x1 1/4" (3X)
Ceiling Mounting Screw
*Optional Reinforcement Mount
P/N: 010991A (Sold Seperately)
Tools Required for Installation:
• (1) Sheetrock saw or
(1) Drywall cutter
• (1) #2 Phillips Screwdriver or
(1) #2 Phillips Screwdriver Hex Bit
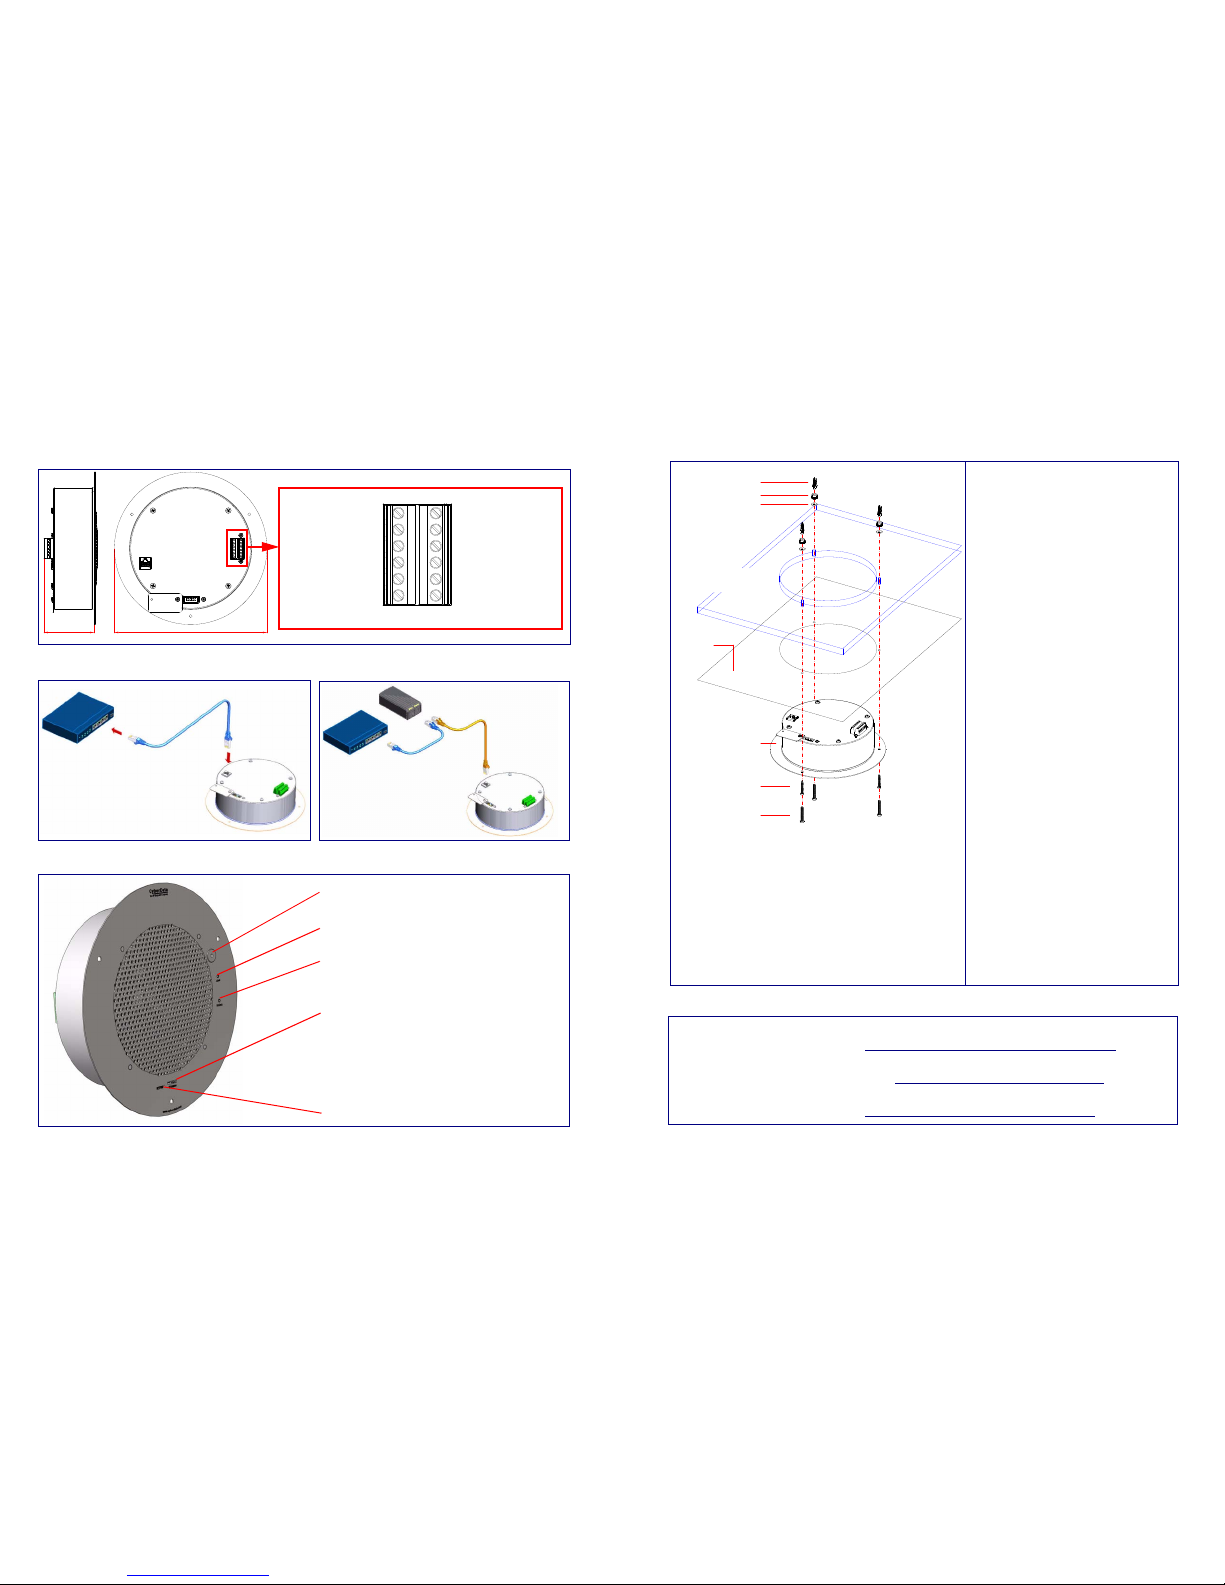
To mount a speaker:
1. Use the TEMPLATE on the back of this
document to cut a hole in the wall or ceiling,
and prepare holes for the screws.
2. Plug the Ethernet cable into the speaker
assembly. The yellow light verifies the
network connection.
3. For drop ceiling mounting, position the IP
SPEAKER ASSEMBLY in the ceilin g so that
its screw holes align with those you
prepared.
4. For drywall mounting, place the three
PLASTIC RIBBED ANCHORS in the holes
you prepared, and position the IP
SPEAKER ASSEMBLY over them, aligning
the screw holes in the assembly with the
anchors.
5. For drop ceiling mounting*, use the three
8-32 x 1 1/4" MOUNTING SCREWS, #8
NYLON THUMB NUTS, and #8 FENDER
WASHERS to secure the speaker.
For drywall mounting, use the three #8
SHEET METAL SCREWS to secure the
speaker.
* For weak ceiling tile, CyberData offers a
reinforcing mount (CyberData part number
010991A).
Speaker
Assembly
Sales: (831) 373-2601 ext. 334
Support: 831-373-2601 ext. 333
Web: http://www.cyberdata.net/support/contactsupportvoip.html
RMA Dept: (831) 373-2601 ext. 136
Email: RMA@CyberData.net
RMA Status: http://www.cyberdata.net/support/rmastatus.html
Warranty information is available at:
Web: http://www.cyberdata.net/support/warranty/index.html
Corporate Headquarters
CyberData Corporation
3 Justin Court
Monterey, CA 93940, USA
Phone: 831-373-2601
Fax: 831-373-4193
www.CyberData.net
Dimensions and Connections
Connecting Power
Features
9.0[229]
3.0[75]
Dimensionsare in Inches [Millimeter]
AUX SPEAKER (-)
AUX SPEAKER (+)
BTN SENSE GND
LINE OUT (-)
LINE OUT (+)
BUTTON LED (-)
BTN SENSE
BUTTON LED (+)
RELAY NO
RELAY COM
AUX POWER (-)
AUX POWER (+)
(+12VDC @ 1A)
J10
J9
PoE Injector (Part #010867A )
Non PoE Switch
802.3af switch Class "0"
RTFM Switch
To broadcast a device’s current IP address, press and release
the RTFM switch within a five second window.
To restore a device’s factory default settings, press and hold
the RTF M switch for more than five seconds.
Speaker Volume
Network Link/Activity LED (yellow)
Speaker Status LED (green)
A solid light confirms that the speaker is operational.
Microphone

© 2012, CyberD ata Corporation, ALL RI GHTS RESERVED 930467B Quick Reference Quick Referenc e 930467B © 2012, Cyb erData Corporation, ALL RIGHTS RESERVED
Mounting Options—Metal Bracket
Mounting Options—Plastic Bracket
Contacting CyberData
Wall Plate Mounting Bracket (Metal)
Tools Required: Wall board saw, Pliers
Instructions:
1. Use the inside area of the bracket to trace the hole
cut onto the wall.
2. Using a wall board saw or matt knife, cut along the
stencil line.
3. Place bracket against the wall opening.
4. Bend tabs up and down against the inside wall to
secure the bracket.
5. Place the optional gasket over the metal bracket.
6. Mount the flush mount wall plate to the bracket.
To be installed and or used in accordance with the
appropriate electrical codes and regulations.
Optional
Gasket
Mounting
Screw (2x)
Remote Call
Button Assembly
One-Gang
Low Voltage
Mounting Bracket
(Metal)
Wall Opening
Bend tabs up and
down against
inside wall to
secure bracket.
To be installed and or used in accordance with the
appropriate electrical codes and regulations.
Wall Plate Mounting Bracket (Plastic)
Tools Required: Wall board saw, Philips screwdriver
Instructions:
1. Use the inside area of the bracket to trace the hole
cut onto the wall.
2. Using a wall board saw or matt knife, cut along the
stencil line.
3. Place bracket through the wall opening.
4. Tighten screws to pull Flagnuts against the inside
wall to secure the bracket.
5. Place the optional gasket over the plastic bracket.
6. Mount the flush mount wall plate to the bracket.
Optional
Gasket
Mounting
Screw (2x)
Remote Call
Button Assembly
One-Gang
Low Voltage
Mounting Bracket
(Plastic)
Wall Opening
Tighten screws to
pull Flagnuts against
inside wall to secure
bracket.
Sales: (831) 373-2601 ext. 334
Support: 831-373-2601 ext. 333
Web: http://www.cyberdata.net/support/contactsupportvoip.html
RMA Dept: (831) 373-2601 ext. 136
Email: RMA@CyberData.net
RMA Status: http://www.cyberdata.net/support/rmastatus.html
Warranty information is available at:
Web: http://www.cyberdata.net/support/warranty/index.html
Corporate Headquarters
CyberData Corporation
3 Justin Court
Monterey, CA 93940, USA
Phone: 831-373-2601
Fax: 831-373-4193
www.CyberData.net
Typical Singlewire Speaker System Installation
Getting Started
• Create a plan for the locations of your Singlewire Speakers.
• Prior to installation, consult local building and electrical code requirements.
• WARNING: This enclosure is not rated for any AC voltages
!
Parts
As an option to the CyberData V2 speaker, the V2 Remote Call Button enables calls to the V2 Speaker that
can be initiated or answered from a remotely-mounted switch.
When enabled through the Web interface, if the Remote Call Button is pressed, the speaker would initiate a
SIP call to a predetermined extension.
When the V2 Speaker is called from a remote phone and Auto-Answer is not enabled within the unit’s Web
interface, the LED on the Remote Button will blink. The call will be answered when the button is pressed.
802.3af Compliant Ethernet Hub
IP Phone IP PBX Server
123 4 56
Remote Call Button
Speaker
(1) Call Button Assembly
(1) Optional Gasket
(1) Optional One-Gang, Low Voltage,
Mounting Bracket (Metal)
(1) Optional One-Gang, Low Voltage,
Mounting Bracket (Plastic)
(1) Wall Mounting Kit
(2) Mounting screws
Optional Parts (Not Included)
(1) Optional One-Gang
Box (Metal)
(1) Optional One-Gang
Box (Plastic)
The IP Endpoint Company
Installation Quick Reference
Push-to-Talk V2 Ceiling Speaker
011184, RAL 9002, Gray White, Standard
011185, RAL 9003, Signal White, Optional

© 2012, CyberD ata Corporation, ALL RI GHTS RESERVED 930467B Quick Reference Quick Referenc e 930467B © 2012, Cyb erData Corporation, ALL RIGHTS RESERVED
Dimensions
Mounting Option s—One-Gang Box (Metal or Plastic)
To be installed and or used in accordance with the
appropriate electrical codes and regulations.
Wall Plate Mounting Bracket
One-Gang Box (Metal or Plastic)
Tools Required: Wall board saw
Instructions:
1. Use the outside area of the One-Gang Box to trace
the hole cut onto the wall.
2. Using a wall board saw or matt knife, cut along the
stencil line.
3. Place One-Gang Box through the wall opening.
4. Optional: Nail the One-Gang Box to the stud or
connect it to the set screw connect and conduit.
5. Place the optional gasket over the One-Gang Box.
6. Mount the flush mount wall plate to the One-Gang
Box.
Optional
Gasket
Mounting
Screw (2x)
Remote Call
Button Assembly
One-Gang Box
(Plastic)
Wall Opening
One-Gang Box
(Metal)
Connections
AUX SPEAKER (-)
AUX SPEAKER (+)
BTN SENSE GND
LINE OUT (-)
LINE OUT (+)
BUTTON LED (+)
RELAY NO
RELAY COM
AUX POWER (-)
AUX POWER (+)
(+12VDC @ 1A)
J10
J9
Speaker
Back View
BTN SENSE
BUTTON LED (-)
 Loading...