

Page 1

VC58SMi
1.3 Megapixel IP Camera
Manual ver.0.2(2010.11.02)
Page 2

-1-
Precautions
Congratulations on your purchase of this product. Read this
manual carefully and keep it in a safe place for future reference.
VC58SMi USER MANUAL
Please read the manual carefully before the installation in order to make use the
camera to be set up correctly and to have the best picture quality.
· Please keep the manual in good condition for your future reference and service
application.
· Installation and services should only be carried out by an authorized personnel
according to local safety regulations.
· If any liquid or solid matter gets into the housing, immediately disconnect the camera
from power supply and have it checked by your authorized dealer before reusing.
· Avoid installing the camera at extremely hot or cold places.
· If you are not a certified person, never try to dismantle the camera. To avoid electric
shock, never remove the screws or covers. There are no parts inside that need
maintenance by the user. All maintenance should be carried out by qualified
personnel.
· Avoid installing the camera at a place of high humidity.
· Avoid installing the camera at the place exposed to gas or oil.
· Keep the top glass of the lens always clean in order to obtain the best picture quality
all the time. Be careful not to be stained by fingerprint.
· Don't face the camera directly toward sunlight or sunlight reflecting area.
CMOS may go defective at this condition.
· Please give a special attention to keep the unit from dangerous drop or
external shock during the process of transportation or handling.
· Never try to touch the camera in wet hand. It may cause an electric shock.
· Do not expose the camera to radioactivity. It causes a serious damage on the CMOS.
Page 3

-2-
VC58SMi USER MANUAL
Table of Contents
1. introduction .................................................................................................................
1. about installation manuals ..................................................................................... 3
2. features .............................................................................................................. 3
3. package contents................................................................................................. 4
4. product view ........................................................................................................ 5
5. system connect ................................................................................................... 7
2. installation ................................................................................................................ 9
1. connecting to a network(LAN) ................................................................................ 9
2. connecting audio ................................................................................................. 9
3. connecting sensor & alram .................................................................................... 9
4. connecting power ................................................................................................ 9
5. initial indicators .................................................................................................... 9
3. getting started ........................................................................................................... 9
1. remote image view ........................................................................................... 10
2. Live view ......................................................................................................... 11
3. Menu ...............................................................................................................17
4. CAMERA SETUP .............................................................................................. 20
5. EVENT SETUP ................................................................................................. 28
6. USER SETUP ................................................................................................... 32
7. NETWORK SETUP ............................................................................................ 35
8. SYSTEM SETUP ............................................................................................... 47
Page 4

-3-
VC58SMi USER MANUAL
1. Synopsis
1. about this article
This manual explain how to use VC58Mi model that high quality network camera
Throughout this article, can be found that how to install VC58Mi, Set according to the environmental
changes, and how to Diagnostic error
2. features
Based on open IP standards, VC58Mi connect to any kind of IP network, including the Internet, and enable
remote viewing and recording from anywhere in the world. They also provide advanced video analytics
features, such as motion detection, audio detection and tampering alarm.
video
- Multiple H.264 & MJPEG streams
- Multiple image resolution: CIF (320x240) ~ HD (1280x720)
- Support bit Rate: CBR, VBR
- Motion detection
- Support COMPOSITE Video out
Audio
- Support Audio streaming Two-way
Network
- Support static IP & IP(DHCP)
- Support multi connection
- Supported protocol : TCP/IP, UDP, DHCP, SMTP, HTTP, RTP, RTSP)
Seriel Data
- Support RS-485
Sensor & Alarm
- Support Sensor & Alarm terminal
Page 5

-4-
- If system is failure it will be trigger alarm
User interface
- Support remote setting, analysis, & update
-
SD Memory
- SD memory Card recording , remote search & play
High stability
- Based on imbedded system
- Watch-dog
VC58SMi USER MANUAL
3. package contents
VC58Mi Quick Guide S/W & installation CD
C-Mount Adaptor Auto Iris Plug 1EA
Page 6

-5-
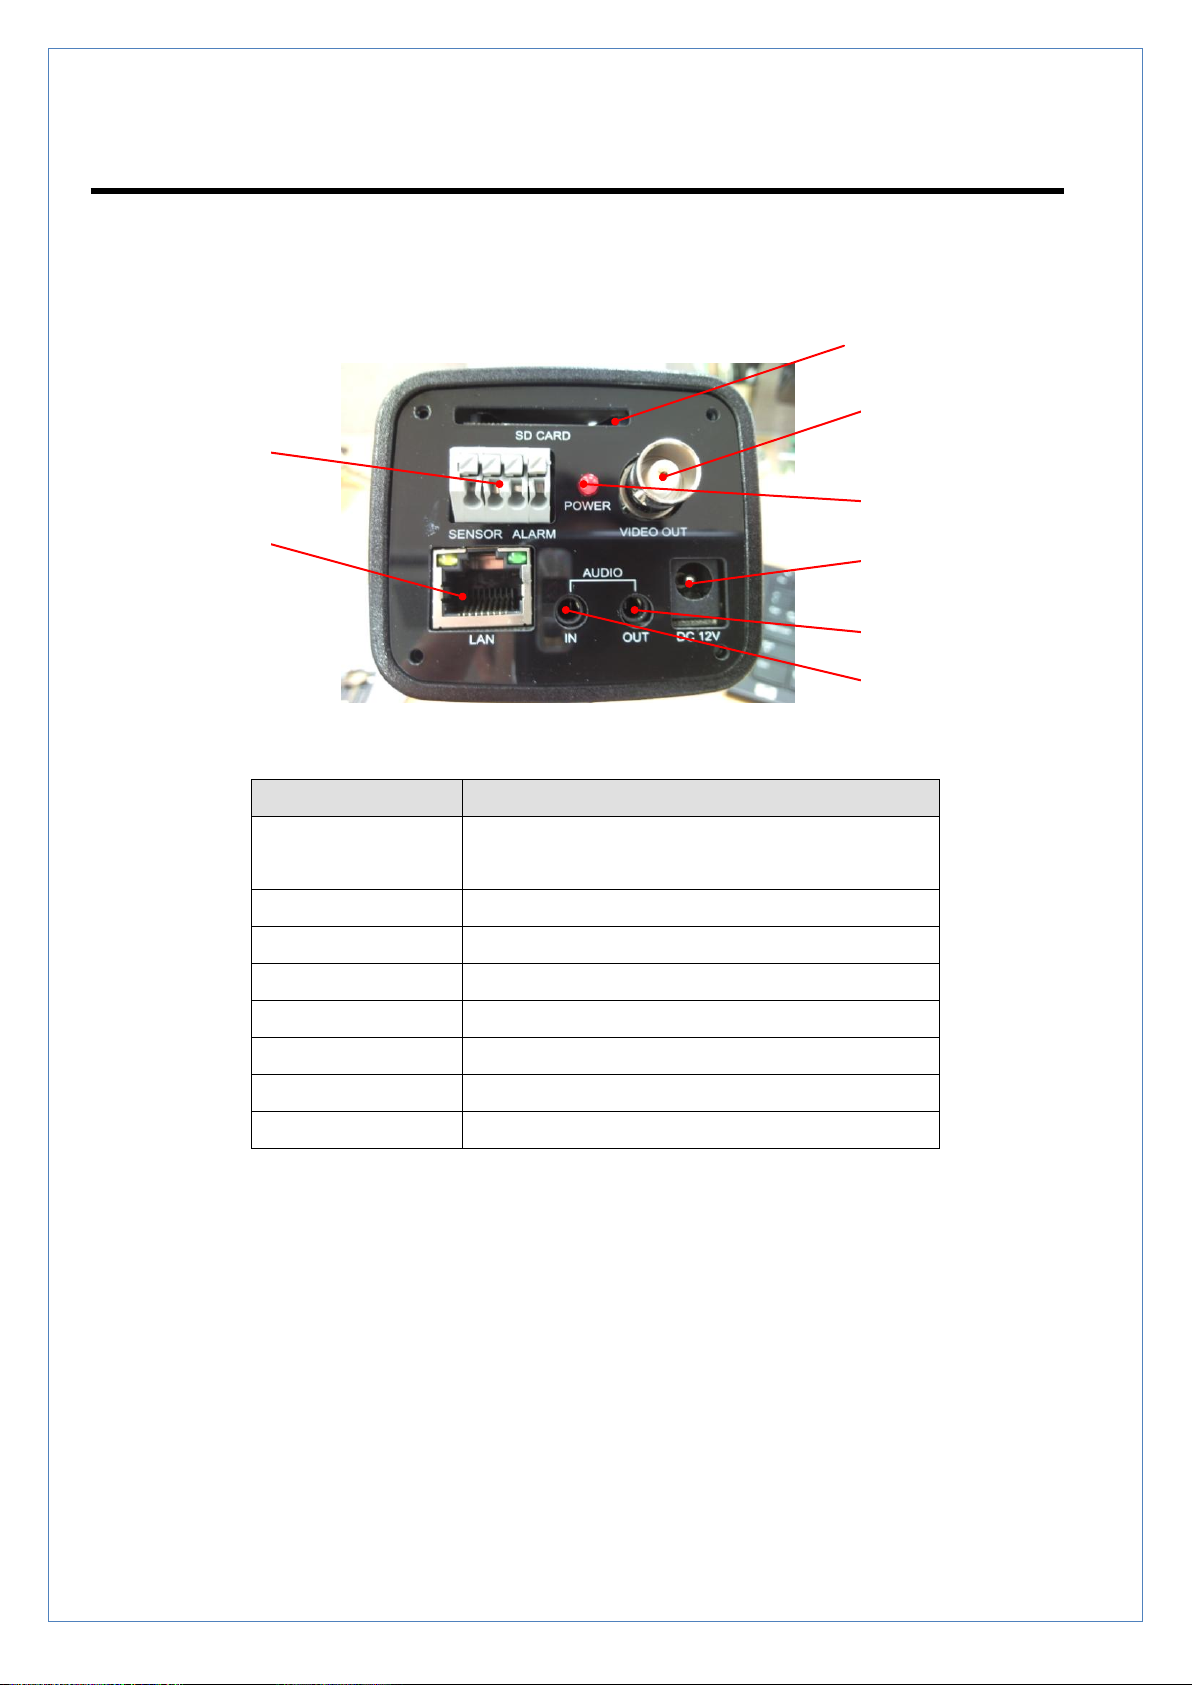
4. Product views
VC58SMi USER MANUAL
① Protective cover
② C-Mount lens adaptor
③ DC Iris Jack
④ Mounting bracket holder
Mounting bracket holder can be
separated and attached on the
bottom side as well.
Please use the supplied clamp
screws only change the position
of the bracket. Using screws more
than 5mm depth can do a serious
damage to the inside this camera.
Page 7
-6-
Connector
Function
1. LAN/802.3af
LAN port/802.3af
LED : indicate status of Power, network communication
2. AUDIO OUT
Audio output
3. AUDIO IN
Audio input
4. RESET Button
Factory Default
5. POWER IN
DC 12V
6. SENSOR/ALARM
Sensor input / relay out
7. COMPOSITE OUT
COMOSITE video out
8. SD CARD
SD memory card
①
②
③
④
⑤ ⑥ ⑦
⑧
Rear
VC58SMi USER MANUAL
Page 8

VC58SMi USER MANUAL
-7-
Default ID : admin Password : 1234
2. INSTALLATION
1. CONNECTING NETWORK(LAN)
There is video output to check the video After connecting power & LAN connection
2. Connecting Audio
If necessary connect Audio
3. Connecting Sensor & alarm
Connect sensor and Alarm(relay).
4. Connecting Power
Connect the power adapter to the DC-IN socket on the camera
.
5. Initial indicators
It takes time about 1min. for initial
3. System operation
1. Remote view
If VC58Mi and center system are connected there are two way you can see.
The system's IP address must be set correctly
Using an Internet Browser to Connect to the Camera
Read this section to learn how to use your Internet browser to connect to the IP camera, view images, and
hear audio output.
Page 9

-8-
To connect to the IP camera using an Internet browser:
http://192.168.1.100
○
1
☞ [note]
- if you do not have the loading during over 30 minutes it will be logout
automatically
- The password is stored by the encryption algorithm
- If authentication fails, error message output on the bottom of the window
Enter the IP address of the camera in the browser address field.
.
☞ All items on the web page can be used after the authentication process
VC58SMi USER MANUAL
[Picture 1] LOGIN
○1 ID / PASSWORD INPUT
ID: MAX 16characters available English & Number
PASSWORD: MAX 16characters available English & Number
To manage register & delete of ID/PASSWORD go to Setup>User> User Account Menu
If you do not have permission it will be show error message and can`t access
Page 10

-9-
2. Live
○
1 ○2 ○3 ○4 ○5 ○6
☞ [Main feature]
- Live monitoring
- fixed/original image size
- PTZ
- Screen Shot, Two-way Audio (Speaker/Mic)
- OSD On/Off
- Alarm Out
- UPNP(Universal Plug and Play) On/Off
- Network Status (LAN/WIFI)
- Storage
- help & support
VC58SMi USER MANUAL
[Picture 2] LIVE Monitoring
Page 11

-10-
1
○
Title Bar (common contents)
1 Display title massage as current page
2 Common contents menu
3 Indicate capital characters in english
2
○
Top right Menu bar (common contents)
VC58SMi USER MANUAL
[Emergency Call]
[logout]
[live view]
[Set-up]
[Live view icon] –to monitor Live view
[Set-up icon] – to Set up Menu
[Log out icon] – to Log out
If do Re -Login it connect last previous page
[Emergency Call] – Emergency Event
Send event massage to CMS/FTP/SMTP
Available in all page
Page 12

VC58SMi USER MANUAL
-11-
○3 [PTZ control]
[ZOOM IN] [direction contorol] [ZOOM OUT]
[FOCUS NEAR] [FOCUS FAR]
[IRIS OPEN] [IRIS CLOSE]
[Choose PRESET]
[Goto PRESET ] [DEL PRESET ]
[Set PRESET ]
[ZOOM IN] – PTZ ZOOM IN
[ZOOM OUT] – PTZ ZOOM OUT
[DIRECTION CONTROL] – PTZ DIRECTION CONTROL (상하좌우)
[FOCUS NEAR] – PTZ FOCUS NEAR
[FOCUS FAR] – PTZ FOCUS FAR
[IRIS OPEN] – PTZ IRIS OPEN
[IRIS CLOSE] – PTZ IRIS CLOSE
[SELLECT PRESET] – CHOOSE NUMBER OF PRESET
[GOTO PRESET] – GOTO PRESET
[SETUP PRESET] – SETUP PRESET CURRENT
[DEL PRESET] – DELATE PRESET
Page 13

VC58SMi USER MANUAL
-12-
○4 VIDEO & CONTROL
[SNAPSHOT] [SPEAKER] [MIC] [ALARM OUT]
[원본크기] [OSD] [UPNP] [HELP]
[SNAPSHOT] – TO SNAP SHOT ON LIVE VIEW
[SPEAKER] – AUDIO ON/OFF
[MIC] – MIC ON/OFF
[ALARM OUT] – ALARM OUT ON/OFF
[IMAGE SIZE] – VIEW ORIGINAL SIZE (ZOOM IN/OUT according to Resolution)
[OSD] –OSD ON/OFF
[UPNP] – UPNP ON/OFF
[HELP] – HELP & SUPPORT
Page 14

-13-
☞ [note]- The camera includes support for UPnP™, which is enabled.
If also enabled on your computer, the camera will automatically be
detected and a new icon will be added to “My Network Places.”
- Click the icon for the device go to authentication of the web page,
☞ [note]
- Indicate As a step the sensitivity of wireless network status
- indicate SD card status
○5 Network and storage status
VC58SMi USER MANUAL
[LAN][WIRELESS][STORAGE]
[LAN] – Display network status
[WIRELESS] – Display wireless network status
[STORAGE] – Display SD CARD status
Page 15

-14-
○6 Live view
☞ [note]
- IF The brightness of the image is not stable, depending on the
background
Change option ATW->USER go to Setup> Camera> AutoWhiteBalance.
Factory Default is ATW.
- Double Click can be show full windows if you want to back press ESC
key.
VC58SMi USER MANUAL
[Event view] [MIC] [SPEAKER]
[event information] – Motion/Alarm Event Icon display
[MIC] – DISPLAY MIC ON/OFF
[SPEAKER] – DISPLAY SPEAKER ON/OFF
Page 16
-15-
3. SETUP
○
1 ○2
☞ [note]
- SETUP MENU is comprised of Menu select window & Menu setup window.
- First select group on the menu at the top and bottom of the group, Go to sub
menu page
- Except PTZ settings, after click SAVE / CHANGE button, then apply
.- Menu is comprised of 6 group Menu.
○
3
MENU
VC58SMi USER MANUAL
[Picture 3] SETUP PAGE
Page 17

-16-
1
☞ [note]
- Menu items are grouped into a total of 6
- Select the menu at the top left of the group first and then select the menu at
the bottom of the details
- To initialize page go to SYSTEM > System Information
- Recommended IE browser
○
view live image
It is possible to monitor during setup page
It is not display during setup page with Image (ex: Motion/Camera)
2
○
select menu icon
VC58SMi USER MANUAL
Page 18

-17-
menu configuration
VC58SMi USER MANUAL
○3 메뉴 설정
○3 Menu settting
Selected sub Menu setting
Page 19

-18-
4. SETUP > CAMERA
○
1 ○2
☞ [feature]
- Camera sub menu setup
- Privacy Mask (4Layer, Click & Drag)
- Day & Night
- Auto White Balance
- Auto Exposure
- Effect
- each setup menu can be edit with intuitionally & easily by using Slide bar
- setup menu is separated as group menu
Camera Setup
VC58SMi USER MANUAL
[Picture 4] camera setup
Page 20

-19-
1
☞ [notes]
- 4zone Mask Area.
- each Mask area can be edit size & locate by click & drag left button in Mouse.
- All changed value will be applied after click SAVE button.
○
Privacy Mask Setup
Show – SELECT Mask ON/OFF
VC58SMi USER MANUAL
Select – SELECT Mask Area
Page 21

VC58SMi USER MANUAL
-20-
☞ [note]
- Menu is comprised with TAB base.
- When the click menu TAB can see Sub menu
.
Set Gray Level – SELECT Gray Level OF mask (ZONE COLOR)
☞ 0: BLACK 255: WHITE
2
○
Day&Night / AutoWhiteBalance / AutoExposure / Effect
Day & Night
Mode: select AUTO/COLOR/IR MODE
Night Level: adjust level to switch from Day to Night
Day Level: adjust level to switch from Night to Day
Page 22

-21-
Auto White Balance
ATW: (:3000°K~6500°K)
Push Lock Mode: AWB can be control within 1800°K~10500°K area
Manual Auto: (User Mode be able to control Auto in setup condition)
VC58SMi USER MANUAL
User Mode: adjust Red & Blue by user
Auto Exposure
IRIS: Lens Type (ESC:Auto Mode, DC:M-IRIS Mode)
Brightness: control brightness
Flickerless: Anti Flicker function at Fluorescent lamp(50Hz:PAL, 60Hz:NTSC)
BLC Mode: back light compensation
BLC Zone: set back light compensation Zone
Page 23

VC58SMi USER MANUAL
-22-
BLC Level: set back light compensation Level
LSC(Lens Shading Correction)Level: Lens Shading Correction)
AGC Analog Gain: set Analog Gain in low light
AGC Digital Gain: set AGC Digital Gain (it can be more bright But Noise has
occurred)
Effect
RY Gain: Color Gain (Red, Mg, Cyan, Green, Color Gain)
BY Gain: Color Gain (Blue, Yellow Color Gain)
Sharpness Enhancement Level: Sharpness Gain
Sharpness Coring Level: Eliminate Sharpness Noise
Mirror/V-Flip: Horizontal, Vertical flip
DNR Edge: 2DNR Edge(decrease DNR function)
DNR Intensity: 2DNR set intensity
Page 24

-23-
4.2. Image Overlay
☞ [note]
- included text on original image .
- Applied with Stream2 (MJPEG).
- Text Input only available with capital English & number.
VC58SMi USER MANUAL
[Picture 5] Image Overlay
Overlay Position – choose position in top & bottom
Include Date – Include Date
Include Time – Include Time
Include Text – Include Text
Text Input – Text Input (Cap English/Number)
Text Color – color of text
Location of Image – format of viewing text
Page 25

-24-
4.3. Stream Setup
☞ [참고]
- Quality of service according to network & PC balance
- Image size are derived from Resolution & Quality/Bit rate
VC58SMi USER MANUAL
[Picture 6] STREAM
[H.264] Resolution – image size
[H.264] Frame rate – number of image per Frame
[H.264] G.O.P – Gap of I Frame between P Frame
[H.264] Quality – image Quality
[H.264] Bitrate Type – Bitrate Type (CBR/VBR)
[H.264] Target Bitrate – Bit rate
[MJPEG] Resolution – image size
[MJPEG] Frame rate – number of image per Frame
[MJPEG] Quality – image Quality
Page 26

-25-
4.4. Audio Setup
☞ [참고]
- Set fot Two-Way Audio
- IP Camera Audio IN/OUT
- PC Control Audio IN/OUT in LIVE View
- Connect MIC in Audio input port, Connect Speaker in Audio output port
- Audio input port (1), Audio output port(1)
VC58SMi USER MANUAL
[Picture 7] Audio setup
Microphone – Connect MIC in Audio input port
Speaker – Connect Speaker in Audio ouput port
Page 27

-26-
5. SETUP > Event
☞ [참고]
- All changed value will be applied after click SAVE button.
- You can edit Motion detection area by click and drag left Mouse button
Detection
[MOTION AREA]
VC58SMi USER MANUAL
[Picture 8] Motion detection
[Motion Sensitivity] – Set Motion Sensitivity
[FULL MOTION] – Select full area
[CLEAR ALL] – Deselect area
[MOTION AREA] – select motion area (Drag action )
[ALARM IN] – Set alarm in
Page 28

-27-
5.2. Notification
☞ [note]
- To Set FTP server go to “NETWORK > FTP SERVER”. menu tree
- To Set Mail server go to “NETWORK > SMTP”. menu tree
- If when alarm trigger Video or Image will be transmit to related server/alarm
out.
VC58SMi USER MANUAL
[CMS]
[Picture 9] Set Notification
Event Type – Event Type
Interval Time – Interval Time
Server Address – Server Address
Dwell Time – Dwell Time
Page 29

-28-
[E-MAIL]
Event Type – Event Type
Interval Time – Interval Time
Num of Images – Num of Images
Attach Images – Attach Images
[FTP]
Event Type – Event Type
Interval Time – Interval Time
[ALARM OUT]
Event Type – Event Type
Interval Time – Interval Time
VC58SMi USER MANUAL
Page 30

-29-
5.3. Recording
☞ [feature]
- Check Recording tab to “ON”.
- Set recording schedule.
- Recording schedule can be set to 1 hour interval
- [All] select all Schedule.
- Pre Alarm -capacity, Post Alarm -time
- Click “SAVE” button and will be record in SD card.
- Video will be Save AVI format in menu tree SYSTEM>STORAGE
VC58SMi USER MANUAL
[Picture 10] Set recording
Page 31

-30-
6. SETUP > USER
☞ [참고]
- Password Change.
- Changed password will be apply from the next Log in.
- Password will be save by encryption algorithm
Password Change
VC58SMi USER MANUAL
[Picture 11] Se password
[Old Password] – Old Password
[New Password] – New Password
[Confirm Password] – Confirm Password
Page 32

-31-
User Account
☞ [note]
- admin ID is not allowed Delete & Edit.
- To change password admin ID go to SETUP>PASSWORD CHANGE
- Support 16 Account. (include admin)
- Selectable 3 ID group.
VC58SMi USER MANUAL
[ID] – User ID
[PASSWORD] – User Password
[GROUP] – User GROUP
[Picture 12] Acconut
Page 33

-32-
Group Management
☞ [참고]
- Selectable 3 ID group.
- Mark required information.
- All changed value will be applied after click SAVE button.
- To categorize User ID by 3group go to “USER ACCOUNT”
VC58SMi USER MANUAL
[Picture 13] Group Management
Page 34

-33-
7. SETUP > NETWORK
IP 모드
Set items
Settings
Static IP
IP Address
Input IP address.
Default
Gateway
Input Gateway.
Subnet Mask
Input Subnet Mask
IP (DHCP)
None
☞ [note]
- Static IP / DHCP.
- If click “SAVE” button that System will be restart and reconnect to changed
IP address (Static IP)
Network Setting
VC58SMi USER MANUAL
IP mode
[Picture 14] network setting
Supports two IP mode and IP settings will be change as IP mode
☞ If you do not know the IP mode please ask to ISP or network person
Page 35

-34-
DNS
note)What is DNS?
DNS (Domain Name Service) provides the translation of host names to IP
addresses on your network.
☞ [참고]
- Set DNS.
VC58SMi USER MANUAL
[Picture 15] DNS setting
[First DNS] –First DNS address
[Second DNS] – Second DNS address
DNS
IP set in DNS server.
Page 36

-35-
DDNS
☞ [note]
- Set DDNS.
- Enable/ Disable DDNS.
VC58SMi USER MANUAL
[Picture 16] DDNS 설정
[ID] – DDNS 서버 아이디
[PASSWORD] – DDNS password
[HOST NAME] – DDNS host name
[Update Period] – DDNS update period
DDNS
DDNS(Dynamic DNS)
Page 37

-36-
7 NTP
☞ [참고]
- Set NTP.
- Enable/Disable.
VC58SMi USER MANUAL
[그림 17] NTP setting
Page 38

-37-
HTTP/HTTPS
☞ [note]
- Set HTTP Port.
- The default HTTP port number (80) can be changed to any port within
the range 1024-65535. This is useful for e.g. simple security port
mapping.
- HTTPS (SSL). (Default Checked)
VC58SMi USER MANUAL
[Picture 18] HTTP setting
Page 39

-38-
FTP Server
☞ [참고]
- Set FTP Server.
VC58SMi USER MANUAL
[Picture 19] FTP setting
[Server Address] – FTP server address
[ID] – FTP account ID
[PASSWORD] – FTP account password
[Port] – FTP Server port
Page 40

-39-
7.7. SMTP
☞ [Note]
- Set SMTP Server & address.
- Enter the host names or addresses for your mail servers in the fields
provided, to enable the sending of notifications and image/video email
messages from the camera to predefined addresses via SMTP
.
VC58SMi USER MANUAL
[Picture 20] SMTP setting
[SSL] – SSL whether to use
[AUTH MODE] – Authentication mode
Page 41

-40-
7.8. RTSP
☞ [참고]
- Set Real Time Streaming Protocol.
VC58SMi USER MANUAL
[Picture 21] RTSP setting
Page 42

-41-
7.9. QOS
☞ [참고]
- Set QOS (Quality Of Service).
- Set by IP /Set by All IP MAX :10IP.
- Step setting: IP/Port/Bandwith-> ADD -> SAVE
VC58SMi USER MANUAL
[Picture 22] QOS setting
Page 43

-42-
7.10. WIRELESS
☞ [note]
- Set Wireless
VC58SMi USER MANUAL
[Picture 23] WIRELESS setting
Page 44

-43-
[AP List loading]
VC58SMi USER MANUAL
[AP connecting]
Page 45

-44-
7.11. CMS
☞ [note]
- Set port to communication with CMS. (video/voice/event)
VC58SMi USER MANUAL
[Picture 24] CMS setting
[AV Stream Port] – Video steaming port
[Event Port] – Video trigger port
[Two-way Audio Port] – Two-way Audio Port
Page 46

-45-
8. SETUP > SYSTEM
[notes]
-
Equipment must be maintained at power-on state
System Upgrade
VC58SMi USER MANUAL
[Picture 25] System Upgrade
Page 47

-46-
System Restart
☞ [note]
- system restart.
- Reconnect automatically after 60 seconds
VC58SMi USER MANUAL
[Picture 26] System Restart
Page 48

-47-
Factory Default
[note]
- Factory Default.
- Please note that all entries are initialized
VC58SMi USER MANUAL
[Picture 27] Factory Default
Page 49

-48-
Export Setting
☞ [note]
- Exporting All setting value.
- Make setup file / Download.
VC58SMi USER MANUAL
[Make setup log file]
[Picture 28] EXPORT
Page 50

-49-
[Download]
[note]
- Please carefully managed for download file.
- If the file has been renamed can not be used
.
VC58SMi USER MANUAL
Page 51

-50-
Import Setting
☞ [note]
- Import setup file.
- If upload finish and then system apply new setting value.
- Reboot.
VC58SMi USER MANUAL
[Picture 29] IMPORT
Page 52

-51-
Date / Time
☞ [참고]
- IP Camera Set time zone & date.
-If NTP time was set that manually setting does not apply
.
VC58SMi USER MANUAL
[Picture 30] Date / Time
Page 53

-52-
Storage
☞ [note]
- (SD Card) capacity/format/data information
- Search image & video by Date.
VC58SMi USER MANUAL
[Show SD card capacity]
[Picture 31] SD card
Page 54

-53-
[recording data]
☞ [note]
- May not be playing AVI file that not set automatically when you click the left
mouse button on a PC and “Save as different name” Menu windows will appear.
In this case, after downloading file and then the video player such as Windows
Media Player can play the file
[recording data play] – click left mouse button.
VC58SMi USER MANUAL
[back up data] – backup data
Page 55

-54-
System Log
[2000-01-01 00:00:09] Network: client ipaddress => 118.46.219.82:, port => 12537 connected
[2000-01-01 00:00:21] Network: client(118.46.219.82:12537) closed
[2000-01-01 00:00:21] Network: client ipaddress => 118.46.219.82:, port => 14073 connected
☞ [note]
- : Click Search log after Select day & time
- Display list system log and network log in/out(CMS)
VC58SMi USER MANUAL
[system log information]
[Picture 32] system log
Page 56

-55-
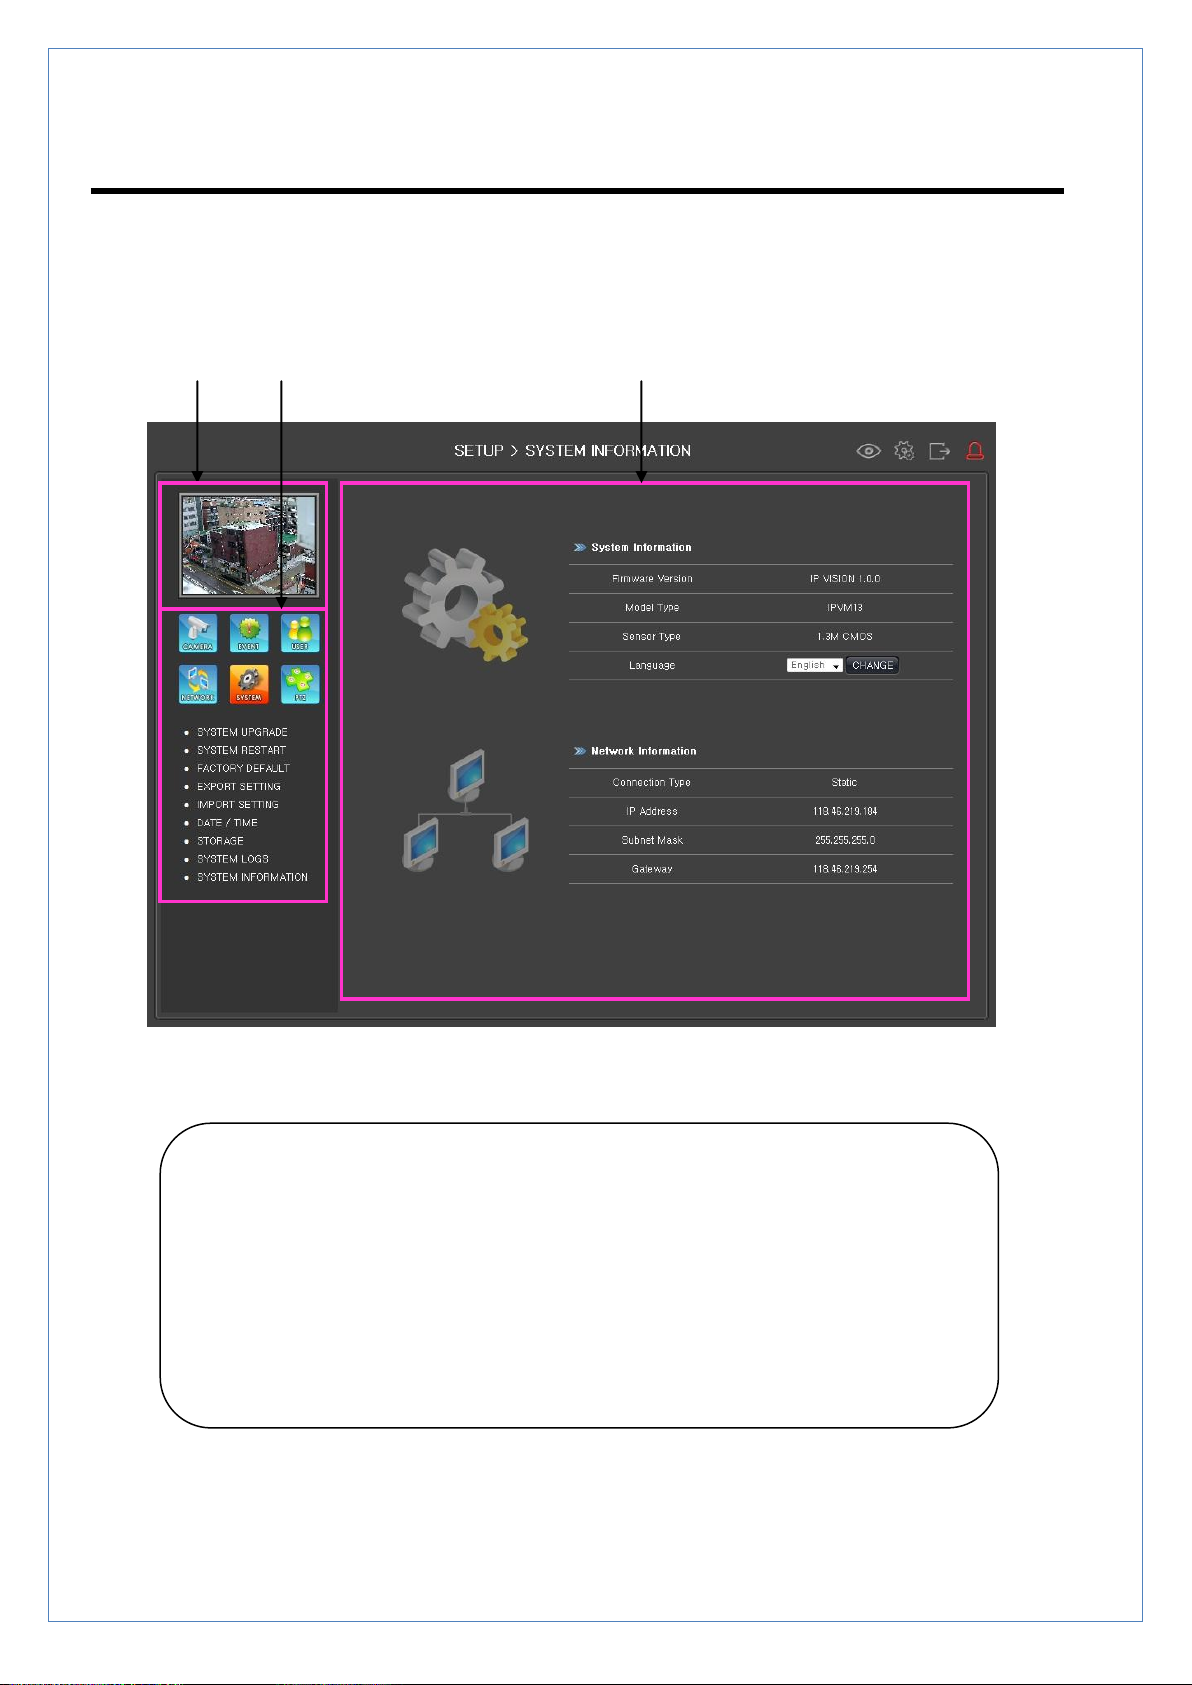
System Information
☞ [note]
- Show system information & network information.
- Support multi languages.
VC58SMi USER MANUAL
[Picture 33] System Information
[Firmware Version] – information of Firmware Version
[Model Type] – information of Model Type
[Sensor Type] – information of Sensor Type
[Language] – Language (possible change)
[Network Information] – information of network
[Connection Type] – Connection Type (Static/DHCP)
[IP Address] – IP CAMERA address
[Subnet Mask] – Subnet Mask
[Gateway IP] – Gateway IP
Page 57

-56-
9. SETUP > PTZ
☞ [note]
- Set PTZ connect.
- Set ID/Baudrate/Protocol.
PTZ Setting
VC58SMi USER MANUAL
[Picture 34] PTZ setting
[ID] – PTZ channel ID
[Baud rate] – RS485 Baud rate
[Protocol] – PTZ Protocol (Pelco-D, Pelco-P …)
Page 58

-57-
PRESET Setting
☞ [Note]
- PTZ PRESET Set & renaming .
- PRESET SAVE/DEL.
VC58SMi USER MANUAL
[Picture 35] PRESET setting
[List] – PRESET list
[Name] –current PRESET name can be create & edit
[GO] – go selected PRESET
[SET] – Set current PRESET
[CLEAR] – clear PRESET
Page 59

-58-
Dimension(mm)
Model
VC58Mi
Network
Network Interface
Ethernet 10/100Base-T (RJ-45)
Network Protocol
TCP/IP, UDP, DHCP, SMTP, HTTP, RTP, RTSP
Camera
Image Device
Sony 1/3“, 1.3M CMOS (Progressive Scan)
Lens
C/CS Mount lens
Mechanical Iris Lens
DC Iris Lens
MIN. Illuminance
1.0 Lux without DSS(F1.2,30IRE,AGC ON)
Iris
Auto / Manual
Shutter Speed
1/30s Default(Long Exposure Mode,~1sec)
AGC
Normal / High / Off
BLC
On / Off
Flickerless
Disable / 50Hz / 60Hz Selectable
Backlight Function
On / Off
Brightness
0~50 Adjustable
MAX. AGC Gain
0~50 adjustable
Day & Night
On / Off
Night->Day
Transition
0~50 Adjustable
Day->Night
Transition
0~50 Adjustable
AWB Mode
ATW Mode / PUSH Mode / Manual Mode
R Gain
0~50 Adjustable
B Gain
0~50 Adjustable
Video
Algorithm
Primary : H.264
9. Specification
VC58SMi USER MANUAL
Page 60

-59-
Secondary : H.264 / M-JPEG (Simultaneous Dual)
Resolution
1280 x720, 640 x 480, 320 x 240,
Frame Rate
1 FPS ~ 30 FPS Selectable
Bit Rate
30K BPS ~ 8M BPS Selectable
Output
Composite : 1 EA
Audio
Algorithm
G.711u
Sample Rate
8KHz
Bit Rate
64K BPS
Input
Line-In(Mini-Stereo, Single Mono) : 1 EA
Output
Line-Out(Mini-Stereo, Single Mono) : 1 EA
Sensor Input
1 Input (Normal Open/Normal Close Contact)
Alarm Output
1 Output (Normal Open Contact)
Others
Dimension
66(W)x57(V)X126.5(L)
Weight
800g
Power
DC 12V, 2A / PoE : 802.3af
Power Consumption
MAX. 12W
Operation
Temperature
-10°C ~ 50°C / 14°F ~ 122°F
# Specification & Design are subject to change without prior notice.
VC58SMi USER MANUAL
 Loading...