

Page 1

CVS 7970
High-Low Pressure
Each CVS 7970 is a self-contained unit containing
Instruction Manual
Head Office
Website: www.cvs-controls.com E-Mail: info@cvs-controls.com
Figure 1: CVS 7970 High-Low Pressure Pilot
Pilot
Introduction
This instruction manual includes the following
information for CVS 7970 High-Low Pressure Pilot:
1. D
escription
2. Piston Arrangement Changeover Instructions
3. Parts Information
O
nly persons qualified through training or experience
should install, operate and service this equipment. If
you have any questions regarding this product or this
manual, please contact your CVS Controls Sales
Representative before proceeding.
Description
The CVS 7970 is a versatile sensor that can be
programmed to detect and react to either increasing
pressure or decreasing pressure with an adjustab le
range of 2 to 10,000 PSI (.138 to 689.5 bar).
hen used within standard safety systems, a
W
pressure sensor monitors a specific media or
process pressure source for changes to the normal
operating range. Loss of pressure within the control
circuit will begin a shutdown sequence or trigger an
alarm, and pressure sensors can also indirectly
operate on/off flow control valves or pneumatic
driven pumps.
T
he CVS 7970 is a two position, three-way pilot with
universal ports (H, O, L), automatic reset (spring
return) and pressure balance spool.
3900 – 101 Street
Edmonton, Alberta, Canada T6E 0A5
Office: (780) 437-3055
Fax: (780) 436-5461
necessary components for four different piston
arrangements. Changeover instructions and
drawings are included in this manual. Parts which
are not installed in your current piston arrangement
are kept in an enclosed storage tube. Machined
within the piston housing of the CVS 7970 is a
convenient 1/8”–27 NPT Female process connection
and 1/2” NPT Male process connection.
Calgary Sales Office
Calgary, Alberta, Canada T2Z 3V6
3516 114 Avenue SE
Office: (403) 250-1416
Fax: (403) 291-9487
Page 2

2
Table 1: CVS 7970 Specifications
Characteristic
Dimensions
Dimensions
1.750” diameter x 8.0” length
Working
Pressure
Process Pressure Inlet
10,000 PSI Maximum (689.5 bar)
Control Ports
125 PSI Maximum (8.62 bar)
Process Pressure Inlet
1/2”-14 NPT M and 1/8”-27 NPT F
Control Ports
1/4”-18 NPT F
Weight
3.5 lbs / 1.6 kg
Panel Hole Cutout Size
1 5/8” (39.81 mm)
M=Male, F=Female
Introduction continued
4. Loosen the lock nut and remove from the
Connections
One particular advantage of the CVS 7970 is its
adjustment range capability. Because of the
complete supplied components, there is no need to
purchase and store additional sets of matching
piston and spring components. The installation or
reorientation of the existing piston components
allows for an adjustment range capability of 2 to
10,000 PSI. This is especially convenient for remote
facilities which require changes to pressure settings
to match changes in process conditions.
The CVS 7970 is available in a High-Low
configuration using two pilots mounted and tubed to
a carbon steel or stainless steel manifold (Figure 8).
Your choice of 2-1/2” NPT process or gauge
connections are available. This design allows for
completely independent setting of the high and low
pilots spanning the range of 2 psi to 10,000 psi. This
configuration is available in Auto Reset (not shown)
or Manual Reset (shown, pg 8).
Piston Arrangement
Changeover Instructions
The information in this manual, including the parts
listings and piston detail drawings, will assist you in
completing the Piston Arrangement Changeover.
Caution: Consult and follow the established
safety procedures of your facility prior to
beginning disassembly of any CVS Control s
product. Ensure that all pressure is
exhausted from the system prior to
performing any service work. Failure to
remove the pressure from the system can
result in serious personal injury .
1. Isolate and depressurize the control system.
2. Disconnect the control circuit instrumentation
tubing from control valve, as well as the
monitored process connection from the
piston housing.
3. Where possible, remove the CVS 7970 from
the service location to perform the
changeover in a clean work environment.
adjusting cap. (See figure 2)
5. Gently relieve all spring tension by fully
unscrewing the adjusting cap. This allows
access to the storage tube.
6. Unscrew the piston housing from the valve
body.
7. Turn the piston housing upside down and tap
it gently on a flat, clean surface to remove
the piston arrangement. The pistons should
slide out easily.
8. Thoroughly clean the piston components,
including the piston housing and internal
bores, using warm water and a liquid
detergent. Do not use abrasive tools or
acidic cleansers. Dry all components with a
cloth or paper towel.
9. Lightly lubricate all components and seals,
and assemble the piston arrangement as
desired according to the enclosed detail
drawing.
10. When inserting the new piston arrangement
into the piston housing, apply even pressure.
Press evenly using both thumbs on the
piston’s outer edges for the insertion of the
1-1/8”, 1/2” and 3/16” piston arrangements.
11. For the 1/4” piston insertion, install the 1/4”
piston first, using a needle-nosed pliers.
Then press the other piston components into
place.
12. Lightly lubricate the threads of the piston
housing, body and spring housing. Be sure
to use a grease or medium appropriate for
stainless steel.
13. Reassemble the pressure pilot.
14. Adjust the pressure setting to the required
amount, and function test the pressure pilot.
When the desired setting is achieved, tighten
the lock nut securely against the adjusting
cap.
15. Connect the instrumentation tubing and the
pressure connection to the monitored
process.
16. Introduce pressure to the pressure pilot’s
control circuit and monitored process inlet.
Resume normal operation.
Page 3

3
CVS 7970 High-Lo w Pres sur e Pilot
Key
Part Number
Qty.
Description
Material
1
CVS79710A
1
Adjusting Cap
Black Delrin
2
CVS79702A
1
5/16” Ball Bearing
Stainless Steel
3
CVS7911A
1
Spring Guide
Black Delrin
4
CVS7970A
1
Spring
302 Stainless Steel
5
CVS79712A
2
Lock Nut
Black Delrin
6
CVS79709A
1
Spring Housing
316 Stainless Steel
7
CVS79708
1
Stop Plate
316 Stainless Steel
8
CVS79704A
1
Body Housing
316 Stainless Steel
9
CVS79707A
1
Upper Stem
316 Stainless Steel
10
CVS79706A
1
Lower Stem
316 Stainless Steel
11
CVS79703A
1
Small Piston
316 Stainless Steel
12
CVS79705
1
Stop Washer
316 Stainless Steel
13
CS79702
1
Large Piston
316 Stainless Steel
14
CVS797014
1
Snap Ring
304 Stainless Steel
15
CVS79701A
1
Piston Housing
316 Stainless Steel
16
V-75-010
2
Seal
Viton Coated TFE
17
V-75-008
2
Seal
Viton Coated TFE
18
V-75-119
1
Seal
Viton Coated TFE
19
TFE-008
1
Back-Up Ring
Teflon
20
V-75-008
1
Seal
Viton Coated TFE
21
CVS79713A
1
1/4” Piston
316 Stainless Steel
22
V-75-006
1
Seal
Viton Coated TFE
23
TFE-006
1
Back-Up Ring
Teflon
24
TFE-012
1
Back-Up Ring
Teflon
25
V-75-012
1
Seal
Viton Coated TFE
CS7970-BK
1
Piston O-Ring Kit (Body Housing)
V-75-008 1 Seal
Viton Coated TFE
V-75-010 1 Seal
Viton Coated TFE
CVS7970-PK
1
Piston O-Ring Kit (Body Housing)
V-75-006 1 Seal
Viton Coated TFE
V-75-008 1 Seal
Viton Coated TFE
V-75-012 1 Seal
Viton Coated TFE
V-75-119 1 Seal
Viton Coated TFE
TFE-006 1 Back-Up-Ring
Teflon
TFE-008 1 Back-Up Ring
Teflon
TFE-012 1 Back-Up Ring
Teflon
Figure 2: Adjusting Cap / Storage Tube
Access
Table 2: Parts List
Seal Kits
Page 4

4
Figure 3: CVS 7970 High-Low Pressure Pilot Assembly
Page 5

5
Figure 4: 3/16 Piston Arrangement Enlarged Detail Drawing
For pressures from 5900 to 10,000 PSI (407 to 690 bar)
Key
Part Number
Qty.
Description
Material
11
CVS79703A
1
Small Piston
316 Stainless Steel
13
CS79702
1
Large Piston
316 Stainless Steel
14
CVS797014
1
Snap Ring
304 Stainless Steel
18
V-75-119
1
Seal
Viton Coated TFE
19
TFE-008
1
Back-Up Ring
Teflon
20
V-75-008
1
Seal
Viton Coated TFE
Figure 5: 1/4” Piston Arrangement Enlarged Detail Drawing
Key
Part Number
Qty.
Description
Material
11
CVS79703A
1
Small Piston
316 Stainless Steel
13
CS79702
1
Large Piston
316 Stainless Steel
14
CVS797014
1
Snap Ring
304 Stainless Steel
19
TFE-008
1
Back-Up Ring
Teflon
20
V-75-008
1
Seal
Viton Coated TFE
21
CVS79713A
1
1/4” Piston
316 Stainless Steel
22
V-75-006
1
Seal
Viton Coated TFE
23
TFE-006
1
Back-Up Ring
Teflon
For pressures from 1440 to 5900 PSI (99 to 407 bar)
Page 6

6
Figure 7: 1-1/8” Piston Arrangement Enlarged Detail Drawing
Key
Part Number
Qty.
Description
Material
11
CVS79703A
1
Small Piston
316 Stainless Steel
12
CVS79705
1
Stop Washer
316 Stainless Steel
13
CS79702
1
Large Piston
316 Stainless Steel
14
CVS797014
1
Snap Ring
304 Stainless Steel
18
V-75-119
1
Seal
Viton Coated TFE
19
TFE-008
1
Back-Up Ring
Teflon
20
V-75-008
1
Seal
Viton Coated TFE
Figure 6: 1/2” Piston Arrangement Enlarged Detail Drawing
For pressures from 290 to 1440 PSI (20 to 99 bar)
Key
Part Number
Qty.
Description
Material
11
CVS79703A
1
Small Piston
316 Stainless Steel
13
CS79702
1
Large Piston
316 Stainless Steel
18
V-75-119
1
Seal
Viton Coated TFE
24
TFE-012
1
Back-Up Ring
Teflon
25
V-75-012
1
Seal
Viton Coated TFE
For pressures from 10 to 290 PSI (.689 to 20 bar)
Page 7

7
Item Number Part Number
Description Qty.
1 CV S 7910A Adjusting Cap, Black Delrin 1
2 CV S 7920A 6/16" Ball Be ari ng, SST 1
3 CV S 7911A Spring Guide, Black Delrin 1
4 CV S 7970A Spri ng, 302 Stainless Steel 1
5 CV S 79712A Lock Nut, Black Delrin 2
6 CV S 79709A Spring Housing, 316 SST 1
7 CV S 79708A Stop Plate, 316 SST 1
8 CV S 79704A Body Housi ng, 316 SST 1
9 CV S 79707A Upper Stem, 316 SST 1
10 CV S 79706A Lowe r Stem, 316 SST 1
11 CV S 79730 Adapter, Low Pressure , 316 SST 1
12 CV S 79701LP Pi ston Housi ng, 316 SST 1
13 V-75-145 o-ring, Viton Coated TFE 2
14 CV S 79702LP Piston, LP, 316 SST 1
15 CV S 79731 Wiper Ring, Viton 1
16 V-75-010 Seal, Viton Coated TFE 2
17 V-75-008 Seal, Viton Coated TFE 2
Figure 8 – CVS Series 7970 Low Pressure Pilot – Adjustment 2 to 15 PSI, Assembly
CVS Series 7970 Low Pressure Pilot – Adjustment 2 to 15 PSI, Parts List
Page 8

8
Figure 9: CVS Series 7970 High-Low Pressure Pilot Switch
Low Pilot
High Pilot
Low Pilot
High Pilot
Hi-Low Pressure Pilot - Manual Reset
Low Pressure Valve:
*Out Port To Valve
*Hi Port To Vent
High Pressure Valve:
*High Port To (air/gas) Supply (Max Supply Pressure 125 psi)
*Low Port To vent
Manifold:
*Either port for process
Page 9
9
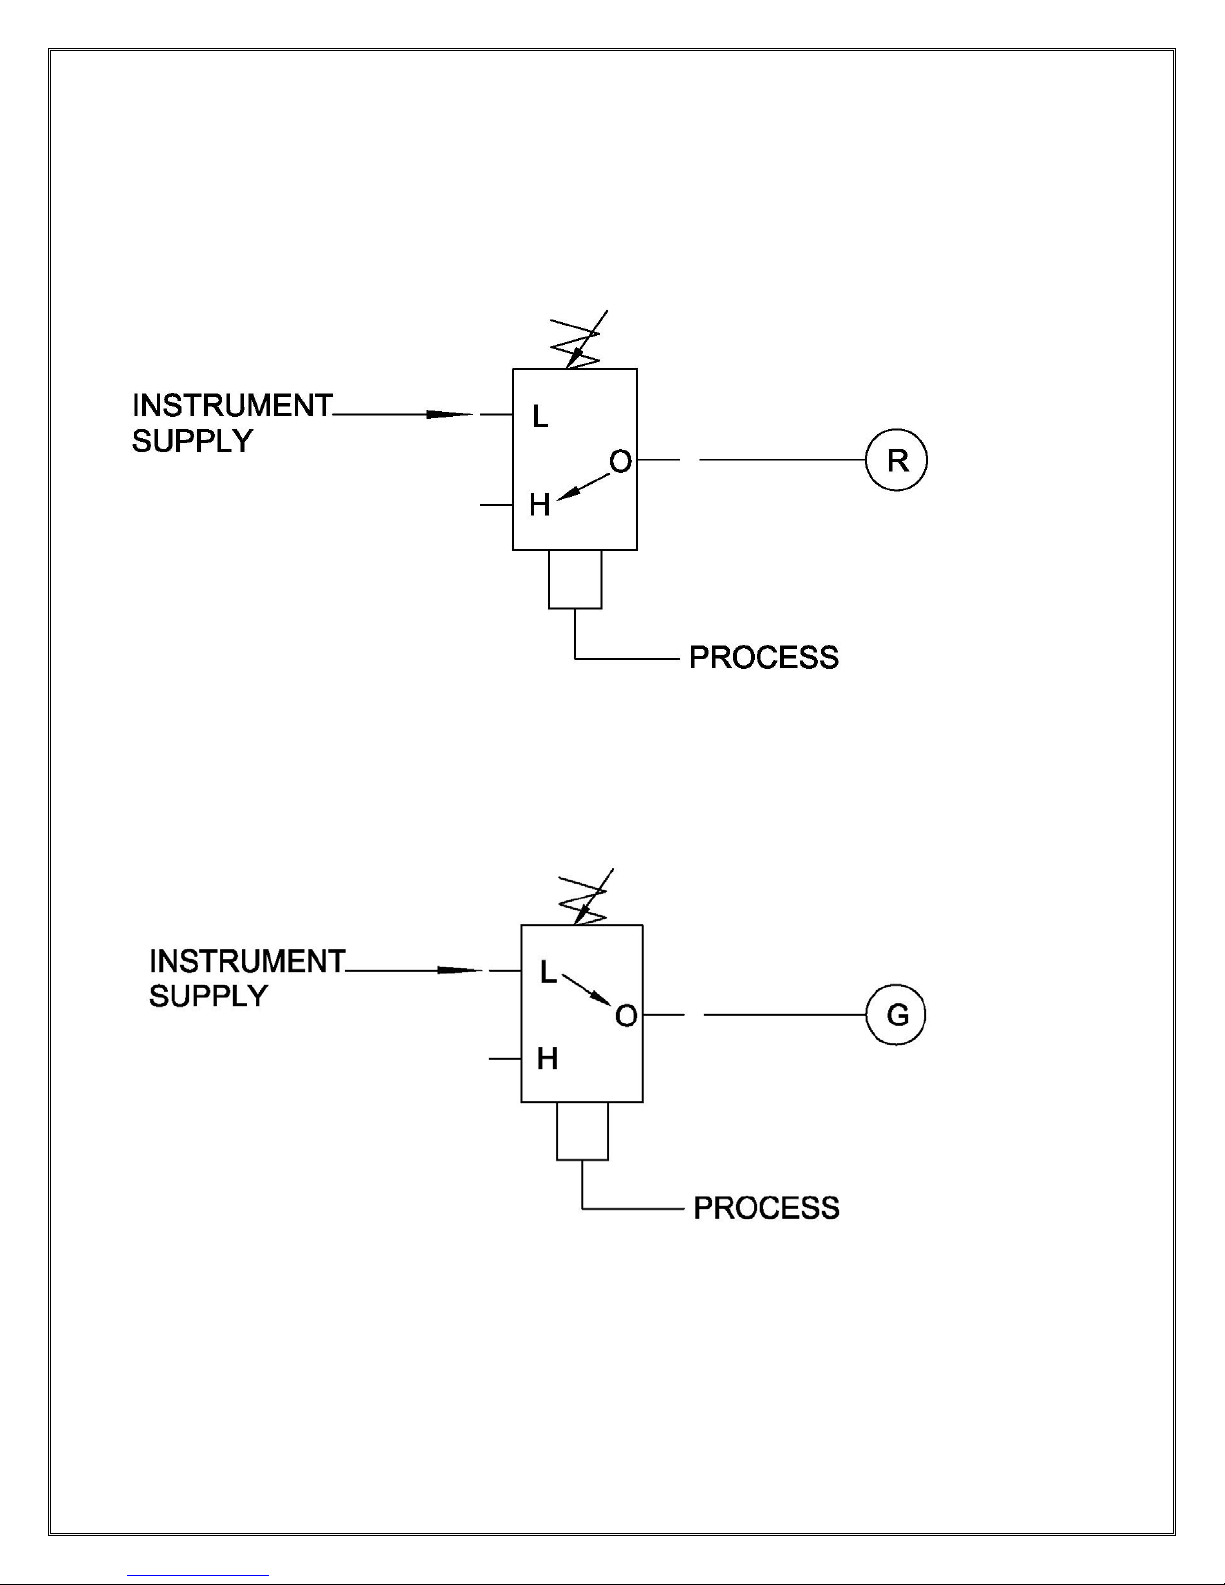
Instructional Schematic: Pressure Sensing Low – Decreasing (PSL)
Reducing Pressure
Inlet Pressure Absent
Unactuated - Monitored process control pressure has
Inlet Pressure Applied
Gaining Pressure
Actuated - Monitored process control pressure has
operation.
Normally Closed – Loss of Instrument (output) pressure, when sensed inlet pressure decreases below
the low pressure setting.
DECREASED below the Low Pressure Setting, or is absent.
INCREASED above the Low Pressure Setting. Normal
Page 10

10
Instructional Schematic: Pressure Sensing High – Increasing (PSH)
Gaining Pressure
Inlet Pressure Applied
Unactuated - Monitored process control pressure is applied,
but is BELOW the high pressure setting. Normal operation.
Reducing Pressure
Inlet Pressure Applied
Actuated – Monitored process control pressure has
Normally Open – Loss in Instrument (output) pressure, when sensed inlet pressure increases above the
high pressure setting.
INCREASED ABOVE the high pressure setting.
Page 11

11
Notes:
Page 12

12
Rev 5 Feb 2016
Head Office
3900 – 101 Street
Webs ite: www.cvs-controls.com E-Mail: info@cvs-controls.com
CVS Controls Ltd. strives for the highest levels of quality and accuracy. The information included in this publication is presented f or
Edmonton, Alberta, Canada T6E 0A5
Office: (780) 437-3055
Fax: (780) 436-5461
Calgary Sales Office
3516 114 Avenue SE
Calgary, Alberta, Canada T2Z 3V6
Office: (403) 250-1416
Fax: (403) 291-9487
informational purposes only. CVS Controls Ltd. reserves the right to modify or change, and improve design, process, and
specifications without written notice. Under no circumstance is the information contained to be interpreted to be a
guarantee/warranty with regard to our products or services, applicability or use.
Selection, use and maintenance are the sole responsibility of the end user and purchaser. CVS Controls assumes no liability for the
selection use and maintenance of any product.
Printed in Canada
 Loading...