

Page 1
POS
USER’S GUIDE
GUIDA OPERATIVA
Commands manual
DOMC-0010e
Page 2

Page 3
GB
CUSTOM ENGINEERING S.p.A.
Str. Berettine 2
43010 Fontevivo (PARMA) - Italy
Tel. : +39 0521-680111
Fax : +39 0521-610701
http: www.custom.biz
Customer Service Department:
Email : [email protected]
© 2011 CUSTOM ENGINEERING S.p.A. –
Italy. All rights reserved. Total or partial reproduction of this manual in whatever form,
whether by printed or electronic means, is
forbidden. While guaranteeing that the information contained in it has been carefully
checked, CUSTOM ENGINEERING S.p.A.
and other entities utilized in the realization
of this manual bear no responsibility for
how the manual is used.
Information regarding any errors found in it
or suggestions on how it could be improved
are appreciated. Since products are subject to continuous check and improvement,
CUSTOM ENGINEERING S.p.A. reserves
the right to make changes in information
contained in this manual without prior
notifi cation.
The pre-installed multimedia contents
are protected from Copyright CUSTOM
ENGINEERING. Other company and
product names mentioned herein may be
trademarks of their respective companies.
Mention of third-party products is for informational purposes only and constitutes
neither an endorsement nor a recommendation. CUSTOM ENGINEERING assumes no responsibility with regard to the
performance or use of these products.
THE IMAGES USED IN THIS MANUAL ARE USED AS AN ILLUSTRATIVE EXAMPLES. THEY COULDN’T
REPRODUCE THE DESCRIBED
MODEL FAITHFULLY.
UNLESS OTHERWISE SPECIFIED,
THE INFORMA TION GIVEN IN THIS
MANUAL
ARE REFERRED TO ALL MODELS
IN PRODUCTION AT THE ISSUE
DATE OF THIS DOCUMENT.
GENERAL SAFETY INFORMATION
Your attention is drawn to the following
actions that could compromise the characteristics of the product:
Read and retain the instructions which •
follow.
Follow all indications and instructions •
given on the device.
Make sure that the surface on which •
the device rests is stable. If it is not, the
device could fall, seriously damaging it.
Make sure that the device rests on a hard •
(non-padded) surface and that there is
suffi cient ventilation.
When positioning the device, make sure •
cables do not get damaged.
Use the type of electrical power supply •
indicated on the device label. If uncertain, contact your dealer.
Make sure the electrical system that •
supplies power to the device is equipped
with a ground wire and is protected by a
differential switch.
Do not block the ventilation openings.•
Do not insert objects inside the device as •
this could cause short-circuiting or damage components that could jeopardize
printer functioning.
Do not carry out repairs on the device •
yourself, except for the normal maintenance operations given in the user
manual.
Make sure that there is an easily-acces-•
sible outlet with a capacity of no less than
15A in the vicinity of where the device is
to be installed.
Periodically perform scheduled mainte-•
nance on the device to avoid dirt build-up
that could compromise the correct, safe
operation of the unit.
Before any type of work is done on the •
machine, disconnect the battery pack.
Do not touch the head heating line with •
bare hands or metal objects. Do not
perform any operation inside the printer
immediately after printing because the
head and motor tend to become very
hot.
GENERAL INSTRUCTIONS
CUSTOM ENGINEERING S.p.A. declines
all responsibility for accidents or damage
to persons or property occurring as a result of tampering, structural or functional
modifi cations, unsuitable or incorrect in-
stallations, environments not in keeping
with the equipment’s protection degree or
with the required temperature and humidity
conditions, failure to carry out maintenance
and periodical inspections and poor repair
work.
THE CE MARK AFFIXED TO
THE PRODUCT CERTIFY
THAT THE PRODUCT SATISFIES THE BASIC SAFETY
REQUIREMENTS.
The device is in conformity with the essential Electromagnetic Compatibility and
Electric Safety requirements laid down in
Directives 2006/95/CE and 2004/108/CE
inasmuch as it was designed in conformity
with the provisions laid down in the following Standards:
EN 55022 Class B • (Limits and methods
of measurements of radio disturbance
characteristics of Information Technology Equipment)
EN 55024 • (Information Technology
Equipment – Immunity characteristics –
Limits and methods of measurement)
EN 60950 • (Safety of information equipment including electrical business
equipment)
GUIDELINES FOR
THE DISPOSAL OF
THE PRODUCT
The crossed-out rubbish bin logo means
that used electrical and electronic products
shall NOT be mixed with unsorted municipal waste. For more detailed information
about recycling of this product, refer to the
instructions of your country for the disposal
of these products.
Do not dispose of this equipment as •
miscellaneous solid municipal waste, but
arrange to have it collected separately.
The re-use or correct recycling of the •
electronic and electrical equipment
(EEE) is important in order to protect
the environment and the wellbeing of
humans.
In accordance with European Directive •
WEEE 2002/96/EC, special collection
points are available to which to deliver
waste electrical and electronic equipment and the equipment can also be
handed over to a distributor at the moment of purchasing a new equivalent
type.
The public administration and producers •
of electrical and electronic equipment
are involved in facilitating the processes
of the re-use and recovery of waste electrical and electronic equipment through
the organisation of collection activities
and the use of appropriate planning arrangements.
Unauthorised disposal of waste electrical •
and electronic equipment is punishable
by law with the appropriate penalties.
The format used for this manual improves use of natural resources reducing the quantity of necessary paper to print this
copy.
Page 4
I
CUSTOM ENGINEERING S.p.A.
Str. Berettine 2
43010 Fontevivo (PARMA) - Italy
Tel. : +39 0521-680111
Fax : +39 0521-610701
http: www.custom.biz
Assistenza Tecnica Clienti :
Email : [email protected]
© 2011 CUSTOM ENGINEERING S.p.A.
– Italy. Tutti i diritti riservati. È vietata la
riproduzione totale o parziale del presente manuale in qualsiasi forma, sia essa
cartacea o informatica. La CUSTOM ENGINEERING S.p.A. e le risorse impiegate
nella realizzazione del manuale, non si
assumono nessuna responsabilità derivante dall’utilizzo dello stesso, garantendo
che le informazioni contenute nel manuale
sono state accuratamente verifi cate. Ogni
suggerimento riguardo ad eventuali errori
riscontrati o a possibili miglioramenti sarà
particolarmente apprezzato. I prodotti
sono soggetti ad un continuo controllo e
miglioramento, pertanto la CUSTOM ENGINEERING S.p.A. si riserva di modifi care
le informazioni contenute nel manuale
senza preavviso.
I contenuti multimediali pre/installati sono
coperti da Copyright CUSTOM ENGINEERING. Altre società e altri nomi di prodotti
qui menzionati sono marchi delle rispettive
società.
La citazione di prodotti di terze parti è a
solo scopo informativo e non costituisce
alcun impegno o raccomandazione. CUSTOM ENGINEERING declina ogni responsabilità riguardo l’uso e le prestazioni
di questi prodotti.
LE IMMAGINI UTILIZZATE NEL
PRESENTE MANUALE RIVESTONO
PURO SCOPO ESEMPLIFICA TIVO E
POTREBBERO NON RIPRODURRE
FEDELMENTE IL MODELLO DESCRITTO.
SE NON DIVERSAMENTE SPECIFICA TO, LE INFORMAZIONI FORNITE
NEL PRESENTE MANUALE SONO
VALIDE PER TUTTI I MODELLI
IN PRODUZIONE AL MOMENTO
DELL’EMISSIONE DI QUESTO DOCUMENTO.
INFORMAZIONI GENERALI
SULLA SICUREZZA
Si richiama l’attenzione sulle seguenti
azioni che possono compromettere la conformità e le caratteristiche del prodotto:
Leggete e conservate le istruzioni se-•
guenti;
Seguite tutti gli avvisi e le istruzioni indi-•
cate sul dispositivo.
Non collocate il dispositivo su una super-•
fi cie instabile perché potrebbe cadere e
danneggiarsi seriamente.
Non collocate il dispositivo su superfi ci •
morbide o in ambienti che non garantiscono la necessaria ventilazione.
Collocate il dispositivo in modo da evita-•
re che i cavi ad esso collegati possano
essere danneggiati.
Utilizzate il tipo di alimentazione elettrica •
indicato sull’etichetta del dispositivo.
Assicuratevi che l’impianto elettrico che •
alimenta il dispositivo sia provvisto del
conduttore di terra e che sia protetto da
interruttore differenziale.
Non ostruite le aperture per la ventila-•
zione.
Non introducete oggetti all’interno del •
dispositivo in quanto essi possono
cortocircuitare o danneggiare parti che
potrebbero comprometterne il funzionamento.
Non intervenite personalmente sul di-•
spositivo, eccetto che per le operazioni
di ordinaria manutenzione, espressamente riportate nel manuale utente.
Assicurarsi che nel luogo in cui si vuole •
installare il dispositivo, vi sia una presa
di corrente facilmente accessibile e di
capacità non inferiore ai 10A.
Eseguire periodicamente la manuten-•
zione ordinaria del dispositivo al fi ne di
evitare che accumuli di sporcizia possano compromettere il corretto e sicuro
funzionamento dell’unità.
Prima di ogni operazione di manutenzio-•
ne scollegare il cavo alimentazione.
Non toccare la linea di riscaldamento •
della testina a mani nude o con oggetti
metallici. Non eseguire operazioni all’interno della stampante subito dopo la
stampa, perché la testina ed il motore
possono raggiungere temperature molto
elevate.
AVVERTENZE GENERALI
La CUSTOM ENGINEERING S.p.A. declina
ogni responsabilità per sinistri od ogni qualsivoglia inconveniente, a persone o cose,
derivanti da manomissioni, modifi che strut-
turali o funzionali, installazione non idonea o
non correttamente eseguita, ambientazione
non idonea alle protezioni o climatizzazioni
richieste, carenze di manutenzione o di
verifi che periodiche o di riparazioni in ogni
caso non correttamente eseguite.
IL MARCHIO CE APPLICATO
AL PRODOTTO CERTIFICA
CHE IL PRODOTTO STESSO SODDISFA I REQUISITI
BASE DI SICUREZZA.
Il dispositivo soddisfa i requisiti essenziali
di Compatibilità Elettromagnetica e di
Sicurezza Elettrica previsti dalle direttive
2006/95/CE e 2004/108/CE in quanto
progettata in conformità alle prescrizioni
delle seguenti Norme:
EN 55022 Classe B • (Apparecchi per la
tecnologia dell’informazione - Caratteristiche di radiodisturbo - Limiti e metodi
di misura)
EN 55024 • (Apparecchiature per la tecnologia dell’informazione Caratteristiche di
immunità Limiti e metodi di misura)
EN 60950 • (Apparecchiature per la tecnologia dell’informazione Caratteristiche di
immunità Limiti e metodi di misura)
INDICAZIONI PER LO
SMALTIMENTO DEL
PRODOTTO
Il simbolo del bidone barrato sta ad indicare che lo smaltimento del dispositivo NON
deve essere eseguito attraverso il normale
ciclo di smaltimento dei rifi uti. Per informa-
zioni maggiormente dettagliate sul riciclaggio di questo prodotto, fare riferimento alle
indicazioni dell’autorità del vostro Paese
per lo smaltimento di questi prodotti.
Non smaltire queste apparecchiature •
come rifi uto municipale solido misto ma
effettuare una raccolta separata.
Il reimpiego o il corretto riciclaggio delle •
AEE è utile a preservare l’ambiente e la
salute umana stessa.
Secondo la Direttiva europea WEEE •
2002/96/EC sono disponibili specifi ci
centri di raccolta a cui consegnare i rifi uti
di apparecchiature elettriche ed elettroniche, ed è altresì possibile riconsegnare
l’apparecchiatura al distributore all’atto
dell’acquisto di una nuova equivalente.
La pubblica amministrazione ed i produt-•
tori di AEE sono impegnati ad agevolare
i processi di reimpiego e recupero dei
RAEE attraverso l’organizzazione delle
attività di raccolta e attraverso l’utilizzo di
opportuni accorgimenti progettuali.
La legge punisce con opportune sanzioni •
chi smaltisce abusivamente i RAEE.
Il formato usato per questo manuale migliora l’uso di risorse naturali riducendola quantità di carta necessaria per stampare
questa copia.
Page 5

TABLE OF CONTENTS
Indice
Table des matières
Inhaltsverzeichnis
Indice
DESCRIPTION
INSTALLATION
MAINTENANCE
TRUOBLESHOOTING GUIDE
SETUP
DRIVERS
TECHNICAL SPECIFICATIONS
CONTACTS
CONSUMABLES AND ACCESSORIES
Page 6

Page 7
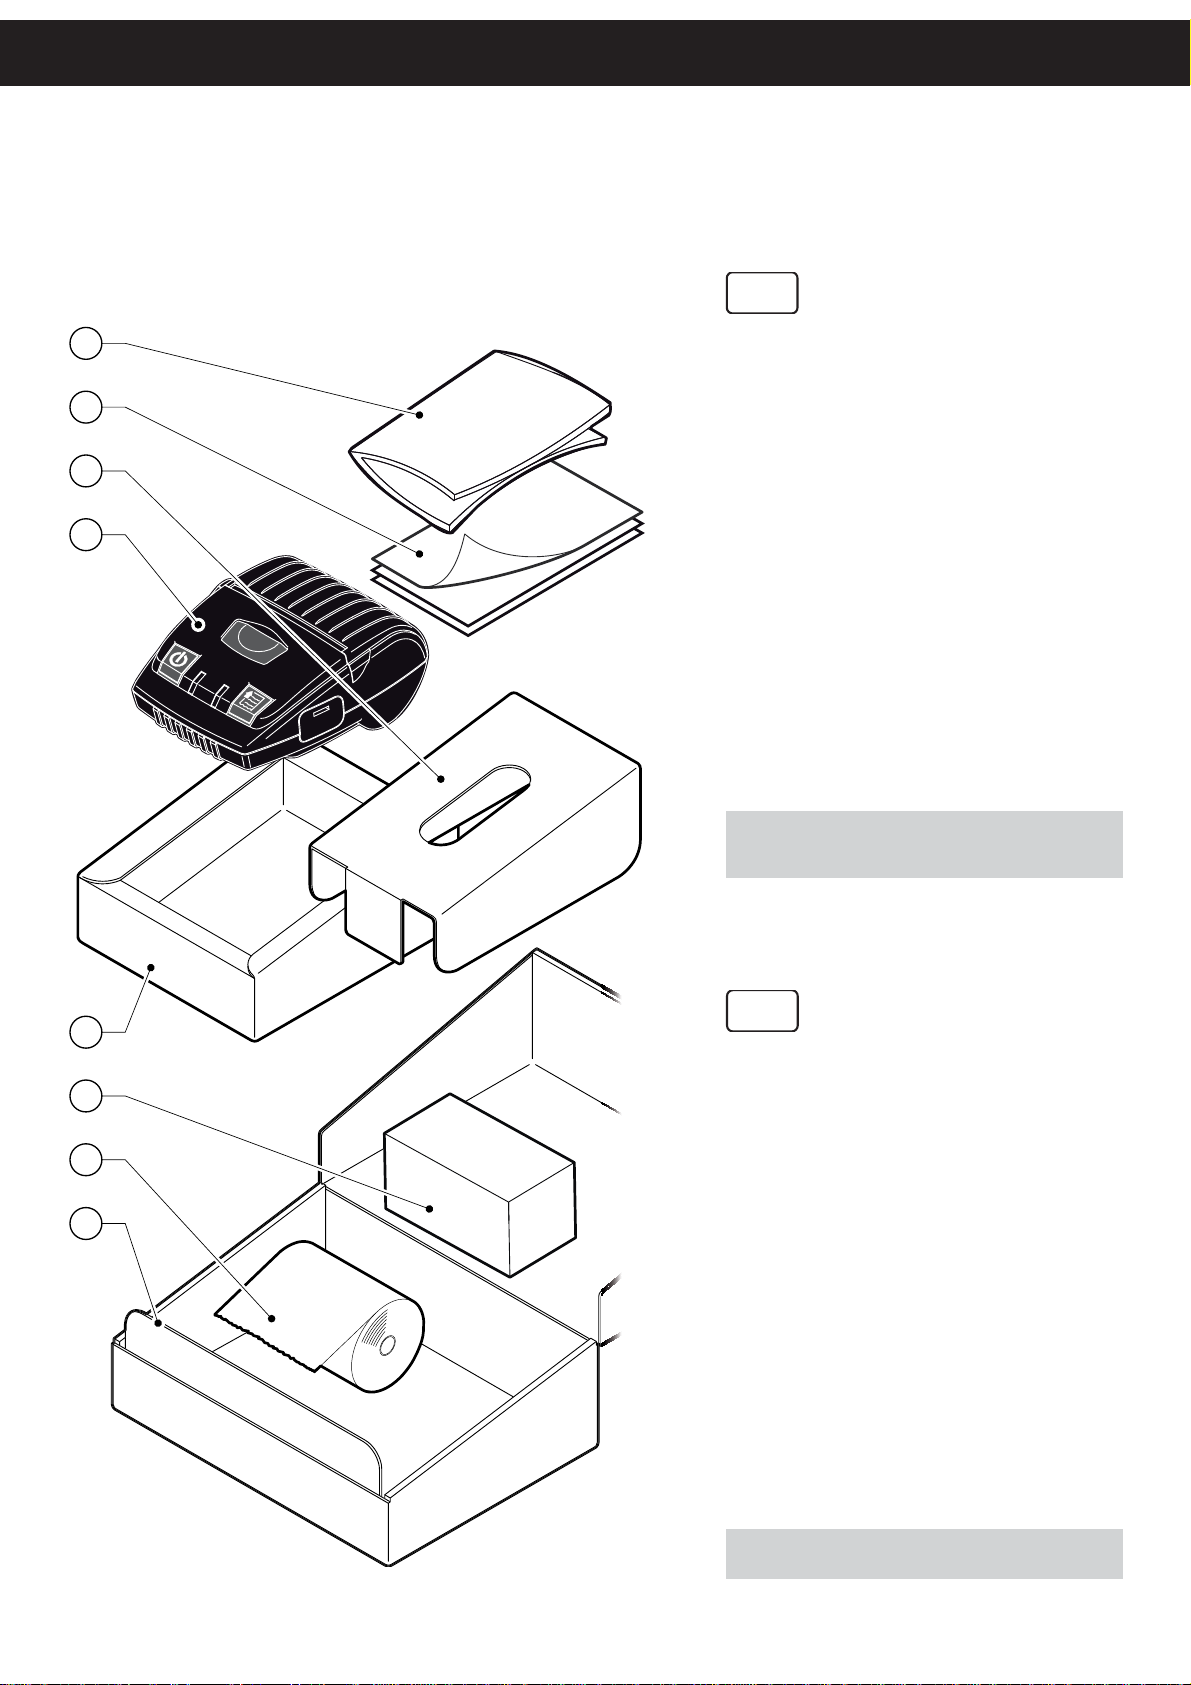
UNPACKING THE PRINTER (model MY3-BT3B)
Disimballo stampante (modello MY3-BT3B)
GB
DESCRIPTION
1
2
3
4
Remove the device from its box being careful not to damage the packing
material so that it may be re-used if
the device is to be transported in the
future. Make sure that all the components illustrated below are present and
that there are no signs of damage. If
there are, contact Customer Service.
User manual1.
Guarantee sheets2.
Packing shell3.
Printer4.
Power supply5.
Paper roll6.
Box7.
NOTE: Keep the box, trays and packing materials in
the event the device must be transported/shipped in
the future.
3
I
Rimuovete il dispositivo dal cartone,
5
6
7
facendo attenzione a non danneggiare
il materiale di imballaggio al fi ne di uti-
lizzarlo per trasporti futuri. Assicuratevi
che vi siano i componenti illustrati in
seguito e che essi non siano danneggiati. In caso contrario contattate il
servizio di assistenza.
Manuale utente1.
Fogli garanzia2.
Imballo sagomato di protezione3.
Stampante4.
Alimentatore5.
Rotolo carta6.
Scatola7.
NOTA: Conservare la scatola, i vassoi e gli imballi per
eventuali trasporti in altre destinazioni.
7
Page 8
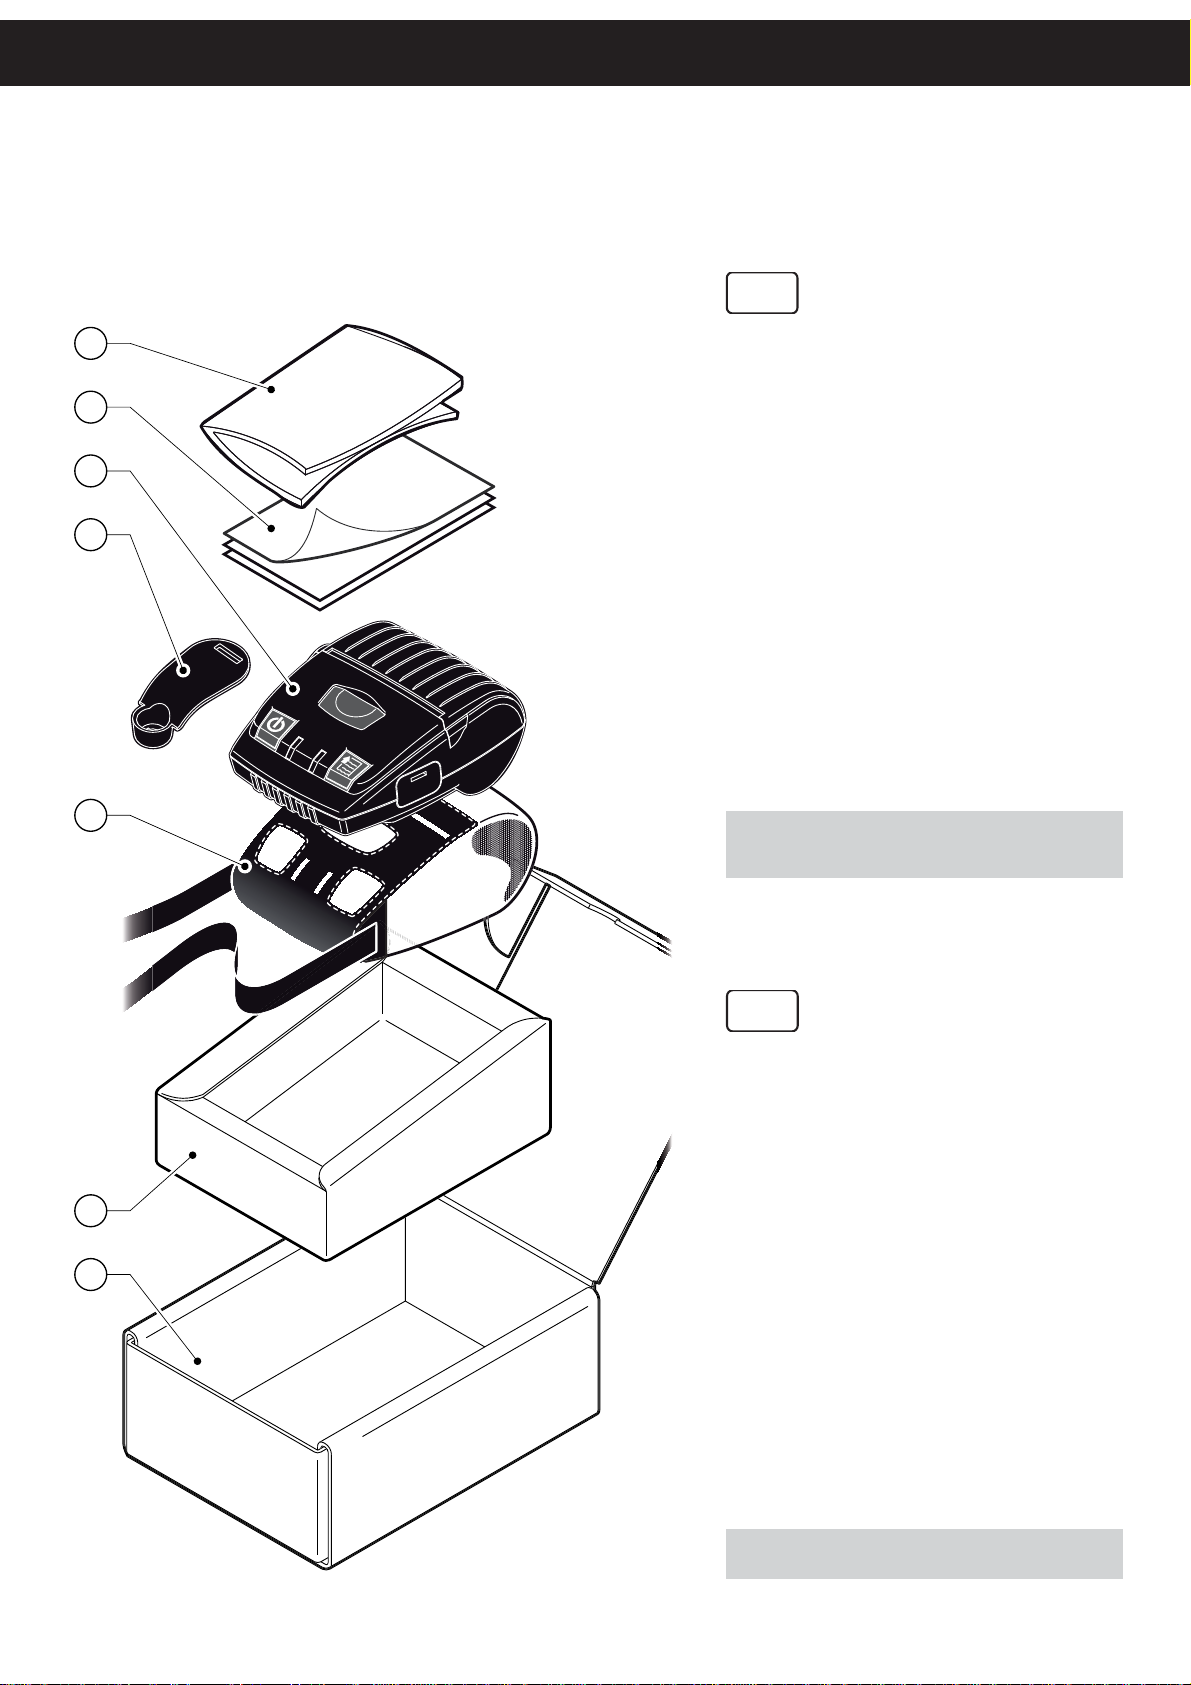
UNPACKING THE PRINTER (model MY3-BT3B-SM)
Disimballo stampante (modello MY3-BT3B-SM)
GB
1
Remove the device from its box being careful not to damage the packing
2
material so that it may be re-used if
the device is to be transported in the
future. Make sure that all the compo-
3
nents illustrated below are present and
that there are no signs of damage. If
4
there are, contact Customer Service.
User manual1.
Guarantee sheets2.
Printer3.
Belt clip4.
Shoulder bag5.
Packing shell6.
Box7.
5
NOTE: Keep the box, trays and packing materials in
the event the device must be transported/shipped in
the future.
I
Rimuovete il dispositivo dal cartone,
facendo attenzione a non danneggiare
il materiale di imballaggio al fi ne di uti-
lizzarlo per trasporti futuri. Assicuratevi
che vi siano i componenti illustrati in
6
seguito e che essi non siano danneggiati. In caso contrario contattate il
servizio di assistenza.
7
Manuale utente1.
Fogli garanzia2.
Stampante3.
Gancio per cintura4.
Tracolla5.
Imballo sagomato di protezione6.
Scatola7.
NOTA: Conservare la scatola, i vassoi e gli imballi per
eventuali trasporti in altre destinazioni.
8
Page 9
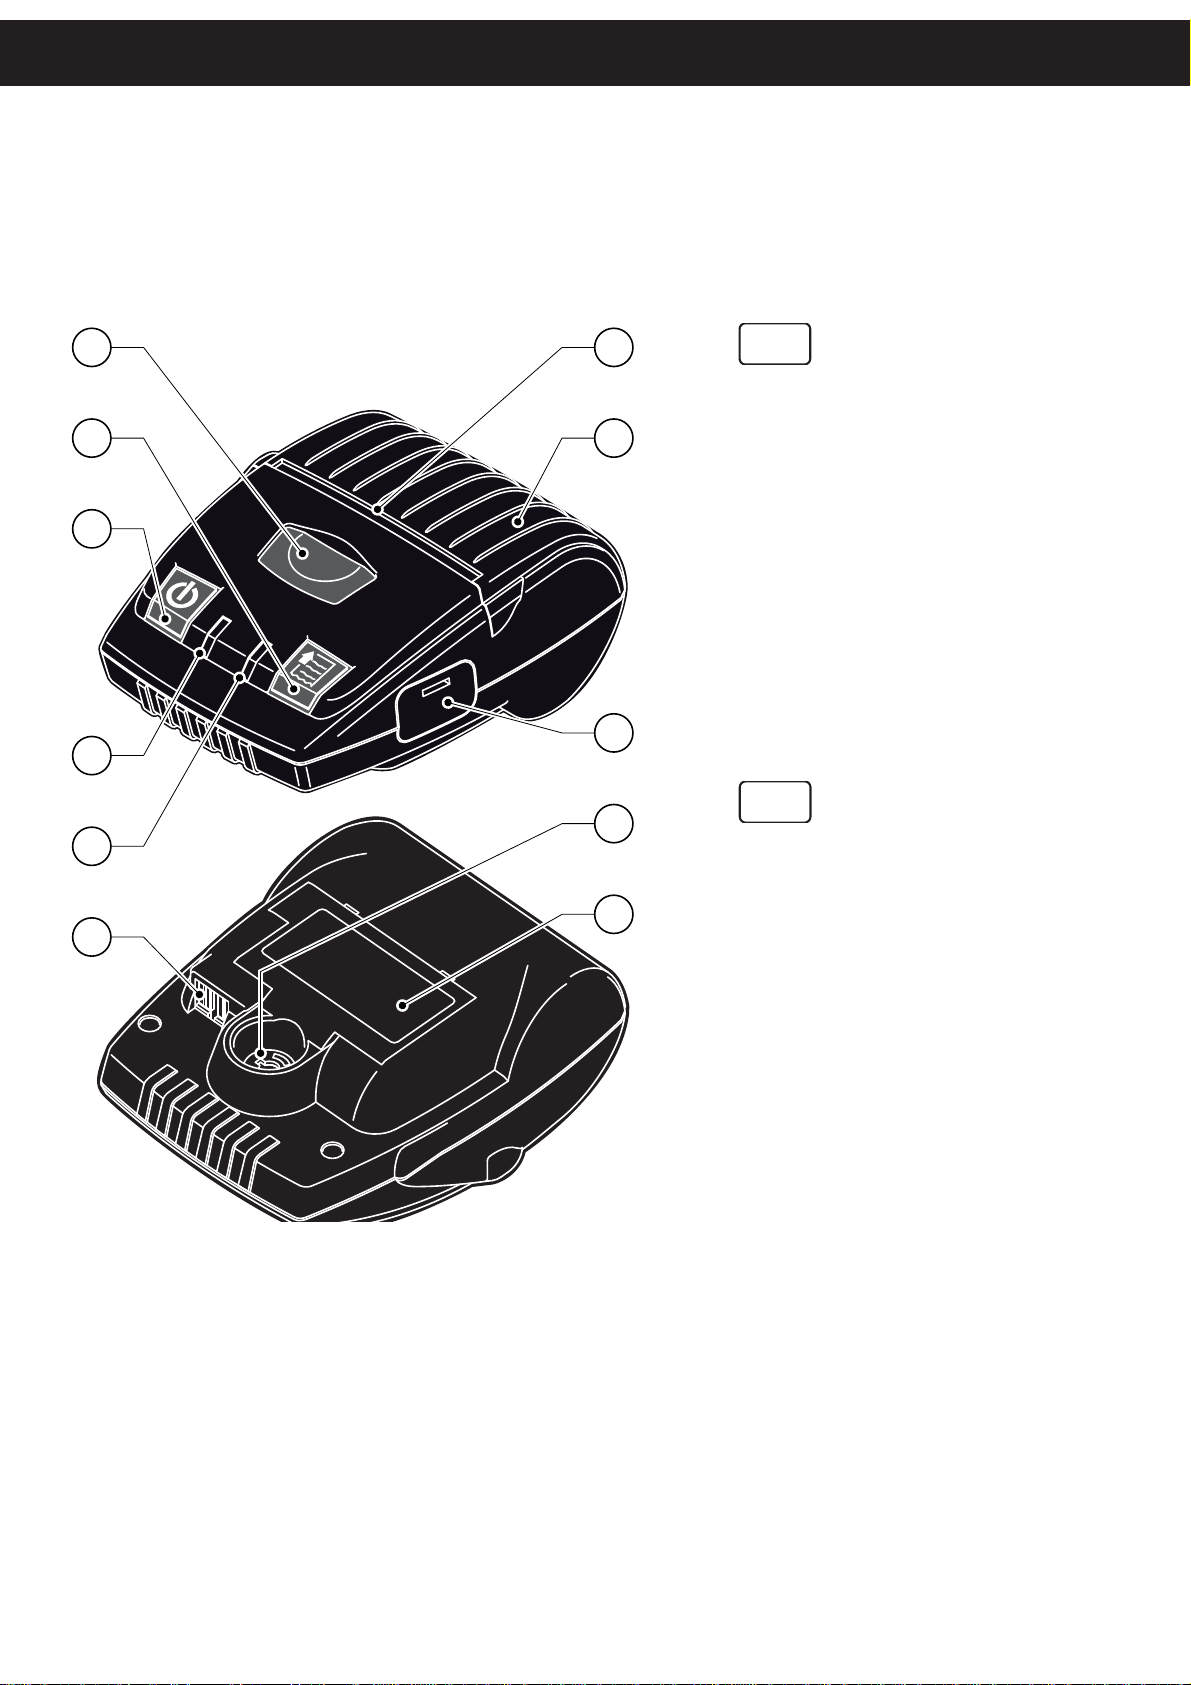
PRINTER DESCRIPTION
Descrizione stampante
DESCRIPTION
1
2
11
10
3
GB
Opening key1.
FEED key2.
ON/OFF key3.
Status Led4.
Recharge Led5.
Contacts for docking station6.
Battery compartment7.
Seat for clip belt8.
Connectors compartment9.
Paper compartment cover10.
Paper out11.
9
4
I
8
5
7
6
Tasto apertura vano carta1.
Tasto FEED2.
Tasto ON/OFF3.
Led di STATUS4.
Led di RICARICA5.
Contatti per stazione di ricarica6.
Vano batteria7.
Alloggiamento gancio cintura8.
Vano connettori9.
Coperchio vano carta10.
Uscita carta11.
9
Page 10
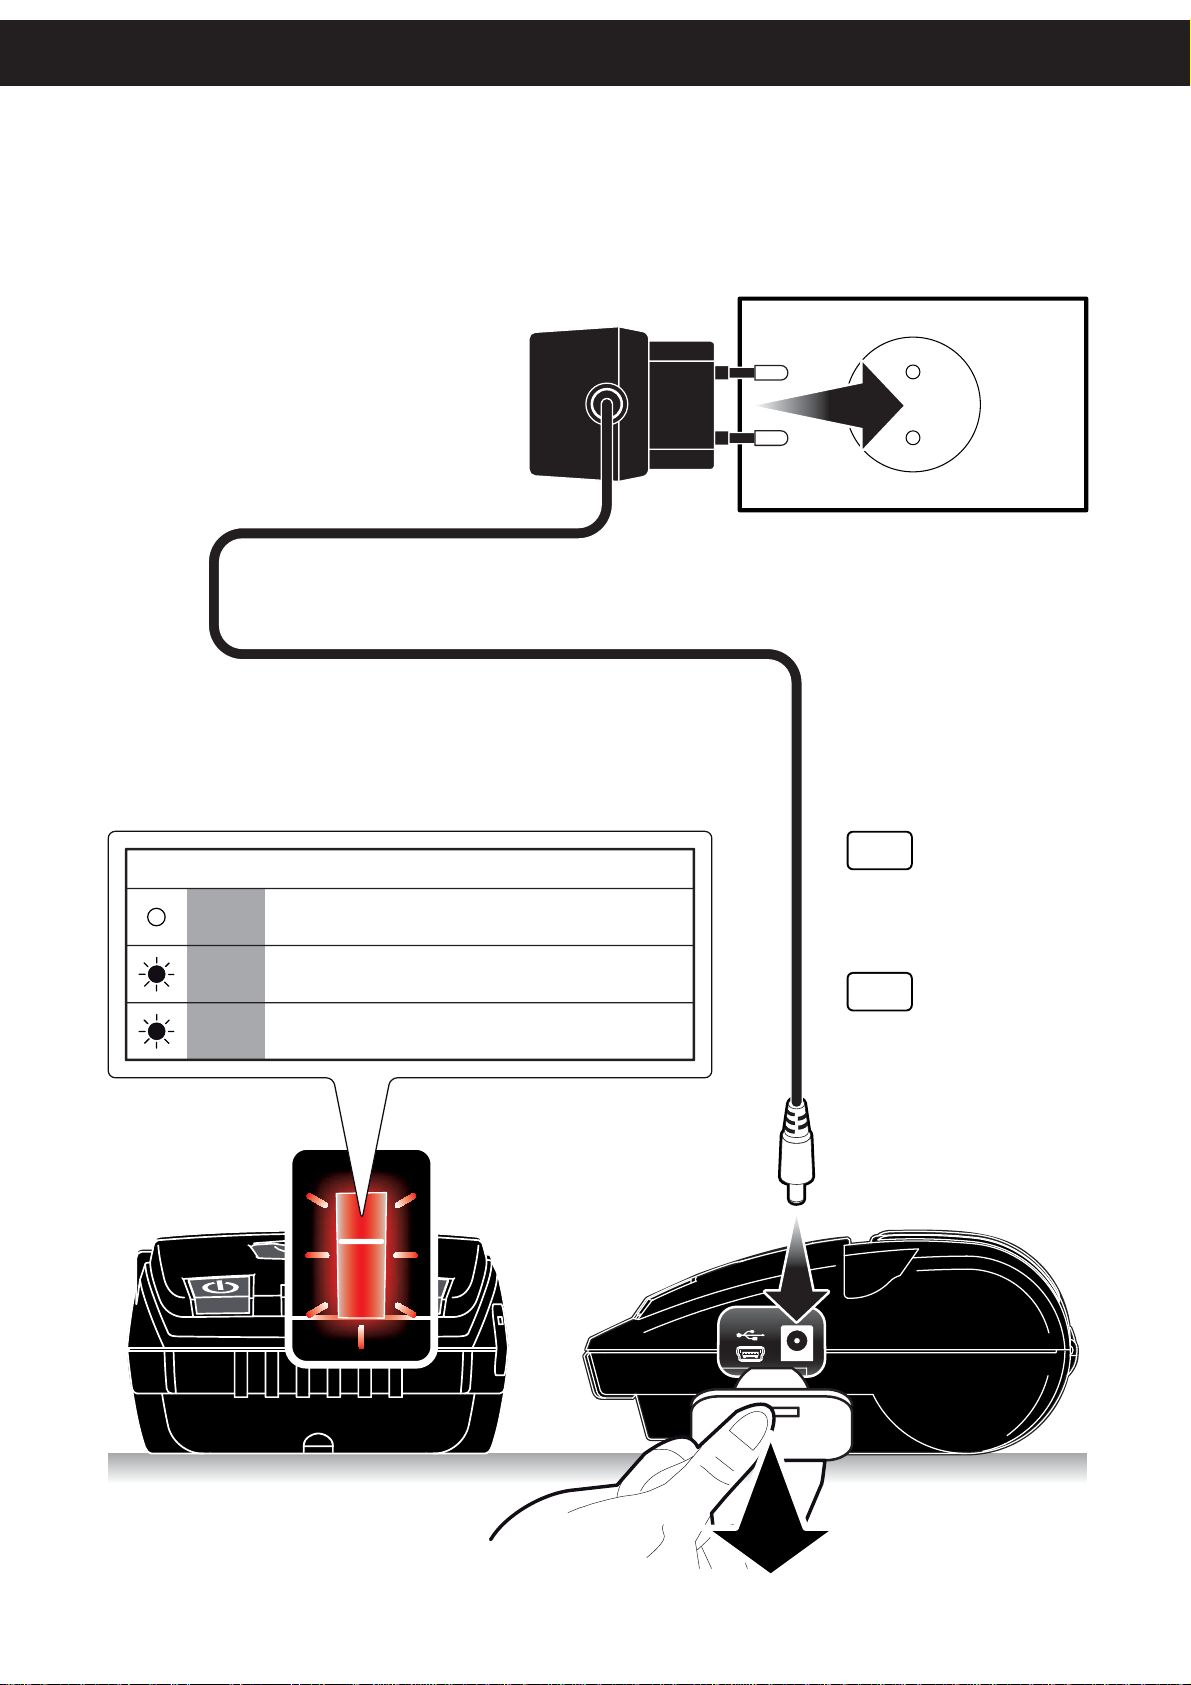
RECHARGE WITH POWER SUPPLY
Ricarica con alimentatore
LED DESCRIPTION DESCRIZIONE
OFF
RED
ROSSO
GREEN
VERDE
PRINTER OFF
RE-CHARGE
RE-CHARGE COMPLETE
STAMPANTE SPENTA
IN CARICA
RICARICA COMPLETATA
GB
NOTE:
To recharge the batteries see
specifications.
I
NOTA:
Per il tempo di ricarica delle
batterie consultare le specifiche
tecniche.
10
Page 11
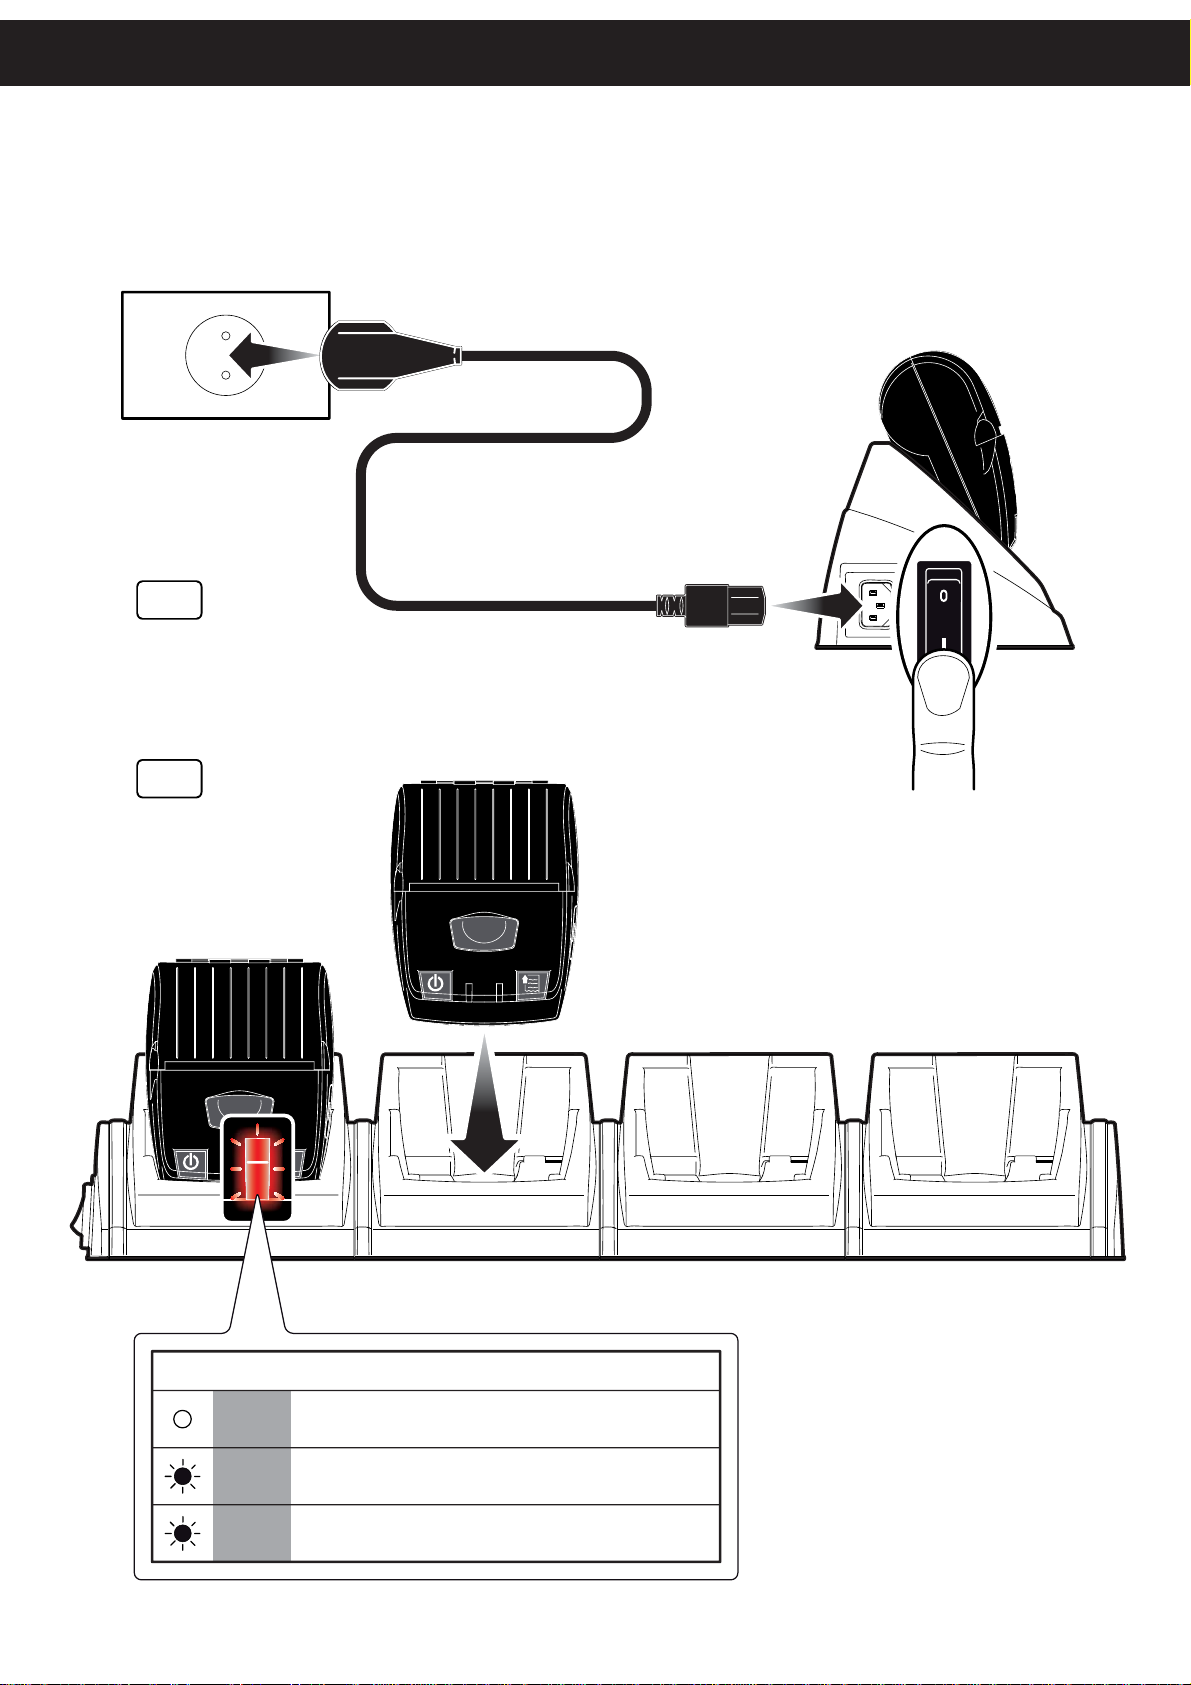
RECHARGE WITH DOCKING STATION
Ricarica con stazione di ricarica
GB
NOTE:
If you are using the shoulder
strap, remove it before inserting
the printer in the docking
station.
DESCRIPTION
I
NOTA:
Se si stà utilizzando la tracolla ,
occorre rimuoverla prima di
inserire la stampante
nell’alloggiamento della stazione di ricarica.
ON/OFF
LED DESCRIPTION DESCRIZIONE
OFF
RED
ROSSO
GREEN
VERDE
PRINTER OFF
RE-CHARGE
RE-CHARGE COMPLETE
STAMPANTE SPENTA
IN CARICA
RICARICA COMPLETATA
11
Page 12
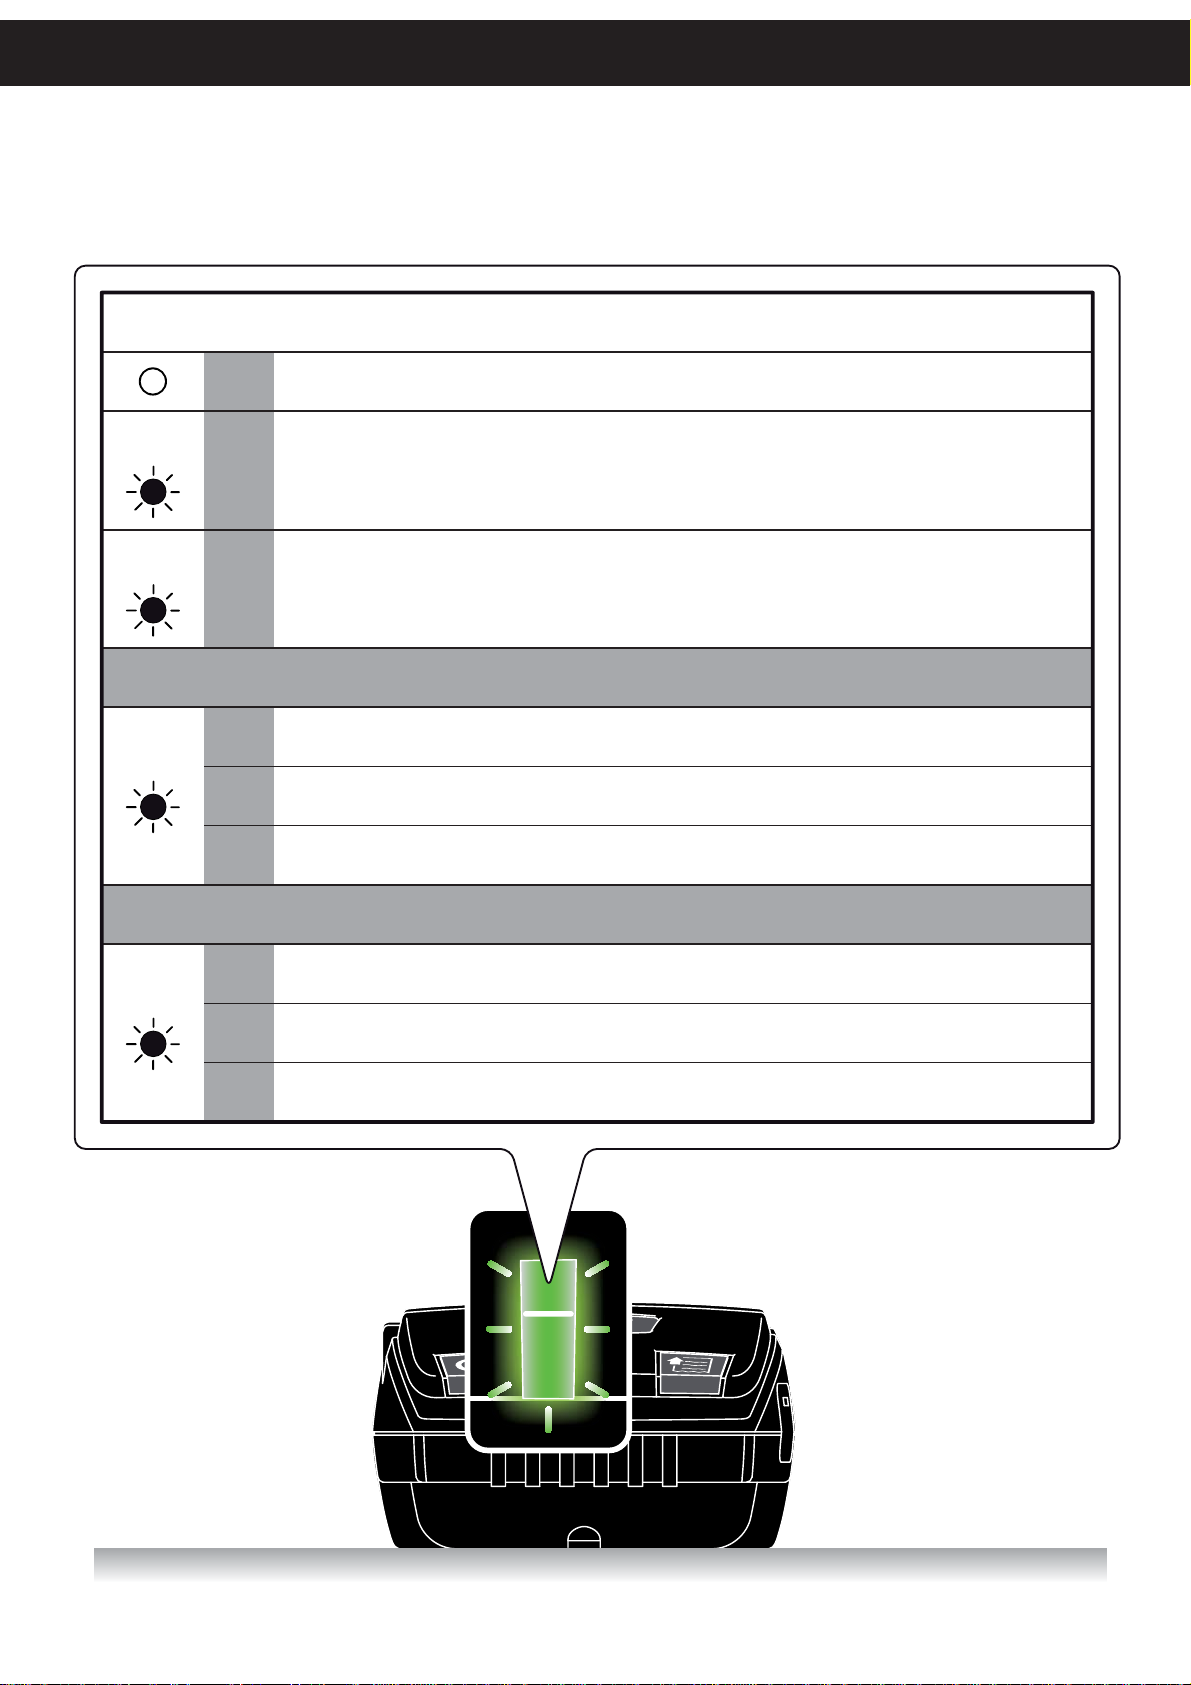
STATUS LED FLASHES
Lampeggi del led di stato
DESCRIPTIONLED DESCRIZIONE
BLUE
BLU
GREEN
VERDE
YELLOW
GIALLO
GREEN
VERDE
OFF
x 1
1
x
2
x
x 3
x 4
x
2
STAMPANTE SPENTAPRINTER OFF
(Bluetooth®)
PRINTER ON: STANDBY
(USB)
PRINTER ON: STANDBY
(Bluetooth®)
LOW-POWER MODE
COMMUNICATION STATUS STATI DI COMUNICAZIONE
RECOVERABLE ERROR ERRORE RECUPERABILE
RECEPTION ERRORS
(parity, frame error, overrun error)
ST AMPANTE ACCESA: STANDBY
ST AMPANTE ACCESA: STANDBY
MODALITÀ BASSO CONSUMO
SOVRATEMPERATURA TESTINAPRINT HEAD OVER TEMP.
LIVELLO BATTERIA BASSOLOW BATTERY LEVEL
(Bluetooth®)
(USB)
(Bluetooth®)
FINE CARTAPAPER END
ERRORI DI RICEZIONE
(parità, frame error, overrun error)
x 3
x 4
MISINTERPRET COMMAND
COMANDO INTERPRETATO
NON CORRETTAMENTE
TIME OUT RICEZIONE COMANDOCOMMAND RECEPTION TIME OUT
12
Page 13
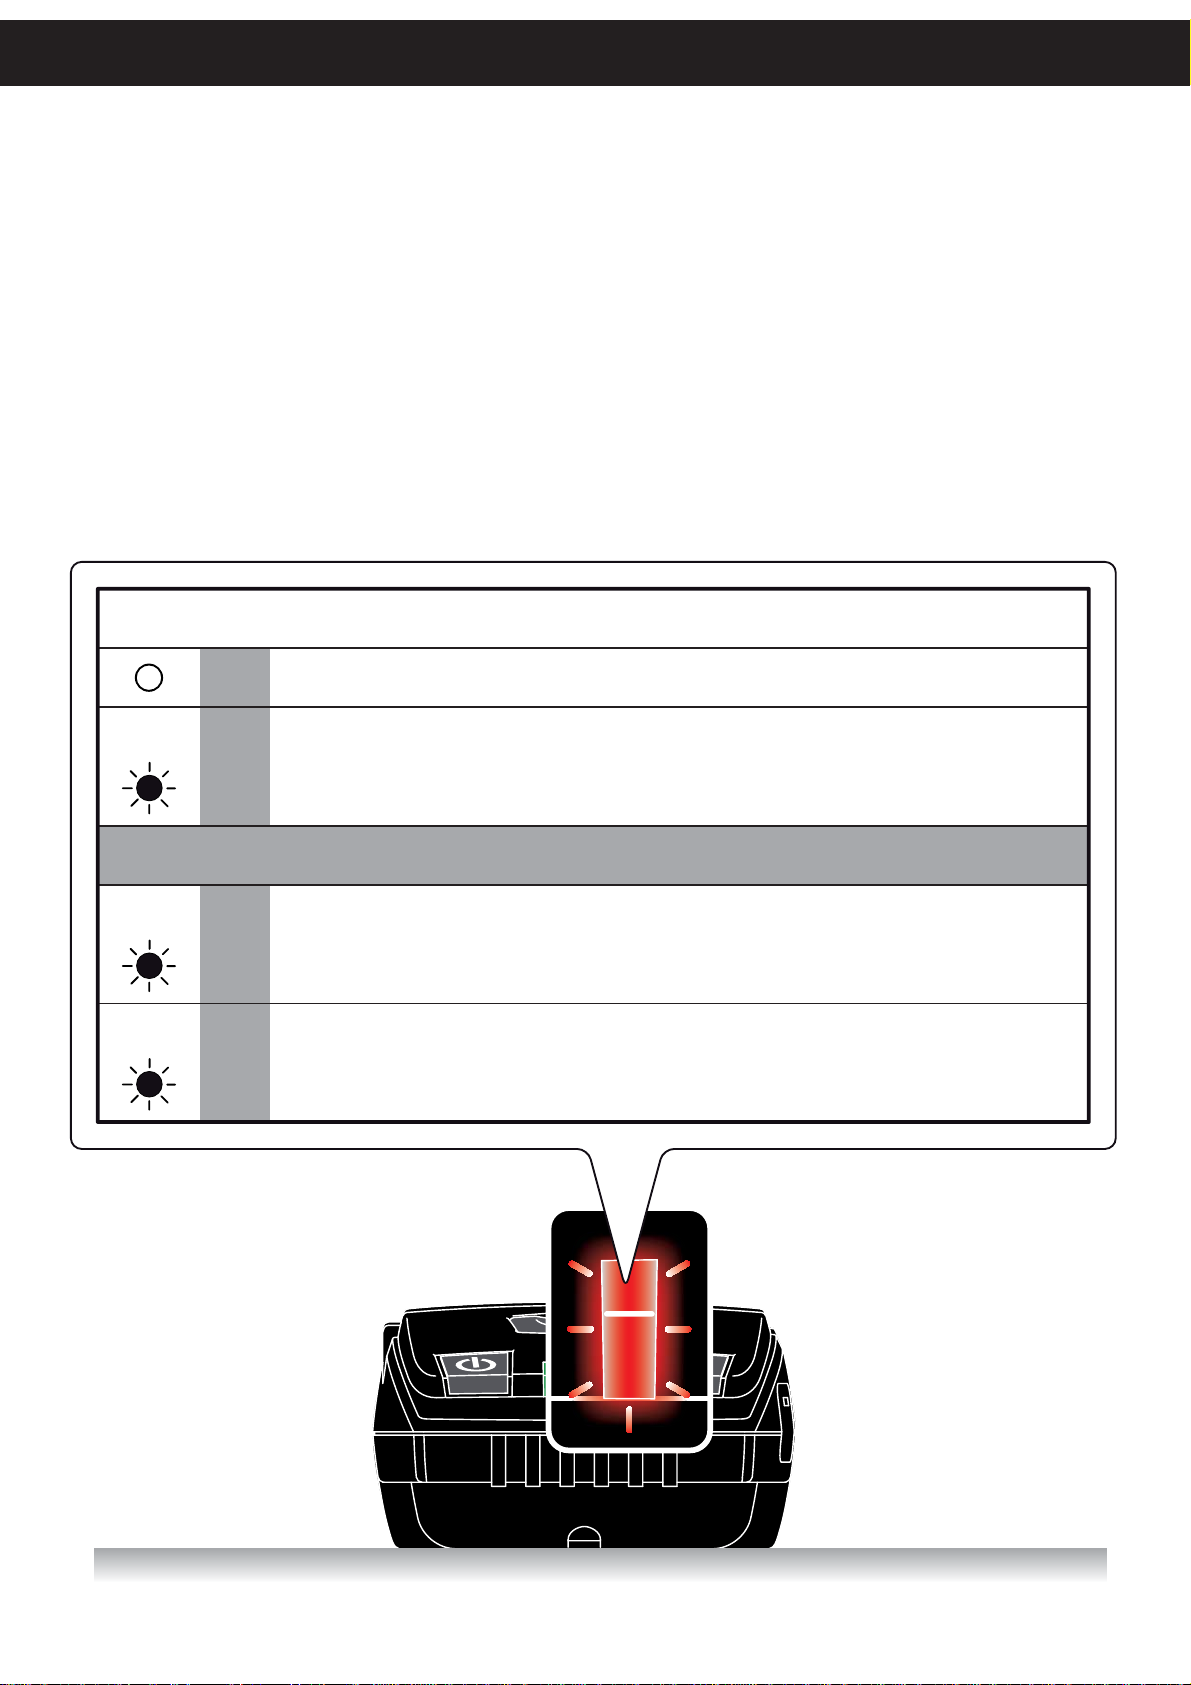
RECHARGE LED FLASHES
Lampeggi del led di ricarica
DESCRIPTIONLED DESCRIZIONE
DESCRIPTION
RED
ROSSO
RED
ROSSO
GREEN
VERDE
OFF
x 1
-
-
BATTERIA OKBATTERY OK
GUASTO ALLA BA TTERIABATTERY FAULT
WITH BATTERY IN CHARGE CON BATTERIA IN CARICA
IN CARICARE-CHARGE
RICARICA COMPLETATARE-CHARGE COMPLETE
13
Page 14
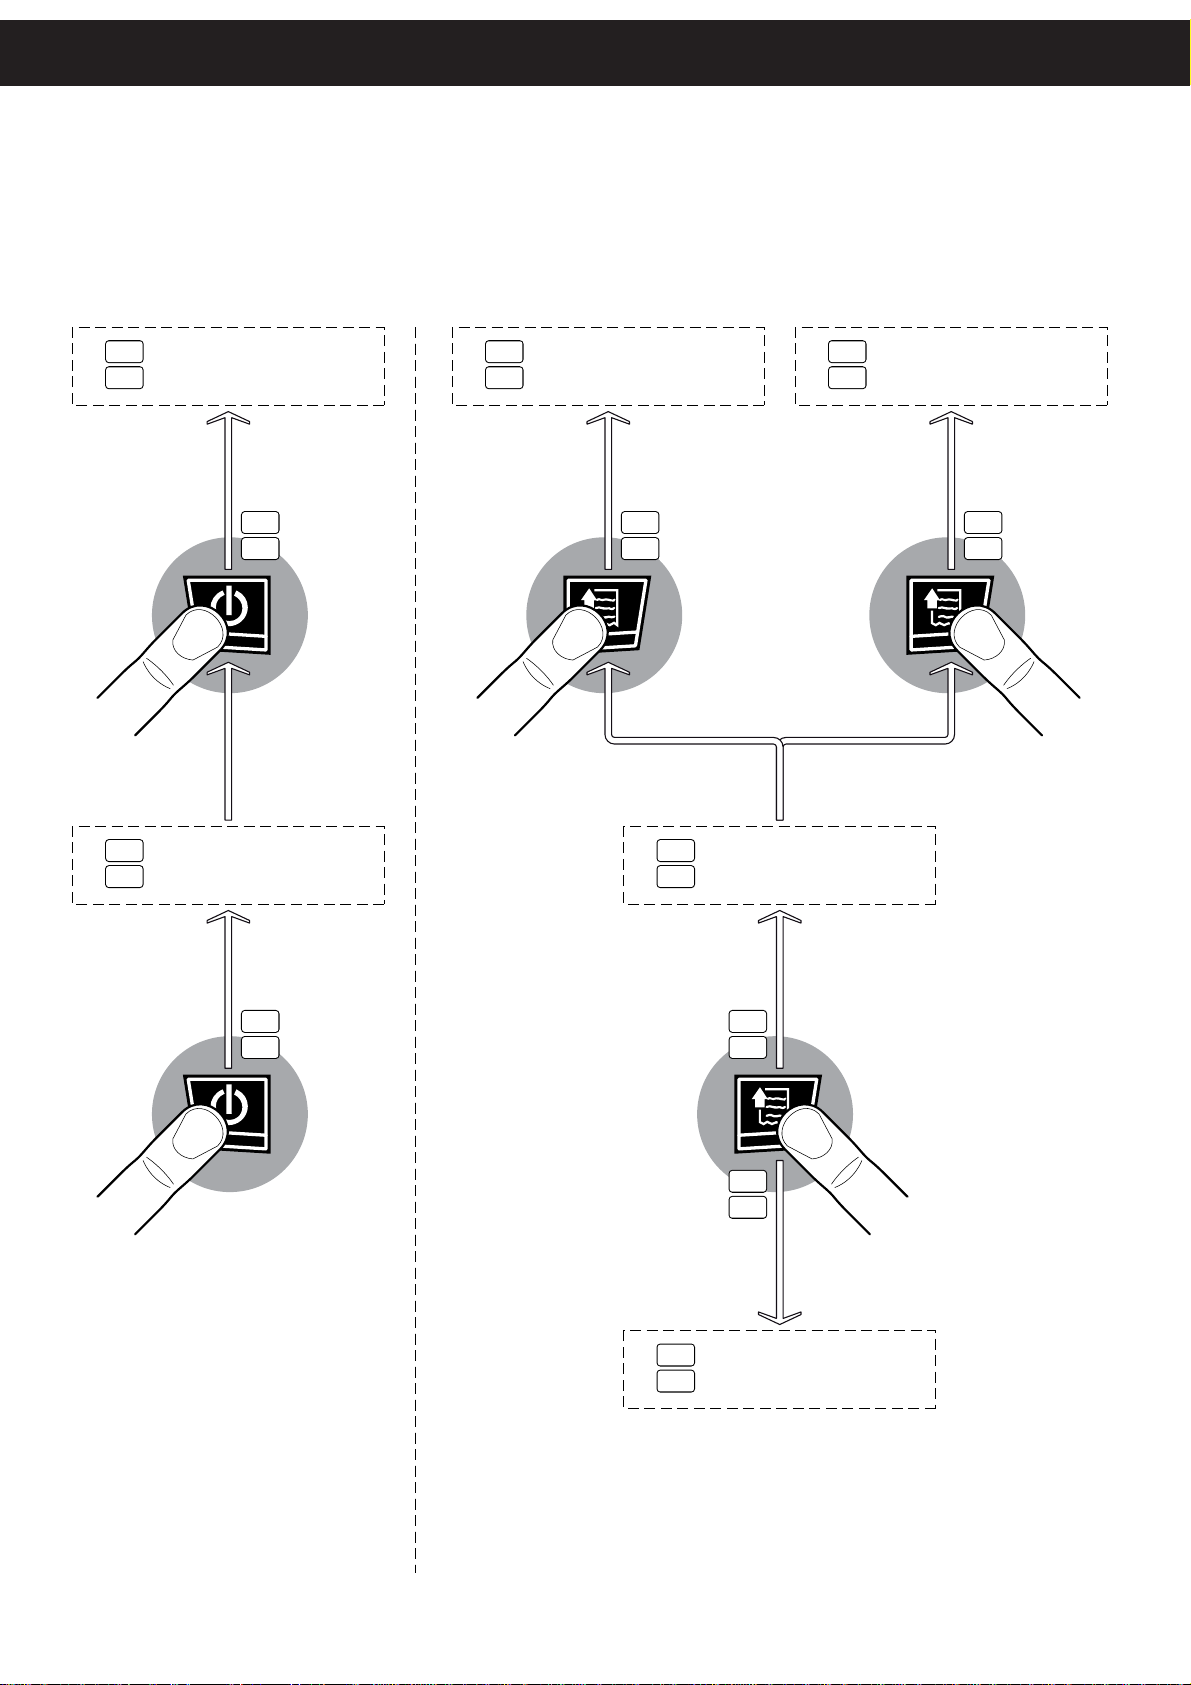
DESCRIPTION OF KEYS
Descrizione dei tasti
GB
Printer OFF
I
Stampante spenta
GB
GB
Printer ON
I
Stampante accesa
Hold down
Mantenere premuto
I
GB
Modify parameter
I
Modifica parametro
GB
Fast push
Breve pressione
I
GB
I
GB
I
SETUP mode
Modalità SETUP
Next parameter
parametro succ.
Hold down
GB
Mantenere premuto
I
Fast push
GB
Breve pressione
I
ON/OFF KEY
Tasto ON/OFF
Hold down on power up
Mantenere premuto all’accensione
Fast push with print ON
Breve pressione a stampante accesa
GB
I
FEED KEY
GB
I
GB
I
Advance the paper
Avanzamento carta
Tasto FEED
14
Page 15
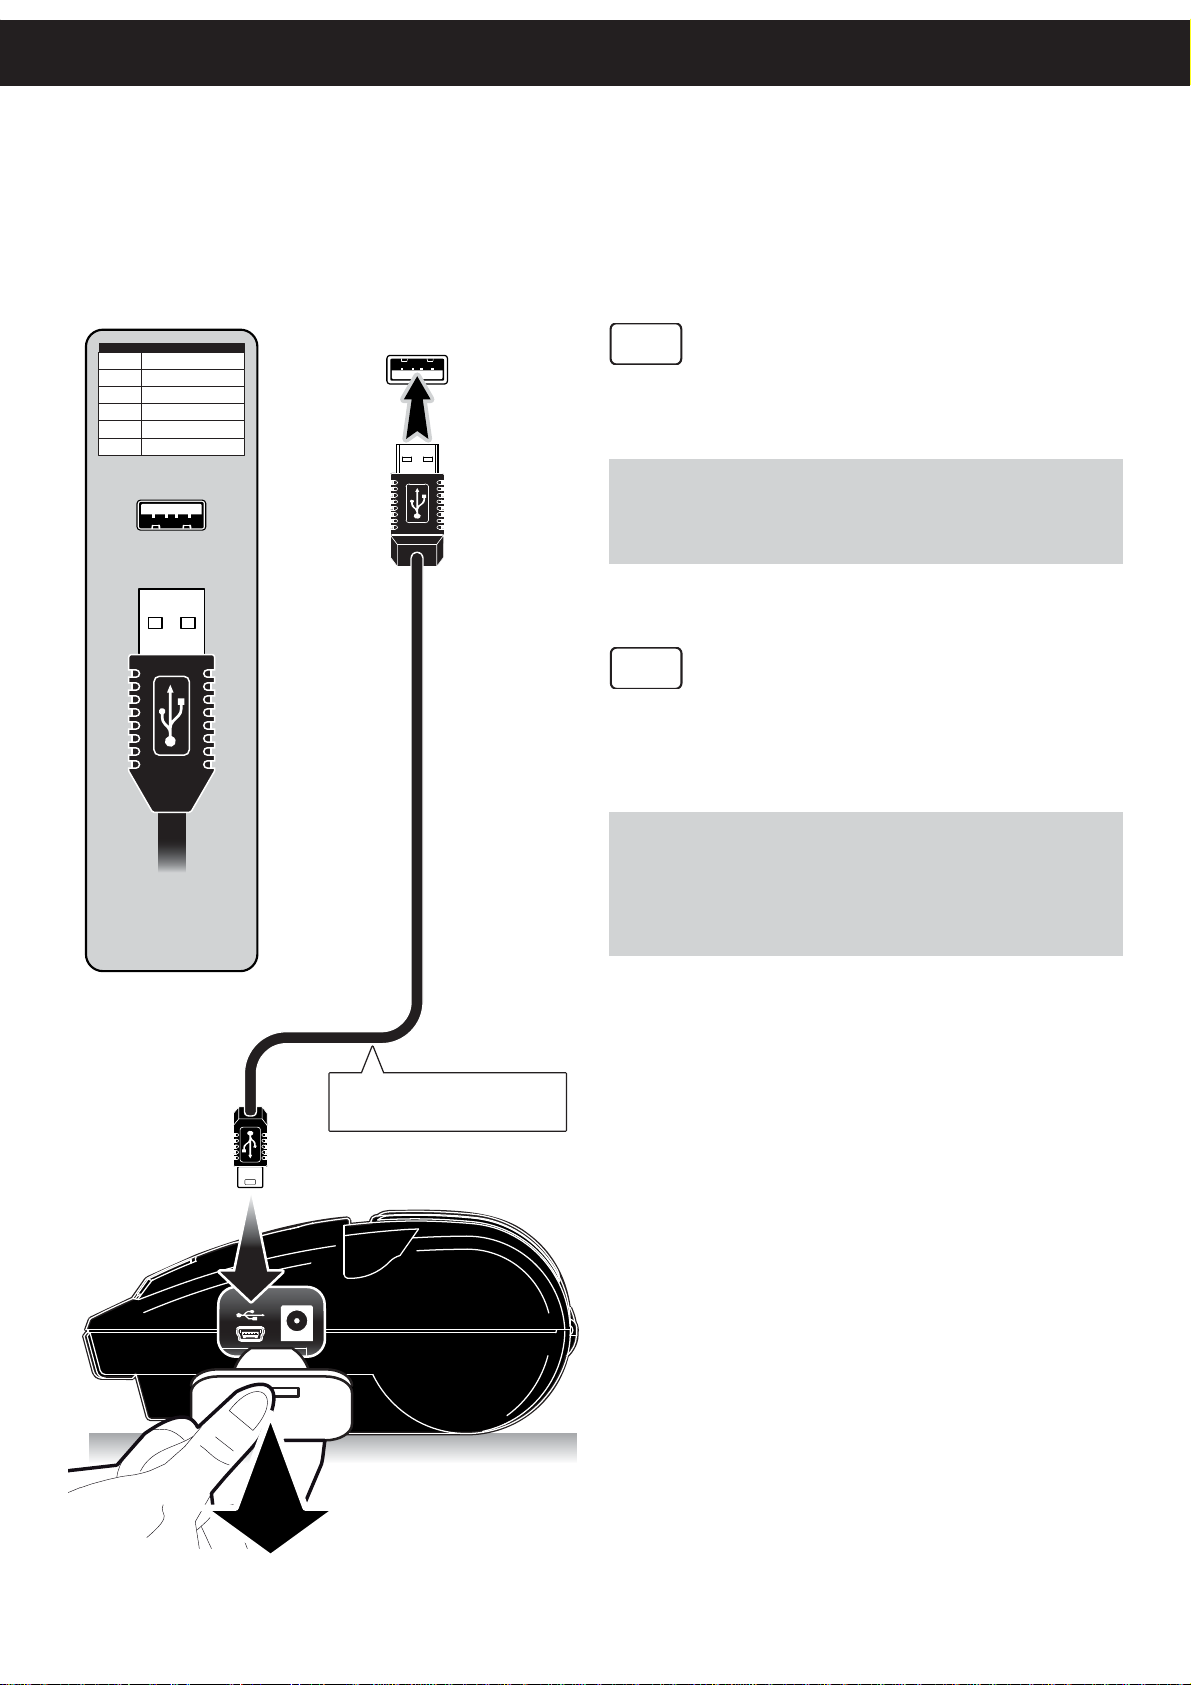
CONNECTION VIA USB
Collegamento via USB
INSTALLATION
USB STANDARD
PIN SIGNAL
1 Vbus
2 Data +
3 Data4Gnd
Shell Shield
41
USB type A
1.1 Compatible
2.0 Port
USB
GB
The USB port allows the connection of MY3 to a
PC, where you can print (ex. using a text editor).
NOTE: When using USB communication port, set USB interface from
SETUP mode.
For communication via USB you must install on PC the printer driver
available in the download area of the web site www.custom.biz.
I
La porta USB di MY3 consente il collegamento a
un PC, da cui è possibile stampare (es. mediante
un editor di testo).
NOTA:
Se si utilizza la porta di comunicazione USB occorre impostare l’interfaccia USB da SETUP.
Per la comunicazione via USB è necessario installare sul PC il driver
della stampante disponibile nell’area DOWNLOAD del sito www.custom.
biz.
STANDARD USB CABLE
Cavo USB standard
15
Page 16
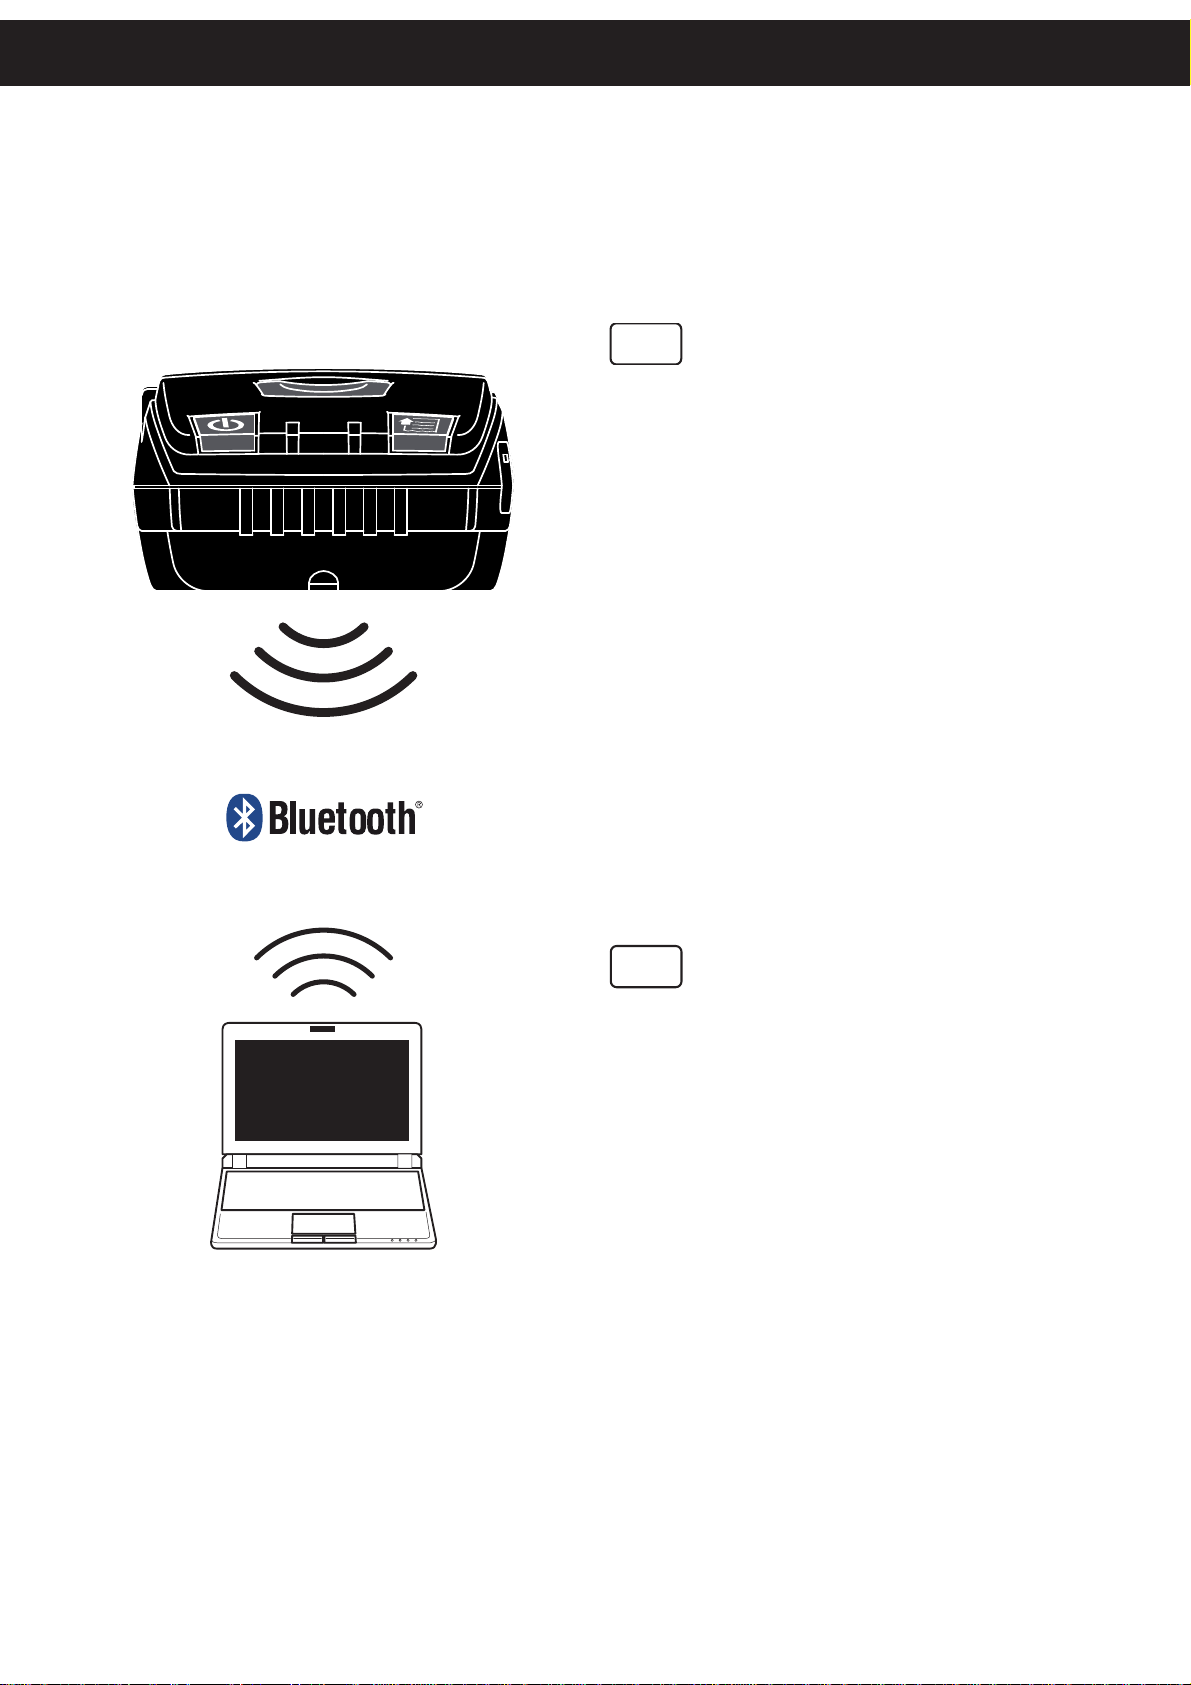
CONNECTION VIA Bluetooth
®
(model MY3-BT3B-SM)
Collegamento via Bluetooth ® (modello MY3-BT3B-SM)
MY3-BT3B-SM
GB
The bluetooth® connectivity of MY3 allows the wireless
printing from a PC (ex. using a text editor or third-part
software).
To perform the wireless printing with a device equipped with
Bluetooth ® connectivity is needed to pair with MY3.
PC Connection
Make sure that the parameter ‘Interface’ of the printer 1.
is set to Bluetooth® (see chapter SETUP) and the
printer is on.
Execute from the PC the search for Bluetooth ® devices 2.
available.
If MY3 is in the range of your PC, it is identifi ed as a 3.
Bluetooth® device MY3_ <serial number>.
Select from PC the Bluetooth® device MY3_<serial 4.
number> to set the pairing.
If necessary, enter the PIN for MY3 (0000).5.
Now you can print wireless from a PC on MY3.6.
I
La connettività bluetooth® di MY3 permette di stampare
senza fi li da un PC (es. mediante un editor di testo o sof-
tware di terze parti).
Per eseguire la stampa senza fi li da un dispositvo dotato
di connettività Bluetooth® è necessario eseguire l’associazione con My3.
Collegamento PC
Accertarsi che il parametro Interface della stampante 1.
sia impostato su Bluetooth® (vedere capitolo SETUP)
e la stampante sia accesa.
Eseguire dal PC la ricerca dei dispositivi bluetooth® 2.
disponibili.
Se My3 è nel raggio del PC, essa viene identifi cata 3.
come dispositivo Bluetooth® MY3_<numero di serie>.
Selezionare dal PC il dispositivo Bluetooth® 4.
MY3_<numero di serie> per seguire l’associazione.
Se necessario immettere il PIN che per MY3 è ’0000’.5.
Ora si può stampare dal PC senza fi li su MY3.6.
16
Page 17
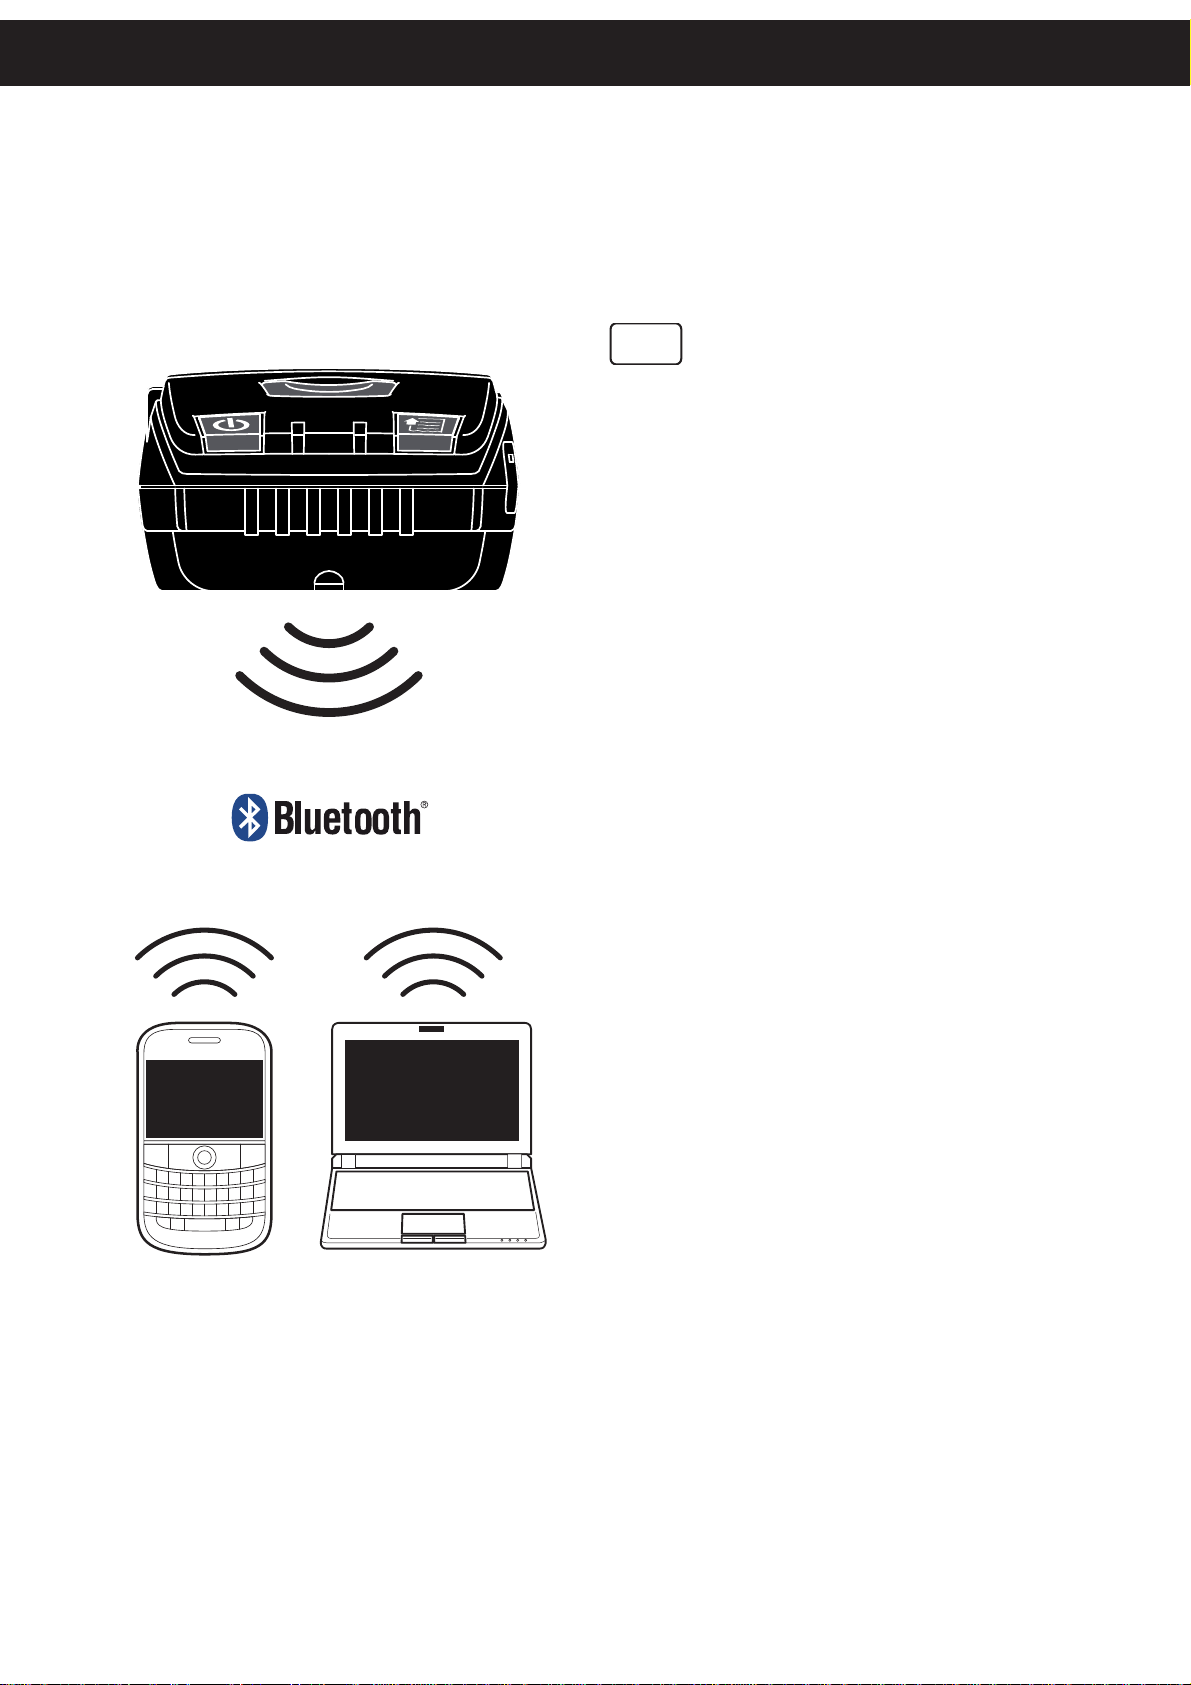
INSTALLATION
CONNECTION VIA Bluetooth
®
(model MY3-BT3B)
Collegamento via Bluetooth ® (modello MY3-BT3B)
MY3-BT3B
GB
The bluetooth® connectivity of MY3 allows the wireless printing from a PC (ex. using a text editor or third-part software),
or a Blackberry ® mobile device after having installed the
“My Printers” software specially designed for printing SMS,
MMS, phone book / addresses, calendar and notes, e-mail
and attachments.
To perform the wireless printing with a device equipped with
Bluetooth ® connectivity is needed to pair with MY3.
PC Connection
Make sure that the parameter ‘Interface’ of the printer 1.
is set to Bluetooth® (see chapter SETUP) and the
printer is on.
Execute from the PC the search for Bluetooth ® devices 2.
available.
If MY3 is in the range of your PC, it is identifi ed as a 3.
Bluetooth® device MY3.
Select from PC the Bluetooth® device MY3 to set the 4.
pairing.
If necessary, enter the PIN for MY3 (0000).5.
Now you can print wireless from a PC on MY3.6.
Tested on BlackBerry®
Curve 8300, 8310,8320
Blackberry® Connect
Install the “My Printers” software on the Blackberry® 1.
(trial version available in the download area of www.
custom.biz.).
If you have a trial version and you want to enable the 2.
license, enter the activation code of the software (contact your dealer).
Make sure that the parameter ‘Interface’ of the printer 1.
is set to Bluetooth® (see chapter SETUP) and the
printer is on.
Launch the “My Printers” software on the BlackBer-2.
ry®.
Select MENU > Add Device to start the search for MY3 3.
printers.
If MY3 is in the range of your Blackberry®, it is identifi ed 4.
as a Bluetooth® device MY3.
Select from your Blackberry® the Bluetooth® device 5.
MY3 to set the pairing.
If necessary, enter the PIN for MY3 (0000).6.
Now you can print wireless from your mobile device 7.
on MY3.
17
Page 18
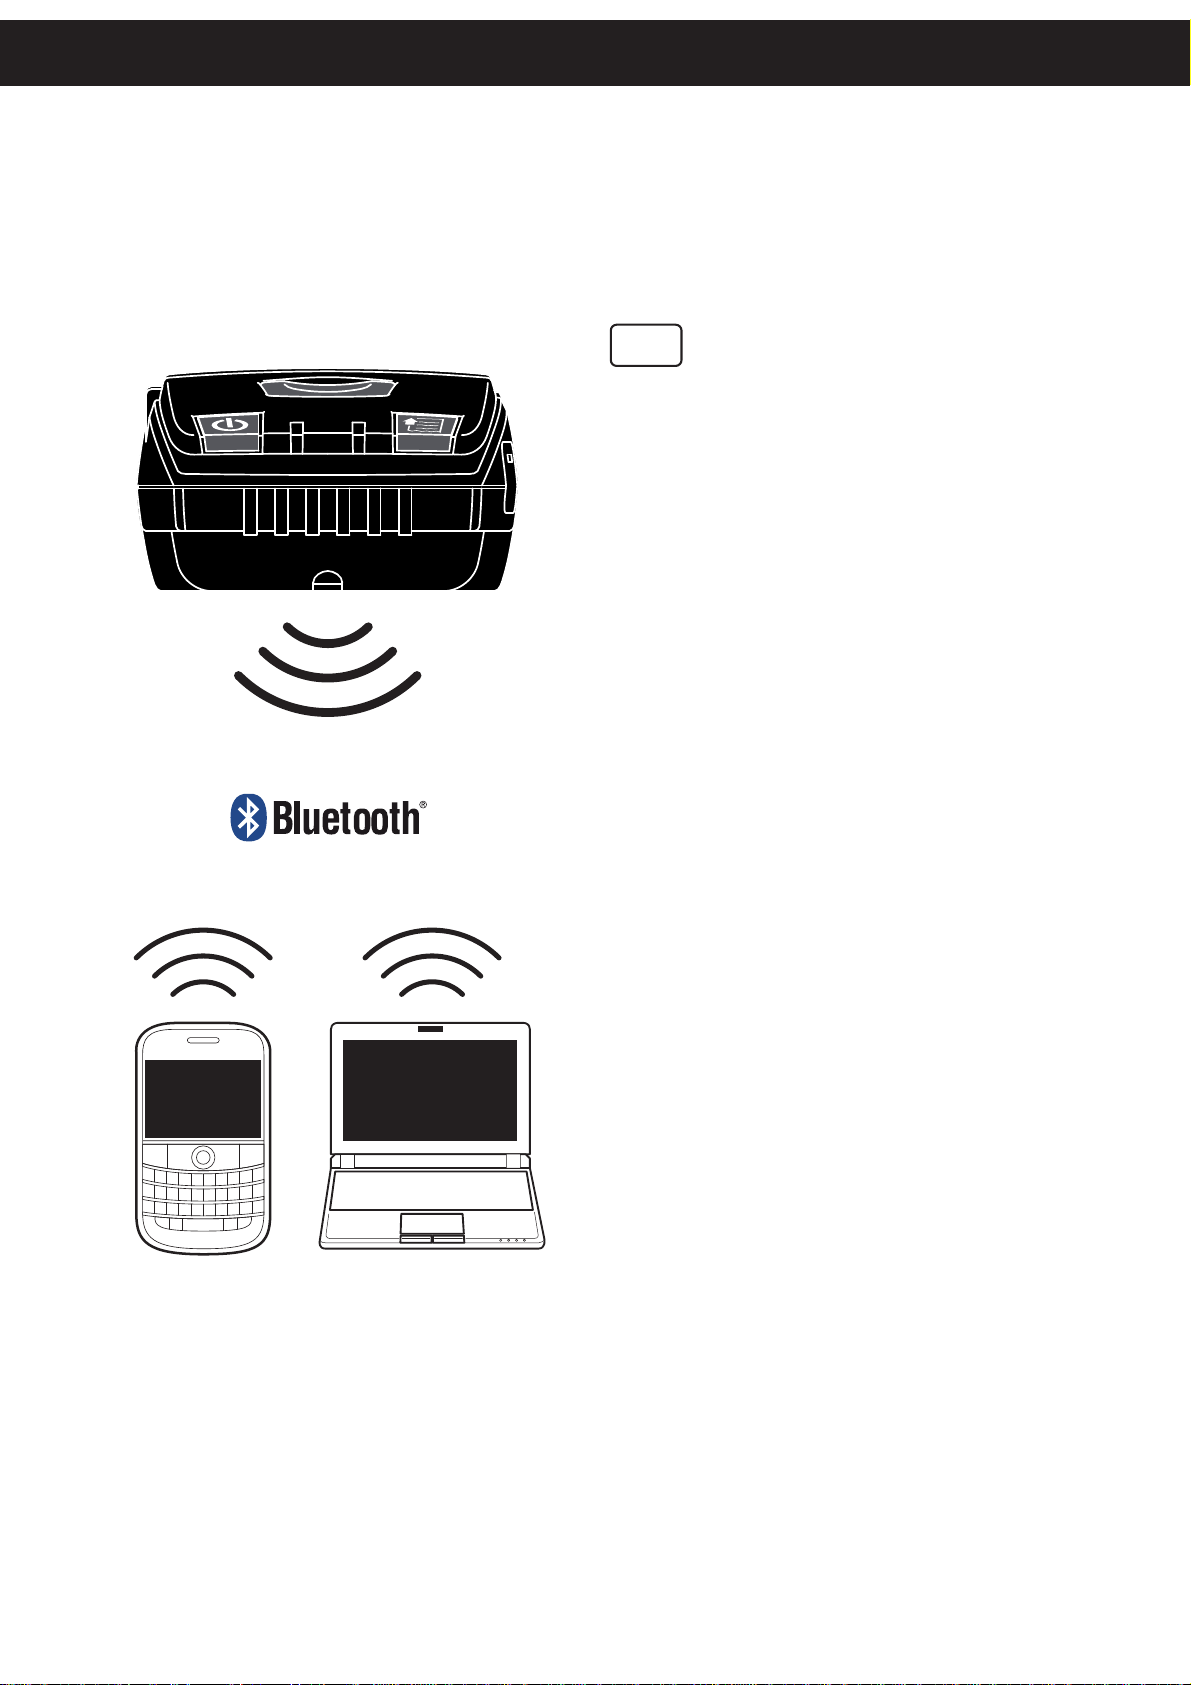
MY3-BT3B
I
La connettività bluetooth® di MY3 permette di stampare senza fi li da un PC (es. mediante un editor di testo o
software di terze parti) oppure da un dispositivo mobile
BLACKBERRY® dopo aver installato l’applicazione “MY
PRINTERS” appositamente progettata per la stampa di
SMS, MMS, Rubrica telefonica/indirizzi, Agenda Impegni e
note, Email e allegati.
Per eseguire la stampa senza fi li da un dispositvo dotato
di connettività Bluetooth® è necessario eseguire l’associazione con My3.
Collegamento PC
Accertarsi che il parametro Interface della stampante 1.
sia impostato su Bluetooth® (vedere capitolo SETUP)
e la stampante sia accesa.
Eseguire dal PC la ricerca dei dispositivi bluetooth® 2.
disponibili.
Se My3 è nel raggio del PC, essa viene identifi cata 3.
come dispositivo Bluetooth® MY3.
Selezionare dal PC il dispositivo Bluetooth® MY3 per 4.
seguire l’associazione.
Se necessario immettere il PIN che per MY3 è ’0000’.5.
Ora si può stampare dal PC senza fi li su MY3.6.
Tested on BlackBerry®
Curve 8300, 8310,8320
Collegamento BLACKBERRY®
Installare l’applicazione “MY PRINTERS” sul BLACK-1.
BERRY® (versione di prova disponibile nell’area
DOWNLOAD del sito www.custom.biz.).
Se si possiede una versione di prova e si desidera 2.
abilitare la licenza, inserire il codice di attivazione del
software (contattare il vostro rivenditore).
Accertarsi che il parametro Interface della stampante 1.
sia impostato su Bluetooth® (vedere capitolo SETUP)
e la stampante sia accesa.
Lanciare l’applicazione “MY PRINTERS” su BLACK-2.
BERRY®.
Selezionare la voce MENU > ADD DEVICE per iniziare 3.
la ricerca di stampanti MY3.
Se MY3 è nel raggio di portata di BLACKBERRY®, essa 4.
viene identifi cata come dispositivo Bluetooth® MY3.
Selezionare da BLACKBERRY® il dispositivo Blueto-5.
oth® MY3 per seguire l’associazione.
Se necessario immettere il PIN per MY3 (0000).6.
Ora si puoi stampare da BLACKBERRY® senza fi li su 7.
MY3.
18
Page 19
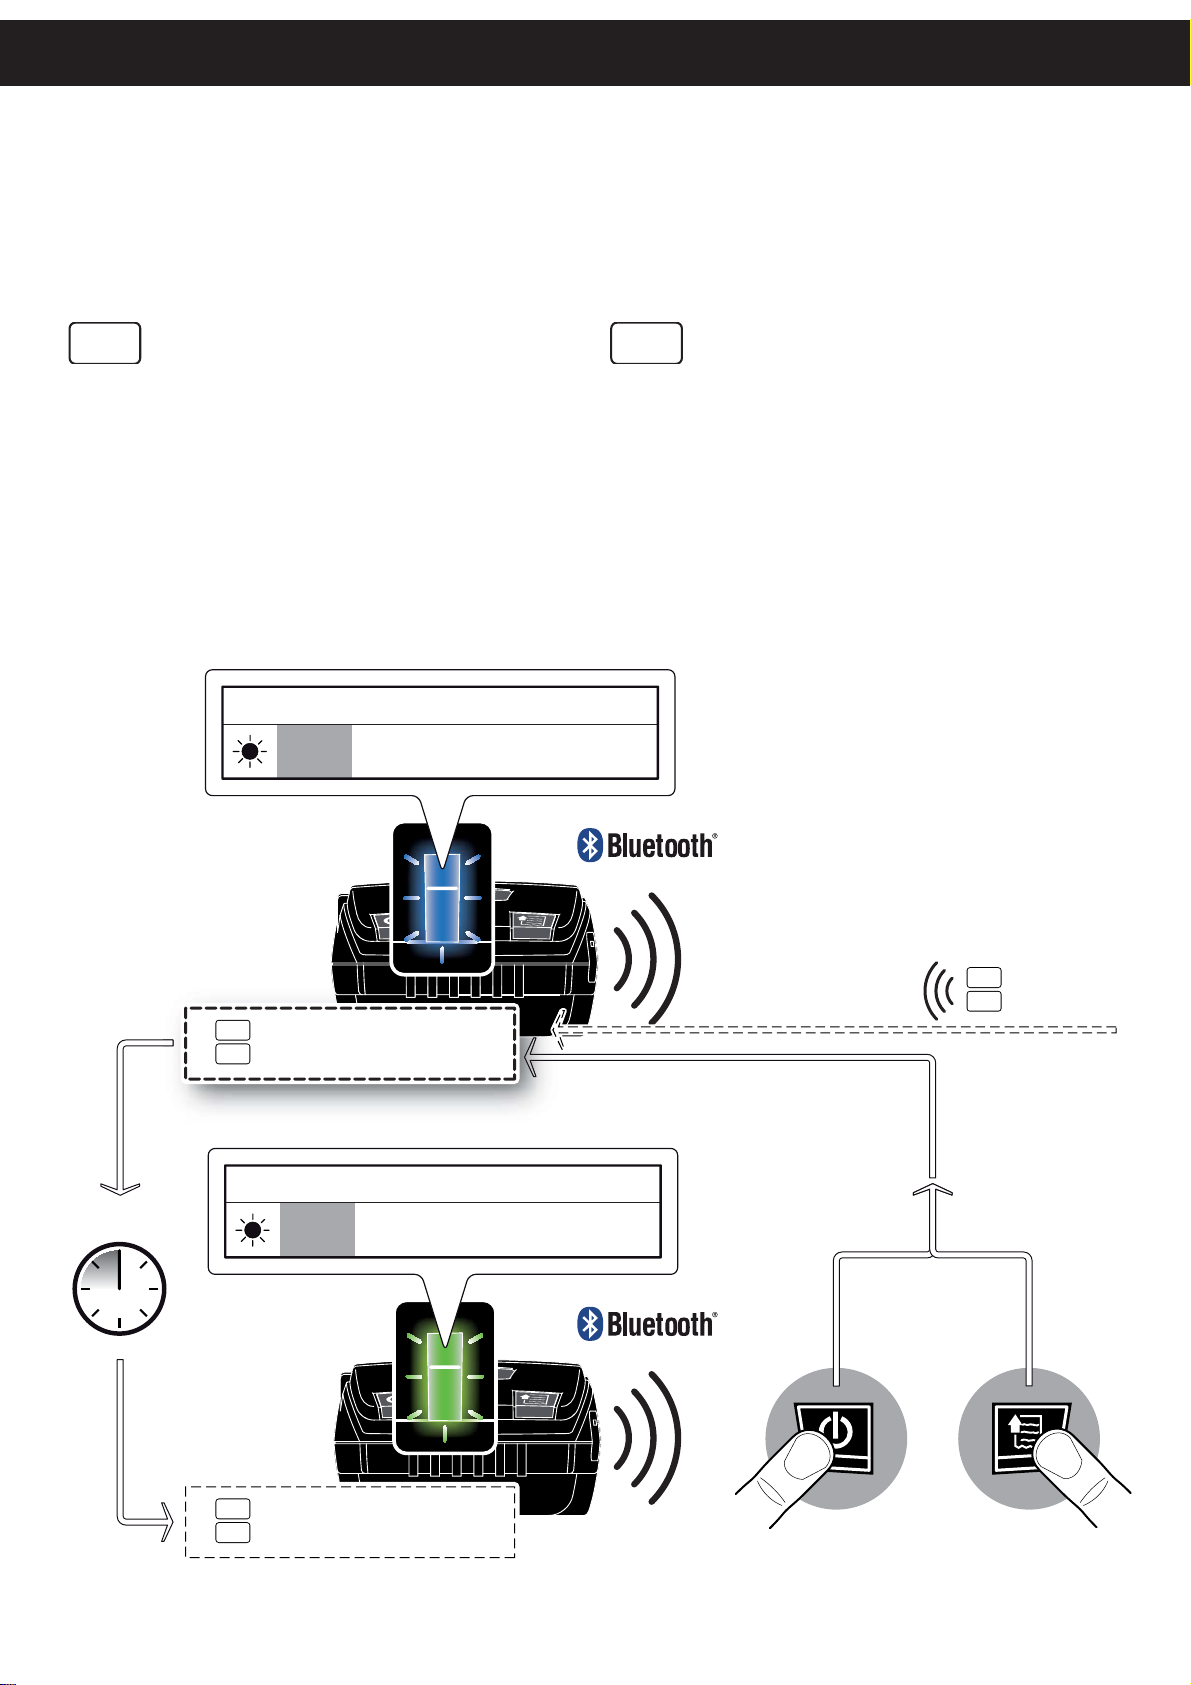
LOW-POWER MODE
Modalità basso consumo
INSTALLATION
GB
The low-power mode allows the printer to save energy and
increase the battery life when operating in Bluetooth®.
The low-power mode is automatically enabled after 5 minutes of printer inactivity. To terminate the low-power mode
and return to operative mode press the FEED or ON / OFF
key.
The printer automatically returns to operative mode when
it receives a print command.
DESCRIPTIONLED DESCRIZIONE
BLUE
BLU
(Bluetooth®)
PRINTER ON:
STANDBY
(Bluetooth®)
STAMP ANTE ACCESA:
STANDBY
I
La modalità basso consumo permette alla stampante di
risparmiare energia ed aumentare l’autonomia della batteria
quando si opera in modalità bluetooth®.
La modalità basso consumo si abilita automaticamente
dopo 5 minuti di inattività della stampante. Per terminare la
modalità basso consumo e tornare alla modalità operativa
premere il tasto FEED oppure il tasto ON/OFF.
La stampante torna automaticamente alla modalità operativa
quando riceve un comando di stampa.
5 min.
GB
Operative mode
I
Modalità operativa
DESCRIPTIONLED DESCRIZIONE
GREEN
VERDE
GB
Low-power mode
I
Modalità basso consumo
(Bluetooth®)
LOW-POWER
MODE
(Bluetooth®)
MODALITÀ
BASSO CONSUMO
OR
Printing command
GB
I
Comando di stampa
19
Page 20

20
Page 21
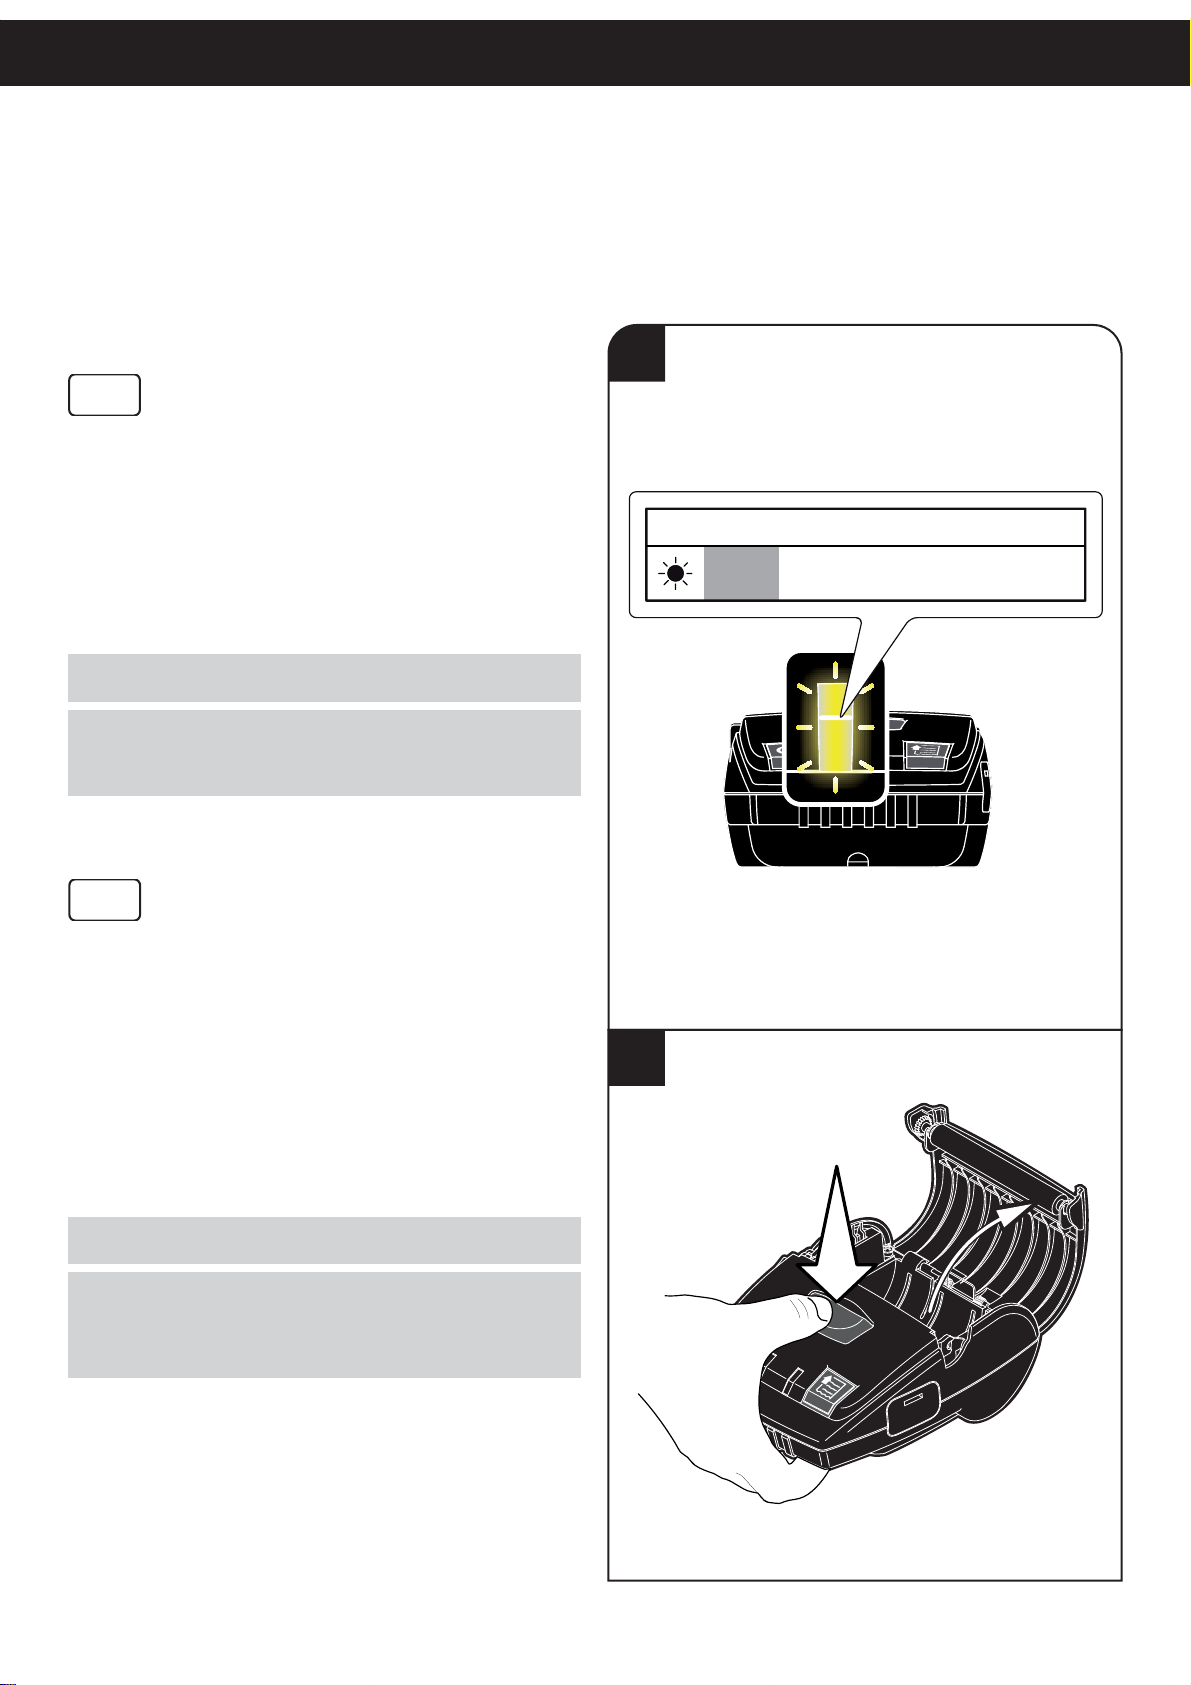
PAPER ROLL INSERTION
Inserimento rotolo carta
GB
To change the paper roll, proceed as follows:
Press the centre button to open the paper 1.
compartment cover.
Insert the paper roll, following the rotation 2.
direction indicated.
Press the centre button and close the lid. The 3.
is printer ready to print.
1
LED
YELLOW
GIALLO
MAINTENANCE
DESCRIPTION DESCRIZIONE
FINE CARTAPAPER END
NOTE:
Respect the paper specifi cations.
NOTE:
Inspect inside the printer every paper change, and verify that there aren’t
paper off-cuts on the cutter compartment; if this event happens remove
the paper off-cuts before execute any other operation with tweezers.
I
Per cambiare il rotolo di carta procedere nel seguente modo:
Premere il pulsante centrale per aprire il co-1.
perchio vano carta.
Inserire il rotolo carta rispettando il verso di 2.
rotazione indicato.
Premere il pulsante centrale e chiudere il 3.
coperchio. La stampante è pronta per stampare.
NOTE:
Rispettare le specifi che della carta.
2
NOTA:
Ad ogni cambio carta ispezionare l’interno della stampante e verifi care
che non vi siano ritagli di carta nel vano cutter; nel caso si verifi chi que-
sta condizione rimuoverli, utilizzando una pinzetta, prima di effettuare
qualsiasi altra operazione.
21
Page 22
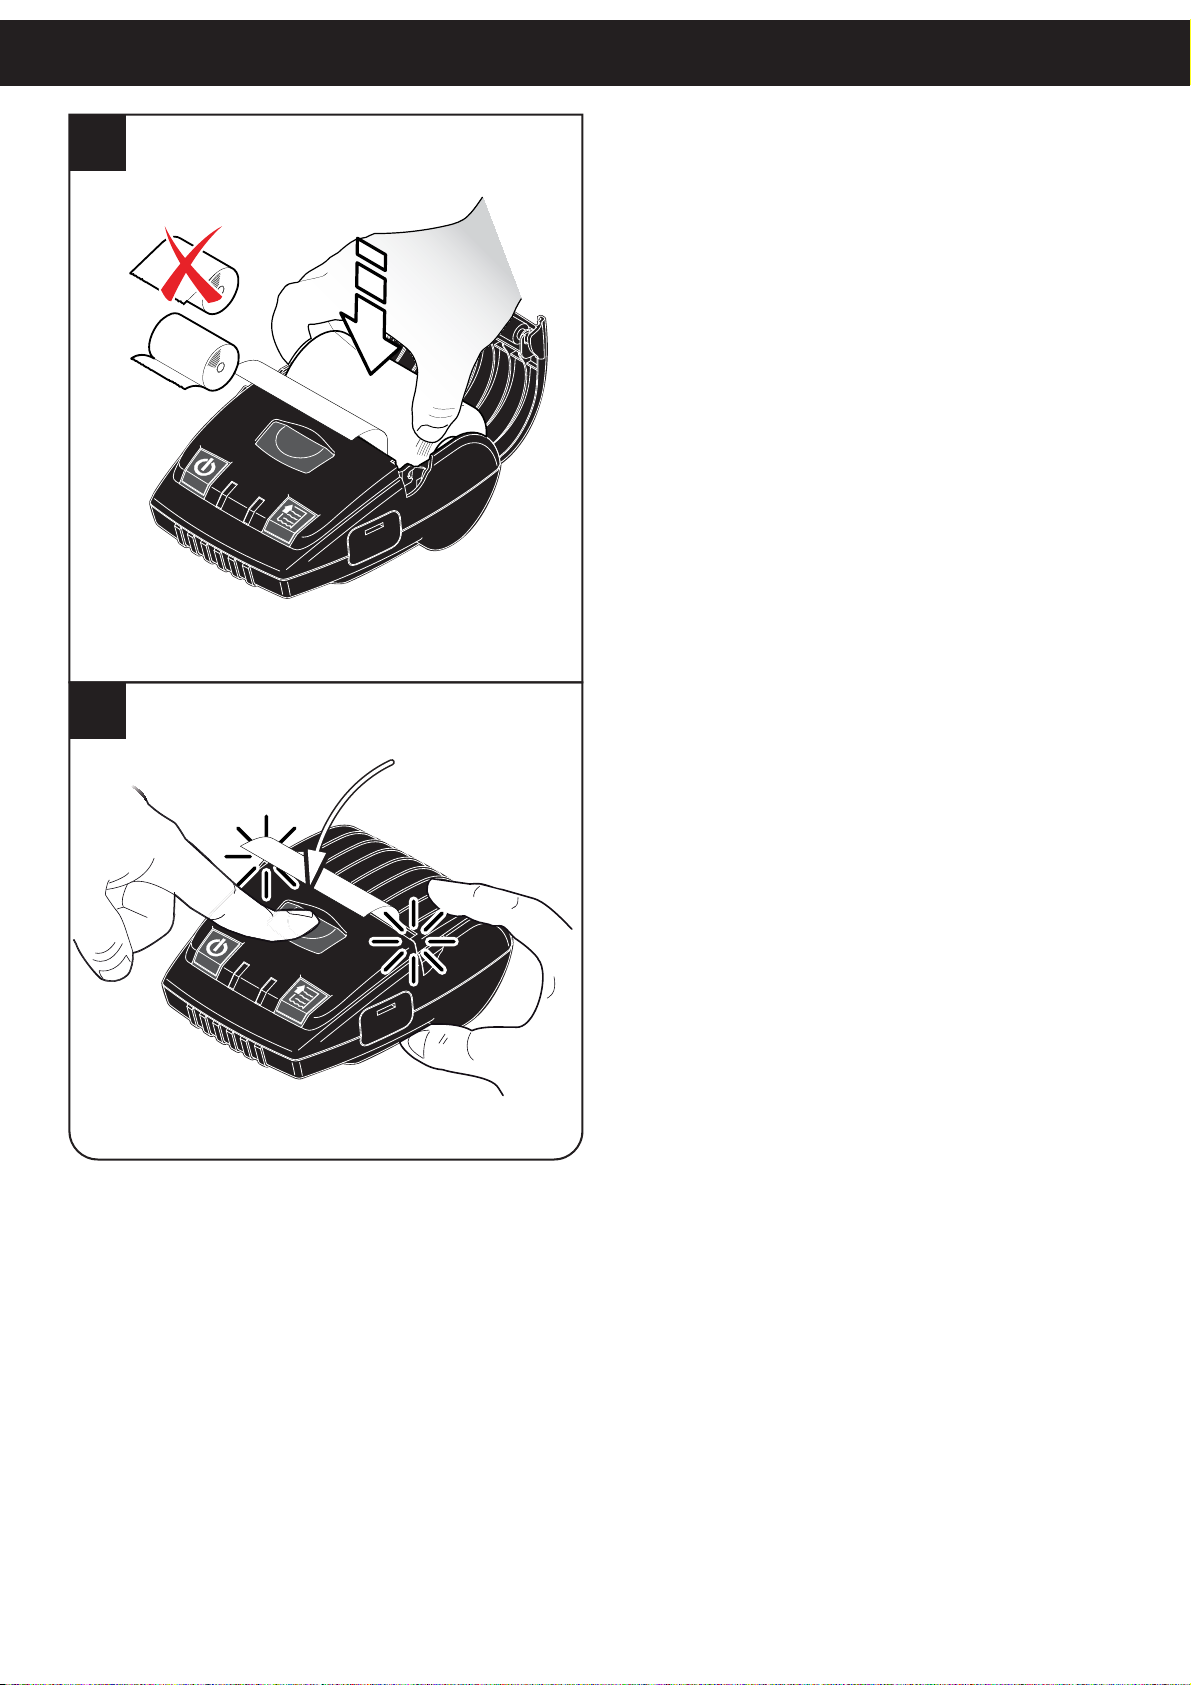
3
4
22
Page 23
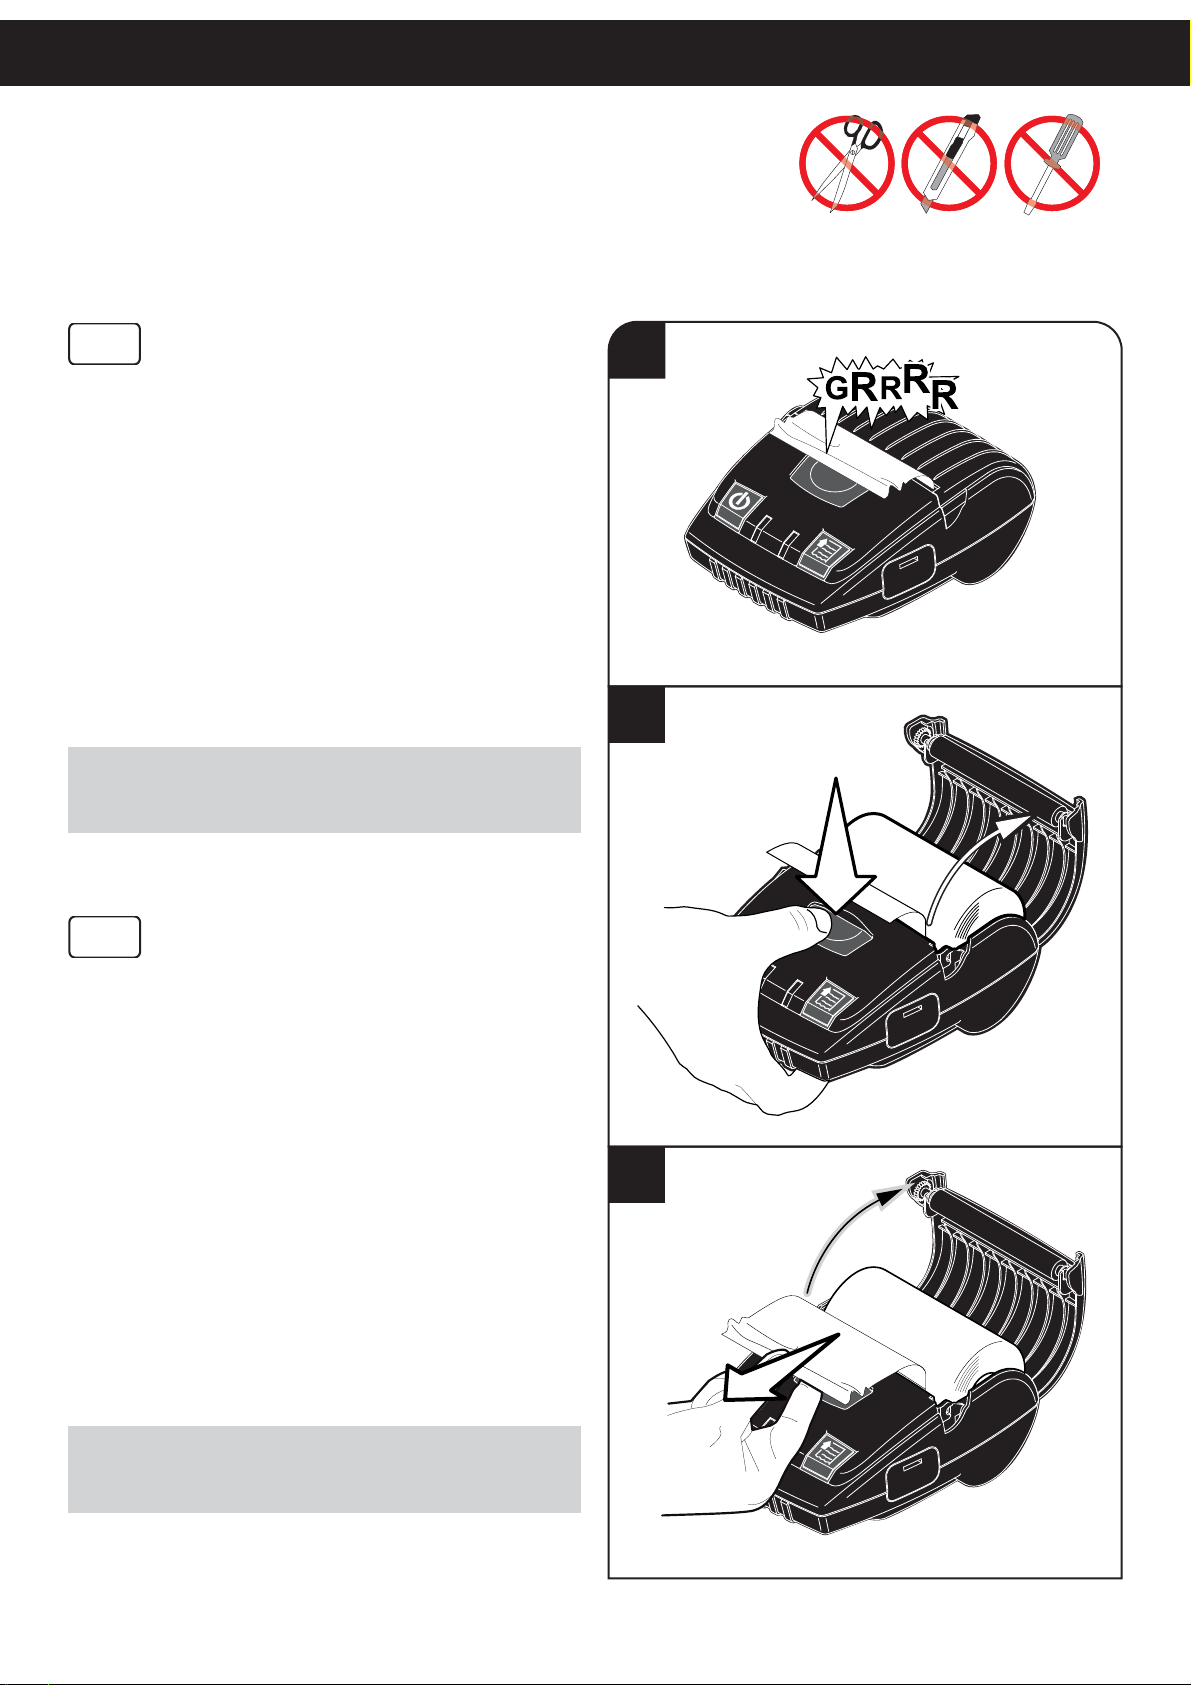
PAPER JAM
Inceppamento carta
MAINTENANCE
GB
In case of paper jam, proceed as follows:
Press the centre button to open the paper 1.
compartment cover.
Lift the damaged paper, check and remove 2.
possible scraps of paper.
Pull the paper in order to have the damaged 3.
part outside the printer.
Press the centre button and close the lid. The 4.
printer is ready to print.
If the problem persists, please contact the customer service.
ATTENTION:
In case of paper jam do not operate over the printer with any kind
of instruments, like scissors, screwdriver, cutter, etc. etc., on any
account.
1
2
I
In caso di inceppamento della carta, procedere
nel seguente modo:
Premere il pulsante centrale per aprire il co-1.
perchio vano carta.
Sollevare la carta danneggiata, verifi care ed 2.
eliminare eventuali residui di carta.
Tirare la carta in modo che la parte danneggia-3.
ta rimanga all’esterno della stampante.
Premere il pulsante centrale e chiudere il 4.
coperchio. La stampante è pronta per stampare.
Se il problema non si risolve contattare il servizio
assistenza tecnica.
ATTENZIONE:
In caso di inceppamento, non agire assolutamente sulla stampante con nessun tipo di strumento, come forbici, cacciaviti, cutter,
ecc. ecc.
3
23
Page 24
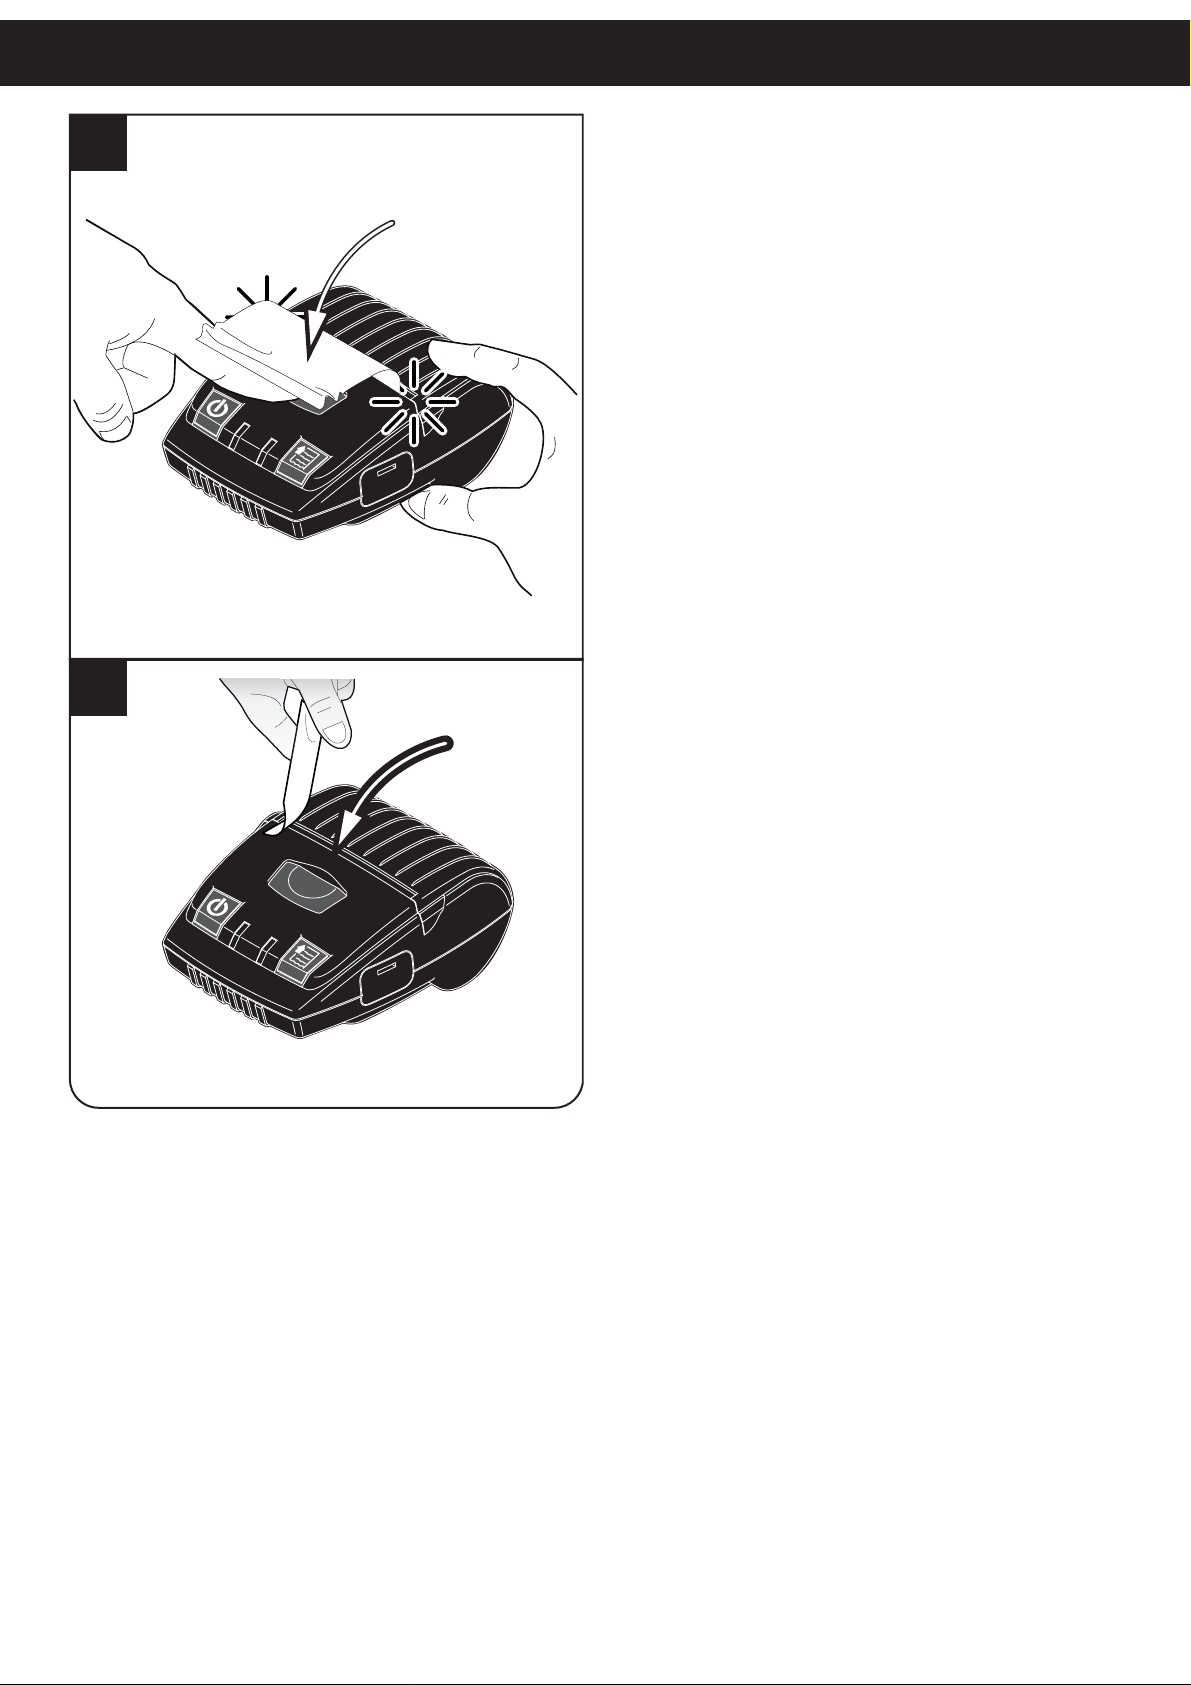
4
5
24
Page 25
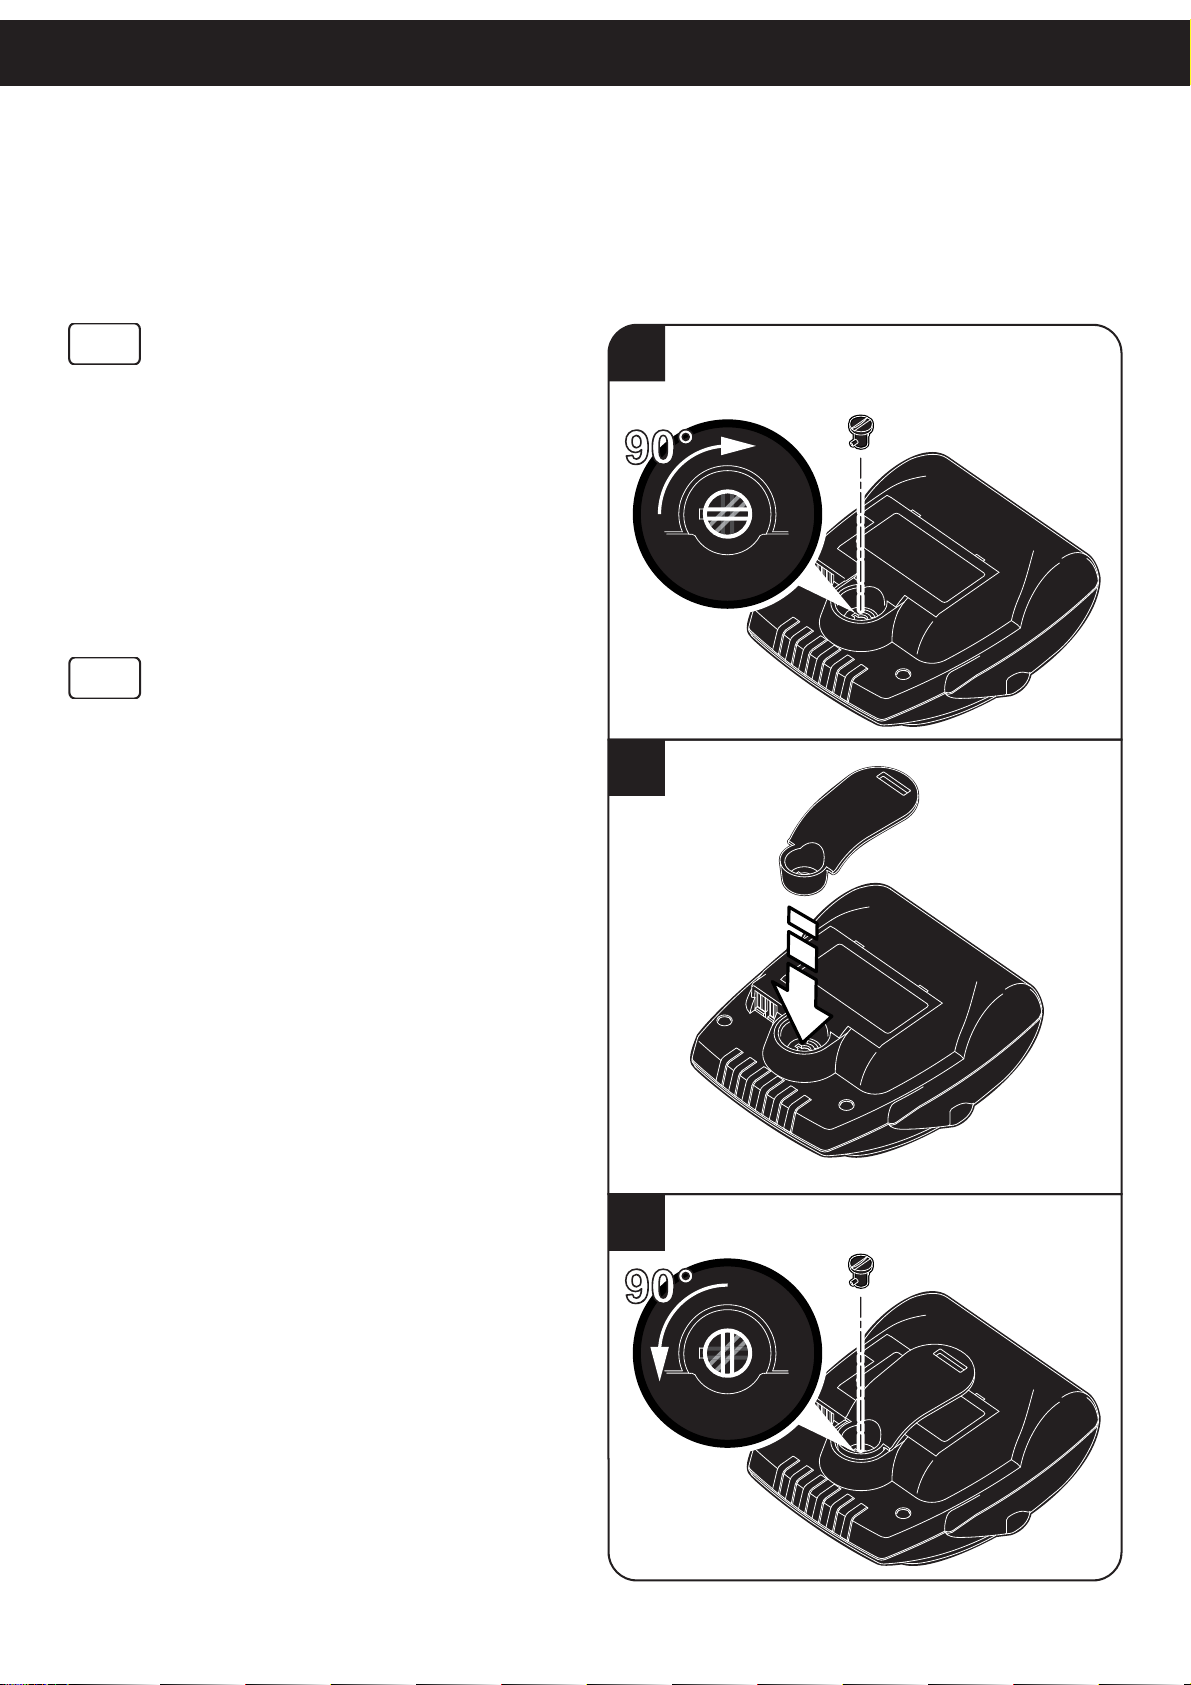
BELT CLIP
Gancio cintura
MAINTENANCE
GB
To mount the belt clip, proceed as follows:
Turn the screw in a horizontal position and 1.
remove it.
Insert the belt clip as shown.2.
Insert the screw and turn it in a vertical position 3.
to secure the belt hook.
I
Per montare il gancio cintura procedere come
segue:
Ruotare la vite in posizione orizzontale e ri-1.
muoverla.
Inserire il gancio cintura come indicato in 2.
fi gura.
Inserire la vite e ruotarla in posizione verticale 3.
per fi ssare il gancio cintura.
1
2
25
3
Page 26
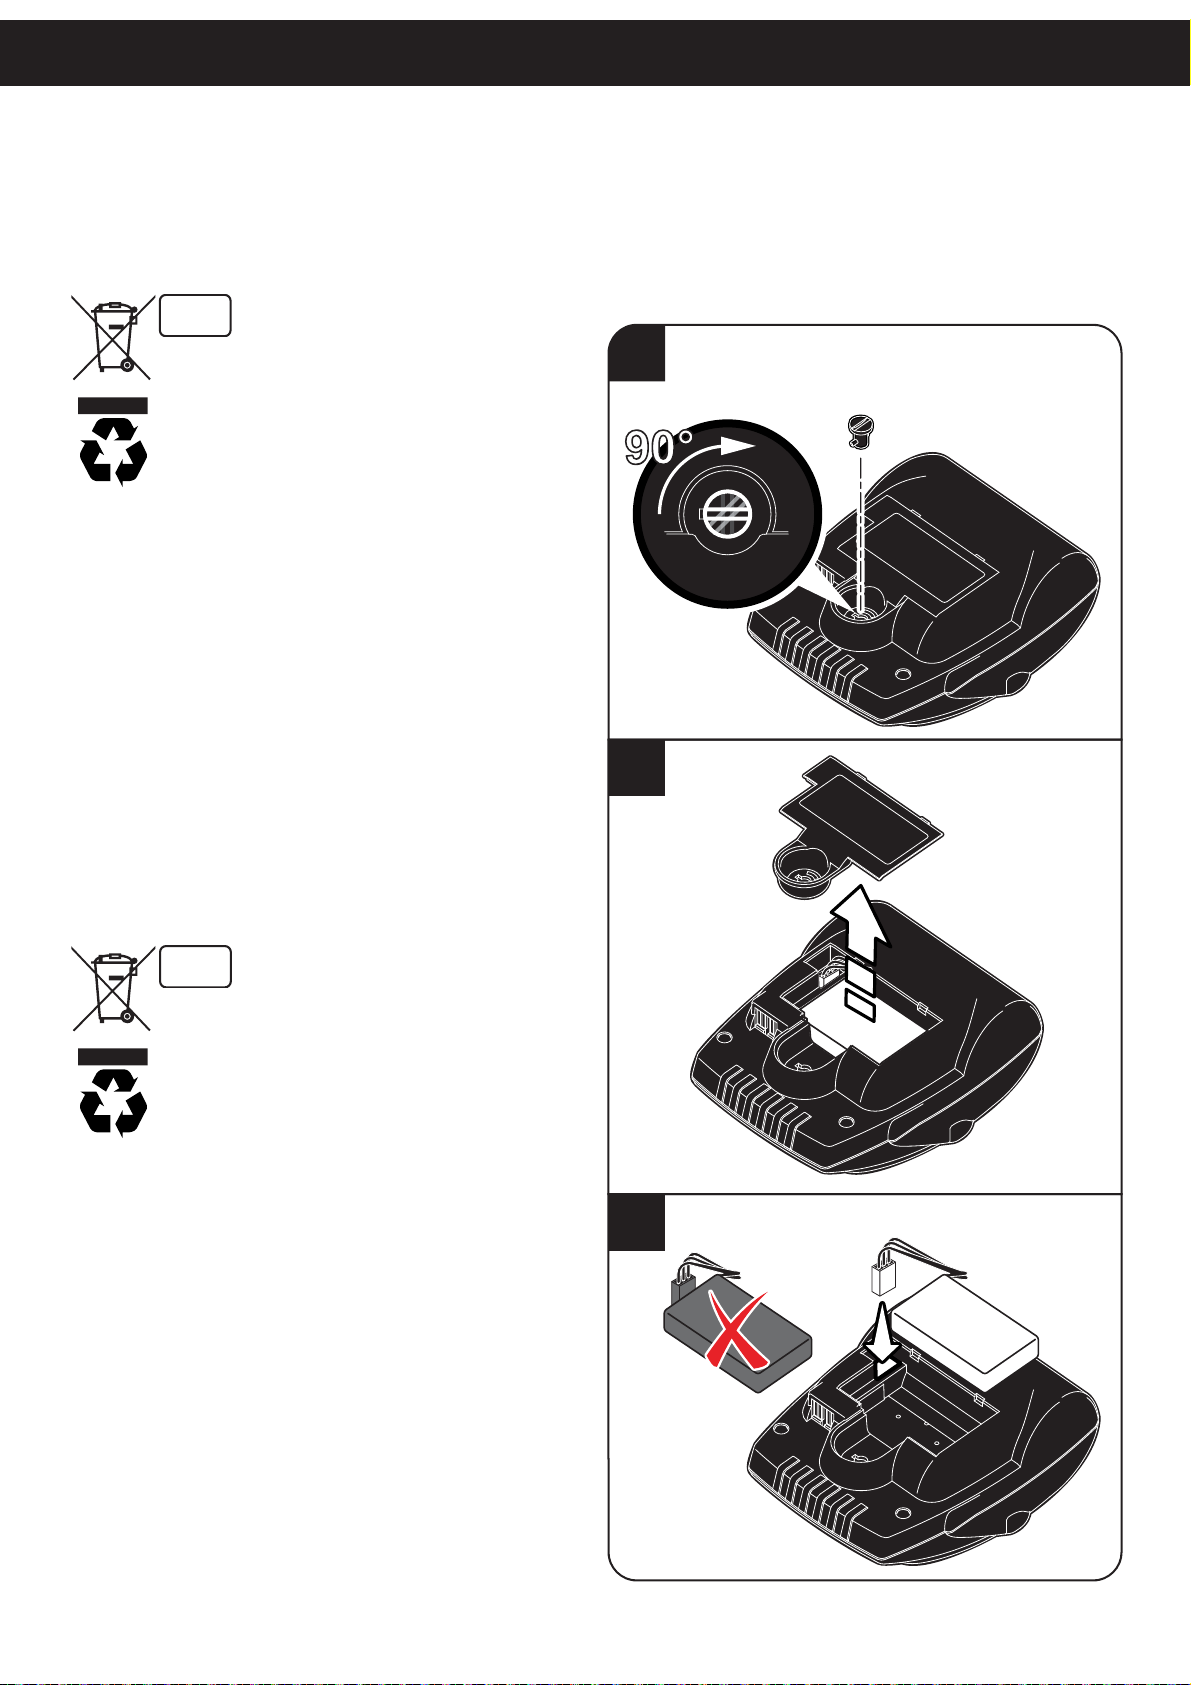
BATTERY PACK
Pacco batterie
GB
The crossed-out wheeled bin symbol indicates that the •
disposing of batteries must not be run through the normal
cycle of waste disposal.
Batteries must be recycled or disposed of properly.•
Do not throw batteries away as part of normal refuse •
disposal.
Do no throw batteries into open fl ame!•
Please note that the new NiMH battery reaches maximum per-•
formance levels only after having been completely discharged
and recharged at least two or three times.
Never use battery re-chargers and/or batteries that are dam-•
aged or worn.
Battery life varies greatly depending, for example, on print •
density and the text to be printed.
Re-charge times vary depending on depletion levels, type of •
battery and battery re-charger used. Batteries may be recharged
and discharged hundreds of times, but they do wear out over
time. When battery life (both print and stand-by) is noticeably
shorter than usual, it is time to buy a new battery.
Only utilize batteries that conform to specifi cations and only •
recharge them using battery re-chargers approved by CUSTOM
ENGINEERING SPA.
When the battery re-charger is not in use, unplug it from the •
electrical mains. If not used, even a completely-charged battery
will automatically discharge over time.
NiMH batteries last longer if you remember to completely dis-•
charge them every so often.
Extreme temperatures can affect battery charge levels leave •
them to cool or warm as required.
1
2
I
Il simbolo del bidone barrato sta ad indicare che lo smalti-•
mento delle batterienon deve essere eseguito attraverso il
normale ciclo di smaltimento dei rifi uti.
È necessario riciclare le batterie o disfarsene in modo •
appropriato.
Non gettare le batterie nei rifi uti urbani.•
Non gettare le batterie nel fuoco !•
Si noti che una nuova batteria NiMH raggiunge il massimo •
delle prestazioni solo dopo essere stata scaricata e ricaricata
completamente almeno due o tre volte.
Non utilizzare mai caricabatterie e/o batterie che risultino dan-•
neggiati o usurati.
L’autonomia della batteria varia considerevolmente, ad esempio, •
in base all’intensità della stampa e con il testo da stampare.
I tempi di carica variano a seconda del livello di carica, del tipo •
di batteria e di carica-batterie utilizzato. La batteria può essere
caricata e scaricata centinaia di volte ma con l’uso si esaurisce. Quando l’autonomia (sia in stampa che in attesa) risulta
notevolmente ridotta rispetto al normale, è giunto il momento
di acquistare una nuova batteria.
Utilizzare solo batterie conformi alle specifi che e ricaricarle •
usando esclusivamente i caricabatterie approvati dalla CUSTOM
ENGINEERING SPA.
Quando il caricabatterie non viene usato, scollegarlo dalla presa •
di corrente. Se non utilizzata, una batteria anche completamente
carica si scarica automaticamente con il tempo.
Le batterie NiMH durano più a lungo se, di tanto in tanto, si ha •
l’accortezza di scaricarle completamente.
Temperature estreme possono incidere sulla capacità di carica •
della batteria :lasciarla raffreddare o riscaldare, a seconda
dei casi.
3
26
Page 27
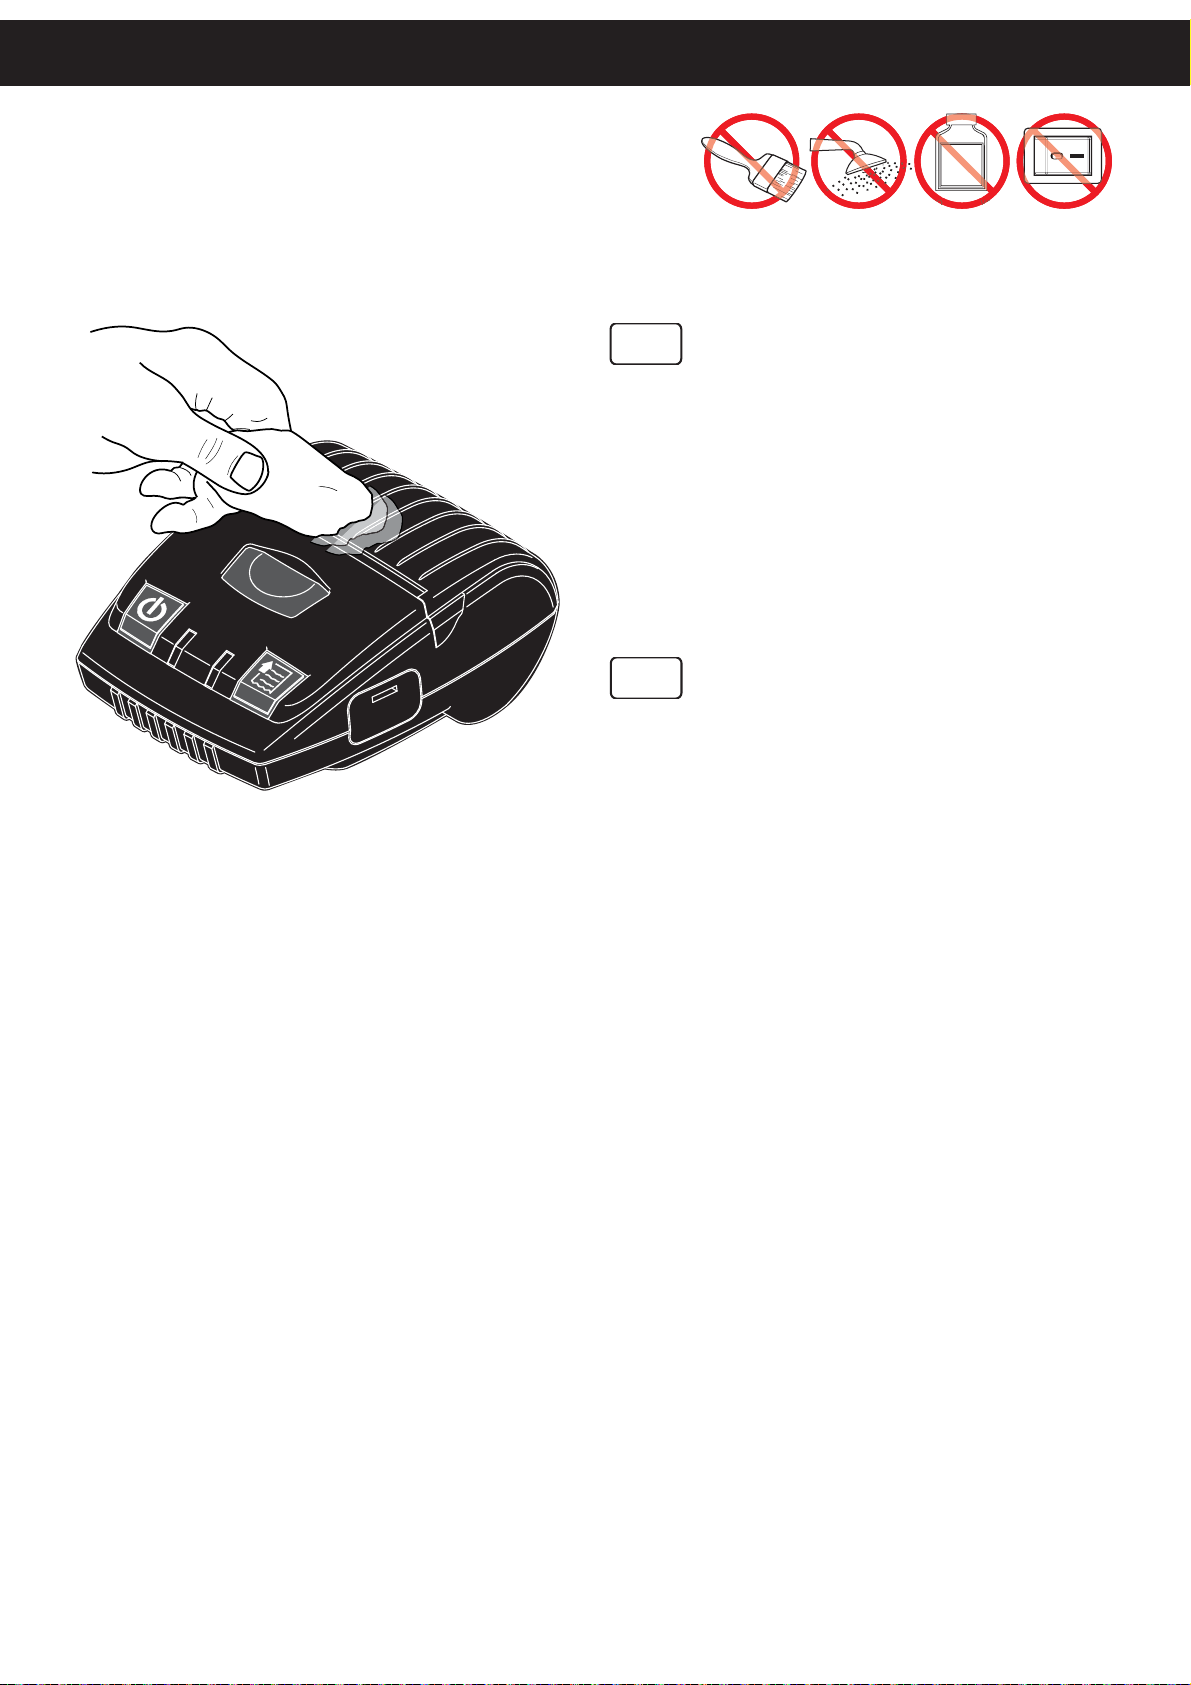
OUTSIDE CLEANING
cohol, solve
MAINTENANCE
Pulizia esterna
Alcohol, solvent
GB
To clean the machine, use pneumatic air or soft
cloth. First remove the mains plug from the wall
socket.
Do not use alcohol, solvents, or hard brushes.
Do not let water or other liquids get inside the
machine.
I
Per pulire la macchina, utilizzare aria compressa
o un panno morbido. Prima di ogni operazione,
scollegare il cavo di alimentazione elettrica dalla
presa di rete. Non utilizzare alcol, solventi o spazzole dure. Assicurarsi che acqua o altri liquidi non
penetrino all’interno della stampante.
ON
27
Page 28
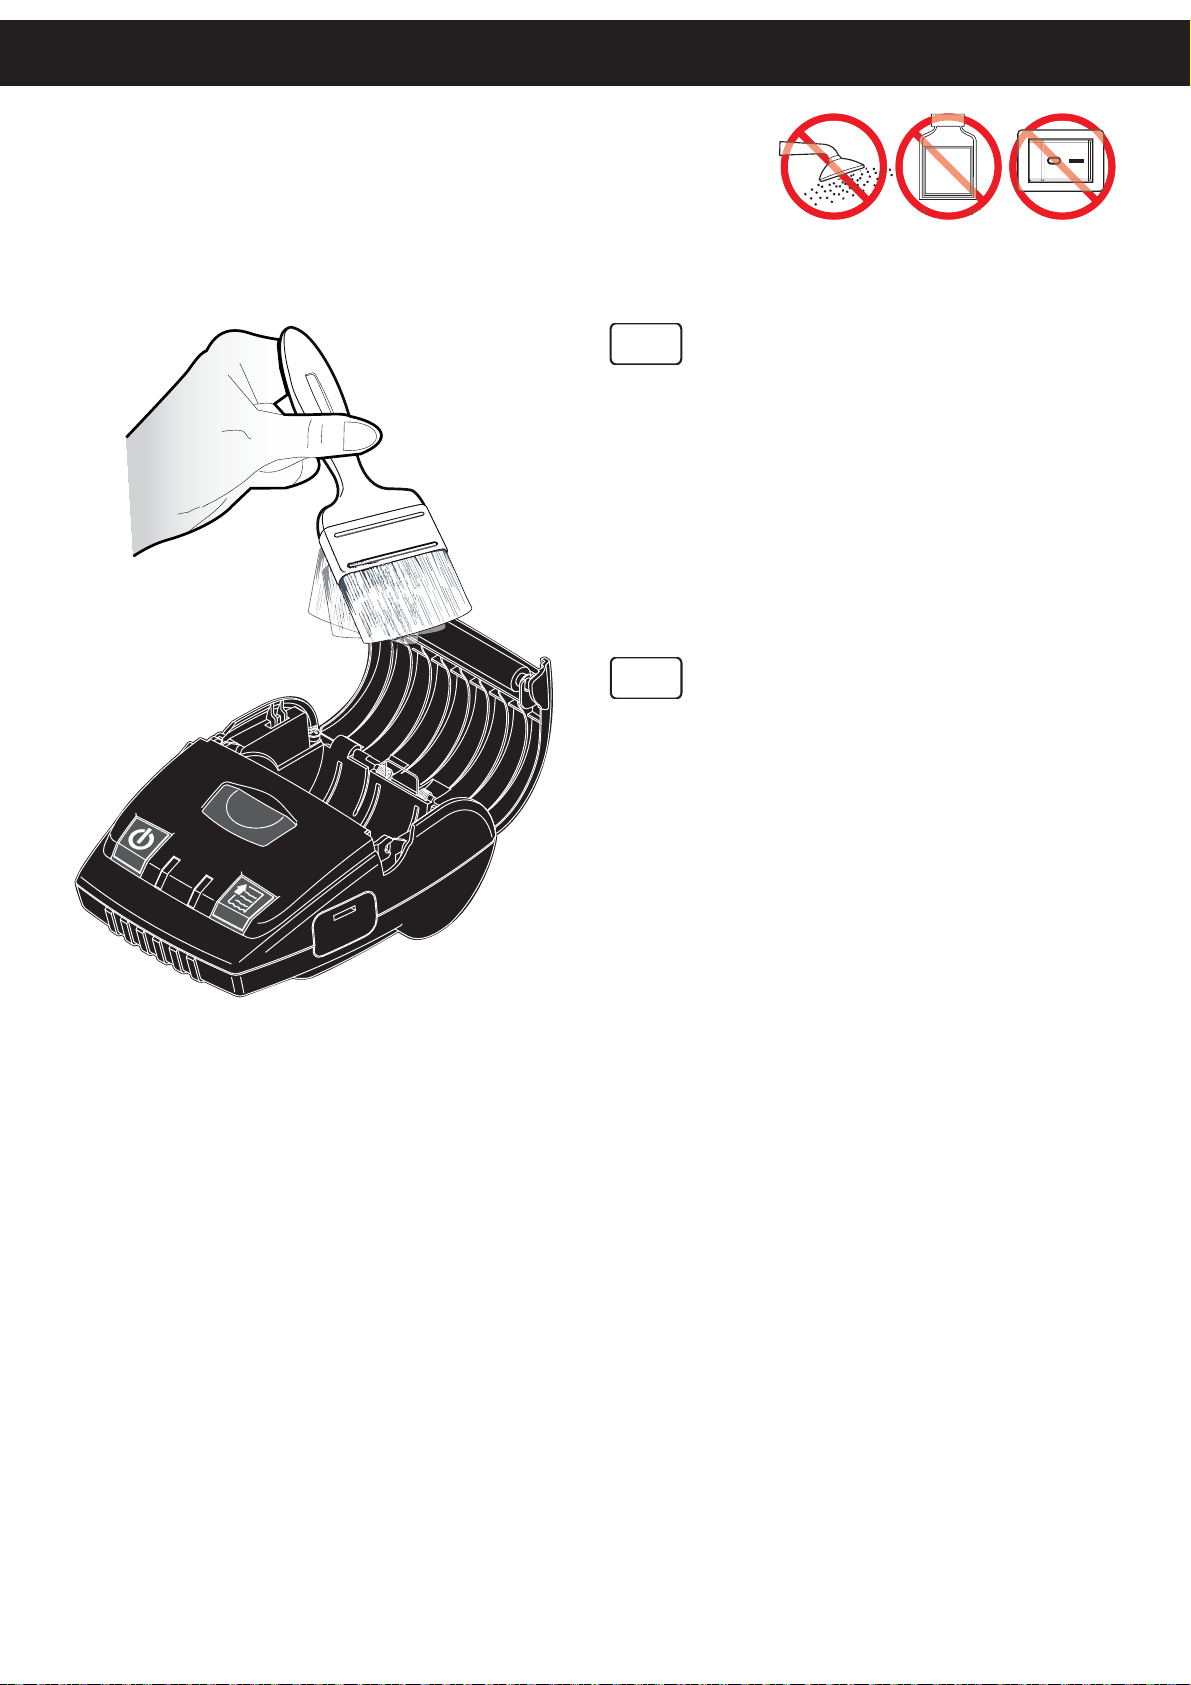
RUBBED ROLLER CLEANING
cohol, solve
Pulizia del rullo gommato
Alcohol, solvent
ON
GB
To clean the roller, use a a medium-stiff brush
to avoid them being scratched. First remove the
mains plug from the wall socket. Do not use alcohol or solvents. Do not let water or other liquids
get inside the machine.
I
Per pulire il rullo, utilizzare una spazzola con
setole semi-rigide in modo da non segnare la
superfi cie. Prima di ogni operazione, scollegare
il cavo di alimentazione elettrica dalla presa di
rete. Non utilizzare alcol o solventi. Assicurarsi
che acqua o altri liquidi non penetrino all’interno
della stampante.
28
Page 29
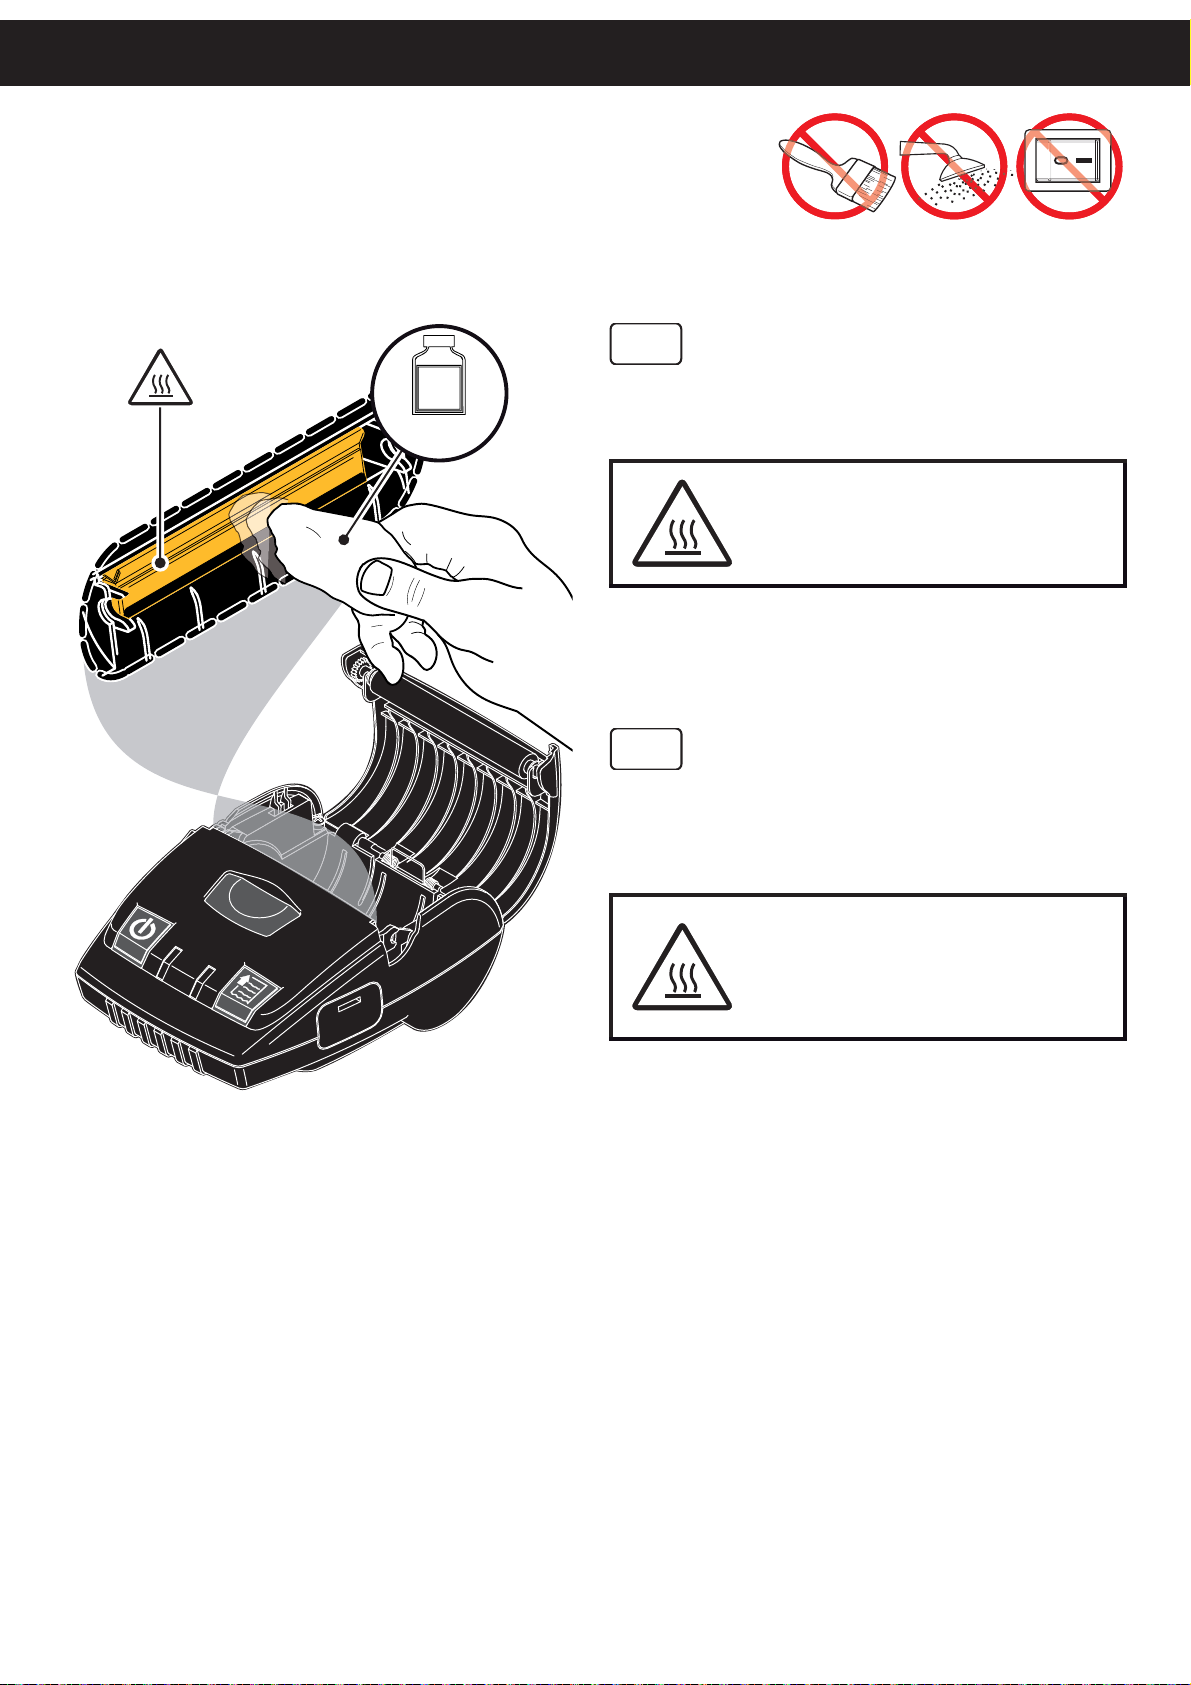
PRINTING HEAD CLEANING
Pulizia testina di stampa
ISOPROPYL
ALCOHOL
MAINTENANCE
ON
GB
Clean the printing head heating line using a nonabrasive cloth moistened with isopropyl alcohol.
ATTENTION:
Do not touch the head heating line with bare
hands or metal objects. Do not perform any
operation inside the printer immediately after
printing because the head and motor tend to
become very hot.
I
Pulire la linea di riscaldamento della testina di
stampa con un panno anti-graffi o imbevuto di
alcool isopropilico.
ATTENZIONE:
Non toccare la linea di riscaldamento della testina a mani nude o con oggetti metallici. Non fare
nessuna operazione all’interno della stampante
subito dopo la stampa, perché la testina ed il
motore sono parti che possono raggiungere
temperature molto elevate.
29
Page 30

30
Page 31
TROUBLESHOOTING GUIDE
TROUBLESHOOTING GUIDE
Risoluzione dei problemi
GB
DO NOT TURN ON THE PRINTER LA STAMPANTE NON SI ACCENDE
Briefl y press the ON / OFF.
The status LED fl ashes green.
Recharge the battery and retry. 10,11 Ricaricare la batteria e riprovare. 10,11
Disconnect the battery pack and reconnect. 26
Replace the battery pack. 26 Sostituire il pacco batteria. 26
PAPER DOES NOT FEED LA CARTA NON AVANZA
Check that the paper roll follows the rotation direction indicated and be sure the paper compartment
cover is correctly closed.
Clean the rubbed roller 28 Pulire il rullo gommato 28
page
14
21,22
I
Premere brevemente il tasto ON/OFF.
Il led di stato lampeggia di verde.
Scollegare il connettore del pacco batterie e ricollegarlo.
Verifi care che il rotolo carta rispetti il verso di
rotazione indicato e assicurarsi che il coperchio
vano carta sia chiuso correttamente.
pag.
14
26
21,22
Recharge the battery and retry. 10,11 Ricaricare la batteria e riprovare. 10,11
WRONG SIGNAL OF PAPER END ERRATA SEGNALAZIONE DI FINE CARTA
Check that the paper roll follows the rotation direction indicated.
If the parameter ‘Notch alignment’ is enabled, but
using paper without notch, the printer is unable
to recognize the end of the paper. Disable the
parameter.
If the parameter ‘Notch alignment’ is disabled,
but using paper without notch, the printer may
recognize the notch as the end of the paper. Enable parameter.
POOR PRINT STAMPA SCADENTE
Check the paper specifi cations. 39 Verifi care le caratteristiche della carta. 39
34,35
34,35
Verifi care che il rotolo carta rispetti il verso di
22
rotazione indicato.
Se il parametro ‘Notch alignment’ è abilitato, ma si
utilizza carta senza notch, la stampante non è in
grado di riconoscere la fi ne della carta. Disabilitare
il parametro.
Se il parametro ‘Notch alignment’ è disabilitato,
ma si utilizza carta senza notch, la stampante
potrebbe riconoscere il notch come fi ne della
carta. Abilitare il parametro.
22
34,35
34,35
Set the parameter ‘Print Density’ with a higher
value. To print labels set the parameter ‘Print
Density’ with value ‘Label’.
34,35
31
Impostare il parametro ‘Print Density’ con un valore maggiore. Per la stampa di etichette impostare
il parametro ‘Print Density’ sul valore ‘Label’.
34,35
Page 32
GB
page
I
pag.
Set the parameter ‘Speed/quality’ with value ‘High
quality’.
Clean print head 29 Pulire la testina di stampa 29
Recharge the battery and retry to print. 10,11 Ricaricare la batteria e riprovare a stampare. 10,11
Replace the battery pack. 26 Sostituire il pacco batteria. 26
COMMUNICATION ERROR ERRORE DI COMUNICAZIONE
If you use the USB port, verify that the connection
is correct.
If you use the Bluetooth® connection.
Turn the printer off and on again. 14 Spegnere e riaccendere la stampante. 14
Recharge the battery and retry. 10,11 Ricaricare la batteria e riprovare. 10,11
Enter the Hexadecimal dump mode and send a
command.
34,35
Impostare il parametro ‘Speed/quality’ il parametro
‘High quality’.
Se si utilizza la porta USB, verifi care che il colle-
gamento sia corretto.
Se si utilizza la connessione Bluetooth®, verifi care
le impostazione Bluetooth® sul dispositivo.
Entrare in modalità Dump esadecimale e provare
36
ad inviare un comando.
34,35
36
32
Page 33
x
N
SETUP
3
4
)
0000
terfe.........
uetoot
Autofe
ed
..
D
ab
d
PRINTER SETUP + HEXADECIMAL DUMP
Setup stampante + Dump esadecimale
SETUP
GB
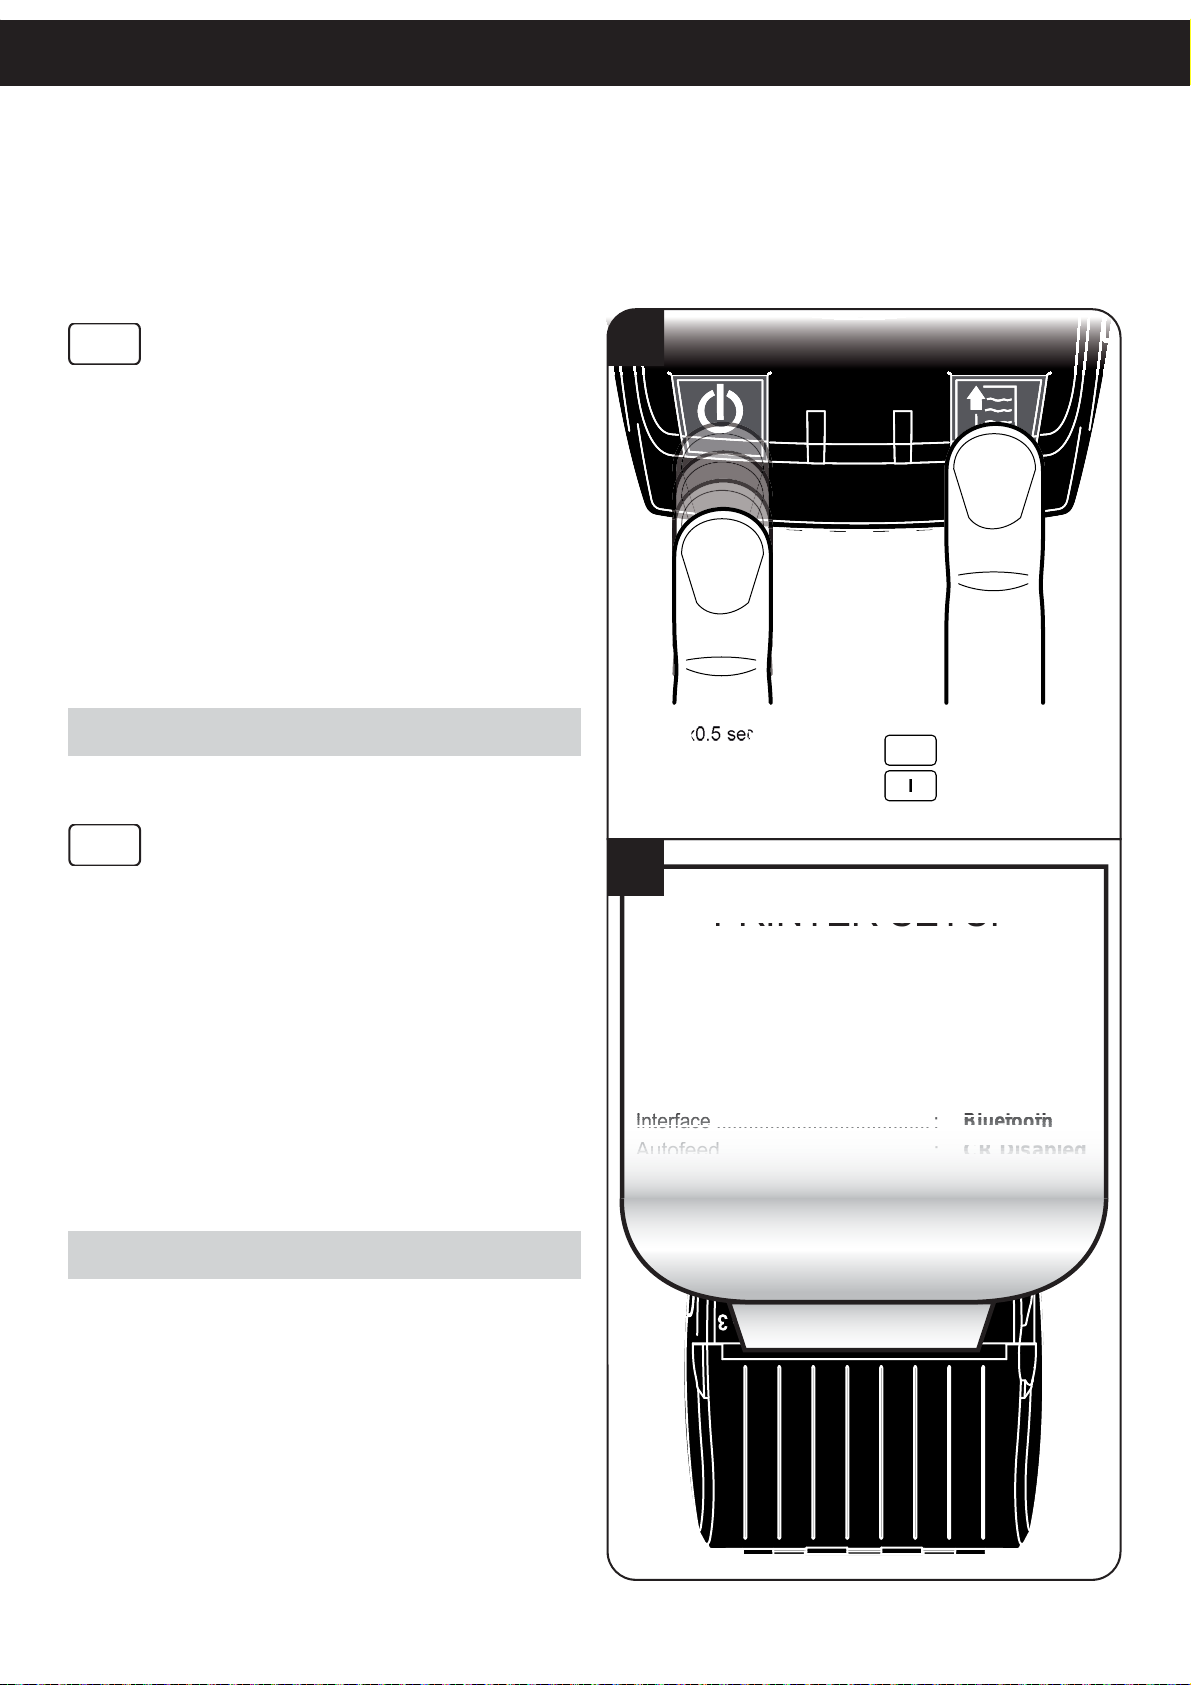
To enter SETUP mode, proceed as follows:
While holding down the FEED button, turn on the printer 1.
by briefl y pressing the ON / OFF button.
The printer will print a list of all parameters.2.
Hold down the FEED key for a few seconds to start setting
the parameters (see Setup report) or press briefl y the FEED
button to exit SETUP.
The printer will remain in standby until a key is pressed or
characters are received through the communication port
(see Hexadecimal dump mode).
NOTE:
See chapter 1 for FEED keys function.
I
Per entrare in modalità SETUP procedere come segue:
Mantenendo premuto il tasto FEED, accendere la stam-1.
pante premendo brevemente il tasto ON/OFF.
La stampante stamperà la lista di tutti i parametri.2.
Mantenere premuto il tasto FEED per qualche secondo per
iniziare la modifi ca dei parametri (vedi Rapporto di Setup)
oppure premere brevemente il tasto FEED per uscire dalla
modalità SETUP.
1
B
2
EAD VOLTAGE [V] = 07.6
EAD TEMPERATURE [°C] = 36
1
ld down
antenere premuto
MY
Se non viene premuto un tasto o non vengono ricevuti dei
caratteri dalla porta di comunicazione la stampante rimane
in attesa nella modalità di Hexadecimal dump (vedi Modalità
Dump esadecimale)
NOTA:
Vedere capitolo1 per la funzione dei tasti.
33
Page 34
US
S
S
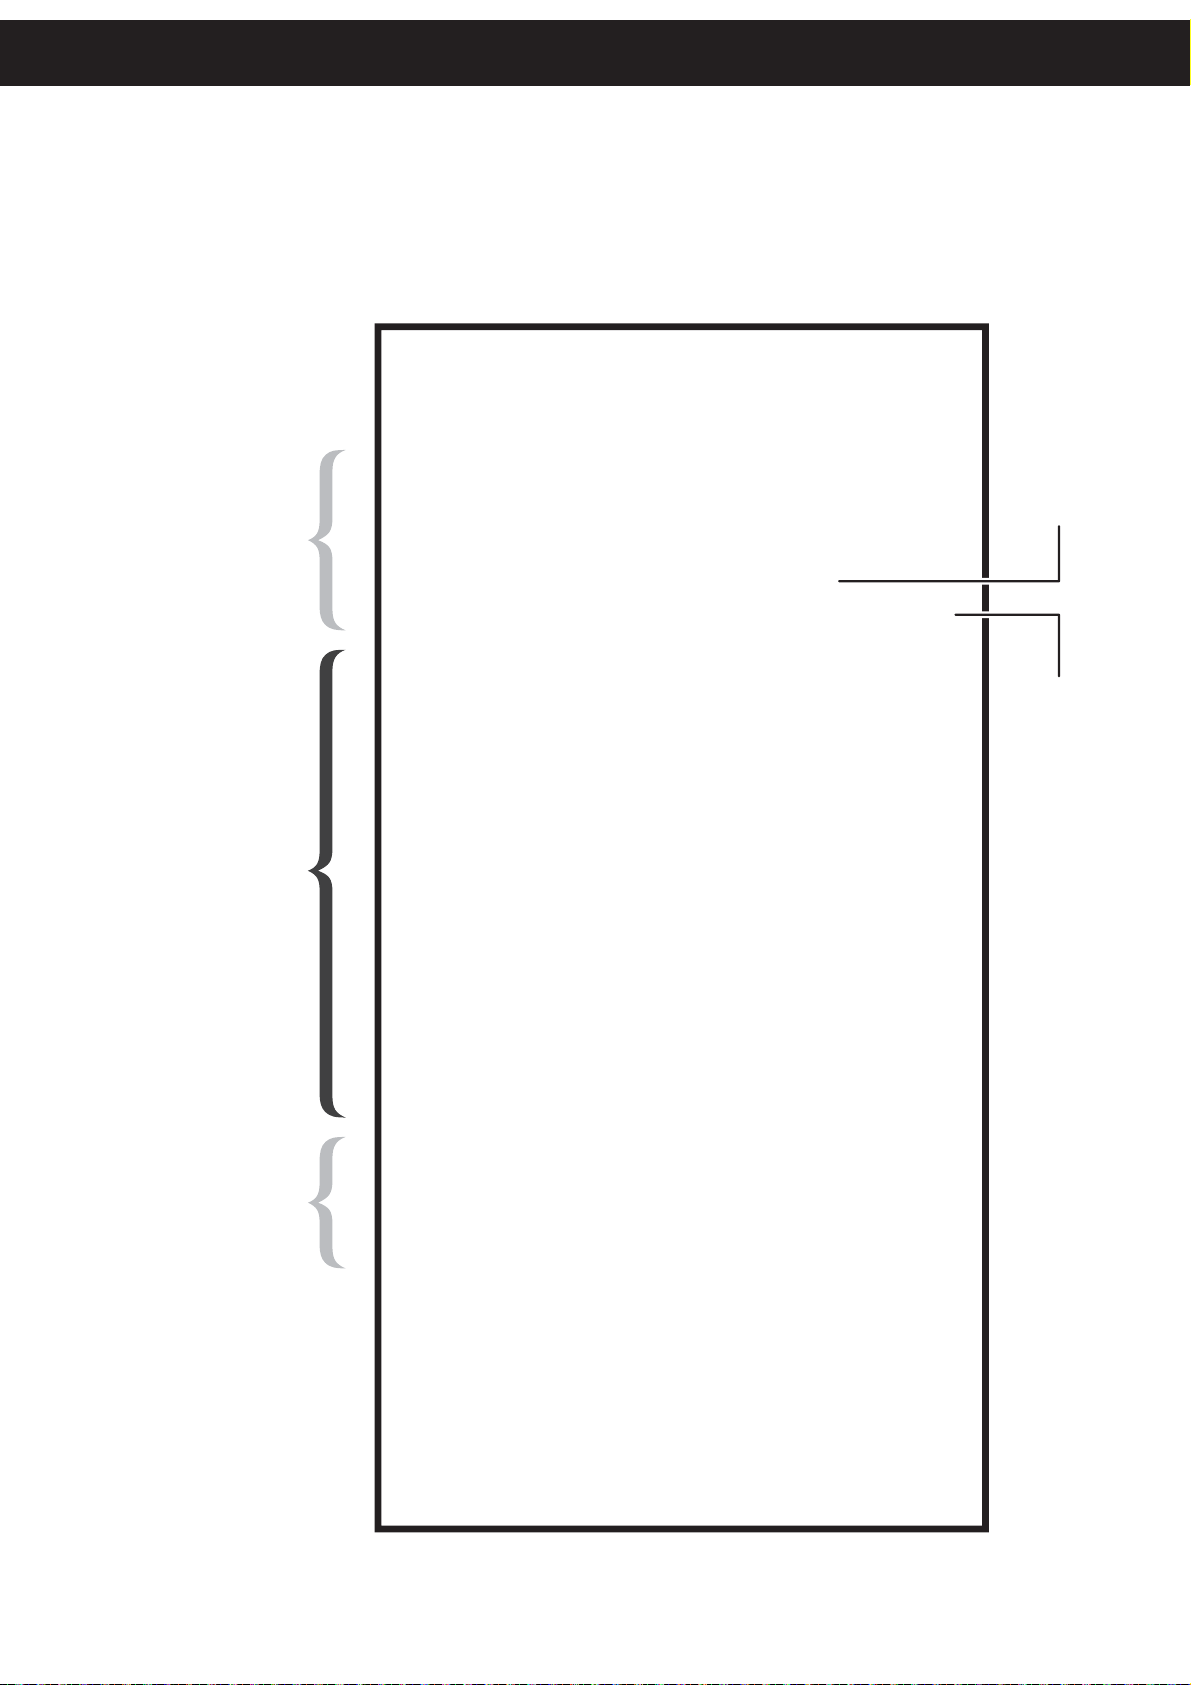
SETUP REPORT
Rapporto di Setup
PRINTER SETUP
PRINTER
TAT
PRINTER
PARAMETERS
PRINTER TYPE = MY3
HEAD VOLTAGE [V] = 07.64
HEAD TEMPERATURE [°C] = 36
PIN BT = 0000
SERIAL NUMBER =
Interface ........................................ : Bluetooth
USB Address Number ...............: 0
Pairing BT..................................: Disabled
Autofeed ....................................: CR Disabled
Print Mode .................................: Normal
Speed / Quality..........................: High Speed
Chars / inch ...............................: A=17 B=22 cpi
Columns 22 cpi.............................. : 60 columns
PowerOFF time .............................: 30 min
Notch alignment ........................: Enabled
Notch dist. [mm x 10].................: 0
Notch dist. [mm x 1]...................: 0
Notch dist. [mm x .1]..................: 0
Print Density..............................: 0%
0123456789101112
MY3-BT3B
only
MY3-BT3B-SM
only
FUNCTION
KEY
[FEED PUSH] key to enter setup
[FEED FAST PUSH] key to skip setup
34
Page 35
SETUP
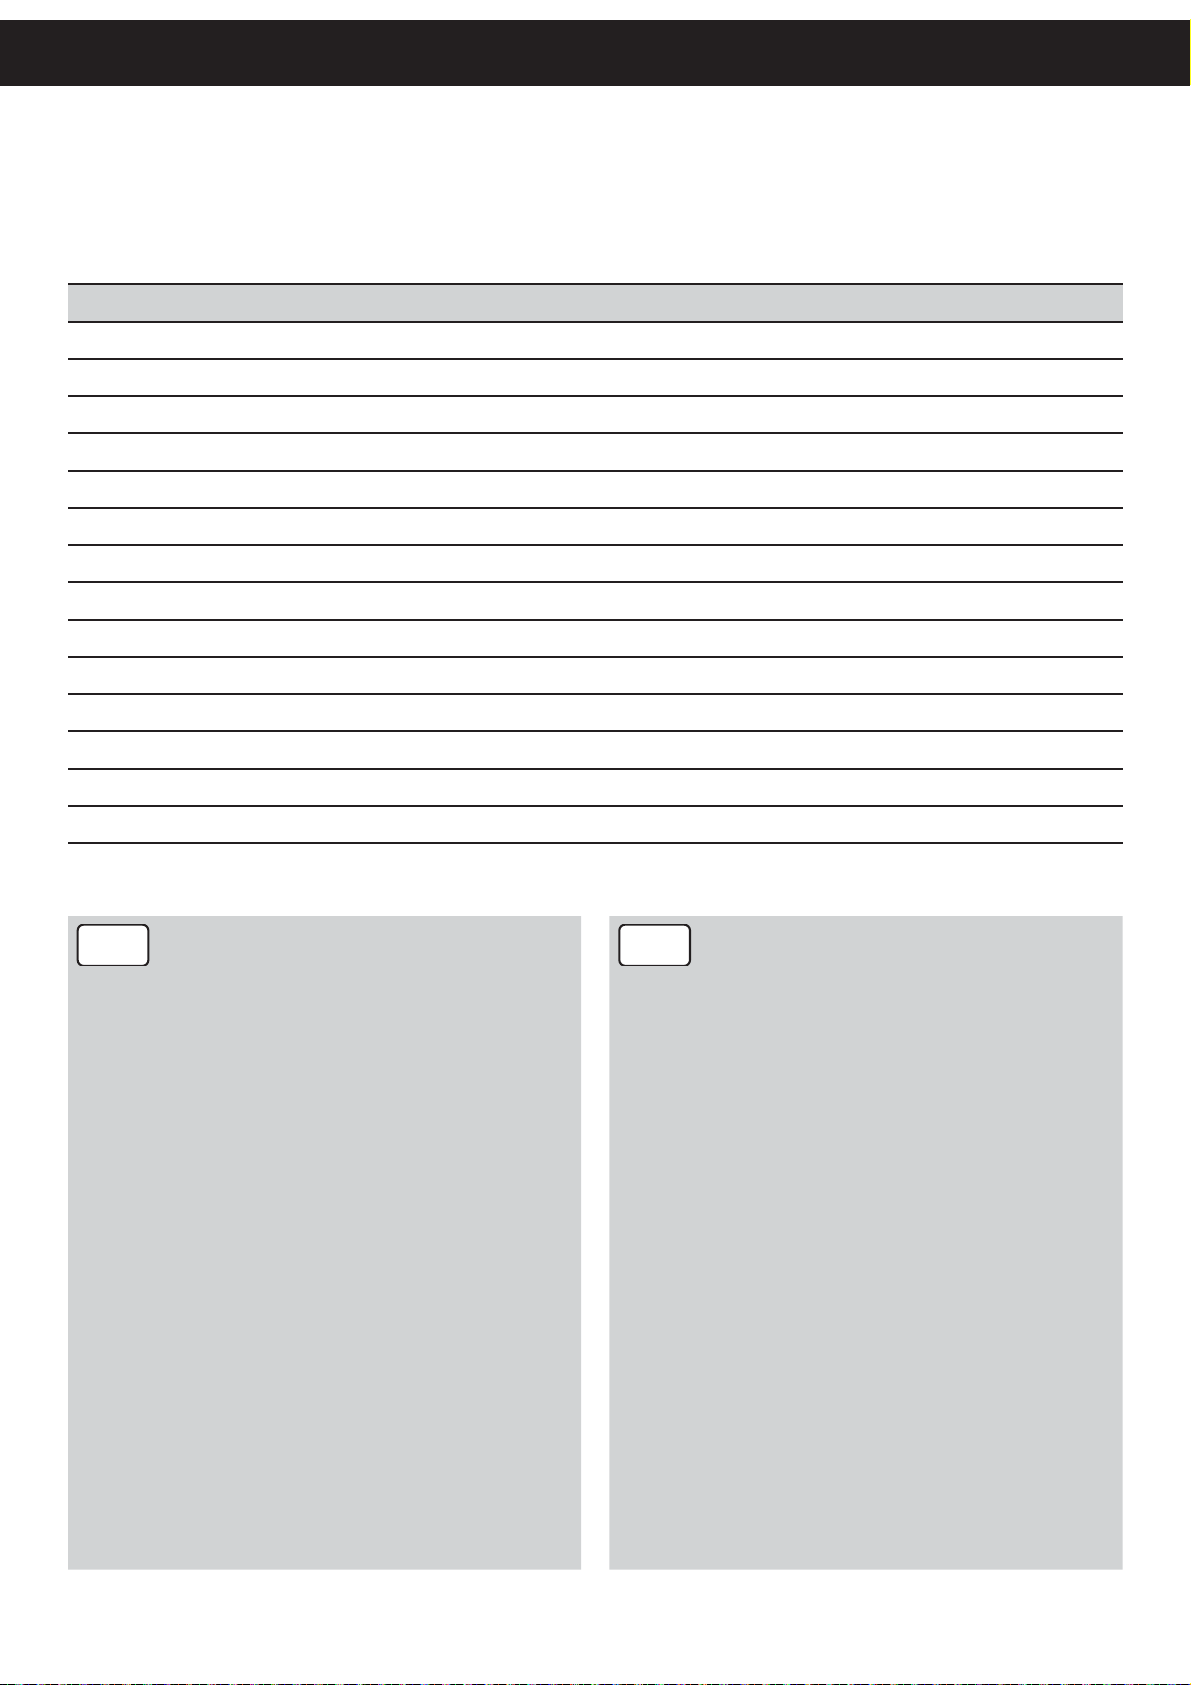
PRINTER PARAMETERS
Interface BluetoothD, USB
(3)
(4)
(1)
0D, 1, 2, 3, 4, 5, 6, 7, 8, 9
DisabledD, Enabled
60D, 64 columns
None, 30minD, 1, 2, 4, 6, 8 hours
USB Address Number
Pairing BT
(2)
Autofeed CR disabledD, CR enabled
Print mode NormalD, Reverse
Speed/Quality High SpeedD, High Quality
Chars/Inch A=17 B=22cpi, A=13 B=17cpi
Columns 22 cpi
PowerOFF time
D
Notch alignment DisabledD, Enabled
(5)
(5)
(5)
0D,1 ,2 ,3 ,4 ,5 ,6 ,7 ,8 ,9
0D,1 ,2 ,3 ,4 ,5 ,6 ,7 ,8 ,9
0D,1 ,2 ,3 ,4 ,5 ,6 ,7 ,8 ,9
Notch dist. [mm x 10]
Notch dist. [mm x 1]
Notch dist. [mm x .1]
Print Density -50%, -37%, -25%, -12%, 0D,+12%, +25%, +37%, +50%, Label
GB
IMPORTANT
If Bluetooth ® interface is enabled, it’s better do not
send data on USB line, because data could overlap
Bluetooth ® wireless line
GENERAL NOTES:
The parameters marked with the symbol •
Settings remain active even after the printer has been turned off.•
NOTES:
(1) This parameter is used to identify univocally the USB printer by a
numerical address code, if on the PC are connected two printers
that are the same models, for example two MY3.
(2) Parameter present only on model MY3-BT3B-SM. Enables/disables
the request of the pin for BlueTooth® connection (see paragraph
CONNECTION VIA Bluetooth ®).
(3) The parameter “Columns 22 cpi” is displayed only in case that the
parameter “Chars/Inch” is “A=17 B=22cpi”.
(4) This parameter regulates the period of inactivity after which the
printer shuts off automatically to avoid battery discharge.
(5) The parameter “Notch Distance” is displayed only in case that the
parameter “Notch Alignment” is enabled.
The “Notch distance” parameter represents the distance in mm
from the upper margin of the ticket to the black mark on the ticket.
For example, to set notch distance to 15 mm, modify the following
parameters in order to obtain the desired values as indicated: Notch
Distance [mm x 10]=1; Notch Distance [mm x 1]=5; Notch Distance
[mm x .1]=0.
D
are the default values.
I
IMPORTANTE
Se è abilitata l’interfaccia BlueT ooth ® è bene che non
vengano inviati dati sulla linea USB, perché potrebbero sovrapporsi alla linea wireless BlueTooth ®.
NOTE GENERALI:
I valori indicati con il simbolo •
I settaggi rimangono attivi anche dopo lo spegnimento della stam-•
pante.
NOTE:
(1) Questo parametro serve per identifi care univocamente la stampan-
te USB attraverso un indirizzo numerico, nel caso in cui il PC sia
connesso a due stampanti dello stesso modello, per esempio due
MY3 (vedere paragrafo COLLEGAMENTO VIA. Bluetooth ®).
(2) Parametro presente solamente su modello MY3-BT3B-SM. Abilita/
disabilita la richiesta del pin per la connessione BlueTooth®.
(3) Il parametro “Columns 22 cpi” viene visualizzato solo nel caso in
cui il parametro “Chars/Inch” è “A=17 B=22cpi”.
(4) Questo parametro regola il tempo di inattività dopo il quale la
stampante si spegne automaticamente per evitare che le batterie
si scarichino.
(5) Il parametro “Notch Distance” viene visualizzato solo nel caso in
cui il parametro “Notch Alignment” è abilitato.
Il parametro “Notch distance” rappresenta la distanza in mm tra
il margine superiore del biglietto e la tacca nera sul biglietto. Per
esempio, per impostare una distanza di notch di 15 mm, occorre
modifi care i parametri come segue: Notch Dist. [mm x 10]=1; Notch
Dist. [mm x 1]=5; Notch Dist. [mm x .1]=0.
D
sono quelli impostati di default.
35
Page 36
HEXADECIMAL DUMP MODE
Modalità Dump esadecimale
GB
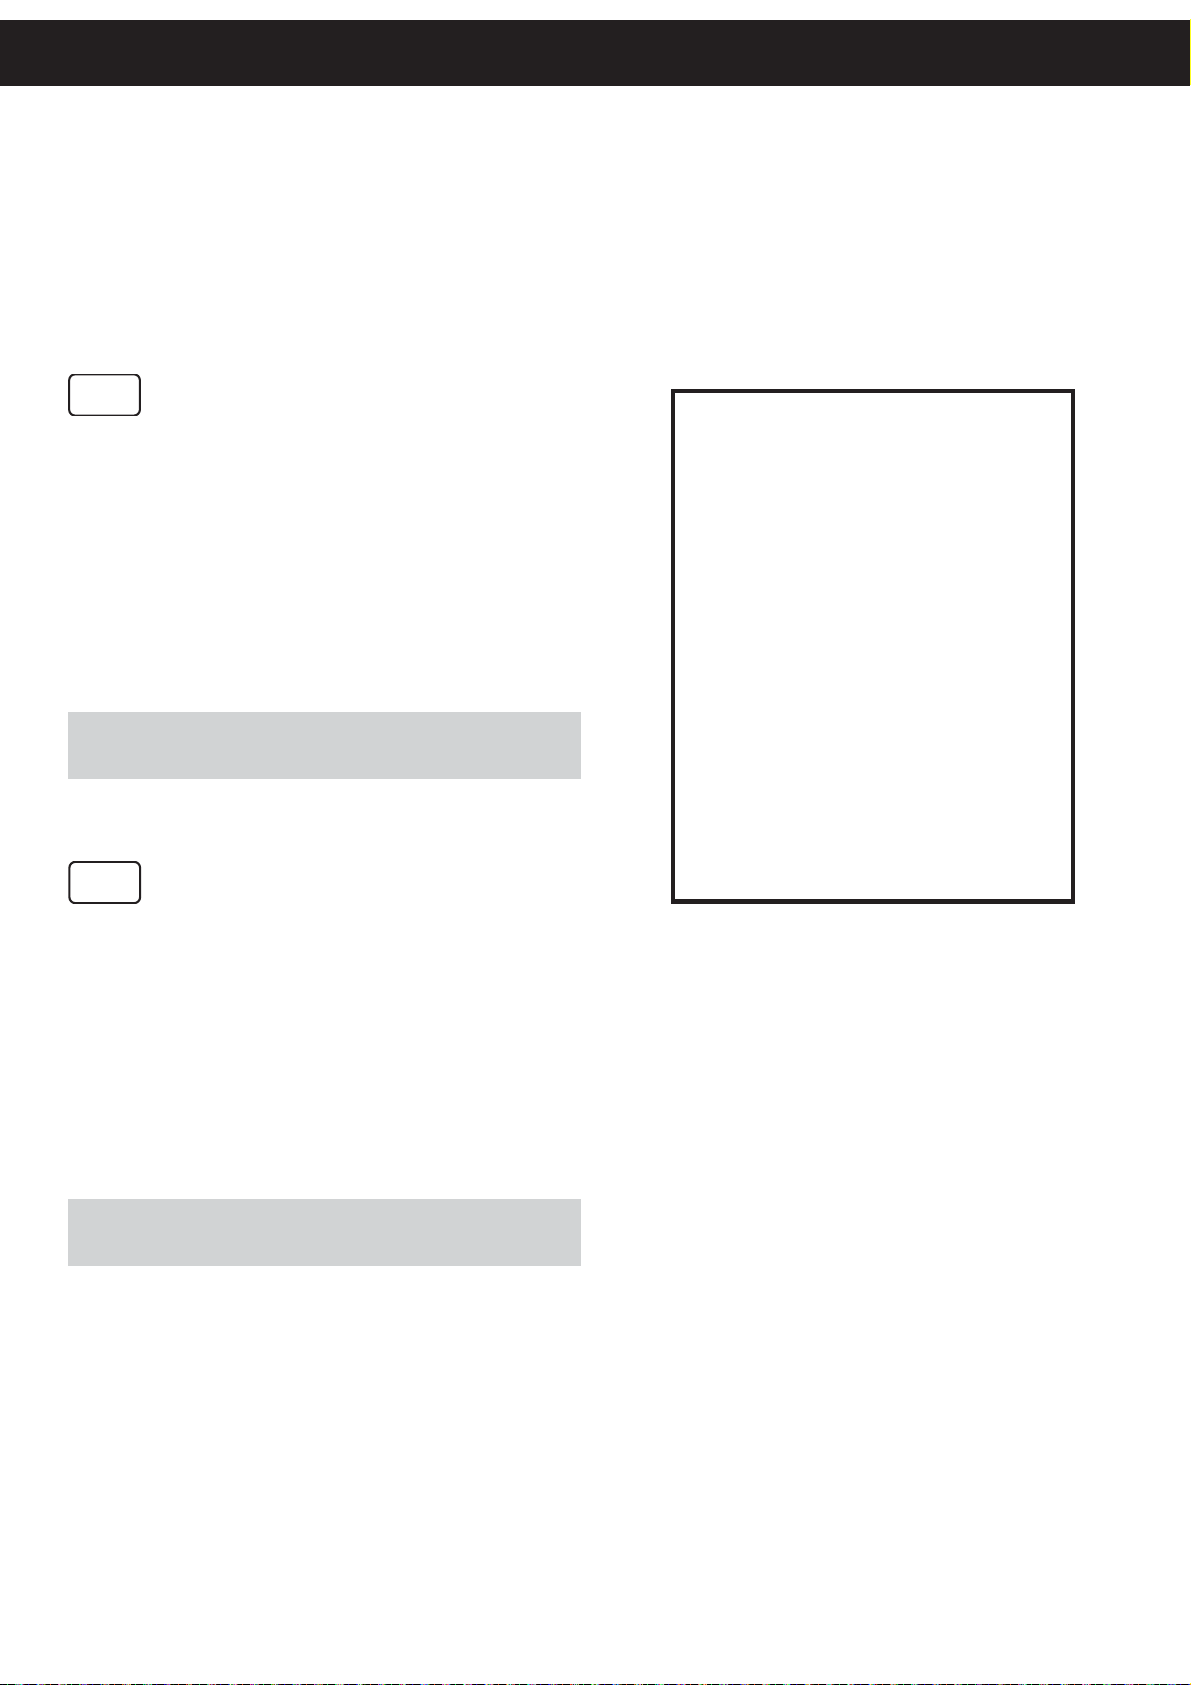
This function is used to diagnose the characters
received through the communication port; for
every 8 characters received, the hexadecimal
and corresponding ASCII codes are printed out.
Shown below is an example of a Hexadecimal
Dump:
Press the ON/OFF key or the FEED key to exit
from Hexadecimal dump mode.
NOTE:
To enter Hexadecimal dump see “PRINTER SETUP + HEXADECIMAL
DUMP”
I
Questa funzione viene utilizzata per visualizzare
i caratteri ricevuti dalla porta di comunicazione;
ogni 8 caratteri ricevuti dalla porta di comunicazione, la stampante esegue una stampa sia del
codice esadecimale ricevuto sia il corrispondente
codice ASCII.
HEXADECIMAL DUMP
31 32 33 34 35 36 37 38
39 30 31 32 33 34 35 36
37 38 39 75 69 73 64 66
68 6B 6A 73 64 68 66 68
73 64 66 6B 6A 68 73 64
66 73 64 66 6B 68 6A 77
65 69 6F 79 75 77 71 65
6F 72 69 75 77 65 72 69
6F 75 77 65 72 69 6F 75
77 65 72 69 6F 75 77 65
72 69 6F 75 77 65 72 68
6B 6C 73 64 66 68 6B 73
64 66 6B 73 64 66 68 6A
73 64 66 6B 6A F2 73 64
66 6B F2 6A 73 68 64 66
6A 6B 6C 68
12345678
90123456
789uisdf
hkjsdhfh
sdfkjhsd
fsdfkhjw
eioyuwqe
oriuweri
ouweriou
weriouwe
riouwerh
klsdfhks
dfksdfhj
sdfkj≥sd
fk≥jshdf
jklh
Premere il tasto ON/OFF oppure il tasto FEED per
uscire dalla modalità Dump esadecimale.
NOTA:
Per entrare in modalità Dump esadecimale vedere “SETUP STAMPANTE
+ DUMP ESADECIMALE”.
36
Page 37
AVAILABLE DRIVERS
Drivers disponibili
DRIVERS
WIN
XP
GB
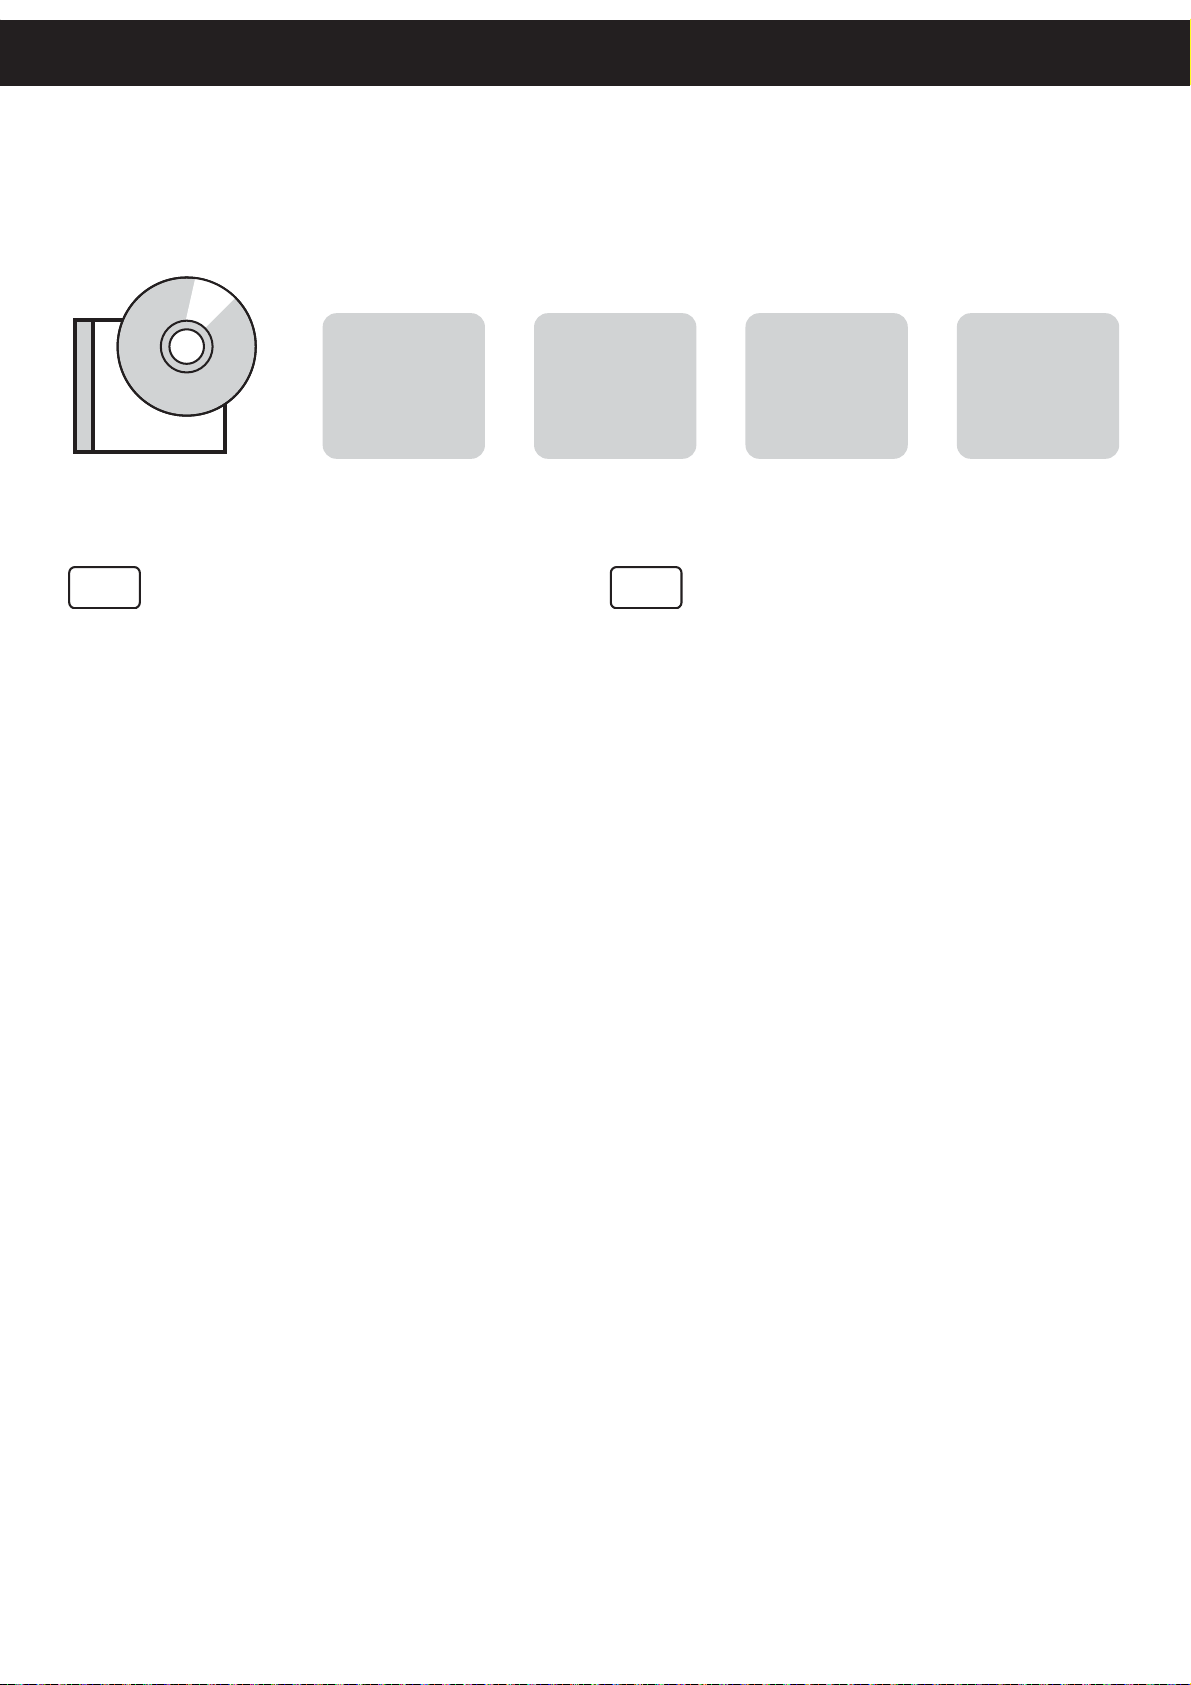
Download the SW from the web site:1.
www.custom.biz
Use the following procedure to install the printer SW:2.
WINDOWS : From the START menu, press Enter and key-in
the path where the SW was saved on your PC, then click
OK. Follow the instructions that appear on the screen to
install the driver.
LINUX : For the installation of the software follows the instruction get back on the README.TXT fi le you can fi nd it
in the software package downloaded in advance.
WIN
VISTA
32/64 bit
WIN
LINUX
7
32/64 bit
I
Prelevare il SW dal sito Internet:1.
www.custom.biz
Installare il software della stampante come indicato nella 2.
seguente procedura:
WINDOWS : Nel menù Avvio selezionate Esegui e digitate
il percorso del SW, precedentemente salvato sul vostro PC,
fate click su OK. Lasciatevi poi guidare dalle istruzioni che
compaiono sullo schermo per installare il driver.
LINUX : Per l’istallazione del software seguire le istruzioni
riportate nel fi le README.txt contenuto nel pacchetto sof-
tware scaricato precedentemente.
32 bit
37
Page 38

38
Page 39

TECHNICAL SPECIFICATIONS
DEVICE SPECIFICATIONS
Caratteristiche del dispositivo
GENERAL
Interface
Communication speed
Sensors Paper presence, head temperature
Flash memory 512 Kbytes
Receive buffer 2 Kbytes
RAM memory 96 Kbytes
Graphic memory 4 logos (576 x 450 dots)
Drivers WindowsTM XP, VISTA, 7, Linux
Emulations ESC/POS
MTBF
PRINTER SPECIFICATIONS
Resolution 203 DPI (8 dot/mm)
Print method Thermal fi xed head (8 dot/mm)
Printing width 72 mm
Printing speed
(1)
(2)
Bluetooth ® = 2.0 Class 2 - SPP (Serial port profi le)
USB = 2.0 Full speed
740.000 hours
Up to 80 mm/sec
USB
Bluetooth
®
TM
Printing mode Normal, 90°, 180°, 270°
Printing format
Character font PC437, PC850, PC860, PC 863, PC865, PC858 (euro)
Printable barcode
Head life 100 Km / 108 pulses
PAPER SPECIFICATIONS
Type of paper Thermal paper roll (heat-sensitive side on outside of roll)
Recommended type of paper 55 ÷ 100 g/m2 (KANZAN KF50, MITSUBISHI PG5075, MITSUBISHI TL4000)
Paper thickness 61 ÷ 100 μm
Paper roll size 76.2 ± 0,5 mm
External roll diameter Max Ø45 mm
Paper end Not attached to roll core
Internal roll core diameter 12 / 25 (± 1 mm)
Core type Cardboard or plastic
Normal, 1x to 8x height and width, reverse,
underscored, italic, bold,
UPCA, UPCE, EAN13, EAN8, CODE39, ITF,
CODABAR, CODE93, CODE128, CODE32,
PDF417, DATAMATRIX, QRCODE
39
Page 40
BATTERY SPECIFICATIONS
Battery Li-ion 7.4V 1200mAh Battery pack
Recharge power supply 12÷24 Vdc - 500÷250 mA
Recharge cycle
Autonomy: print
(5)
MAX.3 h
(3)
8 h x 750 ticket
Autonomy: standby
USB = 1000 min.
Bluetooth ® = 1000 min.
PCALI-DPT100 POWER SUPPLY SPECIFICATIONS
Power supply voltage (input) 100Vac ÷ 240Vac
Frequency 50Hz ÷ 60Hz
Power supply voltage (output) 18 V
Current (output) 1,0 A
Power 18 W
PCXSP-MY3-DS1, PCXSP-MY3-DS DOCKING STATION
INPUT SPECIFICATION
Input voltage 90 ÷ 264 V
Current MAX 0.8 A
Input frequency 47 ÷ 63 Hz
OUTPUT SPECIFICATION
Output voltage 24 V
Output current 0.1 ÷ 1.3 A
Typical effi ciency 75 %
ENVIRONMENTAL CONDITION
Operating temperature -10 ÷ 70 °C
Humidity 20 ÷ 85 % Rh
Storage -10 ÷ 75 °C / 10 ÷ 95 % Rh
PROTECTION DEVICE Short-circuit, overload
ENVIRONMENTAL CONDITIONS
Operating temperature -15 +55°C
(4)
Relative humidity 10-85% Rh w/o condensation
Storage temperature -20 °C + 70 °C
Storage relative humidity 10% - 90% Rh
ESC/POSTM EMULATION
Character set 3
Character density 13 cpi 17 cpi 22 cpi
Number of columns 36 48 60/64
Character (W x H mm)
Normal
2 (W) x 3 (H) 1,5 (W) x 3 (H) 1,1 (W) x 3 (H)
40
Page 41

TECHNICAL SPECIFICATIONS
GB
NOTES:
(1) Electronic board.
(2) It depends by the battery status, the priniting typology and the
environmental temp.
(3) Standard CUSTOM receipt (L=10cm, Density = 12,5% dots on).
(4) In recharge 0+45°C.
(5) With completely discharged batteries
I
NOTE:
(1) Scheda elettronica.
(2) Dipendente dallo stato delle batterie, dalla tipologia della stampa
e dalla temp. ambiente.
(3) Scontrino standard CUSTOM (L = 10cm, Densità = 12,5% dots
accesi).
(4) In ricarica 0+45°C.
(5) Con batterie completamente scariche.
41
Page 42
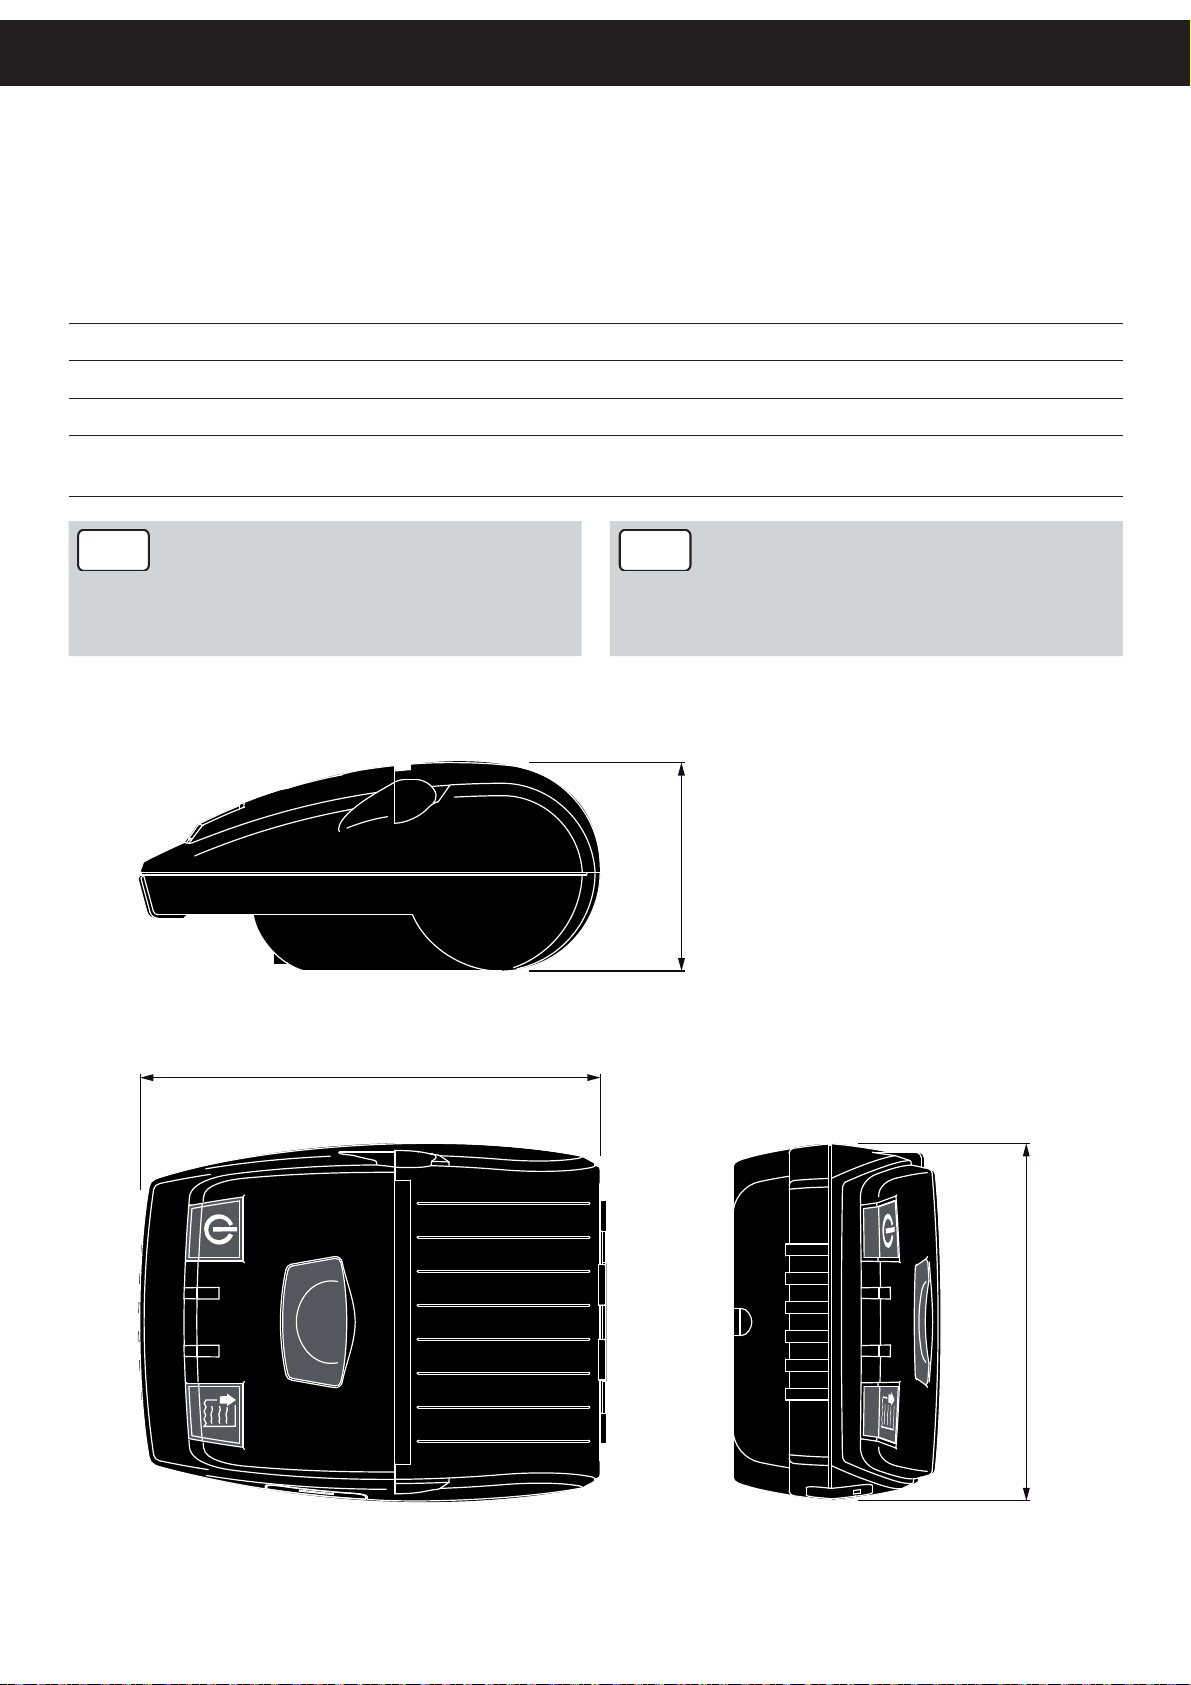
DEVICE DIMENSIONS
Dimensioni dispositivo
Length 105 mm
Width 135 mm
Height 61 mm
(1)
Weight
(2)
GB
NOTES:
(1) Cover closed.
(2) With out paper roll
266 (no battery)
320 (battery)
I
NOTE:
(1) Coperchio chiuso.
(2) Senza rotolo carta
61
135
105
42
Page 43
TECHNICAL SPECIFICATIONS
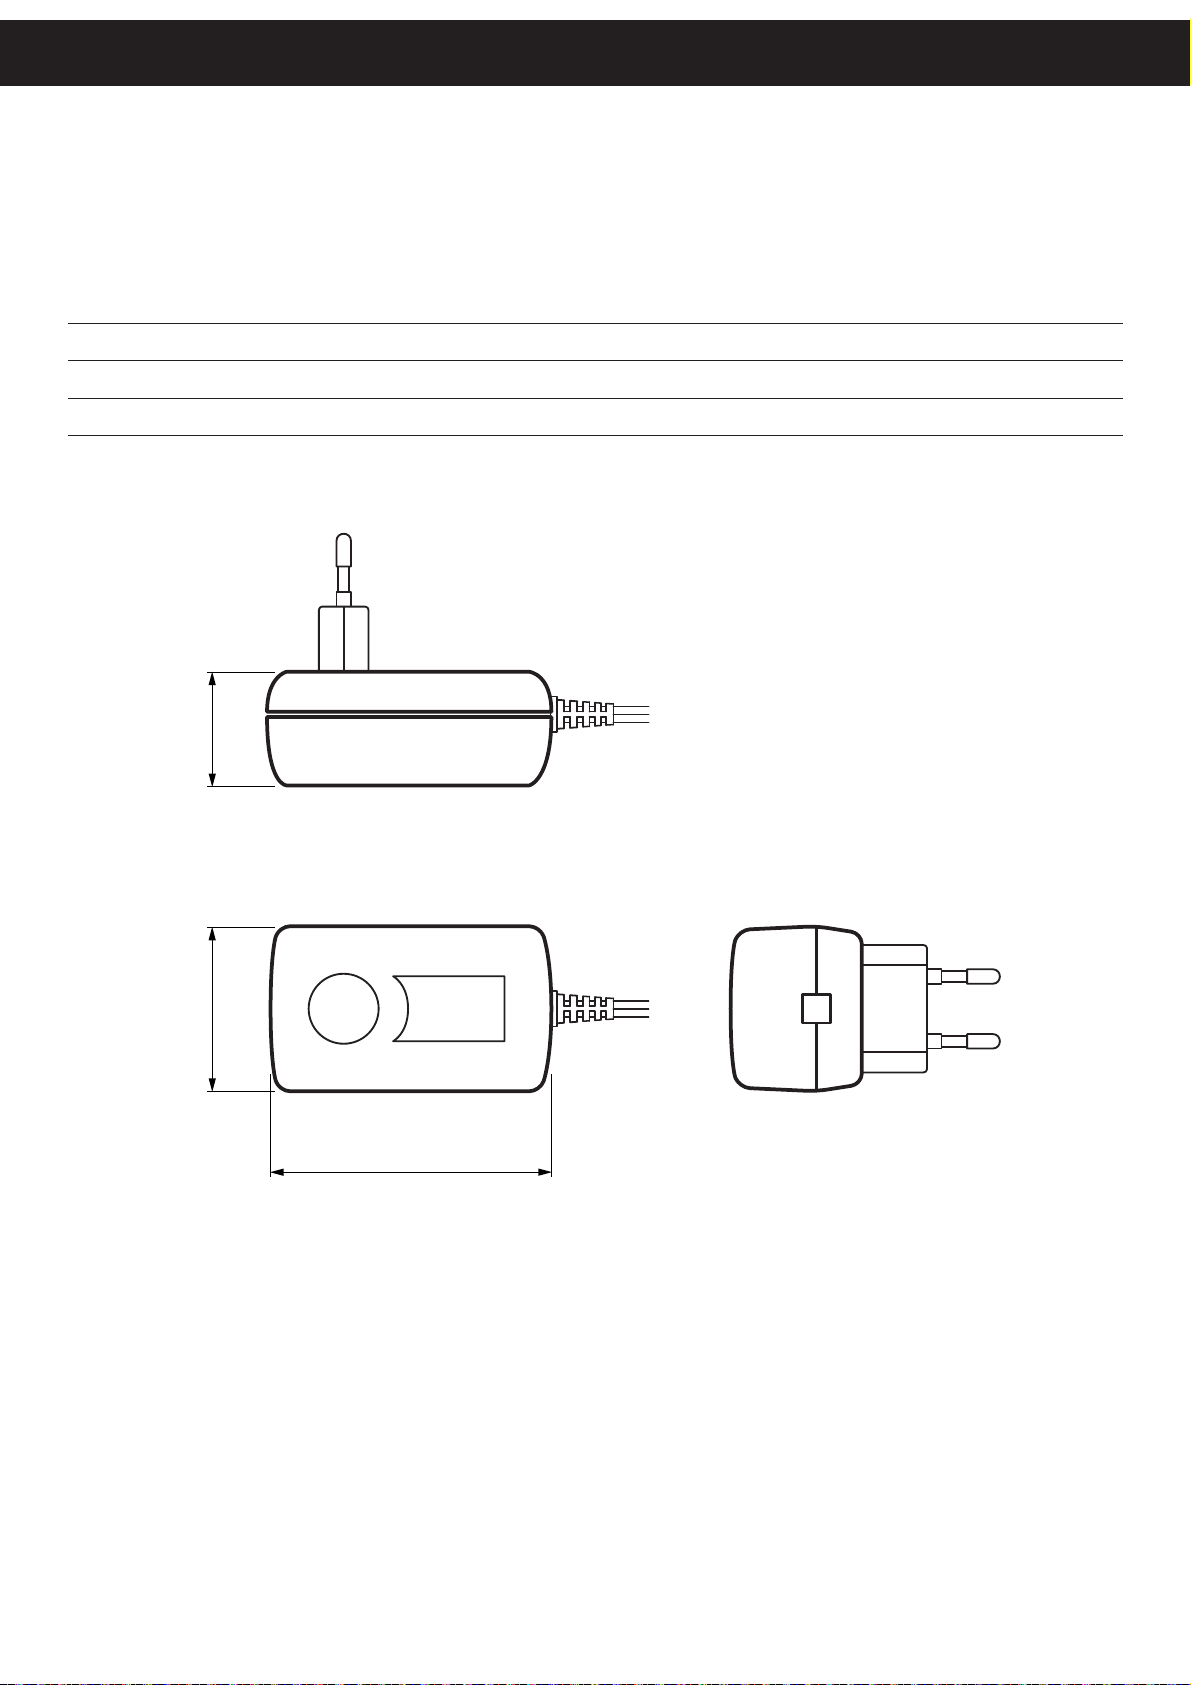
P. SUPPLY PCALI-DPT100 DIMENSIONS
Dimensioni alimentatore PCALI-DPT100
Length 74 mm
Width 43.5 mm
Height 34 mm
43.5 34
74
43
Page 44
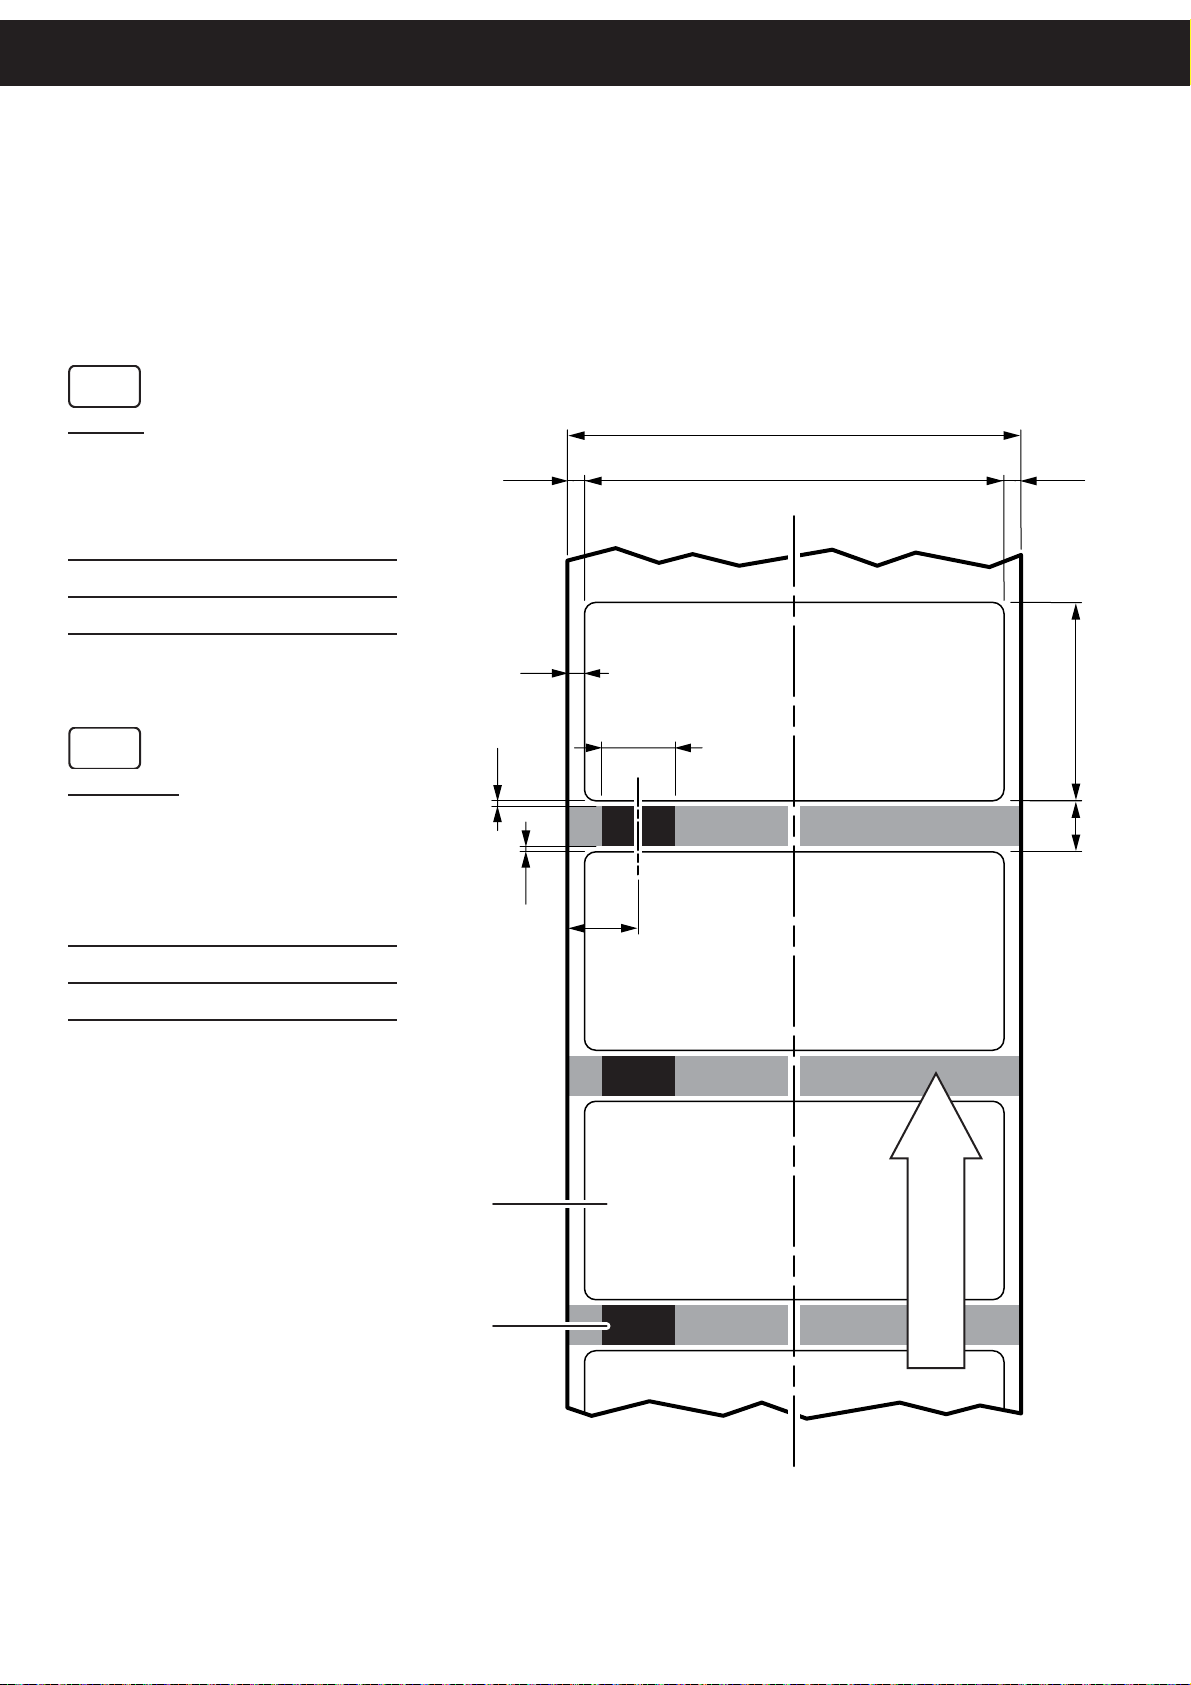
PAPER SPECIFICATIONS
Caratteristiche della carta
Caractéristiques du papier
Papier spezifi kation
Caracteristicas del papel
GB
LABELS
The printer can print on labels having
the characteristics described. For the
management of the labels must be
enabled to SETUP parameters:
Notch alignment = Enabled
Print Density = Label
I
ETICHETTE
La stampante è in grado di stampare
su etichette aventi le caratteristiche
illustrate. Per la gestione delle etichette occorre abilitare da SETUP i
parametri:
Notch alignment = Enabled
Print Density = Label
76 ± 0.5
1.5 1.5
5
min = 8
0,5
0,5
20
73 ± 0.5
25,756
THERMAL LABEL
Etichetta termica
BLACK MARK
Tacca di posizionam.
THERMAL SIDE
44
Page 45
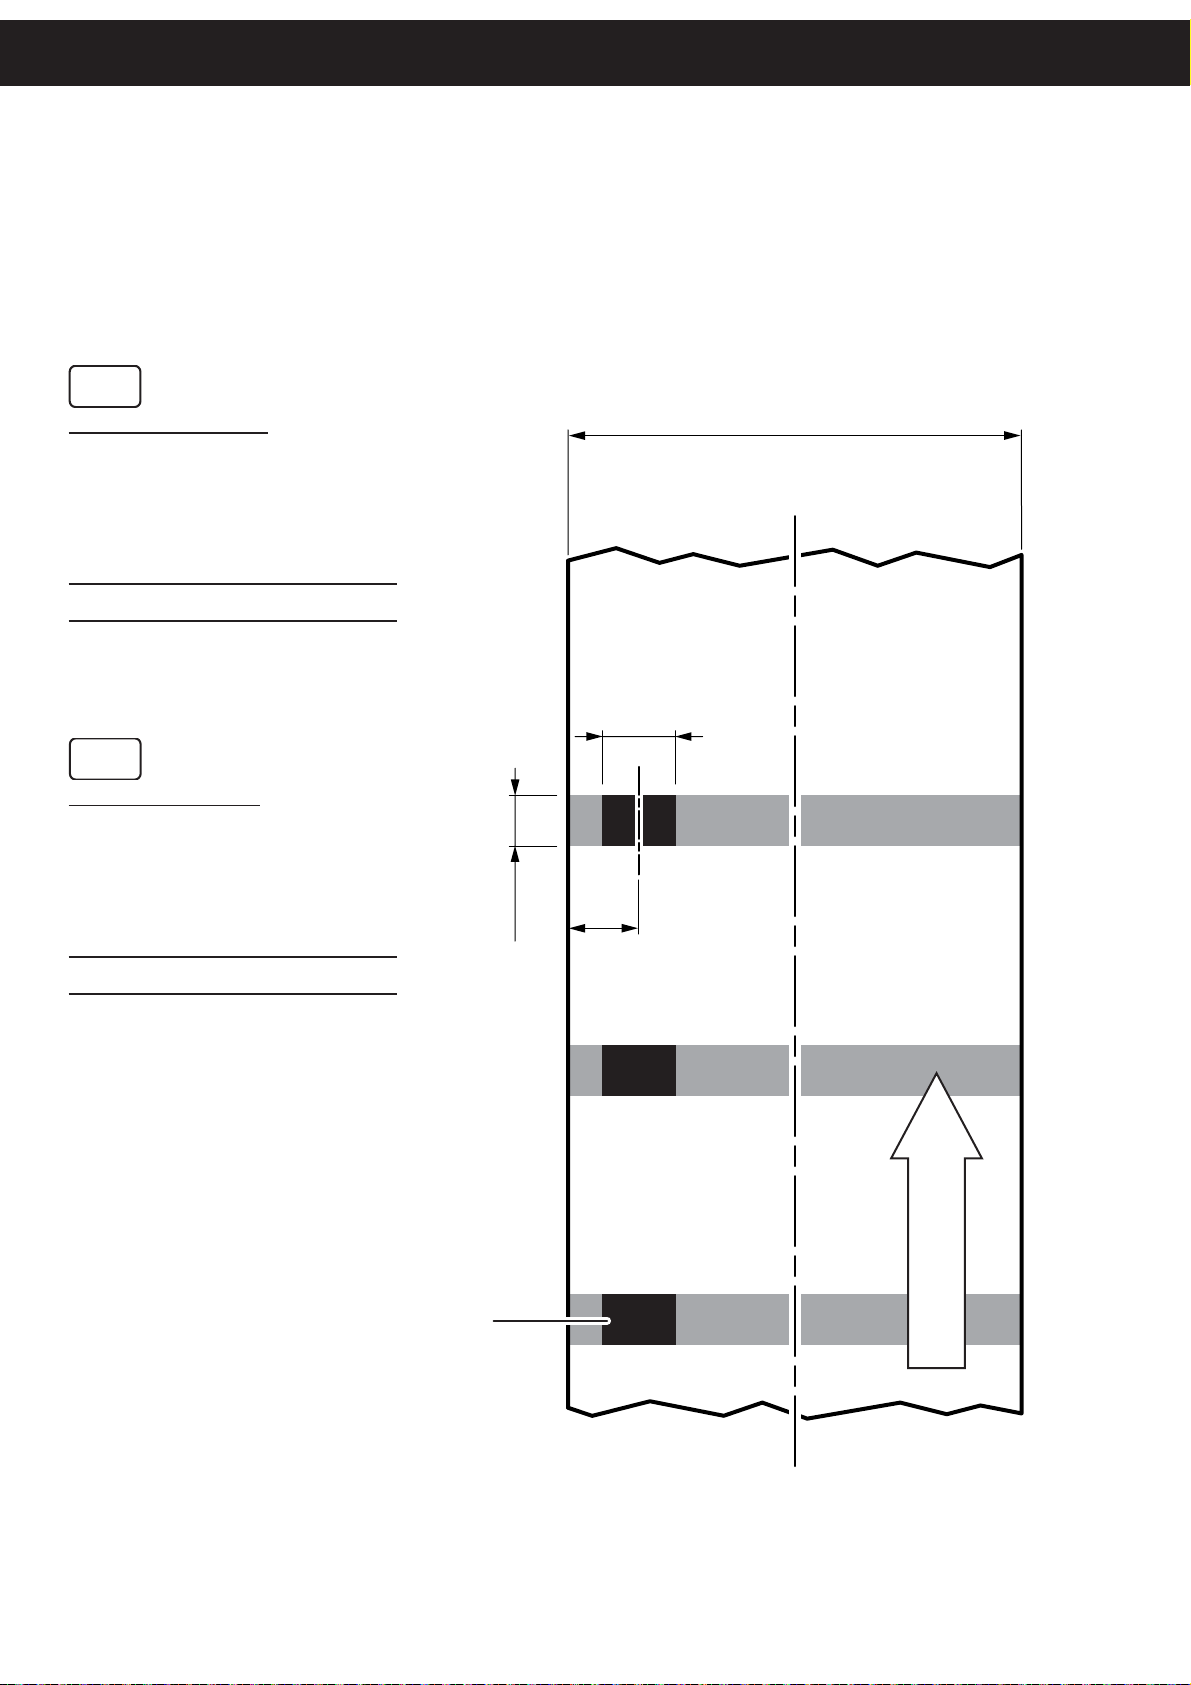
GB
TECHNICAL SPECIFICATIONS
PAPER WITH NOTCH
The printer can print on paper with
notch having the characteristics
described. For the management of
alignment must be enabled to SETUP
parameter:
Notch alignment = Enabled
I
CARTA CON NOTCH
La stampante è in grado di stampare
su carta con notch avente le caratteristiche illustrate. Per la gestione
dell’ allineamento occorre abilitare da
SETUP il parametro:
Notch alignment = Enabled
76 ± 0.5
min = 8
20
min = 8
BLACK MARK
Tacca di posizionam.
THERMAL SIDE
45
Page 46

46
Page 47
SETUP
TYPE
3
64
)
0000
e.........
uetoot
Autofeed......
Disabled
CONTACTS
Contatti
CONTACTS
GB
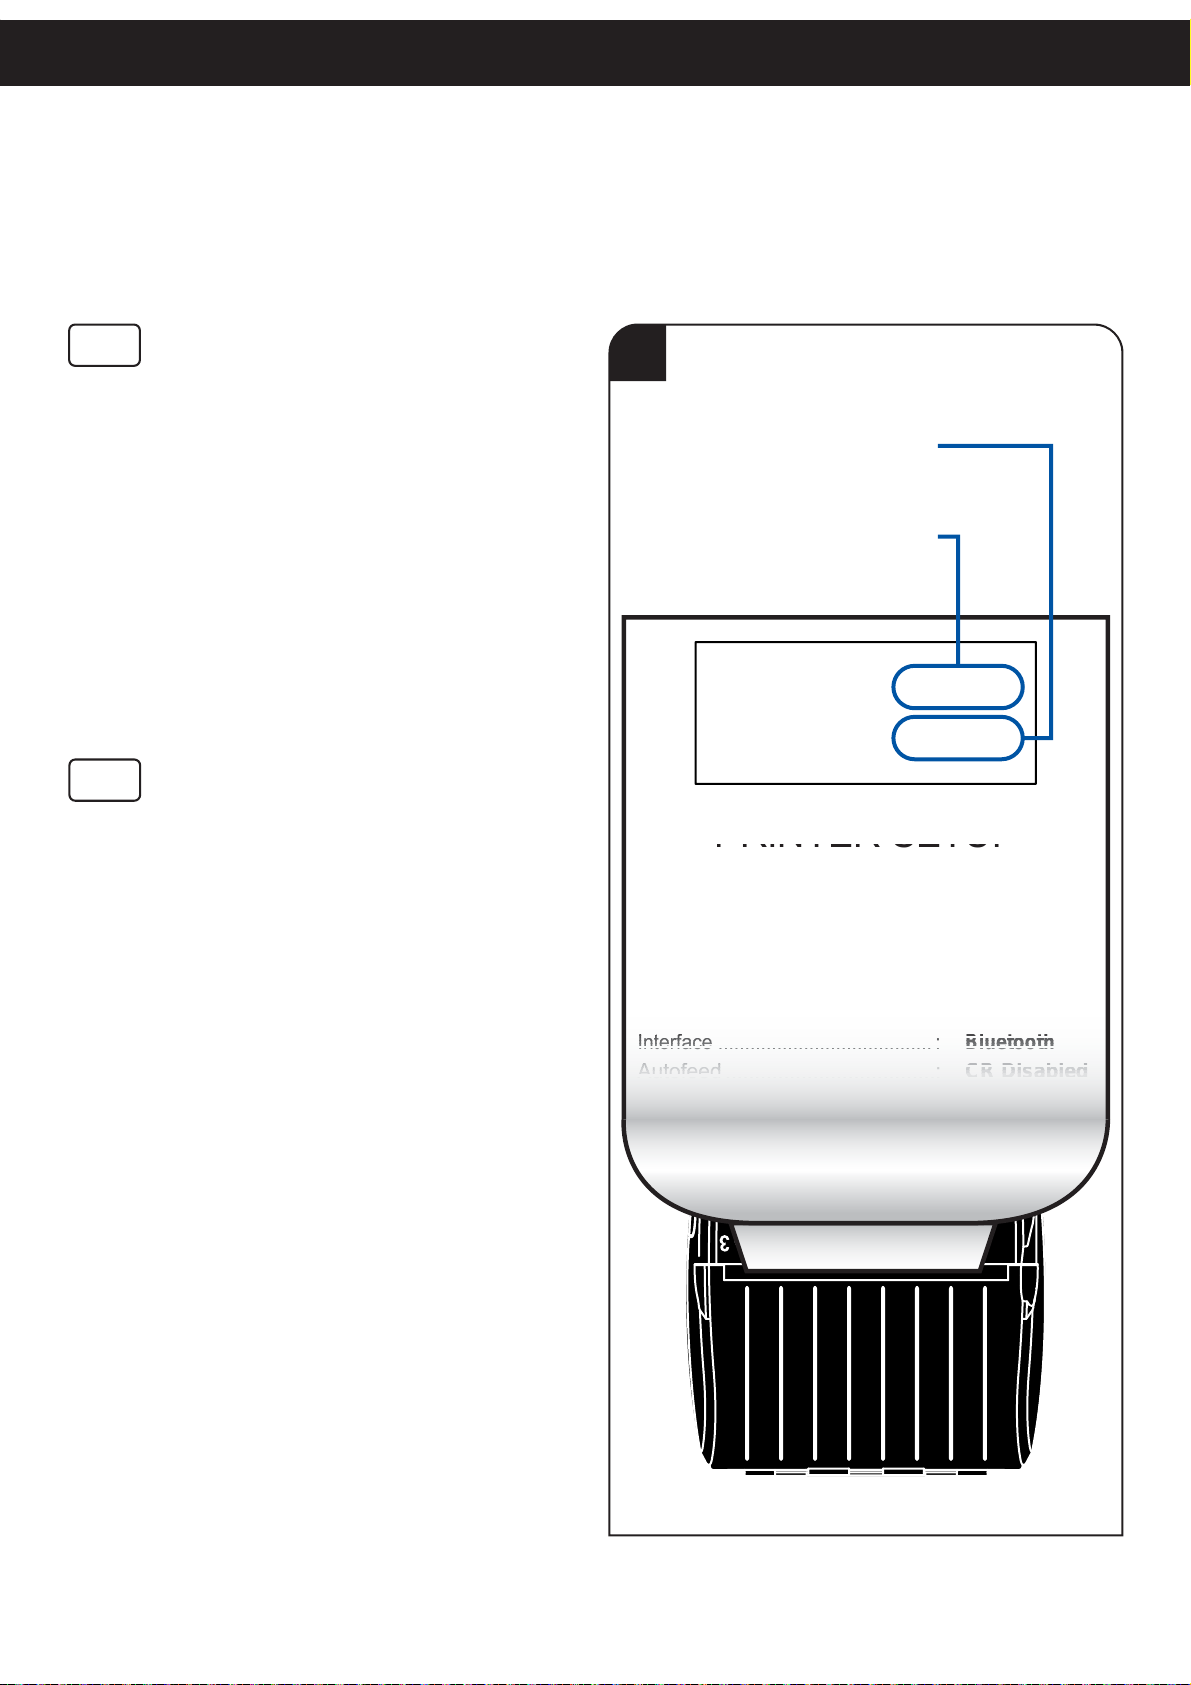
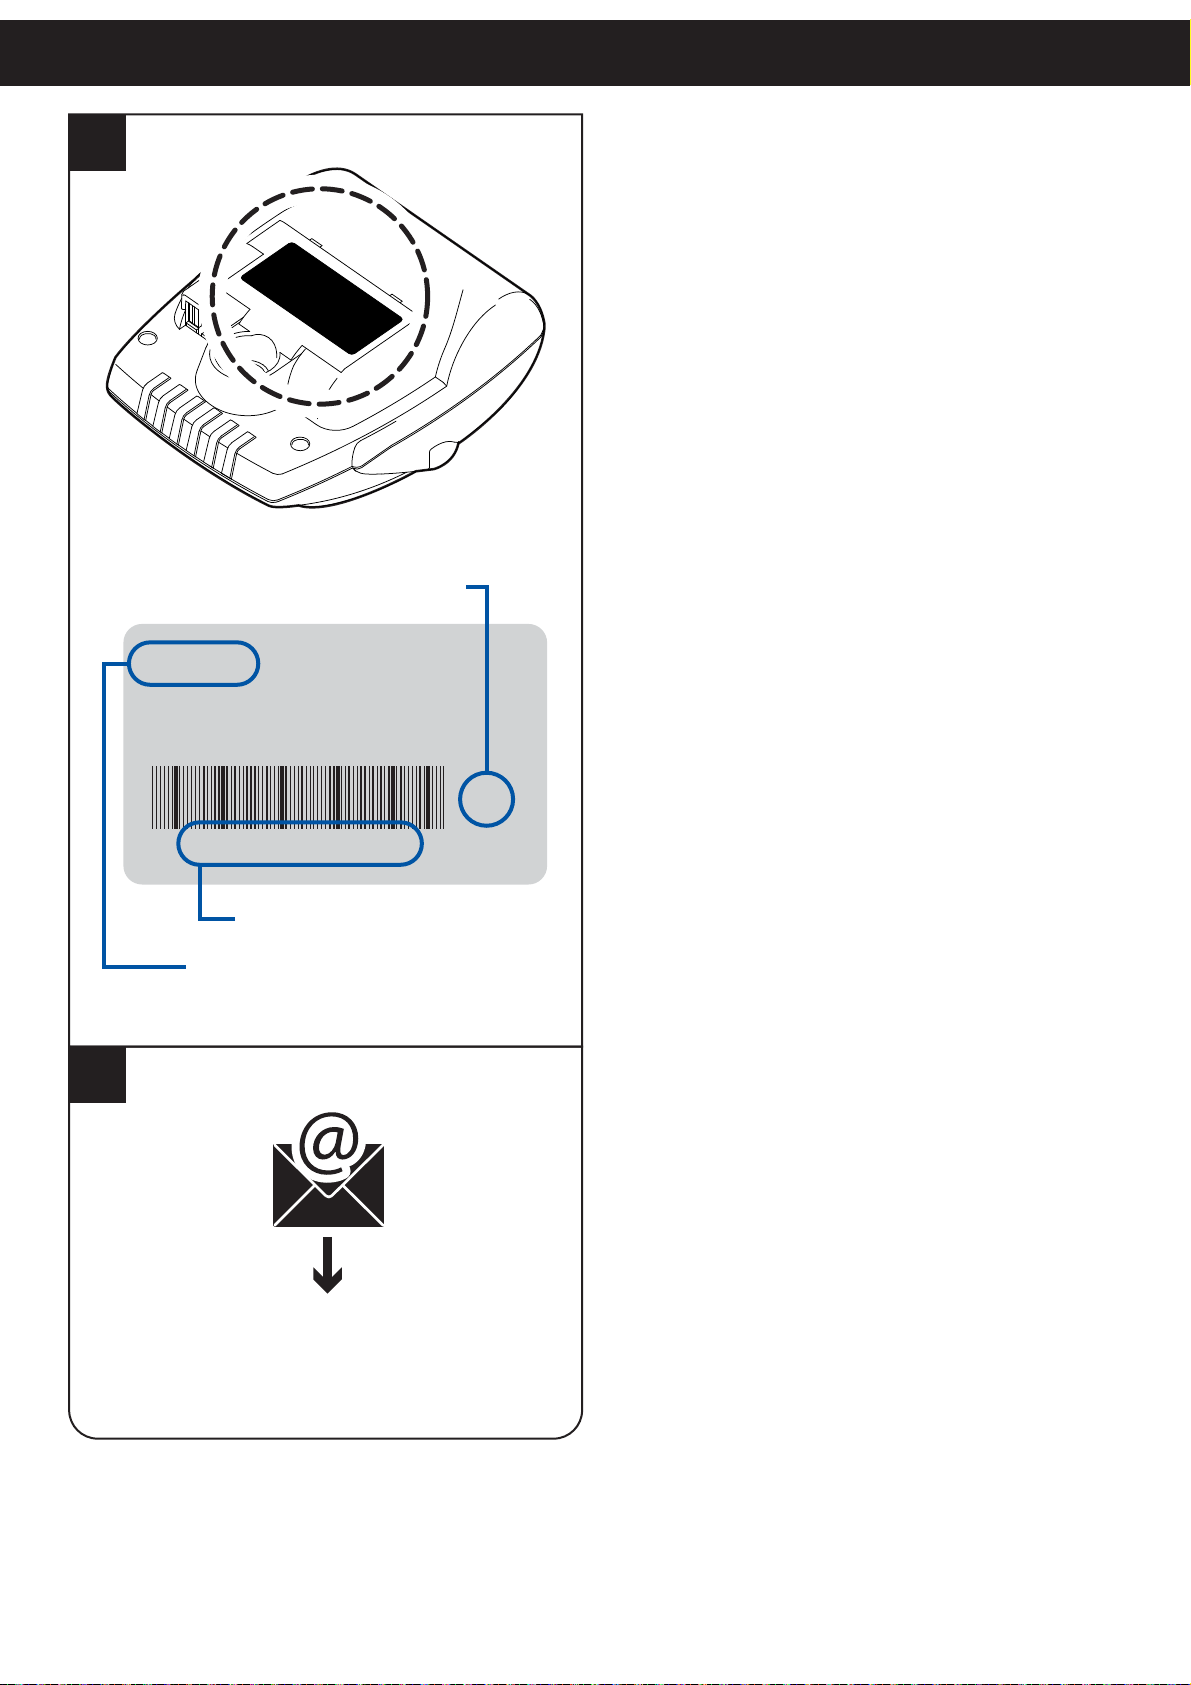
In case of failure, contact Technical Support by
sending an e-mail to [email protected] detailing:
Product code•
Serial number•
Hardware release•
Firmware release•
Bootloader release•
I
In caso di malfunzionamento, contattare l’assistenza tecnica inviando una e-mail all’indirizzo
[email protected] specifi cando:
Codice prodotto•
Numero di serie•
Revisione hardware•
Revisione fi rmware•
Revisione bootloader•
1
Bootloader release
Firmware release
MY3 rel.1.00
BOOTLOADER rel.1.00
EAD VOLTAGE [V] = 07.
EAD TEMPERATURE [°C] = 36
1
MY
47
Page 48
2
hardware release
PCXXXXX
xxxxxx xxx xxxx xxxx
xxxxxx xxx xxxx xxxx
0000000000000000000
serial number
product code
2
Customer Service Department
Customer Service Department
Rx
48
Page 49
CONSUMABLES
Materiale di consumo
GB I
CONSUMABLES AND ACCESSORIES
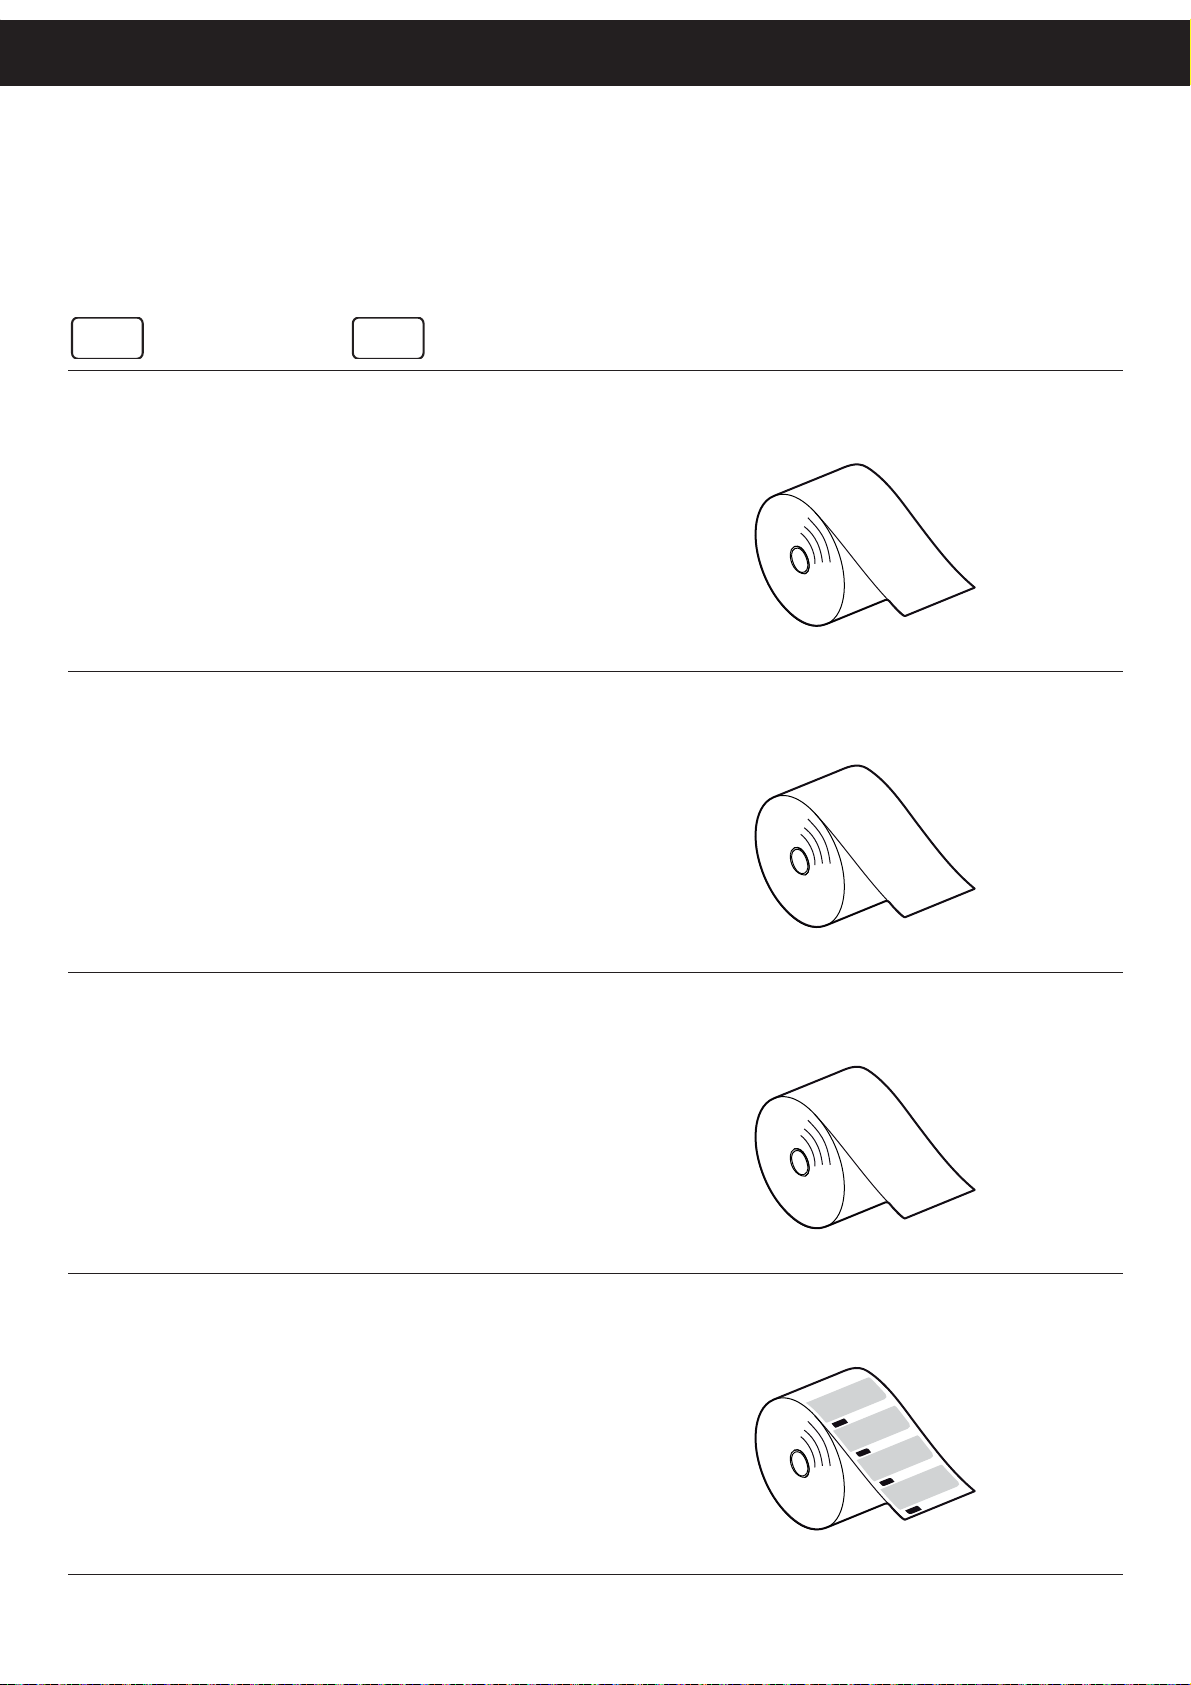
RCT76,2X45-25MM-58GR
Thermal paper roll
58gr.
Width = 76.2mm
d = 45 mm
Core = 25 mm
Thermal paper roll
80gr.
Width = 76.2mm
d = 45 mm
Core = 25 mm
Rotolo di carta termica
58gr.
Larghezza = 76.2 mm
d = 45 mm
Anima = 25mm
RCT76,2X45-25MM-80GR
Rotolo di carta termica
80gr.
Larghezza = 76.2 mm
d = 45 mm
Anima = 25mm
RCT76,2X45-25MM-100GR
Thermal paper roll
100gr.
Width = 76.2mm
d = 45 mm
Core = 25 mm
Roll labels 73x25.75
Width = 76mm
d = 45 mm
Core = 25 mm
Rotolo di carta termica
100gr.
Larghezza = 76.2 mm
d = 45 mm
Anima = 25mm
RCT76X1E-DE45-25MM
Rotolo etichette 73x25.75
Larghezza = 76 mm
d = 45 mm
Anima = 25mm
49
Page 50
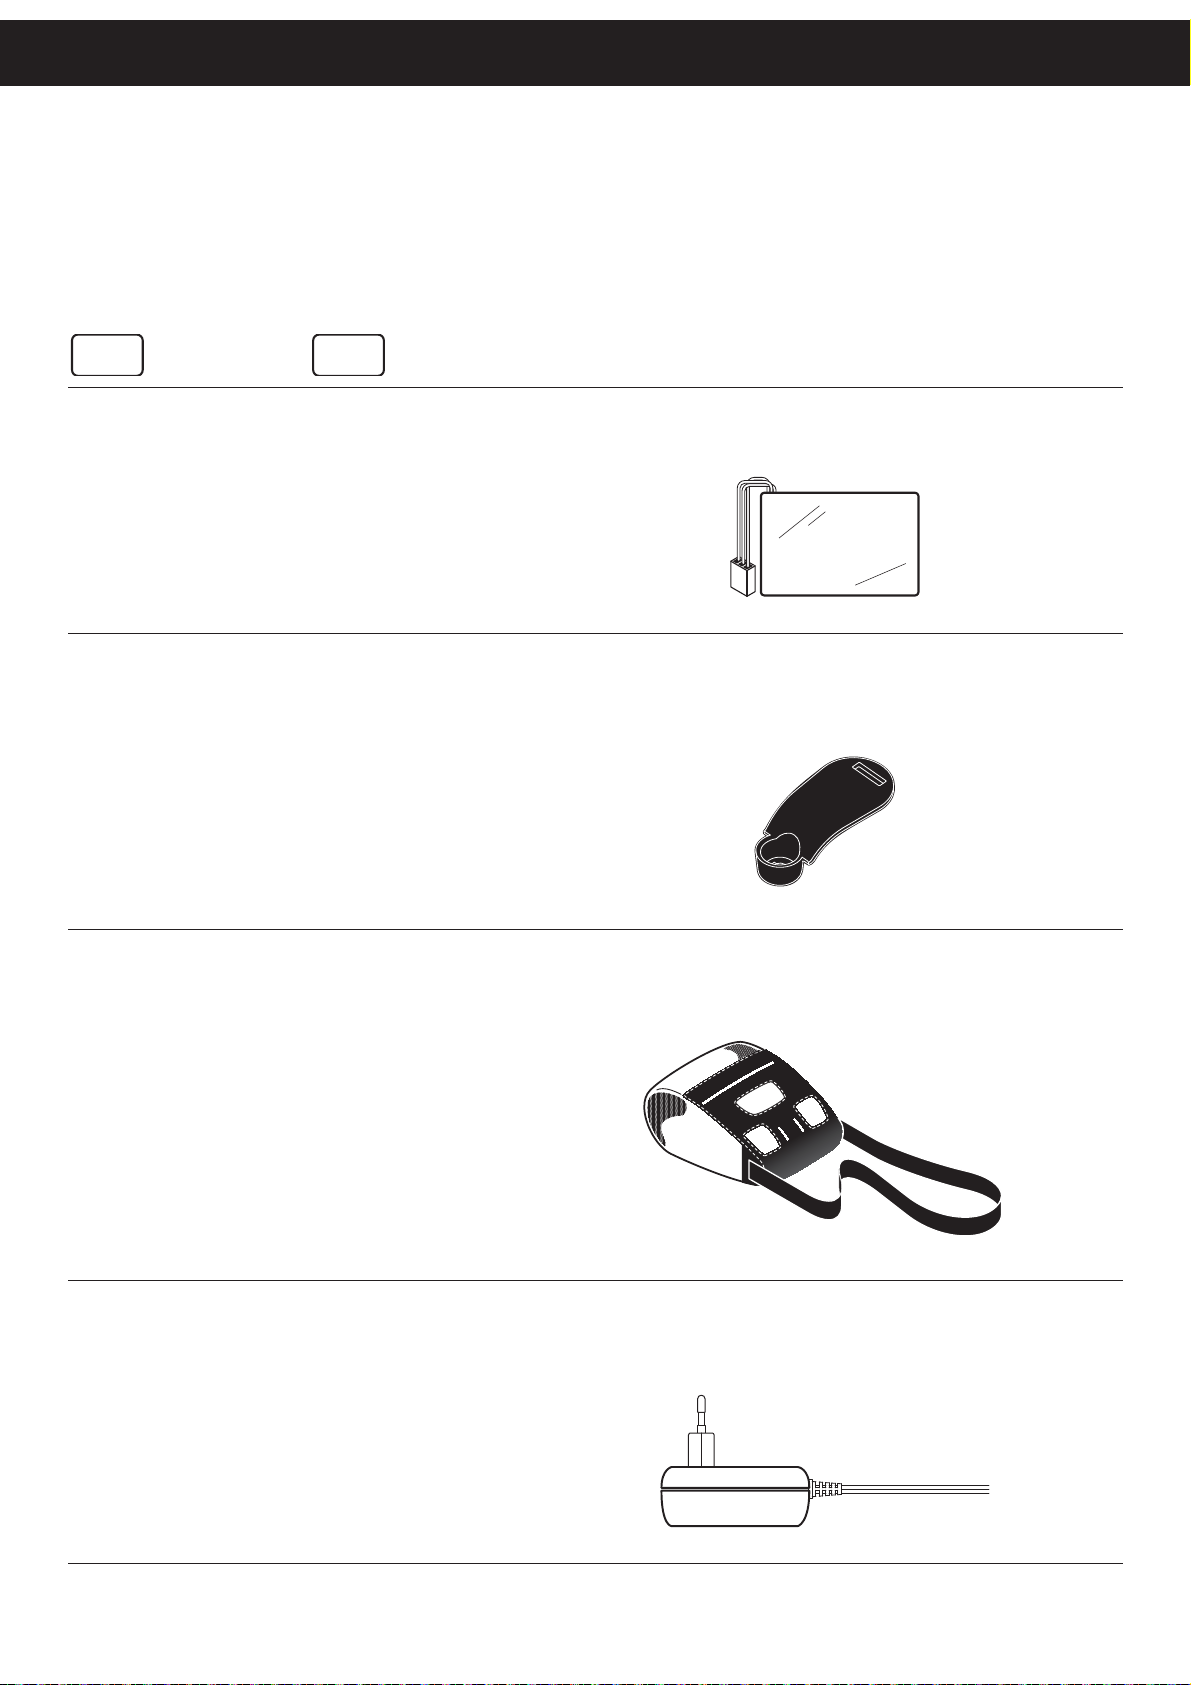
ACCESSORIES
Accessori
GB I
BTST062
Battery pack
(To replace the battery see
“MAINTENANCE”)
Belt Clip
(To replace the battery see
“MAINTENANCE”)
Pacco batteria
(Per sostituire la battera vedere
il capitolo “MANUTENZIONE”)
SCST065-P1200
Gancio per cintura
(Per sostituire la battera vedere
il capitolo “MANUTENZIONE”)
VACUSTODIA-ST065
Shoulder bag Tracolla
18W Power adapter
(see technical specifi cation)
Alimentatore 18W
(vedere specifi che tecniche)
PCALI-DPT100
50
Page 51
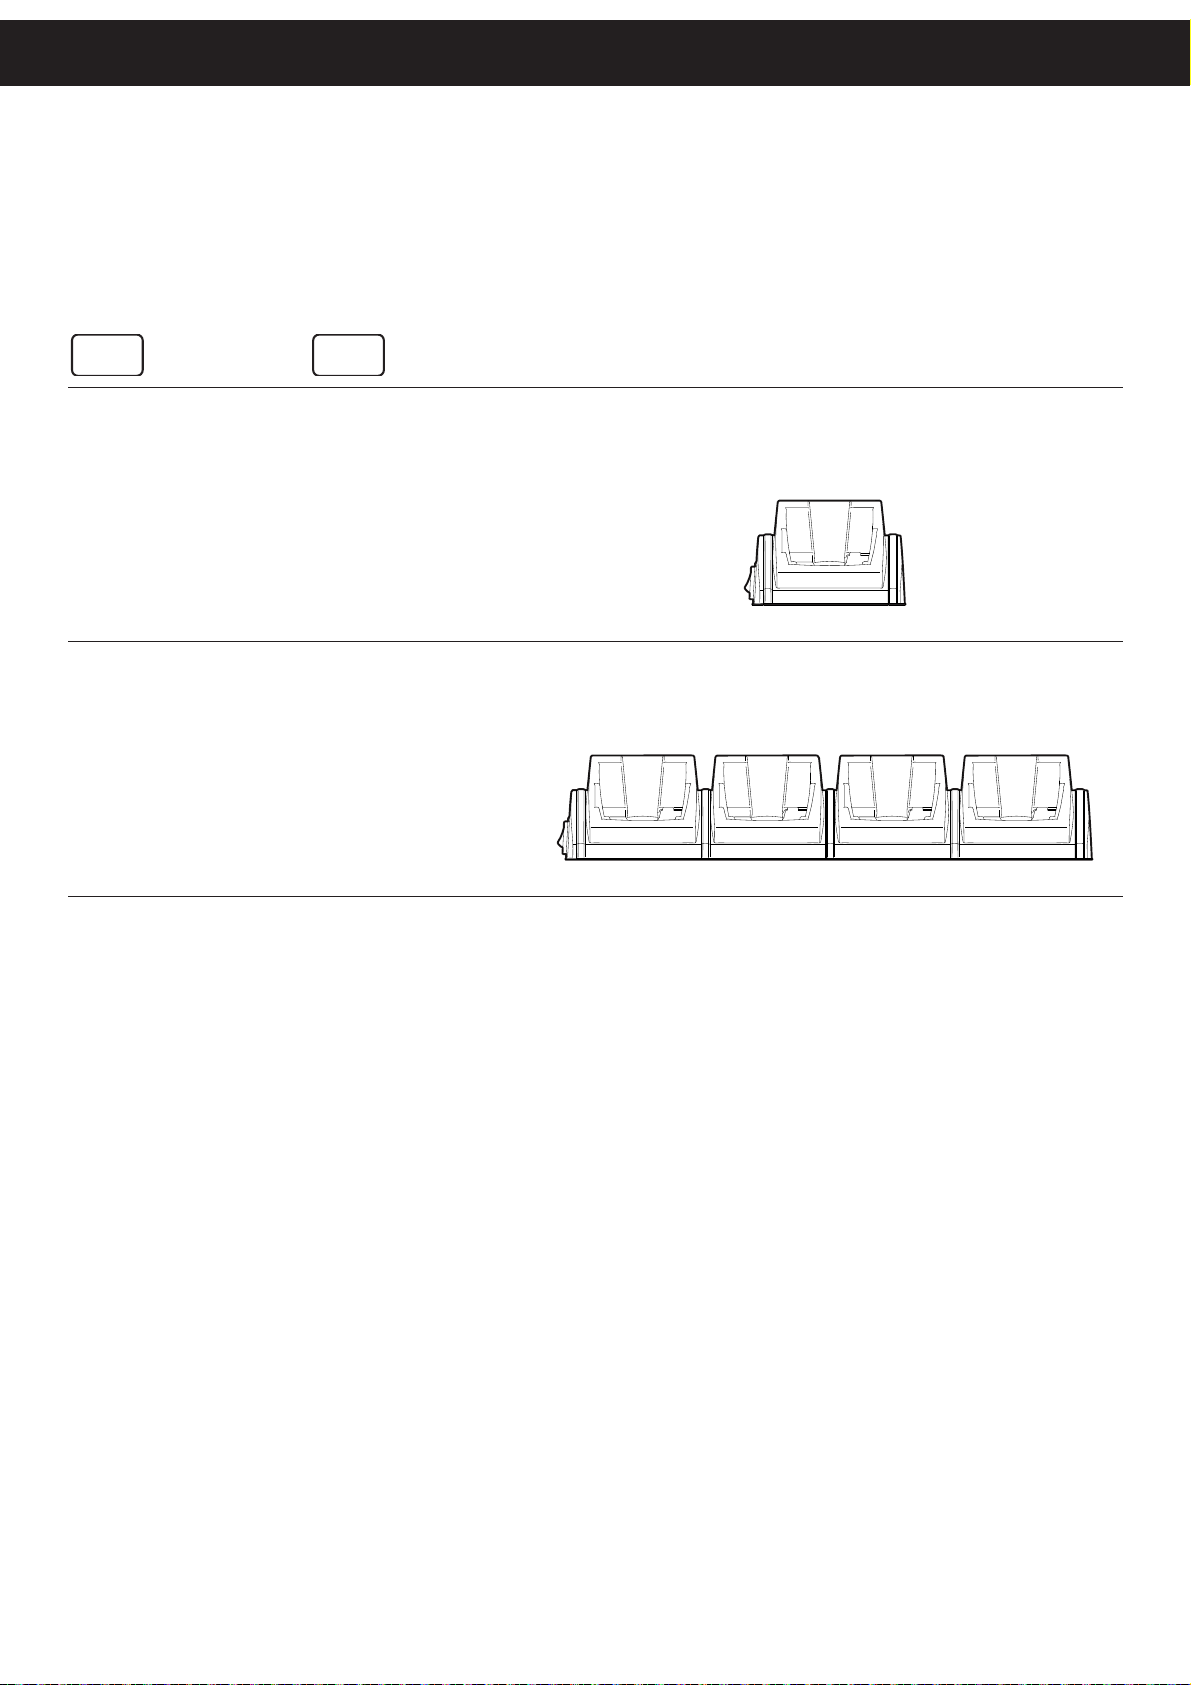
GB I
CONSUMABLES AND ACCESSORIES
PCXSP-MY3-DS1
Docking station
1 stand
(see technical specifi cation)
Docking station
4 stands
(see technical specifi cation)
Stazione di ricarica
1 posizione
(vedere specifi che tecniche)
PCXSP-MY3-DS
Stazione di ricarica
4 posizioni
(vedere specifi che tecniche)
51
Page 52
Part Number : DOMM-MY3 Rev. 2.00
CUSTOM ENGINEERING S.p.A.
World Headquarters
Via Berettine, 2 - 43010 Fontevivo, Parma ITALY
Tel. +39 0521 680111 - Fax +39 0521 610701
[email protected] - www.custom.biz
All rights reserved
www.custom.biz
 Loading...