

Page 1

POS
USER’S GUIDE
GUIDA OPERATIVA
Player
Commands manual
77200000000100
Page 2

GB
This manual is referred to the following release:
Player ......................................1.00
MicroPlaylist Manager ...............1.00
I
Questa manuale si riferisce alle seguenti versioni:
Player ......................................1.00
MicroPlaylistManager ................1.00
Page 3
GB
CUSTOM ENGINEERING S.p.A.
Str. Berettine 2
43010 Fontevivo (PARMA) - Italy
Tel. : +39 0521-680111
Fax : +39 0521-610701
http: www.custom.biz
Customer Service Department:
Email : [email protected]
© 2011 CUSTOM ENGINEERING S.p.A. –
Italy. All rights reserved. Total or partial reproduction of this manual in whatever form,
whether by printed or electronic means, is
forbidden. While guaranteeing that the information contained in it has been carefully
checked, CUSTOM ENGINEERING S.p.A.
and other entities utilized in the realization
of this manual bear no responsibility for
how the manual is used.
Information regarding any errors found in it
or suggestions on how it could be improved
are appreciated. Since products are subject to continuous check and improvement,
CUSTOM ENGINEERING S.p.A. reserves
the right to make changes in information
contained in this manual without prior
notifi cation.
The pre-installed multimedia contents
are protected from Copyright CUSTOM
ENGINEERING. Other company and
product names mentioned herein may be
trademarks of their respective companies.
Mention of third-party products is for informational purposes only and constitutes
neither an endorsement nor a recommendation. CUSTOM ENGINEERING assumes no responsibility with regard to the
performance or use of these products.
THE IMAGES USED IN THIS MANUAL ARE USED AS AN ILLUSTRATIVE EXAMPLES. THEY COULDN’T
REPRODUCE THE DESCRIBED
MODEL FAITHFULLY.
UNLESS OTHERWISE SPECIFIED,
THE INFORMATION GIVEN IN THIS
MANUAL
ARE REFERRED TO ALL MODELS
IN PRODUCTION AT THE ISSUE
DATE OF THIS DOCUMENT.
GENERAL SAFETY INFORMATION
Your attention is drawn to the following
actions that could compromise the characteristics of the product:
Read and retain the instructions which •
follow.
Follow all indications and instructions •
given on the device.
Make sure that the surface on which •
the device rests is stable. If it is not, the
device could fall, seriously damaging it.
Make sure that the device rests on a hard •
(non-padded) surface and that there is
suffi cient ventilation.
When positioning the device, make sure •
cables do not get damaged.
Use the type of electrical power supply •
indicated on the device label. If uncertain, contact your dealer.
Make sure the electrical system that •
supplies power to the device is equipped
with a ground wire and is protected by a
differential switch.
Do not block the ventilation openings.•
Do not insert objects inside the device as •
this could cause short-circuiting or damage components that could jeopardize
printer functioning.
Do not carry out repairs on the device •
yourself, except for the normal maintenance operations given in the user
manual.
Make sure that there is an easily-acces-•
sible outlet with a capacity of no less than
15A in the vicinity of where the device is
to be installed.
Periodically perform scheduled mainte-•
nance on the device to avoid dirt build-up
that could compromise the correct, safe
operation of the unit.
Before any type of work is done on the •
machine, disconnect the battery pack.
Do not touch the head heating line with •
bare hands or metal objects. Do not
perform any operation inside the printer
immediately after printing because the
head and motor tend to become very
hot.
GENERAL INSTRUCTIONS
CUSTOM ENGINEERING S.p.A. declines
all responsibility for accidents or damage
to persons or property occurring as a result of tampering, structural or functional
modifi cations, unsuitable or incorrect in-
stallations, environments not in keeping
with the equipment’s protection degree or
with the required temperature and humidity
conditions, failure to carry out maintenance
and periodical inspections and poor repair
work.
THE CE MARK AFFIXED TO
THE PRODUCT CERTIFY
THAT THE PRODUCT SATISFIES THE BASIC SAFETY
REQUIREMENTS.
The device is in conformity with the essential Electromagnetic Compatibility and
Electric Safety requirements laid down in
Directives 2006/95/CE and 2004/108/CE
inasmuch as it was designed in conformity
with the provisions laid down in the following Standards:
EN 55022 Class B • (Limits and methods
of measurements of radio disturbance
characteristics of Information Technology Equipment)
EN 55024 • (Information Technology
Equipment – Immunity characteristics –
Limits and methods of measurement)
EN 60950 • (Safety of information equipment including electrical business
equipment)
GUIDELINES FOR
THE DISPOSAL OF
THE PRODUCT
The crossed-out rubbish bin logo means
that used electrical and electronic products
shall NOT be mixed with unsorted municipal waste. For more detailed information
about recycling of this product, refer to the
instructions of your country for the disposal
of these products.
Do not dispose of this equipment as •
miscellaneous solid municipal waste, but
arrange to have it collected separately.
The re-use or correct recycling of the •
electronic and electrical equipment
(EEE) is important in order to protect
the environment and the wellbeing of
humans.
In accordance with European Directive •
WEEE 2002/96/EC, special collection
points are available to which to deliver
waste electrical and electronic equipment and the equipment can also be
handed over to a distributor at the moment of purchasing a new equivalent
type.
The public administration and producers •
of electrical and electronic equipment
are involved in facilitating the processes
of the re-use and recovery of waste electrical and electronic equipment through
the organisation of collection activities
and the use of appropriate planning arrangements.
Unauthorised disposal of waste electrical •
and electronic equipment is punishable
by law with the appropriate penalties.
The format used for this manual improves use of natural resources reducing the quantity of necessary paper to print this
copy.
Page 4
I
CUSTOM ENGINEERING S.p.A.
Str. Berettine 2
43010 Fontevivo (PARMA) - Italy
Tel. : +39 0521-680111
Fax : +39 0521-610701
http: www.custom.biz
Assistenza Tecnica Clienti :
Email : [email protected]
© 2011 CUSTOM ENGINEERING S.p.A.
– Italy. Tutti i diritti riservati. È vietata la
riproduzione totale o parziale del presente manuale in qualsiasi forma, sia essa
cartacea o informatica. La CUSTOM ENGINEERING S.p.A. e le risorse impiegate
nella realizzazione del manuale, non si
assumono nessuna responsabilità derivante dall’utilizzo dello stesso, garantendo
che le informazioni contenute nel manuale
sono state accuratamente verifi cate. Ogni
suggerimento riguardo ad eventuali errori
riscontrati o a possibili miglioramenti sarà
particolarmente apprezzato. I prodotti
sono soggetti ad un continuo controllo e
miglioramento, pertanto la CUSTOM ENGINEERING S.p.A. si riserva di modifi care
le informazioni contenute nel manuale
senza preavviso.
I contenuti multimediali pre/installati sono
coperti da Copyright CUSTOM ENGINEERING. Altre società e altri nomi di prodotti
qui menzionati sono marchi delle rispettive
società.
La citazione di prodotti di terze parti è a
solo scopo informativo e non costituisce
alcun impegno o raccomandazione. CUSTOM ENGINEERING declina ogni responsabilità riguardo l’uso e le prestazioni
di questi prodotti.
LE IMMAGINI UTILIZZATE NEL
PRESENTE MANUALE RIVESTONO
PURO SCOPO ESEMPLIFICATIVO E
POTREBBERO NON RIPRODURRE
FEDELMENTE IL MODELLO DESCRITTO.
SE NON DIVERSAMENTE SPECIFICATO, LE INFORMAZIONI FORNITE
NEL PRESENTE MANUALE SONO
VALIDE PER TUTTI I MODELLI
IN PRODUZIONE AL MOMENTO
DELL’EMISSIONE DI QUESTO DOCUMENTO.
INFORMAZIONI GENERALI
SULLA SICUREZZA
Si richiama l’attenzione sulle seguenti
azioni che possono compromettere la conformità e le caratteristiche del prodotto:
Leggete e conservate le istruzioni se-•
guenti;
Seguite tutti gli avvisi e le istruzioni indi-•
cate sul dispositivo.
Non collocate il dispositivo su una super-•
fi cie instabile perché potrebbe cadere e
danneggiarsi seriamente.
Non collocate il dispositivo su superfi ci •
morbide o in ambienti che non garantiscono la necessaria ventilazione.
Collocate il dispositivo in modo da evita-•
re che i cavi ad esso collegati possano
essere danneggiati.
Utilizzate il tipo di alimentazione elettrica •
indicato sull’etichetta del dispositivo.
Assicuratevi che l’impianto elettrico che •
alimenta il dispositivo sia provvisto del
conduttore di terra e che sia protetto da
interruttore differenziale.
Non ostruite le aperture per la ventila-•
zione.
Non introducete oggetti all’interno del •
dispositivo in quanto essi possono
cortocircuitare o danneggiare parti che
potrebbero comprometterne il funzionamento.
Non intervenite personalmente sul di-•
spositivo, eccetto che per le operazioni
di ordinaria manutenzione, espressamente riportate nel manuale utente.
Assicurarsi che nel luogo in cui si vuole •
installare il dispositivo, vi sia una presa
di corrente facilmente accessibile e di
capacità non inferiore ai 10A.
Eseguire periodicamente la manuten-•
zione ordinaria del dispositivo al fi ne di
evitare che accumuli di sporcizia possano compromettere il corretto e sicuro
funzionamento dell’unità.
Prima di ogni operazione di manutenzio-•
ne scollegare il cavo alimentazione.
Non toccare la linea di riscaldamento •
della testina a mani nude o con oggetti
metallici. Non eseguire operazioni all’interno della stampante subito dopo la
stampa, perché la testina ed il motore
possono raggiungere temperature molto
elevate.
AVVERTENZE GENERALI
La CUSTOM ENGINEERING S.p.A. declina
ogni responsabilità per sinistri od ogni qualsivoglia inconveniente, a persone o cose,
derivanti da manomissioni, modifi che strut-
turali o funzionali, installazione non idonea o
non correttamente eseguita, ambientazione
non idonea alle protezioni o climatizzazioni
richieste, carenze di manutenzione o di
verifi che periodiche o di riparazioni in ogni
caso non correttamente eseguite.
IL MARCHIO CE APPLICATO
AL PRODOTTO CERTIFICA
CHE IL PRODOTTO STESSO SODDISFA I REQUISITI
BASE DI SICUREZZA.
Il dispositivo soddisfa i requisiti essenziali
di Compatibilità Elettromagnetica e di
Sicurezza Elettrica previsti dalle direttive
2006/95/CE e 2004/108/CE in quanto
progettata in conformità alle prescrizioni
delle seguenti Norme:
EN 55022 Classe B • (Apparecchi per la
tecnologia dell’informazione - Caratteristiche di radiodisturbo - Limiti e metodi
di misura)
EN 55024 • (Apparecchiature per la tecnologia dell’informazione Caratteristiche di
immunità Limiti e metodi di misura)
EN 60950 • (Apparecchiature per la tecnologia dell’informazione Caratteristiche di
immunità Limiti e metodi di misura)
INDICAZIONI PER LO
SMALTIMENTO DEL
PRODOTTO
Il simbolo del bidone barrato sta ad indicare che lo smaltimento del dispositivo NON
deve essere eseguito attraverso il normale
ciclo di smaltimento dei rifi uti. Per informa-
zioni maggiormente dettagliate sul riciclaggio di questo prodotto, fare riferimento alle
indicazioni dell’autorità del vostro Paese
per lo smaltimento di questi prodotti.
Non smaltire queste apparecchiature •
come rifi uto municipale solido misto ma
effettuare una raccolta separata.
Il reimpiego o il corretto riciclaggio delle •
AEE è utile a preservare l’ambiente e la
salute umana stessa.
Secondo la Direttiva europea WEEE •
2002/96/EC sono disponibili specifi ci
centri di raccolta a cui consegnare i rifi uti
di apparecchiature elettriche ed elettroniche, ed è altresì possibile riconsegnare
l’apparecchiatura al distributore all’atto
dell’acquisto di una nuova equivalente.
La pubblica amministrazione ed i produt-•
tori di AEE sono impegnati ad agevolare
i processi di reimpiego e recupero dei
RAEE attraverso l’organizzazione delle
attività di raccolta e attraverso l’utilizzo di
opportuni accorgimenti progettuali.
La legge punisce con opportune sanzioni •
chi smaltisce abusivamente i RAEE.
Il formato usato per questo manuale migliora l’uso di risorse naturali riducendola quantità di carta necessaria per stampare
questa copia.
Page 5

TABLE OF CONTENTS
Indice
Table des matières
Inhaltsverzeichnis
Indice
DESCRIPTION
FIRST INSTALLATION
USE OF MicroPlaylistManager
ADVANCED FUNCTIONS
TECHNICAL SPECIFICATIONS
TROUBLESHOOTING
CONTACTS
CONSUMABLES AND ACCESSORIES
GLOSSARY
Page 6

6
Page 7
UNPACKING THE DEVICE
Disimballo dispositivo
DESCRIPTION
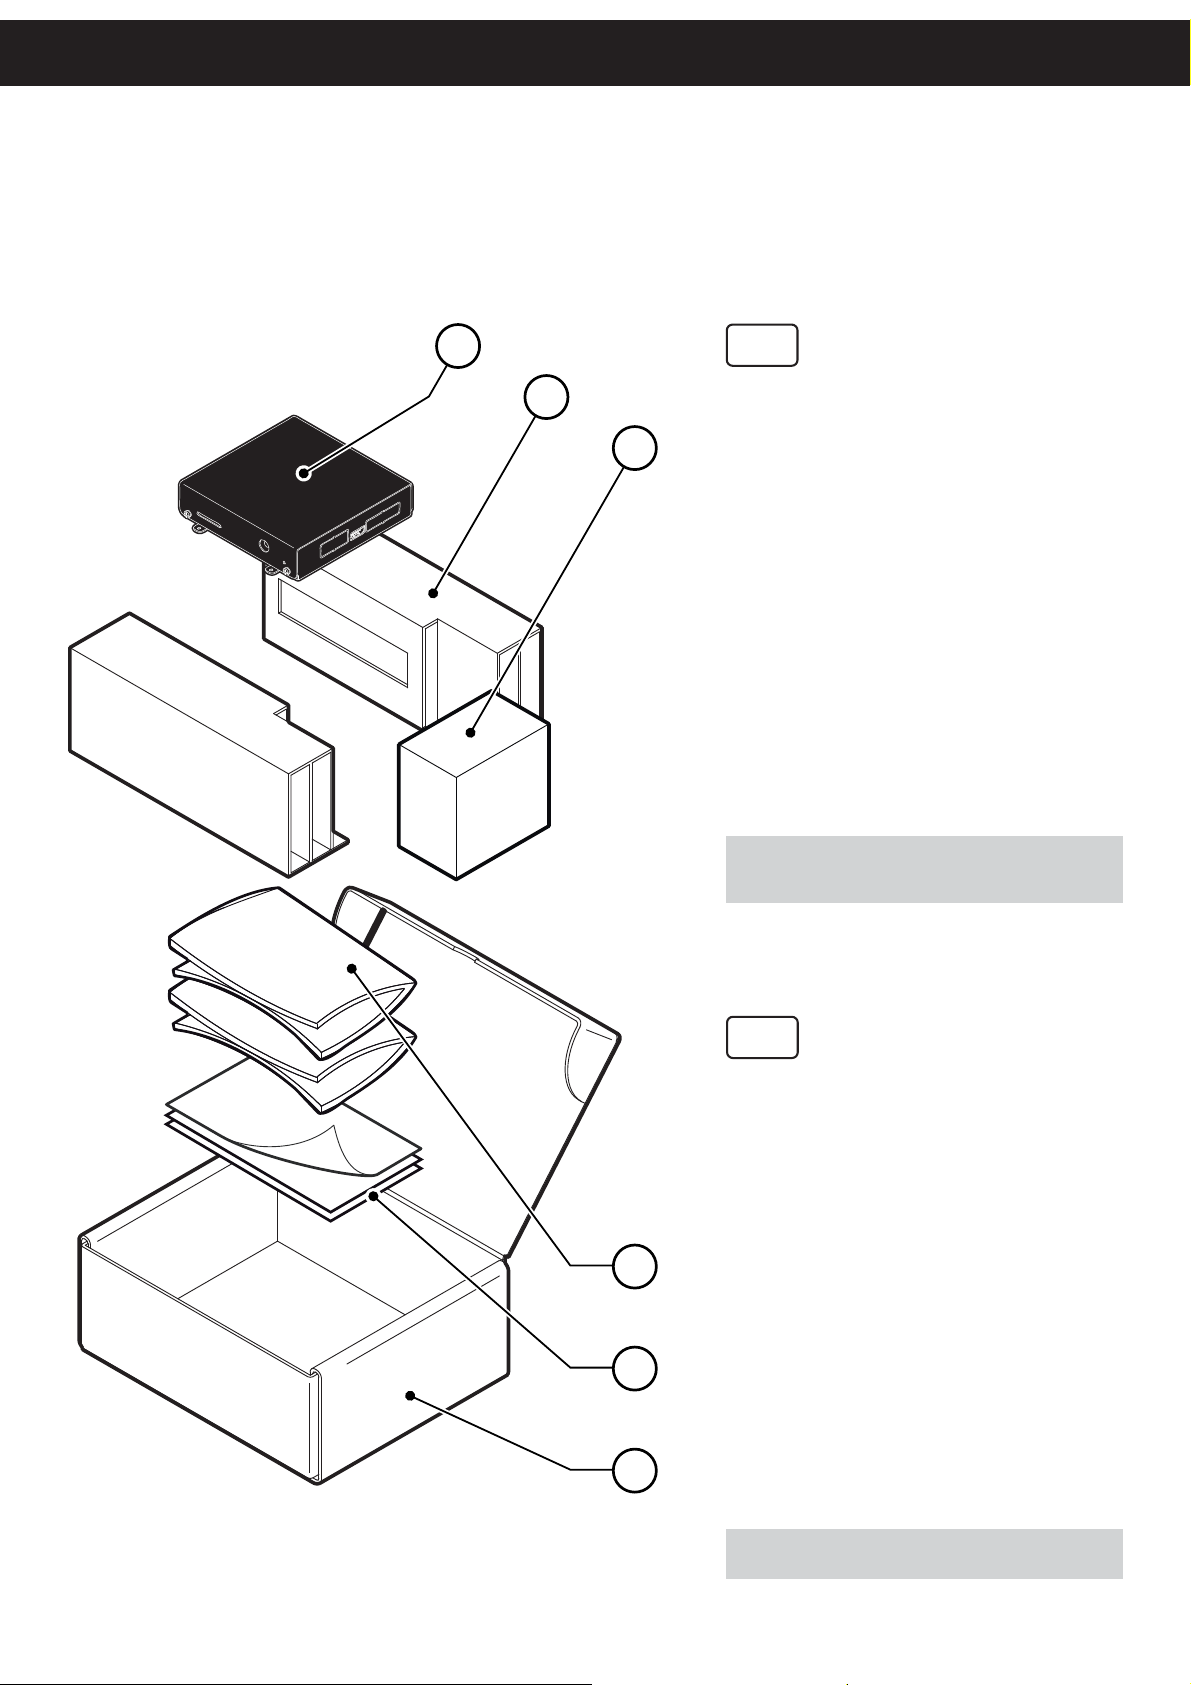
1
2
3
GB
Remove the device from its carton being careful not to damage the packing
material so that it may be re-used if
the device is to be transported in the
future. Make sure that all the components illustrated below are present and
that there are no signs of damage. If
there are, contact Customer Service.
Device1.
Packing shell (left/right)2.
Power supply3.
User manual4.
Guarantee sheet5.
Box6.
NOTE: Keep the box, trays and packing materials in
the event the device must be transported/shipped in
the future.
4
5
6
I
Rimuovete il dispositivo dal cartone,
facendo attenzione a non danneggiare
il materiale di imballaggio al fi ne di uti-
lizzarlo per trasporti futuri. Assicuratevi
che vi siano i componenti illustrati in
seguito e che essi non siano danneggiati. In caso contrario contattate il
servizio di assistenza.
Dispositivo1.
Imballo di protezione (dx/sx)2.
Alimentatore3.
Manuale utente4.
Foglio garanzia5.
Scatola6.
NOTA: Conservare la scatola, i vassoi e gli imballi per
eventuali trasporti in altre destinazioni.
7
Page 8
DEVICE DESCRIPTION
Descrizione dispositivo
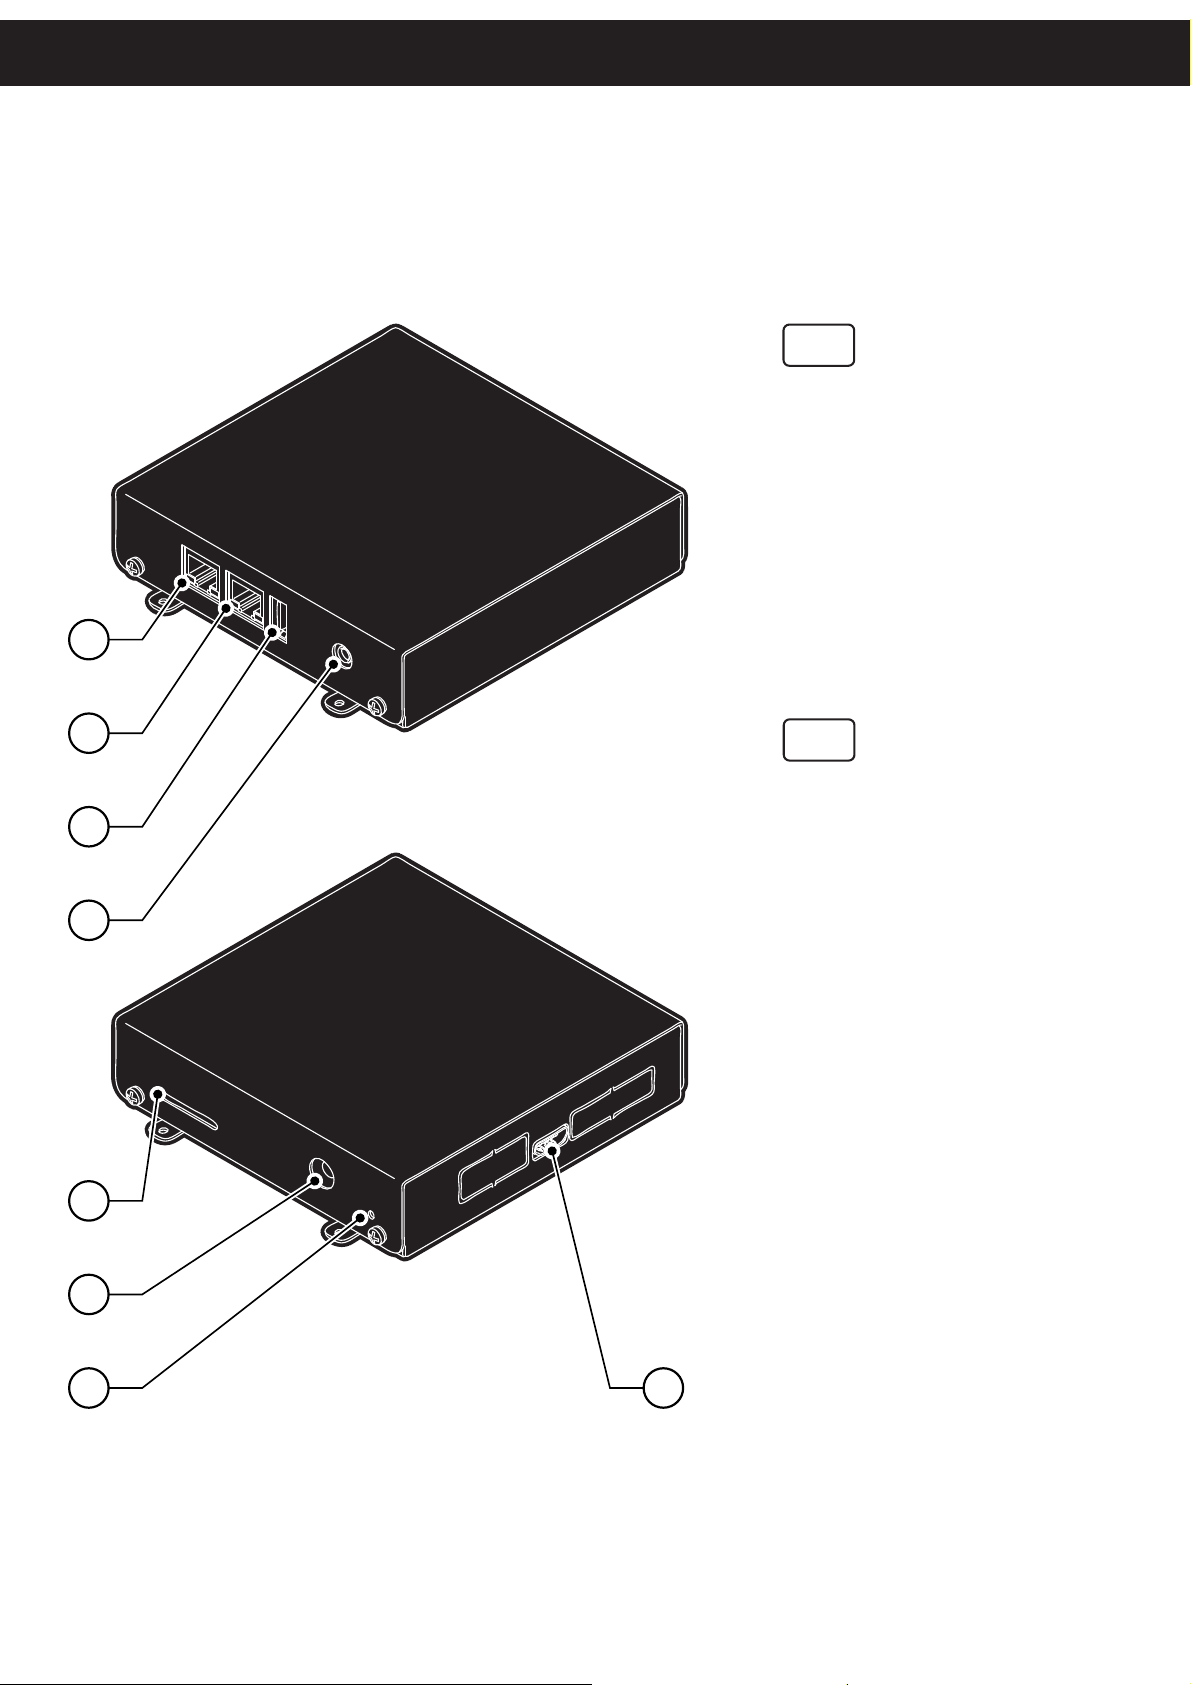
1
GB
ETHERNET 1 port1.
ETHERNET 2 port2.
USB port3.
AUDIO port4.
Slot for SD card5.
Power supply port6.
Status led7.
HDMI video port8.
2
3
4
I
Porta ETHERNET 11.
Porta ETHERNET 22.
Porta USB3.
Porta AUDIO4.
Alloggiamento per SD card5.
Porta alimentazione6.
Led di stato7.
Porta video HDMI8.
5
6
7 8
8
Page 9
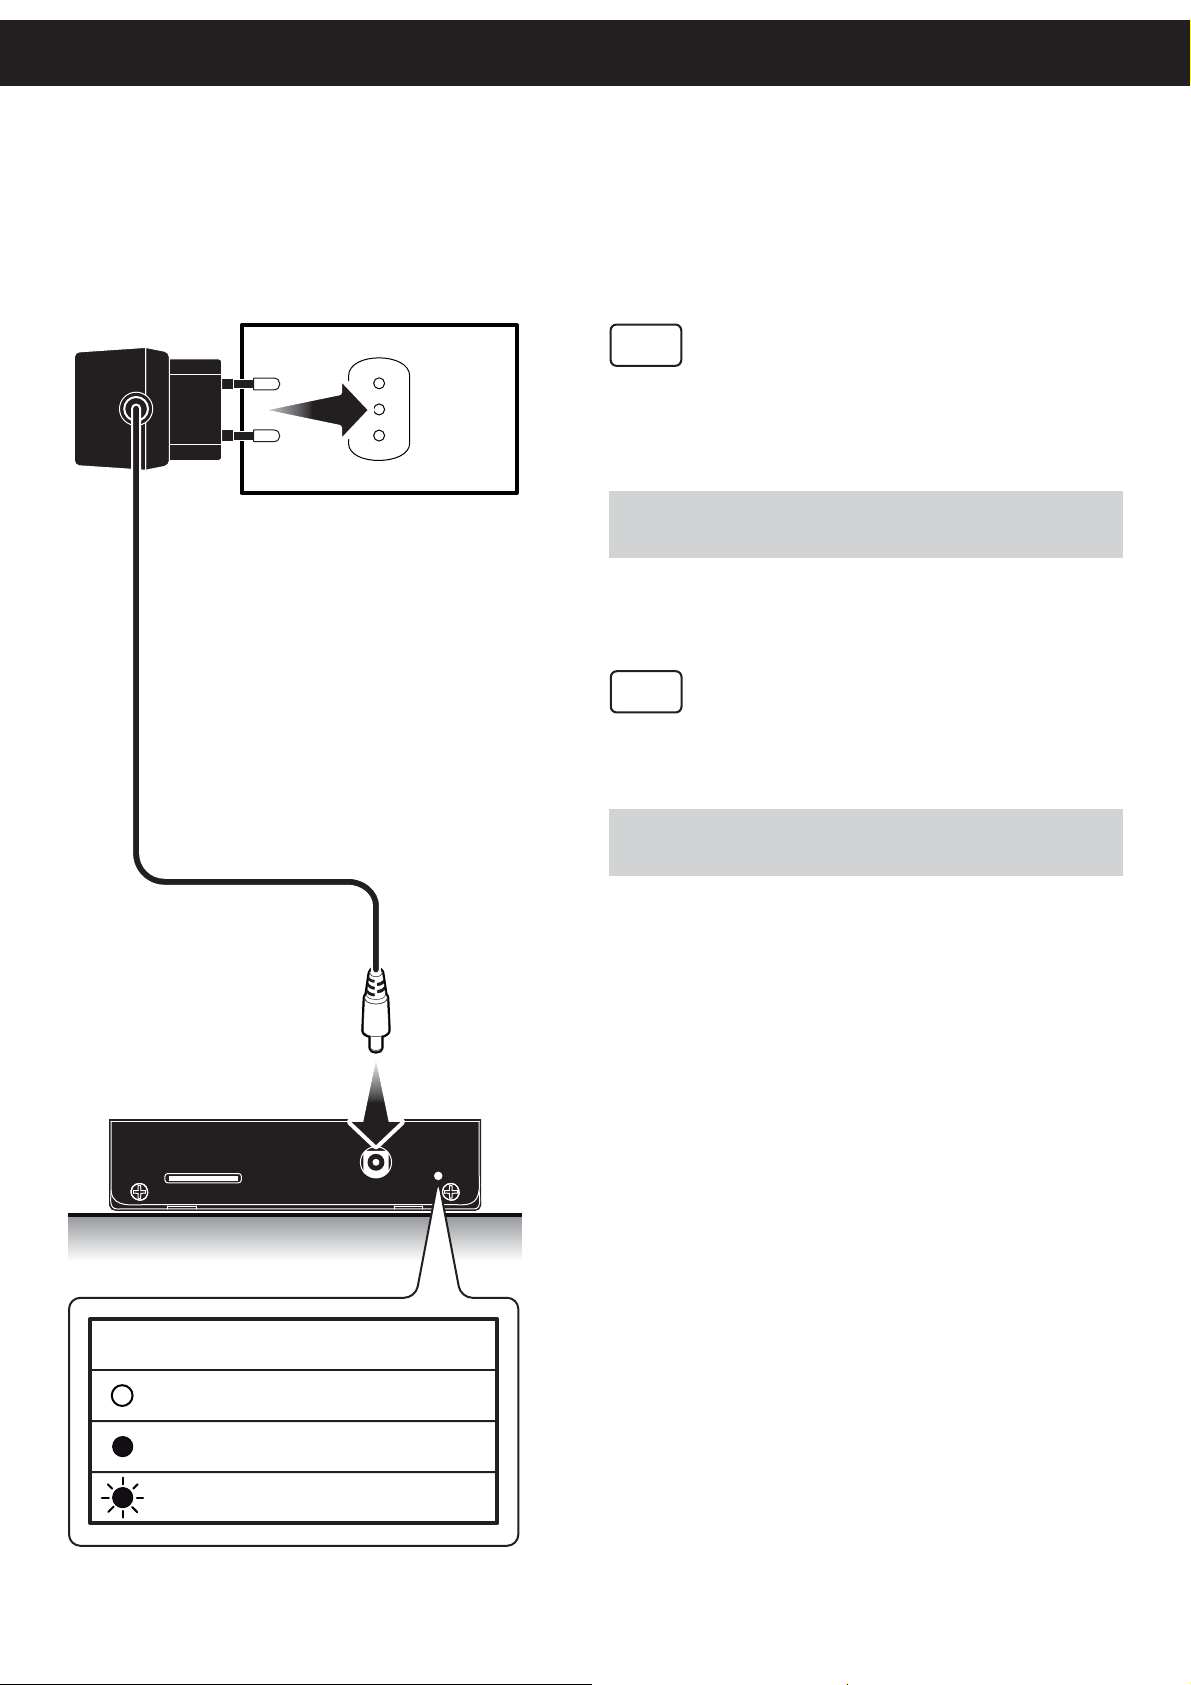
SWITCH THE DEVICE ON/OFF
Accendere / Spegnere il dispositivo
Switch on the device by connecting the power
supply to electrical outlet and the Power In port
as shown.
NOTE:
Use the type of electrical power supply indicated on the label (device
and/or power supply).
DESCRIPTION
GB
SD Card
I
Accendere il dispositivo collegando l’alimentatore
alla presa elettrica e alla porta Power In.
NOTA:
Utilizzate il tipo di alimentazione elettrica indicato sull’etichetta del
dispositivo e/o alimentatore.
Power In
LED
OFF
ON
BLINKING
DESCRIPTION
DEVICE OFF
BOOT
READY
9
Page 10
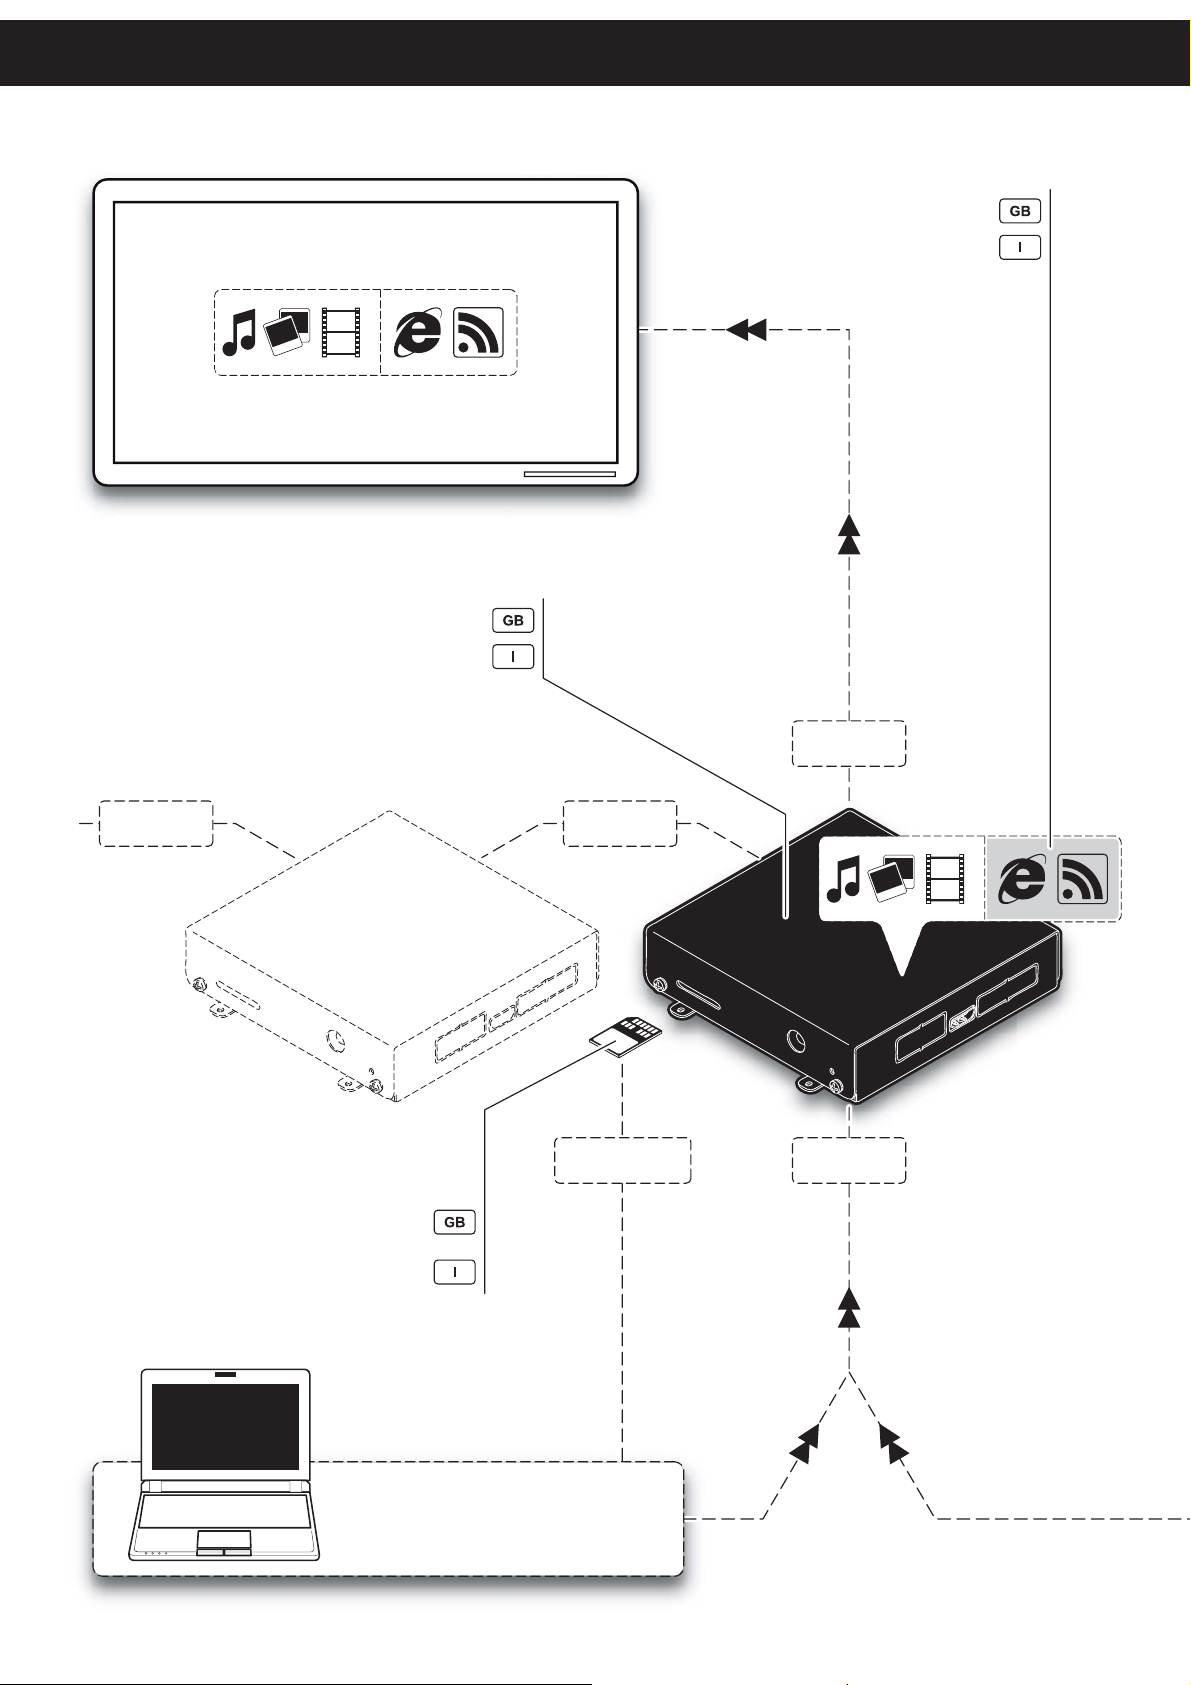
HD TV / MONITOR
Internal storage for multimedia content
Memoria interna per contenuti multimediali
Internet connection required
Richiesta connessione a Internet
Alternative storage for multimedia content
(SD CARD NOT INCLUDED)
Memoria alternativa per i contenuti multimediali
(SD CARD NON INCLUSA)
LAN2LAN2
Card reader
Video out
Playlist
LAN1
MicroPlaylistManager
software
10
Page 11
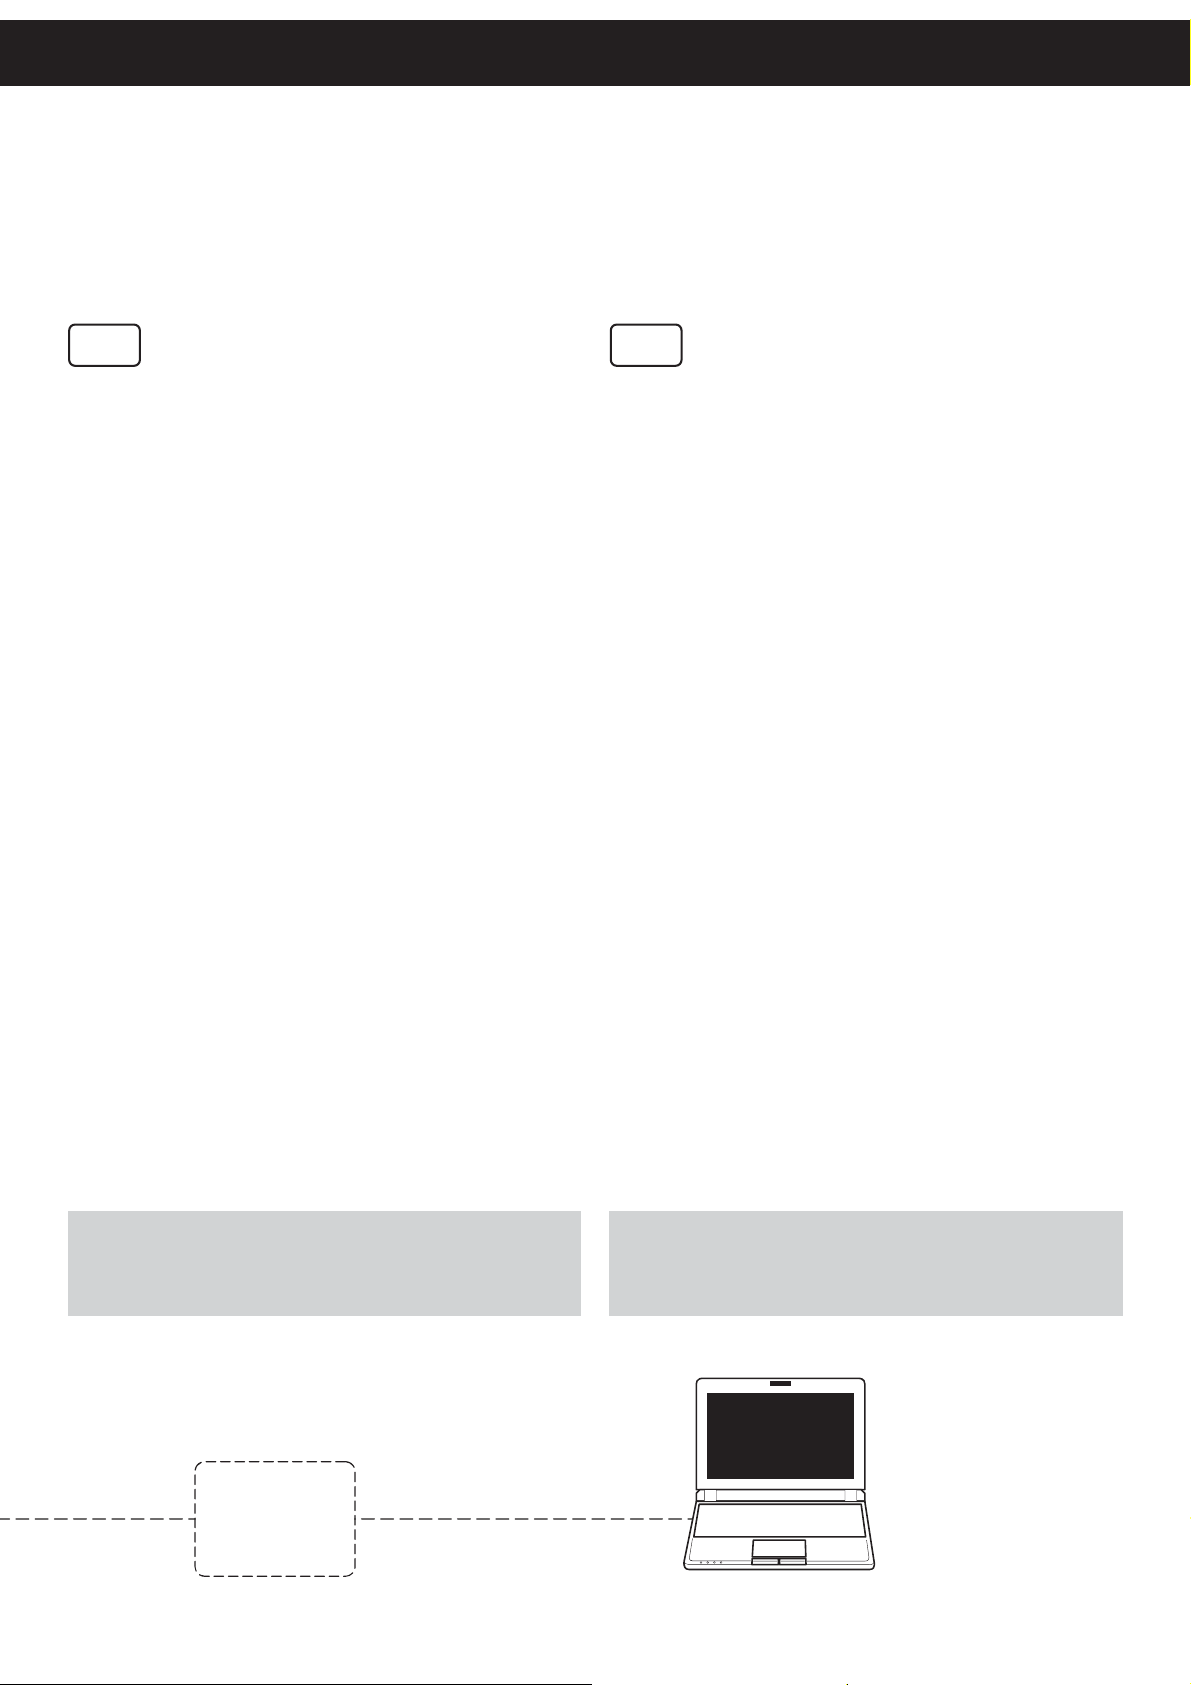
FUNCTIONING DIAGRAM
Schema di funzionamento
FIRST INSTALLATION
GB
This system is able to play multimedia content of
the playlist stored internally on a HD TV / MONITOR.
Use the MicroPlayListManager software to edit
from PC your playlist with the desidered multimedia content and transfer all to the internal memory
of Player via LAN. If the capacity of Player is
not enough, you can export from PC your playlist
and multimedia content on an SD card
(1) (2)
with
adequate capacity to achieve the same result.
With Player (if you have an Internet connection)
you can receive and display web pages and RSS
feeds via LAN port and also thanks to the second
LAN port in switch modality, it is possible to connect additional Player.
Player is equipped with an internal server FTP
to allow:
Set to operating parameters.•
Add/delete multimedia contents such as vid-•
eos, images, streaming contents, webpage
and banner.
I
Questo sistema è in grado di riprodurre i contenuti
multimediali della playlist salvata internamente su
su una HD TV/MONITOR.
Utilizzare il software MicroPlayListManager per
programmare da PC una playlist con i contenuti
multimediali desiderati e trasferire la playlist alla
memoria interna di Player mediante la porta
LAN. Qualora la capienza di Player non fosse
suffi ciente, è possibile esportare dal PC la playlist
e i suoi contenuti multimediali su una SD card
(1) (2)
di capienza adeguata per ottenere il medesimo
risultato.
Player (qualora si disponga di una connessione
Internet) è in grado di ricevere e visualizzare pagine web e feeds RSS mediante la porta LAN e
inoltre, grazie alla seconda porta LAN in modalità
switch, è possibile collegare ulteriori Player in
serie.
Player inoltre è dotato di un server FTP interno
che permette di:
Impostare i parametri di funzionamento.•
Inserire/eliminare contenuti multimediali quali •
video, foto, contenuti streaming, webpage e
banner.
NOTE: the MicroPlayListManager software is available in the download
area of the web site www.custom.biz.
NOTE (1): Insert an SD card in the device disables the internal
memory.
NOTE (2): SD card not included.
FTP
NOTA: il software MicroPlayListManager e disponibile nell’area DOWN-
LOAD del sito www.custom.biz.
NOTA (1): L’inserimento di una SD card nell’alloggiamento del dispositivo
disabilita la memoria interna.
NOTA (2): SD card non inclusa.
11
Page 12
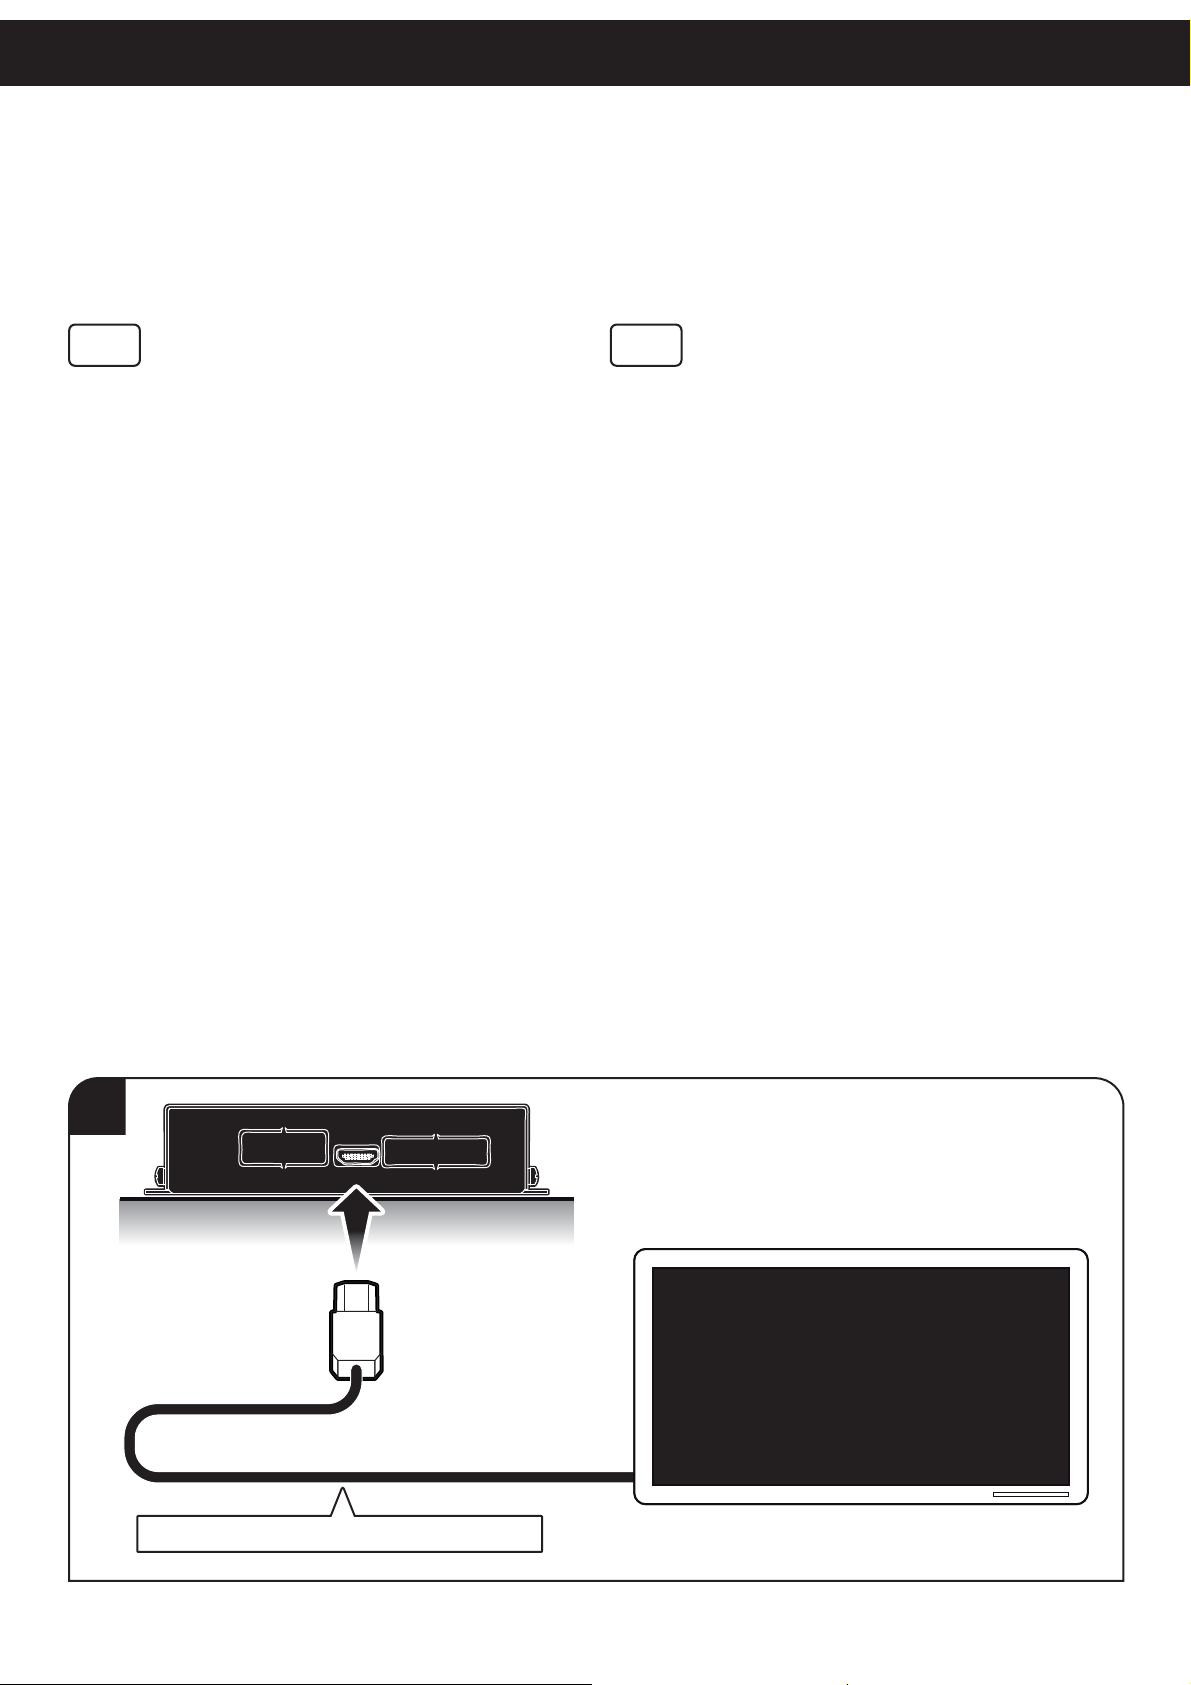
CONFIGURATION
Confi gurazione
GB
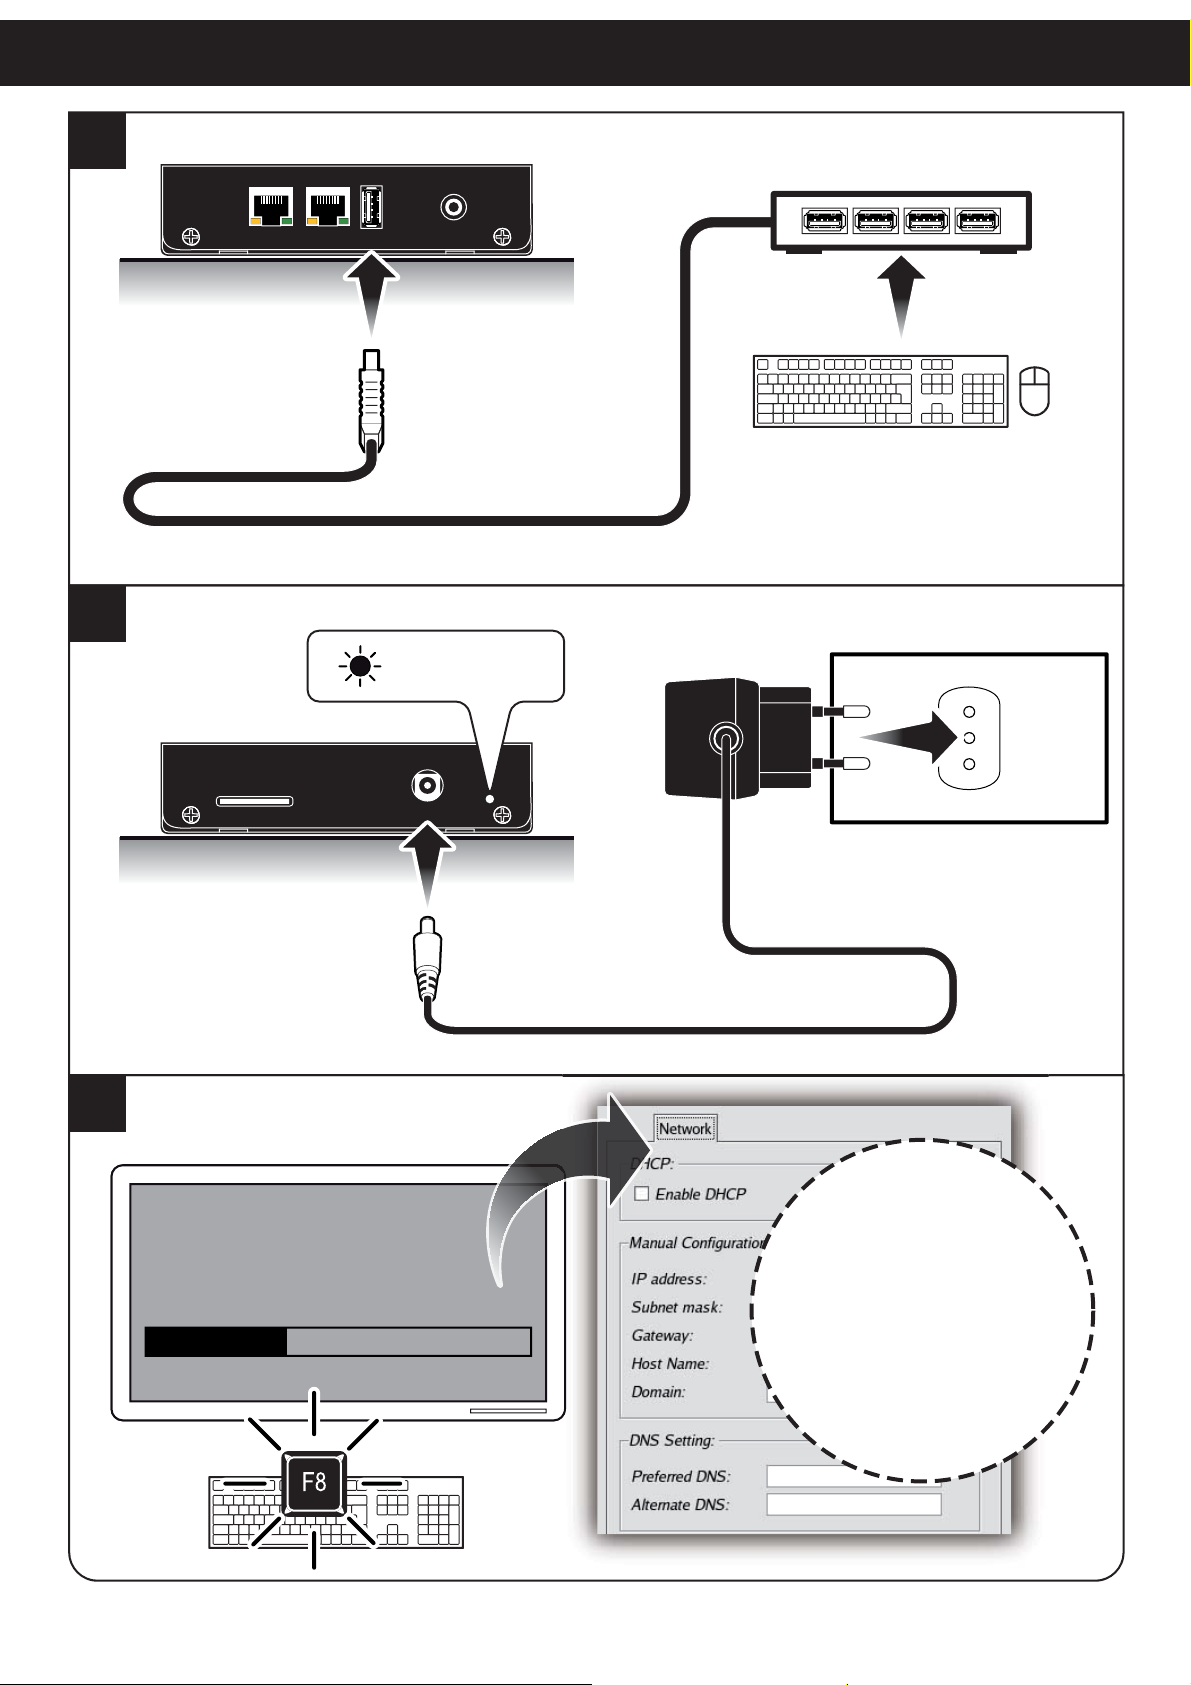
To enter the confi guration panel proceed as fol-
low:
Use the HDMI port to connect a HD TV/MONI-1.
TOR equipped with HDMI or DVI port.
Use the USB port to connect a keyboard (not 2.
supplied). To connect mouse and keyboard
(not supplied) use an USB hub.
Switch on the device (see previous para-3.
graph)
Wait for the boot. A status bar is displayed on 4.
HD TV/MONITOR.
Press the F8 key during the boot (loading bar 5.
between 0% and 100%) to enter the confi gu-
ration panel.
I
Per accedere al pannello confi gurazione proce-
dere come segue:
Utilizzare la porta Hdmi per collegare una 1.
HD TV/MONITOR dotati di connettore Hdmi
o DVI.
Utilizzare la porta USB per collegare una ta-2.
stiera (non in dotazione). Per collegare mouse
e tastiera (non in dotazione) utilizzare un hub
USB.
Accendere il dispositivo (vedi paragrafi pre-3.
cedenti).
Attendere il caricamento del sistema. Sulla HD 4.
TV/MONITOR viene visualizzata una barra di
caricamento.
Premere il tasto F8 durante il caricamento 5.
(barra di caricamento tra 0% e 100%) per accedere al pannello di confi gurazione.
Thanks to confi guration panel (with a user friendly
interface) is possible to set all the parameters for
the correct use of the device.
1
Hdmi
Il pannello di confi gurazione permette, mediante
un’interfaccia grafi ca intuitiva, di impostare i pa-
rametri per il corretto funzionamento del dispositivo.
HD TV /
MONITOR
Hdmi cable (category 2 recommended)
12
Page 13
2
FIRST INSTALLATION
USB hub
3
Eth 1 Eth 2 Usb
Audio
AUTO POWER ON
4
SD Card
Power In
Player
100%0%
Rel. 1.00
CONFIG
IP address:
Subnet MASK
Gateway
...
...
13
Page 14
CONFIGURATION PANEL
Pannello di confi gurazione
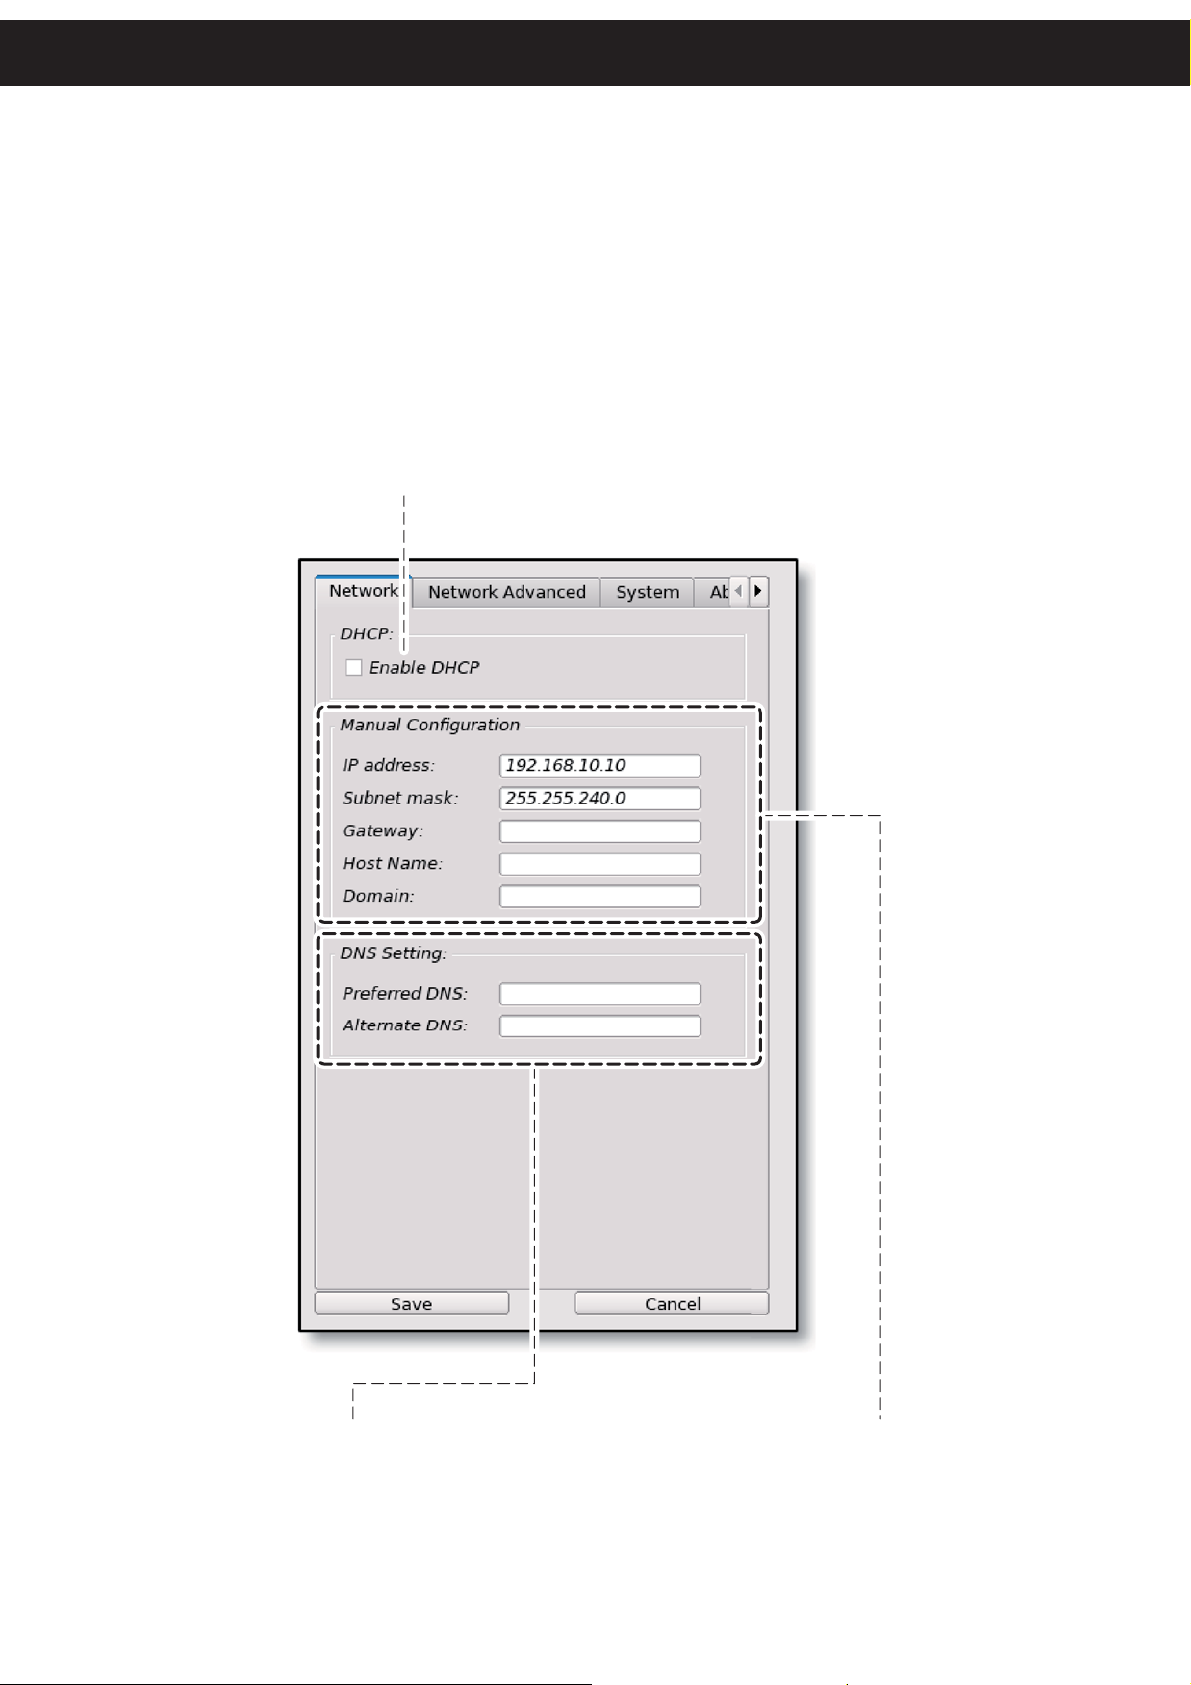
ENABLE/DISABLE NETWORK IP AUTO AQUIRING (only with DHCP server).
If DHCP is enabled the parameters IP address, Subnet mask, Gateway, Host Name,
Domain are assigned automatically.
Abilita/disabilita l’acquisizione automatica dell’ indirizzo di rete (solo con server DHCP).
Se si abilita DHCP i parametri IP address, Subnet mask, Gateway, Host Name, Domain
vengono assegnati automaticamente.
DNS ADDRESS (if not supplied by provider)
Indirizzi DNS (se non forniti da provider)
14
NETWORK CONFIGURATION
Configurazione di rete
Page 15
FIRST INSTALLATION
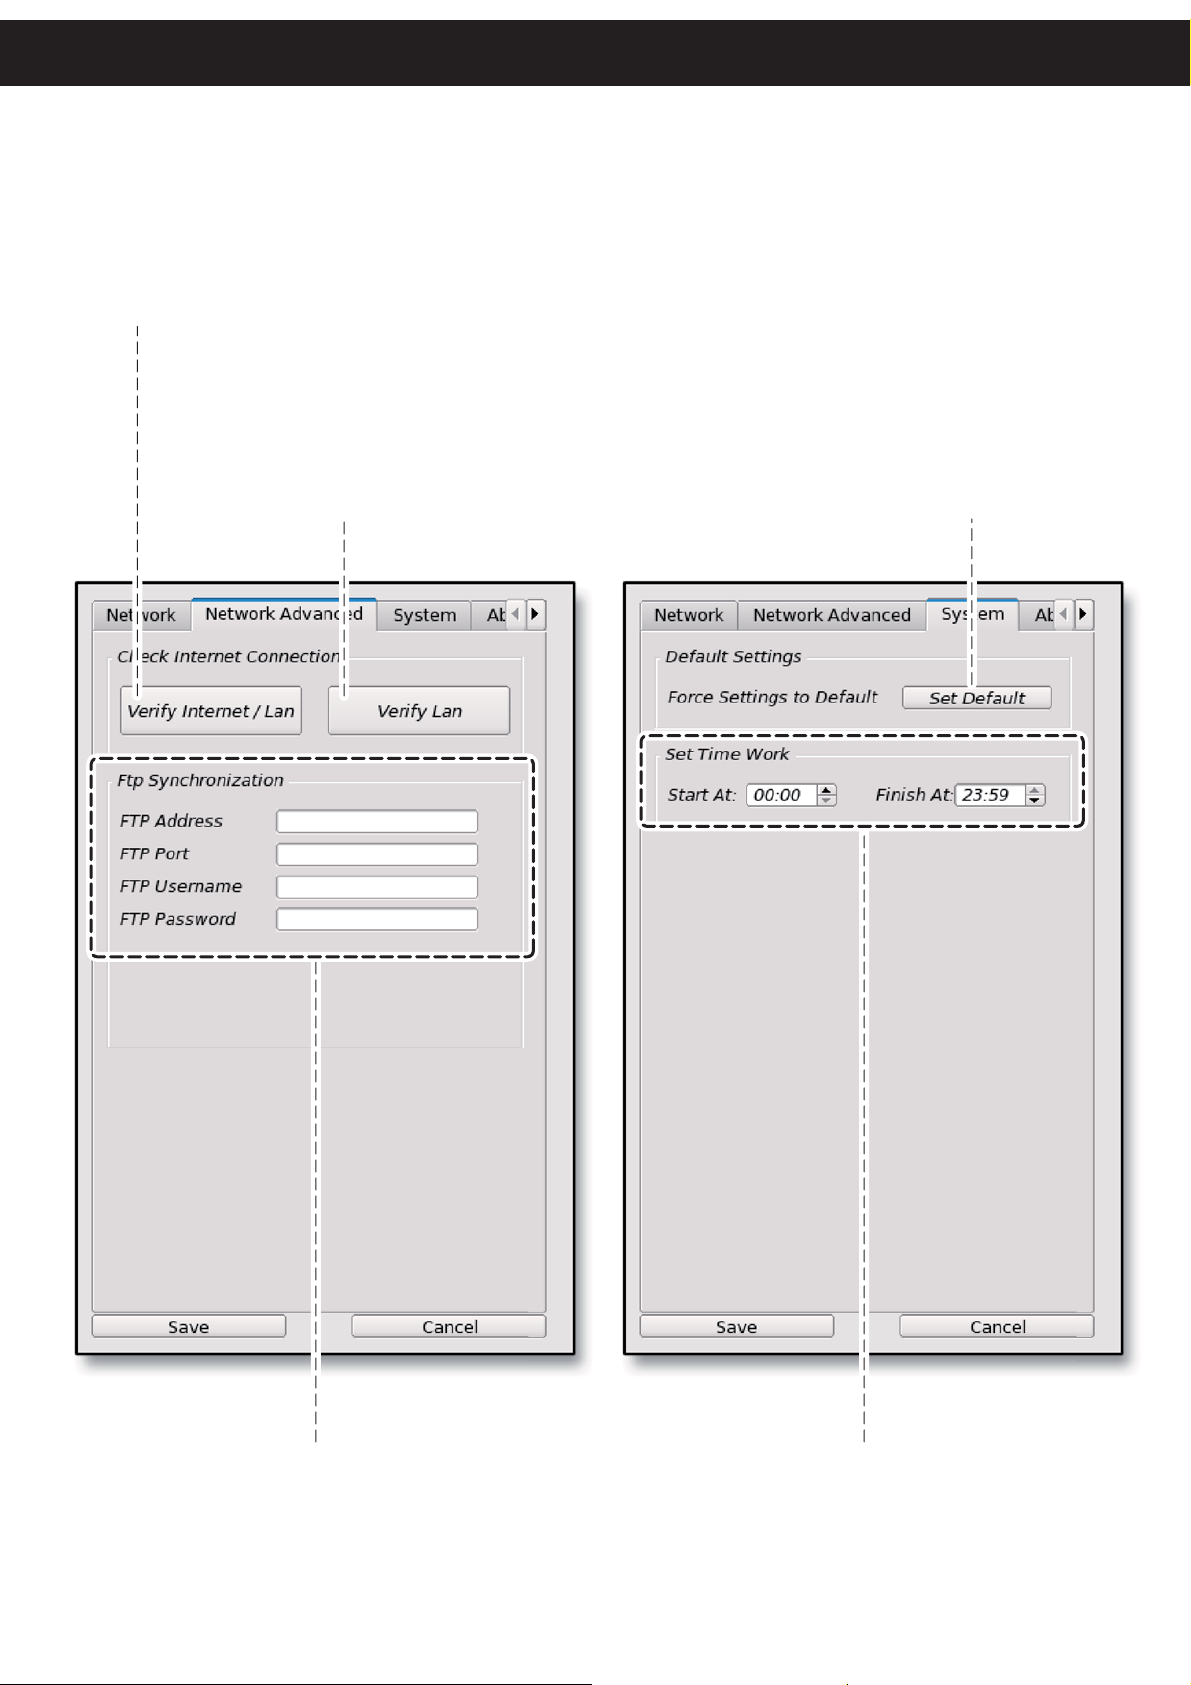
VERIFY CONNECTIVITY BY PINGING:
GATEWAY, PREFERRED DNS, ALTERNATIVE DNS AND SOME SERVER (GOOGLE.COM, CUSTOM.IT, NACK.IT)
AND FTP SYNC SERVER
Verifica connettività mediante ping verso:
Gateway, Preferred DNS, Alternative DNS, alcuni server (google.com, custom.it, nack.it) e FTP Sync Server
INTERNAL VERIFICATION OF THE
CORRECT STORAGE OF PARAMETERS
Verifica interna del corretto salvataggio
dei parametri impostati
SET ALL PARAMETERS
AT DEFAULT VALUES
Imposta tutti i parametri
ai valori di default
FTP SEVER FOR CONTENT SYNCHRONIZATION
Server FTP per la sincronizzaione contenuti
15
TIME INTERVAL IN WHICH THE DEVICE STOPS
BEING IN “LOW POWER CONSUMPTION” MODE
AND STARTS WORKING
Intervallo orario in cui il dispositivo esce dalla modalità
“basso consumo” e inizia a lavorare
Page 16
PLAYBACK
Riproduzione
GB
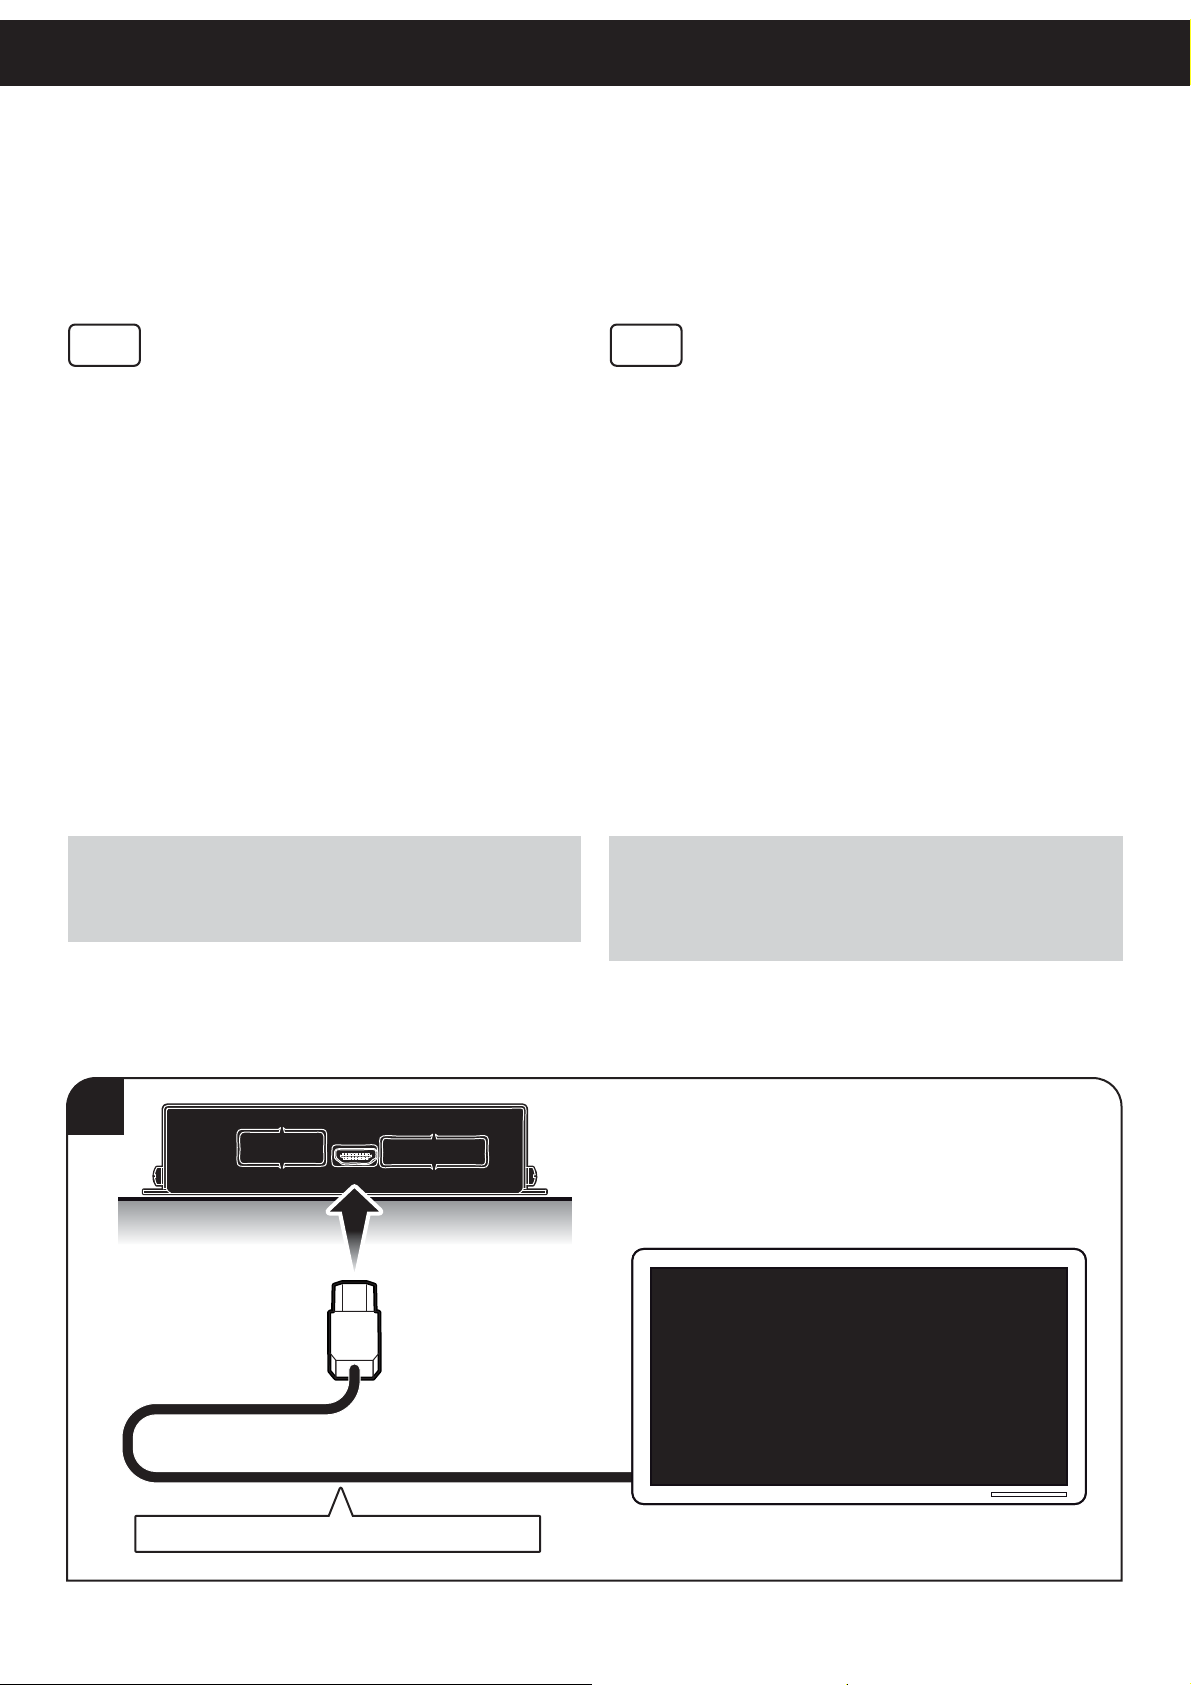
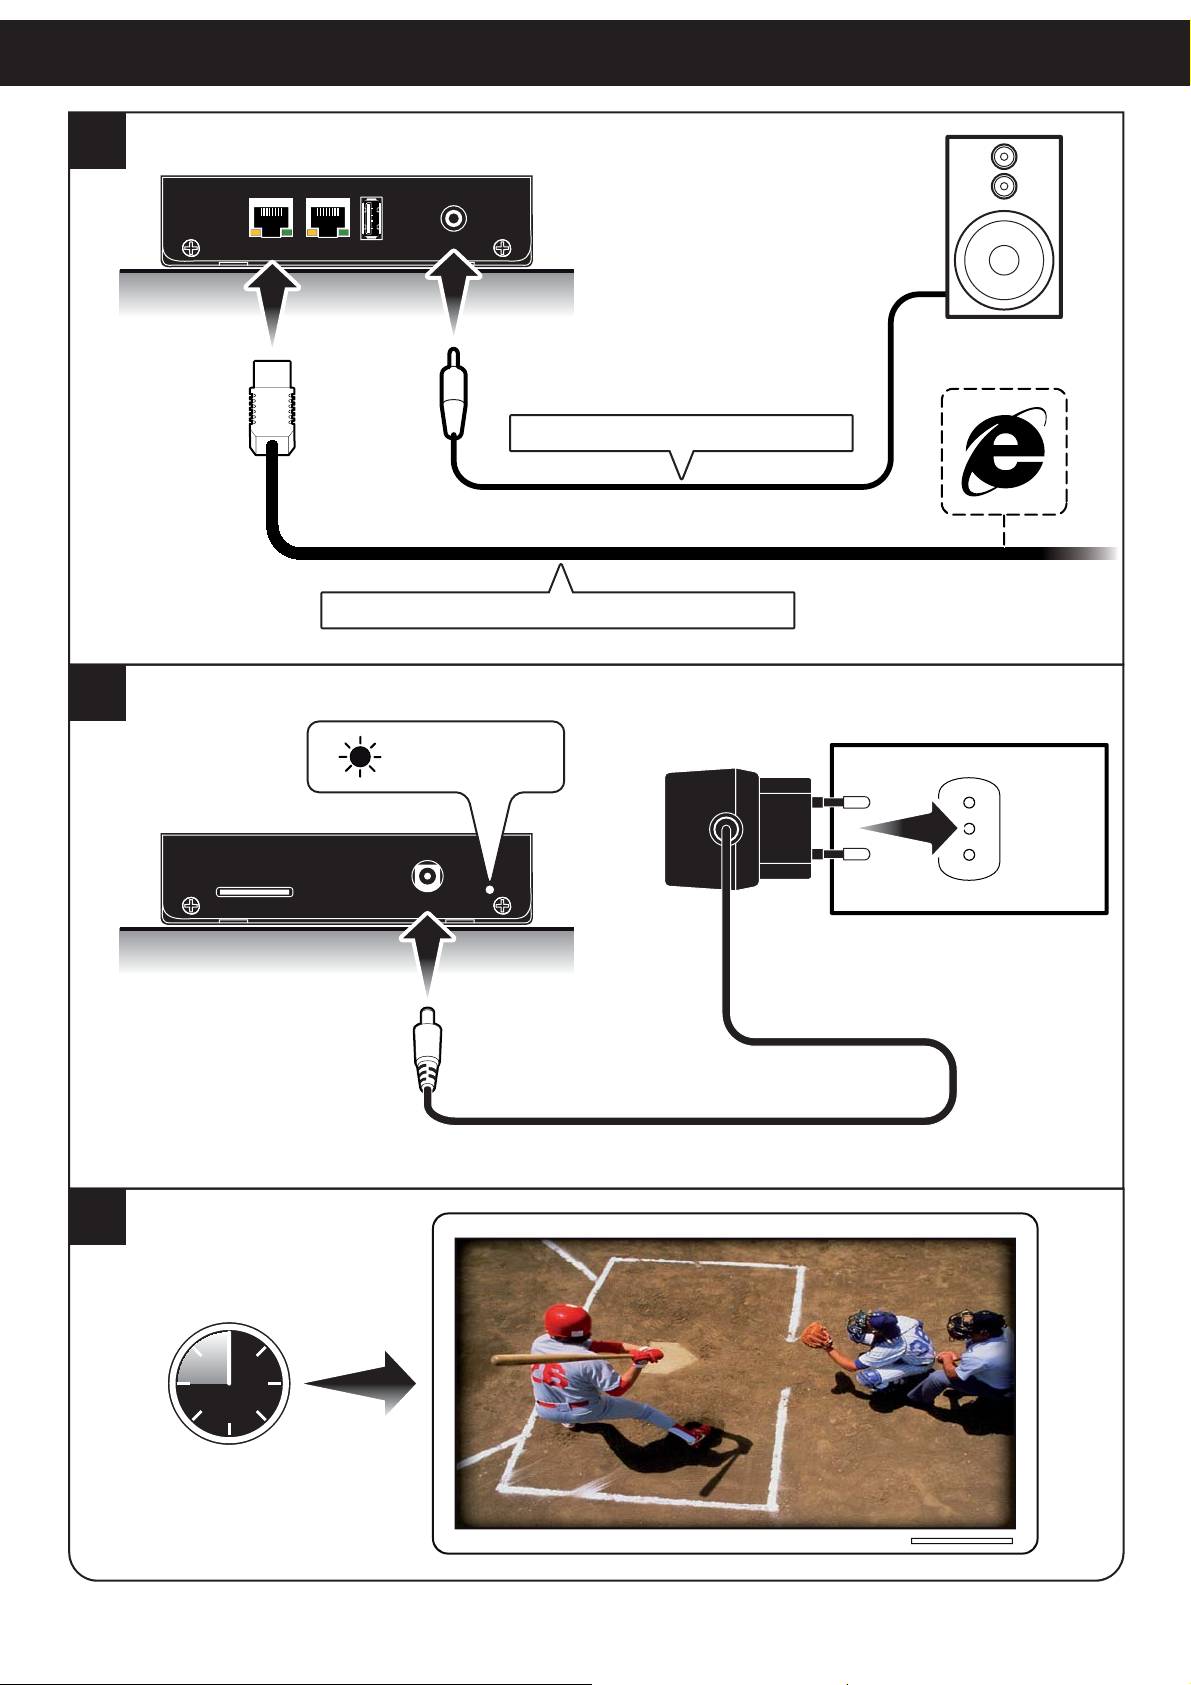
The device comes with the playlist and some
multimedia content pre-loaded. To start playback,
proceed as follows:
Use the HDMI port to connect a HD TV/MONI-1.
TOR equipped with HDMI or DVI port.
(Optional) Use the Audio port to connect a 2.
speaker and one of the Ethernet ports to access to Internet services
(1)
.
Switch on the device.3.
Wait for the boot. On TV / MONITOR begins 4.
playing multimedia content stored in the playlist.
NOTE:
To add content and edit the playlist, see the next chapters.
NOTE (1):
Only if you have an Internet connection.
I
Il dispositivo viene fornito con la playlist e alcuni
contenuti multimediali pre-caricati. Per la riproduzione della playlist procedere come segue:
Utilizzare la porta Hdmi per collegare una 1.
HD TV/MONITOR dotati di connettore Hdmi
o DVI.
(Opzionale) Utilizzare la porta Audio per colle-2.
gare un altoparlante e una delle porte Ethernet
per accedere ai servizi internet
(1)
.
Accendere il dispositivo.3.
Attendere il caricamento del sistema. Sulla TV/4.
MONITOR inizia la riproduzione dei contenuti
multimediali memorizzati nella playlist.
NOTA:
Per aggiungere contenuti e modifi care la playlist vedere capitoli suc-
cessivi.
NOTA (1):
Solo se si dispone di una connessione Internet
1
Hdmi
HD TV /
MONITOR
Hdmi cable (category 2 recommended)
16
Page 17
2
FIRST INSTALLATION
3
Eth 1 Eth 2 Usb
Standard Ethernet cable (Crossover or pin-to-pin)
Audio
Standard stereo 3.5mm audio cable
AUTO POWER ON
4
SD Card
Boot
Power In
17
Page 18

SOFTWARE OVERVIEW
Descrizione del software
GB
MicroPlaylistManager is PC software that allows
to manage the playlist saved on Player.
To install MicroPlaylistManager on a PC proceed
as follows:
Download the installation file available in 1.
DOWNLOAD AREA at www.custom.biz site.
Double-click on fi le “MicroPlaylistManager.2.
exe” to launch the installation procedure.
Follow the instructions until the installation 3.
procedure is complete.
If Player is networked and confi gured correctly
(see above), simply run MicroPlaylistManager
from the PC to start managing Player content.
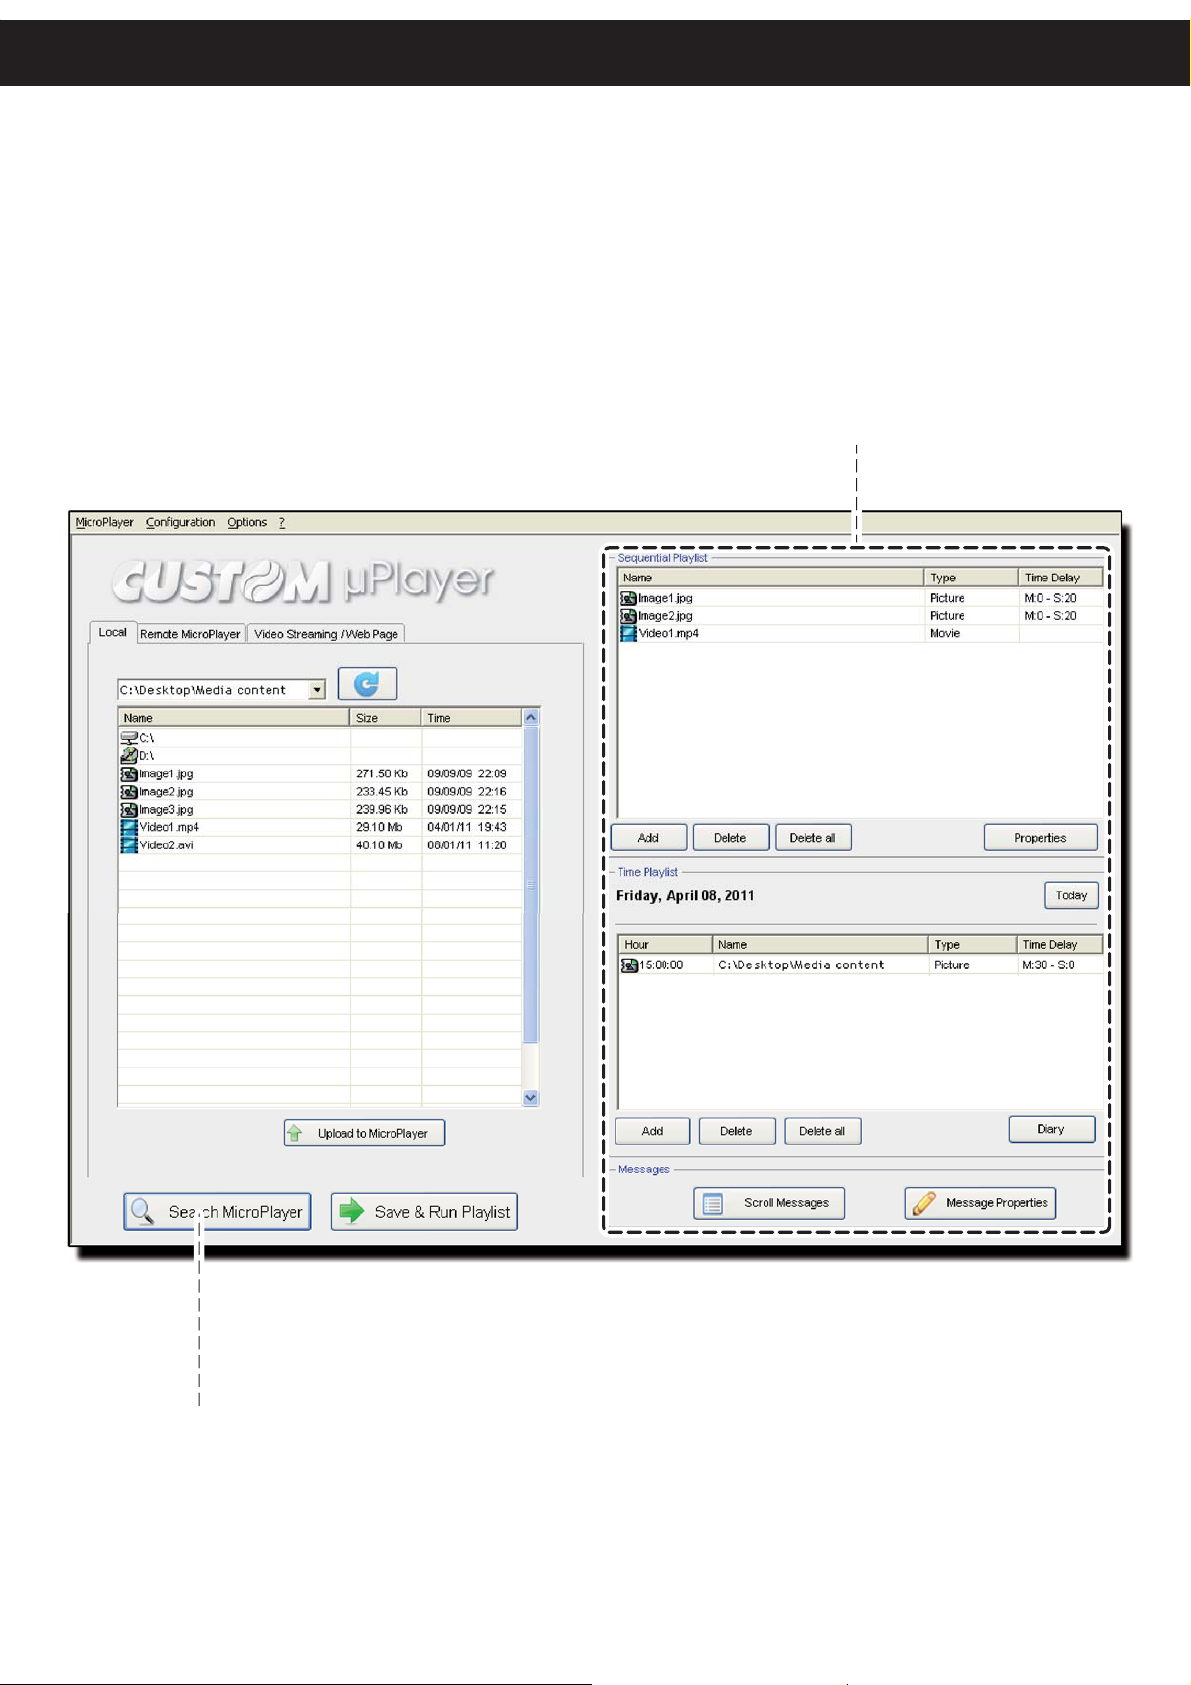
Click on the Search button to show all the detected
device on the network (see next paragraph).
Select the desired Player. In the right panel is
displayed the playlist content saved in the device
divided by type of playback:
I
MicroPlaylistManager è il software per PC che
permette la gestione della playlist salvata su
Player.
Per installare MicroPlaylistManager sul PC procedere come segue:
Scaricare il file d’installazione dispo-1.
nibile nell’area DOWNLOAD del sito
www.custom.biz.
Lanciare con doppio click il fi le d’installazione 2.
”MicroPlaylistManager.exe”.
Seguire le istruzioni a video fi no al completa-3.
mento dell’installazione.
Se Player è collegato in rete e configurato
correttamente (vedi paragrafi precedenti), basta
lanciare dal PC il software MicroPlaylistManager
per iniziare a gestire i contenuti di Player. Con
un click sul pulsante di ricerca vengono rilevati i
dispositivi presenti in rete (vedere paragrafo successivo). Selezionando il Player desiderato, nel
riquadro di destra vengono visualizzati i contenuti
della playlist salvata nel dispositivo divisa per
tipologia di riproduzione:
“Playlist sequential”•
Content to be played in sequence for the speci-
fi ed time and repeated in a cyclical fashion.
“Time Playlist”•
Content to play and time in data specifi ed.
“Messages”•
The scrolling message appears when playing
“all “ Multimedia content consists of texts or RSS
feed.
18
“Sequential Playlist”•
I contenuti da riprodurre in sequenza per il tem-
po specifi cato e ripetuti in modo ciclico.
“Time Playlist”•
I contenuti da riprodurre all’orario e nella data
specifi cati.
“Messages”•
Il messaggio scorrevole generale visualizzato
durante la riproduzione di tutti i contenuti multimediali costituito da un testo o da feed RSS.
Page 19
USE OF MicroPlaylistManager
PLAYLIST CONTENT:
- Content to play in a sequential cycle.
- Content to play on temporal rules.
- Setting the scrolling message or feed RSS.
CONTENUTI DELLA PLAYLIST:
- Contenuti da riprodurre a ciclo sequenziale.
- Contenuti da riprodurre con regole temporali.
- Impostazione del messaggio scorrevole o feed RSS.
SEARCH DEVICES IN THE NETWORK
Ricerca dispositivi in rete
19
Page 20

DETECTING DEVICES IN THE NETWORK
Ricerca dispositivi nella rete
GB
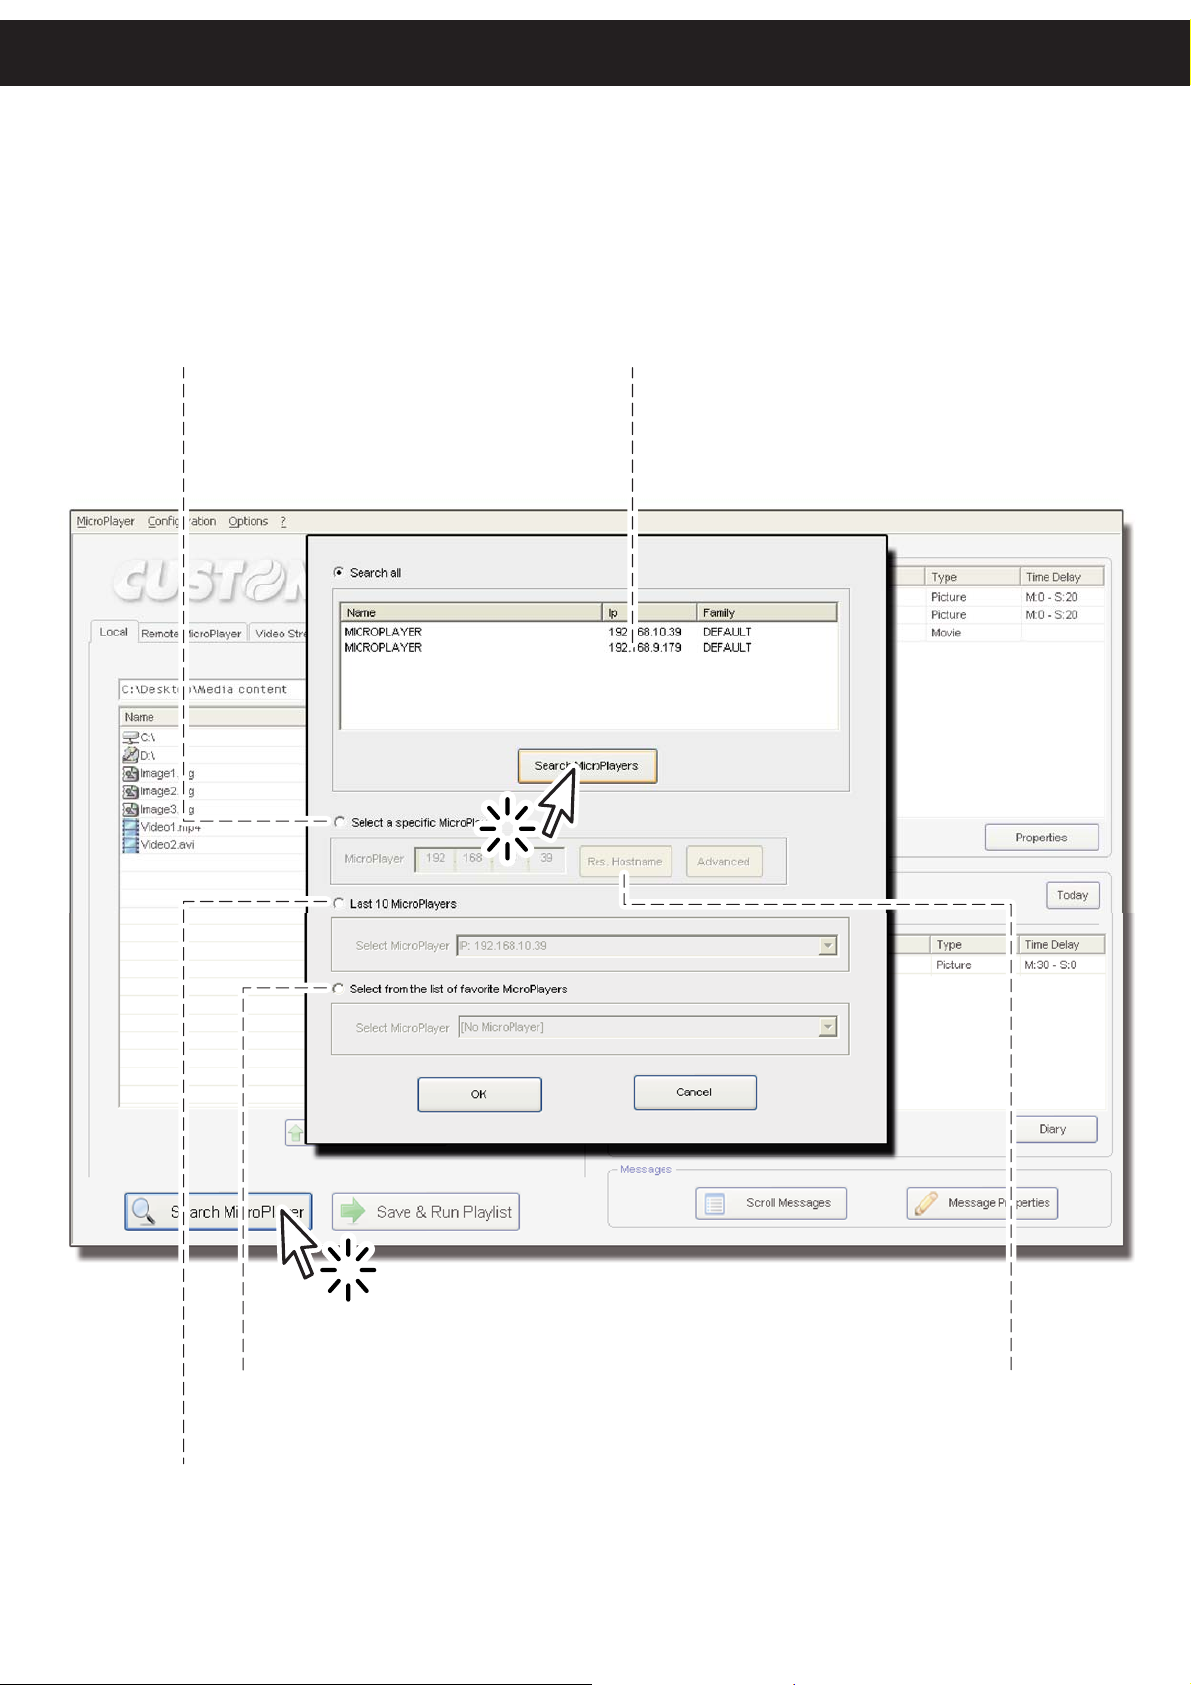
To search and select Player in the network proceed as follows:
Launch MicroplaylistManager and press 1.
“Search MicroPlayer” button to display the
search window.
Press the “Search Microplayers” button from 2.
the search window to start detecting the devices in the network.
Select a device from the list and press OK to 3.
confi rm.
A warning box will ask if you want to view 4.
the playlist stored on Player (YES recommended).
Alternatively it is possible to directly enter the IP
address of your device, select the device from the
list of the last ten selected IP addresses or select
the device from the list of favourites.
I
Per eseguire la ricerca e la selezione di Player
nella rete procedere come segue:
Lanciare MicroplaylistManager e premere il 1.
tasto “Search MicroPlayer” per visualizzare la
fi nestra di ricerca.
Premere il tasto “Search Microplayers” dalla 2.
fi nestra di ricerca per iniziare la ricerca dei
dispositivi nella rete.
Selezionare il dispositivo dalla lista e premere 3.
OK.
Una fi nestra di avvertimento chiederà se vo-4.
gliamo visualizzare la playlist memorizzata su
Player (SI consigliato).
In alternativa è possible inserire direttamente l’indirizzo IP del dispositivo, selezionare il dispositivo
dall’elenco degli ultimi dieci indirizzi IP selezionati
oppure selezionare il dispositivo dall’elenco dei
favoriti.
NOTE:
Check that Player is networked and configured correctly (see
above).
NOTA:
Verifi care che Player sia collegato in rete e confi gurato correttamente
(vedi paragrafi precedenti).
20
Page 21
USE OF MicroPlaylistManager
MANUAL ENTERING
Inserimento manuale
Player DETECTED IN THE NETWORK
Player rilevati nella rete
LIST OF FAVORITE
Elenco dei favoriti
LIST OF THE LAST 10 IP ADDRESS
Lista degli ultimi 10 indirizzi IP
RETURNS THE IP ADDRESS FROM THE
NAME OF THE HOST DEVICE ENTERED
Restituisce l’indirizzo IP dal nome
del dispositivo Host inserito
21
Page 22

ADD MULTIMEDIA CONTENT
Aggiungere contenuti multimediali
GB
In the left panel of MicroPlaylistManager are displayed multimedia contents available. Clicking on
the tabs you can select:
The contents in the local PC,•
The contents stored in Player,•
Set the address of a web page or streaming •
video.
To add one of this content to the playlist by selecting it with a click and dragging it to one of the
two boxes on the right depending on the type of
playback you want to run (sequential or time, see
fi gure).
When you release the content a window is automatically displayed to set the playback parameters
configuration (see Chapter EDIT PLAYBACK
PARAMETERS):
I
Nel riquadro di sinistra del software MicroPlaylistManager sono visualizzati i contenuti multimediali disponibili. Cliccando sulle linguette è
possibile selezionare:
I contenuti multimediali del PC locale,•
I contenuti multimediali memorizzati nella me-•
moria di Player,
Confi gurare l’indirizzo di una pagina web o un •
video in streaming.
Per aggiungere uno di questi contenuti alla playlist, selezionarlo con un click e trascinarlo in uno
dei due riquadri di destra in base al tipo di riproduzione che si desidera venga eseguita (sequenziale
o temporale, vedi fi gura).
Quando si rilascia il contenuto viene visualizzata
automaticamente la fi nestra per la confi gurazione
dei parametri di riproduzione (vedi Cap. MODIFICA PARAMETRI DI RIPRODUZIONE) che
permette di impostare:
Duration of the multimedia content.•
Scrolling message•
(1)
that appears only for this
multimedia content.
Start time and date for playback (only for tem-•
poral playlist).
NOTE (1):
The specifi c scrolling message for this multimedia content set has priority
over the main scrolling message (see next paragraph).
Repeat the procedure until you are satisfi ed with
the changes to the playlist. Then click on the button “Save & Run Playlist” allows you to update
the device with saving of playlists and multimedia
fi les in it.
22
Durata del contenuto multimediale.•
Messaggio scorrevole specifi co•
(1)
visualizzato
solo per questo contenuto multimediale.
Ora e data di inizio riproduzione (solo per •
playlist temporale).
NOTA (1):
Il messaggio scorrevole specifi co per questo contenuto è prioritario ri-
spetto al messaggio scorrevole generale (vedi paragrafo successivo).
Ripetete la procedura fi no a quando non sarete
soddisfatti delle modifi che apportate alla playlist.
Dopodichè un click sul pulsante “Save & Run
Playlist” permette l’aggiornamento del dispositivo
con il salvataggio della playlist e i fi les multimediali
in essa contenuti.
Page 23
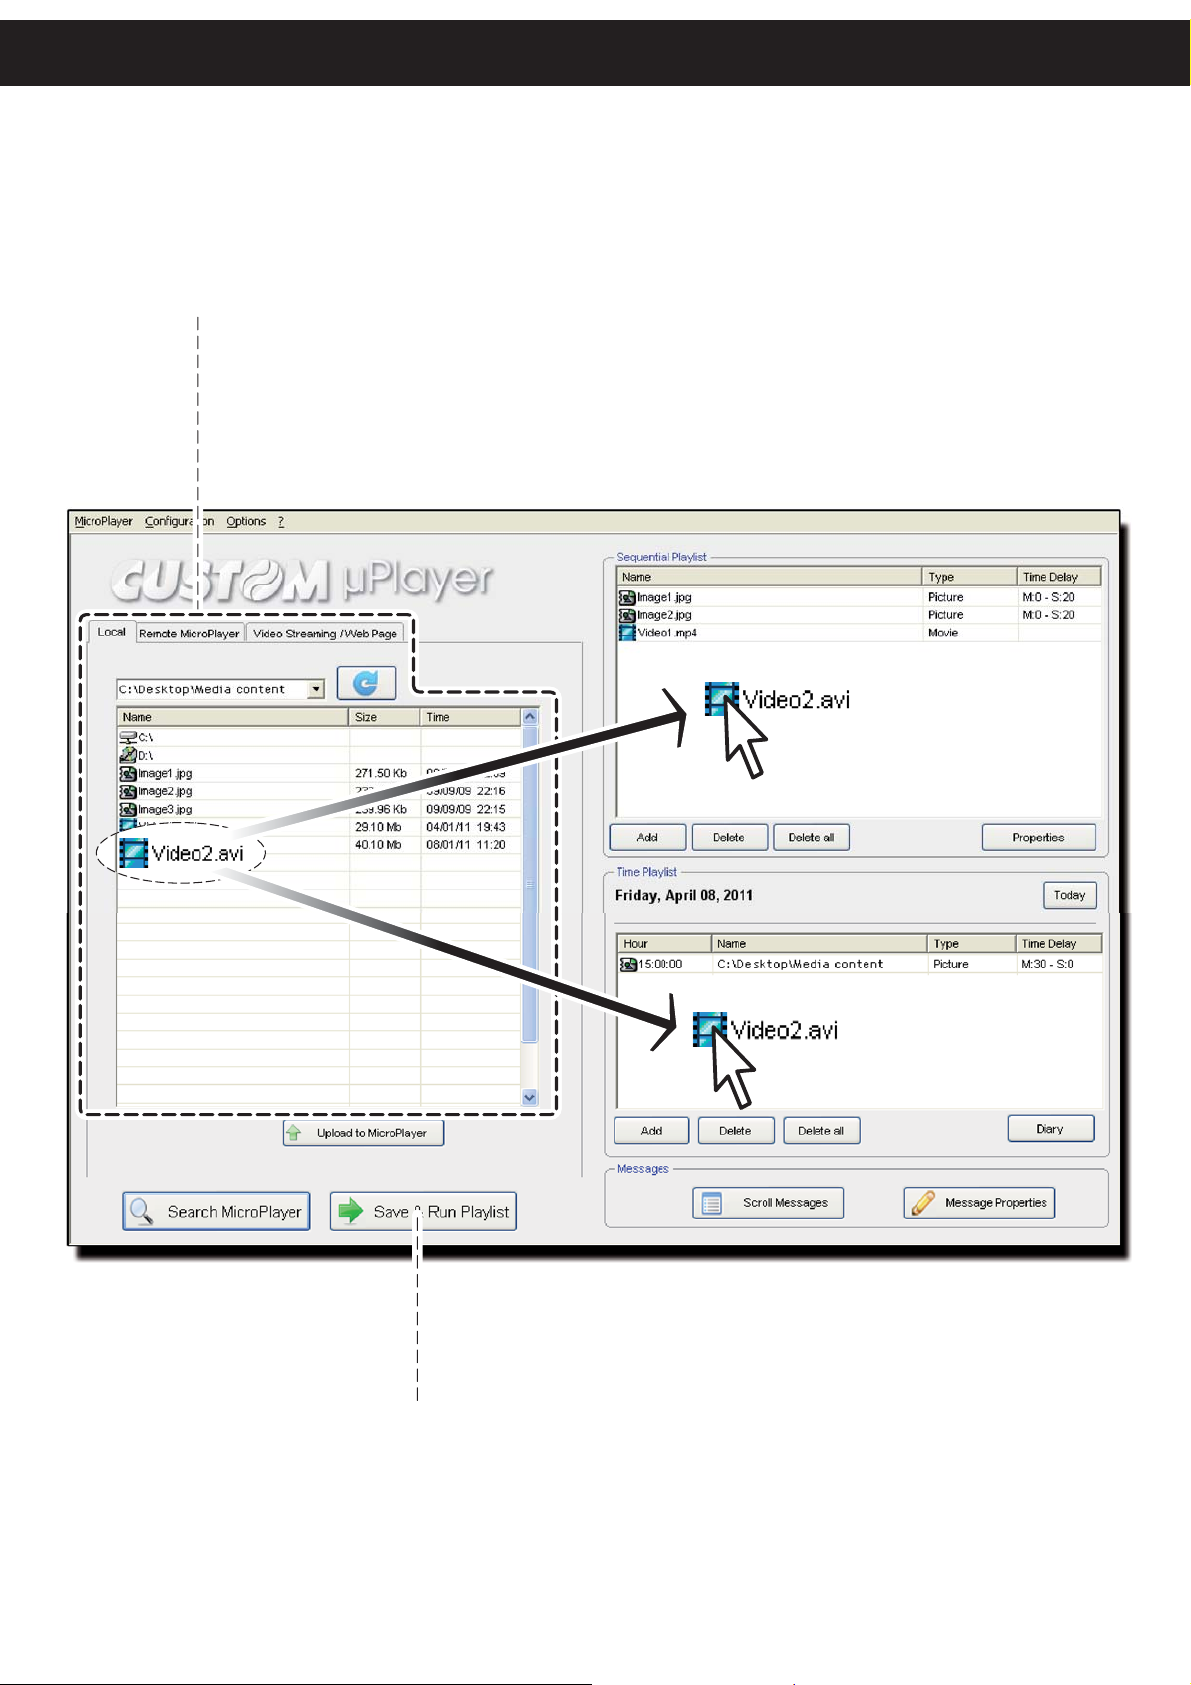
SOURCE FOR THE MEDIA CONTENT
Sorgente per i contenuti multimediali
USE OF MicroPlaylistManager
SAVE THE NEW PLAYLIST IN THE SELECTED DEVICE
Salva la nuova playlist nel dispositivo selezionato
23
Page 24

MAIN SCROLLING MESSAGE
Messaggio scorrevole generale
GB
Player is able to display a main scrolling message (text or RSS feed) during playback of the
playlist.
Press the “Scroll messages” button to display the
confi guration window, where:
Option “Banner messages”
Allows you to manually enter up to a maximum of
30 lines by 80 characters of text that will appear
in sequence during playback of the playlist.
Messages can be complemented by macro functions that allow, for example to automatically insert
today’s date. Here is the complete list of macro
functions:
MACRO FUNCTION
I
Player è in grado di visualizzare un messaggio
scorrevole generale (testo o feed RSS) durante
l’intera riproduzione della playlist.
Premere il tasto “Scroll messages” per visualizzare la fi nestra di confi gurazione, dove:
Opzione “Banner messages”
Permette di inserire manualmente fi no a un massi-
mo di 30 righe di testo da 80 caratteri che verranno
visualizzate in sequenza durante la riproduzione
della playlist.
I messaggi possono essere completati da alcuni
funzioni macro che permettono ad esempio di inserire automaticamente la data odierna. Di seguito
l’elenco completo delle funzioni macro:
MACRO FUNZIONE
[%TIME] Time in the format hh:mm
[%DATE] Date in the format yy-mm-dd
[%DATEEU] Date in the format dd/mm/yy
[%DATEUS] Date in the format mm/dd/yy
Option “RSS messages”
Allows you to insert news from RSS feed.
You can enter up to 99 addresses RSS.
To set the RSS feed that you want to appear, select
the address in the selection window and press the
“Set options” button.
NOTE:
To change the properties of the text that appears press the “Message
Properties” button next to the “Scroll Messages”.
To exclude the main scrolling message from a multimedia content and
set it with a specifi c one (only for this multimedia content) see the next
paragraph.
[%TIME] Orario nel formato oo:mm
[%DATE] Data nel formato aa-mm-gg
[%DATEEU] Data nel formato gg/mm/aa
[%DATEUS] Data nel formato mm/gg/aa
Opzione “RSS messages”
Permette di inserire news provenienti da feed
RSS.
È possibile inserire fi no a 99 indirizzi RSS.
Per Impostare il feed RSS che si desidera venga
visualizzato, selezionare l’indirizzo nella fi nestra
di selezione e premere il tasto “Set RSS”.
NOTA:
Per modifi care le proprietà del testo che verrà visualizzato premere il
tasto “Message Properties” a fi anco del tasto “Scroll Messages”.
Per escludere la visualizzazione del testo scorrevole generale da un
contenuto multimediale e impostarne uno specifi co (solo per quel con-
tenuto multimediale) vedere paragrafo successivo.
24
Page 25
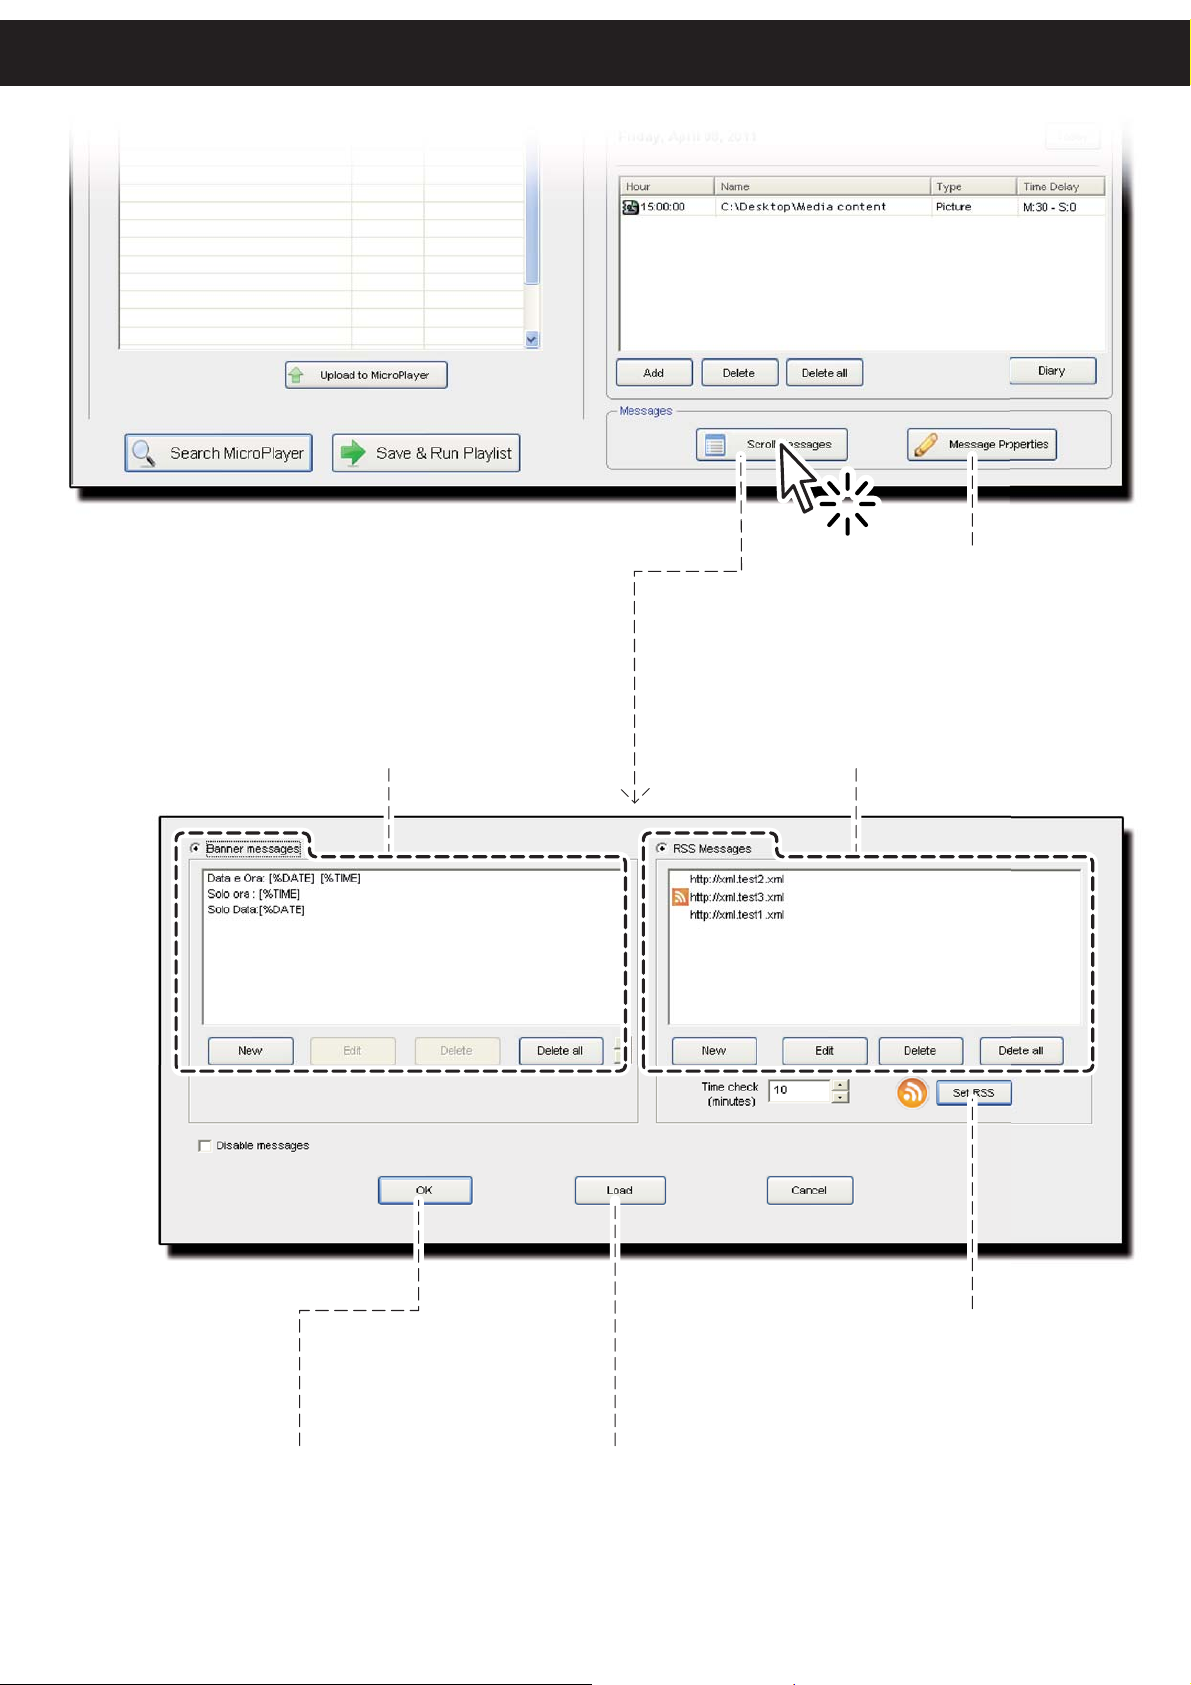
USE OF MicroPlaylistManager
TEXT PROPERTIES
Proprietà del testo
MAIN TEXT MESSAGE
Messaggio testuale generale
RSS NEWS
Notizie rss
SAVE AND CLOSE
Salva e chiudi
SET THE RSS MESSAGE SELECTED
Imposta il messaggio RSS selezionato
LOAD THE CONTENT STORED IN Player
Carica i contenuti salvati in Player
25
Page 26

EDIT PLAYBACK PARAMETERS
Modifi ca parametri di riproduzione
GB
At any time you can change the parameters of
multimedia playback added to the playlist.
Double clicking on any of the multimedia content
added in the temporal or sequential list displays
the confi guration window that allows you to set:
Duration of the multimedia content.•
Specifi c scrolling message•
(1)
that appears only
for this multimedia content. To exclude the
main scrolling message from this multimedia
content.
Enable / disable playback of the audio track •
(only for Video or Video Streaming)
Start time and date for playback (only for tem-•
poral playlist).
I
In qualsiasi momento è possibile modifi care i pa-
rametri di riproduzione dei contenuti multimediali
aggiunti alla playlist.
Facendo doppio click su uno dei contenuti multimediali inseriti nella lista temporale o sequenziale
viene visualizzata la fi nestra di confi gurazione che
permette di impostare:
Durata del contenuto multimediale.•
(1)
Messaggio scorrevole specifi co•
visualizzato
solo per questo contenuto multimediale. Per
escludere la visualizzazione del testo scorrevole generale da questo contenuto multimediale.
Abilitare /disabilitare la riproduzione della •
traccia audio (solo per Filmati o Video Streaming)
Ora e data di inizio riproduzione (solo per •
playlist temporale).
NOTE (1):
The specifi c scrolling message set for this multimedia content has priority
over the main scrolling message (see previous paragraph).
NOTA (1):
Il messaggio scorrevole specifi co impostato per ogni contenuto mul-
timediale è prioritario rispetto al messaggio scorrevole generale (vedi
paragrafo precedente).
26
Page 27
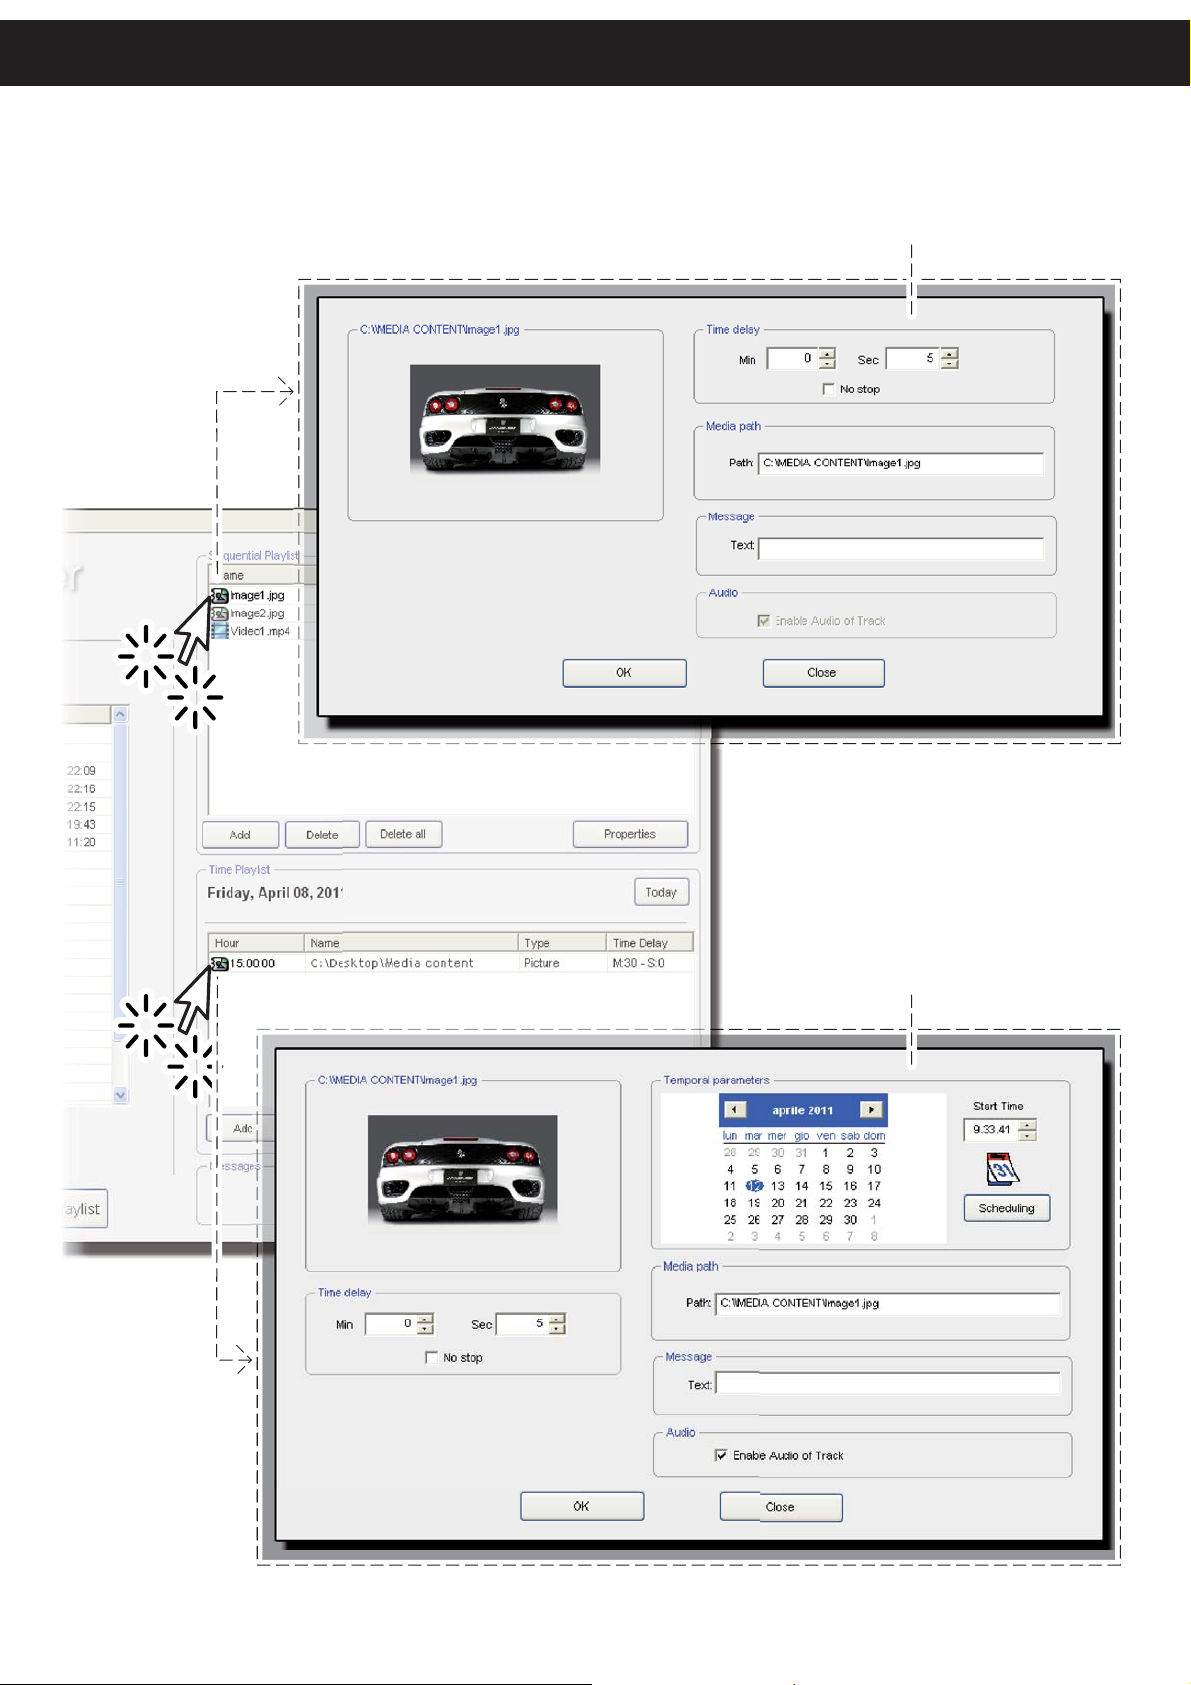
USE OF MicroPlaylistManager
PLAYBACK PARAMETERS
Parametri di riproduzione
PLAYBACK PARAMETERS
Parametri di riproduzione
27
Page 28
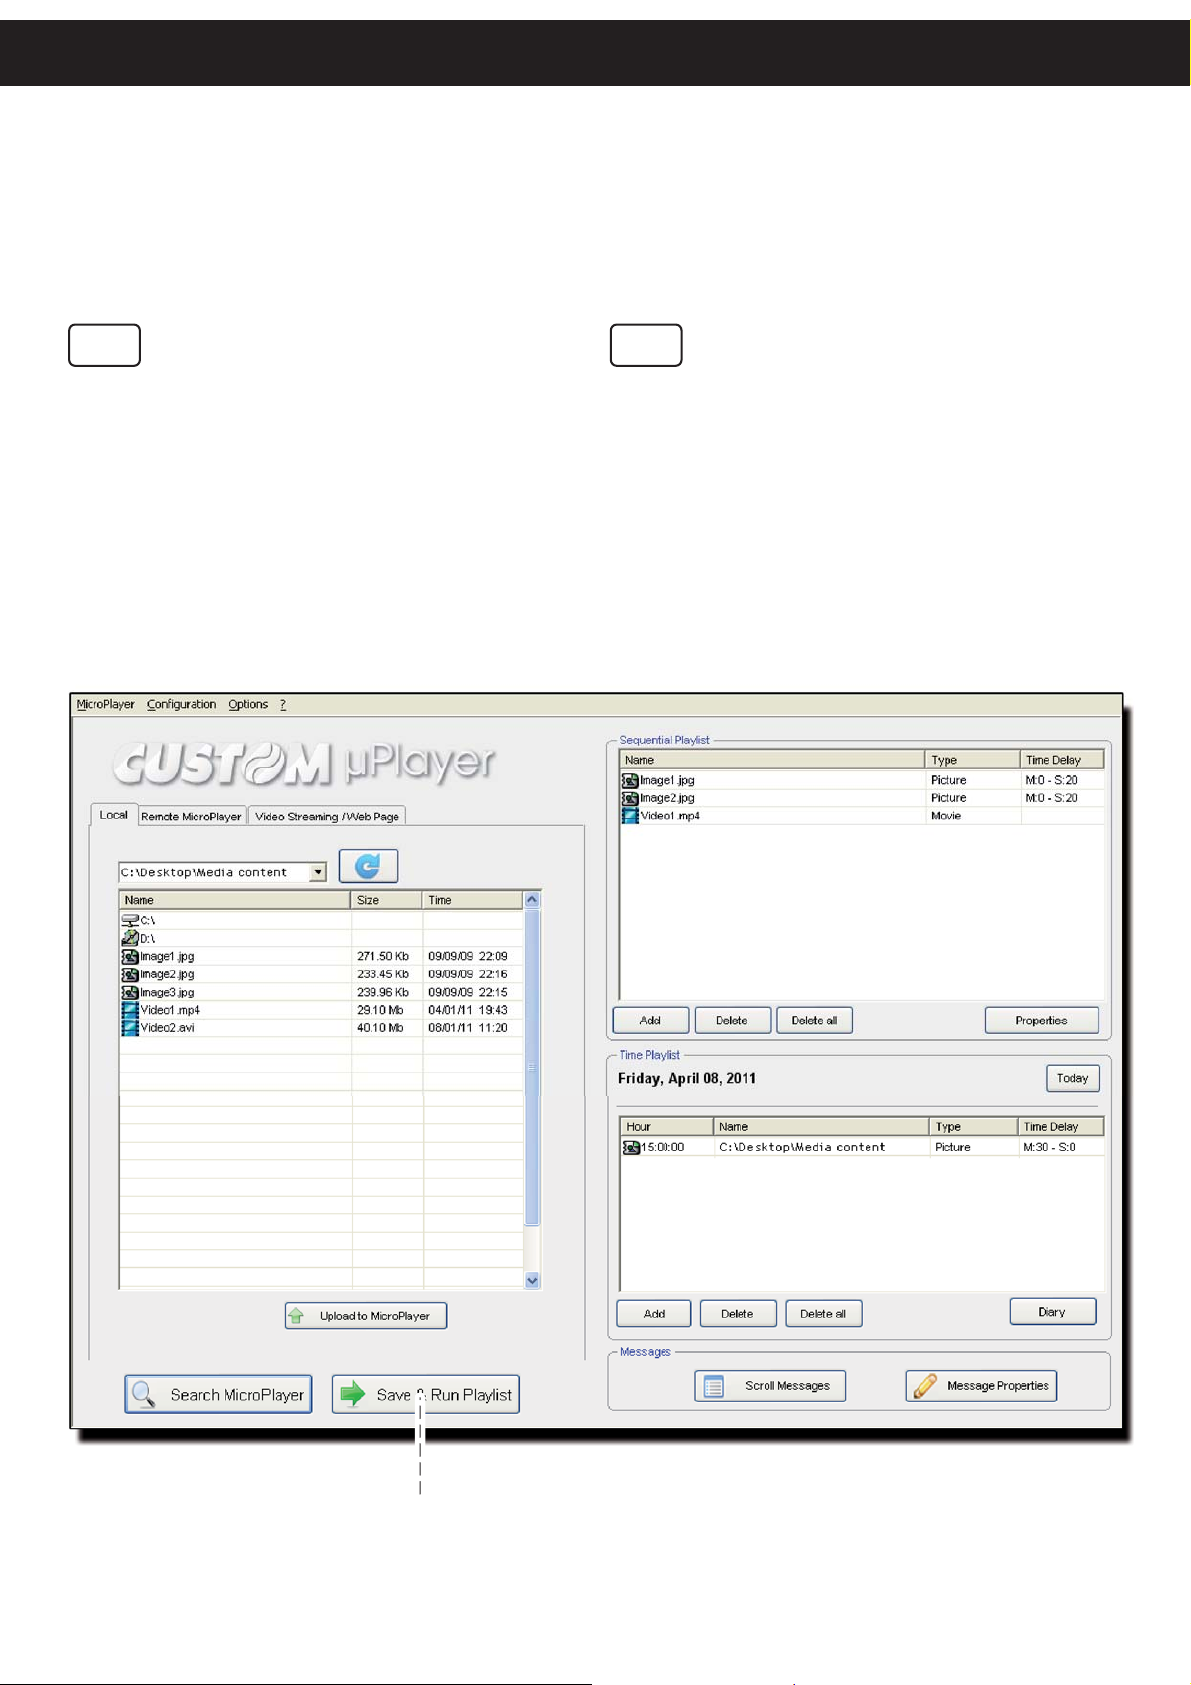
SAVING PLAYLIST
Salvataggio della Playlist
GB
Repeat the procedures for adding / editing of
multimedia content described in the previous
paragraphs until you are satisfi ed with the playl-
ist. Then click on the button “Save & Run Playlist”
allows you to update the device with saving of
the playlist, the multimedia content used and the
operating parameters.
Player starts playing the new playlist.
I
Ripete la procedure di aggiunta/modifica dei
contenuti multimediali descritti nei paragrafi
precedenti fi no a quando non sarete soddisfatti
della playlist. Dopodiché un click sul pulsante
“Save & Run Playlist” permette l’aggiornamento
del dispositivo con il salvataggio della playlist, dei
contenuti multimediali utilizzati e dei parametri di
funzionamento.
Player inizia la riproduzione della nuova playlist.
SAVE PLAYLIST ON Player
Salva la playlist su PLayer
28
Page 29
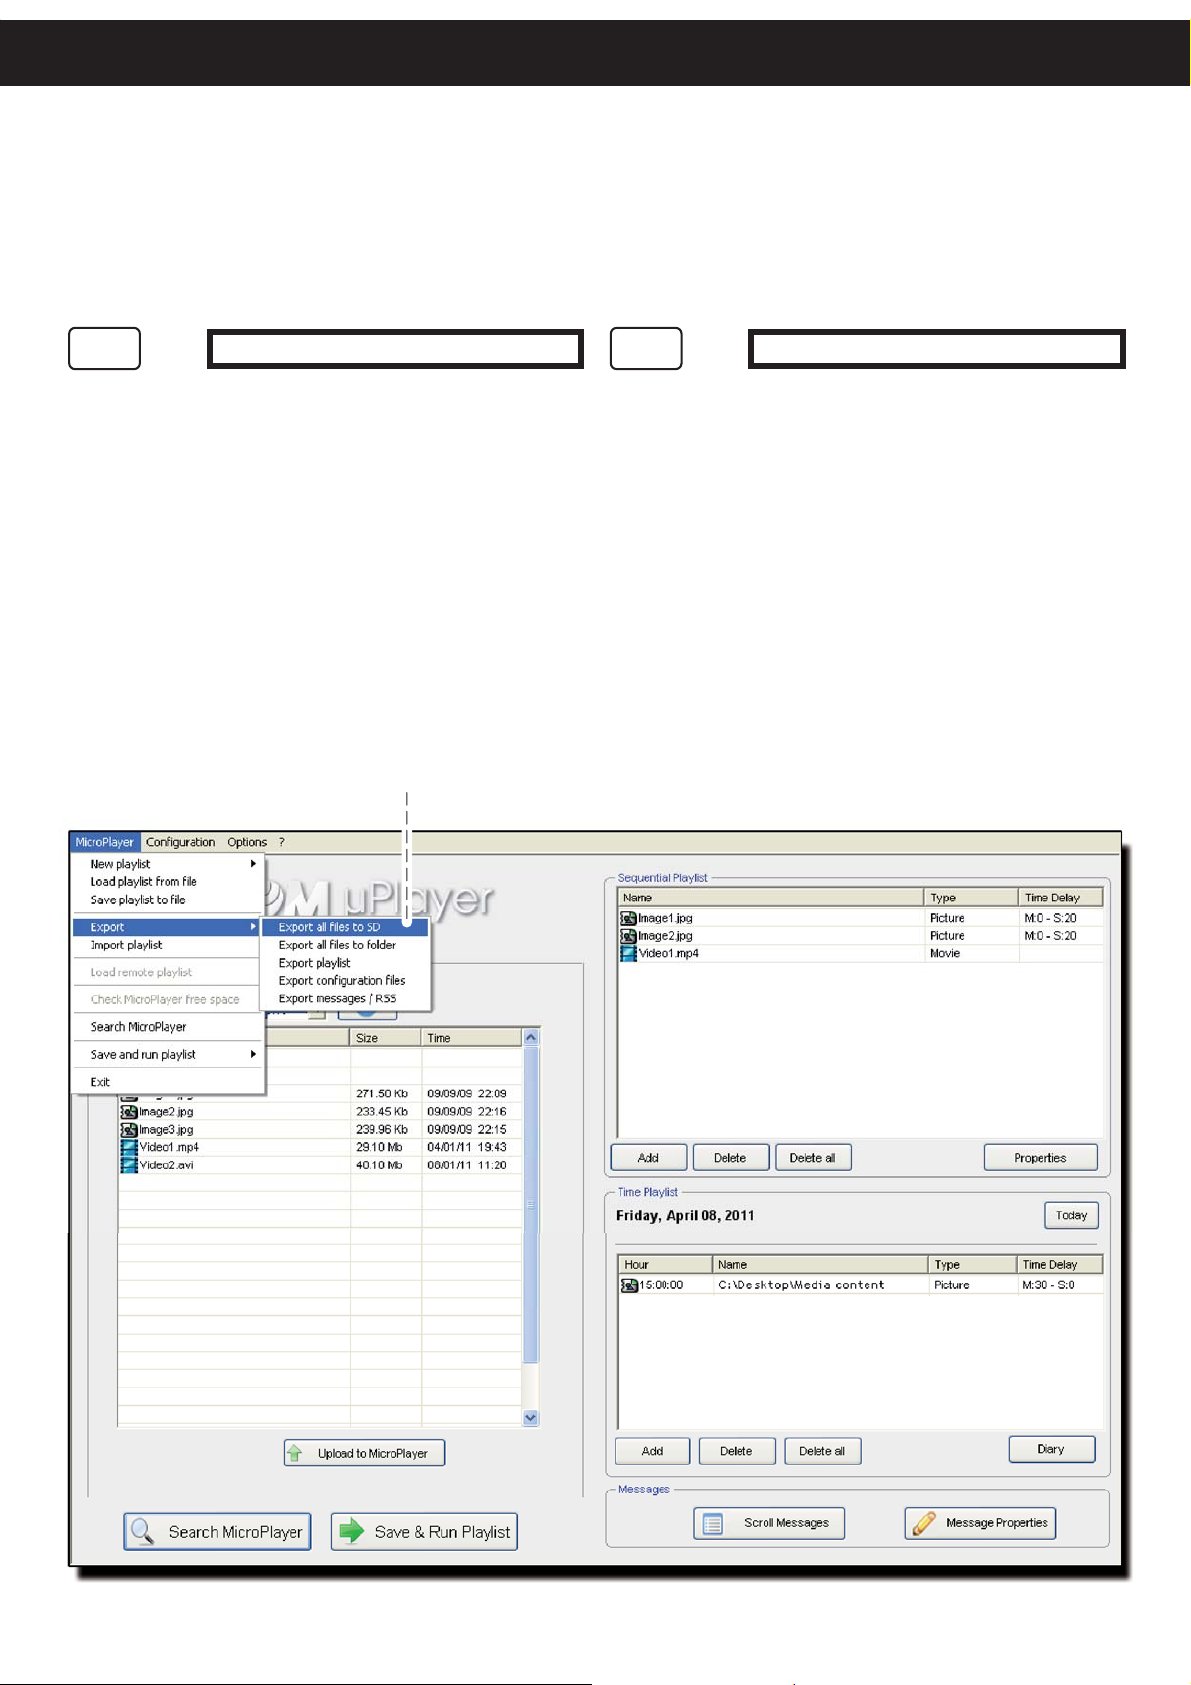
EXPORT THE PLAYLIST
Esportare la Playlist
ADVANCED FUNCTIONS
GB
The MicroPlaylistManager software allows, once
the playlist project is fi nished in OFFLINE mode
(without being connected to Player), to export
the project from PC to an SD card with the saving of:
playlist•
used multimedia content only•
operating parameters.•
The SD card can be used on any Player.
EXPORT PLAYLIST ON SD CARD
Esporta la playlist su scheda SD
ONLY OFFLINE MODE
I
Il software MicroPlaylistManager permette, una
volta terminato il progetto di una playlist in modalità OFFLINE (senza essere connessi a Player),
di esportare il progetto dal PC a una scheda SD
con il salvataggio di:
playlist•
solo contenuti multimediali utilizzati•
parametri di funzionamento.•
La scheda SD potrà essere utilizzata su qualsiasi
Player.
SOLO MODALITÀ OFFLINE
29
Page 30

CLONE MEMORY
Copia della memoria
GB
Anytime you can copy the internal memory of the
device (playlist, all the multimedia content and
operating parameters) on an external SD card
and vice versa.
Proceed as follows:
Connect keyboard and eventually a mouse. 1.
Enter the confi guration panel (see Chapter
CONFIGURATION).
Select “Clone SD card” to display the page 2.
shown at right.
Press the appropriate button to start copy-3.
ing.
In the case of copying from internal memory to
external SD card, the external SD card can be
used on any Player.
I
In qualsiasi momento è possibile copiare la memoria interna del dispositivo (playlist, tutti i contenuti
multimediali e parametri di funzionamento) su una
una scheda SD esterna e viceversa.
Procedere come segue:
Collegare tastiera ed eventualmente mouse al 1.
dispositivo. Accedere al pannello di confi gura-
zione (vedi Cap. CONFIGURAZIONE).
Selezionare “Clone SD card” per visualizzare 2.
la pagina raffi gurata a fi anco.
Premere il pulsante idoneo per iniziare la 3.
copia.
Nel caso di copia da memoria interna a scheda
SD esterna, questa potrà essere utilizzata su
qualsiasi Player.
ATTENTION:
Do not remove the SD card from the slot for no reason during the
copy.
Be very careful using these commands because copying data
from source memory overwrites those that may be present on the
destination memory.
ATTENZIONE:
Non estrarre per nessun motivo la scheda SD dall’alloggiamento
durante la copia dei dati.
Prestare la massima attenzione nell’utilizzo di questi comandi in
quanto, la copia dei dati dalla memoria sorgente sovrascrive quelli
eventualmente presenti sulla memoria di destinazione.
30
Page 31
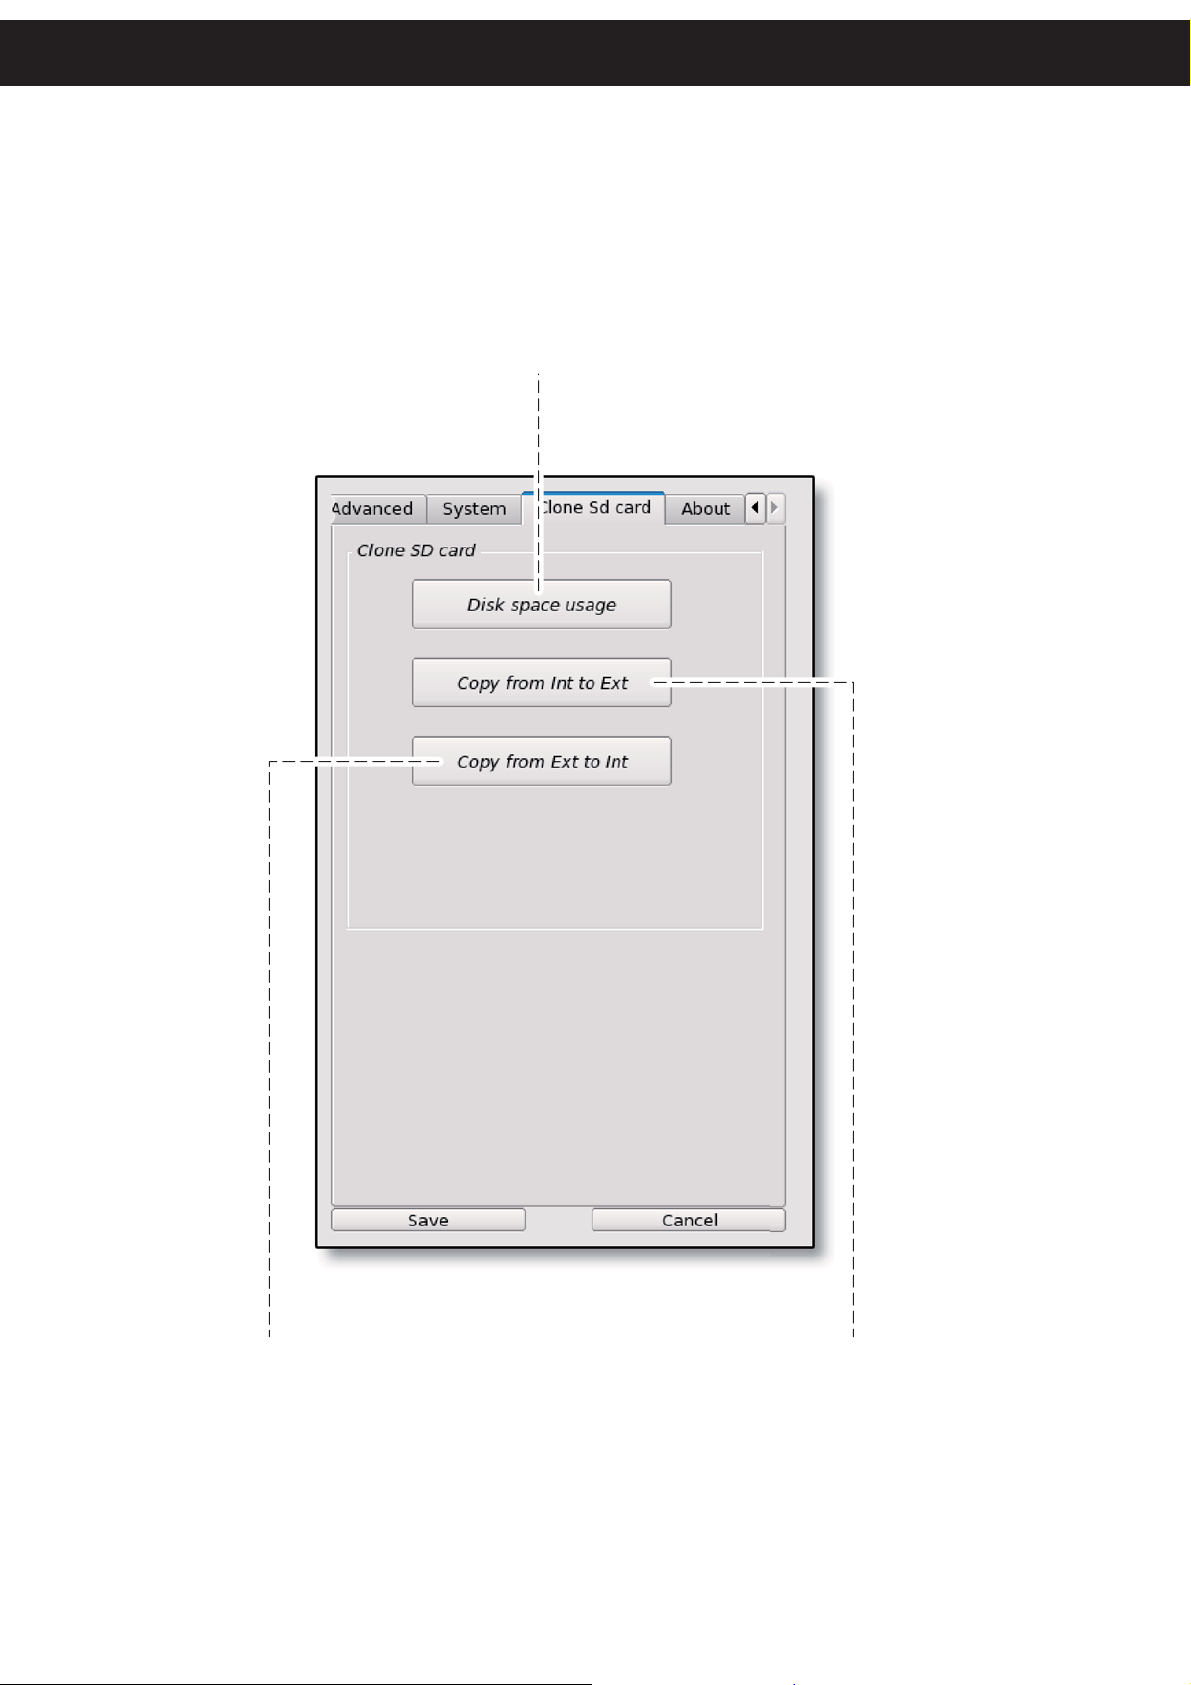
ADVANCED FUNCTIONS
MEMORY IN USE (INTERNAL / EXTERNAL SD),
CAPACITY AND SPACE USED.
Indicazione memoria in uso (interna o scheda SD esterna),
capienza e spazio utilizzato.
COPY THE CONTENT OF
EXTERNAL SD TO INTERNAL
MEMORY (playlist, all the multimedia
content and operating parameters)
Copia il contento della SD esterna sulla
memoria interna (playlist, tutti i contenuti
multimediali e parametri di funzionamento)
COPY THE CONTENT OF INTERNAL
MEMORY TO EXTERNAL SD
(playlist, all the multimedia content
and operating parameters)
Copia il contento della memoria interna
su SD esterna (playlist, tutti i contenuti
multimediali e parametri di funzionamento)
31
Page 32
SET DATE AND TIME
Impostazione data e orario
GB
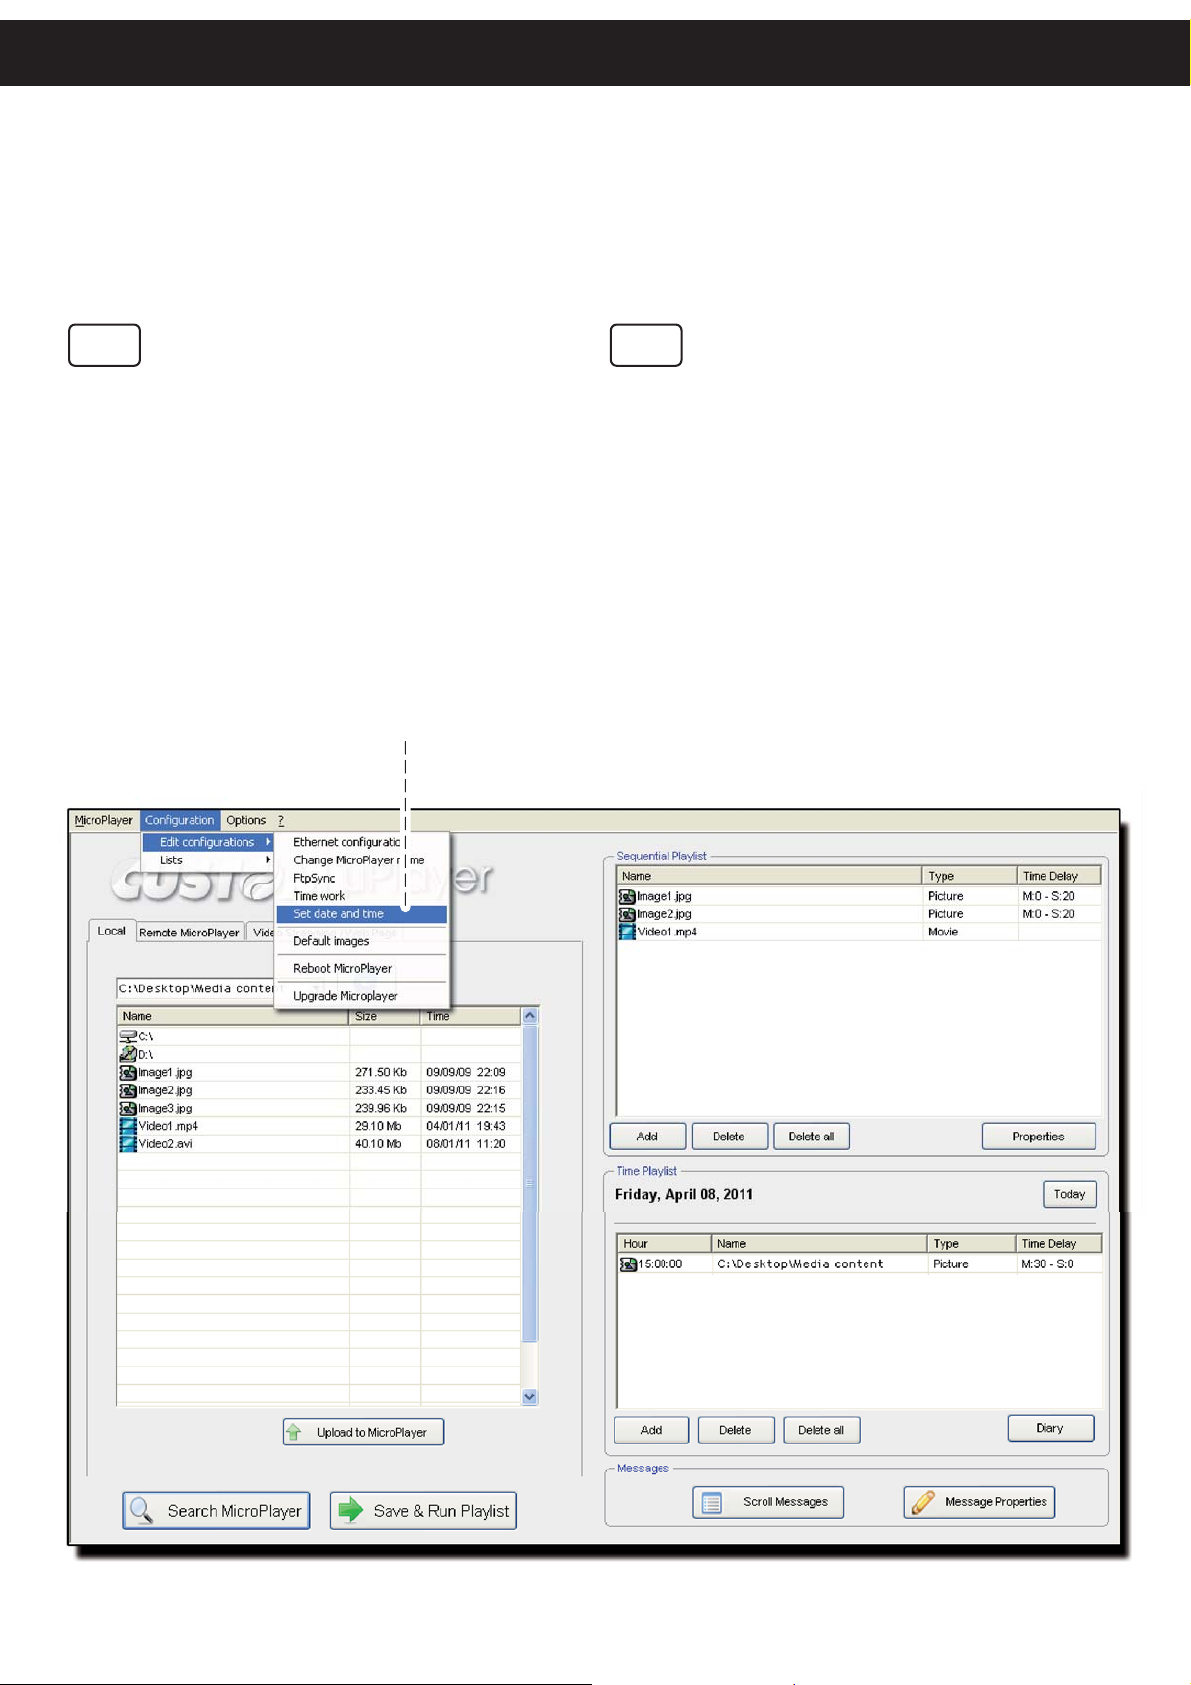
Each time you login to Player, the MicroPlaylistManager software displays a dialog box in which it
is proposed to update the date and time of Player
with that of the PC.
Alternatively, you can do the same at any time
by the command to reach from the drop-down
menu.
UPDATE THE DATE AND TIME OF PLAYER WITH THAT OF THE PC
Regola la data e l’orario di Player con quelli del PC in uso
I
Ogni qualvolta si accede a Player, il software
MicroPlaylistManager visualizza una fi nestra di
dialogo in cui si propone di aggiornare la data e
l’orario di Player con quello del PC in uso.
In alternativa è possibile eseguire la stessa operazione in qualsiasi momento, mediante il comando
raggiungibile dal menu a tendina.
32
Page 33
SELECT THE NETWORK CARD
Selezione della scheda di rete
ADVANCED FUNCTIONS
GB
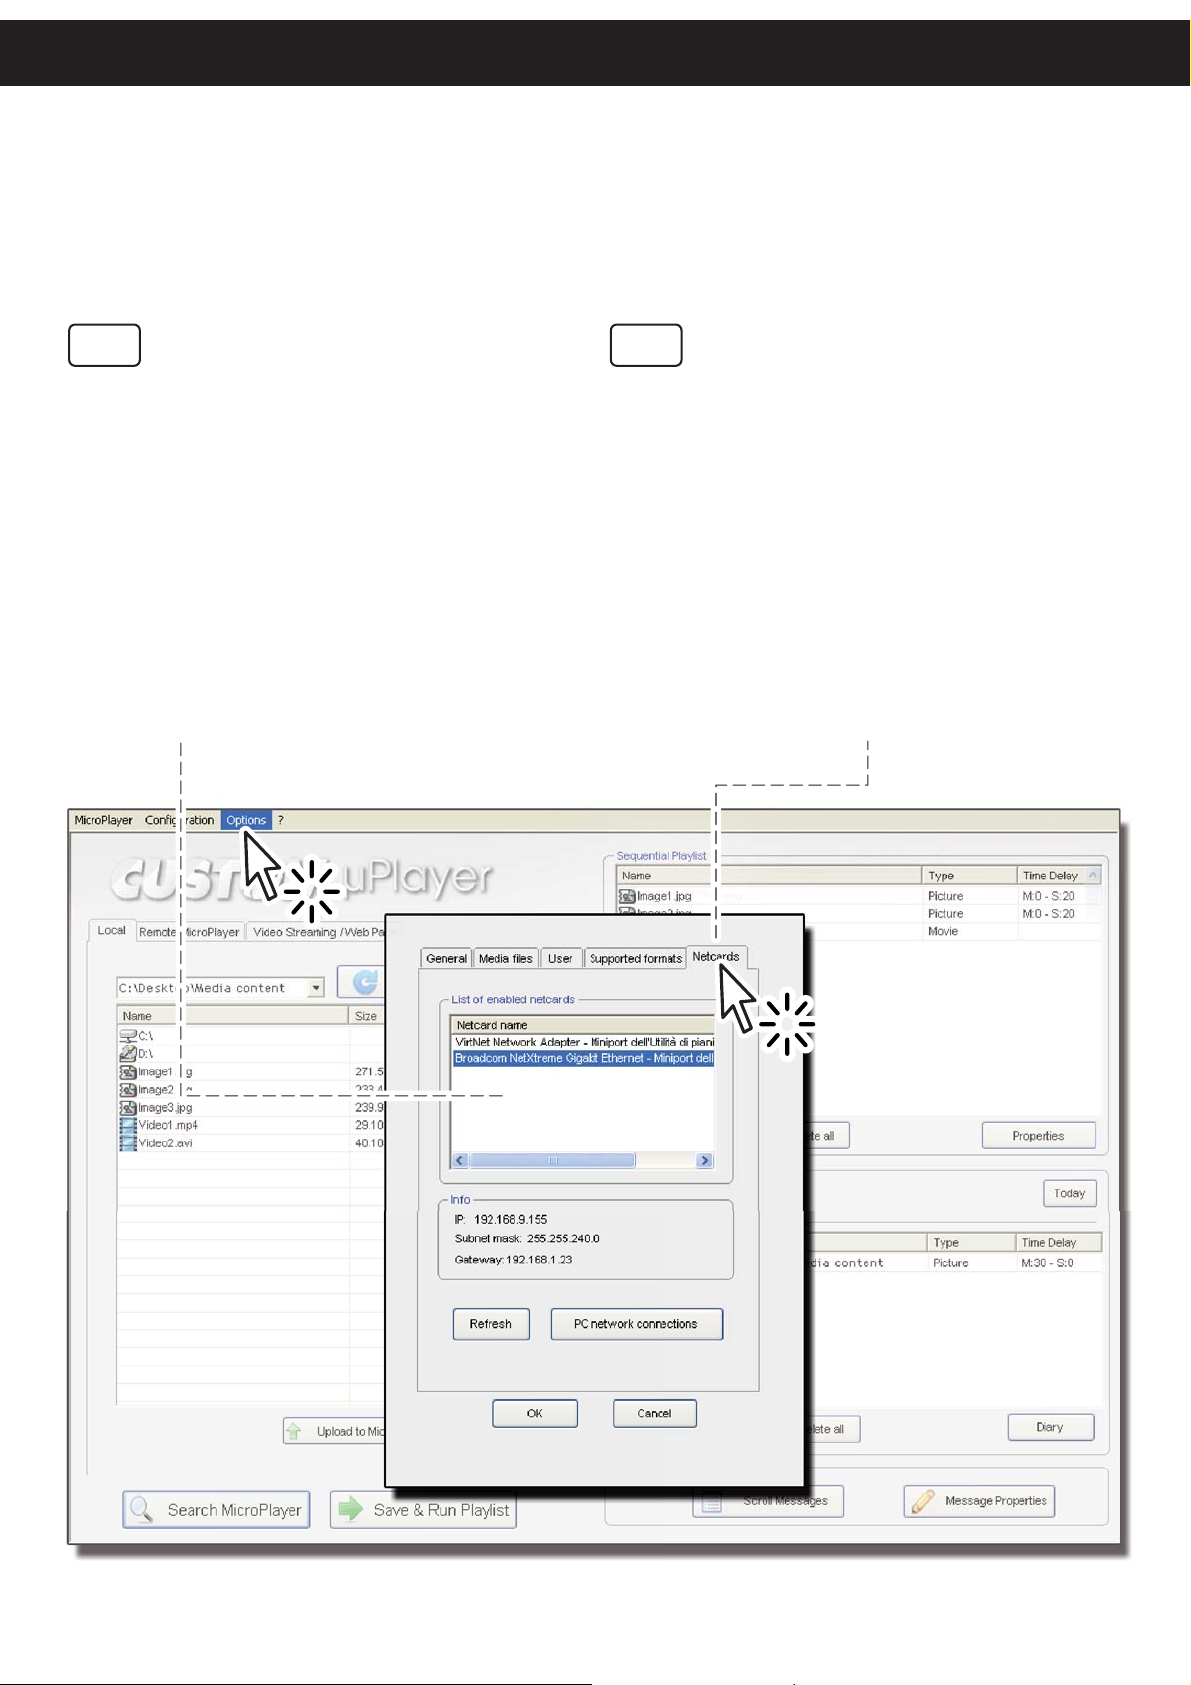
If the PC you are using is equipped with more than
one network card, with the MicroPlaylistManager
software is possible to select the network card that
will always be used to connect to Player.
By clicking on the OPTIONS menu displays the
general confi guration dialog. In the Netcards panel
you can select the desired network card among
those detected.
LIST OF NETWORK CARDS AVAILABLE ON PC
Lista schede di rete disponibili sul PC
I
Qualora il PC in uso sia equipaggiato con più di
una scheda di rete, il software MicroPlaylistManager permette di selezionare la scheda di rete
che verrà sempre utilizzata per la connessione a
Player.
Facendo click sul menù OPTIONS viene visualizzata la fi nestra di confi gurazione generale. Nel
pannello NETCARDS è possibile selezionare la
scheda di rete desiderata tra quelle rilevate.
NETCARDS PANEL
Pannello schede di rete
33
Page 34
UPGRADING THE DEVICE
Aggiornamento del dispositivo
GB
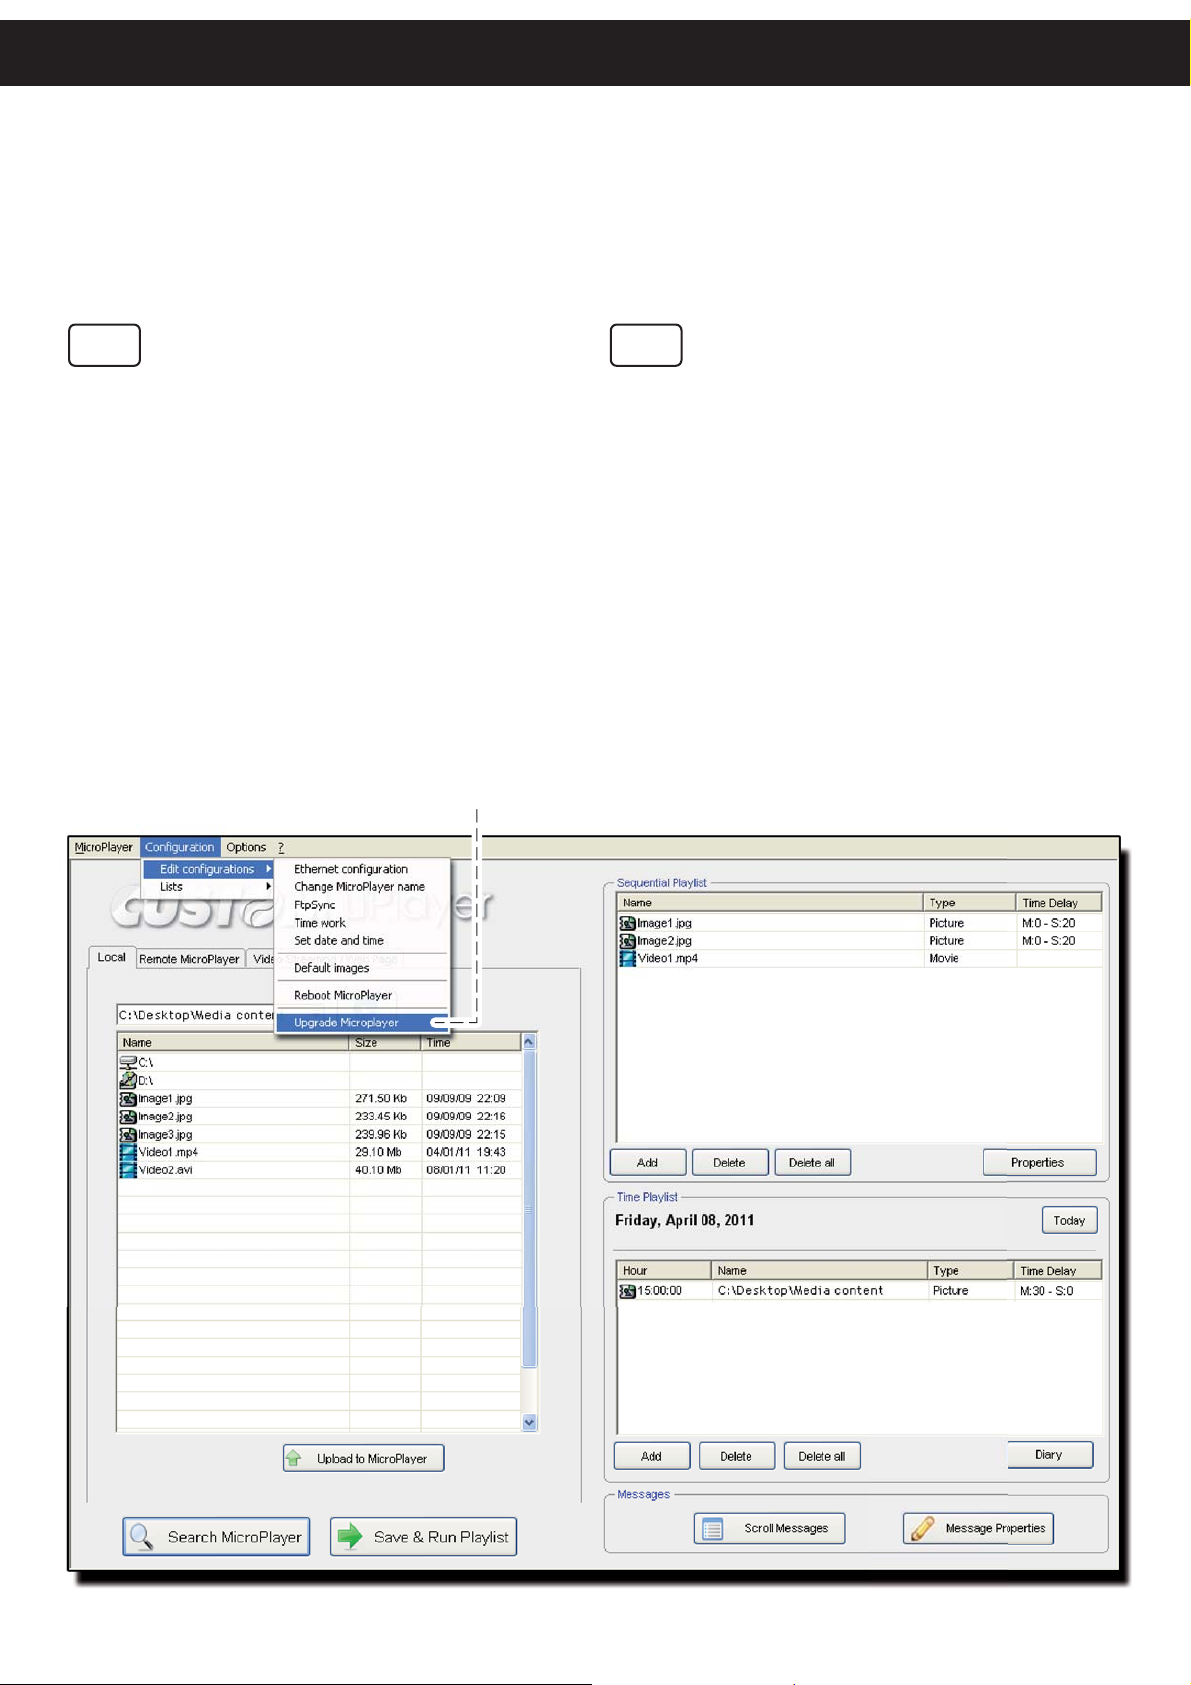
Whenever it is necessary upgrade Player, proceed as follows:
Select the device to be updated (see DETECT-1.
ING DEVICES IN THE NETWORK).
Select the command “Upgrade Microplayer” 2.
accessible from the drop-down menu and
select the update fi le for Player saved on
your PC.
After upgrading the device is restarted.3.
UPDATE THE Player FROM THE UPGRADE FILE (<upgrade file>. zip)
Carica l’aggiornamento di Player da file (<file aggiornamento>.zip)
I
Qualora si renda necessario l’aggiornamento di
Player, procedere come segue:
Selezionare il dispositivo da aggiornare 1.
(vedi Cap. RICERCA DISPOSITIVI NELLA
RETE).
Selezionare il comando “Upgrade Microplayer” 2.
raggiungibile dal menu a tendina e selezionare
il fi le di aggiornamento per Player salvato sul
PC in uso.
Al termine dell’aggiornamento il dispositivo 3.
viene riavviato.
34
Page 35

TECHNICAL SPECIFICATIONS
DEVICE SPECIFICATIONS
Caratteristiche del dispositivo
GB
SYSTEM
Processor ARM Cortex™-A8 800 MHz
System Memory 512MB
Internal Storage 2GB (free 1,3 GB)
Ethernet 10/100Base-TX, RJ-45 connector x 2
Resolutions 720p
TV-out Hdmi
I/O PORTS 1×USB 2.0 (does not support wake-up function)
1×Hdmi
1xStereo line-out audio
2xRJ45 Ethernet ports 100Mbps
CODEC
Audio ac3, aac, wma [1,2,3], mpeg [1,2,4], vorbis
mpeg [1,2,4], mpegts, msmpeg [41,42,43]
Video
IMAGES
Extensions jpg, jpeg, gif, png, bmp, tif, tiff
VIDEOS
Max. resolution 1280 x 720 pixel
STREAMING
Formats WMV + WMA (ASF)
Max. resolution 1280 x 720
WEB PAGE
h263, h264, wmv [1,2,3], mp2v [1,2]
divx [3,4,5,6], xvid [3,4,5,6]
pixel
Protocol http, https
ELECTRICAL SPECIFICATIONS
Power supply 18 Vdc ±10% (external power supply)
Current 150 mA
PCALI-DPT100 POWER SUPPLY SPECIFICATIONS
Power supply voltage 100Vac ÷ 240Vac
Frequency 50Hz ÷ 60Hz
Current (output) 1,0 A
Power 18 W
35
Page 36
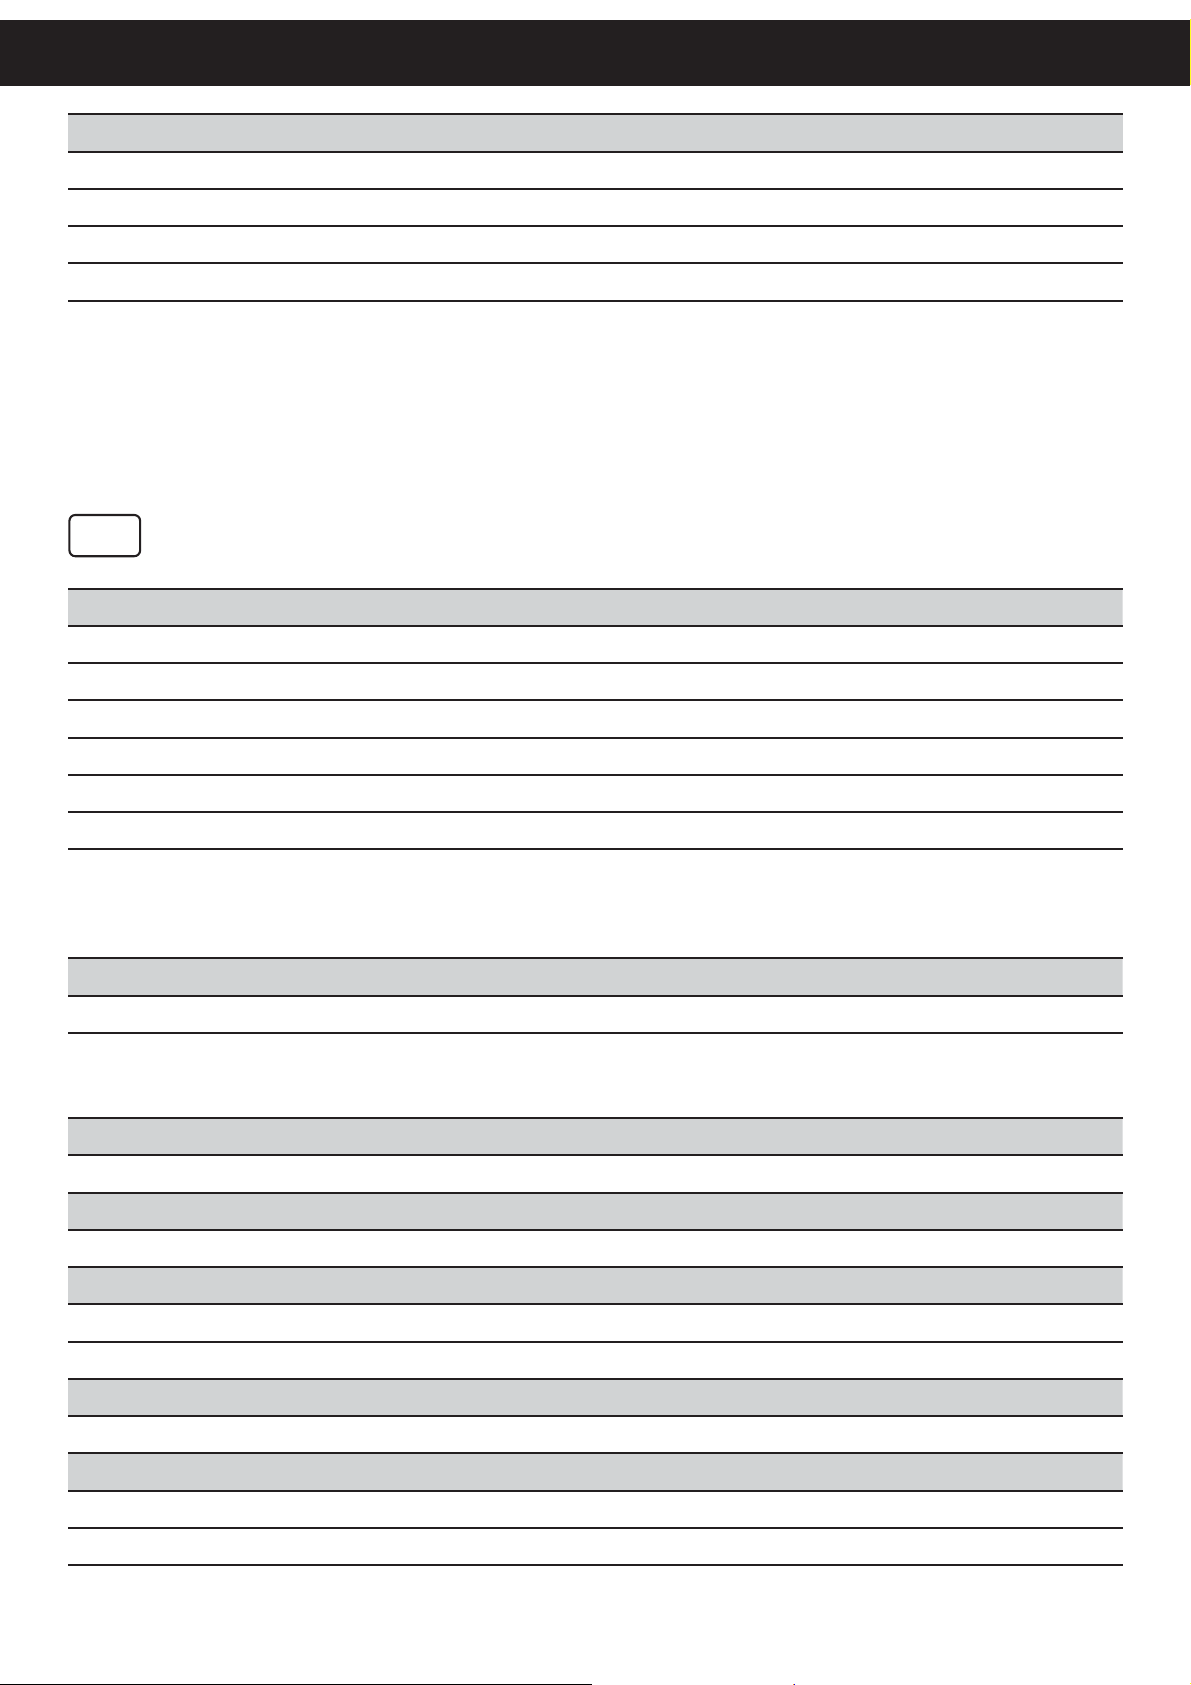
ENVIRONMENTAL SPECIFICATIONS
Operating temperature 0ºC ÷ 50ºC
Operating humidity 10% ÷ 80% Rh
Storage Temperature -20ºC ÷ +70ºC
Storage relative humidity 10% ÷ +90% Rh
I
SISTEMA
Processore ARM Cortex™-A8 800 MHz
Memoria 512MB
Hard Disk 2GB (liberi 1,3 GB)
Ethernet 2x 10/100Base-TX, connettore RJ-45
Risoluzione 720p
TV-out Hdmi
PORTE I/O 1×USB 2.0 (non supporta la funzione wake-up)
1×Hdmi
1xStereo line-out audio
2x porte RJ45 Ethernet 10/100Mbps
CODEC
Audio ac3, aac, wma [1,2,3], mpeg [1,2,4], vorbis
mpeg [1,2,4], mpegts, msmpeg [41,42,43]
Video
IMMAGINI
Estensioni jpg, jpeg, gif, png, bmp, tif, tiff
VIDEO
Risoluzione max. 1280 x 720 pixel
STREAMING
h263, h264, wmv [1,2,3], mp2v [1,2]
divx [3,4,5,6], xvid [3,4,5,6]
Formati WMV + WMA (ASF)
Risoluzione max. 1280 x 720 pixel
WEB PAGE
Protocolli http, https
SPECIFICHE ELETTRICHE
Alimentazione 18 Vdc ±10% (alimentatore esterno)
Assorbimento 150 mA
36
Page 37

TECHNICAL SPECIFICATIONS
SPECIFICHE ALIMENTATORE PCALI-DPT100
Tensione di alimentazione 100 ÷ 240 Vac
Frequenza 50 ÷ 60 Hz
Corrente (output) 1,0 A
Potenza 18 W
SPECIFICHE AMBIENTALI
Temperatura di funzionamento 0ºC ÷ 50ºC
Umidità relativa 10% ÷ 80% Rh
Temperatura di stoccaggio - 20ºC ÷ +70ºC
Umidità relativa di stoccaggio 10% ÷ +90% Rh
37
Page 38
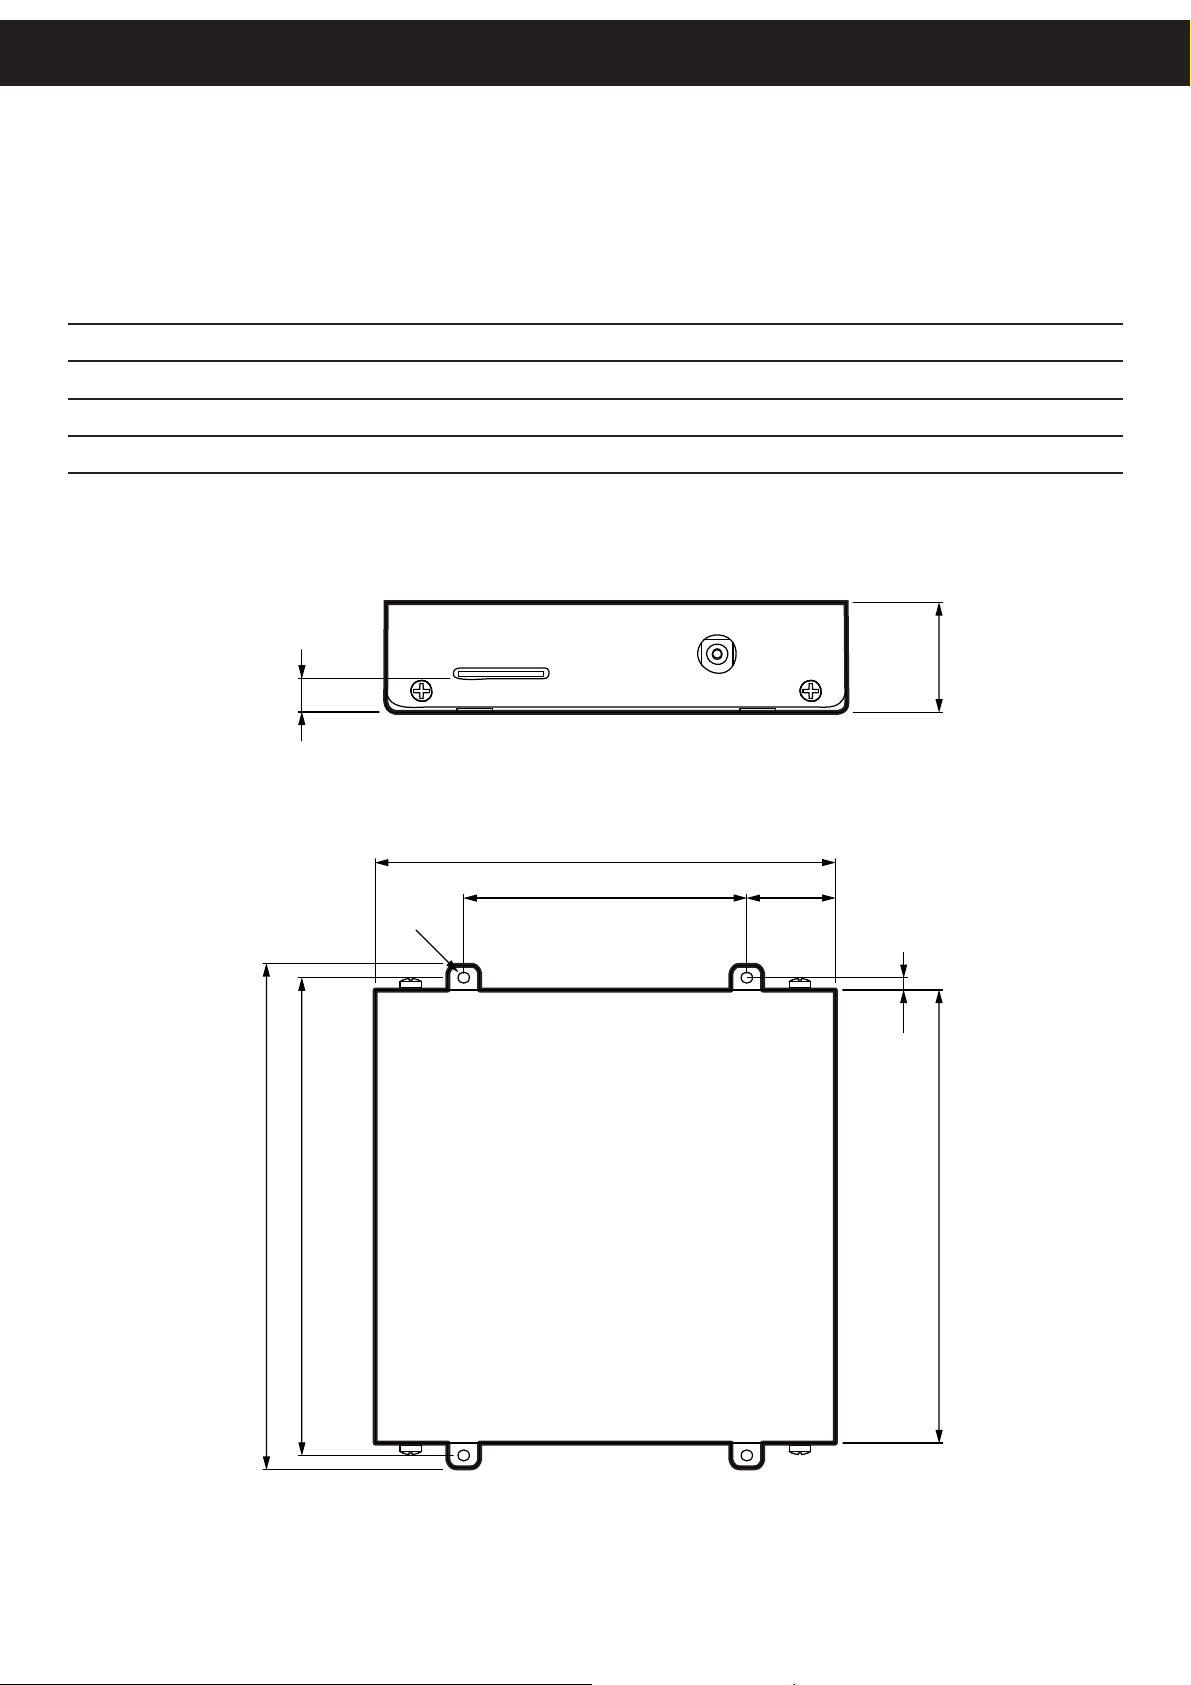
DEVICE DIMENSIONS
Dimensioni dispositivo
Length 130 mm
Width 142 mm
Height 31 mm
Weight 0,5 Kg
31
9.5
142.5
135
130
80 25
Ø3.2
3.5
128
38
Page 39
TECHNICAL SPECIFICATIONS
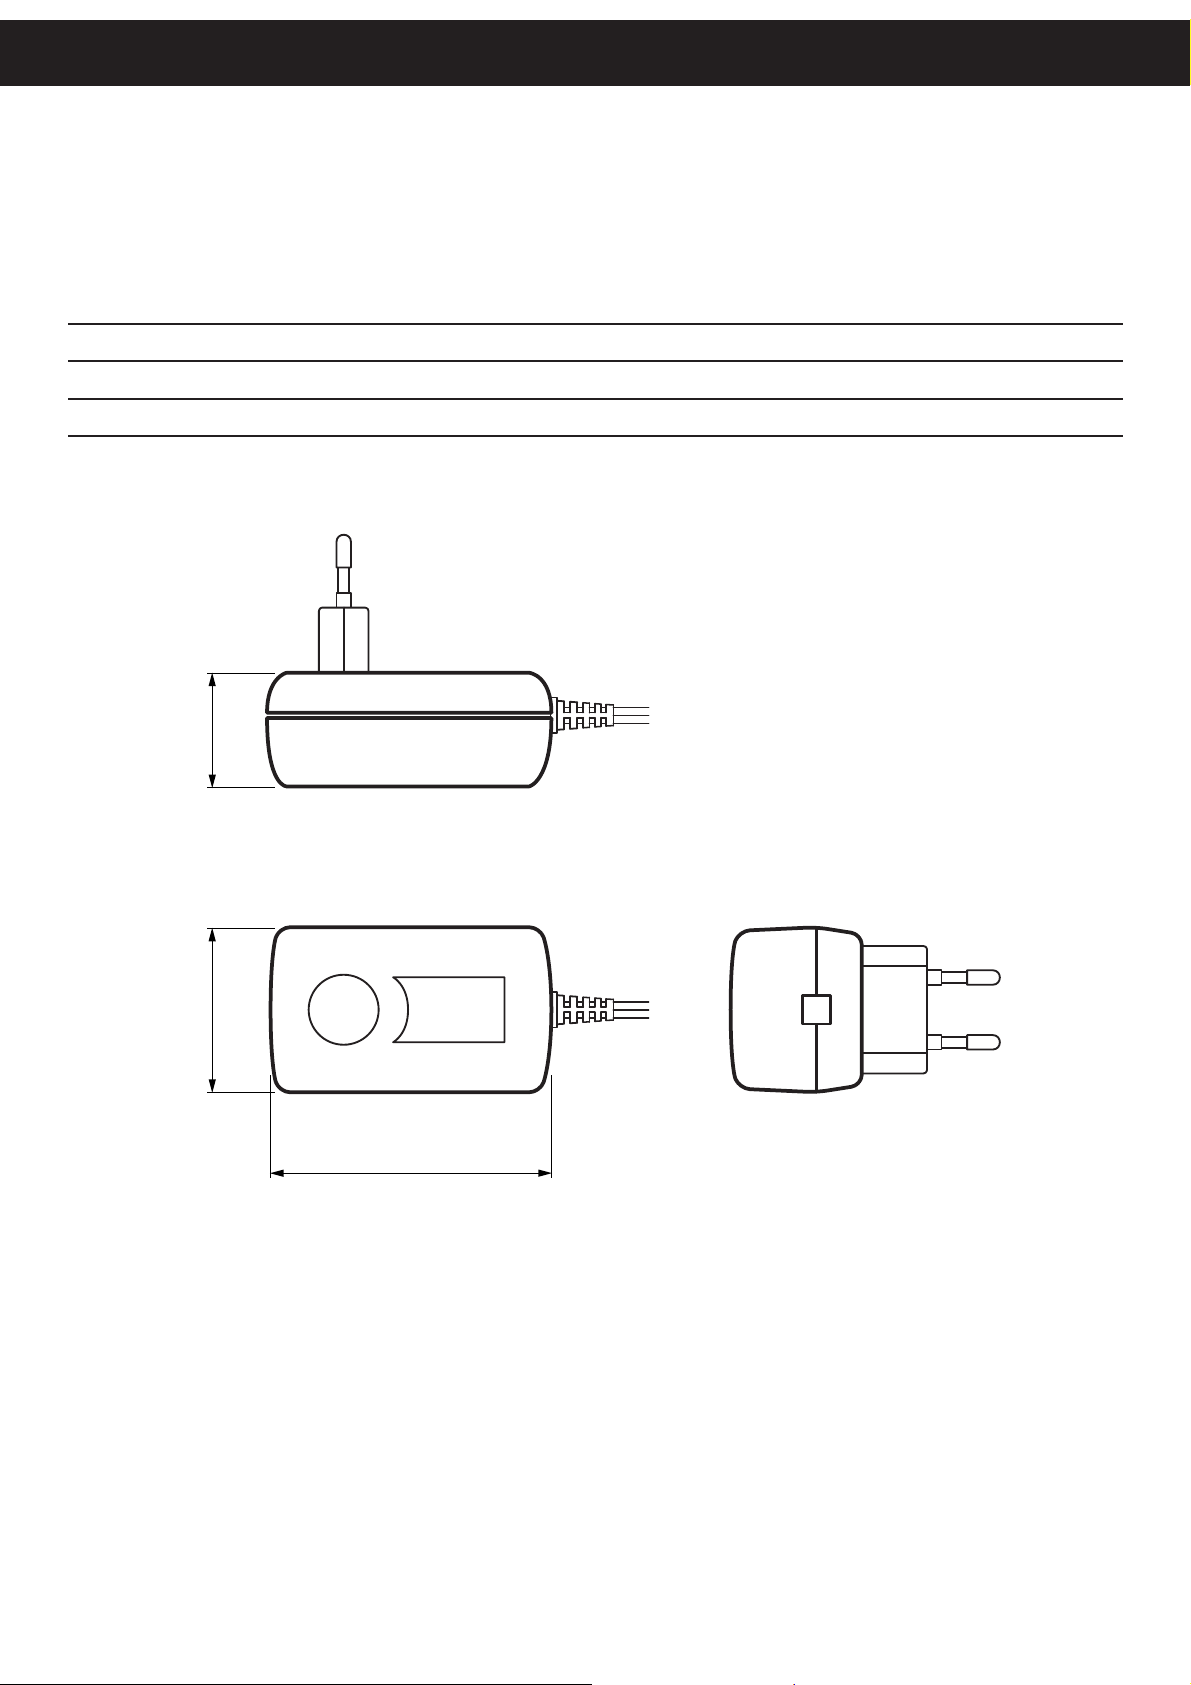
P. SUPPLY PCALI-DPT100 DIMENSIONS
Dimensioni alimentatore PCALI-DPT100
Length 74 mm
Width 43.5 mm
Height 34 mm
43.5 34
74
39
Page 40

40
Page 41
POWER ON
Alimentazione
TROUBLESHOOTING
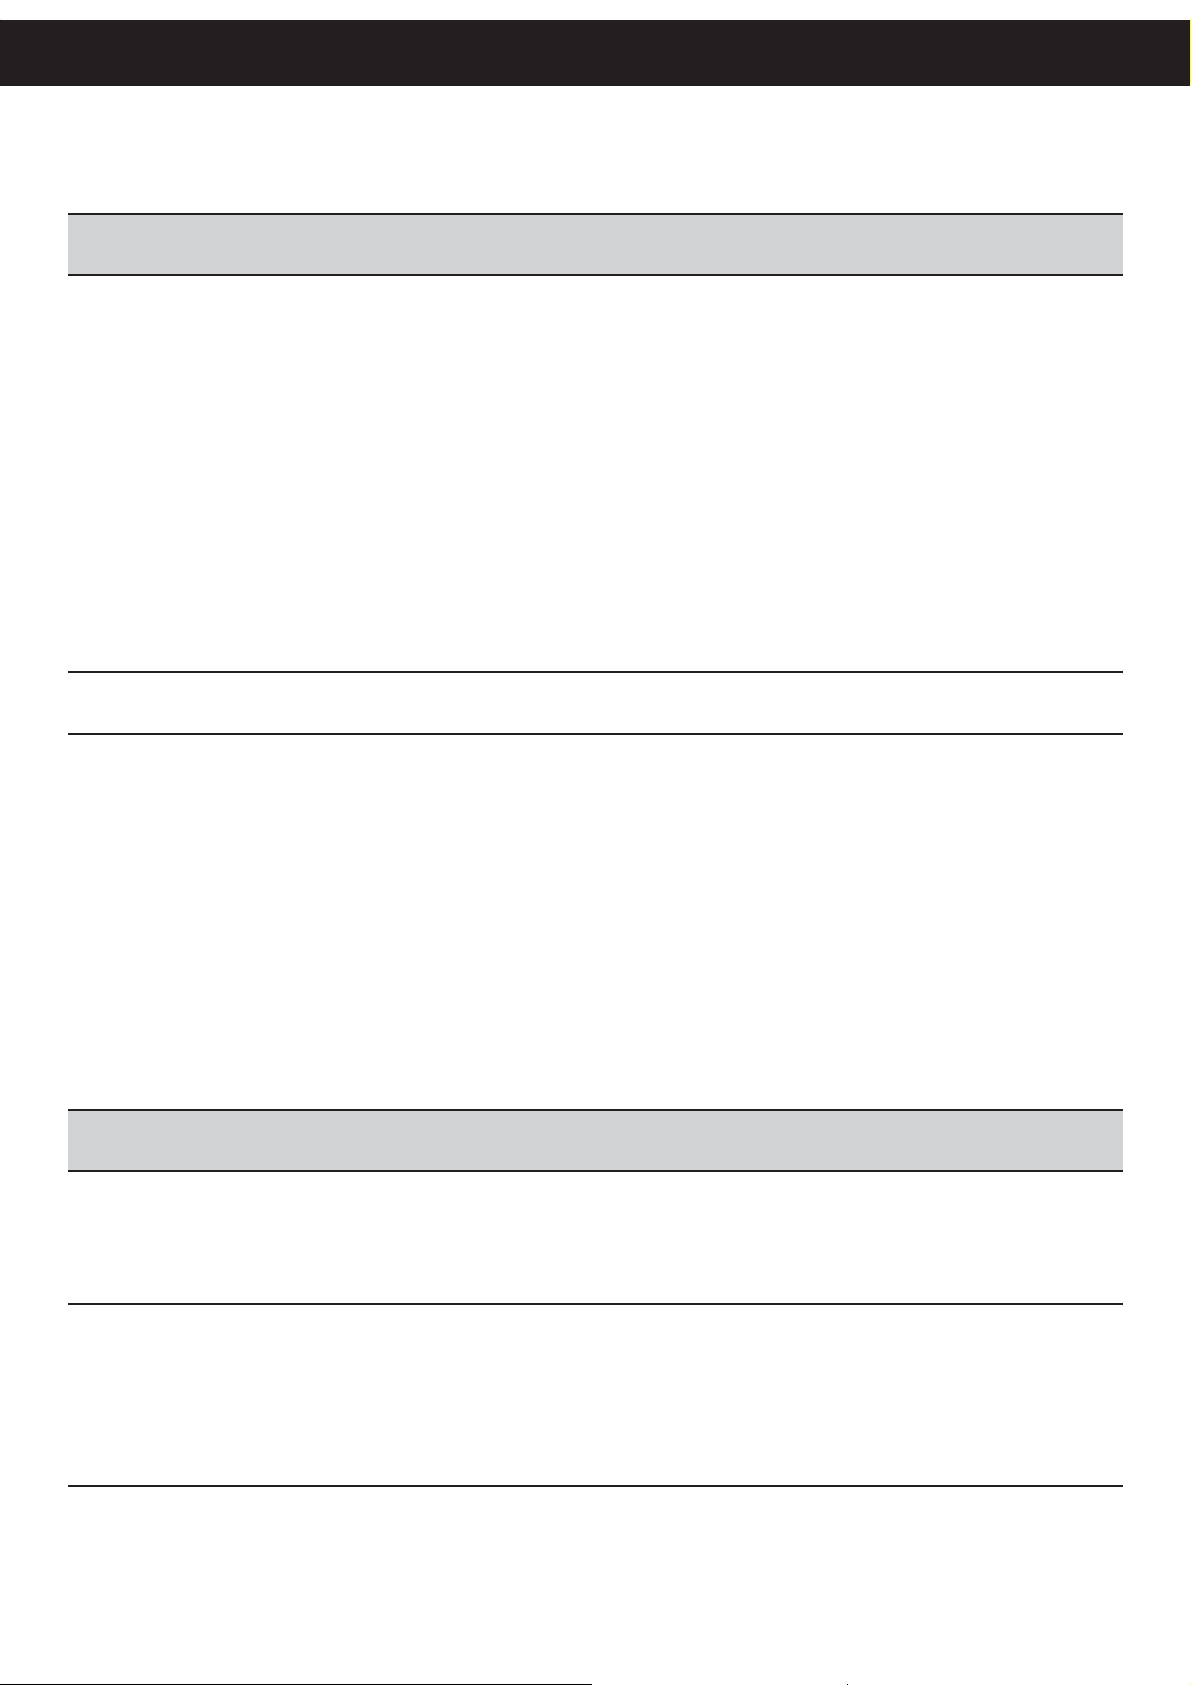
QUESTION
Domanda
Why Player doesn’t turn on?
Perché Player non si accende?
How can I turn off Player?
Come spengo Player?
ANSWER
Risposta
Check:
The HD TV/MONITOR is connected and supplied correctly.1.
The ethernet cable is connected (if you are using web/stream-2.
ing pages).
The status led lights on when the power supply cable is in-3.
serted.
Connected HD TV/MONITOR support the resolution 4.
(1280x720).
Verifi care che:
L’ HD TV/MONITOR sia collegato correttamente ed alimentato.1.
Il cavo di rete sia collegato (se si utilizzano pagine web/strea-2.
ming).
Il led di stato si illumini nel momento in cui inseriamo il cavo di ali-3.
mentazione.
L’ HD TV/MONITOR collegato supporti la risoluzione (1280x720).4.
Disconnect the power supply cable.
Disconnettere il cavo di alimentazione.
CONFIGURATION
Confi gurazione
QUESTION
Domanda
Once modifi ed the Player confi guration I must reboot?
Una volta modifi cata la confi gurazione di Player è necessario riavviare?
Why after a few minutes of playback, Player freeze?
Perché dopo qualche minuto di riproduzione Player si blocca?
ANSWER
Risposta
Yes. To activate the modifi es it is
necessary to restart Player.
Si. E’ necessario riavviare Player per
rendere attive le modifi che.
It is possible a malfunction of the
control board (contact the Customer
Service).
E’ probabile un malfunzionamento della
scheda di controllo (contattare l’assistenza tecnica).
41
Page 42
CONNECTIONS
Collegamenti
QUESTION
Domanda
How can I connect a HD TV / MONITOR with DVI port?
Come collego un HD TV/MONITOR con porta DVI?
How can I connect a HD TV / MONITOR with HDMI port?
Come collego un HD TV/MONITOR con porta HDMI?
What is the function of USB ports?
Quale funzione ha la porta USB?
ANSWER
Risposta
Use a HDMI-DVI cable (not supplied) to connect
Player to the HD TV / MONITOR and select the
appropriate DVI input on the HD TV / MONITOR.
Utilizzare un cavo HDMI-DVI (non in dotazione) per
collegare Player alla HD TV/MONITOR e selezionare
sul HD TV/MONITOR l’ingresso DVI opportuno.
Use a HDMI cable (not supplied) to connect
Player to the HD TV / MONITOR and select the appropriate HDMI input on the HD TV / MONITOR.
Utilizzare un cavo HDMI (non in dotazione) per collegare Player alla HD TV/MONITOR e selezionare sul
HD TV/MONITOR l’ingresso HDMI opportuno.
Use the USB port to connect a keyboard (not
supplied). To connect mouse and keyboard (not
supplied) use an USB hub. Enter the confi guration
panel (see Chapter CONFIGURATION).
Utilizzare la porta USB per collegare una tastiera
(non in dotazione). Per collegare mouse e tastiera
(non in dotazione) utilizzare un hub USB. Accedere
al pannello di confi gurazione.(vedi Cap. CONFIGU-
RAZIONE).
Why Player is slow in turning on?
Perchè Player è lento all’accensione?
UPGRADE
Aggiornamento
QUESTION
Domanda
It is possible to upgrade Player?
È possibile aggiornare Player?
Maybe Player Ethernet settings include a connec-
tion to a server IP not available at the moment.
Probabilmente le impostazioni Ethernet di Player
includono la connessione a server IP non raggiungibili
in quel momento.
ANSWER
Risposta
Yes. Player is upgradable using MicroPlaylistManager
(see Chapter UPGRADING THE DEVICE).
Si. L’aggiornamento di esegue tramite MicroPlaylistManager
(vedi Cap. AGGIORNAMENTO DEL DISPOSITIVO).
42
Page 43

PLAYBACK
Riproduzione
TROUBLESHOOTING
QUESTION
DOMANDA
Why I can’t hear audio?
Perché non sento l’audio?
I can’t see on Monitor the image/video I have just dragged into Playlist.
Sul monitor non vedo l’immagine/fi lmato che ho caricato nella Playlist.
ANSWER
RISPOSTA
The audio signal is only available
on the “Audio” port. Check the
cable is correctly connected with
the “Audio” port. Remember it is
possible to disable audio by using
MicroPlaylistManager.
Il segnale audio è disponibile solo
sulla porta “Audio”. Verificare che
il cavo sia inserito correttamente
nella porta “Audio”. Si ricorda che è
possibile disabilitare l’audio tramite
MicroPlaylistManager.
Probably the image/video size
are not compatible with those of
Player or codecs are not supported (see chapter DEVICE FEATURES).
Probabilmente la dimensione dell’immagine/fi lmato non sono compatibili
con quelle di Player oppure i codec
non sono supportati (vedere Cap. CARATTERISTICHE DISPOSITIVO).
Why Player is slow in managing Playlists?
Perchè Player è lento nella gestione delle Playlist?
Monitor display the image/movie with bad result. What to do?
L’immagine/fi lmato risulta sgranato e/o la visione del contenuto è pessima,
cosa devo fare?
Why the movie is played in spurts?
Perchè il fi lmato viene riprodotto a scatti?
Maybe Player settings include a
connection to a server IP not available at the moment.
Probabilmente le impostazioni di
Player includono la connessione
a server IP non raggiungibili in quel
momento.
Perhaps the multimedia content has
a low resolution. When this multimedia contents is displayed on a
large size screen the result is bad.
Probabilmente il contenuto multimediale è in bassa risoluzione per
cui risulta sgranato una volta che si
visualizza su uno schermo di grandi
dimensioni.
If you are using an external SD
card, check the communication
speed of the SD card (recommended SD2 or SD4).
Se si stà utilizzando una scheda
SD esterna, verificare la velocità
di comunicazione della scheda SD
(consigliato SD2 o SD4).
43
Page 44

MicroPlaylistManager
MicroPlaylistManager
QUESTION
DOMANDA
Before installing a new release of MicroPlaylistManager it’s
better to uninstall the old release?
Prima di installare una nuova versione di MicroPlaylistManager
devo disinstallare dal PC la vecchia versione?
Why clicking on “search” I can’t view any Player?
Perché, quando clicco su “Search”, non vedo nessun Player?
ANSWER
RISPOSTA
Yes. It is recommended.
Si. E’ consigliabile farlo.
First check the Ethernet cable is connected •
with the Ethernet port on Player. Check the
status leds on the connector are on or blinking
to confi rm network activity.
If the PC you are using is equipped with more •
than one network card, select the network
card that will always be used to connect to
Player (see Chapter SELECT THE NETWORK
CARD).
If so, probably the IP and SUBNET MASK on •
PC is not compatible with the ones on Player.
Change the PC confi guration to allow the con-
nection with Player (contact your system
administrator).
Verifi care per prima cosa che il cavo di rete sia •
connesso alla porta Ethernet di Player e che gli
indicatori luminosi sul connettore siano accesi
e/o lampeggino per avere conferma dell’attività
di rete.
Se il PC in uso è equipaggiato con più schede di •
rete, selezionare quella che verrà utilizzata per il
collegamento a Player (vedi Cap. SELEZIONE
DELLA SCHEDA DI RETE).
Se si, allora è probabile che l’IP e la SUBNET •
MASK del PC che si sta utilizzando non sia
compatibile con quella di Player. Modifi care le
impostazioni del PC per potersi connettere con
Player (contattare il proprio amministratore di
Sistema).
When I drag the contents in the Playlist, the HD TV/MONITOR
can’t display its. Why?
La HD TV/MONITOR non visualizza niente quando trascino i
contenuti nella Playlist. Perchè?
It’s possible to add video streaming contents or WEB pages
into Playlists?
È possibile aggiungere alle playlist contenuti video streaming
oppure pagine WEB?
Which type of playlist has priority?
Quale tipo di playlist ha priorità?
44
To make the modifi es active it always necessary
to press the “SAVE&RUN” key.
Per rendere effettive le modifi che eseguite è sempre
necessario premere il tasto “SAVE&RUN”.
Yes, look at the “Video Streaming / Web Page”
section of MicroPlaylistManager.
Si, si trovano entrambi nella sezione “Video Streming / Web Page” di MicroPlaylistManager.
The Time playlist has more priority than the
Sequential playlist.
La playlist Temporale ha sempre la priorità su quella
Sequenziale.
Page 45

What is the priority of scrolling messages?
Quale priorità hanno i messaggi scorrevoli?
The expiry date/hour in the playlists is included?
La data/ora di scadenza nelle Playlist è inclusa?
TROUBLESHOOTING
The specifi c message set for the single multime-
dia content has priority over the main scrolling
message.
Il messaggio scorrevole impostato nel singolo
contenuto multimediale è prioritario rispetto al
messaggio scorrevole generale.
The start date is included. The fi nish date is
excluded.
La data di partenza è inclusa mentre quella di fi ne
è esclusa.
45
Page 46

46
Page 47
CONTACTS
Contatti
GB
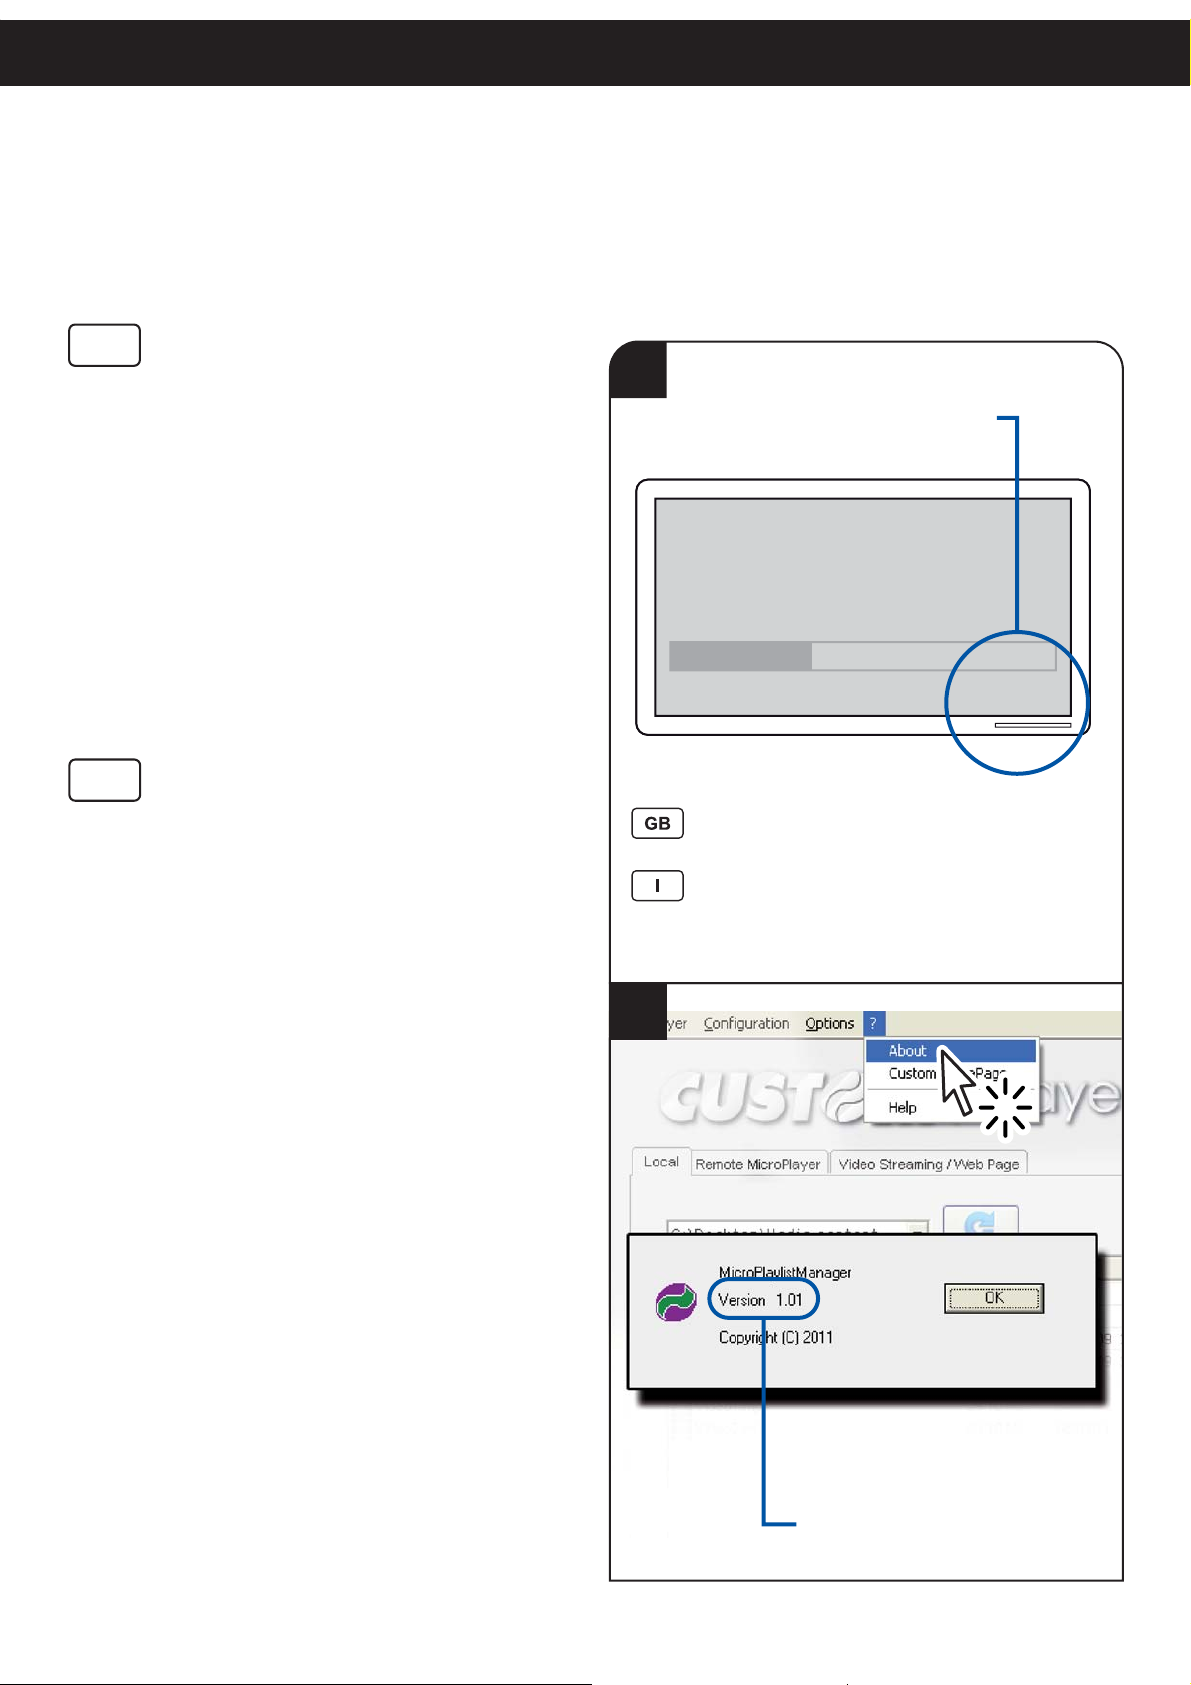
In case of failure, contact Technical Support by
sending an e-mail to [email protected] detailing:
Player: product code•
Player: serial number•
Player: hardware release•
Player: fi rmware release•
MicroPlaylistManager: software release•
CONTACTS
1
Firmware release
Player
100%0%
I
In caso di malfunzionamento, contattare l’assistenza tecnica inviando una e-mail all’indirizzo
[email protected] specifi cando:
Player: codice prodotto•
Player: numero di serie•
Player: revisione hardware•
Player: revisione fi rmware•
MicroPlaylistManager: revisione software•
Rel. 1.00
AT STARTUP
(see Chapter SWITCH THE DEVICE ON/OFF)
ALL’AVVIO
(vedi Cap. ACCENDERE/SPEGNERE IL DISPOSITIVO)
2
47
software release
Page 48
3
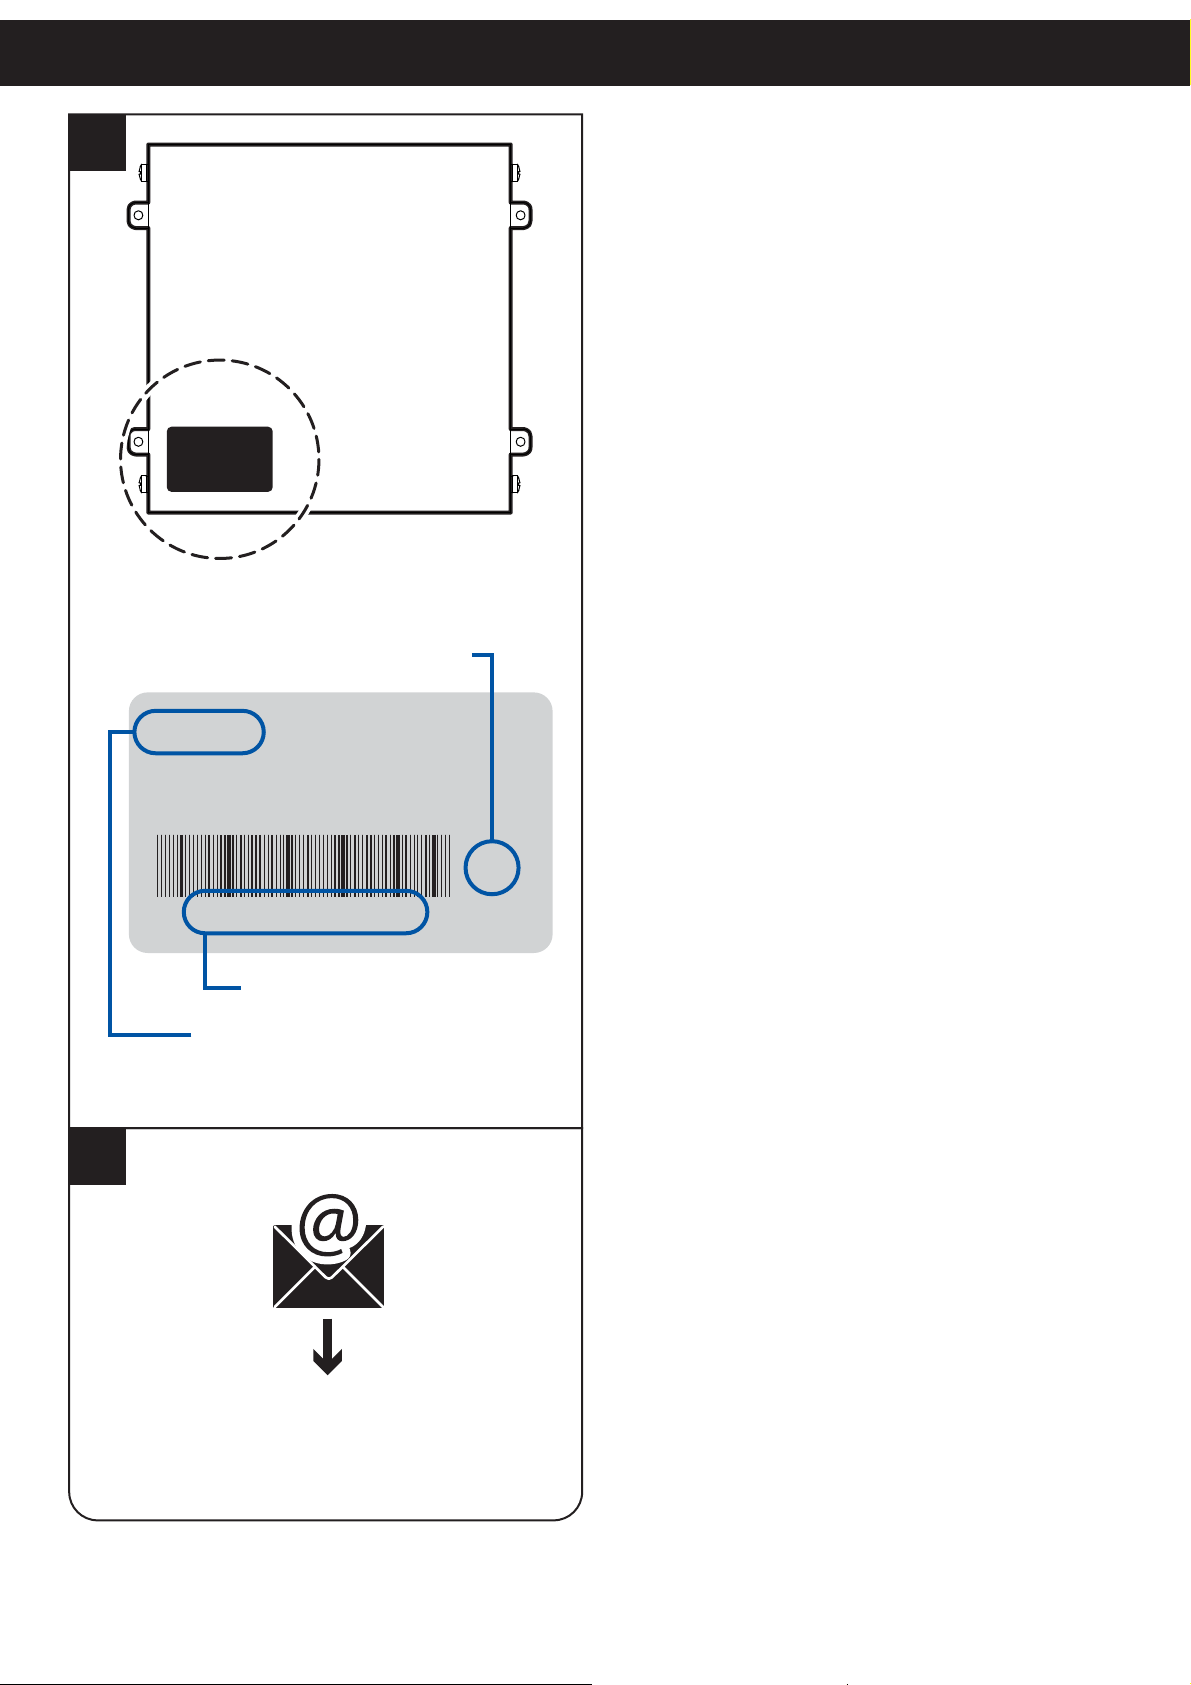
hardware release
4
PCXXXXX
xxxxxx xxx xxxx xxxx
xxxxxx xxx xxxx xxxx
Rx
0000000000000000000
serial number
product code
Customer Service Department
Customer Service Department
48
Page 49
ACCESSORIES
Accessori
GB I
CONSUMABLES AND ACCESSORIES
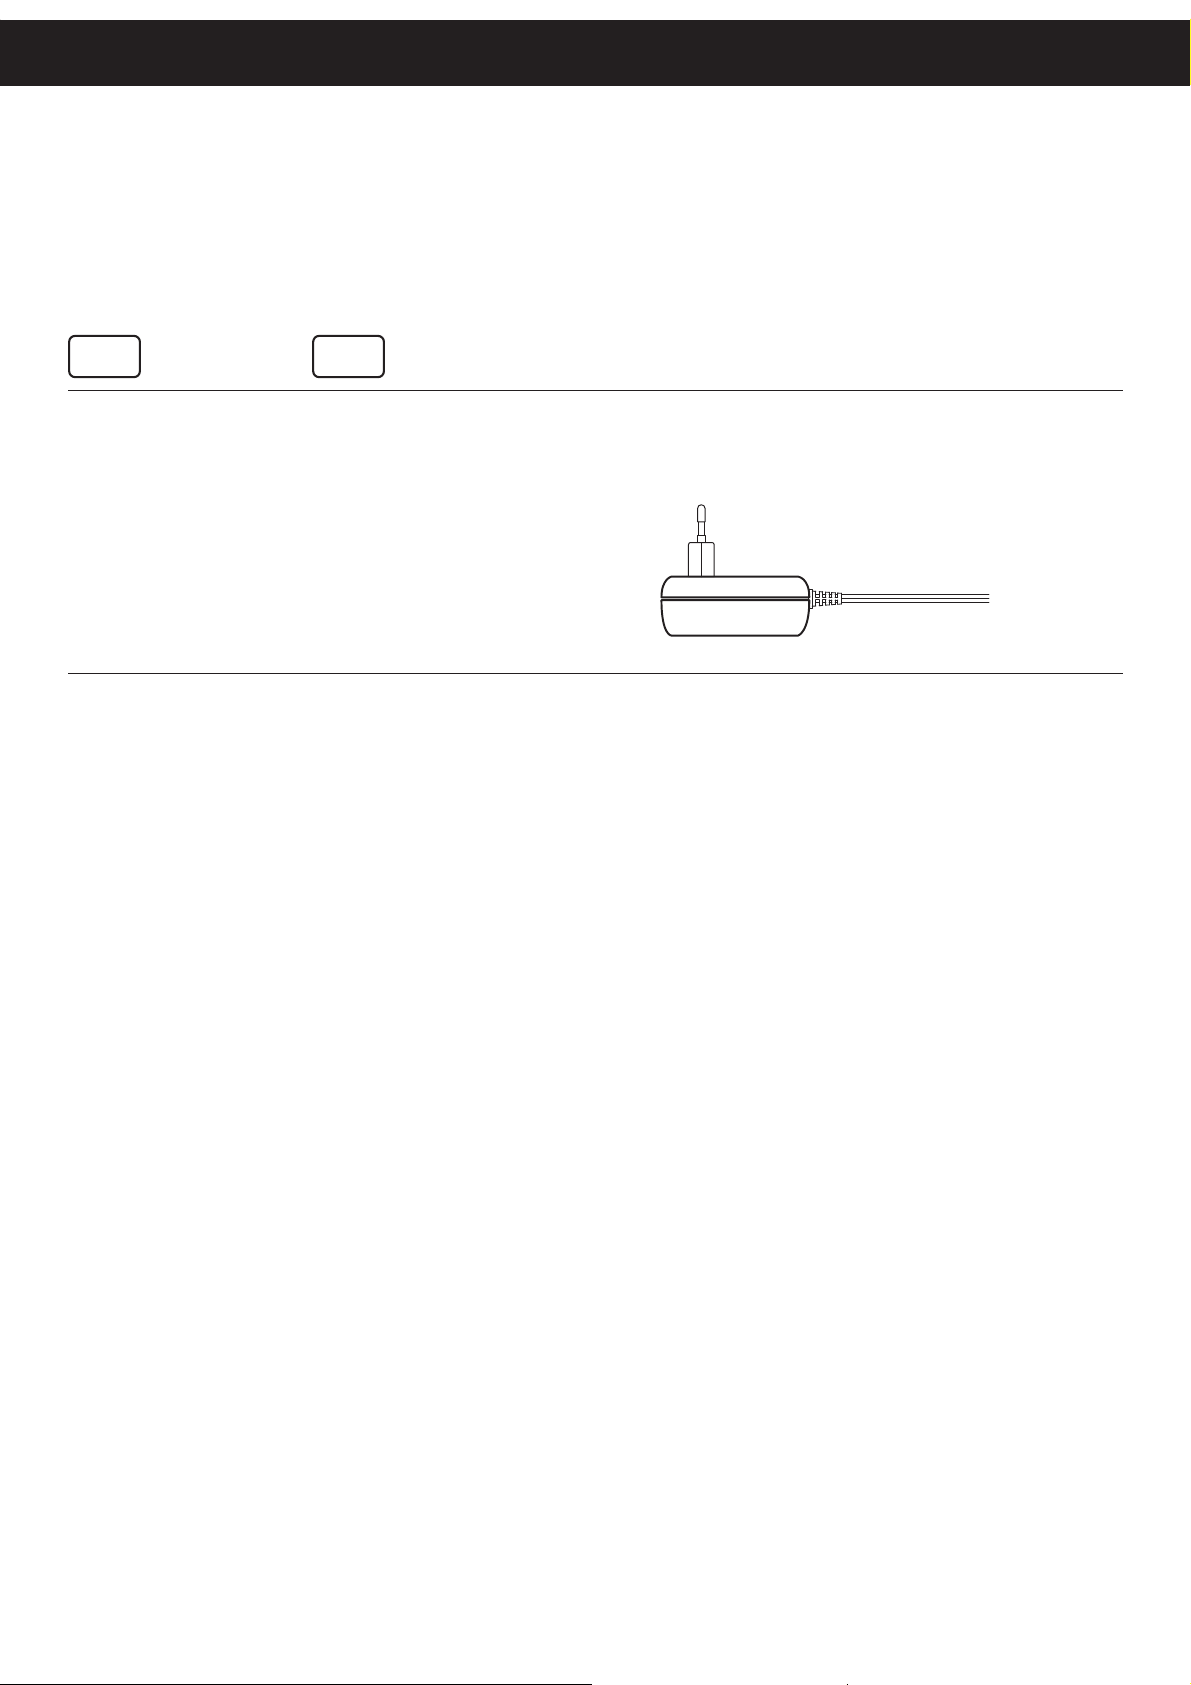
PCALI-DPT100
18W Power adapter
(see technical specifi cation)
Alimentatore 18W
(vedere specifi che tecniche)
49
Page 50

50
Page 51

GB I
GLOSSARY
Enable DHCP DHCP Server for automatic distribu-
tion of IP addresses.
IP address: Univocal identifi cation number for a
single network that use standard IP
(Internet Protocol). Therefore each
device has its IP address.
Subnet mask: A portion of network that share part
of the IP address. A Subnet defi ne
all the device having the same prefi x
in the IP address. For example, all
the peripherals having the fi rst 3
value equal (1.1.1.xxx) belong to
the same subnet.
Gateway: Link between two or more different
networks. Its main task is to send
data outside the local network
(LAN).
Server DHCP per la distribuzione automatica degli indirizzi IP.
Numero che identifica univocamente
nell’ambito di una singola rete che utilizza
lo standard IP (Internet Protocol) i dispositivi collegati. Ciascun dispositivo quindi,
possiede il suo indirizzo.
Una porzione di una rete che condivide
una parte dell’indirizzo IP. Una subnet defi nisce tutti i nodi che hanno un indirizzo
IP avente lo stesso prefi sso. Per esempio,
tutte le periferiche che hanno le prime 3
cifre identiche (1.1.1.xxx) fanno parte della
stessa subnet.
Punto di collegamento tra due o più reti
differenti. Il suo scopo principale è quello
di veicolare i pacchetti di rete all’esterno
della rete locale (LAN).
Host name: Name of the device in the net-
work.
Domain: Name of the network. Nome della rete.
Preferred DNS: Identifi cation system based on tra-
duction/association of name easily
to store in IP address.
Alternate DNS: Secondary DNS. DNS alternativo.
FTP Address IP address of the server for the
Player synchronization.
FTP Port Port for the connection to FTP
server.
FTP Username Username for FTP authentication. Nome utente per la connessione FTP.
Nome del dispositivo in rete.
Sistema d’identifi cazione basato sull’asso-
ciazione e traduzione di nomi facilmente
memorizzabili in indirizzi IP.
Indirizzo IP del server con cui Player deve
sincronizzarsi.
Porta per la connessione al server FTP.
FTP Password Password for FTP authentication. Password per la connessione FTP.
51
Page 52
Part Number : 76900000000100 Rev. 1.00
CUSTOM ENGINEERING S.p.A.
World Headquarters
Via Berettine, 2 - 43010 Fontevivo, Parma ITALY
Tel. +39 0521 680111 - Fax +39 0521 610701
[email protected] - www.custom.biz
All rights reserved
www.custom.biz
 Loading...