

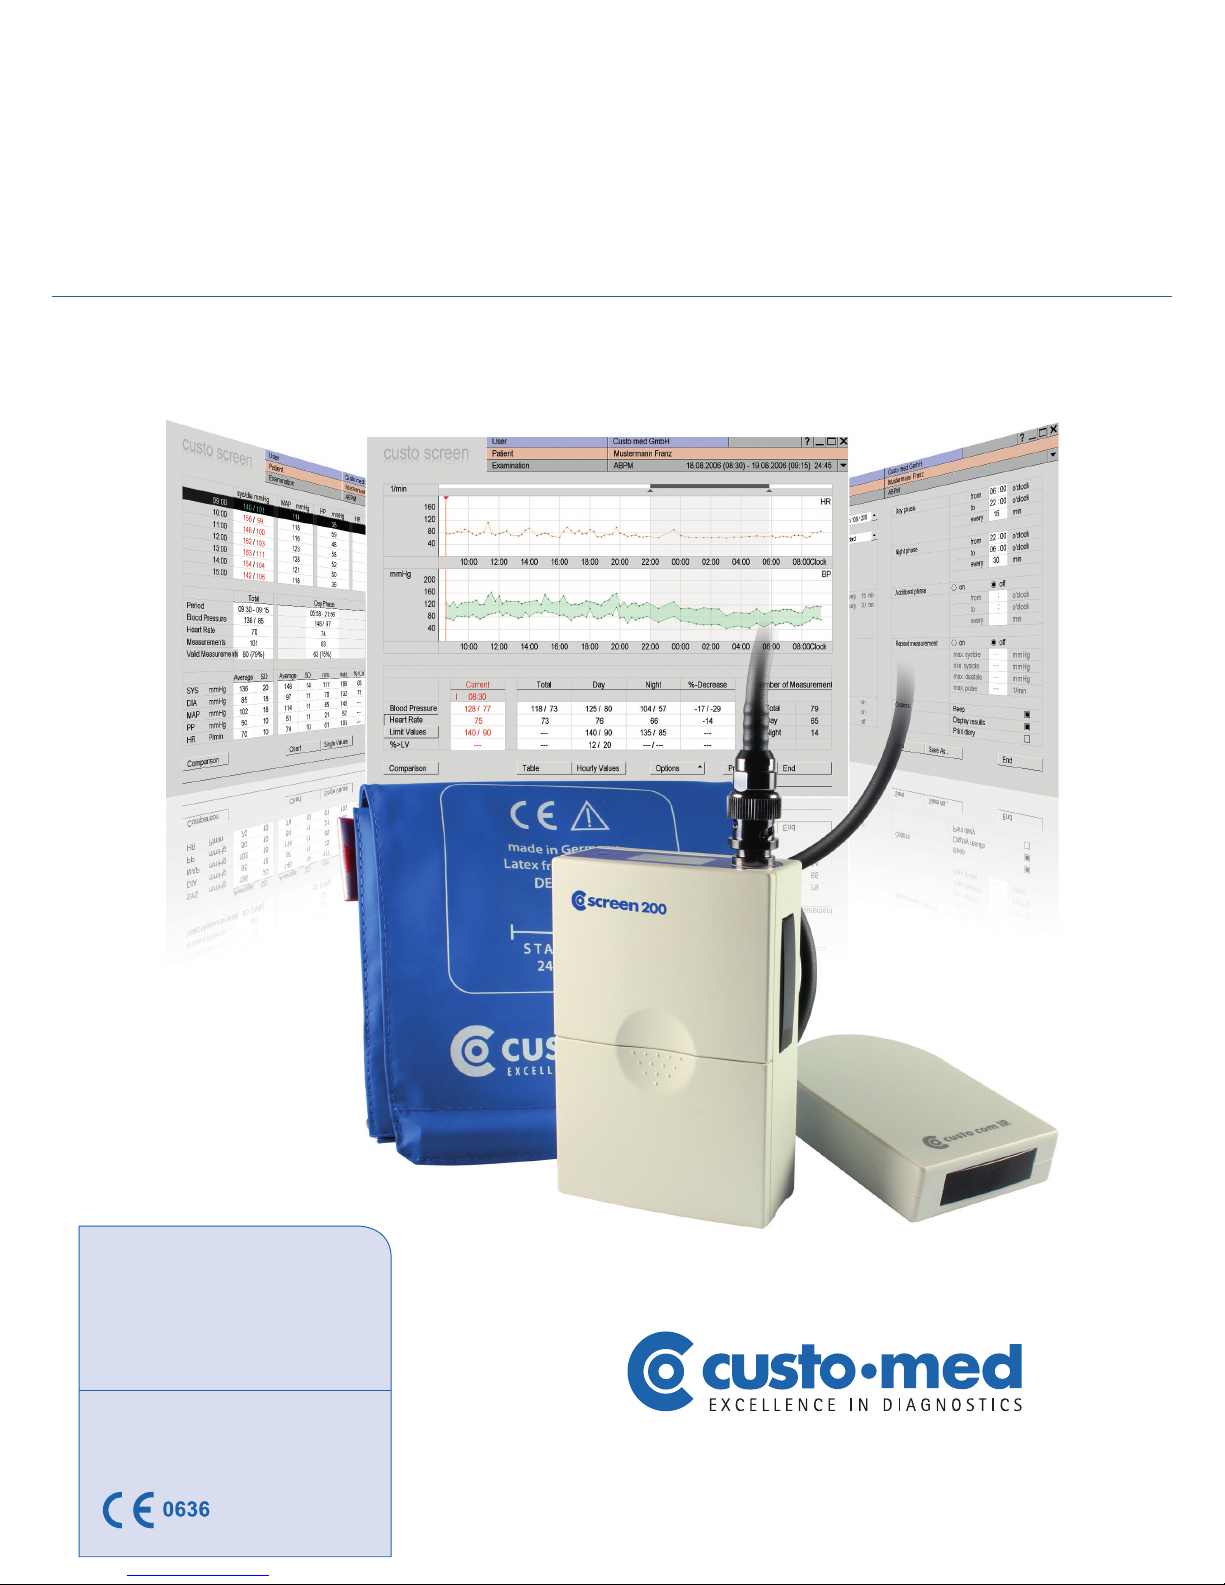
Operating Manual
ABPM
with custo screen 100/200 and custo diagnostic
Operating characteristics:
> custo diagnostic 3.8 and higher
> for Windows®
GEB 0141 – DK 0953
Version 002 – 05.06.2013


Operating Manual
ABPM
with custo screen 100/200 and custo diagnostic
©
2013 custo med GmbH
This Operating Manual may not be copied in its entirety or in part,
duplicated in any form or by any means or translated into another
language without the prior written consent of custo med GmbH.
The manufacturer reserves the right to change the information in
this Operating Manual without prior notice. The current version
can be downloaded from our website: www.customed.de, under
Support, Downloads, Manuals.
Manufacturer's contact details:
custo med GmbH
Leibnizstr. 7
85521 Ottobrunn
Germany
Phone: +49 (0) 89 710 98 - 00
Fax: +49 (0) 89 710 98 - 10
E-mail: info@customed.de
Internet: www.customed.de

4
ABPM with custo screen 100/200 and custo diagnostic | GEB 0141 – DK 0953 | Version 002 – 05.06.2013 | custo med GmbH
Table of contents
01
02
03
04
05
Introduction
01.1 Symbols on the recorder . . . . . . . . . . . . . . . . . . . . . . . . . . . . . . . . . . . . . . . . . . . . . . . . . . . . . . . . . . . . . . . . . . . . . . . . . . . 6
01.2 Intended use . . . . . . . . . . . . . . . . . . . . . . . . . . . . . . . . . . . . . . . . . . . . . . . . . . . . . . . . . . . . . . . . . . . . . . . . . . . . . . . . . . . . . . . . . . . . . . 6
01.3 Symbols used in this Operating Manual . . . . . . . . . . . . . . . . . . . . . . . . . . . . . . . . . . . . . . . . . . . . . . . . . . . 7
Safety notes
02.1 General . . . . . . . . . . . . . . . . . . . . . . . . . . . . . . . . . . . . . . . . . . . . . . . . . . . . . . . . . . . . . . . . . . . . . . . . . . . . . . . . . . . . . . . . . . . . . . . . . . . . . . . 8
02.2 Safety installations and safe working . . . . . . . . . . . . . . . . . . . . . . . . . . . . . . . . . . . . . . . . . . . . . . . . . . . . . . . 9
02.3 Information on EMC (Electromagnetic Compatibility) . . . . . . . . . . . . . . . . . . . . . . . . . . . 12
02.4 Maintenance (regular safety checks) . . . . . . . . . . . . . . . . . . . . . . . . . . . . . . . . . . . . . . . . . . . . . . . . . . . . . . 12
02.5 Disclaimer . . . . . . . . . . . . . . . . . . . . . . . . . . . . . . . . . . . . . . . . . . . . . . . . . . . . . . . . . . . . . . . . . . . . . . . . . . . . . . . . . . . . . . . . . . . . . . . . 12
02.6 Warranty . . . . . . . . . . . . . . . . . . . . . . . . . . . . . . . . . . . . . . . . . . . . . . . . . . . . . . . . . . . . . . . . . . . . . . . . . . . . . . . . . . . . . . . . . . . . . . . . . . 13
Device description, basics of putting into operation
03.1 Scope of delivery and accessories . . . . . . . . . . . . . . . . . . . . . . . . . . . . . . . . . . . . . . . . . . . . . . . . . . . . . . . . . . 14
03.2 Operating the device . . . . . . . . . . . . . . . . . . . . . . . . . . . . . . . . . . . . . . . . . . . . . . . . . . . . . . . . . . . . . . . . . . . . . . . . . . . . . . . 15
03.3 custo diagnostic – basic program structure . . . . . . . . . . . . . . . . . . . . . . . . . . . . . . . . . . . . . . . . . . . 16
03.4 Connection and selection of device . . . . . . . . . . . . . . . . . . . . . . . . . . . . . . . . . . . . . . . . . . . . . . . . . . . . . . . 17
Hygiene
04.1 Cleaning and disinfection . . . . . . . . . . . . . . . . . . . . . . . . . . . . . . . . . . . . . . . . . . . . . . . . . . . . . . . . . . . . . . . . . . . . . . . 18
04.2 Recommended cleaning and disinfecting agents . . . . . . . . . . . . . . . . . . . . . . . . . . . . . . . . . 19
Carrying out an examination
05.1 Preparing the patient for the examination . . . . . . . . . . . . . . . . . . . . . . . . . . . . . . . . . . . . . . . . . . . . . 20
05.2 Preparing the recorder for recording . . . . . . . . . . . . . . . . . . . . . . . . . . . . . . . . . . . . . . . . . . . . . . . . . . . . . . 22
05.3 Attaching the recorder to the patient . . . . . . . . . . . . . . . . . . . . . . . . . . . . . . . . . . . . . . . . . . . . . . . . . . . . . 24
05.4 Start recording . . . . . . . . . . . . . . . . . . . . . . . . . . . . . . . . . . . . . . . . . . . . . . . . . . . . . . . . . . . . . . . . . . . . . . . . . . . . . . . . . . . . . . . . . 24
05.5 Download recording . . . . . . . . . . . . . . . . . . . . . . . . . . . . . . . . . . . . . . . . . . . . . . . . . . . . . . . . . . . . . . . . . . . . . . . . . . . . . . . 24
05.6 Control the evaluation . . . . . . . . . . . . . . . . . . . . . . . . . . . . . . . . . . . . . . . . . . . . . . . . . . . . . . . . . . . . . . . . . . . . . . . . . . . . 25

5
ABPM with custo screen 100/200 and custo diagnostic | GEB 0141 – DK 0953 | Version 002 – 05.06.2013 | custo med GmbH
06
07
Working with the evaluation
06.1 Opening an evaluation . . . . . . . . . . . . . . . . . . . . . . . . . . . . . . . . . . . . . . . . . . . . . . . . . . . . . . . . . . . . . . . . . . . . . . . . . . . . 26
06.2 The workspace at a glance . . . . . . . . . . . . . . . . . . . . . . . . . . . . . . . . . . . . . . . . . . . . . . . . . . . . . . . . . . . . . . . . . . . . . . 28
06.3 Navigation concept, structure of the evaluation . . . . . . . . . . . . . . . . . . . . . . . . . . . . . . . . . . . . 29
06.4 Evaluation view modes
06.4.1 Graphic, Hourly Values . . . . . . . . . . . . . . . . . . . . . . . . . . . . . . . . . . . . . . . . . . . . . . . . . . . . . . . . . . . . . . . . . . 30
06.4.2 Trend. . . . . . . . . . . . . . . . . . . . . . . . . . . . . . . . . . . . . . . . . . . . . . . . . . . . . . . . . . . . . . . . . . . . . . . . . . . . . . . . . . . . . . . . . . . . . . 30
06.4.3 Comparison . . . . . . . . . . . . . . . . . . . . . . . . . . . . . . . . . . . . . . . . . . . . . . . . . . . . . . . . . . . . . . . . . . . . . . . . . . . . . . . . . . . 31
06.4.4 Comparison with Hourly Values . . . . . . . . . . . . . . . . . . . . . . . . . . . . . . . . . . . . . . . . . . . . . . . . . . . 31
06.4.5 Table . . . . . . . . . . . . . . . . . . . . . . . . . . . . . . . . . . . . . . . . . . . . . . . . . . . . . . . . . . . . . . . . . . . . . . . . . . . . . . . . . . . . . . . . . . . . . . 32
06.4.6 Table with Hourly Values . . . . . . . . . . . . . . . . . . . . . . . . . . . . . . . . . . . . . . . . . . . . . . . . . . . . . . . . . . . . . . . 32
06.4.7 Automatic Report . . . . . . . . . . . . . . . . . . . . . . . . . . . . . . . . . . . . . . . . . . . . . . . . . . . . . . . . . . . . . . . . . . . . . . . . . 33
06.4.8 Unconfirmed report . . . . . . . . . . . . . . . . . . . . . . . . . . . . . . . . . . . . . . . . . . . . . . . . . . . . . . . . . . . . . . . . . . . . . . 34
06.5 Confirming the evaluation . . . . . . . . . . . . . . . . . . . . . . . . . . . . . . . . . . . . . . . . . . . . . . . . . . . . . . . . . . . . . . . . . . . . . . 34
06.6 Ending the evaluation . . . . . . . . . . . . . . . . . . . . . . . . . . . . . . . . . . . . . . . . . . . . . . . . . . . . . . . . . . . . . . . . . . . . . . . . . . . . . 35
06.7 Archiving evaluations . . . . . . . . . . . . . . . . . . . . . . . . . . . . . . . . . . . . . . . . . . . . . . . . . . . . . . . . . . . . . . . . . . . . . . . . . . . . . . 35
Product information
07.1 Measurement and status indication on the display . . . . . . . . . . . . . . . . . . . . . . . . . . . . . 36
07.2 Error codes and their causes . . . . . . . . . . . . . . . . . . . . . . . . . . . . . . . . . . . . . . . . . . . . . . . . . . . . . . . . . . . . . . . . . . 37
07.3 Limit values for blood pressure measurement . . . . . . . . . . . . . . . . . . . . . . . . . . . . . . . . . . . . . 38
07.4 Abbreviations in the evaluation . . . . . . . . . . . . . . . . . . . . . . . . . . . . . . . . . . . . . . . . . . . . . . . . . . . . . . . . . . . . 39
07.5 Technical data and system requirements . . . . . . . . . . . . . . . . . . . . . . . . . . . . . . . . . . . . . . . . . . . . . 40
07.6 Support . . . . . . . . . . . . . . . . . . . . . . . . . . . . . . . . . . . . . . . . . . . . . . . . . . . . . . . . . . . . . . . . . . . . . . . . . . . . . . . . . . . . . . . . . . . . . . . . . . 41
07.7 Manufacturer declaration regarding EMC
(electromagnetic compatibility)
according to IEC 60601-1-2:2007. . . . . . . . . . . . . . . . . . . . . . . . . . . . . . . . . . . . . . . . . . . . . . . . . . . . . . . . . . . 42
07.8 EC Declaration of Conformity . . . . . . . . . . . . . . . . . . . . . . . . . . . . . . . . . . . . . . . . . . . . . . . . . . . . . . . . . . . . . . . . 45
07.9 Putting out of operation, storage, transport . . . . . . . . . . . . . . . . . . . . . . . . . . . . . . . . . . . . . . . . . 46
07.10 Disposal . . . . . . . . . . . . . . . . . . . . . . . . . . . . . . . . . . . . . . . . . . . . . . . . . . . . . . . . . . . . . . . . . . . . . . . . . . . . . . . . . . . . . . . . . . . . . . . . . . 46

6
ABPM with custo screen 100/200 and custo diagnostic | GEB 0141 – DK 0953 | Version 002 – 05.06.2013 | custo med GmbH
Introduction01
01.1 Symbols on the recorder
CE mark
Safety class designation of a medical electrical device according to
IEC 60601-1 (type BF)
Suitable for application with XXL blood pressure cuff
Take note of the accompanying documents
Follow the operating manual
Recyclable material
Separate collection of electric and electronic equipment,
do not dispose with domestic waste
01.2 Intended use
custo screen 100/200 is an ABPM recorder with internal power supply and
serves for recording and evaluating the blood pressure behaviour of a patient.
The recording period is 24 hours. custo screen 100/200 can be applied with
pacemaker patients without any risk.
The system is intended for use by trained specialist staff or physicians in clinics
and medical practices. Patients are only allowed to use the recording device
after receiving instruction by trained specialist staff. Patients who are not capable of understanding and following the instructions given are not allowed to
use the device. This applies in particular to senile patients or patients suffering
from dementia.
The device is not suited for small children or newborns as well as for the
unsupervised use with unconscious patients.

7
ABPM with custo screen 100/200 and custo diagnostic | GEB 0141 – DK 0953 | Version 002 – 05.06.2013 | custo med GmbH
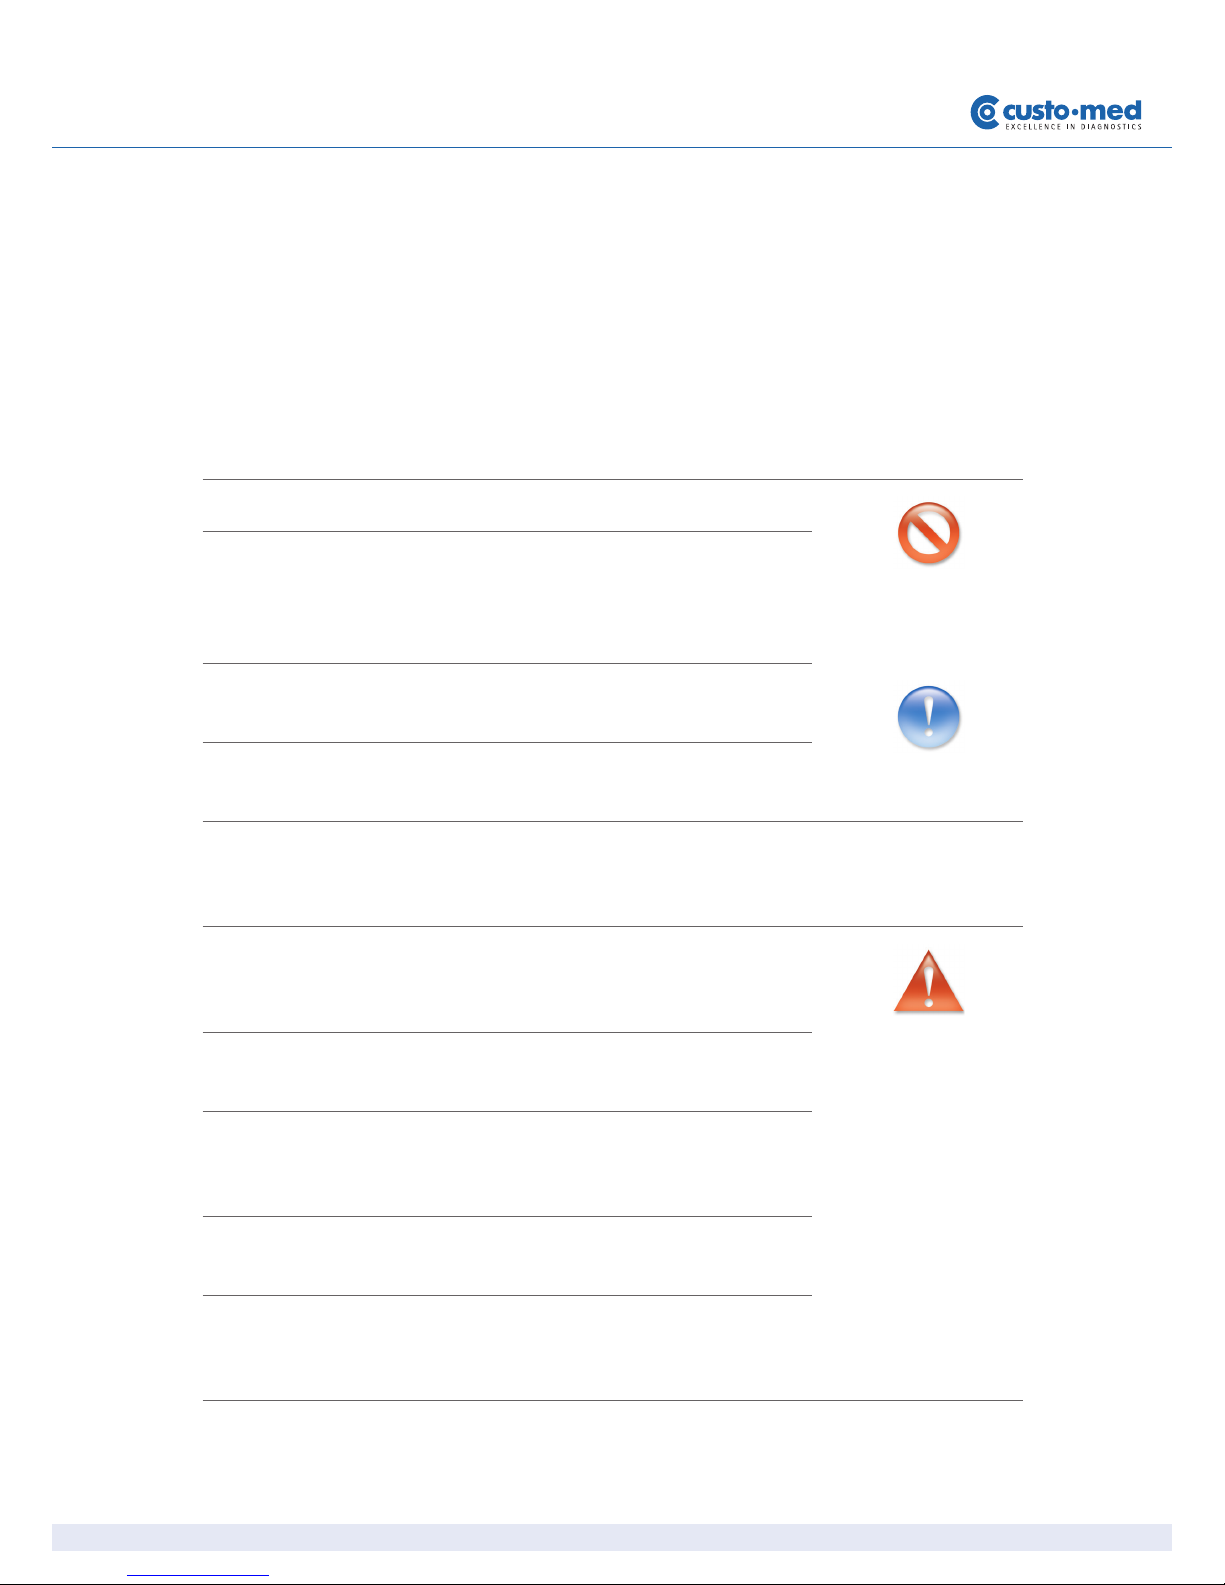
01.3 Symbols used in this Operating Manual
This Operating Manual uses the following symbols to indicate important information, comments and tips:
ACTIONS THAT ARE PROHIBITED
or not allowed under any circumstances!
WARNING
used to indicate situations which, if not avoided, may result in personal injury
and property damage
NOTE
provides important information which must be observed
TIP
contains practical information to assist you with your work
Words highlighted in colour indicate buttons or click paths
for the corresponding program point, e.g. Examination, ABPM
Words highlighted
in colour..

8
ABPM with custo screen 100/200 and custo diagnostic | GEB 0141 – DK 0953 | Version 002 – 05.06.2013 | custo med GmbH
02 Safety notes
02.1 General
Strict compliance with the safety notes protects against personal injury and
property damage during device operation. This Operating Manual is designed
to accompany the product and should be kept ready to hand close to the
device. As either the operator or user of this device you should have read and
understood this Operating Manual, in particular the safety notes.
Laws and regulations applicable to the product
This system is designed in accordance with Medical Device Directive 93/42/EEC,
Class II a, and meets the requirements of protection class I or II (depending on
the power supply unit used; the recorder is a device with an internal power
supply), type BF according to DIN EN 60601-1.
Other devices which are part of the system must meet the requirements of
the office equipment standard (IEC 60950) and the standard for electromedical
devices (IEC 60601-1).
The electrical installations in the rooms in which the system is used must meet the
requirements of the applicable safety standards.
For users outside of Germany, the respective national accident prevention
measures, regulations and requirements apply.
9
ABPM with custo screen 100/200 and custo diagnostic | GEB 0141 – DK 0953 | Version 002 – 05.06.2013 | custo med GmbH
02.2 Safety installations and safe working
custo screen 100/200 must only be used in a technically perfect condition.
Regularly carry out a visual inspection of the device. Only use accessories
approved by custo med.
Installation of the system
Portable socket outlets must not be laid on the ground.
Portable multiple socket outlets which are supplied with the system are to be
used only for supplying devices which are part of the system. Additional portable multiple socket outlets, lines and other equipment, which are not part of
the system, must not be connected to the system.
When using a multiple socket outlet, the maximum permitted load is 3200 VA.
Slots which are not used in the delivered system (portable multiple socket outlets) must be provided with covers.
Ambient conditions
For the installation and operation of the device, please observe the EMC notes
(electromagnetic compatibility) in these instructions for use, see chapter
07.7 Manufacturer declaration regarding EMC... .
custo screen 100/200 is not suitable for use in rooms and/or areas with a risk
of explosion.
Strong electromagnetic sources in the immediate vicinity of the custo screen
100/200 may result in recording errors (e.g. HF electrosurgical devices, mobile
phones, induction furnaces).
Other electrical devices such as mobile phones or radio transceivers may impair the quality of the recording.
The device must be protected against the penetration of moisture, dust or dirt
and also against mechanical influences such as damage due to dropping or
damage while in transit.

10
ABPM with custo screen 100/200 and custo diagnostic | GEB 0141 – DK 0953 | Version 002 – 05.06.2013 | custo med GmbH
02 Safety notes
Patient safety
Without medical protective devices, for example medical protector, the PC and
all the non-medical devices connected to the system (e.g. the monitor and
printer) must be set up and used at a distance of at least 1.5 m to the patient
unit (see the orange area in the figure) as leakage currents can occur.
Non-medical devices and the patient may not be touched simultaneously
during the examination.
During routine maintenance work to non-medical devices connected to the
system the patient must not be touched (risk of electric shock).
All unconfirmed reports produced by the system should only be considered as
suggestions. For diagnosis and therapy purposes it is essential that the results
are checked and assessed by a qualified physician.
Important hints regarding the handling of custo screen 100/200
See to it that the patient is not permanently impaired due to the short interruption of blood circulation caused by the measuring method.
Any compression or reduction in cross-sectional area of the air tube must be
avoided.
The device does not have any protection against potential impacts by high
frequency (HF) surgical devices.
Risks arising from defibrillator discharge according to the Standard EN 60601-
2-30 are not known.
In no case use damaged batteries or accumulators. If custo screen 100/200
stands idle for a longer time, remove the batteries from the device.
Safety distances of devices to the patient
1.5 m
1.5 m 1.5 m
1.5 m 1.5 m
2.5 m 2.5 m
1.5 m

11
ABPM with custo screen 100/200 and custo diagnostic | GEB 0141 – DK 0953 | Version 002 – 05.06.2013 | custo med GmbH
If liquid is spilled on the device, the batteries or accumulators must be removed immediately and the device must be sent to your authorised custo med
dealer or to custo med for inspection.
Hygiene
For cleaning and disinfection observe the legal requirements and the current
state of technology.
Only cleaning and disinfecting agents recommended by custo med may
be used for cleaning and disinfection. Clean and disinfect your device in
accordance with the specifications given in Chapter 04 Hygiene.
System and data security
The device must only be used with the supplied custo med software (custo
diagnostic).
As the operator you are responsible for ensuring regular data backups (patient
databases, evaluations etc.) and system backups. We recommend that you
backup the data at the latest before new installations, updates and far-reaching system configurations.
custo diagnostic new installations, updates and system configurations may
only be performed by your authorised custo med dealer.
Only change data which is generated in custo diagnostic within custo
diagnostic itself and not in your surgery IT system or your hospital information
system (HIS). custo med does not accept any responsibility for any changes to
data which were made after the export from custo diagnostic in your surgery
IT system or your HIS.
To ensure the safe operation of custo diagnostic, deactivate the screensaver
and energy management options on your PC.
Set up your operating system in such a way to prevent the PC from being
switched off either accidentally or automatically during the examination
(standby mode/idle mode).

12
ABPM with custo screen 100/200 and custo diagnostic | GEB 0141 – DK 0953 | Version 002 – 05.06.2013 | custo med GmbH
02 Safety notes
When you use custo connect to integrate additional medical devices in the
custo med system, for automatic PDF printouts from the connected medical
device, check whether the PDF file belongs to the current patient. Do not trigger any PDF printouts in other programs during the PDF printout in the connected medical device.
02.3 Information on EMC (Electromagnetic Compatibility)
The use of other accessories, other converters and wires than the ones indi-
cated, except for the converters and wires sold by custo med as spare parts
for inner components, can lead to increased electromagnetic emissions or to a
reduced electromagnetic immunity of the system. For connecting the device
to other equipment, only specially screened cables supplied by custo med
must be used.
02.4 Maintenance (regular safety checks)
The operator is responsible for maintenance. The operator must ensure that the
device is checked for proper condition at the latest every two years. The functionality and the state of accessories must be checked at regular intervals. If
damaged and / or heavily soiled, the complete system must no longer be used.
All interventions in the existing system, changes to system components,
enhancements as well as internal cleaning and repairs may only be performed
by your authorised custo med dealer or custo med.
Technical safety checks
After each system or device repair, modification or conversion, a technical
safety check must be performed by your authorised custo med dealer.
Metrological controls
For the ABPM recorder custo screen 100/200 metrological controls are prescribed every two years. Please contact your authorised custo med dealer.

13
ABPM with custo screen 100/200 and custo diagnostic | GEB 0141 – DK 0953 | Version 002 – 05.06.2013 | custo med GmbH
02.5 Disclaimer
The manufacturer is not responsible for improper operation, failure to comply
with the safety notes and non-observation of specifications due to negligence.
custo med only assumes responsibility for the safety and reliability of the custo
screen 100/200 when all changes, enhancements, repairs and other work to
the device and/or system have been performed by an authorised custo med
dealer or custo med and the Operating Manual has been observed during
device operation.
02.6 Warranty
Our product philosophy is committed to providing you with faultless products
which meet your expectations. Should you have reason to complain we aim to
rectify any defects immediately or provide a replacement delivery. This does
not include damage that can be attributed to usual wear and tear, improper
use, unauthorised modification of parts and the use of violent force.
After the expiration of the warranty period only use original spare parts and
accessories from custo med. This is the only way to ensure the safe and troublefree operation of your device.

14
ABPM with custo screen 100/200 and custo diagnostic | GEB 0141 – DK 0953 | Version 002 – 05.06.2013 | custo med GmbH
03 Device description, basics of putting into operation
03.1 Scope of delivery and accessories
custo screen 100/200 ABPM recorder
Blood pressure cuff (standard)
Carrying belt
Carrying bag
Batteries (3 pieces)
Mignon 1.5 Volt, Type AA
custo com IR
Infrared interface for connection
of custo screen 100/200 and PC
(included in delivery
when purchasing a system)
USB cable for connection to the PC

15
ABPM with custo screen 100/200 and custo diagnostic | GEB 0141 – DK 0953 | Version 002 – 05.06.2013 | custo med GmbH
03.2 Operating the device
Insert batteries or accumulators
Open the battery case as illustrated on the left
and insert three customary batteries or accumulators. The direction of insertion is shown on the illustrations in the battery case.
Functional elements on the device
Turn-on-off button:
for turning on and off the recorder
Infrared interface:
for transferring data between
custo screen 100/200 and PC
Port for blood pressure cuff
Functional key
for starting and stopping measurements
Display
for showing results and error messages
(Errors see chapter 07.2 Error Codes and
their Causes)
Port for blood pressure cuff
16
ABPM with custo screen 100/200 and custo diagnostic | GEB 0141 – DK 0953 | Version 002 – 05.06.2013 | custo med GmbH
Device description, basics of putting into operation03
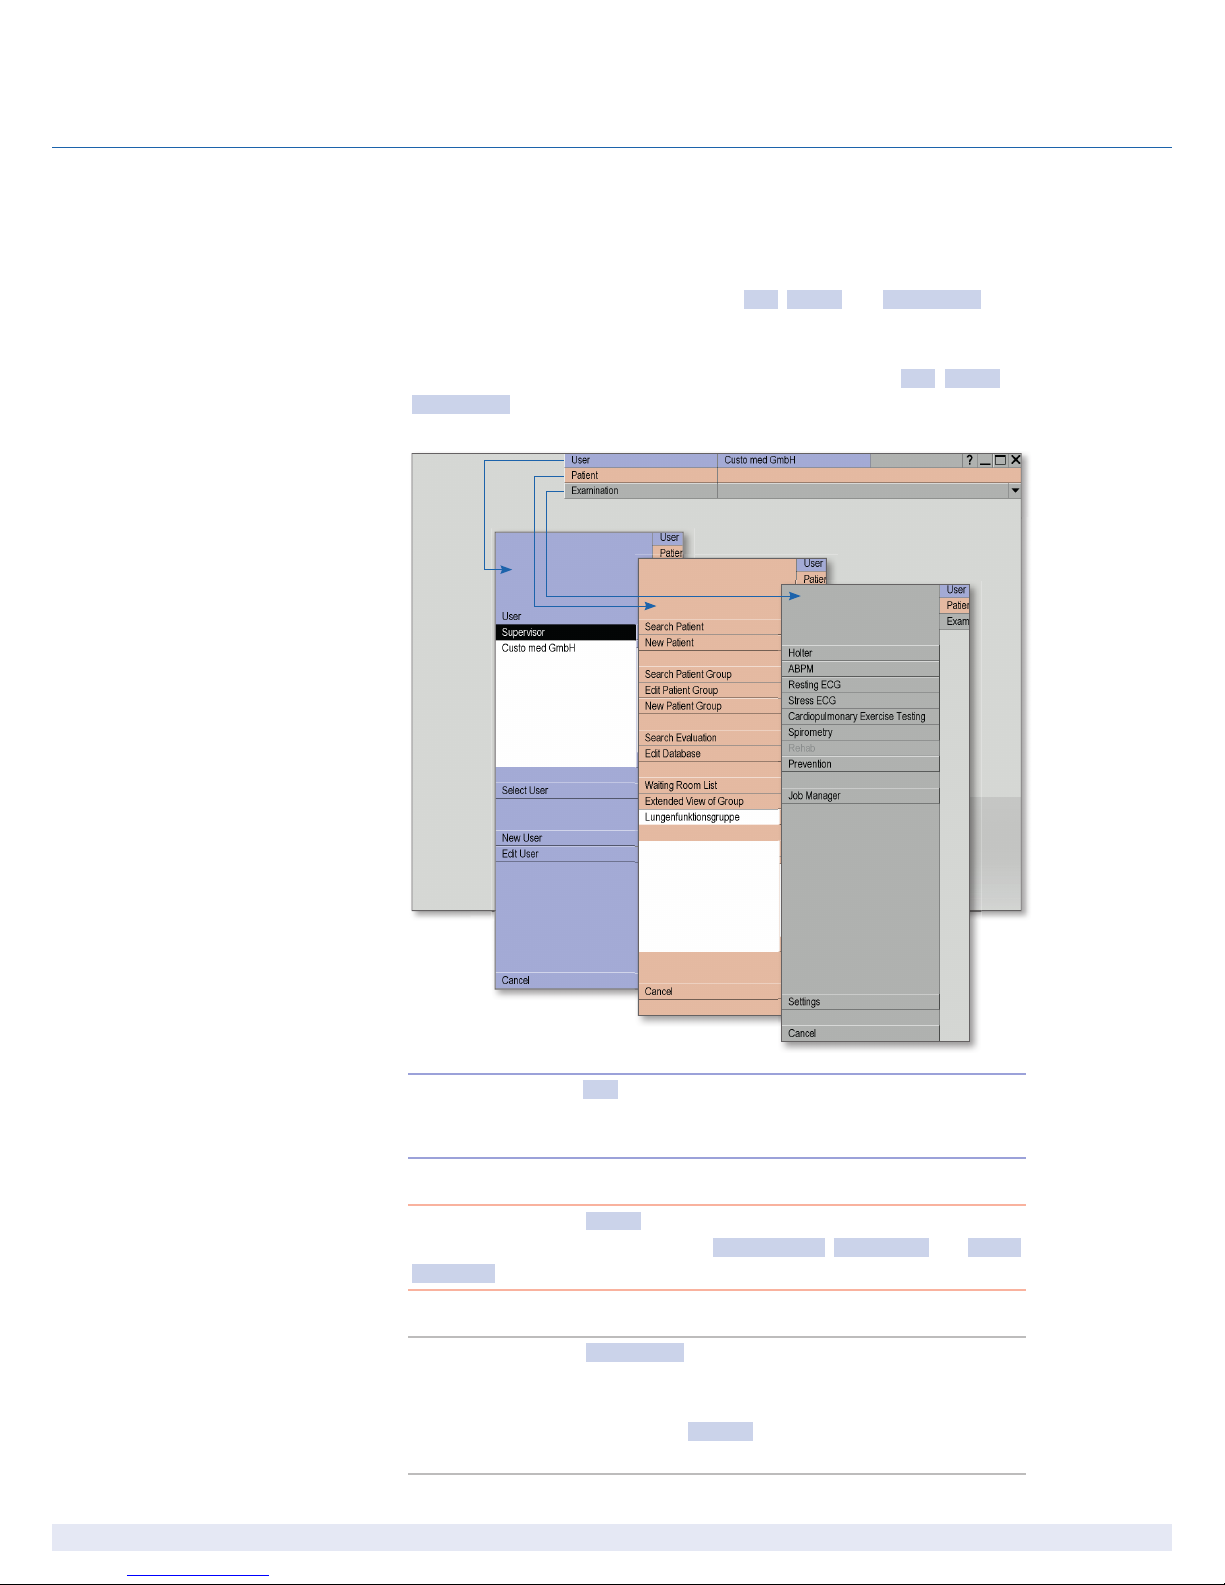
03.3 custo diagnostic – basic program structure
The program is divided into three areas – User, Patient and Examination. This
structure ensures that you can always recognize who (which user) is carrying
out what type of examination with whom (which patient).
The main menus of each area can be reached by clicking on User, Patient or
Examination.
The main menu of the User area is used to create and manage system users. The
user administration can be used to allocate user rights and control user-specific
settings, e.g. the creation of a separate patient database for each user.
The main menu of the Patient area is used for patient management.
The most important functions include Search Patient, New Patient and Search
Evaluation.
The main menu of the Examination area lists all the examination types that are
possible with custo diagnostic. All modules you do not own are deactivated.
This can be recognised by the light gray font.
In this menu you can also go to the Settings area. Cross-program, examinationrelated and user-specific settings can be made here.
17
ABPM with custo screen 100/200 and custo diagnostic | GEB 0141 – DK 0953 | Version 002 – 05.06.2013 | custo med GmbH
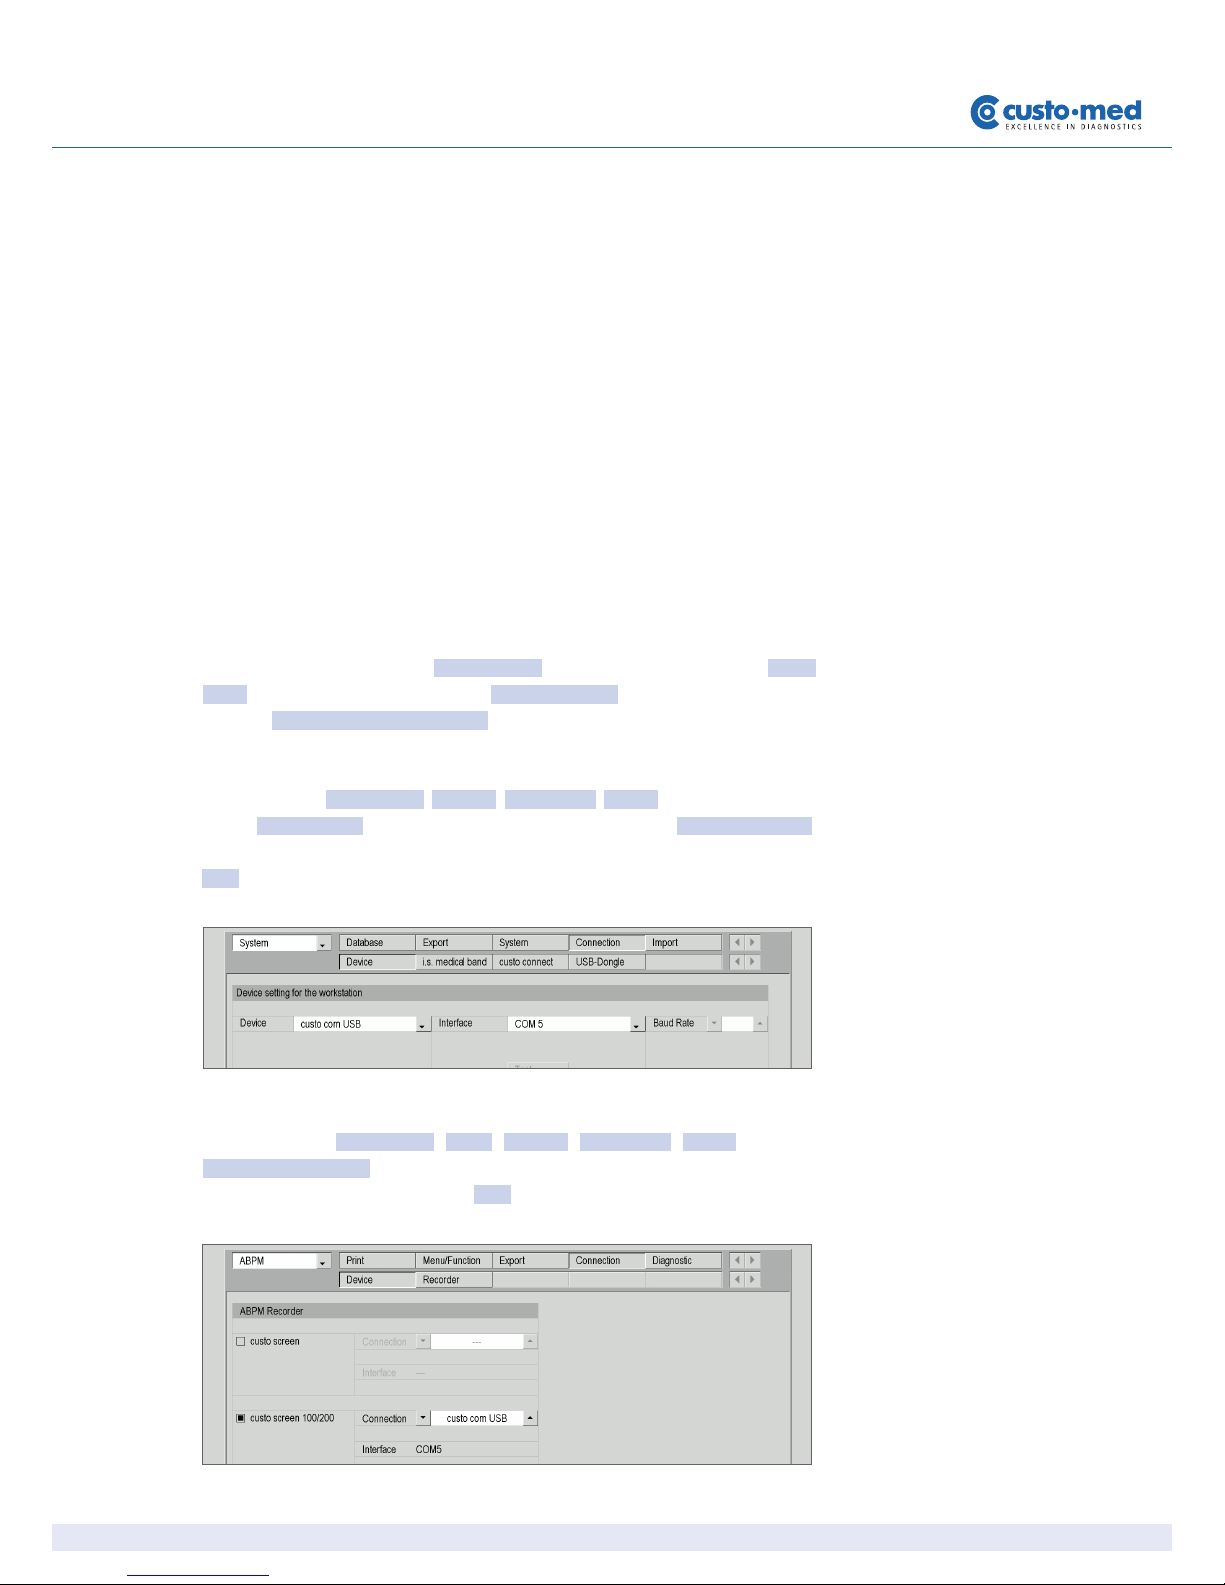
03.4 Connection and selection of device
For the following steps custo diagnostic must be installed on your PC. Data
transfer between recorder and PC is made via the infrared interfaces on custo
screen 100/200 und custo com IR.
Installing custo com IR (infrared interface)
For data exchange between the recorder and your PC the driver for custo com
IR must be installed on your PC (the driver is installed automatically during a
custo diagnostic standard installation) and custo com IR must be connected
to the PC.
Check in the Device Manager which COM connection is assigned to custo com
IR so that you can enter the COM connection in custo diagnostic afterwards.
Make a right click on the icon My Computer in your Windows surface, on Administer in the context menu, there on Device Manager (left window half), open
the item Connections (COM and LTP) in the right window half and make a note
of the custo com IR connection, e. g. (COM5).
Open the page Examination, Settings, Connection, Device in custo diagnostic.
Select custo com IR under Device and the corresponding COM connection
from the Device Manager under Interface. Your inputs will be taken over with
Save.
Installing custo screen 100/200
Open the page Examination, ABPM, Settings, Connection, Device. Activate
custo screen 100/200. In the field Connection, custo com IR must be specified.
Your inputs will be taken over with Save. Your device is ready for operation.

18
ABPM with custo screen 100/200 and custo diagnostic | GEB 0141 – DK 0953 | Version 002 – 05.06.2013 | custo med GmbH
Hygiene04
04.1 Cleaning and disinfection
Important notes
Only cleaning and disinfecting agents recommended by custo med may be
used. Unsuitable agents may damage the device.
Follow the manufacturer’s instructions (e.g. regarding dosage and application
periods).
The recorder must never be immersed in liquids or cleaned with too much
water.
custo screen 100/200
The exterior of custo screen 100/200 should always be aesthetic and clean. If
there is any dirt, gently wipe down the surfaces with a damp cleaning cloth and
an acid-free cleaning agent.
Light spray application of suitable disinfectants is allowed.
Carrying case and belt
Both case and belt can be machine washed with a mild detergent at 40°C, but
must not be dried in a dryer.
Light spray application of suitable disinfectants is allowed.
Blood pressure cuff
After each use, the blood pressure cuff should be cleaned to remove dirt and
sweat. Observe the instructions on the instruction leaflet provided with the
blood pressure cuff.
Cleaning and disinfection: Sponge cuff with a damp cloth. If necessary,
removebladder and wash cover with soap or detergent disinfectant.
The cuffs have been tested to withstand the following recommended disinfec-
tants: Cidex, Sporicidin, Microzid, Isopropyl-alcohol 70%, Ethanol 70%, Buraton
liquid. After disinfection the cuff cover should be rinsed and allowed to air dry.
Sterilisation: The cuff has been tested to withstand Ethylene Oxide (EtO)
gas sterilization. Be sure that all safety precautions regarding aeration after EtO
exposure are followed. Never autoclave.

19
ABPM with custo screen 100/200 and custo diagnostic | GEB 0141 – DK 0953 | Version 002 – 05.06.2013 | custo med GmbH
04.2 Recommended cleaning agents and disinfectants
Disinfectants (custo screen 100/200, carrying case, belt):
All alcohol-based disinfectants (e.g. propanol, ethanol)
approved for medical use.
20
ABPM with custo screen 100/200 and custo diagnostic | GEB 0141 – DK 0953 | Version 002 – 05.06.2013 | custo med GmbH
05 Carrying out an examination
05.1 Preparing the patient for the examination
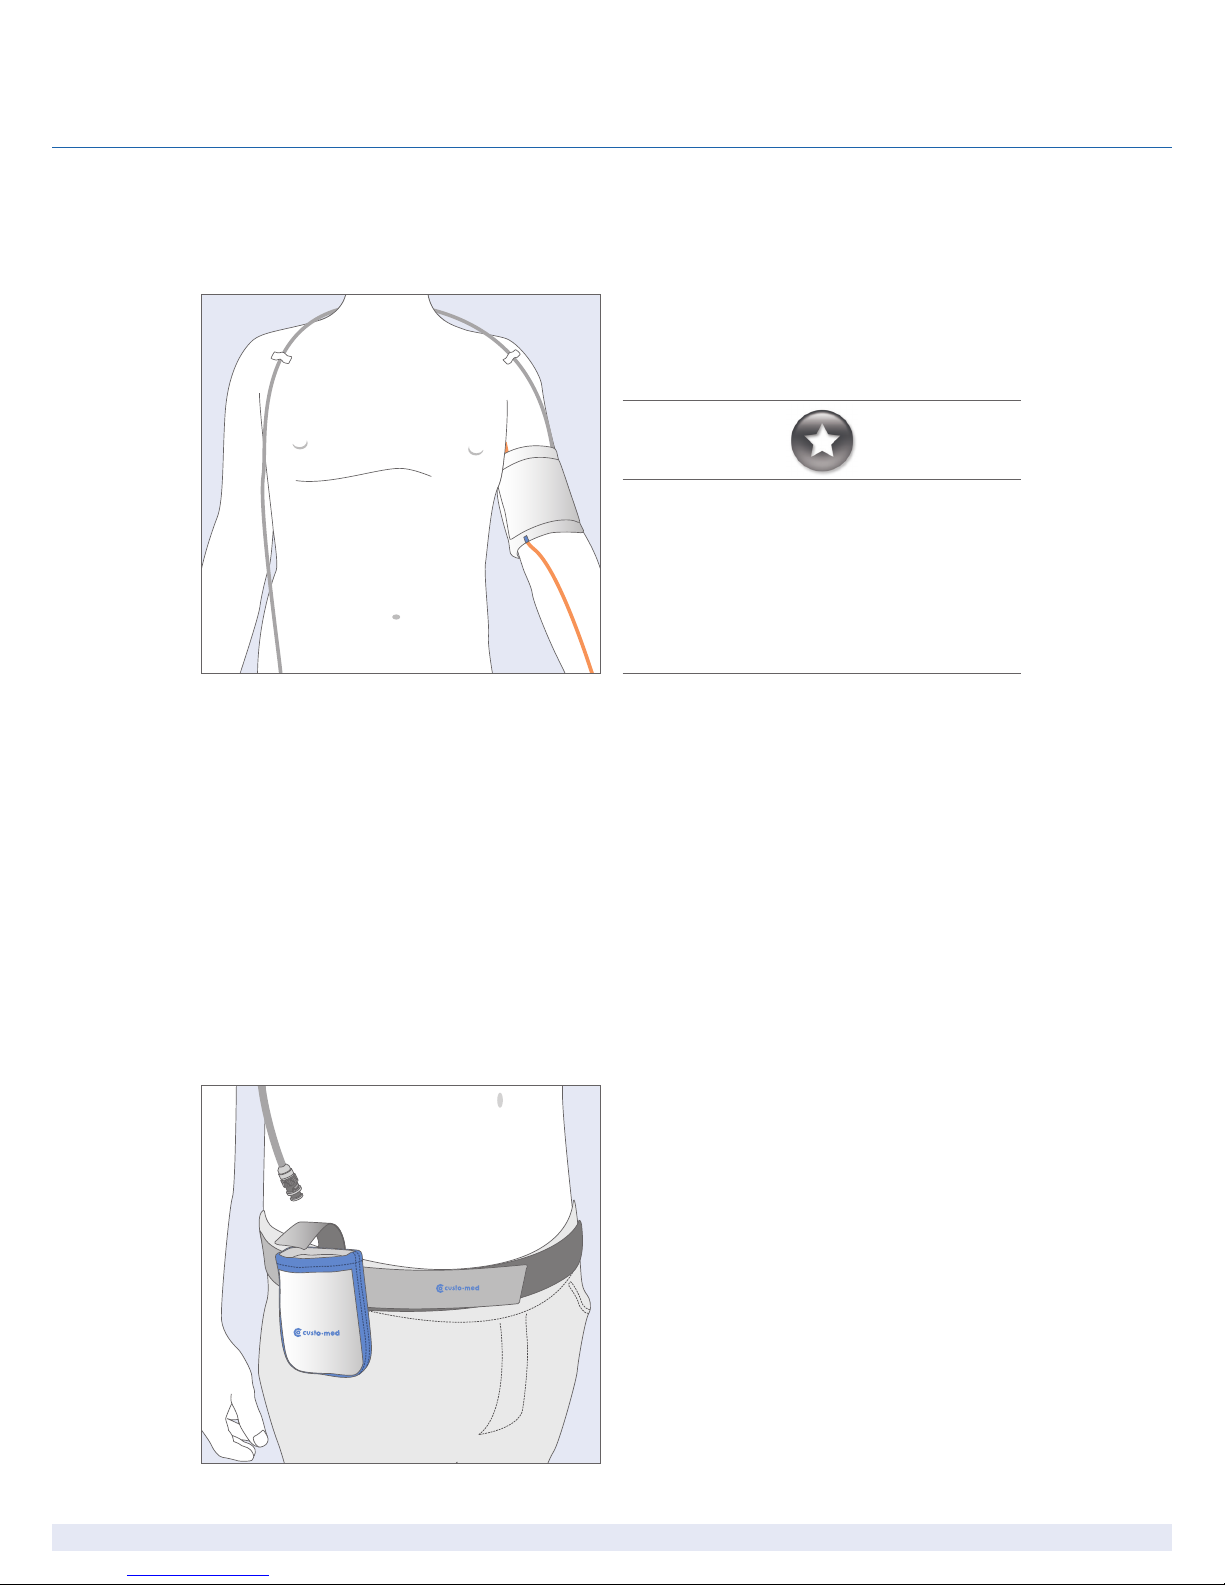
Applying the blood pressure cuff
In order to attach cuff and tube optimally, the
patient should undress to the waist.
Tip for applying the blood pressure cuff:
Slip the patient a tube bandage over the left upper
arm – take a sufficiently sized piece so that you can
put the bandage bottom-up over the cuff later. Thus
you increase the level of hygiene and the wearing
comfort.
Attach the cuff to the left upper arm, two to three
centimetres above the crook of the arm. Apply the
cuff in a way that the marking is situated on the
arteria brachialis. The cuff must not be attached
too firmly. It should still be possible to put approximately two fingers between arm and cuff.
Lay the tube from the left shoulder over the right
shoulder to the right hip. There, the recorder will be
placed later.
Fix the cuff and the tube at the patient’s body. Thus
faulty measurements due to incorrect cuff or tube
position are excluded.
Attaching the carrying belt
Attach the carrying bag to the carrying belt. Apply
the carrying belt with the patient. The bag should
be positioned on the patient’s right hip.
21
ABPM with custo screen 100/200 and custo diagnostic | GEB 0141 – DK 0953 | Version 002 – 05.06.2013 | custo med GmbH
Patient Information
In order to receive optimum results, inform your patients on the recording
procedure and about the correct handling of the recorder.
Handling of the recorder
The day on which the recording is made should be planned as normally as
possible (no day off, no exceptional events).
The switched-on recorder and the cuff must also be carried during the night.
On the day of recording no X-ray recordings are allowed to be made, interference sources such as stimulation current devices are to be avoided.
Each measurement is announced with a beep (unless this function is deactivated in custo diagnostic). Using default settings, the measurements are performed every 15 minutes during the day and every 30 minutes during the night.
The recorder must be protected against extreme cold, heat, humidity, dirt and
mechanical impacts (e. g. no shower, no use of swimming-pool and sauna).
Avoiding faulty measurements
In order to avoid faulty measurements, the patient must keep his/her arm
steady during a measurement – physical activities must be stopped.
A new measurement is automatically performed three minutes after a failed
measurement. If several measurements fail during recording (especially E6,
E21-24 and E25-28) it should be checked if the cuff is still positioned correctly.
The marker should be located on the brachial artery and the cuff should be po-
sitioned so that approximately two fingers fit between the cuff and the arm.
In case of disorders during the recording
If during the recording process disorders occur, e. g. caused by a too high cuff
pressure, the patient has to contact the doctor. The patient is able to stop the
measurements at any time by pressing the function key or by opening the
cuff’s hook and loop fastener.
22
ABPM with custo screen 100/200 and custo diagnostic | GEB 0141 – DK 0953 | Version 002 – 05.06.2013 | custo med GmbH
05 Carrying out an examination
The steps necessary to record and evaluate an ABPM
recording in custo diagnostic are shown without a
surgery IT system or HIS connection.
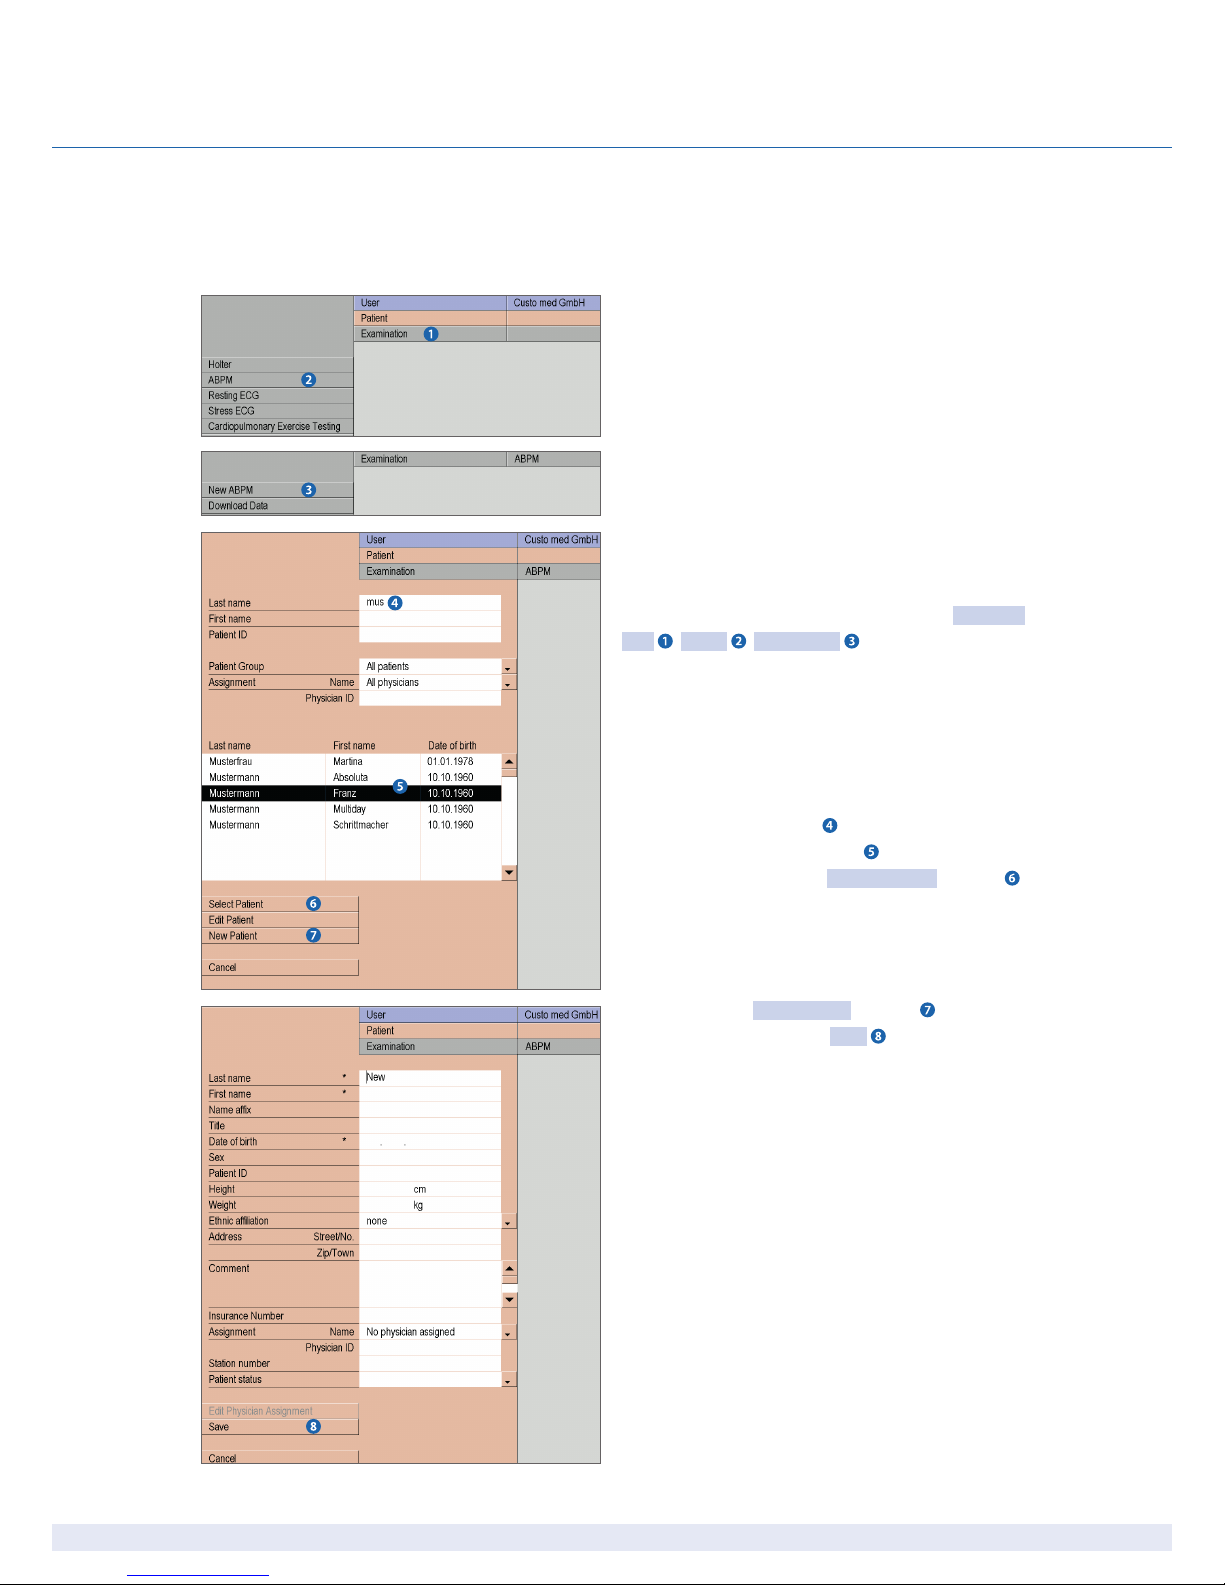
Program start, calling the ABPM
Make sure that the infrared interface custo com IR is
connected to the PC and ready for operation.
Start custo diagnostic and log on with your user
name and password if required. Click on Examination , ABPM , New ABPM .
Selecting the patient
Select a patient for the recording. To do this, enter
the patient‘s name, in full or in part, into the input
fields in the search screen . Select the patient from
the list below the input fields and confirm your
selection by clicking the Select Patient button .
You can also select the patient by double-clicking
on the corresponding name.
If the patient does not yet exist in your database, click on the New Patient button . Enter the
patient‘s data and click on Save .
05.2 Preparing the recorder for recording
23
ABPM with custo screen 100/200 and custo diagnostic | GEB 0141 – DK 0953 | Version 002 – 05.06.2013 | custo med GmbH
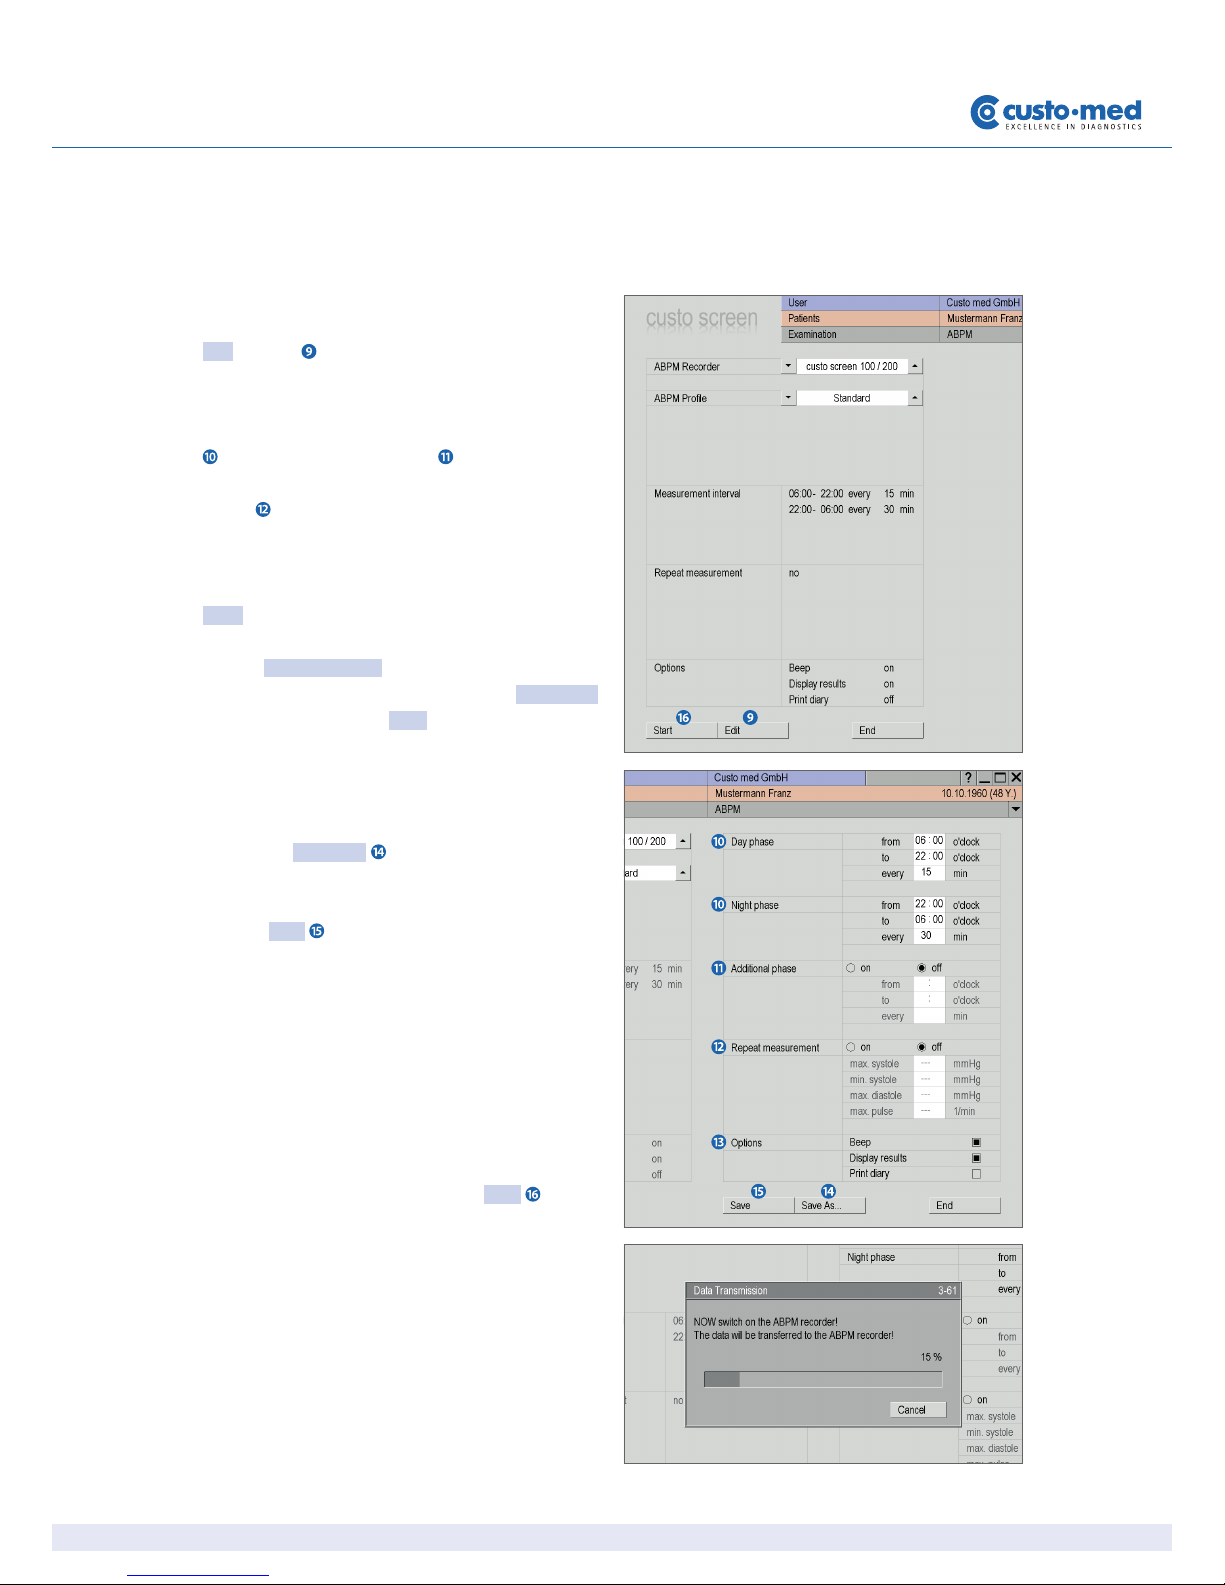
Setting the recording parameters
The settings for the recording are displayed. The
Edit button can be used to change the preset
parameters.
You can change the periods of day and night phase
, define an additional phase and release repeat
measurements when reaching predetermined limit
values .
The Following Options have to be set if required:
Beep: Gives a signal before each measurement
so that the patient can prepare him-/herself accor-
dingly. Display results: The measurement results
are displayed after each measurement. Print diary:
After having clicked on Start a form for the patient
is being printed which can be used to document
events during measurements.
You can save the modified profile under a new
name with Save As... and thus make it available
for further recordings.
Click on Save to overwrite the selected profile.
Hint:
Insert new batteries into the recorder before starting
the data transfer.
Data transfer, starting the recorder
Put the switched-off recorder in front of the infrared interface custo com IR. Click on Start . Switch
the recorder on as soon as the dialogue box for data
transfer is displayed.
If the recorder does not respond, press the function
key. If “PC” appears in the display, the recorder is in
data transfer mode.
The settings and patient data are being transferred
to the recorder. The recorder is ready for recording.
24
ABPM with custo screen 100/200 and custo diagnostic | GEB 0141 – DK 0953 | Version 002 – 05.06.2013 | custo med GmbH
05 Carrying out an examination
05.3 Attaching the recorder to
the patient
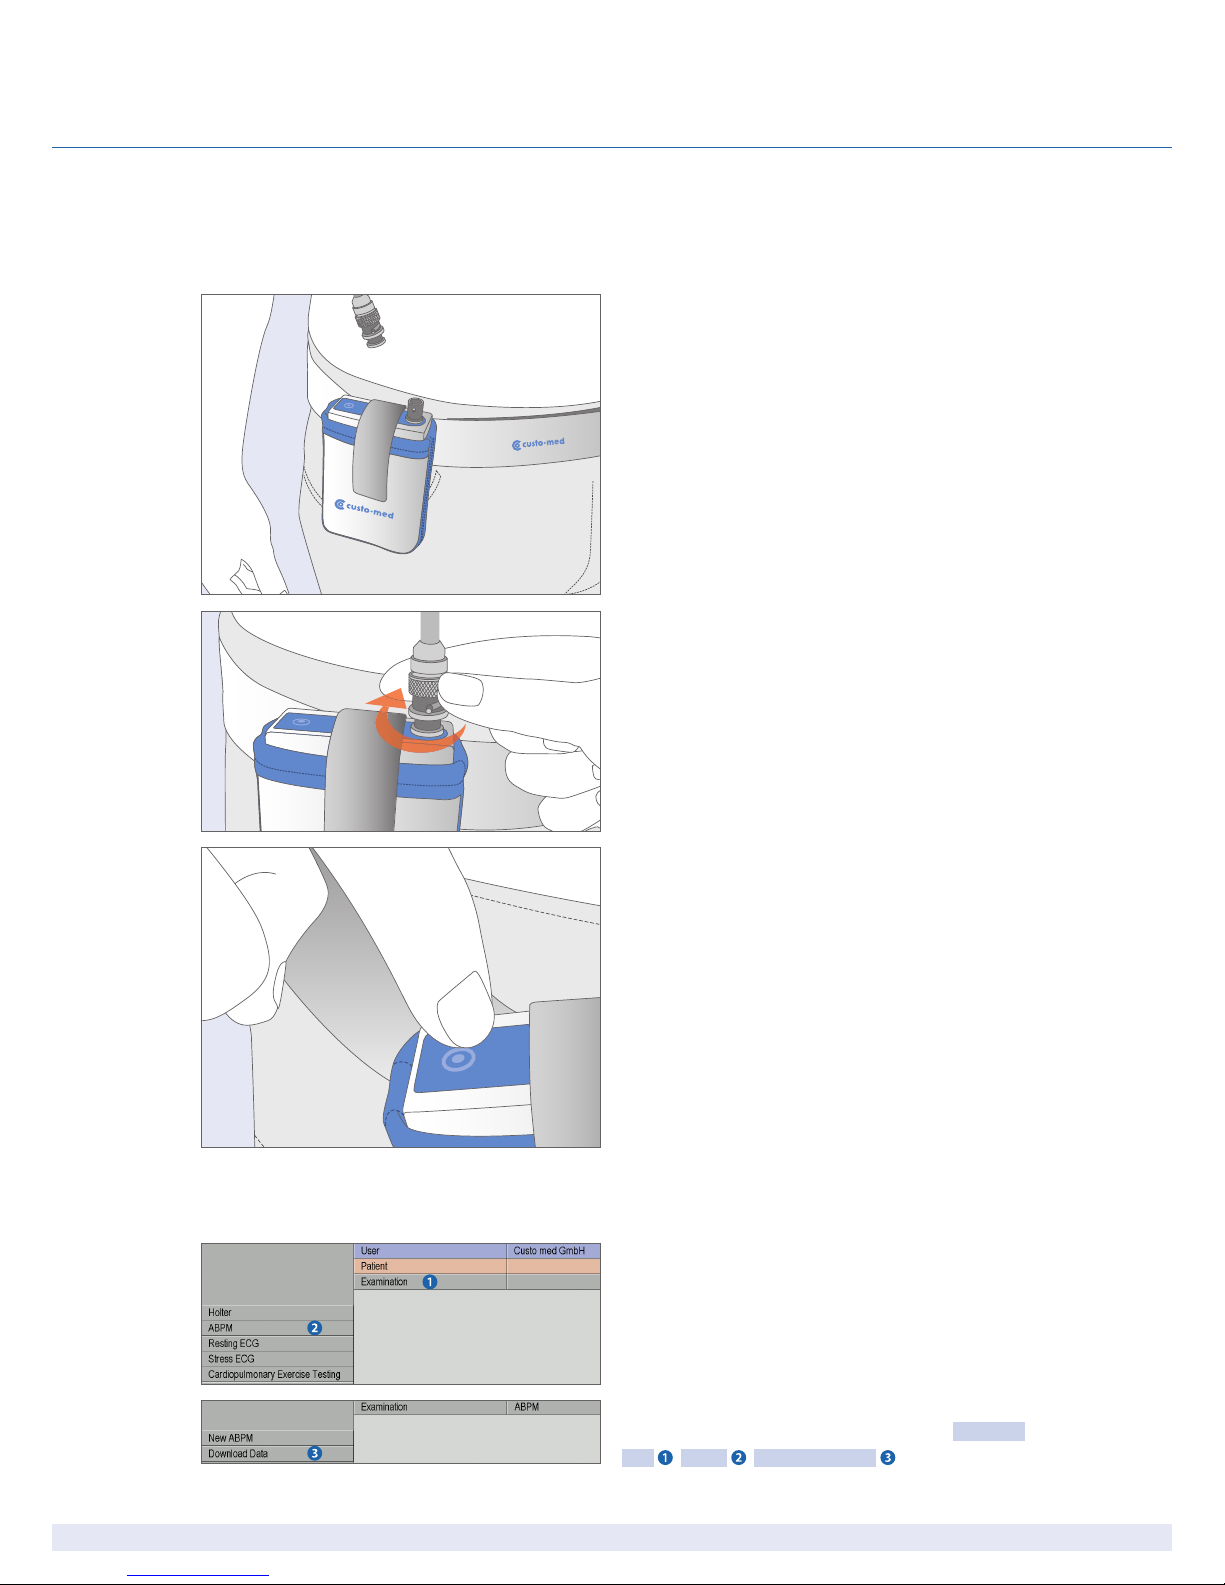
The final steps
If it has not yet happened, attach the carrying belt
with the carrying bag to the patient
Put the switched-on recorder into the carrying bag
and close it with the hook and loop fastener.
Connect the cuff tube to the recorder as illustrated.
05.4 Start recording
Press the function key in order to carry out a
sample measurement. Take care that the patient
keeps steady during the measurement. In the event
of a faulty measurement, improve the fitting of cuff
and tube.
If the sample measurement has been carried out
successfully, patient and recorder are ready for
recording.
05.5 Download recording
Take the recorder from the patient after the recor-
ding. Remove the tube (turn the fastener to the left)
from the recorder and pull the recorder out of the
carrying bag. Switch off the device.
Start Program and Download Recorder Data
Start custo diagnostic and log on with your user
name and password if required. Click on Examination , ABPM , Download Data .
25
ABPM with custo screen 100/200 and custo diagnostic | GEB 0141 – DK 0953 | Version 002 – 05.06.2013 | custo med GmbH
Put the switched-off recorder in front of the infrared interface custo com IR. Switch the recorder
on as soon as the dialogue box for data transfer is
being displayed. After the download, the evaluati-
on will be displayed automatically.
If the recorder does not respond, press the function
key. If “PC” appears in the display, the recorder is in
data transfer mode.
After the download the evaluation will be displayed
automatically.
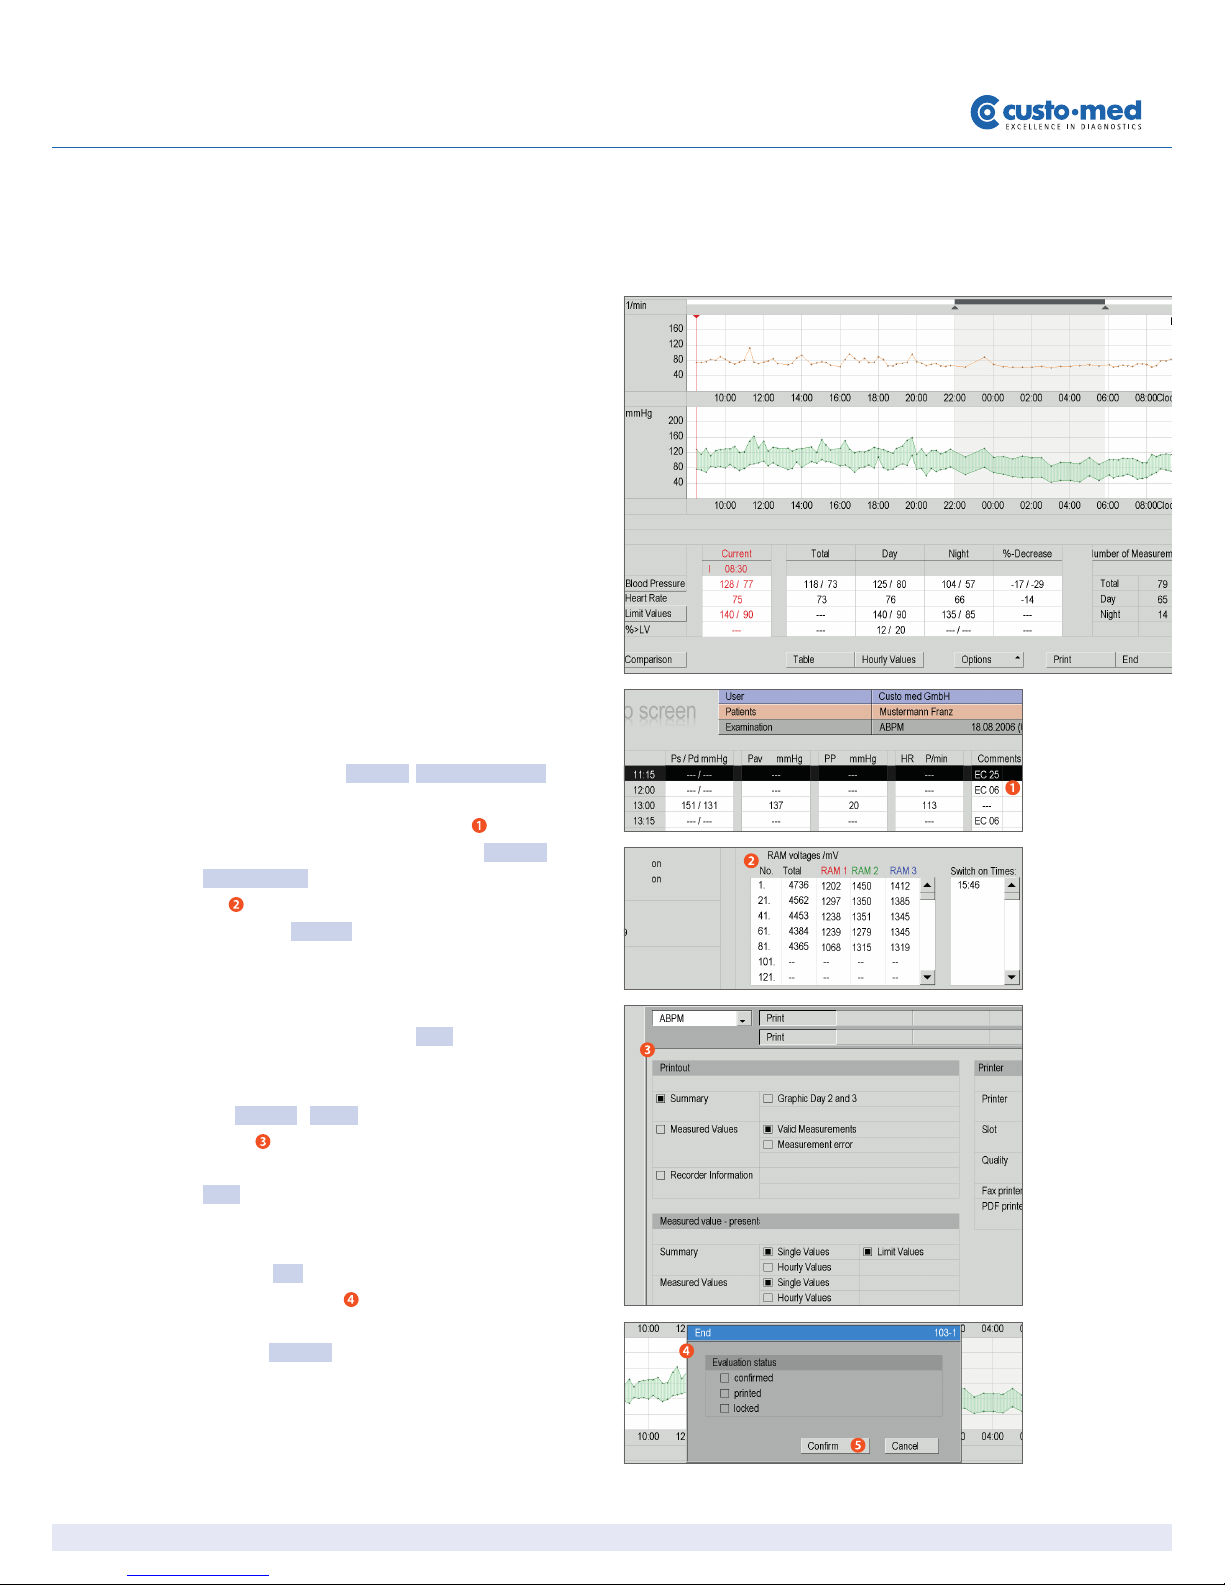
05.6 Control the evaluation
Check if and how many faulty measurements have
occurred. Click on Options, Faulty Measure...
You can see from the error codes which kind of
disorder has occurred. In the menu Options, under
Recorder Info you can check the accumulator volta-
ge during the recording process. By clicking on
the button Graphic you can get back to Evaluation.
Print evaluation
By clicking on the button Print you can print the
evaluation according to the system settings.
Via Options, Print... you can access the printing
menu . There, you can arrange the contents for
a printout individually. The printout is started with
Print.
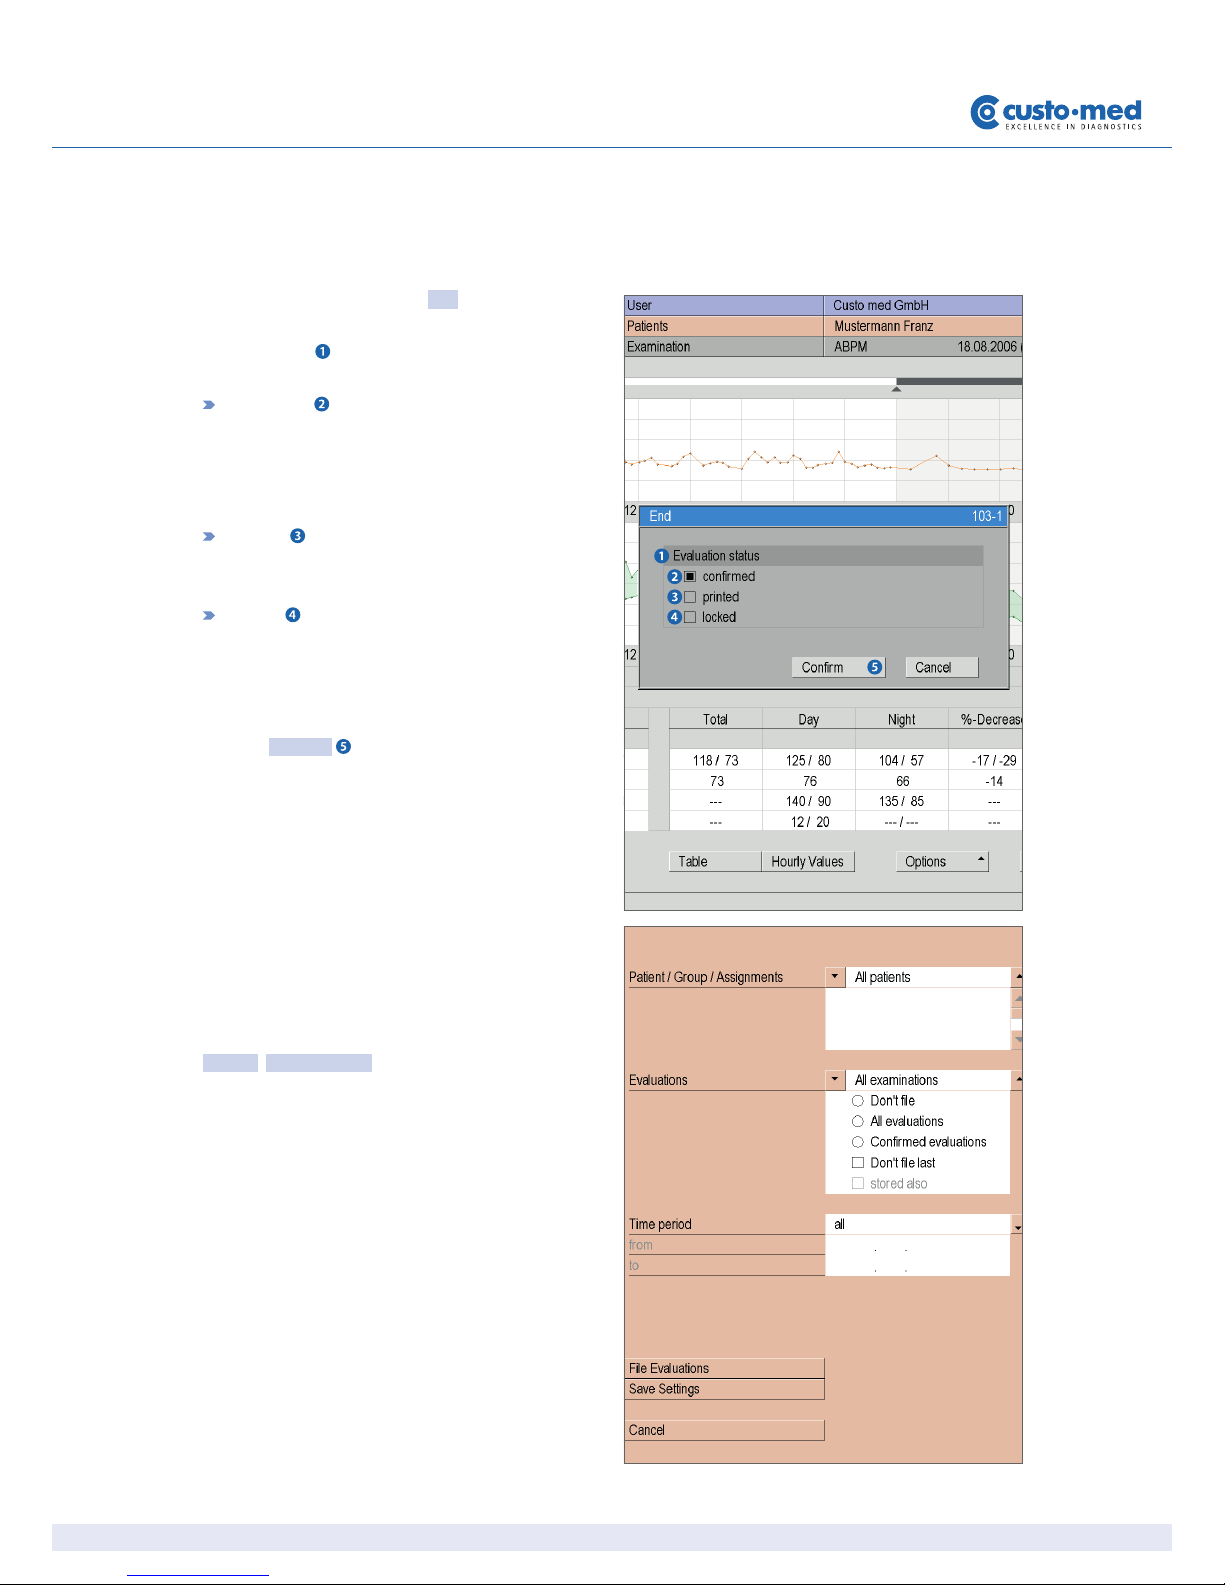
End evaluation
Click on End in order to close the evaluation. The
End dialogue box will be opened.
Click on Confirm to close the examination.
Final work steps
Remove carrying belt, tube, cuff and fixing aids
from the patient.

26
ABPM with custo screen 100/200 and custo diagnostic | GEB 0141 – DK 0953 | Version 002 – 05.06.2013 | custo med GmbH
06 Working with the evaluation
06.1 Opening an evaluation
custo diagnostic offers different options to open an evaluation, e.g. via the
evaluation search or the main menu of the respective examination (ABPM in
this case).
Opening an evaluation via the evaluation search
Click with the right mouse button on the Patient button. This opens the evaluation search.
In the Examinations area enter what type of evaluation you are searching for,
e.g. ABPM . In the Properties area you can define more search criteria.
If you set the confirmed property to No, you will receive a list of all the evaluations
which have not yet been confirmed – a type of to-do list.
To start the search, click on Search Evaluation or activate the Search auto-
matically option. This option triggers an automatic search in your database
whenever the search criteria are changed.
The right part of the screen displays a list of all the evaluations which corre-
spond to the activated search criteria. To open the desired evaluation, select it
from the list and click on the Show Evaluation button or double-click on the
evaluation.
If you want to use the same search criteria for the next search, activate the Save
selection option.

27
ABPM with custo screen 100/200 and custo diagnostic | GEB 0141 – DK 0953 | Version 002 – 05.06.2013 | custo med GmbH
Opening an evaluation via the examination main menu
Open the ABPM main menu via Examination, ABPM, and click there on Show
Evaluation .
The patient search screen appears. In this screen select the patient whose re-
cording you want to open. Enter the patient’s name, or parts of it, into the input
fields in the search screen . Select the patient from the list below the input
fields and confirm your selection by clicking on the Select Patient button.
You can also select the patient by double-clicking on the corresponding name.
A list containing all the evaluations of the patient is then displayed. Select the
desired evaluation from the list and open it by means of a double-click or via
the Show Evaluation button.

28
ABPM with custo screen 100/200 and custo diagnostic | GEB 0141 – DK 0953 | Version 002 – 05.06.2013 | custo med GmbH
06 Working with the evaluation
Bei mehrtägigen Auswertungen: Auswahlliste zur Ansteuerung der einzelnen Tage
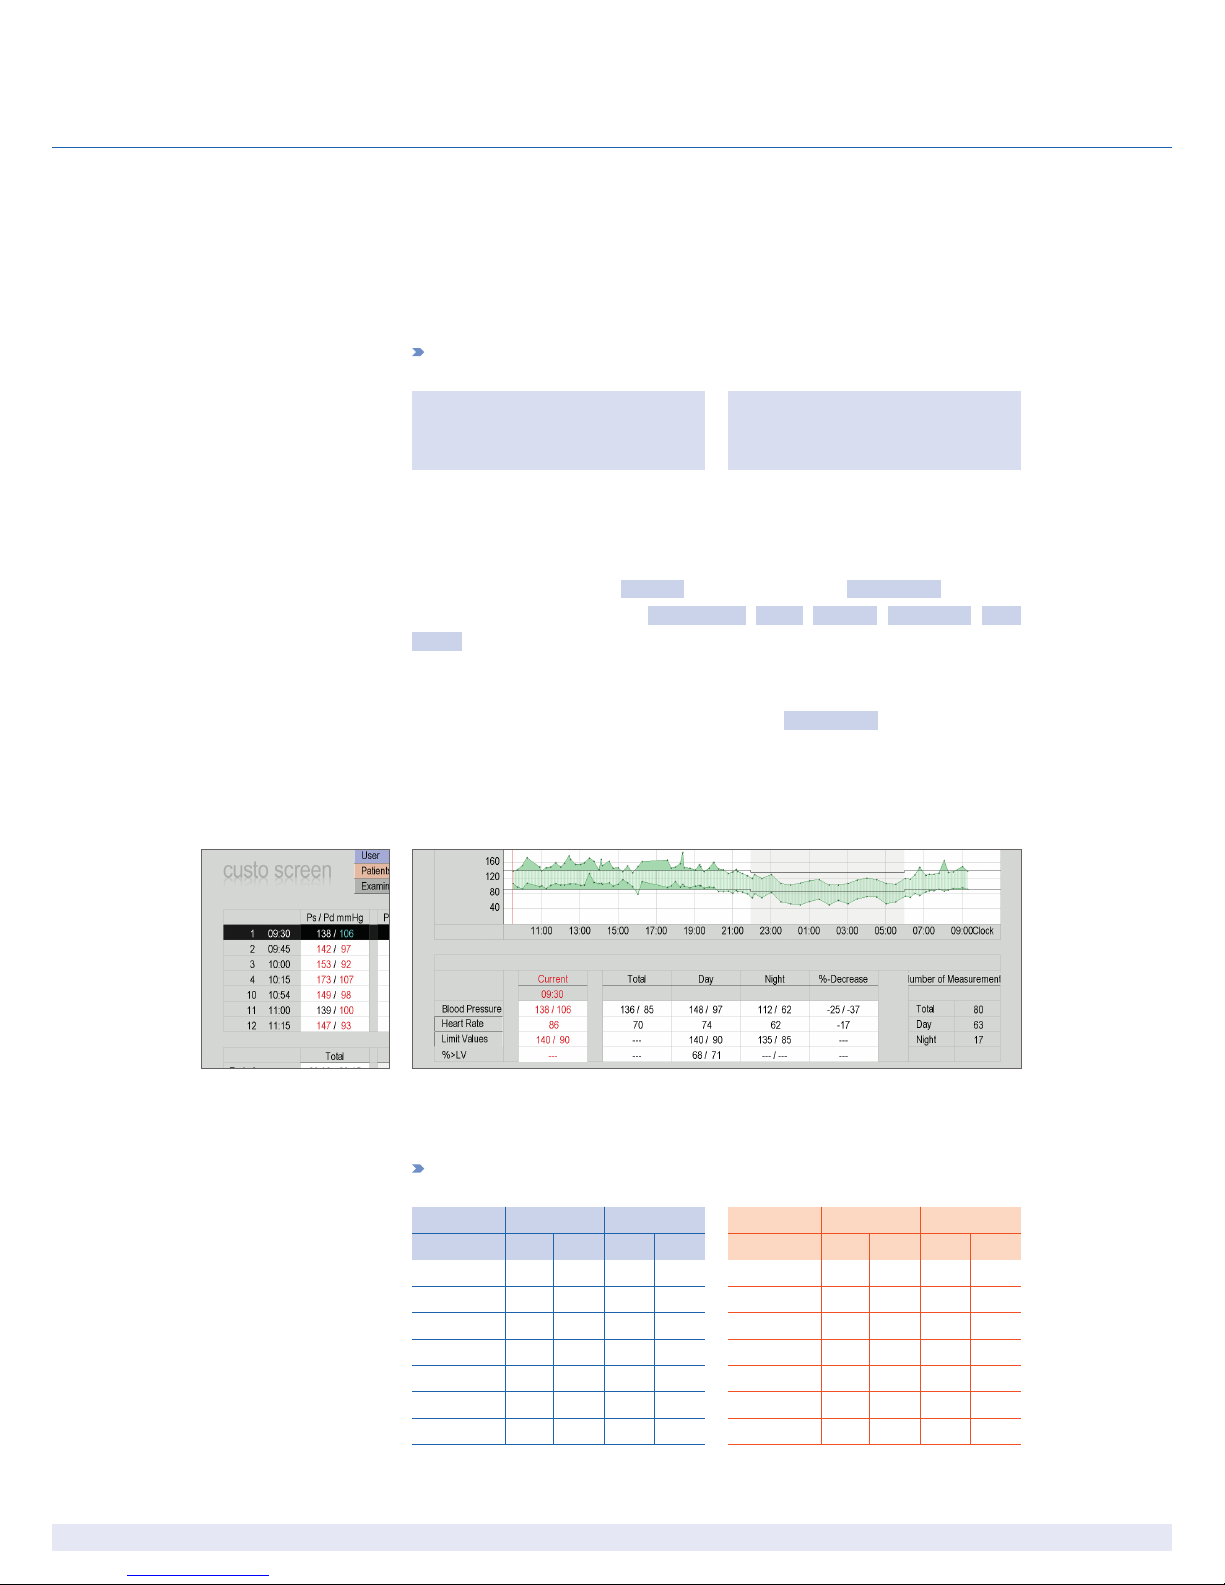
06.2 The workspace at a glance
Display and control elements
Heart rate curve
Blood pressure curve
Overview table with average values
Number of measurements
Controller for modifying the night phase;
in the event of changes, the average values adapt in the overview table
Event curser for piloting specific points;
the corresponding values are presented under “Current” in the overview table
Fade in and out of the heart rate curve
Fade in and out of limit values for the blood pressure curve
Buttons for opening various viewing modes
Button for printing the evaluation
Button for closing the evaluation
The menu options
Display of faulty messages with error codes
Note: It can be helpful to display the error codes when the measurement curves show blank spaces
( and ). Error codes refer to Chapter 07 Product information
Display of recorder information with accumulator voltage during the recording process
Opening of trend display for evaluating the blood pressure behaviour over a longer period of time
Print menu for temporary modification of the print settings
Export of the evaluation, e.g. in Excel, PDF or email format
Dialogue box for changing the limit values

29
ABPM with custo screen 100/200 and custo diagnostic | GEB 0141 – DK 0953 | Version 002 – 05.06.2013 | custo med GmbH
Initial point:
ABPM graphic
Comparison
of current and
further evaluation
Table
tabular overview of
all measured values
Trend
display of all
evaluations as
a bar chart
06.3 Navigation concept, structure of the evaluation
Navigation in the evaluation
When you change from your initial screen to another view mode, you can
return to the original view mode by clicking on the same button.
Example: You click on Table in the evaluation. You access the tabular overview
of all measured values and the button Table changes to Graphic. By clicking the
button Graphic you get back to the original viewing mode.
Structure and connection of the view modes
Single Values:
display of all values
or hourly values:
evaluation view
reduced to the mean
hour value per hour
Single Values:
display of all values
or hourly values:
evaluation view
reduced to the mean
hour value per hour

30
ABPM with custo screen 100/200 and custo diagnostic | GEB 0141 – DK 0953 | Version 002 – 05.06.2013 | custo med GmbH
06 Working with the evaluation
06.4 Evaluation view modes
06.4.1 Graphic, Hourly Values ( Evaluation > Hourly Values)
Simplified heart frequency and blood pressure curve with the mean hour values;
Benefit: Better overview thanks to a more smooth measurement curve without
fluctuations in the measured values
06.4.2 Trend (Options > Trend)
Display of all existing ABPM evaluations of a patient in bar chart format
with mean values

31
ABPM with custo screen 100/200 and custo diagnostic | GEB 0141 – DK 0953 | Version 002 – 05.06.2013 | custo med GmbH
06.4.3 Comparison (Evaluation > Comparison)
Comparison of the current evaluation with an additional one.
Use the arrow buttons to select other evaluations of the patient
for a comparison.
06.4.4 Comparison with Hourly Values (Evaluation > Comparison > Hourly Values)
Simplified comparison view with mean hour values in ABPM curves
32
ABPM with custo screen 100/200 and custo diagnostic | GEB 0141 – DK 0953 | Version 002 – 05.06.2013 | custo med GmbH
06 Working with the evaluation
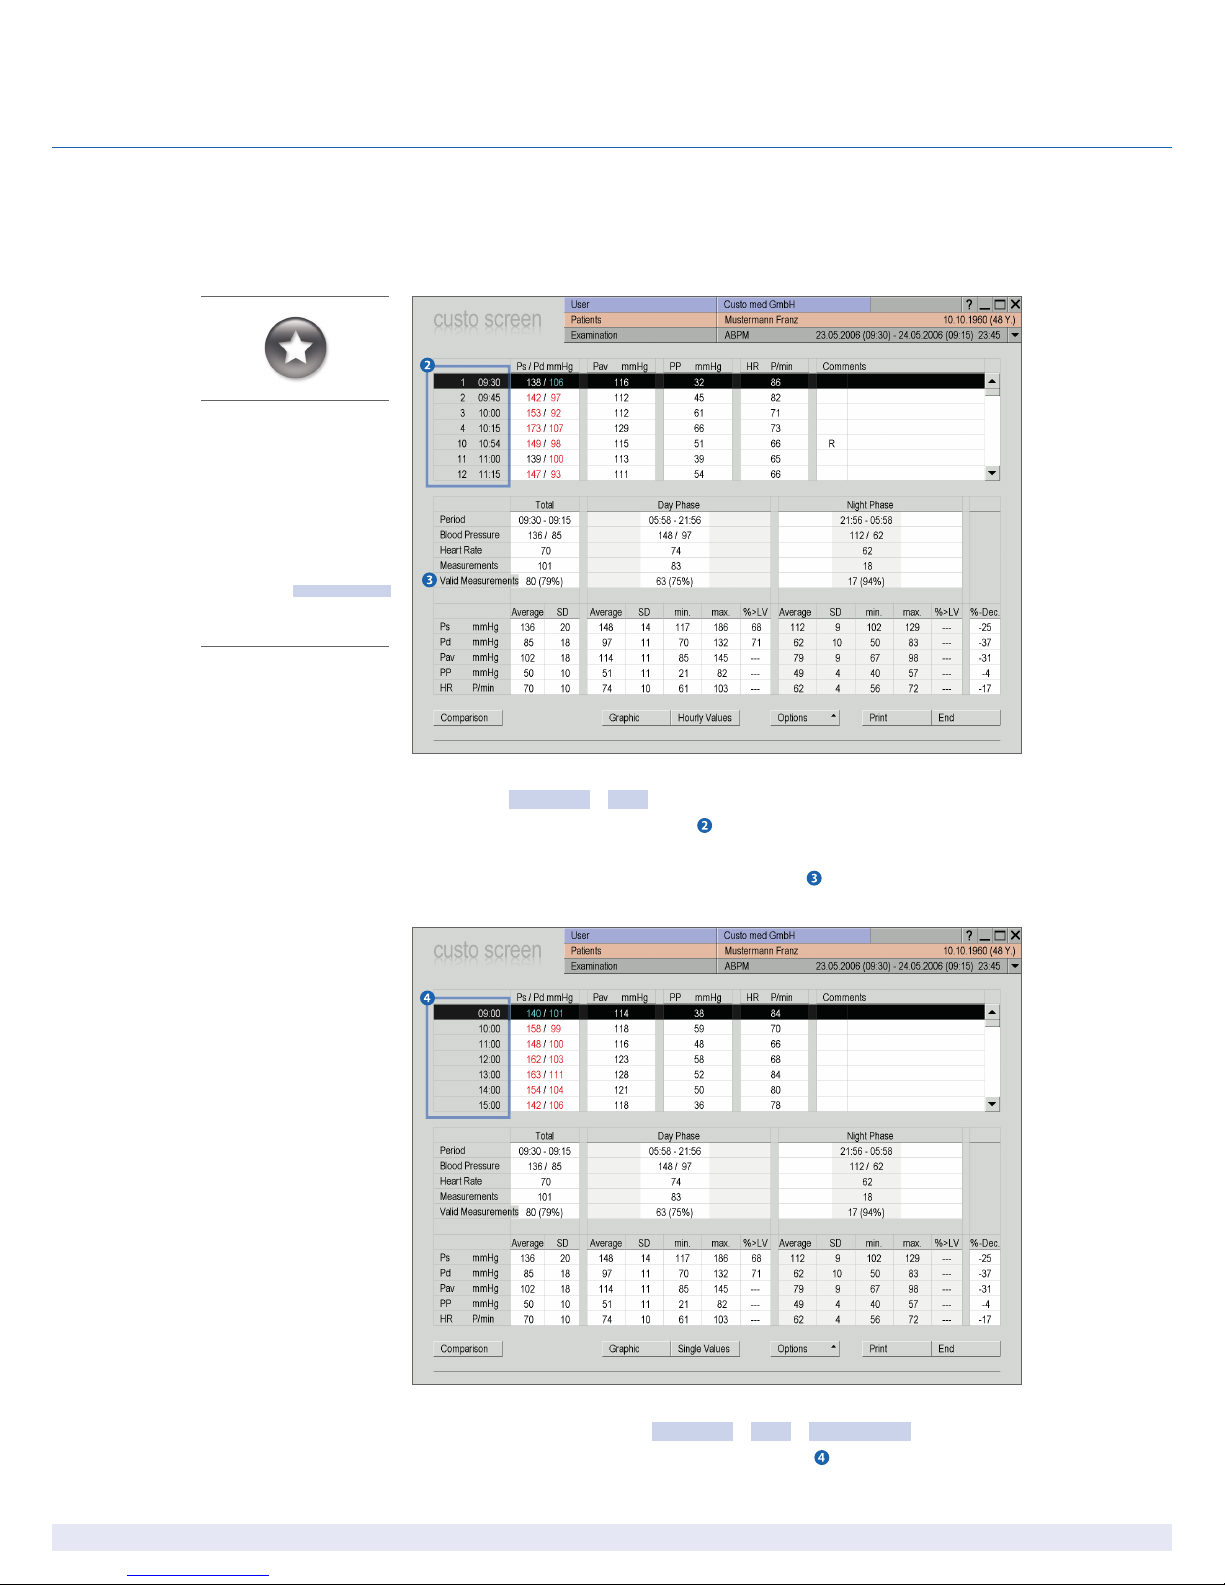
06.4.5 Table (Evaluation > Table)
Listing of all individual measurements and overview table with mean, minimum
and maximum values for the total recording. The line Valid Measurements shows
the portion of successfully performed measurements .
06.4.6 Table with Hourly Values (Evaluation > Table > Hourly Values)
Simplified measurement table with mean hour values .
Tips for working
in the tabular view
> In order to transfer diary notes
into the software, click on the
desired line in the column Remarks.
There you can enter the text.
> In order to delete measurements
choose the measurement to be dele-
ted in the top table with a mouse click.
Open the context menu with a right
click and select Delete Measurem.
there.

33
ABPM with custo screen 100/200 and custo diagnostic | GEB 0141 – DK 0953 | Version 002 – 05.06.2013 | custo med GmbH
06.4.7 Automatic Report (Evaluation Interface > context menu > Autom. Report)
The automatic report is created from the mean values, day-night drop and the por-
tion of the measurements which exceed the limit values. Click on Accept report to
transfer the results into the unconfirmed report.
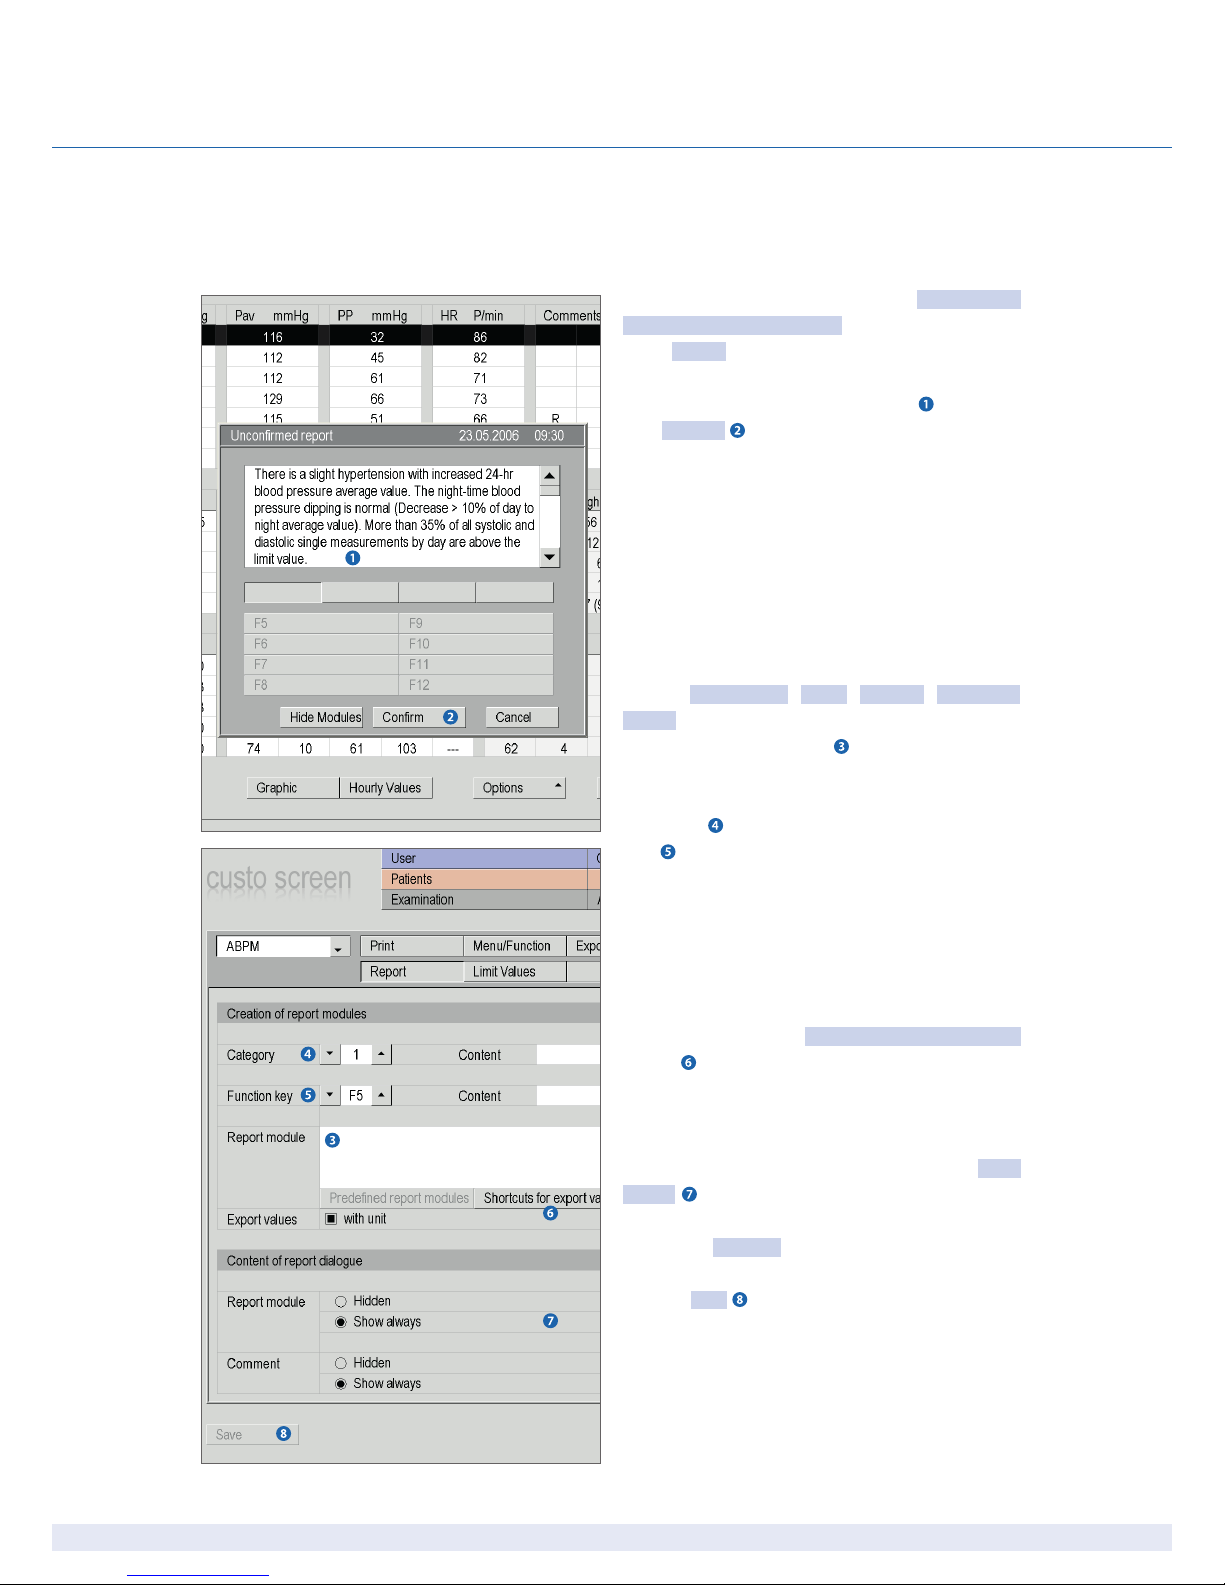
06.4.8 Unconfirmed report (Evaluation interface > context menu > Report)
Unconfirmed report with results from the automatic report.
Click on Confirm to convert the unconfirmed report to a report.
34
ABPM with custo screen 100/200 and custo diagnostic | GEB 0141 – DK 0953 | Version 002 – 05.06.2013 | custo med GmbH
06 Working with the evaluation
06.5 Confirming the evaluation
The unconfirmed report is opened by right-clicking
on the evaluation interface. In the context menu,
select Report.
Enter your data in the white text field . When you
click Confirm this data is saved and the unconfirmed report becomes a report.
If your report text is not yet complete, but you want
to save it nevertheless without allocating the report
status, reset the „Confirmed evaluation“ status in
the End dialogue box.
Tools for report modules
On the Examination, ABPM, Settings, Diagnostic,
Report page you can create report modules for
confirming an evaluation . The report modules
are called during the confirmation via keyboard
commands (F5 to F12). In total, you can create four
categories each with eight report modules (F5 to
F12) .
A report module can be created from normal text as
well as variables. When you use the report module
in the unconfirmed report, the actual value from
the evaluation is used instead of a variable and inserted in your report text. The structure of a variable is @VARIABLE. The Shortcuts for export values
button provides you with a list containing all the
available variables.
If the report modules should be shown in the unconfirmed report window, make sure that the Show
always option is activated. Alternatively the report modules can be shown in the report dialogue
box via the Modules button.
Click on Save to apply your report modules and
settings.
35
ABPM with custo screen 100/200 and custo diagnostic | GEB 0141 – DK 0953 | Version 002 – 05.06.2013 | custo med GmbH
06.6 Ending the evaluation
The evaluation is closed with End. The end dialogue
box is opened. The status of an examination can be
changed here .
confirmed
A confirmed evaluation can be reset to “not confirmed” by deselecting the “confirmed” option (e.g. if
reporting has not been completed).
Printed
Indicates if the evaluation has been printed.
locked
This option indicates that the work on an evaluation
is complete and it acts as a write protection when
the evaluation is opened again.
Click on Confirm to close the examination.
06.7 Archiving evaluations
Archiving serves for long term storage of evaluations. The archiving functions can be found under
Patient, Edit database.
When archiving, the evaluations are moved to a
directory on your hard disc, which you have to save
on a data carrier (CD, DVD, etc.) afterwards.
Archiving is not the same as a data backup (copy)
but only a relocation of your evaluations to another
storage position. Make sure that regular data backups are made within your archive in order to avoid
loss of data.
36
ABPM with custo screen 100/200 and custo diagnostic | GEB 0141 – DK 0953 | Version 002 – 05.06.2013 | custo med GmbH
07 Product information
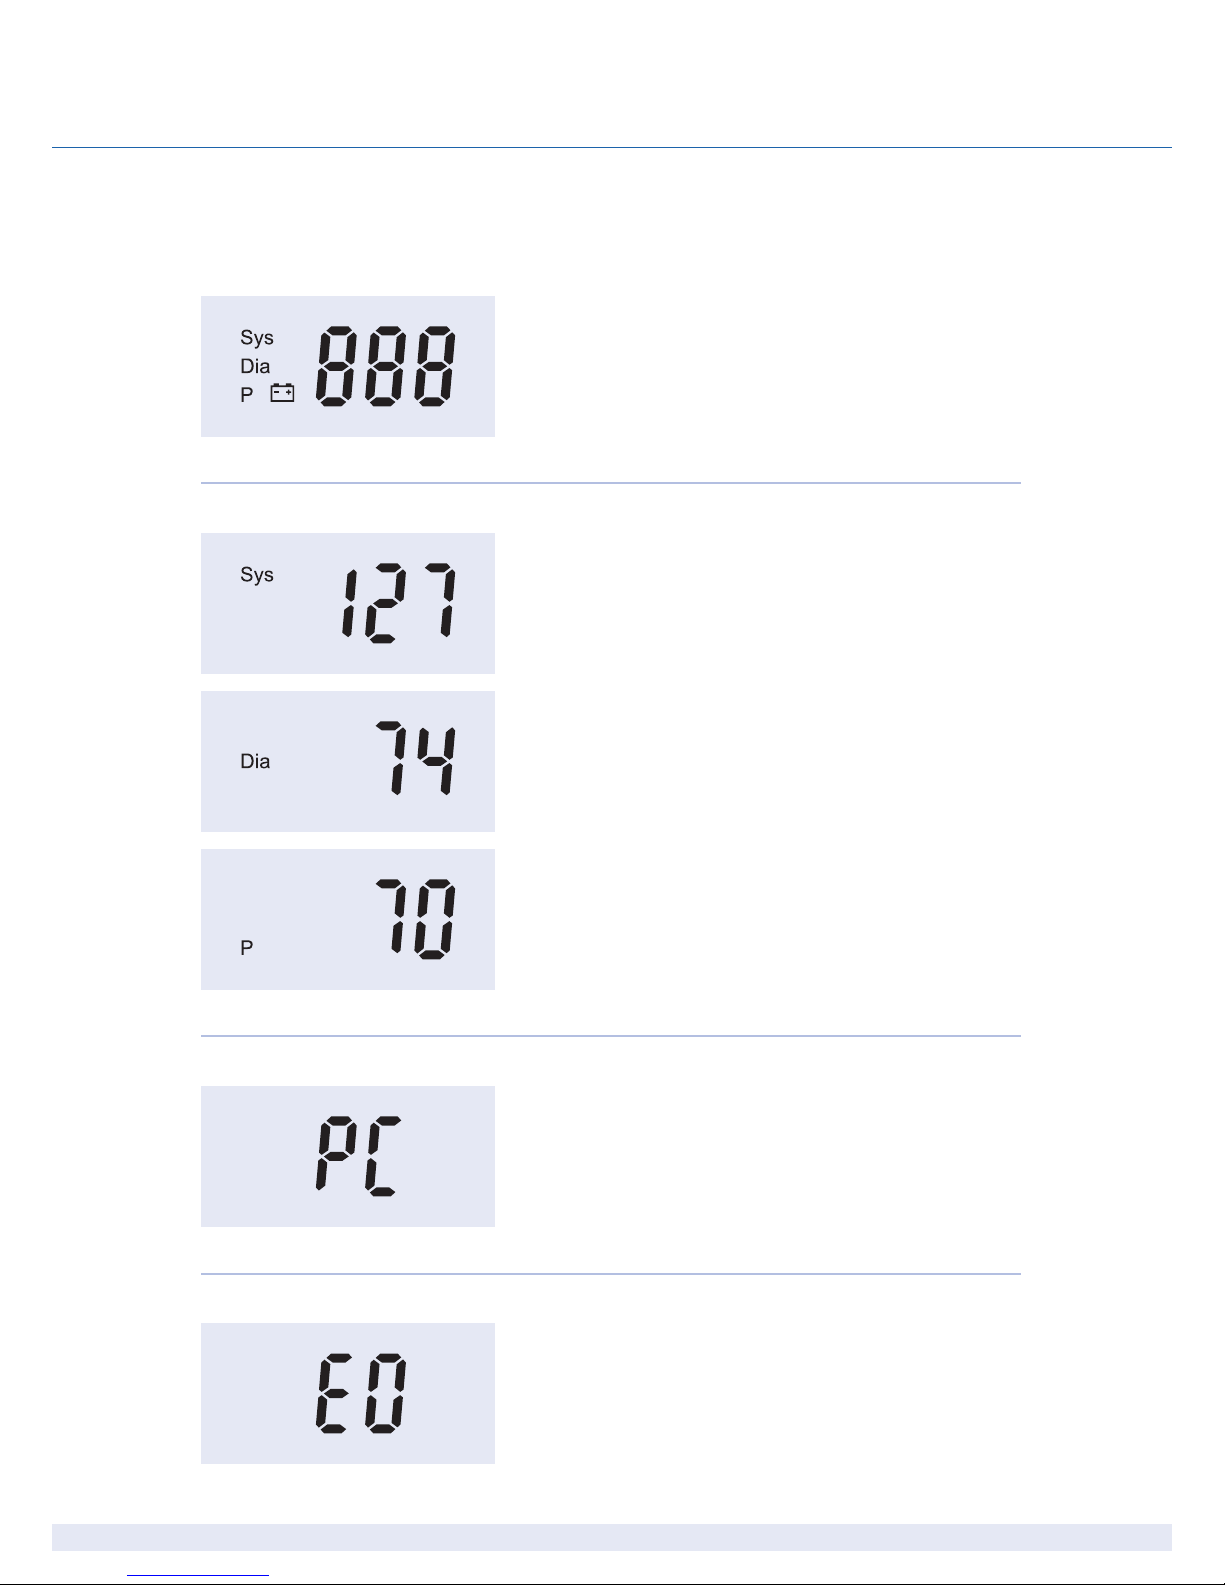
Display elements
Sys: Systolic blood pressure
Dia: Diastolic blood pressure
P: Pulse
Battery: will light up if batteries are weak
If the blood pressure measurement has been
carried out successfully...
systole, diastole and pulse will be displayed
three times one after the other
During data transfer between recorder and PC...
“PC” is shown in the display
(the LED of the infrared interface custo com IR flashes)
In the event of faulty measurements...
an error code is shown in the display, e. g. “E4”
07.1 Measurement and status indication on the display

37
ABPM with custo screen 100/200 and custo diagnostic | GEB 0141 – DK 0953 | Version 002 – 05.06.2013 | custo med GmbH
Blood pressure values exceed limit values
Sys: < 70 mmHg > 270 mmHg
Dia: < 40 mmHg > 155 mm Hg
Sys - Dia: < 15 mmHg, HR: < 35/min > 220/min
Measurement is repeated automatically
Pressure discharge rate outside the given limits
Cause: valve is leaky or defective
Customer service required
Disturbed measurement
Cause: too many movement artefacts
Attach the cuff carefully
Keep the arm steady during measurement
Pressure increase is too slow
Cause: Cuff is not tight (defective), valve is leaky
Check the cuff (O ring in connector)
Customer service required
Discharge period is too long
Cause: cuff tube is snapped off or valve is defective
Customer service,
if multiple occurrences during a recording
Error when determining diastole
Cause: Cuff has been attached incorrectly / insufficient oscillation
(marking on the cuff is not situated on the artery)
Attach the cuff carefully
Keep the arm steady during measurement
Error when determining systole
Cause: Systole lies above the pump up pressure,
movement artefacts
Attach the cuff carefully
Keep the arm steady during measurement
Zero point balancing is not possible
Cause: System is not at zero pressure when being switched on
Error after attaching the cuff: wait until the display
switches off, repeat measurement after 10 sec
Customer service, if multiple occurrences during a recording
07.2 Error codes and their causes *)
*) A repeated measurement is automatically performed 3 minutes after a failed measurement.
Customer service is always required for all error codes which are not listed. Please contact your authorised custo med dealer.
38
ABPM with custo screen 100/200 and custo diagnostic | GEB 0141 – DK 0953 | Version 002 – 05.06.2013 | custo med GmbH
07 Product information
07.3 Limit values for blood pressure measurement
The limit values are defined as follows in custo diagnostic:
Adults
Day phase Night phase
Systole . . . . . . . . . . . . . . . . . . . . . . . . . . . 135 mmHg Systole . . . . . . . . . . . . . . . . . . . . . . . . . . 120 mmHg
Diastole . . . . . . . . . . . . . . . . . . . . . . . . . . .85 mmHg Diastole. . . . . . . . . . . . . . . . . . . . . . . . . . . 75 mmHg
Measurements for which these values are exceeded are displayed in red font
in the evaluation. If required, the limit values for the current evaluation can
be modified via the menu Options in the dialogue box Limit values. Enter the
required values on the page Examination, ABPM, Settings, Diagnostic, Limit
values to change the limit values permanently.
In the ABPM graphic (initial screen), you can fade in auxiliary lines at the level of
the fixed limit values by clicking on the button Limit Values (bottom left, next
to the summary table). Consequently, values outside the fixed limit values can
be seen immediately and be piloted easily.
Limit values for children and adolescents up to 16 years
Boys Day Night Girls Day Night
Height Sys Dia Sys Dia Height Sys Dia Sys Dia
120 cm 123 85 104 63 120 cm 120 84 107 66
130 cm 125 85 107 65 130 cm 124 84 109 66
140 cm 127 85 110 67 140 cm 127 84 111 66
150 cm 129 85 113 67 150 cm 129 84 112 66
160 cm 132 85 116 67 160 cm 131 84 113 66
170 cm 135 85 119 67 170 cm 131 84 113 66
180 cm 137 85 122 67 180 cm 131 84 114 66

39
ABPM with custo screen 100/200 and custo diagnostic | GEB 0141 – DK 0953 | Version 002 – 05.06.2013 | custo med GmbH
07.4 Abbreviations in the evaluation
Ps Systolic blood pressure
Pd Diastolic blood pressure
Pav Mean (average) arterial pressure Pav = (Ps - Pd) : 3 + Pd
PP Pulse pressure PP = Ps - Pd
HR Heart rate
A Additional measurement,
measurement which has been released with the function key
R Repeat measurement,
e. g. if the limit values have been exceeded before
(they can be set individually at the start)
Average Average value of the corresponding measured value
over the total measurement period, taking into consideration
the intervals between the measurements
SD Standard deviation
Min lowest measured value
Max highest measured value
% >LV Percentage of measurements exceeding the limit value
%-Dec. Decrease in terms of percentage between
day and night average values
(daily average value - night average value = 10 – 15 %)

40
ABPM with custo screen 100/200 and custo diagnostic | GEB 0141 – DK 0953 | Version 002 – 05.06.2013 | custo med GmbH
07 Product information
07.5 Technical data and system requirements
Technical data custo screen 100/200
Measurement method Oscillometric measurement procedure
automatic zero balancing
Measurement range Heart rate 35 – 220 beats / min
Systolic blood pressure 70 – 270 mmHg
Diastolic blood pressure 40 – 155 mmHg
Max. number of measurements 512
Max. time of recording 72 hours
Duration of a measurement approx. 30 seconds
Measurement intervals Defined by the examination settings in custo diagnostic
Standard setting: every 15 min during the day, every 30 min during the night
Intervals can be set between 5 and 90 min
Individual adaptation of all phases (day, night, additional) possible
Cuff pressure max. 300 mmHg
Cuff sizes Children 20 – 24 cm
Default (in the scope of delivery) 24 – 32 cm
XL 32 – 40 cm
XXL (with or without retainer) 38 – 50 cm
Data transfer Infrared interface custo com IR, with USB port
(IrDA standard)
Voltage supply 3 Mignon, 1.5 Volt, Type AA
3 accumulators, Ni-MH, 1.2 Volt, at least 1500 mAh
Operating conditions Temperature +10°C ... +40°C
Air humidity 30 ... 80% rH
Air pressure 700 ... 1060 hPa
Transport and storage Temperature -20°C ... +45°C
conditions Air humidity 30 ... 80% rH
Air pressure 700 ... 1060 hPa
Dimensions Size approx. 100
*
66 * 26 mm (L * W * H)
Weight approx. 250 g (with batteries)
Classification Device with internal power supply
Class II a
Type BF
IEC 60601-1

41
ABPM with custo screen 100/200 and custo diagnostic | GEB 0141 – DK 0953 | Version 002 – 05.06.2013 | custo med GmbH
07.6 Support
If you have any questions or problems which are not dealt with here, please do
not hesitate to contact your authorised custo med dealer. A list of the authorised custo med dealers can be found in the Internet under www.customed.de,
in the category CONTACT, Dealers.
You can also contact custo med GmbH directly at any time. We will be pleased
to provide you with information about your authorised custo med dealer or
contact your authorised custo med dealer and forward your queries.
System Requirements
Operating system Windows XP (x64)
Windows Vista (x64)
Windows 7 (x64)
Windows Server 2003 (x64)
Windows Server 2008 (x64)
Windows Server 2008 R2
older versions are not supported
PC The PC hardware must meet the minimum requirements
of the operating system used.
custo diagnostic requires additional RAM (256MB).
Ensure that there is enough free hard disk space
for the custo diagnostic evaluations.
File size of the evaluations Holter ECG approx. 15 MB (max. 60 MB)
ABPM approx. 128 KB (max. 512 KB)
Resting ECG approx. 200 KB (approx. 10 sec ECG)
Stress ECG approx. 6 MB (approx. 20 min. ECG)
CPET see Stress ECG
Spirometry approx. 50 KB (max. 256 KB)
Rehab approx. 6 MB (approx. 45 min. training session)
Hardware & ports DVD or CD-ROM drive
USB ports

42
ABPM with custo screen 100/200 and custo diagnostic | GEB 0141 – DK 0953 | Version 002 – 05.06.2013 | custo med GmbH
07 Product information
Manufacturer’s Declaration – Electromagnetic Emissions
The custo screen 100/200 ABPM Recorder is designed for operation in the electromagnetic environment
stated below. The customer or user of custo screen 100/200 should make sure that it is used in such an
environment.
Manufacturer’s Declaration – Electromagnetic Immunity
The custo screen 100/200 ABPM Recorder is designed for operation in the electromagnetic environment
stated below. The customer or user of custo screen 100/200 should make sure that it is used in such an
environment.
COMMENT: UT is the net AC voltage before applying the test levels
Emission Measurements
HF emissions according to CISPR11
HF emissions according to CISPR11
Harmonics according to IEC61000-3-2
Voltage fluctuations/flickers according to IEC61000-3-3
Compliance
Group 1
Class B
non-applicable
non-applicable
Immunity Tests
Discharge of static
electricity according to
IEC 61000-4-2
Fast transient electric interference factors / bursts
according to IEC 61000-4-2
Surges according
to IEC 61000-4-5
Voltage drops, short-time
interruptions and
fluctuations in the
supply voltage, according
to IEC 61000-4-11
Magnetic field with supply
frequency (50/60 Hz)
according to IEC 61000-4-8
IEC 60601 Test Level
± 6 kV contact discharge
± 8 kV air discharge
± 2 kV for net wires
± 1 kV for input and
output wires
± 1 kV push-pull voltage
± 2 kV push-push voltage
< 5% UT for 0.5 period
(> 95% drop)
40% UT for 5 periods
(60% drop)
70% UT for 25 periods
(30% drop )
< 5% UT for 5s
(> 95% drop)
3 A/m
Compliance Level
± 6 kV contact discharge
± 8 kV air discharge
non-applicable
non-applicable
non-applicable
3 A/m
Electromagnetic Environment - Guidelines
custo screen 100/200 uses HF energy exclusively for
its internal function. For this reason its HF emission is
very low and it is unlikely that surrounding electronic
devices are being disturbed.
custo screen 100/200 is designed for the use in all
facilities including living areas and those directly
connected to public power supply providing also buildings used for living purposes.
Electromagnetic Environment - Guidelines
Floors should be made of wood or concrete or be
equipped with ceramic tiles. If the floor is provided
with synthetic material, the relative air humidity must
be at least 30 %.
The quality of the supply voltage should correspond
to the one of a typical business or clinical environment.
The quality of the supply voltage should correspond
to the one of a typical business or clinical environment.
The quality of the supply voltage should correspond
to the one of a typical business or clinical environment.
If the user of custo screen 100/200 requests continued function, also if interruptions in the energy supply
occur, it is recommended to supply custo screen
100/200 from an interruption-free power supply.
Magnetic fields with net frequency should correspond to the typical values, as they can be found in the
business and clinical environment.
07.7 Manufacturer declaration regarding EMC (electromagnetic compatibility)
according to IEC 60601-1-2:2007

43
ABPM with custo screen 100/200 and custo diagnostic | GEB 0141 – DK 0953 | Version 002 – 05.06.2013 | custo med GmbH
Manufacturer’s Declaration – Electromagnetic Immunity
The custo screen 100/200 ABPM Recorder is designed for operation in the electromagnetic environment
stated below. The customer or user of custo screen 100/200 should make sure that it is used in such an
environment.
COMMENT 1:
With 80 MHz and 800 MHz the higher frequency range is valid.
COMMENT 2:
These guidelines may not apply in every case. The propagation of electromagnetic variables is influenced by
absorptions and reflections of buildings, objects and people.
a) The field strength of stationary radio transmitters such as e. g. base stations of radio phones and mobile
transmitting stations, amateur radio stations, AM and FM broadcasting as well as television networks cannot
be exactly predetermined theoretically. In order to determine the electromagnetic environment regarding
the stationary transmitters, a study of the location should be considered. If the measured field strength ex-
ceeds the above-mentioned compliance levels at the location where the device is used, the device should
be watched in order to prove the intended functions. If unusual performance features are being observed, it
may be necessary to take additional measures, for example reorienting or relocating the device.
Immunity Tests
Conducted HF transients
according to IEC 61000-4-6
Radiated HF transients
according to IEC 61000-4-3
IEC 60601- Test Level
3 V
effective value
150 KHz to 80 Mhz
3 V/m
80 MHz to 2.5 GHz
Compliance Level
[U1] V
non-applicable
3 V/m
Electromagnetic Environment - Guidelines
Portable and mobile radio sets should not be used in
a shorter distance to the device including the leads,
than the recommended protective distance, which is
determined according to the equation of transmitting
frequency.
Recommended protective distance:
d = (3.5/U1) √P
d = (3.5/E1) √P 80 MHz to 800 MHz
d = (7/E1) √P 800 MHz to 2.5 GHz
with P as nominal power of the transmitter in Watt (W),
according to the indications of the transmitter manufacturer and d as recommended protective distance
in meters (m).
According to an examination on-site a) the field
strength of stationary radio transmitters should be
inferior to the compliance level, with regard to all frequencies.
In the vicinity of devices carrying the following symbol,
interferences are possible:

44
ABPM with custo screen 100/200 and custo diagnostic | GEB 0141 – DK 0953 | Version 002 – 05.06.2013 | custo med GmbH
07 Product information
Recommended protective distances between portable
and mobile HF telecommunication devices and custo screen 100/200
custo screen 100/200 is designed for the operation in an electromagnetic environment in which the HF
transients can be controlled. The user can help avoid electromagnetic interferences by keeping to the
minimum distance between portable and mobile HF telecommunication devices (transmitters) and the
device – depending on the initial performance of the communication device, as indicated below.
For transmitters whose maximum nominal power is not indicated in the above table, the recommended
protective distance d can be determined in meters (m), using the equation affiliated with the corresponding column. P is the maximum nominal power of the transmitter in Watt (W) according to the indications
of the manufacturer of the transmitter.
COMMENT 1:
With 80 MHz and 800 MHz the higher frequency range is valid.
COMMENT 2:
These guidelines may not apply in every case. The propagation of electromagnetic factors is influenced by
absorptions and reflections of buildings, objects and people.
Protective distance depending on the transmitting frequency in m
Nominal power
of the transmitter
W
0.01
0.1
1
10
100
150 kHz to 80 MHz
d= (3.5/U1) √P
non-applicable
non-applicable
non-applicable
non-applicable
non-applicable
80 MHz to 800 MHz
d= (3.5/E
1
) √P
0.12
0.38
1.20
3.79
12.00
800 MHz to 2.5 GHz
d= (7/E
1
) √P
0.23
0.73
2.30
7.27
23.00

45
ABPM with custo screen 100/200 and custo diagnostic | GEB 0141 – DK 0953 | Version 002 – 05.06.2013 | custo med GmbH
07.8 EC Declaration of Conformity
V001 / DK-1315 / CEK-0197
EC Declaration of Conformity
Manufacturer: custo med GmbH | Leibnizstrasse 7 | 85521 Ottobrunn, Germany
We hereby declare under our sole responsibility that the
CUSTO DIAGNOSTIC SYSTEM to which this declaration relates
is in conformity with the basic requirements according to Annex I of the Medical Device Directive
93/42/EEC. The conformity assessment procedure is based on Annex II (excluding section 4),
Medical Device Directive 93/42/EEC.
Notified body: Testing Institute of Medical Devices Graz (PMG)
Technische Universität Graz
Kopernikusgasse 24, A-8010 Graz, Austria
ID number: 0636
Certificate registration no.: EGII-130001-002-1
Date of issue Graz, 2013-04-30
Certificate expiry date Graz, 2018-04-29
CUSTO DIAGNOSTIC SYSTEM
Product Category Product Name
Medical Software custo diagnostic
ECG Systems
custo cardio 100/100 BT
custo cardio 110/110 BT
custo cardio 130
custo cardio 200/200 BT
Holter ECG Systems
custo flash 110/220
custo flash 500/501/510
custo cor 3/12
custo guard 1/3
ABPM Systems custo screen 100/200/300/400
Cardiac Rehabilitation Systems
custo care card
custo guard 1/3
Telemedical Systems
custo kybe
custo guard 1/3
Polysomnography Systems custo night 300/310
Pulmonary Function Systems
custo vit m R
custo spiro mobile
custo spiro protect
Ergometry Systems
custo ec3000
custo er2100
Ottobrunn, 04 June 2013
Peter Müller

46
ABPM with custo screen 100/200 and custo diagnostic | GEB 0141 – DK 0953 | Version 002 – 05.06.2013 | custo med GmbH
07 Product information
07.9 Putting out of operation, storage, transport
Putting out of operation and storage
Clean and disinfect custo screen 100/200 and its components before putting
it out of operation.
Make sure that the storage location is dust-free, dry and away from direct
sunlight.
Transport
Clean and disinfect custo screen 100/200 and its components before transport.
If available, use the original packaging for transport. This is a sensitive piece of
electronic equipment. If unavailable, pack the custo screen 100/200 such that
the device is protected against impact, moisture and dust.
The device must meet operation conditions when put back into operation, e.g.
operating temperature (see 07.5 Technical data ...).
Ambient conditions for storage and transport
Temperature: -20° ... +45°C
Humidity: 30 ... 80% rH
Air pressure: 700 ... 1060 hPa
07.10 Disposal
The device and all its components must be disposed of in a proper manner in
compliance with applicable regulations (that is, in accordance with the valid
laws governing waste electrical and electronic equipment). The device must
not be disposed of as normal domestic waste.
The original packing of custo screen 100/200 is recyclable
(cardboard/waste paper).

47
ABPM with custo screen 100/200 and custo diagnostic | GEB 0141 – DK 0953 | Version 002 – 05.06.2013 | custo med GmbH
custo med GmbH
Leibnizstrasse 7
85521 Ottobrunn
Germany
Phone: +49 (0)89 710 98 - 00
Fax: +49 (0)89 710 98 - 10
E-mail: info@customed.de
Internet: www.customed.de
 Loading...