

Page 1
Custom Dynamics® CCM-6 Bluetooth Remote
Installation Instructions
We thank you for purchasing the Custom Dynamics® CCM-6 Bluetooth Remote
Module. Our products utilize the latest technology and high quality components
to ensure you the most reliable service. We offer one of the best warranty programs in the industry and we back our products with excellent customer support, if you have questions before or during installation of this product please
call Custom Dynamics® at 1(800) 382-1388.
Questions? Call us at: 1 (800) 382-1388 M-TH 8:30AM-5:30PM / FR 9:30AM-5:30PM EST
06-2017
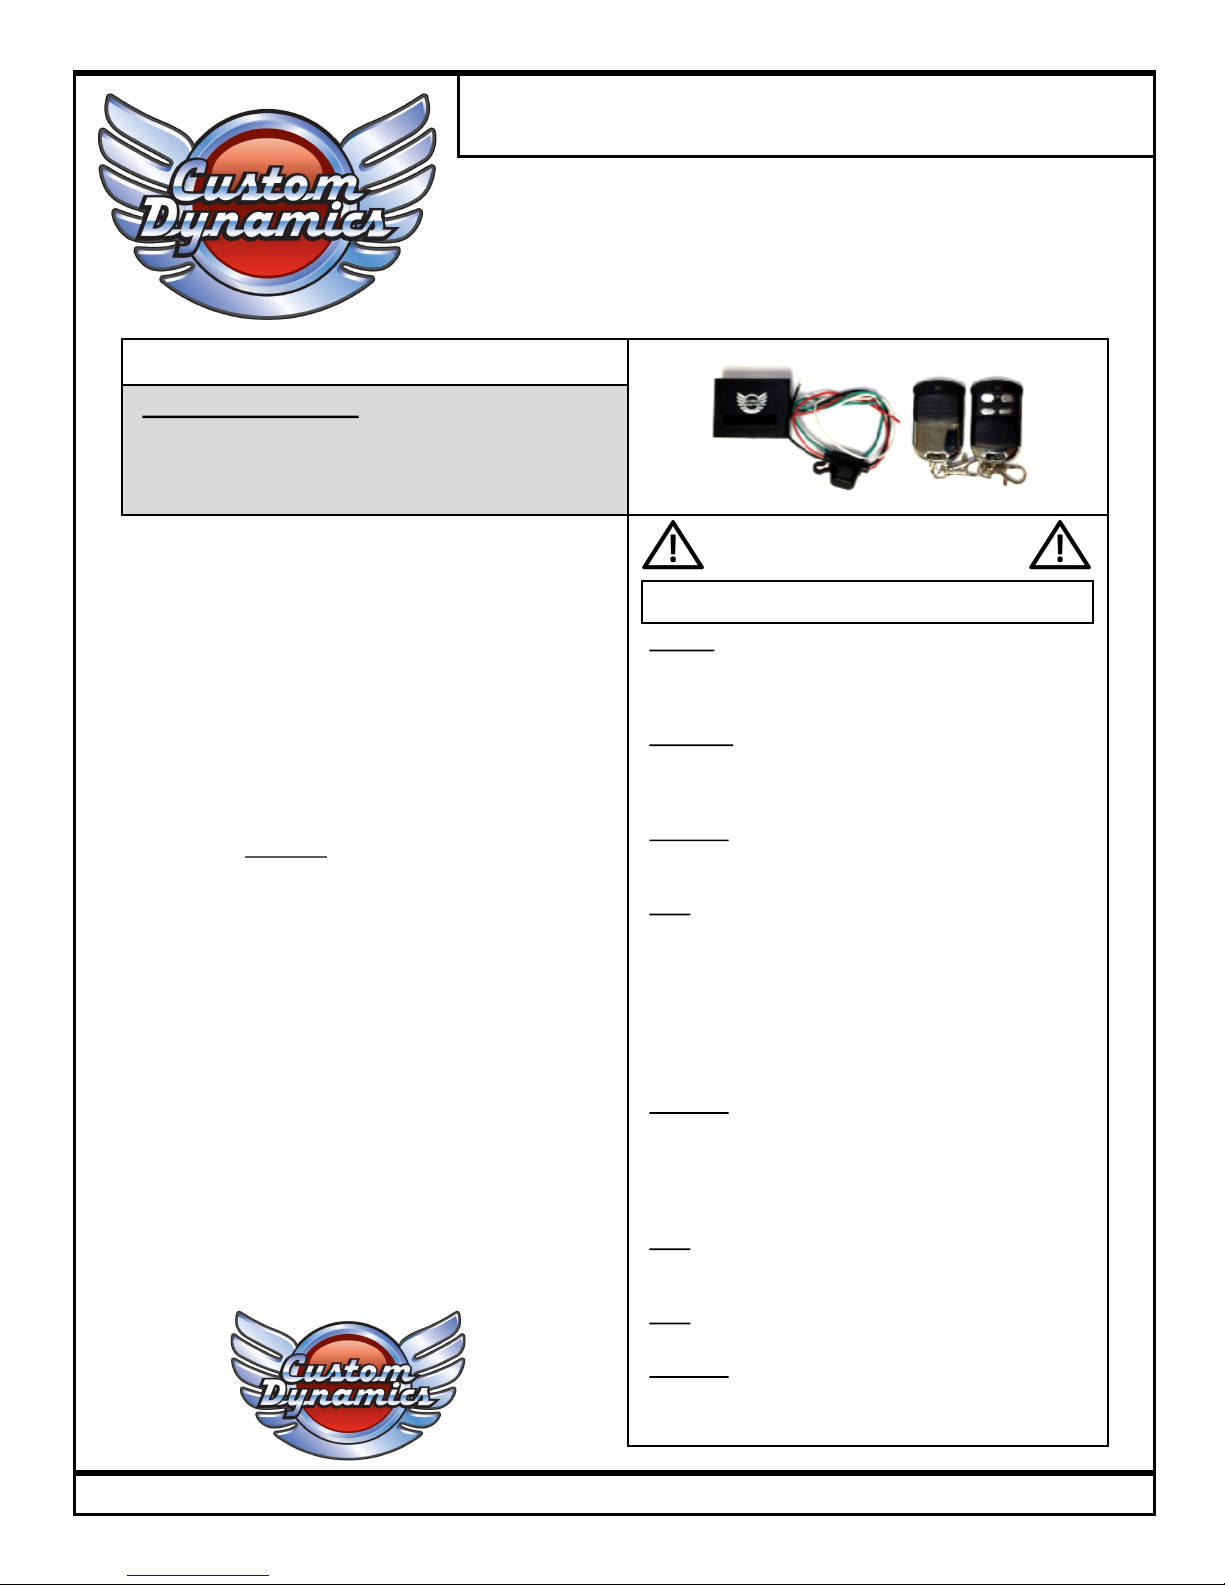
Package Contents:
- Bluetooth Remote Module (1)
- Remote Key Fob (2)
Please read all Information below before Installation
Part Number: CCM-6BT
Caution: Before beginning installation, disconnect the nega-
tive battery cable from the battery to prevent damage to the
LEDs or remote during installation. Damage to either as a
result of direct shorting is not covered under warranty.
Important: Module should only be used with Custom Dynamics® brand Magical Wizard™ LED accent lights. This
device and the LEDs used with it are not compatible with
other manufacture’s products.
Important: This unit is rated for a 7.5 amp load. Never use a
fuse greater than 7.5 amps in the in-line fuse holder, using a
larger fuse or bypassing the fuse will void warranty.
Note: Module App is Compatible with iPhone 4S and newer
equipped with Bluetooth 4.0 and with Android Phones Versions 4.3 and newer with Bluetooth 4.0. Apps available for
download from the following sources:
- Google Play: https://play.google.com/store/apps
- iTunes: https://itunes.apple.com/
Keyword Search: CCM-6BT or Custom Dynamics
Important: Module should be secured after installation in an
area away from heat, water, and any moving parts. We recommend the use of tie wraps (sold separately) to secure
wires from becoming cut, frayed, or pinched. Custom
Dynamics® is not liable for damage as a result of improperly
securing or failing to secure the remote.
Note: The functions available from the provided key fob vary
from the functions available in the Bluetooth controller.
Please read instructions completely before operating.
Note: Secondary screen functions are only accessible in F1
program on the main screen.
Important: This remote has an optional brake override safety feature on the yellow wire. If not used, wire should be
capped to prevent shorting.
Installation:
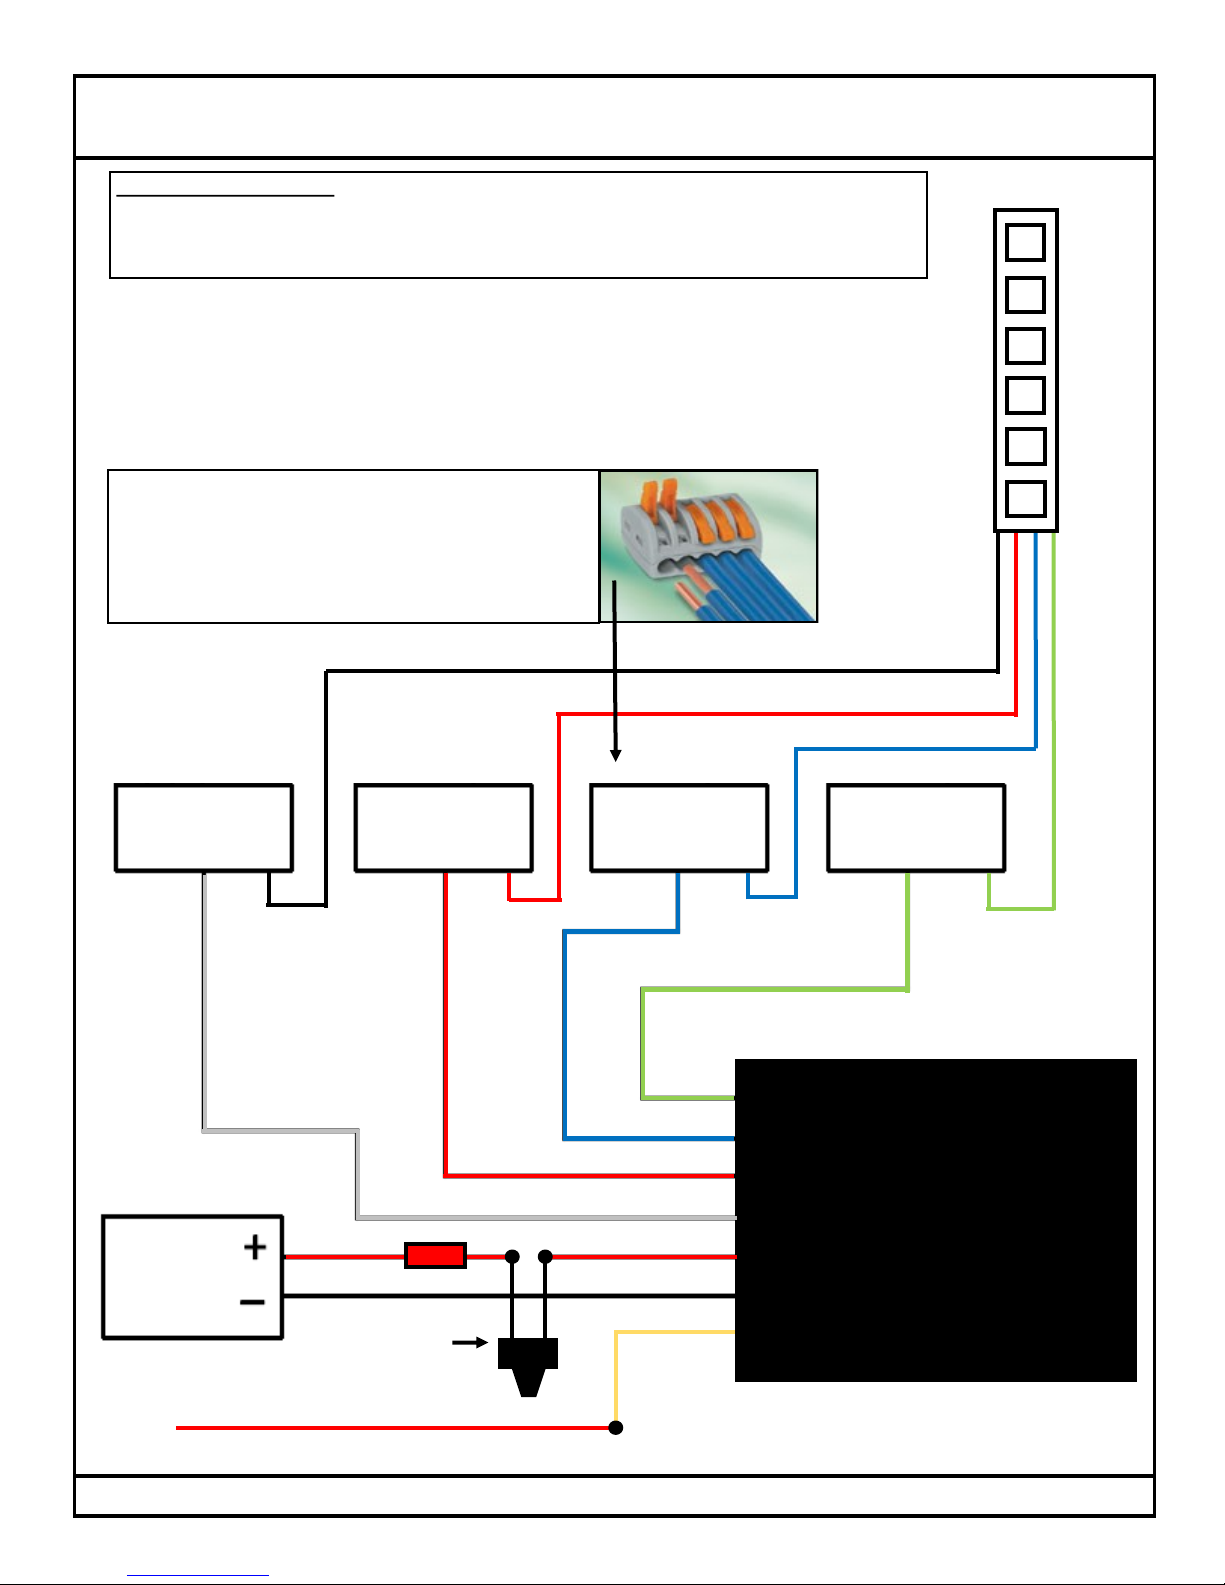
The CCM (Color Command Module) has 7 wires that connect to the battery and to the LED wiring. The Diagram on
page 2 shows how to correctly wire the remote with Custom
Dynamics® Magical Wizard™ LEDs.
For joining large quantities of wires, we recommend using
cage clamp connectors, (included with all Magical Wizard™
lighting kits). The cage clamps offer easy connection of the
LEDs to the CCM Remote. Strip back enough insulation on
the wires and terminate as follows:
1. RED wire with Fuse - Connect to the [ + ] Positive termi-
nal of 12Volt battery or power source.
2. BLACK wire - Connect to suitable ground or [ - ] Negative
terminal of 12Volt battery or power source.
3. WHITE wire - Connect to Cage Clamp #1, the BLACK
wires from the LEDs.
4. RED wire - Connect to Cage Clamp #2, the RED wires
from the LEDs.
5. BLUE wire - Connect to Cage Clamp #3, the BLUE wires
from the LEDs.
6. GREEN wire - Connect to Cage Clamp #4, the GREEN
wires from the LEDs.
7. YELLOW wire - (Optional) Connect to the vehicle brake
wire to enable brake mode. Lights will change to Red
when brake is engaged, then return to normal program
function when released. (See more next page)
ATTENTION
Page 2
Installation Instructions - Page 2
Questions? Call us at: 1 (800) 382-1388 M-TH 8:30AM-5:30PM / FR 9:30AM-5:30PM EST
06-2017
Cage Clamp #1
Black Wires From
LEDs
Cage Clamp #2
Red Wires From
LEDs
Cage Clamp #3
Blue Wires From
LEDs
Cage Clamp #4
Green Wires From
LEDs
12V Battery
Black
Red/fuse
White
Orange
Blue
Green
CCM Remote
LED
LED
LED
Fuse
Switch
Custom Dynamics®
CCM
CCM Remote
Controller
Magical Wizard™
4 Wire LED Pod
Black
Red
Blue
Green
Winter Kill Switch
(sold separately)
LED Positive Power [ + ]
Red LED Negative [ - ]
Blue LED Negative [ - ]
Green LED Negative [
- ]
Red
Custom Dynamics®
CCM-6BT
For joining large quantities of wires, we recommend using cage
clamp connectors (included with all Magical Wizard™ lighting kits).
The cage clamps offer easy connection of the LEDs to the CCM
Remote. Strip back enough insulation on the wires and follow the
diagram below.
Yellow
Vehicle Brake Wire (Optional)
8. Once wiring is completed, clean up installation and secure the module.
9. Re-connect the negative battery terminal, then use the Key Fob to test the
LEDs. See page 3 for Key Fob features.
Installation Continued
Brake Mode Important Notes: The Brake mode will interrupt the light programming and change to red when the
brake is applied. Brake function will function on lighting system even if lights are off, a Kill switch is recommended. Do NOT wire in after a Magic Strobe brake flasher, to prevent accent lights from flashing during braking. If
you decide not to use this feature, disconnect the wire and cap off to prevent shorting.
Page 3
Instructions - Page 3
Questions? Call us at: 1 (800) 382-1388 M-TH 8:30AM-5:30PM / FR 9:30AM-5:30PM EST
06-2017
Receiver
Power: 12V/7.5A Fused
Transmitter/Key Fob:
Distance: Up to 50 Meters (clear line of sight)
Antenna: Internal
Power: 12V/10MA
Batteries: (2) CR2016 Coin Cell
Bluetooth Module:
Distance: Up to 50 Meters (clear Line of sight)
Antenna: Internal
Power: 12V
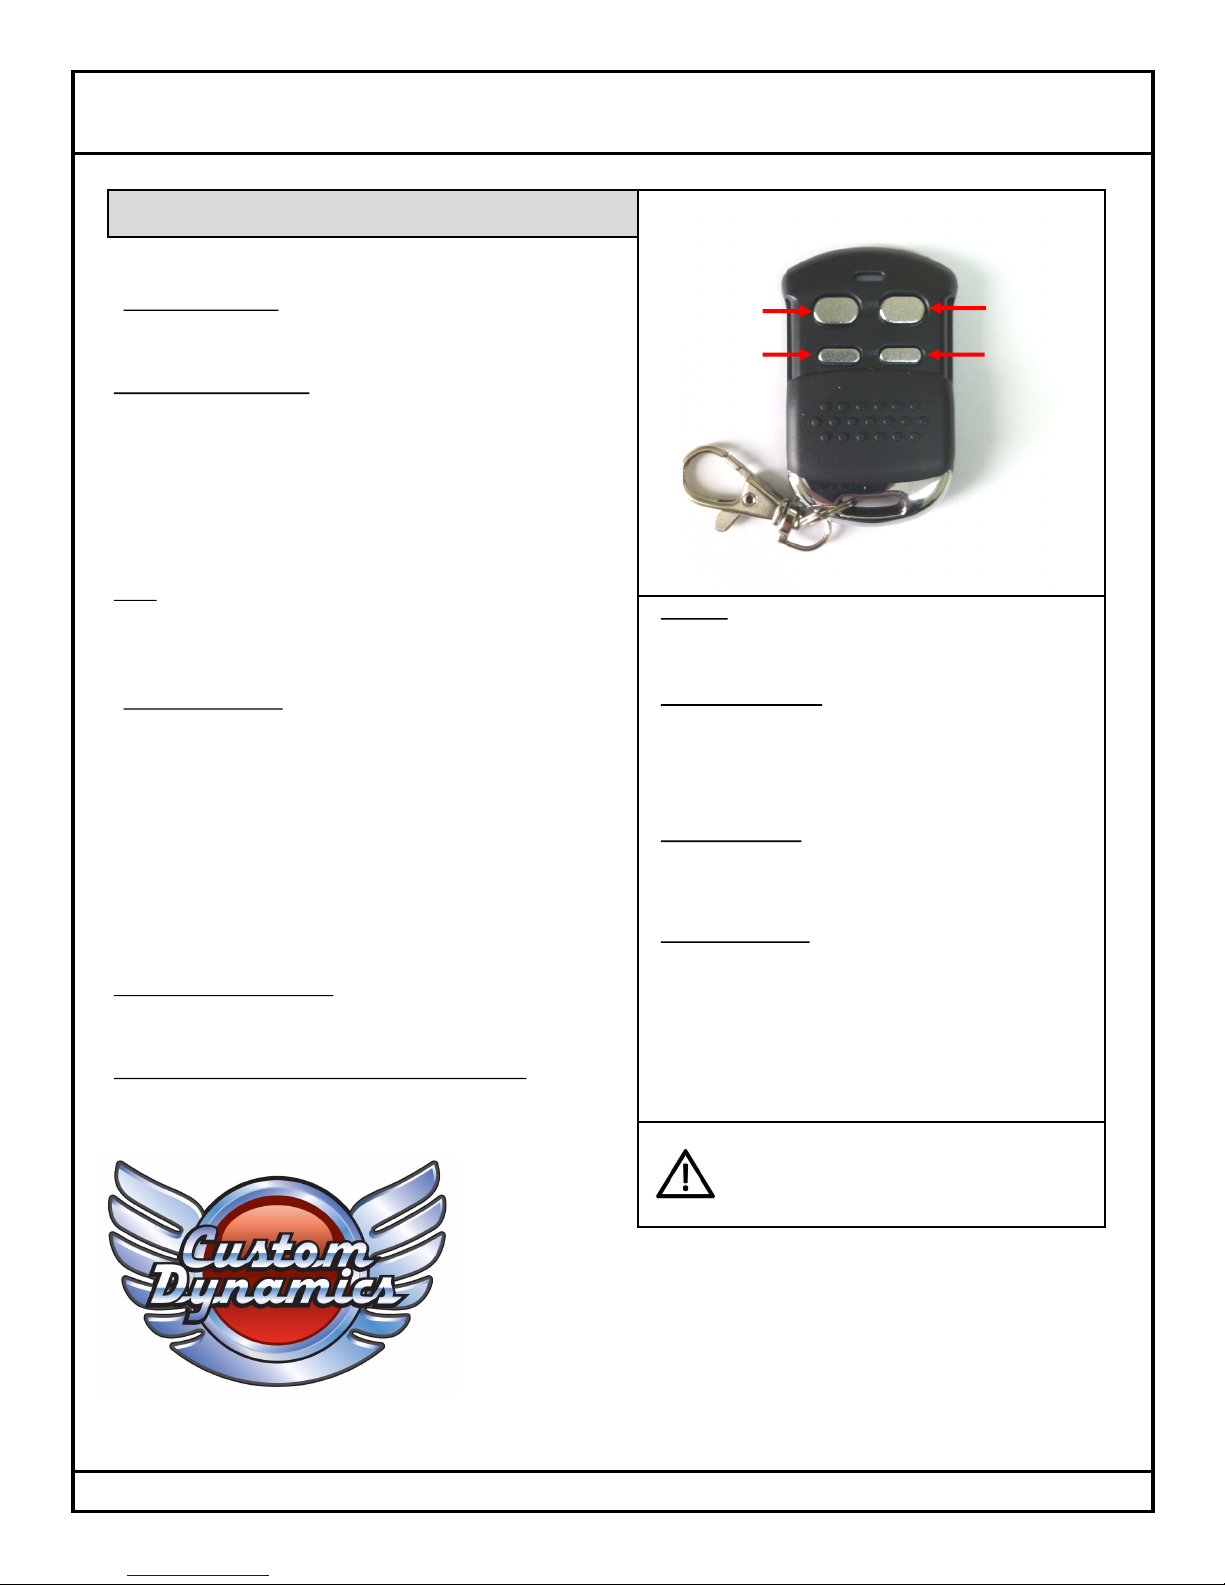
Button [1]
Button [2]
Button [3]
Button [4]
CCM-6BT Key Fob Features:
Button [1] - 7 Preset Colors/Timer Mode
- Press to turn lights on.
- Press repeatedly to cycle through 7 different pre-programmed
colors.
Enter 2 Hour Timer Mode:
- Select your desired program settings
- Then Press button [1] down and hold:
The lights will blink white and will then return to their previous function for 2 hours. At the end of the time limit, the lights will shut off
automatically. Do not change program or touch any buttons as this
will cancel the timer. Time cannot be adjusted. To turn timer function off, hit any button on the key fob and/or turn the lights off.
Note: The use of the App controller gives you more time duration
setting options, see page 6 for details.
Button [2] - Color Morphing Modes
- Press to turn lights on.
- Pressing repeatedly cycles through 3 “Color Morphing” mode
speeds (changes color automatically)
- Press button [4] to stop on custom color.
- Press button [2] again to resume color morphing mode.
Button [3] - Strobe/Breathe Functions
(After button [1] or [2] is pressed first to turn lights on preset colors)
Press repeatedly to cycle through:
- 3 Strobe effects patterns
- 3 Breathe effect speeds
Button [4] - Off /Memory
During “Color Morphing” effect:
- Press once to pause on any desired color of your choice
- Press again to store your color and turn off the lights
- Press again to turn lights back on and resume custom color
During Manual color change, “Strobe” or “Breathe” effects:
- Press once to save function and turn lights off
- Press again to turn on and resume color or effects.
Custom Dynamics® is proud to offer a 3 year
warranty on your new remote. Contact us for
details.
Everything to Light Up Your Ride®
Note: Never use a fuse greater than
7.5 amps in the in-line fuse holder,
using a larger fuse will void warranty.
CCM6-BT Features:
- Built-in Short Circuit Protection
- Memory Save
- Timer Function
- Brake Override
- Voltage Meter/Battery Status
- Color Mixer
- Custom Sequence
- Custom Color Wheel
Page 4
Questions? Call us at: 1 (800) 382-1388 M-TH 8:30AM-5:30PM / FR 9:30AM-5:30PM EST
Bluetooth Color Command Module 6 V1.0 Connection Instructions
1. Make sure there is power going to the Remote Module.
2. Download the phone App for the appropriate operating system. Follow the prompts on device. Consult the Phone manufacturer
if unsure of this process. Keyword Search: CCM-6BT or Custom Dynamics.
Note: Remote should be synced through the app only, do not attempt to manually pair devices through the device settings.
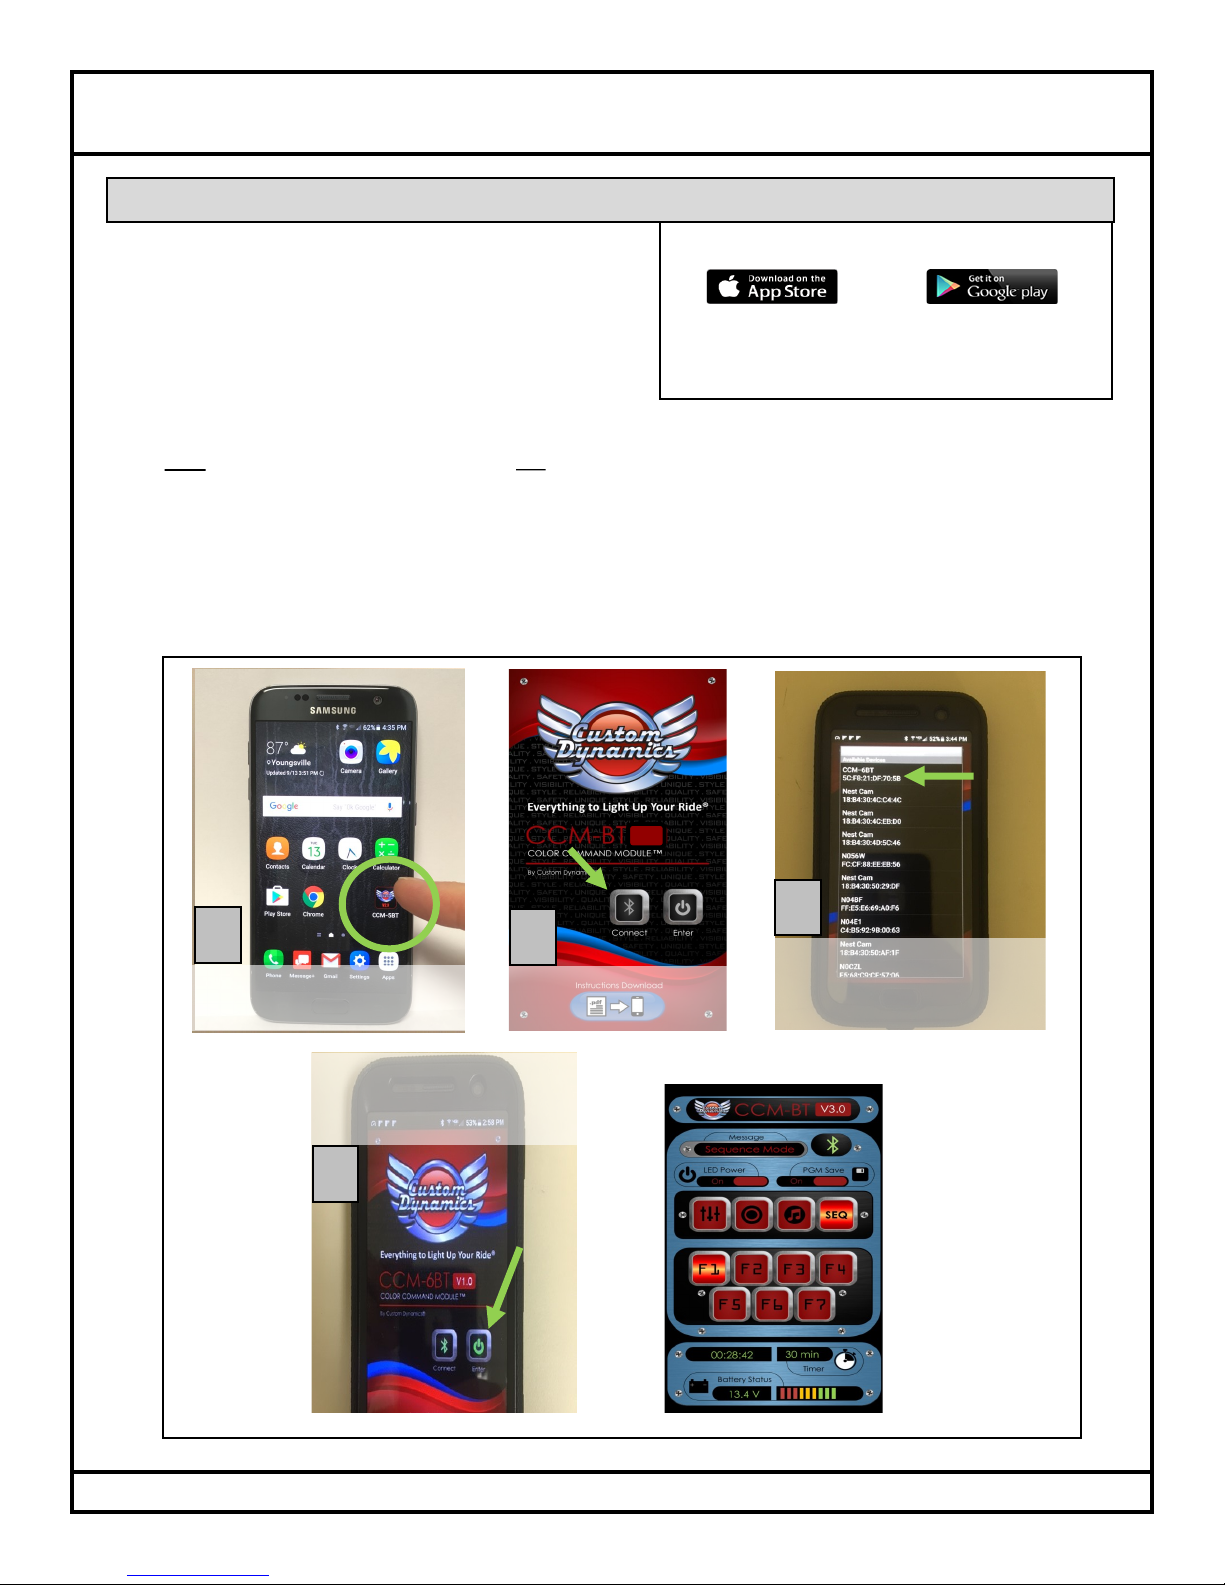
3. Open the App by touching the logo application icon, then sync the app to the receiver by tapping the “Scan” button. A list of Bluetooth devices should pop up. Find the “CCM-6BT” device in the list and tap to select. The application will confirm the connection. If
the message reads connection failed or Disconnected, try the sync again. If remote does not show up in the list of devices or has
trouble connecting, try rebooting the phone, then check to make sure Bluetooth function is enabled. Also, verify that power is getting to the remote module.
4. Turn on the Lights with the interface by tapping the “On” button. When activated, the button will change color from black to red.
The “F1” button will also change to red to indicate function 1 - Single Color control is activated.
Open the app located in the
“APPS” section of phone.
1
3
Touch the Connect button.
2
A list of available devices will be
displayed. Tap the screen to se-
lect the CCM-6BT.
V1.0
Press the green Enter button
4
Operations screen
Instructions page 4
Get more control from your Magical Wizard™ LED lights with the
Color Command Module Bluetooth controller. The new app has enhanced features, improved connectivity and faster response. This
easy to use interface gives you more color
control options and function combinations than any other remote
on the market. See below for touch screen features.
Compatible with iPhone 4S and newer equipped with Bluetooth 4.0
and with Android Phones Versions 4.3 and newer with Bluetooth 4.0.
Keyword Search: CCM-6BT or Custom Dynamics®
App instructions available at: www.customdynamics.com
06-2017
Page 5
Instructions Page 5
Questions? Call us at: 1 (800) 382-1388 M-TH 8:30AM-5:30PM / FR 9:30AM-5:30PM EST
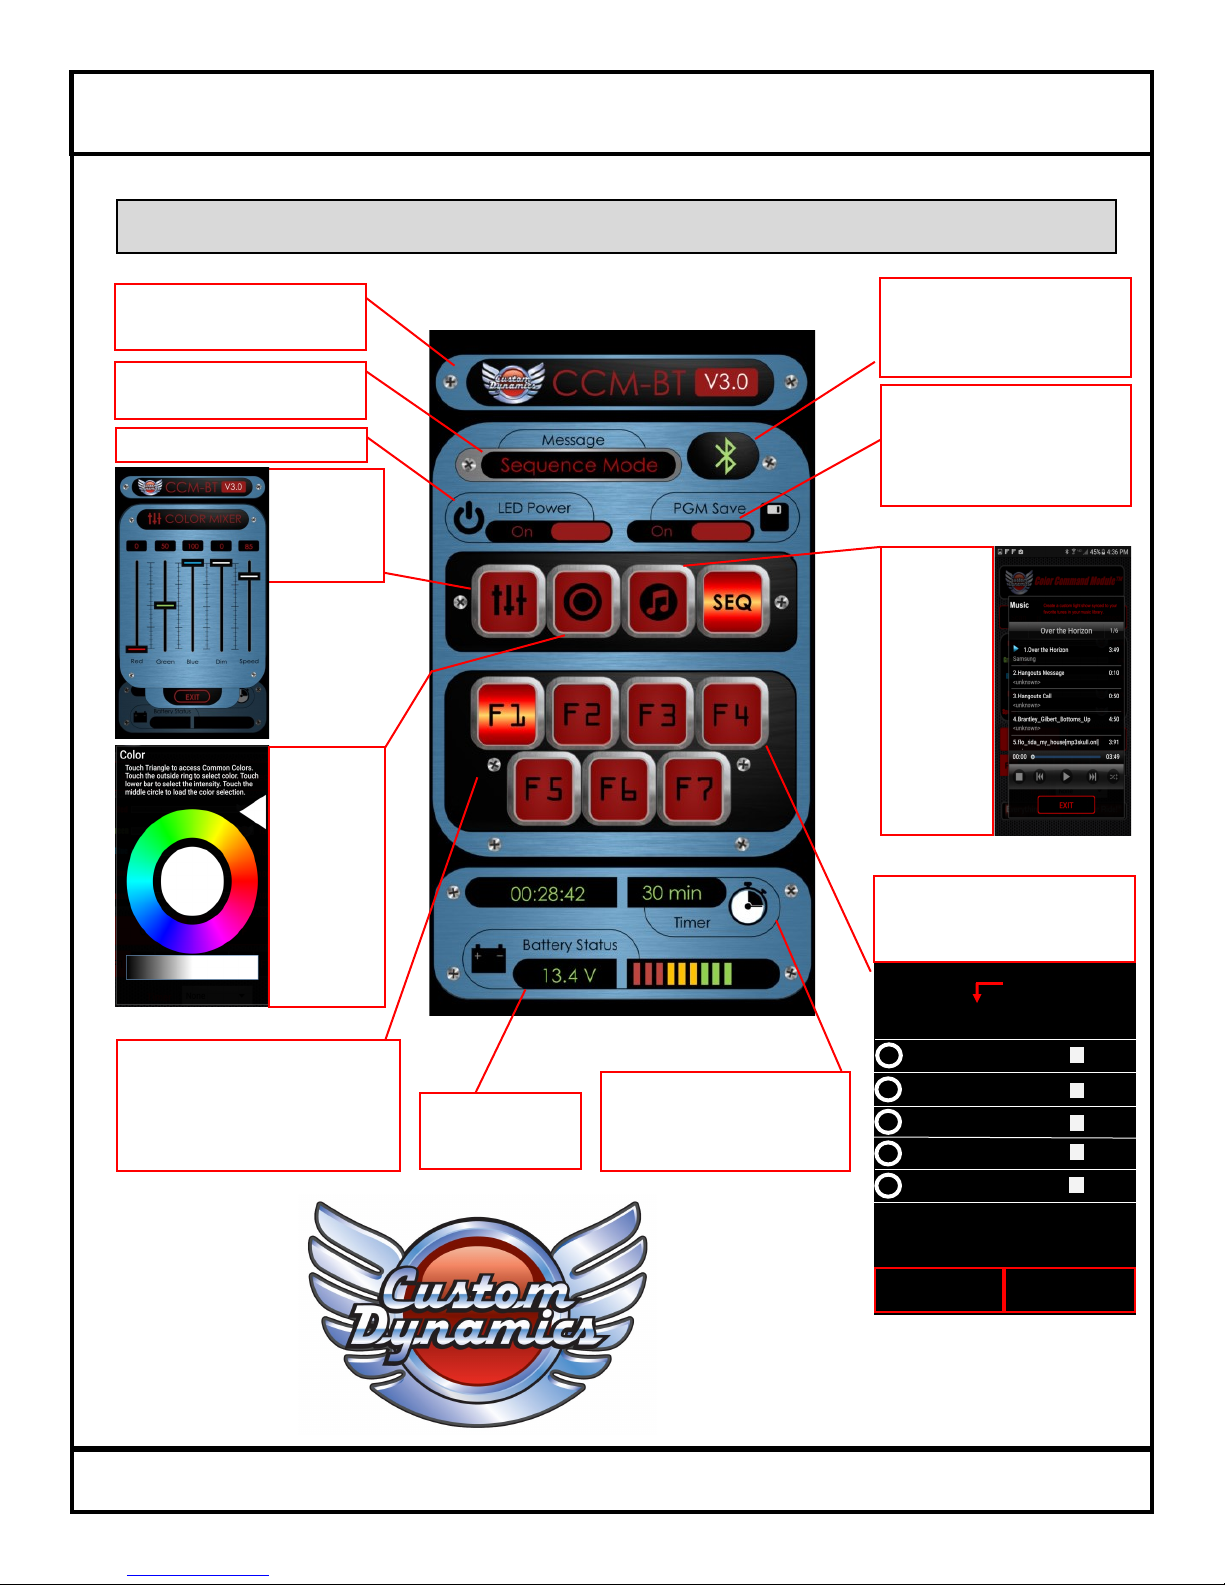
Bluetooth Color Command Module 6 V1.0 Operations Screen
LED Power. On/Off slider
Color Mixer.
Colors can be
selected with
function buttons
F1, F2, and F3.
Function Buttons: 7 Different Function
programs to choose from. Active
function is illuminated.
Timer Function: Allows users to
set lights while parked and walk
away. Timer durations are
30/60/120 minute intervals.
Program (PGM) Save button.
Allows user to save all settings
last used on Control Screen
when app is turned off or disconnected.
Battery status: Indicates voltage level
of the bike’s battery.
Color Wheel
selection mode
lets user choose
color, then load
the selection
into the main
screen
program. Can
be used with
function buttons
F1, F2 and F3.
Music Play
Interface allows
users to play
custom color
sequences
synchronized to
their favorite
songs from
their phone’s
music library.
Can be used
with function
buttons F1, F4
and F7.
Message screen indicates what
mode/function you are using.
Bluetooth On/Off button and
connection indicator. It will illuminate green when connected to
Bluetooth
Custom Create Sequences
Run
Run
Run
Run
Sequence 5
Run
EXIT SAVE
Sequence allows selection of custom
colors set to 4 different Modes.
Breathe, Strobe, Solid and Color
Morph. See page 6.
Sequence 4
Sequence 3
Sequence 2
Sequence 1
Title Bar. Press the bar to access
Technical support Screen. See next
page.
06-2017
Page 6
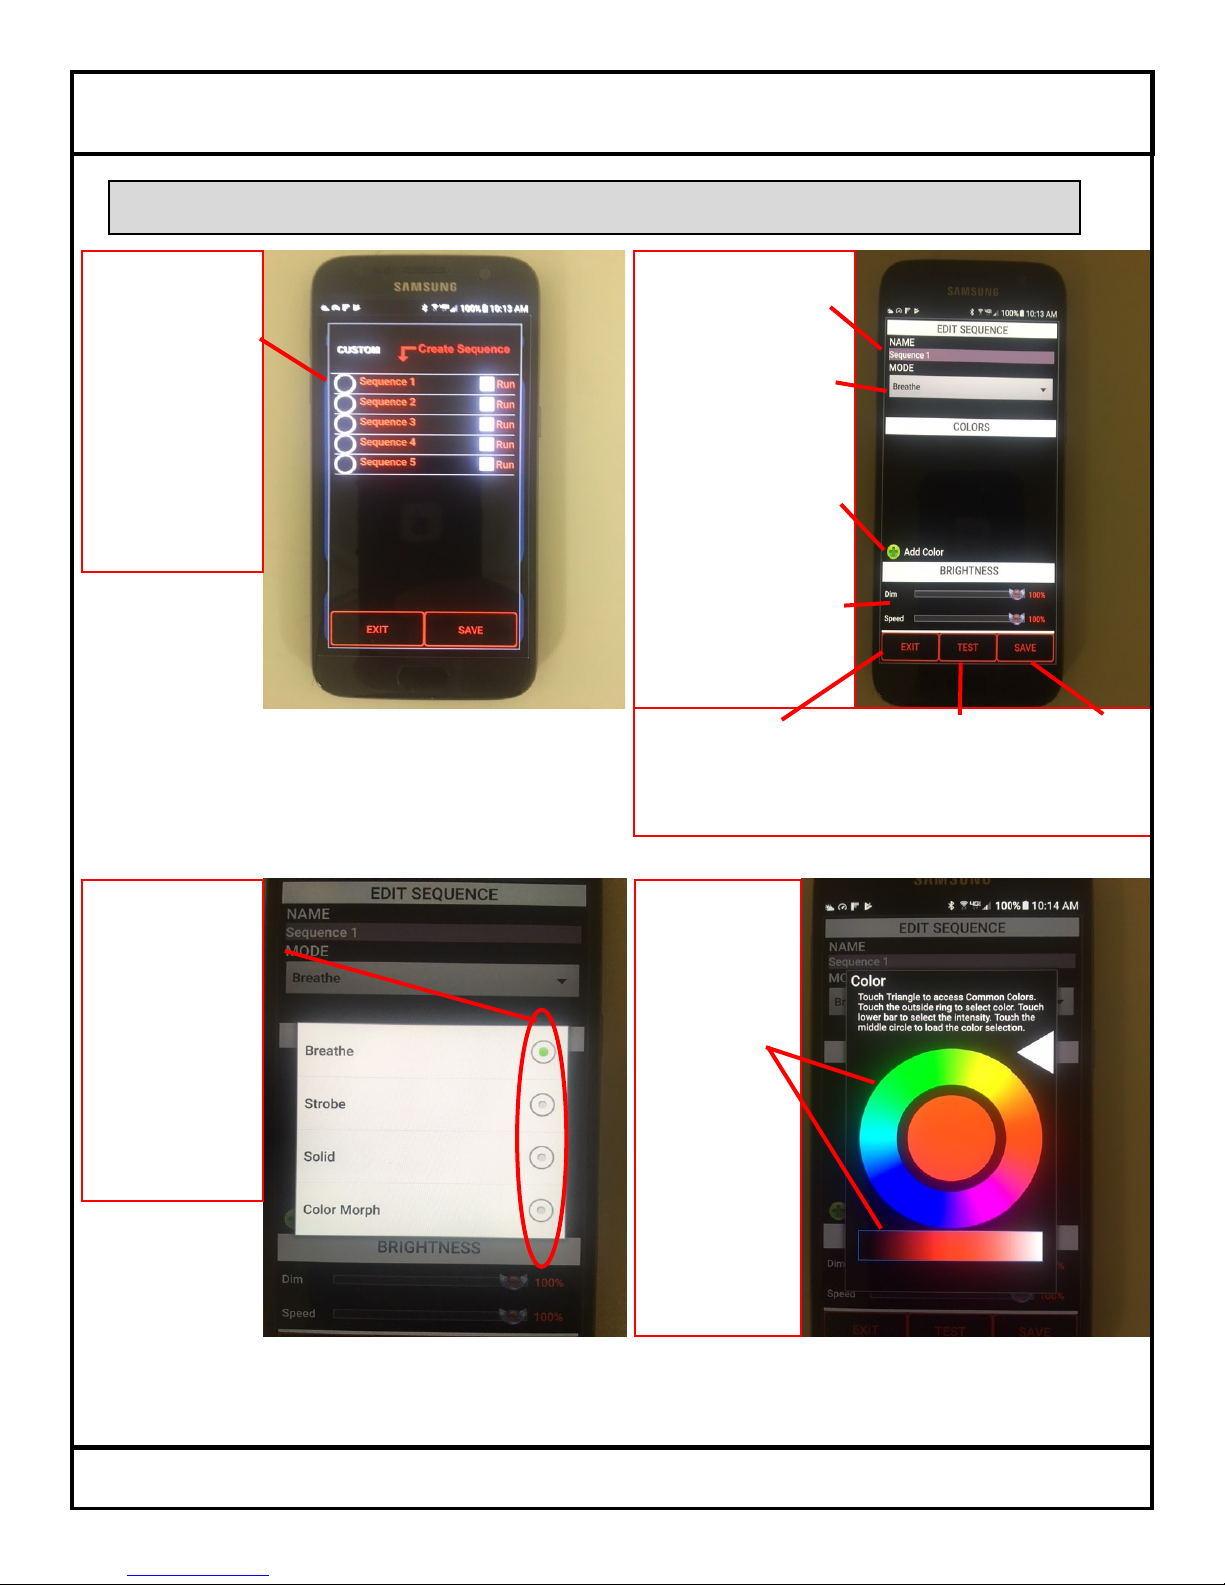
Create Sequence
Screen
Touch the circle next
to the sequence
number to enter the
EDIT SEQUENCE
screen
Instructions Page 6
Bluetooth Color Command Module 6 V1.0 Create Sequence Screen
EDIT SEQUENCE
Create sequence name.
Touch the MODE indicator space to enter the
Mode select screen.
Touch Add Color to enter
the Color Wheel and select colors.
Use sliders to adjust
brightness and Speed of
the sequence.
MODE Select
Screen
Select the desired
mode by touching
the indicator.
Choose from:
Breathe
Strobe
Solid
Color Morph
Color Wheel
Touch the outer
color wheel or the
color rectangle to
choose a color.
The color will fil
the center of the
wheel.
Touch the center
wheel to save the
selected color to
the sequence.
Select up to 10
colors for each
sequence.
Touch the EXIT
space to return to the
Create Sequence
Screen.
Touch the TEST
space to test
your created
sequence.
Questions? Call us at: 1 (800) 382-1388 M-TH 8:30AM-5:30PM / FR 9:30AM-5:30PM EST
06-2017
Touch the SAVE
space to save
your created sequence.
Page 7
Instructions Page 7
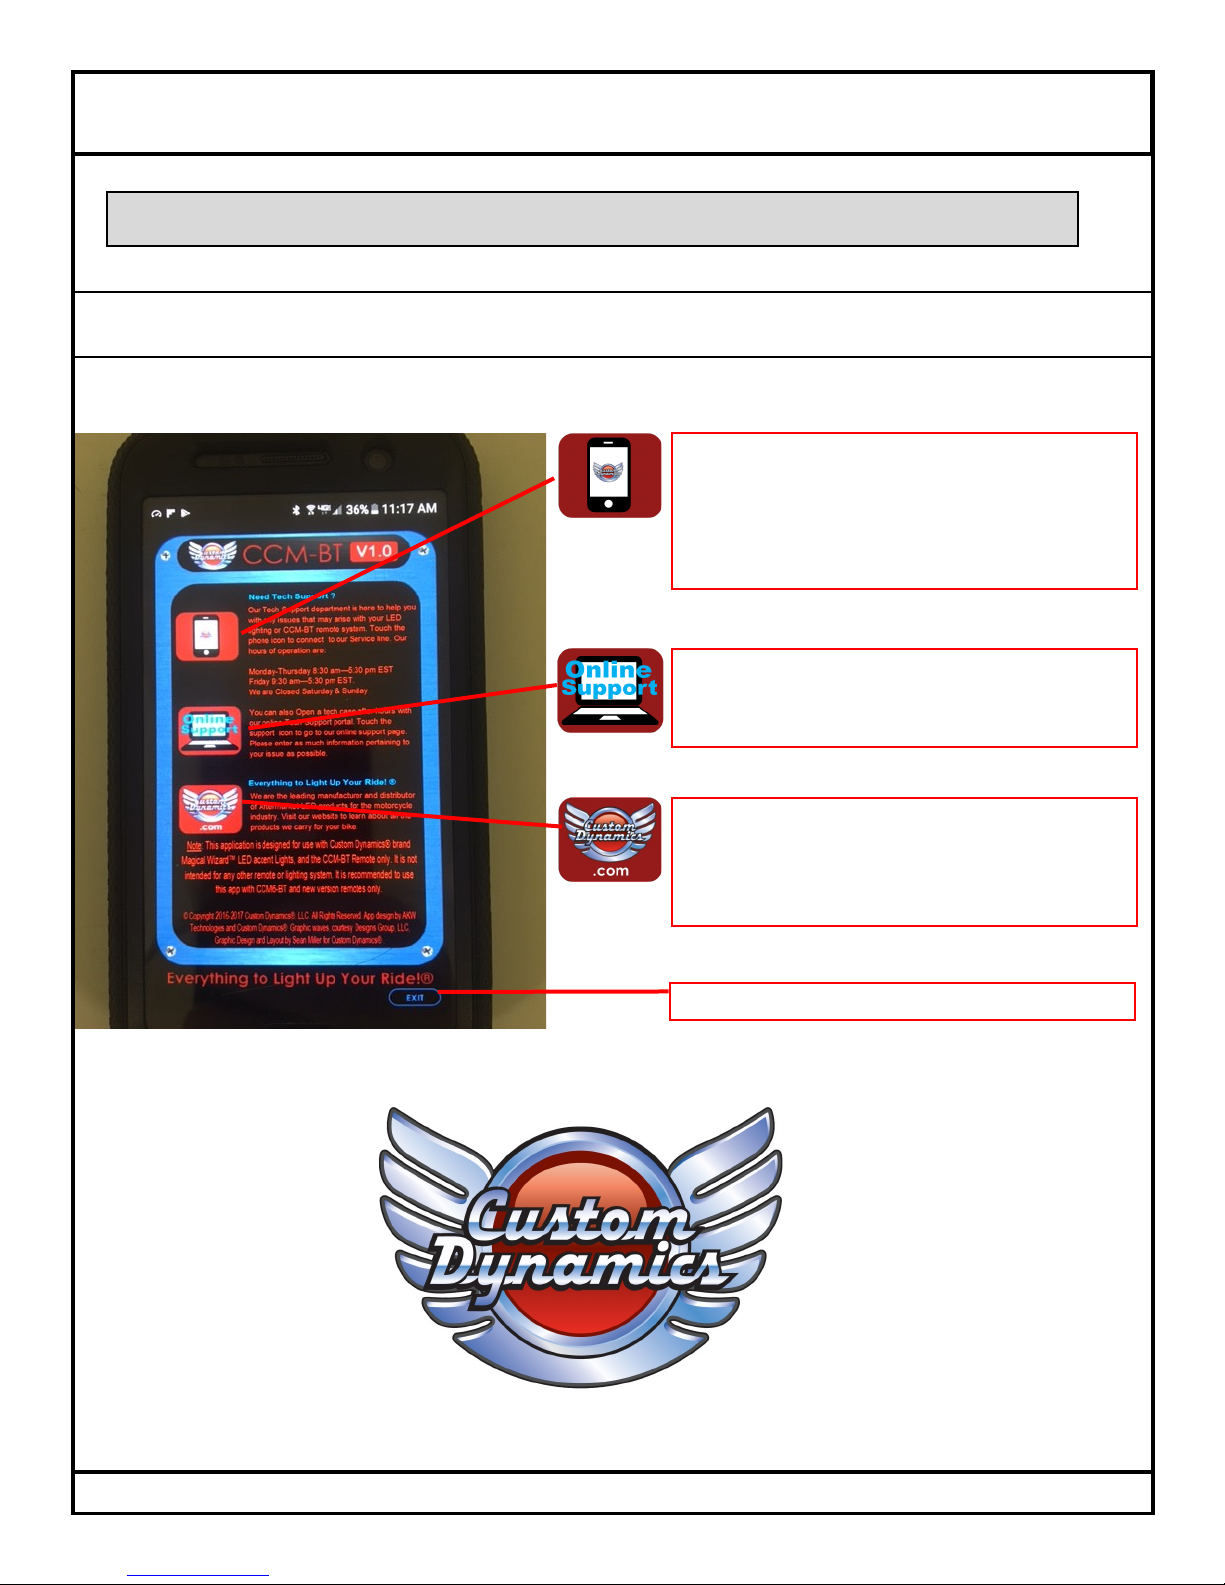
Bluetooth Color Command Module 6 V1.0 Technical Support Screen
Our Technical Support department is here to help you with any
issues that may arise with your LED lighting or CCM-6BT remote system. Touch the phone icon to connect to our Service
line. Our hours of operation:
Monday-Thursday 8:30am– 5:30pm EST
Friday 9:30am-5:30pm EST
We are closed Saturday and Sunday.
The Technical Support screen gives you the ability to quickly access our Technical Support team by telephone, online support and our
website with the touch of your finger.
You can also open a technical support case after hours with
our Online Technical Support portal. Touch the support icon to
enter the online support page. Please enter as much information pertaining to your issue as possible.
Everything to Light Up Your Ride! ®
We are the leading manufacturer and distributor of Aftermarket
LED products for the motorcycle industry industry. Visit our
website to learn about all the products we carry for your bike by
touching the Custom Dynamics® icon.
Exit button takes you back to the Operation Screen
Questions? Call us at: 1 (800) 382-1388 M-TH 8:30AM-5:30PM / FR 9:30AM-5:30PM EST
06-2017
 Loading...