

Page 1

Figure #3
Two screws for
mounting CMP
Attaching your camera to the CMP
Camera with add on vertical grips or battery packs
Remove the anti-twist posts using the Allen
wrench (5/64”) provided with the bracket. Refer
to picture at the top of this page (gure #4).
2 -
Attach your camera with lens toward vertical plate. Once the “D” style camera screw is tightened,
loosen 1/2 turn.
Turn the adjusting screw counterclockwise with a Phillips screwdriver to move the camera screw
plate forward until the camera touches the vertical plate. Then turn an additional 1/4 turn.
Tighten the “D” style camera screw completely.
4 -
5 -
6 -
Remove the “D” style camera screw and install from opposite side as shown.
3 -
Camera without add on vertical grips or battery packs
Attach your camera with lens toward the
anti-twist posts. Once the “D” style camera
screw is tightened, loosen 1/2 turn (gure #2).
Turn the adjusting screw counterclockwise using a Phillips screwdriver to move the camera
screw plate forward until the camera touches one of the anti-twist posts. Then turn an additional
1/4 turn (make sure camera is facing straight forward).
Tighten the “D” style camera screw completely.
Camera screw plate
Adjusting Screw
“D” style camera screw
Vertical plate
2 -
3 -
4 -
(2) Anti-twist posts
Loosen second anti-twist post (if it is not touching the camera) using the same Allen wrench
(5/64”) and move it until it touches the camera and then tighten.
5 -
Attach the camera plate (CMP) to the bracket
using the two screws (8-32 threads x 1/2” long
socket head) and Allen wrench (5/64”) supplied
with your bracket (gure #1).
1 -
Figure #1
Two screws for
mounting CMP
Camera screw plate
Adjusting Screw
“D” style camera screw
Attach the camera plate (CMP) to the bracket
using the two screws (8-32 threads x 1/2” long
socket head) and Allen wrench (5/64”) supplied
with your bracket (gure #3).
1 -
Figure #2
Figure #4
Yuri Arcurs SteadyPod
BRACKET INSTRUCTIONS
phone 800.530.2289
website: www.steady-pod.com
email: info@custombrackets.com
32 Alpha Park
Cleveland, Ohio 44143
Made in USA
U.S. Patent 6,354,544
Attaching the camera quick release (QR-C kit, QR-C, C-SP)
Attach the camera quick release (QR-C) to the bracket using the two screws (8-32 thread x 1/2” long
socket head screw) and Allen wrench (5/64”) supplied with your bracket (gure #5)
C-SP attached to CMP
for tall cameras and
cameras with vertical
grips / battery packs
C-SP attached to CMP
for short cameras and
cameras without vertical
grips / battery packs
Figure #6
Figure #7
Figure #5
Push bar
2 - Slide C-SP in
from above
1 - Push the
push bar in
Attaching the camera bottom plate (CBP)
Attach the camera bottom plate (CBP) to the CMP using the two screws (8-32 threads x 1/2” long
socket head screw) supplied with your CBP and Allen wrench (5/64”) supplied with your bracket.
Figures #8 and #9 are showing the CMP up-side-down with the CBP attached
CBP attached
to CMP for tall
cameras and
cameras with
vertical grips /
battery packs
CBP attached
to CMP for short
cameras and
cameras without
vertical grips /
battery packs
Figure #8
Figure #9
CMP
CBP
Two screws for
mounting CBP
Attach the camera subplate (C-SP) to the camera mounting plate (CMP) using the two screws
(8-32 threads x 5/16” long socket head screw) supplied with the C-SP and Allen wrench (5/64”)
supplied with your bracket per either gure #6 or #7.
Attach your camera per the CMP instructions.
While pushing in the push bar on the QR-C (step 1 in gure #5), slide the C-SP (attached to the CMP)
downwards into the QR-C (attached to the bracket) (step 2 in gure #5). The push bar on the QR-C
needs to be pushed in when attaching and detaching the C-SP.
Attaching the bracket to the tripod quick release (QR)
Figure #10
Figure #11
Attach the bracket to the QR by pushing in the push bar (step 1 in gure #10), and while
holding the push bar in, slide the bracket into the QR from the front (step 2 in gure #10).
Figure #11 shows the bracket in the quick release.
QR
2 - Slide bracket in
from front side
1 - Push in the
push bar
Push Bar
Page 2
Quick Release
push bar
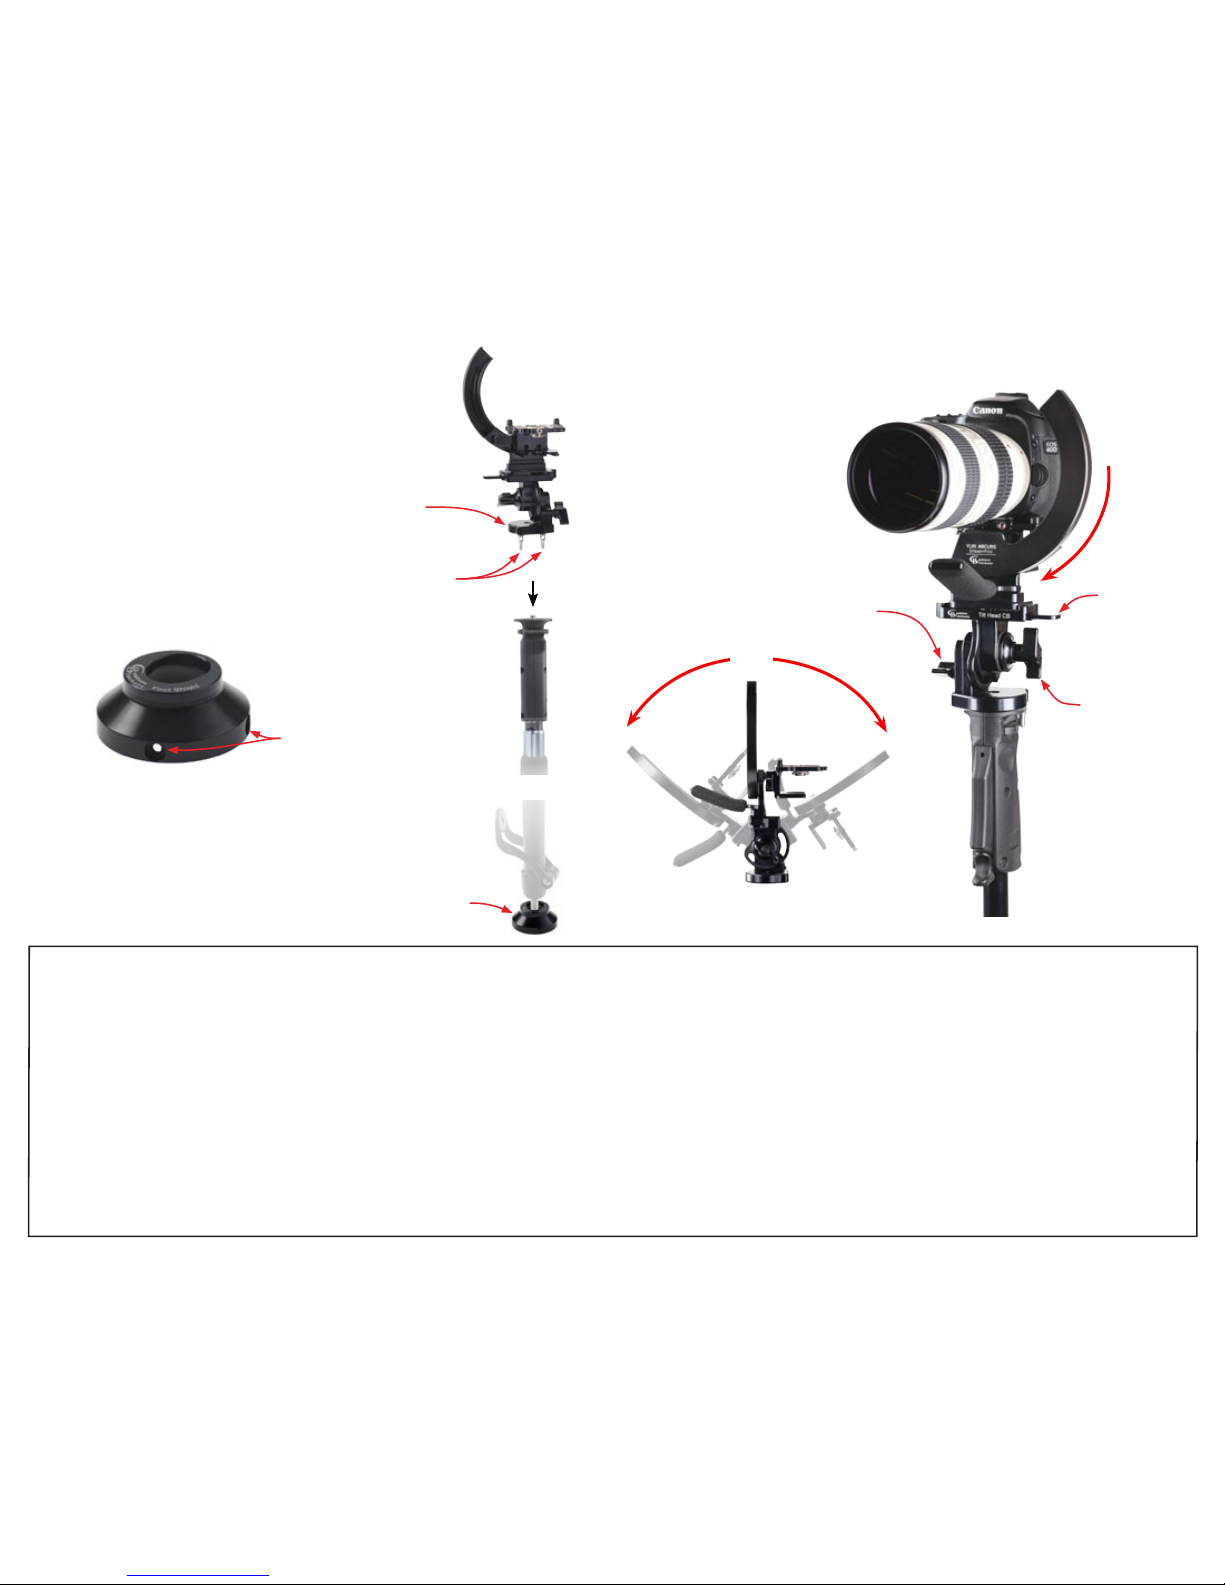
Tilt lock knob
Rotate knob
counter-clockwise
to tighten
Tilt drag knob
Rotate to
vertical
Base
(4) Retaining screw
locations
Place the base on the monopod’s ⅜”-16
mounting stud and screw it into the base
until it is rmly attached.
* * * * *
Caution
* * * * *
If you choose to use a monopod with a ¼”
mounting stud, you will need to purchase
a ⅜” to ¼” reducer bushing and install it in
bottom of SteadyPod’s base.
If you choose not to use the Manfrotto 685B
NeoTec monopod, you must unscrew and
remove the (2) monopod anti-twist posts.
Attaching the SteadyPod
to a monopod
For a period of ve (5) years from date of purchase, Custom Brackets will repair or replace free of charge, any defect in material or workmanship. Warranty does not cover repairs due to abuse, negligence, impact or any
modications made by the customer. Excessive force unscrewing knobs will void warranty. Warranty service is available by returning the SteadyPod (shipping prepaid) to Custom Brackets. All returns must include a return
authorization (RA) number (contact Custom Brackets to obtain), letter explaining the problem, and a copy of the sales receipt. Contact Manfrotto for Manfrotto 685B monopod warranty.
USA 5 Year Warranty
Repair service is available by returning the SteadyPod (shipping prepaid) to Custom Brackets. All returns must include a return authorization (RA) number (contact Custom Brackets to obtain), letter explaining the problem, and
a copy of the sales receipt. A repair cost will be issued and must be approved prior to any repairs. Shipping charges are the responsibility of the customer.
Repair
The SteadyPod is designed completely maintenance-free. The bearing rotation tension is factory set. Attempting to adjust the tension will void the warranty and may result in damage to the camera.
Maintenance
For a period of ve (5) years from date of purchase, Custom Brackets will repair or replace free of charge, any defect in material or workmanship. Warranty does not cover repairs due to abuse, negligence, impact or any
modications made by the customer. Excessive force unscrewing knobs will void warranty. Limitation to the warranty - after year one shipping charges are not covered. Warranty service is available by returning the
SteadyPod (shipping prepaid) to Custom Brackets. All returns must include a return authorization (RA) number (email info@custombrackets.com to obtain), letter explaining the problem, and a copy of the sales receipt.
Contact Manfrotto for Manfrotto 685B monopod warranty.
International 5 Year Limited Warranty
The SteadyPod has many unique features. It is constructed from anodized aircraft aluminum for a lightweight, scratch-resistent nish. The tilt head has separate lock and drag knobs for better control and are captive to prevent
loss. All of the fasteners are made from stainless steel to resist corrosion and black oxided for appearance. The monopod base has (2) removable anti-twist posts designed to t the Manfrotto 685B NeoTec monopod.
SteadyPod Facts
Attaching the Foot Shield
to the Manfrotto monopod
- - - SteadyPod Features - - -
(2) Monopod
anti-twist posts
The Foot Shield is shipped assembled to
the monopod.
If removal is necessary, remove the (4)
retaining screws and slide the Foot Shield
up, then remove the rubber foot followed by
the Foot Shield.
Assemble in reverse order. Make sure that
the rubber foot sticks out evenly from the
Foot Shield.
Foot Shield
Tilt
Side view of Tilt Head and
Digital PRO-SV
 Loading...