

Page 1
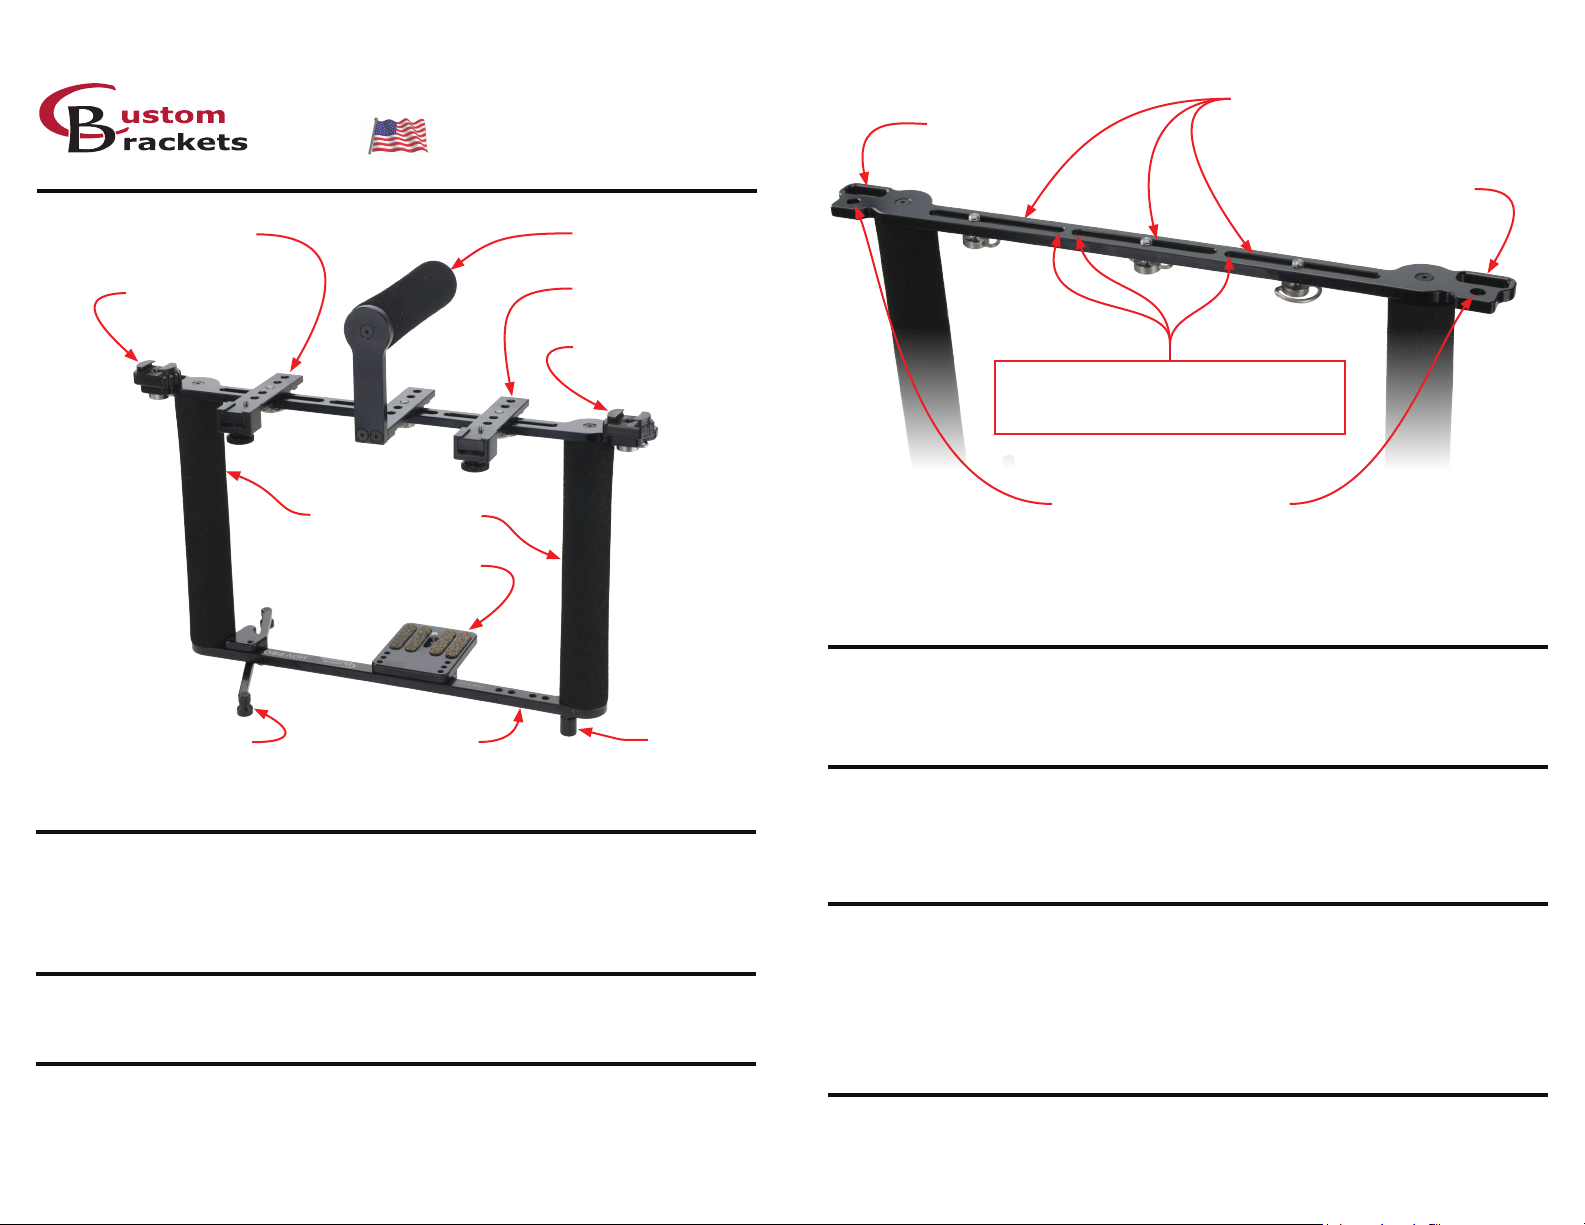
Attaching the MC shoe mounts to the bracket
Attaching the Extension Bars to the bracket
Attaching the camera neck strap to the bracket
HDV PRO Kit INSTRUCTIONS
Attaching the bracket to a tripod or monopod
Innovative Camera Supports
HDV Extension Bar
(Locking shoe mount)
Made in USA
Cleveland, Ohio 44143
32 Alpha Park
phone: 446-446-0819
toll free: 800-530-2289
website: www.custombrackets.com
email: info@custombrackets.com
Low view handle
(Comfortable foam grip)
(3) Slots for mounting components
Slot for
neck strap
Slot for
neck strap
(MC) shoe mount
(For locking-ring
components)
Fold-in legs
Comfortable foam grips
Camera mounting plate
(with 1/4 - 20 screw)
Accessory holes &
oppitional fold-in legs position
HDV Extension Bar
(Locking shoe mount)
(MC) shoe mount
(For locking-ring
components)
Foot
Front View
Attaching the camera plate to the bracket
Attach the camera mounting plate to the bracket using the two screws (8-32 threads x 1/2” long socket
head) and Allen wrench (5/64”) supplied with your bracket. Install screws from underneath the bracket.
There are ve different positions that the camera mounting plate can be placed in. The position of the
camera mounting plate will allow access for replacing the battery.
Attaching a camera to the camera plate
Attach your camera with lens positioned to the front of the bracket. Tighten the “D” style camera screw
completely. Best position is to position the screw in the middle of the slot.
Attaching the low view handle to the bracket
The top of the bracket was designed to give users many ways to place components. The handle
position (side to side & front to back) is the location for the best balance. The handle can be positioned
with face open towards the front or the back. Once the nal position is determined, tighten the handle
down with the “D” style screw.
Important
* *
Screws for the three slots must be
installed and removed at these locations
or screw may be damaged and warranty voided
Holes for mounting components
Figure #1
The kit includes (2) MCs (shoe mount for locking-ring components. The location of these can be in on
of the (3) slots or the holes on either end. Once nal location is determined, tighten the MC down with
the “D” style screw.
The kit includes (2) Extension Bars (extended locking shoe mounts). The location of these can be in on
of the (3) slots. They can be positioned towards the front or back of the bracket. This allows placement
of any component in the perfect position while helping maintain a disired balance of the setup. Once
nal location is determined then, tighten the Extension Bar down with the “D” style screw.
The use of a camera neck strap to help stabilize the setup is suggested. Pushing on the bracket with
even the slightest tension upon the back of your neck from your strap, will help steady and stablize the
setup, allowing smoother shooting techniques.
At either end of the bracket there is a slot to attach each end of the neck strap (see Figure #1). Attach
the strap through the slot similar to attaching the strap to the camera. Other neck straps are available
through Photographic suppliers.
The HDV PRO includes a 1/4-20 threaded hole on the base. To attach to a tripod or monopod, place the
base on the 1/4-20 mounting stud and screw it into the base until it is rmly attached.
* *
Page 2
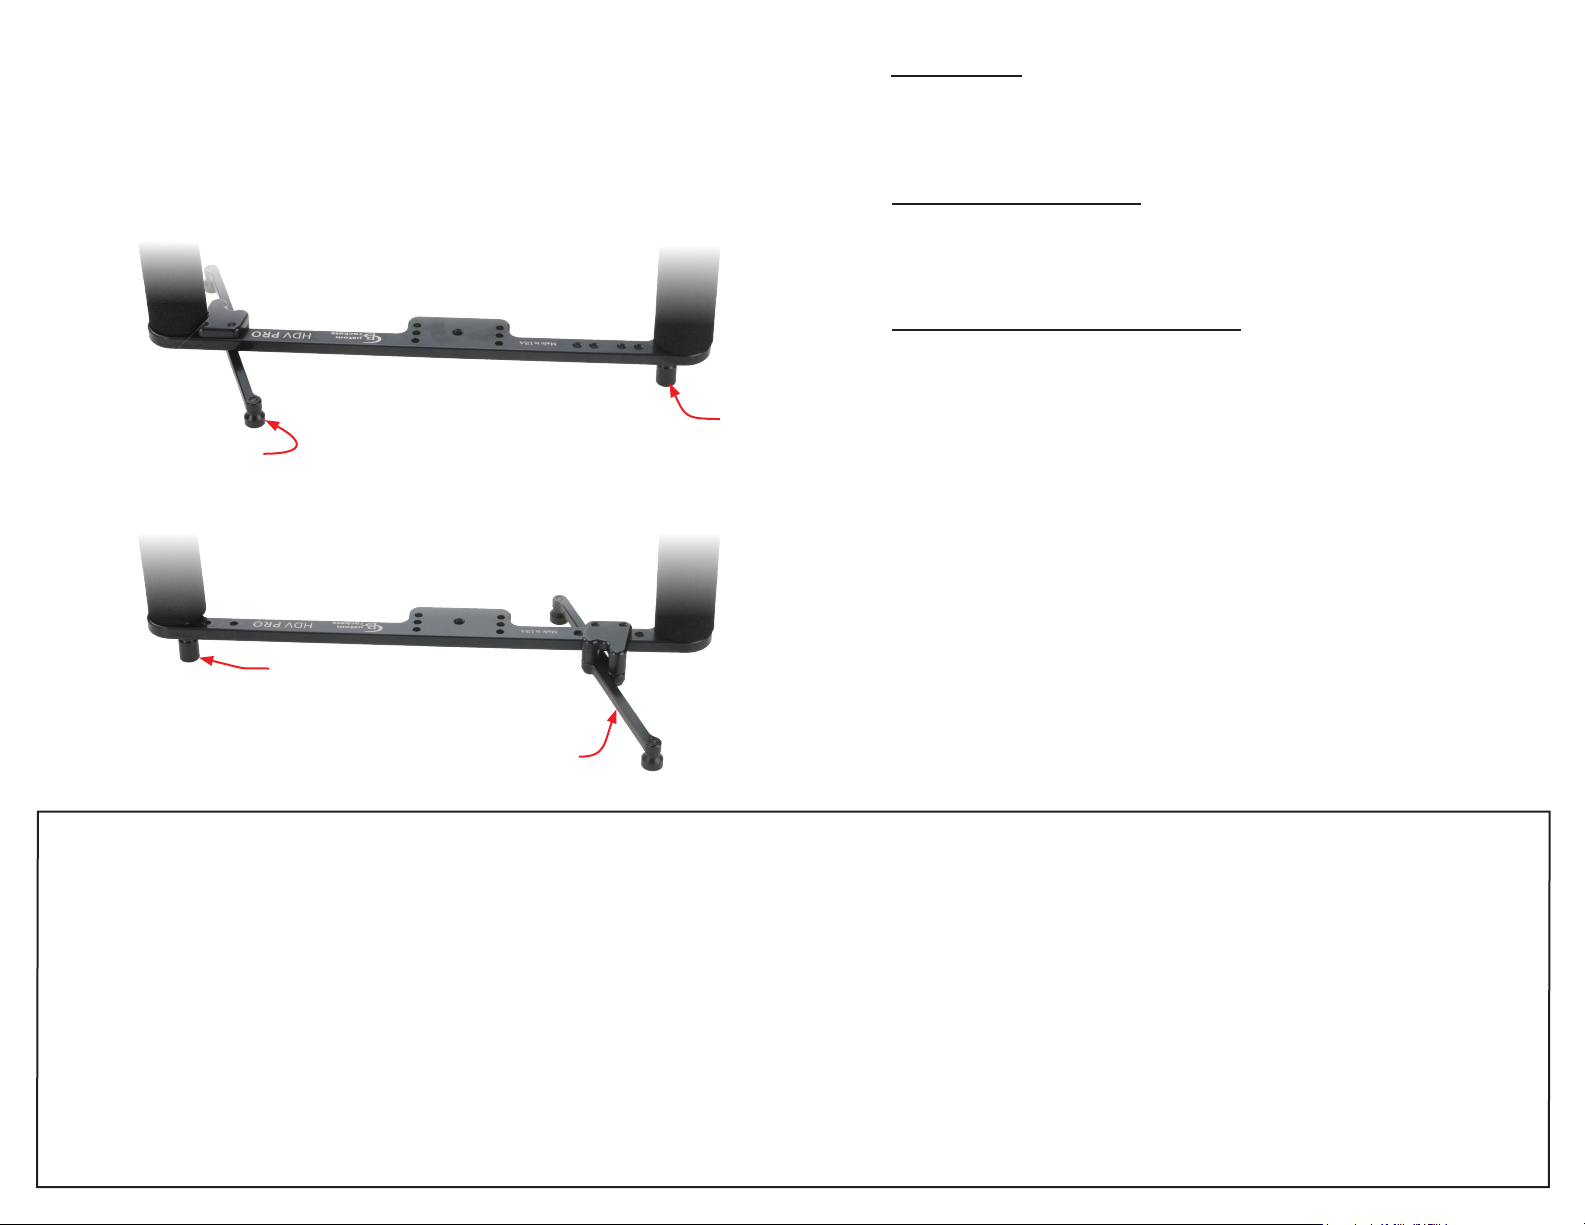
Attaching the Legs to opposite side of bracket
The fold-in legs are assembled on the left side of the bracket (view from in front of camera). The fold-in
legs can also be positioned on the right side of the bracket. Using the Allen wrench (5/64”) supplied with
your bracket, unscrew the two screws (8-32 threads by 1/2” long socket head) from underneath the leg
set and place them accordingly as shown in Figure #3. Once in place, tighten down the screws. Move
the foot (Figure #2) by unscrewing it and placing it into position as shown in Figure #3.
Figure #2
Default Leg Position
Fold-in legs
Foot
Front View
Accessories
MC (Shoe mount for locking-ring components)
FT-JR (Locking shoe mount)
HDV Extension Bar (Extended locking shoe mount)
Camera Quick Releases
QR & T-CP (Custom Brackets quick release)
QRA (Arca Swiss style quick release receiver)
QRM (Manfrotto RC2 series quick release receiver)
Bracket to Tripod Quick Releases
QR & CK-502 (Custom Brackets quick release - for tripod with 1/4” x 20 )
CK-500 (Mounts into Arca Swiss style quick release receiver)
CK-501 (Mounts into Manfrotto RC2 series quick release receiver)
Foot
Figure #3
Optional Leg Position
Front View
Fold-in legs
HDV PRO Kit Facts
The HDV PRO has many unique features. It is constructed from anodized aircraft aluminum for a lightweight and andozied for a scratch-resistent nish.
USA 5 Year Warranty
For a period of ve (5) years from date of purchase, Custom Brackets will repair or replace free of charge, any defect in material or workmanship. Warranty does not cover repairs due to abuse, negligence, impact or any
modications made by the customer. Excessive force unscrewing knobs will void warranty. Warranty service is available by returning the HDV PRO Kit (shipping prepaid) to Custom Brackets. All returns must include a return
authorization (RA) number (contact Custom Brackets to obtain), letter explaining the problem, and a copy of the sales receipt.
International 5 Year Limited Warranty
For a period of ve (5) years from date of purchase, Custom Brackets will repair or replace free of charge, any defect in material or workmanship. Warranty does not cover repairs due to abuse, negligence, impact or any
modications made by the customer. Excessive force unscrewing knobs will void warranty. Limitation to the warranty - after year one shipping charges are not covered. Warranty service is available by returning the
HDV PRO Kit (shipping prepaid) to Custom Brackets. All returns must include a return authorization (RA) number (email info@custombrackets.com to obtain), letter explaining the problem, and a copy of the sales receipt.
Repair
Repair service is available by returning the HDV PRO Kit (shipping prepaid) to Custom Brackets. All returns must include a return authorization (RA) number (contact Custom Brackets to obtain), letter explaining the problem, and
a copy of the sales receipt. A repair cost will be issued and must be approved prior to any repairs. Shipping charges are the responsibility of the customer.
Maintenance
The HDV PRO Kit is designed completely maintenance-free.
 Loading...