


CMC13410
CMC19410
TV/VCR Combination Unit
Owner ’s Manual
2
I
MPORTANT
S
AFETY
I
NSTRUCTIONS
I
MPORTANT
S
AFETYINSTRUCTIONS
Save These Instructions
Warning! Important Safety Instructions
CAUTION: TO REDUCE THE RISK OF ELECTRIC SHOCK, DO NOT
REMOVE COVER (OR BACK). NO USER SERVICEABLE PARTS INSIDE.
REFER SERVICING TO QUALIFIED SERVICE PERSONNEL.
This symbol indicates high voltage is present inside. It is
dangerous to make any kind of contact with any inside part of
this product.
This symbol alerts you that important literature concerning
operation and maintenance has been included with this
product.
Note to CATV system installer:This reminder is provided to call CATV
system installer’s attention to Article 820-40 of the National Electrical
Code (Section 54 of Canadian Electrical Code, Part I), that provides
guidelines for proper grounding and, in particular, specifies that the
cable ground shall be connected to the grounding system of the
building as close to the point of cable entry as practical.
Caution: FCC regulations state that any unauthorized changes or modifications to this equipment may void the user’s authority to operate it.
Caution: To prevent electric shock, match the wide blade of plug to the
wide slot, and fully insert the plug.
Important: One Federal Court has held that unauthorized recording of
copyrighted TV programs is an infringement of U.S. copyright laws.
To prevent damage which may result in fire or electric shock hazard,
do not expose this appliance to rain or moisture.
Important Safety Information
Always be careful when using your TV/VCR. To reduce the risk
of fire, electrical shock, and other injuries, keep these safety
precautions in mind when installing, using, and maintaining
your machine.
• Read all safety and operating instructions before operating the
TV/VCR.
• Retain the safety and operating instructions for future reference.
• Heed all warnings on the TV/VCR and in the operating instructions.
• Follow all operating and use instructions.
• Unplug the TV/VCR from the wall outlet before cleaning. Use a
damp cloth; do not use liquid or aerosol cleaners.
• Never add any attachments and/or equipment without approval of
the manufacturer. Such additions may result in the risk of fire,
electric shock, or other personal injury.
• Do not use the TV/VCR where contact with or immersion in water is
a possibility, such as near bath tubs, sinks, washing machines,
swimming pools, etc.
• Provide ventilation for the TV/VCR. The unit is designed with slots in
the cabinet for ventilation to protect it from overheating. Do not
block these openings, and do not place the TV/VCR on a bed, sofa,
rug, or other similar surface. Do not place it near a radiator or heat
register. If you place the TV/VCR on a rack or bookcase, ensure that
there is adequate ventilation and that you’ve followed the
manufacturer’s instructions for mounting.

3
I
MPORTANTSAFETYINSTRUCTIONS
I
MPORTANT
S
AFETYINSTRUCTIONS
Save These Instructions
I
MPORTANTSAFETYINSTRUCTIONS
Important Safety Information, continued
• Do not place the TV/VCR on an unstable cart,
stand, tripod, bracket, or table. The TV/VCR may
fall, causing serious injury to a child or adult,
and serious damage to the unit. Use only with a
cart, stand, tripod, bracket, or table recommended by the manufacturer or sold with the
TV/VCR. Follow the manufacturer’s instructions
when mounting the unit, and use a mounting accessory recommended by the manufacturer. Move the TV/VCR and its cart with
care. Quick stops, excessive force, and uneven surfaces may
cause the unit and cart to overturn.
• Operate your TV/VCR only from the type of power source indicated
on the marking label. If you are not sure of the type of power
supplied to your home, consult your appliance dealer or local
power company.
• Use only a grounded or polarized outlet. For your safety, this
TV/VCR is equipped with a polarized alternating current line plug
having one blade wider than the other. This plug will fit into the
power outlet only one way. If you are unable to insert the plug fully
into the outlet, try reversing the plug. If the plug still doesn’t fit,
contact your electrician to replace your outlet.
• Protect the power cord. Power supply cords should be routed so
that they are unlikely to be walked on or pinched by items placed
on or against them. Pay particular attention to cords at plugs, convenience receptacles, and the point where they exit from the unit.
• Unplug the TV/VCR from the wall outlet and disconnect the
antenna or cable system during a lightning storm or when left
unattended and unused for long periods of time. This will prevent
damage to the unit due to lightning and power-line surges.
• Avoid overhead power lines. An outside antenna system should not
be placed in the vicinity of overhead power lines or other electric
light or power circuits or where it can fall into such power lines or
circuits. When installing an outside antenna system, be extremely
careful to keep from touching the power lines or circuits. Contact
with such lines can be fatal.
• Do not overload the wall outlet or extension cords. Overloading
can result in fire or electric shock.
• Do not insert foreign objects through openings in the unit, as they
may touch dangerous voltage points or damage parts. Never spill
liquid of any kind on the TV/VCR.

I
MPORTANT
S
AFETY
I
NSTRUCTIONS
4
I
MPORTANT
S
AFETYINSTRUCTIONS
Save These Instructions
Important Safety Information, continued
• Ground outdoor antennas. If an outside antenna or cable system is
connected to the TV/VCR, be sure the antenna or cable system is
grounded so as to provide
some protection against
voltage surges and built-up
static charges. Section 810 of
the National Electrical Code,
ANSI/NFPA No. 70-1984,
provides information with
respect to proper grounding
of the mast and supporting
structure, grounding of the lead-in wire to an antenna discharge
unit, size of grounding conductors, location of antenna-discharge
unit, connection to grounding electrodes, and requirements for the
grounding electrode.
• Do not attempt to service the TV/VCR yourself. Refer all servicing to
qualified service personnel. Unplug the unit from the wall outlet and
refer servicing to qualified service personnel under the following
conditions:
– when the power-supply cord or plug is damaged
– if liquid has been spilled on or objects have fallen into the unit
– if the TV/VCR has been exposed to rain or water
– if the TV/VCR does not operate normally by following the
operating instructions
– if the TV/VCR has been dropped or the cabinet has been
damaged
– when the TV/VCR exhibits a distinct change in performance
• If you make adjustments yourself, adjust only those controls that
are covered by the operating instructions. Adjusting other controls
may result in damage and will often require extensive work by a
qualified technician to restore the TV/VCR to normal.
• When replacement parts are required, be sure the service
technician uses replacement parts specified by the manufacturer
or those that have the same characteristics as the original part.
Unauthorized substitutions may result in additional damage to the
unit.
• Upon completion of any service or repairs to this TV/VCR, ask the
service technician to perform safety checks to determine that the
TV/VCR is in a safe operating condition.
This device complies with part 15 of the FCC Rules. Operation is
subject to the following two conditions:
(1) This device may not cause harmful interference, and
(2) This device must accept any interference that may cause
undesired operation.
This television receiver provides display of television closed
captioning in accordance with §15.119 of the FCC rules.

C
ONTENTS
5
C
ONTENTS
Chapter 1: Learning About Your New TV/VCR ..................7
List of Features. . . . . . . . . . . . . . . . . . . . . . . . . . . . . . . . . . . 7
Checking Parts. . . . . . . . . . . . . . . . . . . . . . . . . . . . . . . . . . . 7
Understanding the Controls . . . . . . . . . . . . . . . . . . . . . . . . 8
Front Panel Controls & Jacks . . . . . . . . . . . . . . . . . . . 8
Rear Panel . . . . . . . . . . . . . . . . . . . . . . . . . . . . . . . . . . . 9
Remote Control. . . . . . . . . . . . . . . . . . . . . . . . . . . . . . . 10
Chapter 2: Installation...........................................................12
Connecting VHF and UHF Antennas . . . . . . . . . . . . . . . . . 12
Antennas With 300-ohm Flat Twin Leads. . . . . . . . . . 12
Antennas With 75-ohm Round Leads. . . . . . . . . . . . . 12
Separate VHF and UHF Antennas. . . . . . . . . . . . . . . . 12
Connecting Cable TV Systems to the TV/VCR. . . . . . . . . . 13
Cable Without a Converter Box . . . . . . . . . . . . . . . . . 13
Cable With a Converter Box . . . . . . . . . . . . . . . . . . . . 13
Installing Batteries in the Remote Control . . . . . . . . . . . . 15
Chapter 3: TV Operation........................................................16
Viewing the On-screen Display . . . . . . . . . . . . . . . . . . . . . 16
Viewing the Main Menu . . . . . . . . . . . . . . . . . . . . . . . . . . . 16
Selecting the On-screen Language. . . . . . . . . . . . . . . . . . 16
Selecting the Signal Source. . . . . . . . . . . . . . . . . . . . . . . . 17
Programming the Channels . . . . . . . . . . . . . . . . . . . . . . . . 17
Setting the Clock . . . . . . . . . . . . . . . . . . . . . . . . . . . . . . . . . 18
Choosing Picture Settings. . . . . . . . . . . . . . . . . . . . . . . . . . 20
Customizing Picture Settings . . . . . . . . . . . . . . . . . . . 20
Resetting Standard Picture Settings . . . . . . . . . . . . . 21
Setting the Sleep Timer. . . . . . . . . . . . . . . . . . . . . . . . . . . . 22
Using the On/Off Timer . . . . . . . . . . . . . . . . . . . . . . . . . . . . 22
Chapter 4: VCR Operation.....................................................23
Inserting and Ejecting a Video Tape . . . . . . . . . . . . . . . . . 23
Playing a Video Tape. . . . . . . . . . . . . . . . . . . . . . . . . . . . . . 23
Playing a Tape. . . . . . . . . . . . . . . . . . . . . . . . . . . . . . . . 23
Pausing . . . . . . . . . . . . . . . . . . . . . . . . . . . . . . . . . . . . . 23
Using Picture Search. . . . . . . . . . . . . . . . . . . . . . . . . . 24
Using Tracking . . . . . . . . . . . . . . . . . . . . . . . . . . . . . . . 24
Using the Time Counter . . . . . . . . . . . . . . . . . . . . . . . . 24
Using Memory Stop . . . . . . . . . . . . . . . . . . . . . . . . . . . 24
Using P.PLUS. . . . . . . . . . . . . . . . . . . . . . . . . . . . . . . . . 25
Recording TV Programs as You Watch . . . . . . . . . . . . . . . 25
Recording . . . . . . . . . . . . . . . . . . . . . . . . . . . . . . . . . . . 25
Editing While Recording . . . . . . . . . . . . . . . . . . . . . . . 26
Using Advanced Recording Features . . . . . . . . . . . . . . . . 26
One-touch Recording. . . . . . . . . . . . . . . . . . . . . . . . . . 26
Timer Recording. . . . . . . . . . . . . . . . . . . . . . . . . . . . . . 26
Using Program Review . . . . . . . . . . . . . . . . . . . . . . . . 29

C
ONTENTS
6
C
ONTENTS
Chapter 5: Special Features.................................................30
Using True Repeat . . . . . . . . . . . . . . . . . . . . . . . . . . . . . . . . 30
Using Block Repeat. . . . . . . . . . . . . . . . . . . . . . . . . . . . . . . 30
Viewing Closed Captions. . . . . . . . . . . . . . . . . . . . . . . . . . . 31
Using the V-Chip . . . . . . . . . . . . . . . . . . . . . . . . . . . . . . . . . 32
Setting Up Your Personal ID Number(PIN) . . . . . . . . 32
How to Enable/Disable the V-Chip . . . . . . . . . . . . . . . 32
How to Set Up Restrictions
Using the “TV guidelines”. . . . . . . . . . . . . . . . . . . . . . 33
How to Set Up Restrictions Using the MPAA
Ratings; G, PG, PG-13, R, NC-17, X . . . . . . . . . . . . . . . 34
How to Reset the TV after the V-Chip Blocks
a channel (“Energency Escape”) . . . . . . . . . . . . . . . . 35
Using Special Playback Features. . . . . . . . . . . . . . . . . . . . 36
Frame Advance. . . . . . . . . . . . . . . . . . . . . . . . . . . . . . . 36
Skip Search. . . . . . . . . . . . . . . . . . . . . . . . . . . . . . . . . . 36
Slow Motion . . . . . . . . . . . . . . . . . . . . . . . . . . . . . . . . . 36
Jet Search . . . . . . . . . . . . . . . . . . . . . . . . . . . . . . . . . . . 36
Copying, or Dubbing, a Video. . . . . . . . . . . . . . . . . . . . . . . 37
Making the Connections . . . . . . . . . . . . . . . . . . . . . . . 37
Dubbing . . . . . . . . . . . . . . . . . . . . . . . . . . . . . . . . . . . . . 37
Chapter 6: Troubleshooting...................................................38
Identifying TV Problems . . . . . . . . . . . . . . . . . . . . . . . . . . . 38
Identifying VCR Problems . . . . . . . . . . . . . . . . . . . . . . . . . . 38
Appendix..................................................................................39
Caring for Your TV/VCR . . . . . . . . . . . . . . . . . . . . . . . . . . . . 39
Placement. . . . . . . . . . . . . . . . . . . . . . . . . . . . . . . . . . . 39
Liquids . . . . . . . . . . . . . . . . . . . . . . . . . . . . . . . . . . . . . . 39
Cabinet. . . . . . . . . . . . . . . . . . . . . . . . . . . . . . . . . . . . . . 39
Video Heads . . . . . . . . . . . . . . . . . . . . . . . . . . . . . . . . . 39
Temperature . . . . . . . . . . . . . . . . . . . . . . . . . . . . . . . . . 39
About Video Tapes . . . . . . . . . . . . . . . . . . . . . . . . . . . . . . . . 39
Caring for Video Tapes . . . . . . . . . . . . . . . . . . . . . . . . . 39
Recording Speeds . . . . . . . . . . . . . . . . . . . . . . . . . . . . 39
The Record Safety Tab . . . . . . . . . . . . . . . . . . . . . . . . . 39
Specifications. . . . . . . . . . . . . . . . . . . . . . . . . . . . . . . . . . . . 40
7
C
HAPTERONE
: L
EARNING ABOUTYOURNEW
TV/VCR
List of Features
Your TV/VCR was designed and
engineered using the latest
technology. This TV/VCR is a
full-featured, high-performance
unit that not only meets, but
exceeds, industry standards.
Along with the standard
features you expect, TV/VCR has
included the following special
features:
• Easy-to-operate infrared
remote control
• Easy-to-use on-screen menu
system you can use from the
front panel or the remote
control
• Closed captioning
• On-screen programmed
recording of up to six events
in one year
• Digital auto-tracking
• Repeat play
• Infrared wireless remote
control system
• Quick start, full loading
system
• High speed rewinding
• High quality video circuitry
• 181-channel capability
(frequency synthesized tuner)
• Auto channel programming
• One-touch recording (up to
four hours)
• Eight hour recording on a
single T-160 video cassette
• Auto clock setting
• Rental picture plus
• Tri-lingual on-screen displays
(English, Spanish, and
French)
• V-chip feature
• Jet-search
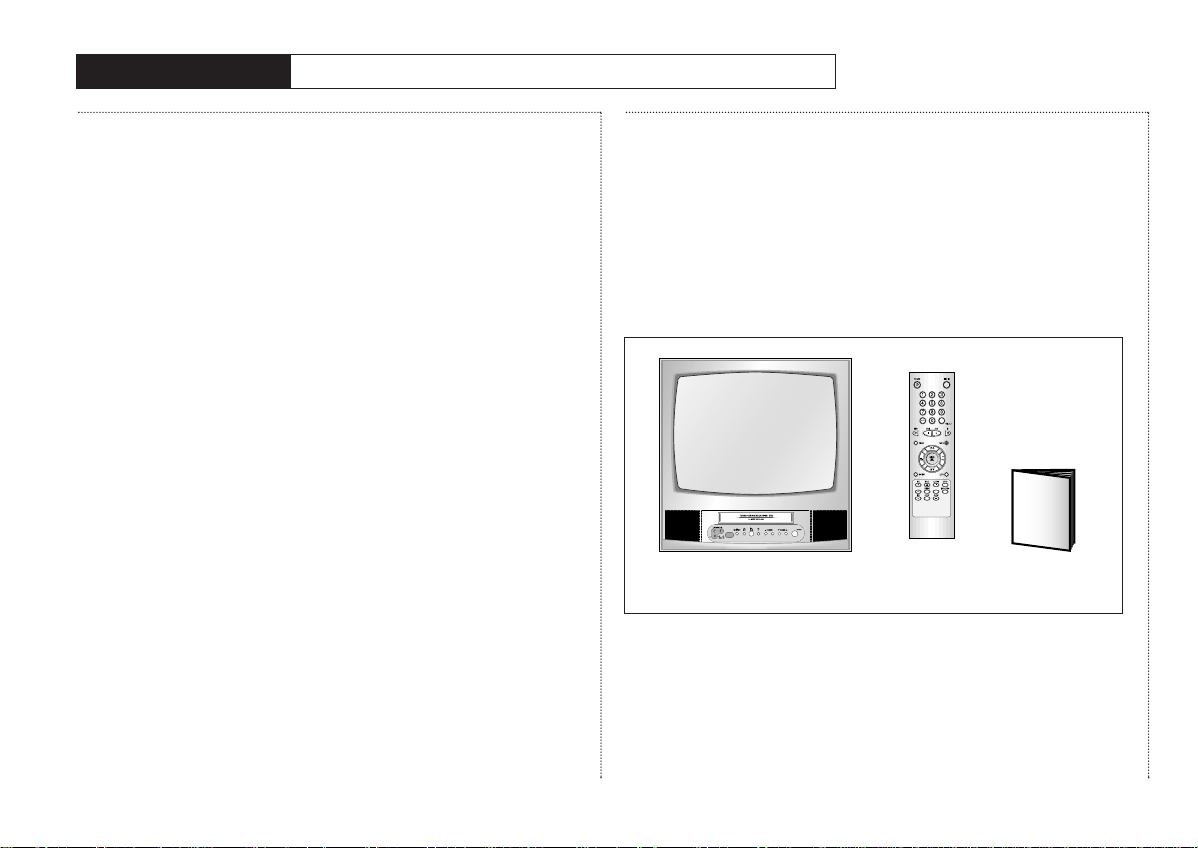
Checking Parts
Once you have unpacked your
TV/VCR, check to make sure that
you have all the parts shown
here. If any piece is missing or
broken, call your dealer.
(The TV illustration shown does
not necessarily match the
design of your TV set.)
C
HAPTER
O
NE
L
EARNING
A
BOUT
Y
OUR
N
EW
TV/VCR
TV/VCR Remote
Control
This
manual
+
8
C
HAPTER
ONE: L
EARNING ABOUTYOURNEW
TV/VCR
Understanding the
Controls
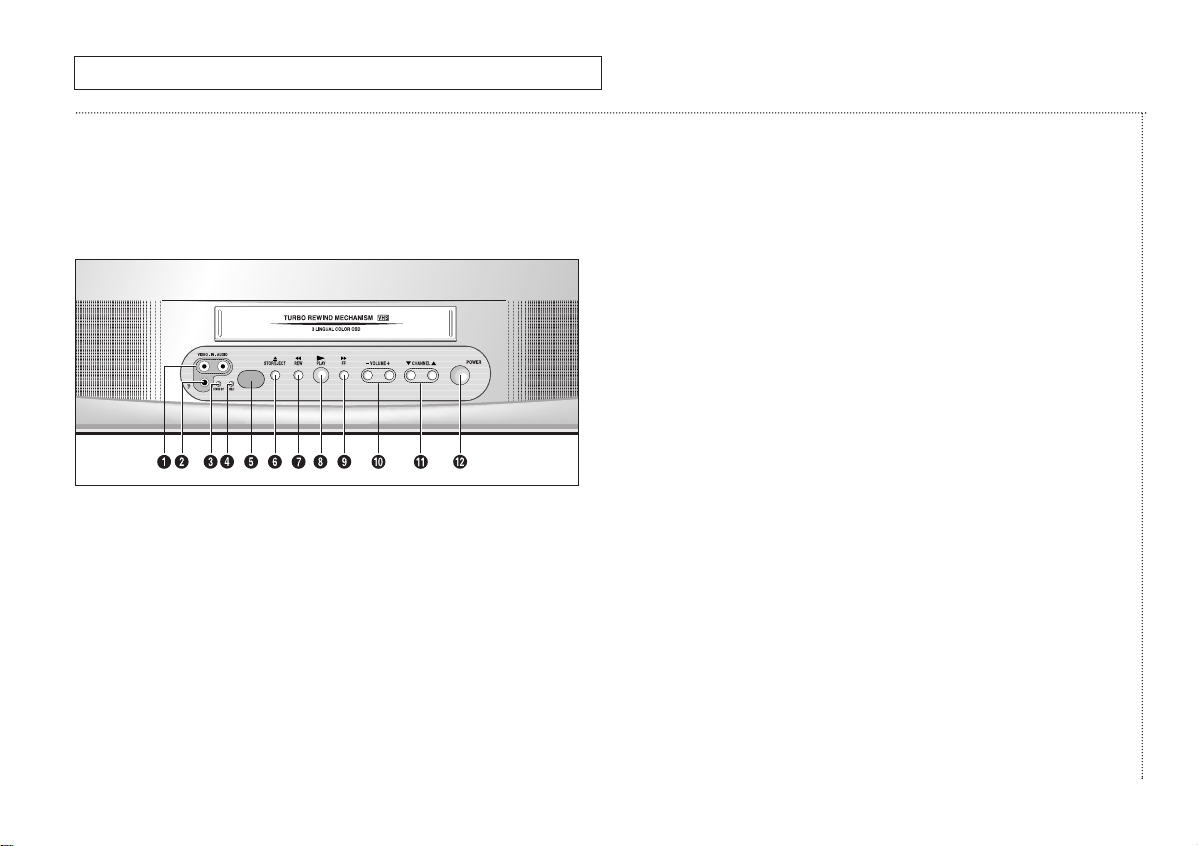
Front Panel Controls & Jacks
The buttons on the front panel
control basic features.
For more advanced features,
you will use the remote control.
1 VIDEO and AUDIO IN jacks
Connect components, such
as a camcorder, to these
jacks.
2 EARPHONE jack
Connect a set of earphones
(with a mini connector) to
this jack.
3 STAND BYindicator
Lit when TV/VCR power is
Off.
4 REC indicator
Lit when the TV/VCR is
recording or when program
times are stored.
5 REMOTE sensor
Receives signals from the
remote control.
6 STOP/EJECT button
Press to stop a video tape
during play, record, rewind,
or fast forward. Press to
eject a video tape if the
tape is stopped.
7 REW button
Press to rewind a video
tape.
8 PLAYbutton
Press to play a video tape.
9 FF button
Press to fast forward a
video tape.
10 – VOL and VOL+ buttons
(VOLUME)
Press to change the volume
or to change features on
the menu.
11 CH▼ and CH▲ buttons
(CHANNEL)
Press to change channels
or to select features on the
menu.
12 POWER button
Press to turn the TV/VCR on
or off.
L
EARNING
A
BOUT
Y
OUR
N
EW
TV/VCR
9
C
HAPTERONE
: L
EARNING ABOUTYOURNEW
TV/VCR
L
EARNING ABOUT
Y
OUR
N
EW
TV/VCR
Understanding the
Controls, continued
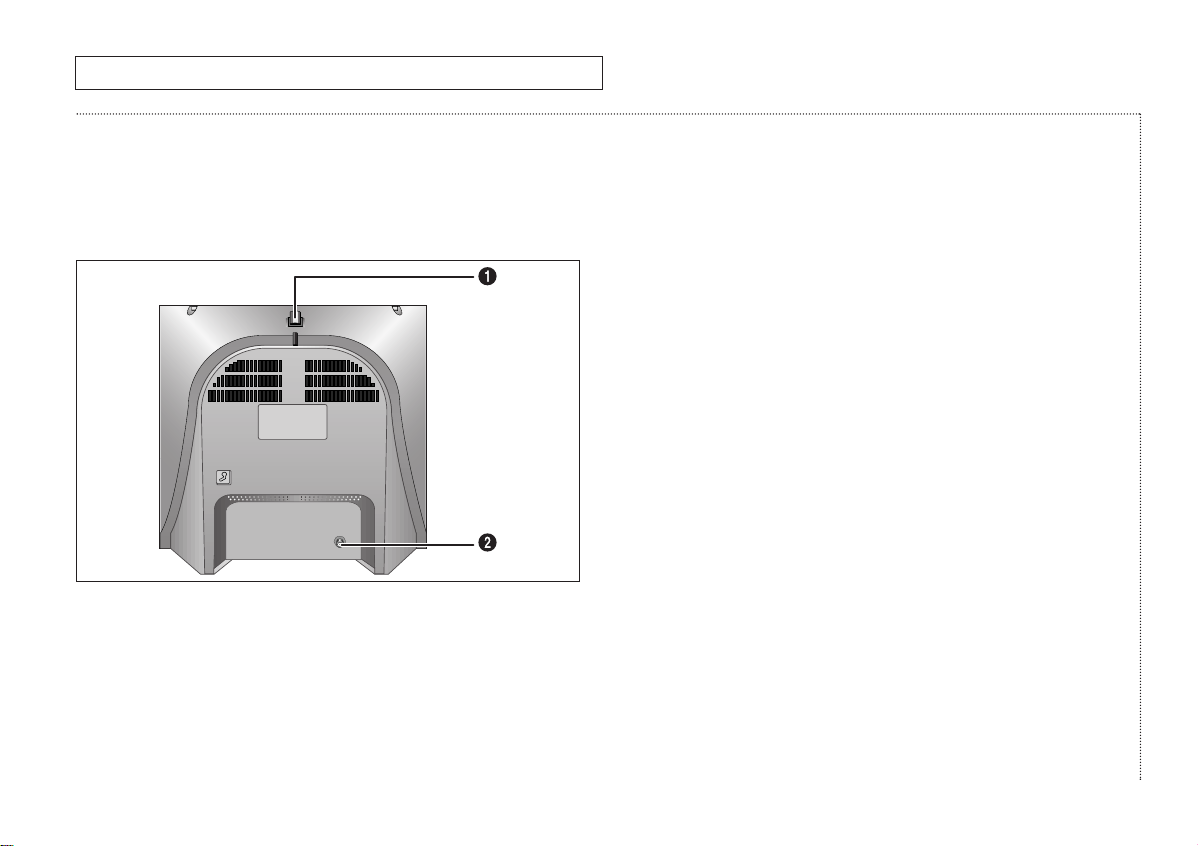
Rear Panel
1 VHF antenna mount
VHF rod antenna mount.
See page 6.
2 Antenna terminal
Use this terminal (VHF/UHF
IN FROM ANT) to connect
the TV/VCR to a 75-ohm
outdoor antenna or cable
system. See page 6.
10
C
HAPTER
ONE: L
EARNING ABOUTYOURNEW
TV/VCR
Understanding the
Controls, continued
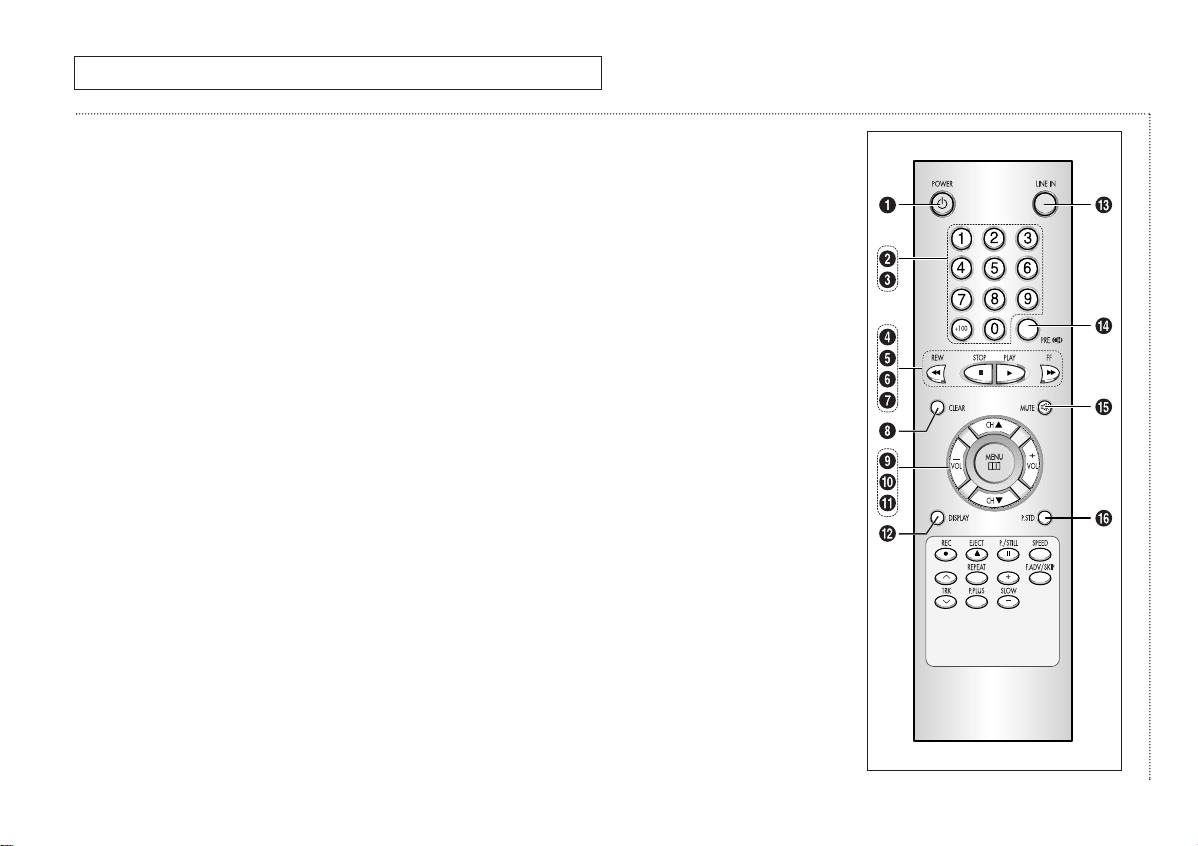
Remote Control
Use the remote control within 33
feet (10 meters) of the TV/VCR
and point it directly at the
TV/VCR.
1 POWER
Press to turn the TV/VCR
on and off.
2 NUMBER BUTTONS
Press to select specific
channels.
3 +100
Press to select channels over
100.
4 REW (rewind)
Press to rewind a tape.
5 STOP
Press to stop a tape.
6 PLAY
Press to play a tape.
7 FF (fast forward)
Press to fast forward a
tape.
8 CLEAR
Press to correct
programming errors, clear
programs, or reset the tape
counter.
9 –VOL and VOL+ (volume)
Press – VOL to decrease or
VOL+ to increase the
volume.
10 CH▲ and CH▼ (channel)
Press CH▲ or CH▼ to
change channels. Also
used with the menu
system.
11 MENU
Press to display the onscreen menu.
12 DISPLAY
Press to show on-screen
displays.
13 LINE IN
Press to select the
component connected to
the Audio/Video jacks.
14 PRE-CH (previous channel)
Press to return to the last
channel viewed.
15 MUTE
Press to silence the
volume.
16 P.STD (picture-standard)
Press to select memorized
or standard picture
settings.
L
EARNING
A
BOUT
Y
OUR
N
EW
TV/VCR
11
C
HAPTERONE
: L
EARNING ABOUTYOURNEW
TV/VCR
L
EARNING ABOUT
Y
OUR
N
EW
TV/VCR
Understanding the
Controls, continued
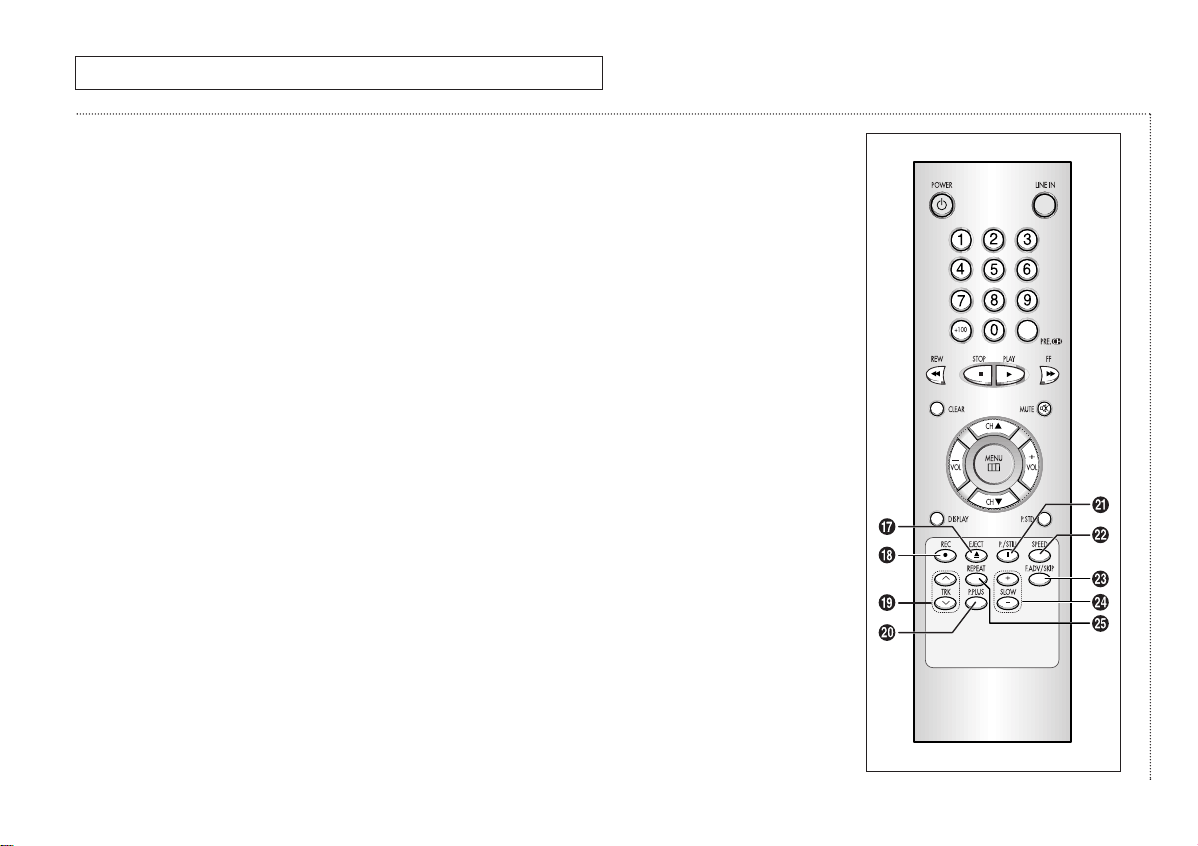
Remote Control
Use the remote control within 33
feet (10 meters) of the TV/VCR
and point it directly at the
TV/VCR.
17 EJECT
Press to eject a tape.
18 REC (record)
Press to begin recording.
19 TRK+, – (tracking)
Press to adjust tape
tracking.
20 P.PLUS
Press to compensate for a
poor rental tape.
21 P. (pause)/STILL
Press to freeze a video
frame.
22 SPEED
Press to select the tape
recording speed.
23 F.ADV (frame advance)/SKIP
Press to advance a tape
frame-by-frame or to use
skip search.
24 SLOW+, –
Press to watch a tape in
slow motion.
25 REPEAT
Press to play a tape or a
section of tape repeatedly.
12
C
HAPTER
TWO: I
NSTALLATION
C
HAPTER
T
WO
I
NSTALLATION
Connecting VHF and
UHF Antennas
If you do not have cable TV, you
must connect an antenna to your
TV/VCR. First you need to identify
your antenna’s lead type:
• If you are using the antenna
that has 300-ohm twin flat
leads, (see the illustration
below) see “Antennas With
300-ohm Flat Twin Leads,”on
this page.
• If your antenna has a 75-ohm
round lead (see the
illustration below), see
“Antennas With 75-ohm
Round Leads,” on this page.
• If you have two antennas,
see “Separate VHF and UHF
Antennas,” on this page.
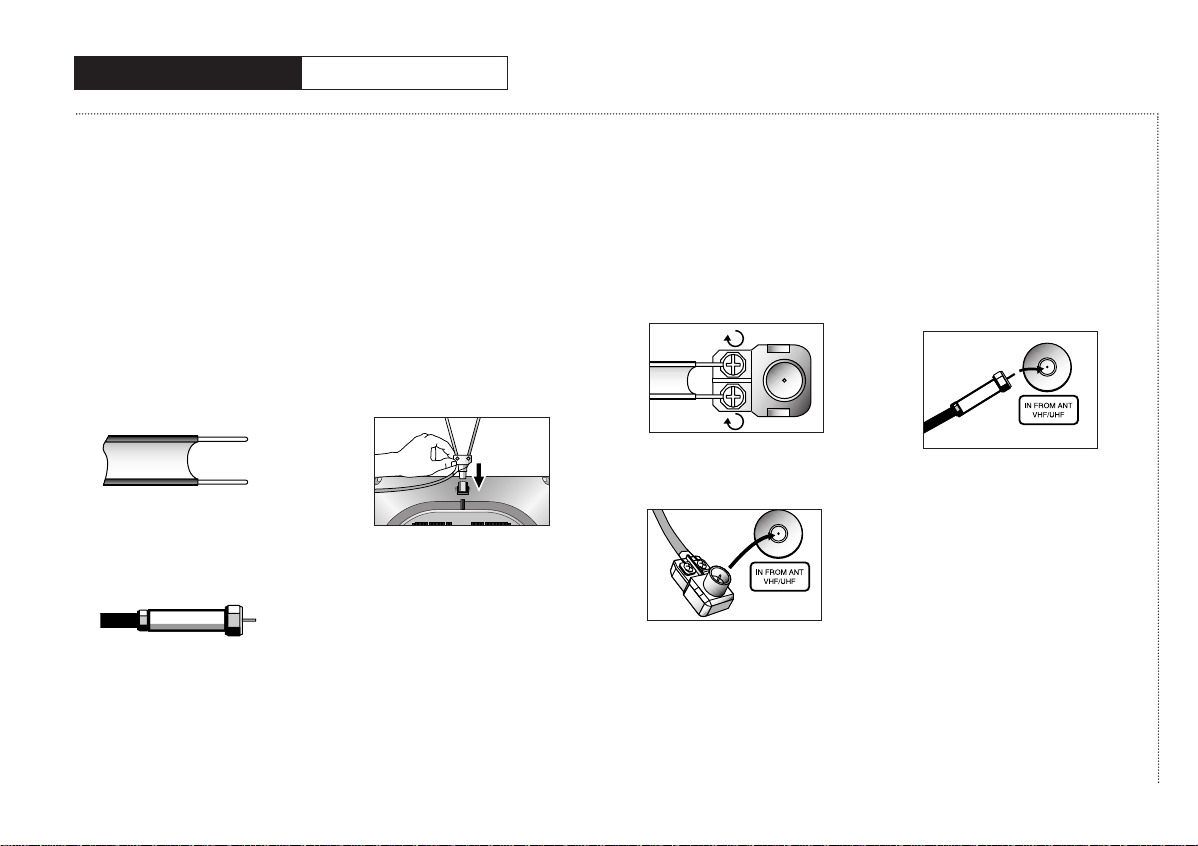
Antennas With 300-ohm
Flat Twin Leads
If you use a different 300-ohm
antenna with twin flat leads,
follow the directions below, but
skip step 1.
1 Push the stem of the rod
antenna into the antenna
mount.
2 Place the wires from the twin
leads under the screws on
the 300-75 ohm adapter (not
supplied). Use a screwdriver
to tighten the screws.
3 Plug the adapter into the
terminal on the rear panel of
the TV/VCR.
Extend the antenna and
adjust it for the clearest
picture.To reduce the risk of
damage, only adjust the
antenna by moving the black
plastic base.
Antennas With 75-ohm
Round Leads
1 Plug the lead into the
terminal on the rear panel of
the TV/VCR.
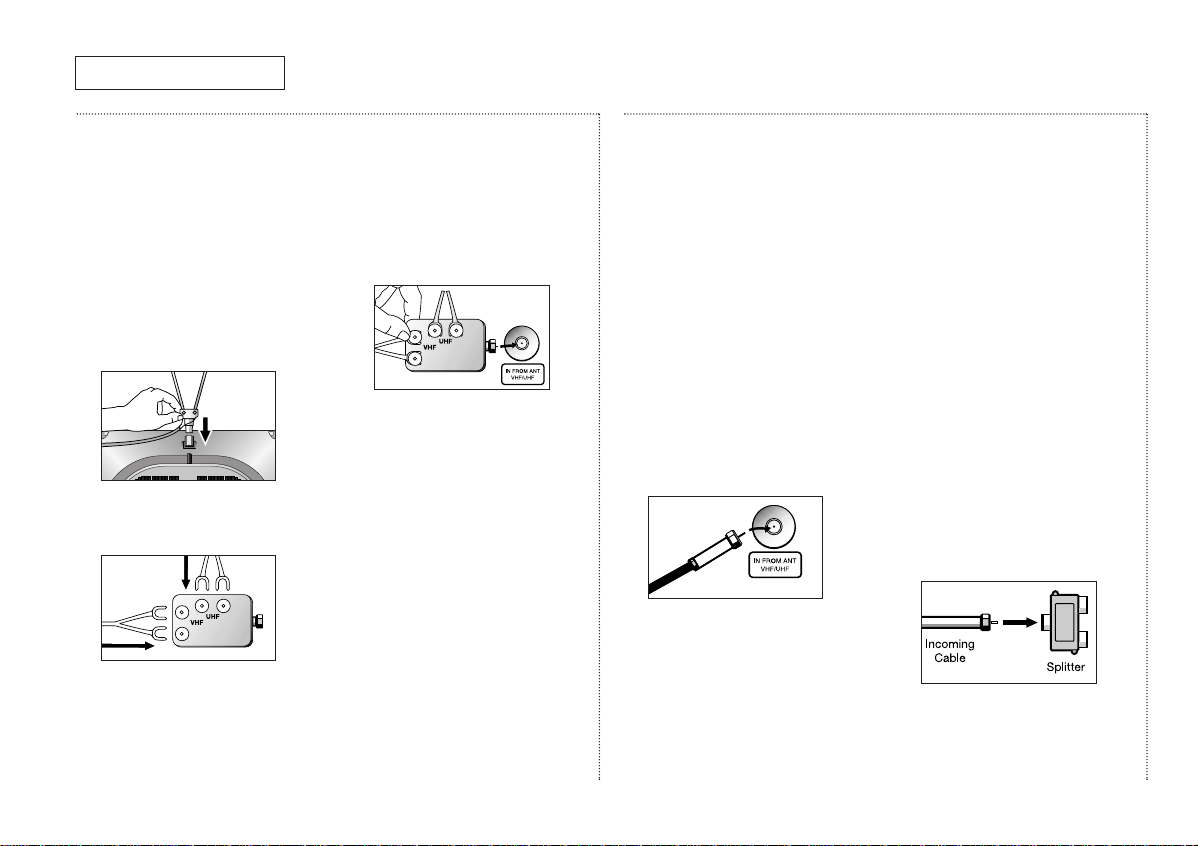
Separate VHF and UHF
Antennas
If you have two separate antennas for your TV/VCR (one VHF
and one UHF), you must combine
the two antenna signals before
connecting them to the TV/VCR.
This procedure requires a combiner attachment that you can
purchase at an electronics
store.
13
C
HAPTERTWO
: I
NSTALLATION
I
NSTALLATION
Connecting VHF and UHF
Antennas, continued
If you use a different 300-ohm
antenna with twin flat leads, follow the directions below, but skip
step 1.
1 Push the stem of the rod
antenna into the antenna
mount.
2 Connect both antenna leads
to a combiner.
3 Plug the combiner into the
terminal on the rear panel of
the TV/VCR.
Connecting Cable TV
Systems to the TV/VCR
Choose one of the sections below
for connecting a cable system.
✓ This TV/VCR is cable-ready; you
don’t need a converter for basic
cable channels.
Cable Without a
Converter Box
To connect cable without a
converter box:
1 Plug the incoming cable into
the terminal on the rear
panel of the TV/VCR.
Cable With a
Converter Box
If your cable company
scrambles some channels and
requires you to use a converter
box for only those channels, use
these instructions.
You will need the following
pieces of equipment, which you
can purchase from an
electronics store:
• A two-way splitter
• An RF (A/B) switch
• Four lengths of coaxial cable
1 Plug the incoming cable into
the 2-way splitter.

I
NSTALLATION
14
C
HAPTER
TWO: I
NSTALLATION
Connecting Cable TV Systems
to the TV/VCR, continued
2 Connect one of the coaxial cables between the splitter and the
input on the converter box.
3 Connect a second coaxial cable between the output of the
converter box and the “B” input on the RF (A/B) switch.
4 Connect a third coaxial cable between the splitter and the “A”
input on the RF (A/B) switch.
5 Connect the fourth coaxial cable between the output on the RF
(A/B) switch and the terminal on the TV/VCR’s back panel.
Choose the “A” position on the A/B switch to select all nonscrambled channels by remote control. Choose the “B” position on
the A/B switch to select scrambled channels via the converter box.
When using the “B” position, tune your TV/VCR to the output
channel of the converter box (usually channel 3 or 4).

15
C
HAPTERTWO
: I
NSTALLATION
I
NSTALLATION
Installing Batteries in the Remote Control
1
Open the battery compartment by pressing down on the back
cover’s tab, then lifting up.
2 Install two AAA size batteries. Make sure to match the + and –
ends of the batteries with the diagram inside the compartment.
3 Replace the cover.
✓ If you won’t be using the remote control for a long time, remove the batteries and
store them in a cool, dry place.
✓ Batteries last for about one year.

16
C
HAPTER
T
HREE
: TV O
PERATION
C
HAPTER
T
HREE
TV O
PERATION
Viewing the
On-screen Display
The on-screen display
automatically appears on the
screen when you turn the
TV/VCR on or change its status
(from stop to play, from play to
stop, etc.). You can also activate
the on-screen displays manually
by using the remote control.
1 With the power on, press
DISPLAY.
✔ This display disappears from the
screen within ten seconds.
2 Press DISPLAY again (while
the display items are still on
the TV/VCR screen) to display
the time counter.
Press DISPLAY once more to
remove all displays from the
screen and return to normal
viewing.
Viewing the Main Menu
1
With the power on, press
MENU.
The main menu appears on
the screen. Press MENU
again to remove the main
menu from the screen.
The menu will disappear from
the screen in less than thirty
seconds if you don’t press
any buttons on the remote.
Selecting the
On-screen Language
On-screen text can appear in
English, Spanish, or French.
1 Press MENU to display the
menu.
2 Press CH▼ until “Setup” is
selected. Press VOL+.
3 Press CH▼ until “Language”
is selected. Press VOL– or
VOL+ to select the on-screen
language you want.
ANT 04
Stop
Clock : 10:30am
Picture : Custom
Sleep : off
Speed : SP
00:00:00
Menu
Picture
Time Set
Setup
VCR Setup
Caption
V-chip
▲▼Move œ√Sel. Exit
Menu
Picture
Time Set
Setup
VCR Setup
Caption
V-chip
▲▼Move œ√Sel. Exit
Setup
TV/Line : TV
Air/Cable : Antenna
Auto Program
Add/Erase
Auto Clock Set
Language : English
▲▼Move œ√Sel. Menu

17
C
HAPTERTHREE
: TV O
PERATION
TV O
PERATION
Selecting the
Signal Source
The first step in programming
your TV/VCR is to select the
signal source of your antenna or
cable TV system.
1 Press MENU to display the
menu.
2 Press CH▼ until “Setup” is
highlighted. Press VOL+.
3 Press VOL– or VOL+ to select
“Antenna,” “Cable STD,”
“Cable HRC,” or “Cable IRC.”
✔ If your TV/VCR is connected to
an antenna, select “Antenna.” If
you have cable TV, select “Cable
STD,” “Cable HRC,” or “CABLE
IRC,” depending on the type of
cable system you have.
Programming
the Channels
Storing Channels in
Memory
Your TV/VCR can automatically
memorize all the channels you
receive. Once they are in
memory, you can use CH▲and
CH▼ to select channels without
using the number buttons.
✔ Before you can store channels in
memory, you must have already
selected the signal source. See
“Selecting the Signal Source” on
this page.
1 Press MENU to display the
menu.
2 Press CH▼until “Setup” is
highlighted. Press VOL+.
3 Press CH▼ until “Auto
Program” is highlighted.
4 Press VOL– or VOL+ button to
begin automatic
programming.
The TV/VCR automatically
cycles through all the
channel numbers and places
the available channels in
memory. This takes two to
three minutes.
✔ Press MENU at any time to
interrupt the programming
process and return to normal
viewing.
5 When the programming
process is complete, press
CH▲ or CH▼ to scan the
channels stored in the
TV/VCR’s memory.
✔ Occasionally the TV/VCR will
miss an active channel if the
signal is weak or if the channel
is off the air when you start
programming. Likewise, an
unavailable channel may be
included in memory if there are
stray signals on that channel.
Adding and Erasing
Channels in Memory
• When entering single-digit
channels, press 0 first. For
example, to select channel 8,
press 0, then 8.
Setup
TV/Line : TV
Air/Cable : Antenna
Auto Program
Add/Erase
Auto Clock Set
Language : English
▲▼Move œ√Sel. Menu
Menu
Picture
Time Set
Setup
VCR Setup
Caption
V-chip
▲▼Move œ√Sel. Exit
Setup
TV/Line : TV
Air/Cable : Antenna
Auto Program
Add/Erase
Auto Clock Set
Language : English
▲▼Move œ√Sel. Menu
Auto Program
ANT 15
: Stop

TV O
PERATION
18
C
HAPTER
T
HREE
: TV O
PERATION
Programming
the Channels, continued
• When entering three-digit
channels, press the +100
button on the remote control
first. For example, to select
channel 104, press +100, then
press 0, then 4.
You can manually add or erase a
channel from your TV/VCR’s
memory.
1 Press MENU to display the
menu.
2 Press CH▼ until “Setup” is
selected.
3 Press VOL+ to display the
Setup menu.
4 Press CH▼ until “Add/Erase”
is selected.
Press VOL+.
5 Press VOL+ or VOL- to select
a channel.
6 Press CH▼ until “Add/Erase”
is selected.
Press VOL+ to select
“Added” or “Erased”.
You can still view a channel that
is not stored in memory by using
the number buttons to select the
channel directly.
Setting the Clock
To record programs while you
are away, or to use the sleep
timer, you must first set the
clock and calendar.
There are two ways to set the
clock:
Option 1, Manual: The digits for
hours and minutes are entered
directly.
Option 2, Auto: The TV’s clock is
synchronized to a time signal
sent out by the local PBS
channel.
Option 1: Setting the clock
directly (“Manual” Method)
1 Press MENU to display the
menu.
2 Press CH▼ until “Time Set”
is selected. Press VOL+.
3 Press VOL+.
The Time Set menu appears.
4 Press VOL+ to select the hour
digits. Press CH▼ or CH▲
repeatedly until the correct
hour appears.
✔ Be sure to set the correct time of
day (am or pm), which appears to
the right of the minutes.
Setup
TV/Line : TV
Air/Cable : Antenna
Auto Program
Add/Erase
Auto Clock Set
Language : English
▲▼Move œ√Sel. Menu
Setup
TV/Line : TV
Air/Cable : Antenna
Auto Program
Add/Erase
Auto Clock Set
Language : English
▲▼Move œ√Sel. Menu
Add/Erase
Channel : ANT 07
Add/Erase : Added
▲▼Move œ√Adj. Menu
Menu
Picture
Time Set
Setup
VCR Setup
Caption
V-chip
▲▼Move œ√Sel. Exit
Time Set
Clock 12:00pm
On Time 12:00pm Off
Off Time 12:00pm Off
Sleep Off
▲▼Move œ√Sel. Menu
Time Set
Clock 07:00pm
Date 01/01/2002 Tue
œ√Move ▲▼Adj. Menu

19
C
HAPTERTHREE
: TV O
PERATION
TV O
PERATION
Setting the Clock,
continued
5
Press VOL+ to select the
minute digits. Press CH▲ or
CH▼ repeatedly until the
correct minute appears.
Press VOL+ to finish the
clock set.
Setting the date
1 Press CH▼ to select the
Date.
2 Press VOL+ to select the
month digits. Press CH▲ or
CH▼ to set the current
month.
3 Press VOL+ to select the day
digits. Press CH▲ or CH▼ to
set the current day.
4 Press VOL+ to select the year
digits. Press CH▲ or CH▼ to
set the current year.
✔ If you make a mistake, press
VOL – to move back to the
incorrect item. Press CH▲ and
CH▼ to change the item.
5 Press MENU to exit the
menu.
Option 2: Using the Local PBS
channel to Automatically Set
the TV Clock:
If the TV clock is set using the
Auto Clock Set option, it will be
automatically synchronized to a
time signal sent out by the local
PBS channel.
1 Press MENU to display the
menu.
2 Press CH▼ until “Setup” is
selected. Press VOL+.
Time Set
Clock 07:30pm
Date 01/01/2002 Tue
œ√Move ▲▼Adj. Menu
Time Set
Clock 07:30pm
Date 01/01/2002 Tue
▲▼Move œ√Sel. Menu
Time Set
Clock 07:30pm
Date 05/01/2002 Thu
œ√Move ▲▼Adj. Menu
Time Set
Clock 07:30pm
Date 05/05/2002 Wed
œ√Move ▲▼Adj. Menu
Time Set
Clock 07:30pm
Date 05/05/2002 Wed
œ√Move ▲▼Adj. Menu
Menu
Picture
Time Set
Setup
VCR Setup
Caption
V-chip
▲▼Move œ√Sel. Exit

TV O
PERATION
20
C
HAPTER
T
HREE
: TV O
PERATION
Setting the Clock,
continued
3
Press CH▼ until “Auto Clock
Set” is selected. Press VOL+.
4 Press VOL+ to select Auto
Clock Set “On”.
5 Press CH▼ to select the
“PBS channel”.
6
Press VOL +.
Press CH▲ and
CH▼ to select your local
PBS channel. Press
VOL + or
VOL -
again to lock in the PBS
channel.
✔ The picture changes according to the
channel.
7 Press the CH▼ button to
select the “Time Zone”
✔ While “Time Zone” is selected, press
either VOL + or VOL - to change the
Time Zone.
Sequence : ATL., EAST, CEN., MTN.,
PAC., ALAS, HAW.
8 Press CH▼ to select the
“DST”(Daylight Savings
Time).
✔ While “DST” is selected, press VOL +
to indicate “Yes,” or “No.”
(Set DST “Yes” on the appropriate day
in April. And set DST “No” on the
appropriate day in October.)
9 Press MENU to exit the
menu.
✔ The time is automatically corrected
when viewing your local PBS channel.
Choosing
Picture Settings
Your TV/VCR has preset
standard values for picture
settings (contrast, brightness,
sharpness, color, and tint). You
can also customize these
settings.
Customizing
Picture Settings
1 Press MENU to display the
menu.
2 Press CH▼ until “Picture” is
selected. Press VOL+.
Setup
TV/Line : TV
Air/Cable : Antenna
Auto Program
Add/Erase
Auto Clock Set
Language : English
▲▼Move œ√Sel. Menu
Auto Clock Set
Auto Clock Set : On
PBS Channel : 06
Time Zone : CEN.
DST : No
▲▼Move œ√Sel. Menu
Auto Clock Set
Auto Clock Set : On
PBS Channel : 06
Time Zone : CEN.
DST : No
▲▼Move œ√Sel. Menu
Auto Clock Set
Auto Clock Set : On
PBS Channel : 07
Time Zone : CEN.
DST : No
▲▼Move œ√Sel. Menu
Auto Clock Set
Auto Clock Set : On
PBS Channel : 07
Time Zone : HAW.
DST : No
▲▼Move œ√Sel. Menu
Auto Clock Set
Auto Clock Set : On
PBS Channel : 07
Time Zone : HAW.
DST : Yes
▲▼Move œ√Sel. Menu
Menu
Picture
Time Set
Setup
VCR Setup
Caption
V-chip
▲▼Move œ√Sel. Exit

21
C
HAPTERTHREE
: TV O
PERATION
TV O
PERATION
Choosing Picture
Settings, continued
3
Press CH▲ or CH▼ to select
Contrast, Brightness,
Sharpness, Color, or Tint.
4 Press VOL+ or VOL– to
change the setting.
The setting for the feature
appears on the screen.
5 Press MENU or wait a few
seconds to store the setting.
✔ Once you’ve made changes to
one or more of the picture
features, your settings are
stored in the TV/VCR’s memory.
Your custom picture setting now
becomes the default setting for
the TV/VCR.
6 Press CH▲ or CH▼ to select
another setting or press
MENU to exit the menu.
Using Automatic Picturre
Settings
This is a special feature that
automatically adjusts your
picture for you.
1 Press P-STD to select an
automatic picture setting.
• Choose Standard to set
the TV to operate at top
performance according to
your TV’s specifications.
• Choose Mild when
viewing the TV in low
light, or when playing
video games.
• Choose Custom if you
want to adjust the settings
yourself.
Picture
Mode : Custom
Contrast 100
Brightness 50
Sharpness 50
Color 50
Tint G: 50 R: 50
▲▼Move œ√Adj. Menu
Standard

TV O
PERATION
22
C
HAPTER
T
HREE
: TV O
PERATION
Setting the Sleep Timer
The sleep timer automatically
turns off the TV/VCR at the time
you select. This is convenient if
you like to fall asleep with the
television on.
1 Press MENU to display the
menu.
2 Press CH▼ until “Time Set”
is selected. Press VOL+.
3 Press CH▼ until “Sleep” is
selected.
4 Press VOL+ or VOL– to set
the length of time you want
the TV/VCR to remain on; off,
10, 20, 30, 60, 90, 120, 150, or
180 minutes.
5 Press MENU to exit the
menu.
Using the On/Off Timer
This timer turns the TV/VCR on
or off at a specific time. You may
set the on time, the off time, or
both.
Whatever you choose, you must
turn the timer on after you set
the on or off times.
1 Press MENU to display the
menu.
2 Press CH▼ until “Time Set”
is selected. Press VOL+.
Setting the on time
1 Press CH▼ to select “On
Time.”
2 Press VOL+ to make the hour
flash.
3 Press CH▲ or CH▼ to set the
hour the set will turn on.
4 Press VOL+ to make the
minutes flash.
5 Press CH▲ or CH▼ to set the
minute the set will turn on.
6 Press VOL+ to make the Off
flash.
7 Press CH▲ or CH▼ to set the
timer to “ON.”
Setting the off time
1 Press CH▼ to select “Off
Time.”
2 Press VOL+ to make the hour
flash.
3 Press CH▲ or CH▼ to set the
hour the set will turn off.
4 Press VOL+ to make the
minutes flash.
5 Press CH▲ or CH▼ to set the
minute the set will turn off.
6 Press VOL+ and CH▲ or
CH▼ to set the timer “On”.
7 Press MENU to exit the
menu.
Time Set
Clock 07:30pm
On Time 12:00pm Off
Off Time 12:00pm Off
Sleep 30
▲▼Move œ√Sel. Menu
Menu
Picture
Time Set
Setup
VCR Setup
Caption
V-chip
▲▼Move œ√Sel. Exit
Time Set
Clock 07:30pm
On Time 07:00pm Off
Off Time 12:00pm Off
Sleep Off
œ√Move ▲▼Adj. Menu

23
C
HAPTERFOUR
: VCR
OPERATION
C
HAPTER
F
OUR
: VCR O
PERATION
Inserting and Ejecting
a Video Tape
To insert a video tape:
1 Hold the video tape window-
side up, with the arrow
pointing away from you.
Don’t try to insert a tape
upside down or backwards.
Use only video tapes labeled
“VHS.” PAL and S-VHS video
tapes are not compatible
with this unit. Choose brand
name, high quality tapes for
best results.
2 Gently push the tape through
the compartment door until
you feel the VCR pull it in.
The TV/VCR loads the tape
automatically.
If the power is off when you
insert a tape, the TV/VCR
turns on automatically.
If the safety tab of your video
tape has been removed, the
tape begins to play
automatically.
✔ For more information on the
safety tab, see page 40.
To eject a video cassette tape:
1 Press STOP to stop playing
the tape.
✔ When you’re finished playing a
video tape, rewind it and
remove it from the TV/VCR to
protect it from wear and tear.
2 Press STOP/EJECT on the
TV/VCR to eject the tape.
Remove the tape and turn off
the TV/VCR.
Playing a
Video Tape
Playing a Tape
1 Insert the video tape.
2 If the tape doesn’t begin to
play automatically, press
PLAY.
Then, if necessary, the
TV/VCR will automatically
adjust the tape’s tracking.
✔ For information on automatic
tracking, see page 25.
✔ For information on the time
counter, see page 25.
Pausing
1 While a tape is playing, press
P./STILL to pause the tape.
There may be vertical jitter or
horizontal streaks on the
screen while a tape is
paused. You can try to
eliminate these problems by
pressing the TRK + and TRK –
buttons on the remote
control.
✔ For information on automatic
tracking, see page 25.
After five minutes in pause,
the TV/VCR automatically
enters PLAY mode to protect
the video heads.
2 Press PLAY to resume playing
the tape.
C
HAPTER
F
OUR
VCR O
PERATION
Play

24
C
HAPTER
F
OUR
: VCR O
PERATION
24
VCR O
PERATION
Playing a Video Tape,
continued
Using Picture Search
Picture Search lets you quickly
search a pre-recorded video
tape for a particular scene.
1 While playing a tape, press
and release FF or REW.
The images from the tape are
displayed on the screen at a
high speed.
This technique is useful if you
are searching a small amount
of tape. If you want to search
a large amount of tape, stop
the tape before pressing FF
or REW.
There is no sound while you
search for a picture at high
speeds, and some horizontal
streaks may appear on the
screen.
2 When you find the scene you
want, press and release FF or
REW again to resume playing
the tape at regular speed.
Using Tracking
This feature automatically
adjusts tracking on video tapes.
1 Insert and play a video tape.
When the tape begins to play,
the TV/VCR begins automatic
tracking.
The tracking display will
appear the first time a tape is
played after being inserted
into the TV/VCR, when there
is a change in tape speed, or
when you press TRK +,-.
2 If automatic tracking doesn’t
remove the streaks from the
picture, press and hold TRK+
or TRK– until the streaks
disappear.
Using the Time Counter
The time counter allows you to
keep track of how much time
(in hours, minutes, and seconds)
has elapsed on the video tape.
The counter can also be useful if
you want to find a specific point
on a pre-recorded tape.
1 While a tape is playing, press
DISPLAY twice.
The time counter appears.
The counter displays time
only for recorded sections of
tape. Blank tapes or blank
sections of tapes do not
affect the counter display.
2 Press CLEAR to set the
counter to “00:00:00.”
✔ The TV/VCR automatically
resets the counter to “00:00:00”
when you eject a tape or record.
3 Press DISPLAY to remove the
time counter.
Using Memory Stop
Memory Stop makes it easy to
find a particular scene in a video
tape. The TV/VCR automatically
stops rewinding or fast
forwarding when the memory
counter reaches “00:00:00.”
If you mark a desired scene as
“00:00:00,” you can search for it
the next time you watch the
tape.
1 While playing a tape, when
you reach the scene you
want, press DISPLAY twice.
The time counter appears.
2 Press CLEAR to reset the
timer to “00:00:00.”
00:01:41

25
C
HAPTERFOUR
: VCR O
PERATION
VCR O
PERATION
Playing a Video Tape,
continued
To return to the scene you
marked:
1 Press STOP.
2 Press FF or REW to return to
the scene you marked.
The TV/VCR stops the tape
when the counter reaches
“00:00:00.”
3 Press PLAY to view the scene
you marked again.
Using P.PLUS
Press P.PLUS to compensate for
a poor rental tape.
1 Insert a tape and press PLAY.
2 Press P.PLUS, and “Picture
Plus Off” appears on the
screen. Press P.PLUS again
to turn to “Picture Plus On”.
The Rental Picture Plus
functions only when a tape is
being played.
✔ If the tape is ejected and
reinserted, the Rental Plus
feature will be OFF.
Recording TV Programs
as You Watch
Recording
1 With your TV/VCR turned on,
and with a tape in the unit,
press SPEED.
✔ Be sure the record safety tab is
in place. For information on the
record safety tab, see page 40.
The tape speed appears in
the lower left corner of the
screen.
2 Press SPEED repeatedly until
the speed you want (SLP, SP)
appears.
✔ SP (Standard Play) is the most
common speed for recording.
For more information on tape
speeds, see page 40.
3 Select the television channel
you want by pressing CH▲
or CH▼ or by using the
number buttons.
If you are using the number
buttons to select the channel,
press 0 before a single-digit
channel number (for channel
5, press 0, 5).
4 Press REC on the remote
control.
The record indicator on the
control panel illuminates and
the TV/VCR begins recording.
✔ The TV/VCR automatically stops
recording when it reaches the
end of the tape.
✔ Press STOP at any time to stop
recording.
✔ Don’t change tape speeds while
recording; this may cause
picture distortion during
playback.
When you finish recording,
rewind the tape and remove
it from the TV/VCR.
Picture Plus : On
SP

VCR O
PERATION
26
C
HAPTERFOUR
: VCR O
PERATION
Recording TV Programs
as You Watch, continued
Editing While Recording
You can edit while recording,
selecting only those scenes you
want to record from the current
television program.
This is especially helpful if you
want to record a program
without commercials.
1 Be sure you have begun
recording and that the record
indicator light on the front
panel is lit.
2 Press P./STILL to temporarily
stop recording.
After ten minutes in pause
mode, the TV/VCR stops the
tape automatically and
switches to TV mode to
protect the video heads. If
this happens, press REC to
resume recording.
3 To resume recording, press
P./STILL again.
Using Advanced
Recording Features
One-touch Recording
One-touch Recording (OTR) lets
you record television programs
with the touch of a button.
You can program the length of
time (up to four hours) that you
want to record.
1 Insert a video cassette tape,
set the tape speed, and
select the channel you want
to record.
✔ The TV/VCR won’t record if the
record safety tab on the tape
has been removed. For more
information, see page 40.
2 Press REC on the remote
control twice.
Your recording time options are:
30 minutes, 1 hour, 1 hour and 30
minutes, 2 hours, 2 hours and 30
minutes, 3 hours, or 4 hours.
3 Press REC on the remote
control repeatedly until the
time you want appears.
The TV/VCR begins recording.
You can increase the length
of time you want to record at
any time during the recording
process by pressing the REC
button again and choosing
additional time.
If you want to stop recording
before the time is up, press
the REC button until the OTR
display shows “Stop.” The
recording stops after a few
seconds. You can also press
STOP/EJECT on the front
panel.
Timer Recording
You can set the timer to record
up to six different programs. The
timer can turn the TV/VCR on at
the time you select, record for a
selected length of time, and then
turn off.
You can record a program one
time, daily (every day, Monday
through Friday), or weekly (the
same day every week).
1 Press MENU to display the
menu.
2 Press CH▼ until “VCR Setup”
is selected. Press VOL+.
✔ The clock must be set to the
correct time and date before you
program the timer.
Record
30M
Menu
Picture
Time Set
Setup
VCR Setup
Caption
V-chip
▲▼Move œ√Sel. Exit

27
C
HAPTERFOUR
: VCR O
PERATION
VCR O
PERATION
Using Advanced Recording
Features, continued
2 Press CH▼ until “Timer
Record” is selected. Press
VOL+.
3 Press VOL+.
Press CH▲ or CH▼ to select
the channel you want to
record. Press VOL+ to lock in
the channel you’ve chosen.
The TV/VCR assigns a
number (1-6) to your entry
which is used in the program
review feature. (For more
information, see page 22.)
✔ If you make a mistake at any
point during programming, press
VOL– and CH▲ until the number
you want to change is flashing,
then enter the correct number.
If you are recording a
channel that comes through
a cable converter box, enter
the output number of the
cable box.
4 Press CH▼ to select “Time.”
Press VOL+.
Press CH▲ or CH▼ to select
the hour to begin recording.
5 Press VOL+.
Press CH▲ or CH▼ to select
the minute to begin
recording.
6 Press VOL+.
Press CH▲ or CH▼ to select
the hour to end recording.
✔ The TV/VCR automatically
selects AM or PM for the
ending time.
7 Press VOL+.
Press CH▲ or CH▼ to select
the minute to end recording.
Press VOL+ to lock in the
minute.
VCR Setup
Timer Record
Program Review
True Repeat : Off
Block Repeat : 1
▲▼Move œ√Sel. Exit
Timer Record (1)
05/01/2002 Wed 05:30pm
Channel : 11
Time : 05:30pm √ 06:30
MO/DAY : 05/01/2002 Wed
Speed : SLP
Select : One Time
Clear :REC Cancel
œ√Move ▲▼Sel. Confirm
Timer Record (1)
05/01/2002 Wed 05:30pm
Channel : 11
Time : 06:30pm √ 06:30
MO/DAY : 05/01/2002 Wed
Speed : SLP
Select : One Time
Clear :REC Cancel
▲▼Move œ√Sel. Confirm
Timer Record (1)
05/01/2002 Wed 05:30pm
Channel : 11
Time : 06:30pm √ 06:30
MO/DAY : 05/01/2002 Wed
Speed : SLP
Select : One Time
Clear :REC Cancel
▲▼Move œ√Sel. Confirm
Timer Record (1)
05/01/2002 Wed 05:30pm
Channel : 11
Time : 06:30pm √ 07:30
MO/DAY : 05/01/2002 Wed
Speed : SLP
Select : One Time
Clear :REC Cancel
▲▼Move œ√Sel. Confirm
Timer Record (1)
05/01/2002 Wed 05:30pm
Channel : 11
Time : 06:30pm √ 07:30
MO/DAY : 05/01/2002 Wed
Speed : SLP
Select : One Time
Clear :REC Cancel
▲▼Move œ√Sel. Confirm

VCR O
PERATION
28
C
HAPTER
F
OUR
: VCR O
PERATION
Using Advanced Recording
Features, continued
8 Press CH▼ to select
“MO/DAY.” Press VOL+.
Press CH▲ or CH▼ to select
the month to begin recording.
9 Press VOL+.
Press CH▲ or CH▼ to select
the day to begin recording.
10 Press VOL+.
Pse CH▲ or CH▼ to select
the year to begin recording.
Press VOL+ to lock in the
year. ”
11Press CH▼ to select
“Speed”.
Press VOL+ and CH▲ or
CH▼ to select the speed at
which you want to record.
12 Press CH▼ to select
“Select”. Press VOL+
Press CH▼ to select the
“One Time”, or “Weekly”,
“Daily”.
13 Press MENU to exit the
menu.
✔ If you enter two program times
that overlap, a program overlap
warning appears on the TV
screen, along with instructions
for fixing the overlap.
✔ The REC indicator on the front
panel of the TV/VCR is lit when
program times are stored.
14 Press POWER to turn off
the TV/VCR.
Important
• The TV/VCR should be off to
record the programs you’ve
chosen. But, if you are
recording a channel that
comes through a cable box,
be sure to leave the cable
box on and tuned to the
channel you want to record.
• During timer recording, there
is no picture on the screen
because the power is off. If
you want to watch the
channel while it’s being
recorded, press POWER on
the remote control.
• One-time timer programs
clear from memory after
recording. Daily and weekly
programs remain in the timer
until you remove them. If
power to the TV/VCR is
interrupted, all programs will
be disabled until you reset
the clock. Then, the programs
will be restored.
Timer Record (1)
05/01/2002 Wed 05:30pm
Channel : 11
Time : 06:30pm √ 07:30
MO/DAY : 05/01/2002 Wed
Speed : SLP
Select : One Time
Clear :REC Cancel
▲▼Move œ√Sel. Confirm
Timer Record (1)
05/01/2002 Wed 05:30pm
Channel : 11
Time : 06:30pm √ 07:30
MO/DAY : 05/01/2002 Wed
Speed : SLP
Select : One Time
Clear :REC Cancel
▲▼Move œ√Sel. Confirm
Timer Record (1)
05/01/2002 Wed 05:30pm
Channel : 11
Time : 06:30pm √ 07:30
MO/DAY : 05/01/2002 Wed
Speed : SLP
Select : One Time
Clear :REC Cancel
▲▼Move œ√Sel. Confirm
Timer Record (1)
05/01/2002 Wed 05:30pm
Channel : 11
Time : 06:30pm √ 07:30
MO/DAY : 05/01/2002 Wed
Speed : SLP
Select : One Time
Clear :REC Cancel
▲▼Move œ√Sel. Confirm
Timer Record (1)
05/01/2002 Wed 05:30pm
Channel : 11
Time : 06:30pm √ 07:30
MO/DAY : 05/01/2002 Wed
Speed : SLP
Select : One Time
Clear :REC Cancel
▲▼Move œ√Sel. Confirm

29
C
HAPTERFOUR
: VCR O
PERATION
VCR O
PERATION
Using Advanced Recording
Features, continued
Using Program Review
Program Review allows you to
review all of the programmed
recordings currently stored in
the TV/VCR’s memory and to
remove a programmed
recording quickly and easily.
1 Press MENU to display the
menu.
2 Press CH▼ until “VCR Setup”
is selected. Press VOL+.
3 Press CH▼ until “Program
Review” is selected.
Press VOL+.
The information for the first
program appears on the
screen.
✔ Program Review is only
available if you have
programmed your TV/VCR to
record at a later time.
4 To see the information for the
program number, press VOL+.
✔ If you’re recording through a
cable box, the Program Review
screen displays the output
channel of the cable box as the
channel number to be recorded.
5 If you want to remove a
program from memory, press
CLEAR when the program
you want to erase appears
on the screen.
That program is erased from
memory.
The TV/VCR is equipped with
a program memory backup
that saves all the timer
program information if the
power to the TV/VCR is
interrupted.
If the unit has been without
power, all of the timer
program information will be
disabled, until you reset the
clock. When the clock is
reset, the programs will be
restored.
6 Press MENU to exit the
menu.
VCR Setup
Timer Record
Program Review
True Repeat : Off
Block Repeat : 1
▲▼Move œ√Sel. Menu
Program Revies
Date Start End CH
1. 5/01 6:30pm √ 7:30 24
2. 5/02 6:30pm √ 7:30 11
3. -/-- -:--am √ -:-- --
4. -/-- -:--am √ -:-- --
5. -/-- -:--am √ -:-- --
6. -/-- -:--am √ -:-- -Clear : REC Canel
▲▼Move √Adj. Menu
Menu
Picture
Time Set
Setup
VCR Setup
Caption
V-chip
▲▼Move œ√Sel. Exit

30
C
HAPTER
F
IVE
: S
PECIALFEATURES
C
HAPTER
F
IVE
S
PECIAL
F
EATURES
C
HAPTERFIVE
: S
PECIALFEATURES
Using True Repeat
You can set your TV/VCR to
automatically repeat a tape or a
section of tape. When you use
True Repeat, your TV/VCR will
play until it reaches the end of a
tape. Then, it will rewind to the
beginning of the tape and begin
playing again.
1 Press MENU to display the
menu.
2 Press CH▼ until “VCR Setup”
is selected. Press VOL+.
3 Press CH▼ until “True
Repeat” is selected. Press
VOL+ to turn True Repeat on.
4 Press MENU to exit the
menu.
5 Insert and play a pre-
recorded video tape.
The TV/VCR will play the tape
until it reaches the end.
Then, the TV/VCR will stop
the tape, rewind it to the
beginning, and begin playing
again.
If the TV/VCR reaches an
unrecorded section of tape
before it reaches the end, it
will search forward and
check the tape again. If it
finds a recorded section of
tape, it will begin playing. If
the tape is still blank, it will
continue to search forward,
until it reaches the end of the
tape.
6 Press STOP to end the
repeat.
Using Block Repeat
Block Repeat allows you to
repeat a section of tape that you
select. You can repeat this
section of tape (the “block”)
from one to ten times. “Repeat”
section should be set up at a
minimum ten-second interval.
1 Press MENU to display the
menu.
2 Press CH▼ until “VCR Setup”
is selected. Press VOL+.
3 Press CH▼ until “Block
Repeat” is selected. Press
VOL+ to select the number of
times you want your “block”
to repeat.
You can choose to have your
“block” repeat from one to
ten times.
4 Press MENU to exit the
menu.
5 Insert and play a pre-
recorded video tape.
6 Press REPEAT at the
beginning of the “block” you
want to repeat. (“Repeat
setting” appears on the
screen when the button is
pressed.)
Menu
Picture
Time Set
Setup
VCR Setup
Caption
V-chip
▲▼Move œ√Sel. Exit
Menu
Picture
Time Set
Setup
VCR Setup
Caption
V-chip
▲▼Move œ√Sel. Exit
VCR Setup
Timer Record
Program Review
True Repeat : On
Block Repeat : 1
▲▼Move œ√Sel. Exit
VCR Setup
Timer Record
Program Review
True Repeat : Off
Block Repeat : 1
▲▼Move œ√Sel. Exit

31
C
HAPTERFIVE
: S
PECIALFEATURES
S
PECIAL
F
EATURES
C
HAPTER
F
IVE
: S
PECIALFEATURES
Using Block Repeat,
continued
7
When you reach the end of
the “block,” press REPEAT
again.
The TV/VCR will rewind the
tape to beginning of the
block and repeat it.
The TV/VCR will repeat the
block as many times as the
number you set in step 3.
8 To stop block repeat, press
the STOP, P./STILL, or PLAY
buttons. You can also cancel
block repeat by fast
forwarding or rewinding to a
point outside of the “block.”
Viewing Closed
Captions
Your TV/VCR decodes and
displays closed captions. These
captions are usually subtitles for
the hearing impaired or
translations into another
language. All VCRs record the
closed caption signal from
television programs, so homerecorded video tapes also
provide closed captions.
✔ Most pre-recorded commercial video
tapes provide closed captions. Check
for this symbol in your
television schedule and on tape
packaging.
1 Press MENU to display the
menu.
2 Press CH▼ until “Caption” is
selected. Press VOL+.
3 Press VOL+ to turn the closed
caption feature on.
✔ Misspellings and unusual
characters sometimes appear in
closed caption transmissions.
✔ There may be a small delay
before captions appear when
you change channels.
4 Press or CH▼ to select,
“Mode.” Press VOL+ to
choose “Caption” or “Text.”
✔ In text mode, information
unrelated to the captions is
displayed, such as news or
weather. Text often covers a
large portion of the screen.
5 If you wish, use CH▲, CH▼,
or VOL+ to change the
channel or field. Then, press
MENU to return to normal
viewing.
✔ Different channels display
different information. For
example, Channel 1 may have
subtitles in English, while
Channel 2 has subtitles in
Spanish.
The second field contains
additional information that could
not be included in the first field.
Menu
Picture
Time Set
Setup
VCR Setup
Caption
V-chip
▲▼Move œ√Sel. Exit
Caption
Caption : On
Mode : Text
Channel : 1
Field : 1
▲▼Move œ√Sel. Menu
Caption
Caption : On
Mode : Text
Channel : 1
Field : 1
▲▼Move œ√Sel. Menu

32
C
HAPTER
F
IVE
: S
PECIALFEATURES
S
PECIAL
F
EATURES
Using the V-Chip
The V-Chip feature automatically
locks out programming that is
deemed inappropriate for
children. The user must first
enter a PIN (personal ID
number) before any of the
V-Chip restrictions can be set up
or changed.
Setting Up Your Personal
ID Number (PIN)
1 Press MENU to display the
menu.
2 Press CH▼ until “V-chip” is
selected. Press VOL+.
3 Press VOL+. The “Enter PIN”
screen will appear. Enter
your 4-digit PIN number.
Note: The default PIN
number for a new TV set is
“0-0-0-0.”
4 After entering a valid PIN
number, the “V-chip” screen
will appear. Press
CH▼ and select “Change
Pin.”
5 While the “Change Pin” is
selected, press VOL+.
The Change Pin screen will
appear. Choose any 4-digits
for your PIN and enter them.
As soon as the 4 digits are
entered, the “Confirm new
Pin” screen appears. Reenter the same 4 digits.
When the Confirm screen
disappears, your PIN has
been memorized.
Note: If you forget the PIN,
press the remote-control
keys in the following
sequence. (this resets the pin
to 0-0-0-0:)
POWER OFF ➜ MUTE ➜ 8 ➜
2 ➜ 4 ➜ POWER ON.
How to Enable/Disable
the V-Chip
1 Press MENU to display the
menu.
2 Press CH▼ until “V-chip” is
selected. Press VOL+.
3 Press VOL+. The “Enter PIN”
screen will appear. Enter
your 4-digit PIN number.
4 The “V-Chip” screen will
appear, and “V-Chip lock”
will be selected.
To enable the V-Chip feature,
press VOL+ so that the
“V-Chip lock” field is Yes.
(Pressing VOL+ will alternate
between Yes and No.)
Menu
Picture
Time Set
Setup
VCR Setup
Caption
V-chip
▲▼Move œ√Sel. Exit
Enter Pin :
_ _ _ _
0-9: Sel. Exit
Change Pin
Enter new Pin :
_ _ _ _
Change Pin
Confirm new Pin :
_ _ _ _
➜
V-chip
V-chip Lock :Yes
TV Guide lines
MPAARating
Change Pin
▲▼Move œ√Sel. Menu

33
C
HAPTERFIVE
: S
PECIALFEATURES
Using the V-Chip, continued
How to Set up
Restrictions Using the
“TV guidelines”
First, set up a personal
identification number (PIN), and
enable the V-Chip. (See last
sections.) Parental restrictions
can be set up using either of
two methods: The TV guidelines
or the MPAA rating.
1 Press MENU to display the
menu.
2 Press CH▼ until “V-chip” is
selected. Press VOL+.
3 Press VOL+. The “Enter PIN”
screen will appear. Enter
your 4-digit PIN number.
4 The “V-chip mode” screen
will appear. Press CH ▼ to
select the “TV guide lines.”
5 Press VOL+. The “TV
guidelines” screen will
appear. Press the CH ▲,
CH ▼ buttons to select one
of the six age-based
categories:
TV-Y Young children
TV-Y7 Children 7 and over
----------------------------------TV-G General audience
TV-PG Parental guidance
TV-14 Viewers 14 and over
TV-MA Mature audience
Note: These categories
consist of two separate
groups.
TV-Y and TV-Y7 (young
children through age 7), and
TV-G through TV-MA
(everybody else).
The restrictions for these two
groups work independently:
If a household includes very
young children as well as
young adults, the TV
guidelines must be set up
separately for each age
group. (See next step.)
6 At this point, one of the TV-
Ratings is selected (red
color).
Press VOL+: Depending on
your existing setup, either
“U” or “B” will will be
selected.
(U= Unblocked, B= Blocked)
While the “U” or ”B” is red
color, press CH ▲or CH ▼ to
block or unblock the
category.
Press MENU once to save
the TV guidelines.
A TV-Rating will be selected,
and no letters will be
selected. To exit this screen,
press MENU again. To select
a different TV-Rating, press
CH ▲ or CH▼ and then
repeat the process.
Note 1: The TV-Y7, TV-PG,
TV-14 and TV-MA have
additional options. See the
next step to change any of
the following sub-ratings:
FV: Fantasy violence
D: Dialog
L: Adult language
S: Sexual situation
V: Violence
Note 2: The V-Chip will
automatically block certain
categories that are “more
restrictive”.
For example, if you block
“TV-Y” category, then TV-Y7
will automatically be blocked.
Similarly, if you block the TVG category, then all the
categories in the “young
adult” group will be blocked
(TV-G, TV-PG, TV-14 and TVMA). The sub-ratings (D, L, S,
V) work together similarly.
(See next section).
S
PECIAL
F
EATURES
C
HAPTER
F
IVE
: S
PECIALFEATURES
V-chip
V-chip Lock :Yes
TV Guide lines
MPAARating
Change Pin
▲▼Move œ√Sel. Menu
TV Guide lines
All FV V S L D
TV-Y U
TV-Y7 U U
TV-G U UUUU
TV-PGU UUUU
TV-14 U UUUU
TV-MAU UUU
U: Unblocked B: Blocked

34
C
HAPTER
F
IVE
: S
PECIALFEATURES
Using the V-Chip, continued
7 How to set the FV, D, L, S and
V sub-ratings.
First, select one of these TV-
Ratings: TV-Y7, TV-PG, TV-14
or TV-MA (See Step 4,
above).
Next, while the TV-Rating is
selected, repeatedly press
VOL+. This will cycle
through the available subratings (FV,L, S, D or V).
A selecting letter (“U” or
“B”) will be displayed for
each sub-rating. While the
“U” or “B” is selecting, press
CH ▲ or CH ▼ to change the
sub-rating.
Press MENU once to save
the TV guidelines.
A particular TV-Rating will be
selected, and no letters will
be selected. To exit this
screen, press MENU again.
To select a different TVRating, pressCH ▲ or CH ▼
and then repeat the process.
Note: The V-chip will
automatically block certain
categories that are “More
restrictive”.
For example, if you block the
“L” sub-rating in TV-PG, then
the “L” sub-ratings in TV-14
and TV-MA will automatically
blocked.
8 Press MENU to clear all the
screens.
(Or proceed to the next
section, and set up additional
restrictions based on the
MPAA codes).
How to Set up Restrictions
using the MPAA Ratings:
G, PG, PG-13, R, NC-17, X
The MPAArating system uses
the Motion Picture Association
of America (MPAA) system, and
its main application is for
movies. (Eventually, movie
videocassettes will be encoded
with MPAA ratings.) When the
V-Chip lock is on, the TV will
automatically block any
programs that are coded with
objectionable ratings (either
MPAA or TV-Ratings).
1 Press MENU to display the
menu.
2 Press CH▼ until “V-chip” is
selected. Press VOL+.
3 Press VOL+. The “Enter PIN”
screen will appear. Enter
your 4-digit PIN number.
4 The “V-chip” screen will
appear. Press CH ▼to select
the “MPAA rating”.
5 While “MPAA rating” is
selected, press the VOL+
button. The “MPAA rating”
screen will appear.
6 Repeatedly press CH ▼ to
select a particular MPAA
category. Pressing CH▼ will
cycle through the MPAA
categories:
G: General audience (no
restrictions).
PG: Parental guidance
suggested.
PG-13: PG-13(Parents strongly
cautioned).
R: R(Restricted. Children under
17 should be accompanied by an
adult).
NC-17: No children under age 17.
X: X (Adults only).
NR: Not rated.
S
PECIAL
F
EATURES
V-chip
V-chip Lock :Yes
TV Guide lines
MPAARating
Change Pin
▲▼Move œ√Sel. Menu
MPAARating
GU
PG U
PG-13 U
RU
NC-17 U
XU
NR U
U: Unblocked B: Blocked

35
C
HAPTERFIVE
: S
PECIALFEATURES
C
HAPTER
F
IVE
: S
PECIALFEATURES
Using the V-Chip, continued
Next, press VOL+ to activate the
category.
While a particular category is
selected, press VOL+ to activate
it.
Press MENU to exit the V-Chip
menu.
Note: The V-Chip will
automatically block any
category that is “more
restrictive”.
For example, if you block the
“PG-13” category, then “R”,
“NC-17” and “X” will
automatically be blocked also.
How to Reset the TV after
the V-Chip Blocks a
Channel(“Emergency
Escape”)
If the TV is tuned to a restricted
channel, the V-Chip will block it.
The screen will go blank and the
following message will appear:
“Excessive rating.”
To resume normal viewing, tune
to a different channel using the
number buttons. Under certain
conditions (depending on the
rating of the local TV programs)
the V-Chip might lock out all the
channels.
In this case, use the V-Chip
function for an “emergency
escape”:
1 Press MENU to display the
menu.
2 Press CH▼ until “V-chip” is
selected. Press VOL+.
3 Press VOL+. The “Enter PIN”
screen will appear. Enter
your 4-digit PIN number.
4 Press VOL+: The V-Chip lock
field will appear, and “V-Chip
lock” will be selected.
Press VOL+ to switch V-Chip
off. (Repeatedly pressing
VOL+ will alternate between
yes and no.)
S
PECIAL
F
EATURES

36
C
HAPTERFIVE
: S
PECIALFEATURES
C
HAPTERFIVE
: S
PECIALFEATURES
Using Special
Playback Features
Your TV/VCR provides you with
special features that are
available when you are playing a
tape. These features are Frame
Advance, Skip Search, and Slow
Motion.
Frame Advance
Frame Advance allows you to
watch a tape frame-by-frame.
1 While a tape is playing, press
P./STILL on the remote.
If the picture jitters, pressTRK
+,- .
2 Press F.ADV/SKIP repeatedly
to move forward frame-byframe. Do not hold the button
down.
Press PLAY to resume normal
playback.
Skip search
Skip search allows you to
quickly search through a short
section of tape.
1 While a tape is playing, press
F.ADV/SKIP.
The TV/VCR will fast-forward
through the tape for 60
seconds, then continue
playing.
Slow motion
You can watch a tape at various
slow-motion speeds.
1 While a tape is playing, press
SLOW + or SLOW – on the
remote.
If the picture is jittery or
shows noise, try using the
TRK buttons to clear the
picture.
2 Press SLOW + or SLOW – to
adjust the slow motion speed
between 1/5 and 1/60 normal
speed.
3 Press PLAY to resume normal
play.
There is no sound during
slow motion.
✔ It is normal to occasionally see
some streaks or jitter during
slow motion play.
✔ If slow motion continues for
more than five minutes, the
TV/VCR may play automatically
to protect the tape and video
heads.
Jet search
When pressing FF or REW
during play, the search speed
becomes faster.
S
PECIAL
F
EATURES

37
C
HAPTERFIVE
: S
PECIALFEATURES
Copying, or Dubbing, a Video
To make a copy, or “dub,” of another video tape, you need:
• your TV/VCR
• a separate VCR (or camcorder)
• two A/V cables with connectors. (You can find these at most
electronics supply stores.)
Important warning:
One Federal Court has held that unauthorized recording of copyrighted
TV programs may be an infringement of copyright laws.
Making the Connections
Attach one end of the video/audio cable to the VIDEO/AUDIO OUT
connector of the playback VCR (or camcorder) and the other end to
the VIDEO/AUDIO IN connector of the TV/VCR.
Dubbing
1 Insert the video cassette tape you want to copy into the playback
VCR (or camcorder).
2 Insert a blank video tape (or any video tape with the record safety
tab intact) into the recording TV/VCR.
3 Press LINE IN on the remote control of the recording TV/VCR.
The words “Line in” appear in the upper left corner of the TV/VCR
screen.
✔ The TV/VCR will be recording from the incoming line rather than from the
normal broadcast signal.
“Line in” will remain on-screen until the PLAY button is pressed on
the playback VCR.
4 To begin recording, simultaneously press REC on the recording
TV/VCR’s remote control and PLAY on the playback VCR (or
camcorder).
5 When you are finished, press STOP on both the VCR (or
camcorder) and the TV/VCR to stop recording.
6 Press LINE IN to return to normal TV viewing.
S
PECIAL
F
EATURES
Line in

38
C
HAPTERSIX
: T
ROUBLESHOOTING
C
HAPTER
S
IX
T
ROUBLESHOOTING
Identifying TV Problems
Poor picture, no picture, blurred
picture, or blue screen.
• Try another channel. Make
sure the unit is plugged into a
working wall outlet.
• Adjust the antenna.
• Press LINE IN.
• Check all wire connections.
Poor sound quality.
• Try another channel.
• Adjust the antenna.
No color, wrong colors or tints.
• Make sure the program is
broadcast in color.
• Adjust the picture settings.
• If the set is moved or turned
in a different direction, the
power should be OFF for at
least 30 minutes.
Picture rolls vertically.
• Adjust the antenna.
• Check all wire connections.
Identifying VCR
Problems
Unit won’t turn on.
• Make sure the unit is plugged
into a working wall outlet.
• Press the POWER button.
Unit won’t take video tape.
• Make sure the tape is
window side up with the
arrow pointing away from
you.
• Make sure there is no other
tape in the compartment.
Unit didn’t record a program.
• Make sure the antenna or
cable is connected and that
the TV/VCR is receiving the
broadcast signal.
• Make sure the record safety
tab on the tape is intact.
Unit didn’t record a timer
program.
• Make sure the unit was
turned off.
• Check the programmed start
and stop times.
• Make sure the time is set
correctly.
There is no picture, the picture
is distorted during video tape
playback, or noise or streaks
appear in the picture.
• Adjust the tracking.
• Clean the video heads.
• Make sure there has been a
recording on the tape.
You can’t receive regular
broadcasts.
• Check the antenna or
cable connections.
Rewind command doesn’t work.
• Make sure the VCR is not in
pause mode.
• Make sure the tape hasn’t
already been rewound.
Fast forward command doesn’t
work.
• Make sure the VCR is not in
pause mode.
• Make sure the tape hasn’t
already been forwarded.
Picture is streaked during
pause mode.
This is normal for SP recordings.

A
PPENDIX
39
A
PPENDIX
Caring for Your TV/VCR
Please follow these guidelines
to get the maximum
performance from your TV/VCR.
Placement
• Do not place the TV/VCR near
extremely hot, cold, humid or
dusty places.
• Do not place the TV/VCR near
appliances with electric
motors that create magnetic
fields, such as vacuum
cleaners.
• Keep the ventilation openings
clear; do not place the
TV/VCR on a soft surface,
such as cloth or paper.
• Place the TV/VCR in an
upright position only.
Liquids
Do not handle liquids near or on
the TV/VCR. Liquids that spill
into it can cause serious
damage.
Cabinet
• Never open the cabinet or
touch the parts inside.
• Wipe your TV/VCR with a
clean, dry cloth. Never use
water, cleaning fluids, wax,
or chemicals.
• Do not put heavy objects on
top of the cabinet.
Video Heads
• Use a head cleaning tape to
remove any dirt that has
accumulated on the video
heads.
• Follow the instructions that
come with the cleaning tape;
excessive use of a cleaning
tape can shorten head life.
Temperature
If your TV/VCR is moved from a
cold to a warm place, unplug the
power cord, and allow at least
two hours for moisture that may
have formed inside the unit to
dry completely.
About Video Tapes
Use only video tapes marked
VHS with this TV/VCR.
Caring for Video Tapes
• Keep tapes away from direct
sunlight, heat or cold.
• Insert tapes with the window
side up and the arrow
pointing away from you.
• Do not subject tapes to
violent vibrations or shocks.
• Never try to take apart or
splice a video tape.
• Do not open the cassette,
touch the tape, or put
anything inside the tape
case.
• Read the instructions
supplied with video tapes.
Recording Speeds
You can play or record a tape at:
• SP (Standard Play) speed
• SLP (Super Long Play) speed
Your TV/VCR automatically plays
tapes at the proper speed.
Recording at slower tape
speeds allows tapes to hold
more program material.
TAPE SP SLP
T-60 1 hr. 3 hrs.
T-120 2 hrs. 6 hrs.
T-160 2 hrs., 8 hrs.
4 0 mins.
The Record Safety Tab
Most video tapes have a safety
tab that must be intact to record.
To protect a tape from erasure,
you can break off the tab.
To record on a cassette with the
tab removed, cover the hole
with cellophane tape.

A
PPENDIX
40
A
PPENDIX
Specifications
Format
VHS Standard
Recording system
Rotary, azimuth four-head
helical scanning system
Luminance: FM azimuth
recording
Color signal: Converted
subcarrier phase shift recording
Television system
NTSC-type color signal EIA
Standard (525 lines, 60 fields)
Audio track
One track
Tape width
12.7 mm (1/2 inch)
Record speed
SP: 33.35 mm/s (1.31 in./s)
SLP: 11.12 mm/s (0.43 in./s)
Record/playback time
480 minutes with T-160 used in
SLP mode
FF/REW time
Less than 2 min. with T-120
Heads
Video: Four rotary heads
Audio/control: One stationary
head
Erase: One full track erase, one
audio track erase
Video
Input
VIDEO IN jack (RCA) 1.0 V p-p,
75-ohm unbalanced
Audio
Input
AUDIO IN jack (RCA) -8 dBm,
50K-ohm unbalanced
TV tuners
VHF input: ch. 2 – ch. 13, cable
channels “4A, A~W, W+1~W+84,
A-5~A-1” 75-ohm unbalanced
UHF input: ch. 14 – ch. 69 VHF,
UHF one input 75-ohm unbalanced
Operating temperature
41° F – 104° F (5° C – 40° C)
Operating humidity
10% – 75%
Equipment specifications are
subject to change without
notice
Model
Power requirements
Power consumption
Dimensions(w x d x h)
Weight
CMC13410
120V AC, 60Hz
Approx. 60watts when on
Approx. 5watts when off
366 x 382 x 381 mm
14.41 x 15.04 x 15.00 inches
11.2kg ; 24.69lbs
CMC19410
120V AC, 60Hz
Approx. 70watts when on
Approx. 5watts when off
486 x 468 x 487 mm
19.13x 18.43 x 19.17 inches
19kg ; 41.89lbs

Curtis Mathes Color Television
This Curtis Mathes brand product, as supplied and distributed by Curtis Mathes and delivered
new, in the original carton to the original consumer purchaser, is warranted by Curtis Mathes
against manufacturing defects in materials and workmanship for a limited warranty period of:
Ninety (90) Days Labor and One (1) Year Parts and
Two (2) Years Warranty for Picture Tube (CRT)
This limited warranty begins on the original date of purchase, and is valid only on products
purchased and used in the United States. To receive warranty service, the purchaser must
contact Curtis Mathes for determination of problem and service procedures. Warranty service
can only be performed by a Curtis Mathes authorized service center. The original dated bill of
sale must be presented upon request as proof of purchase to Curtis Mathes or authorized
service center.
Curtis Mathes will repair or replace this product, at our option and at no charge as stipulated
herein, with new or reconditioned parts or products if found to be defective during the limited
warranty period specified above. All replaced parts and products become the property of Curtis
Mathes and must be returned to Curtis Mathes. Replacement parts and products assume the
remaining original warranty, or ninety (90) days, whichever is longer.
To obtain warranty service, please contact Curtis Mathes at: 1-877-456-2788
For more product and customer support information, visit the Curtis Mathes website at:
www.curtismathes.com
In-home service will be provided during the warranty labor period subject to availability within
the contiguous United States. In-home service is not available in all areas. To receive in-home
service, the product must be unobstructed and accessible to service personnel. If during inhome service repair can not be completed, it may be necessary to remove, repair and return
the product. If in-home service is unavailable, Curtis Mathes may elect, at our option to provide
for transportation of our choice to and from a Curtis Mathes authorized service center.
Otherwise, transportation to and from the Curtis Mathes authorized service center is the
responsibility of the purchaser.
This limited warranty covers manufacturing defects in materials and workmanship
encountered in normal, noncommercial use of this product and shall not apply to the following,
including, but not limited to: damage which occurs in shipment; delivery and installation;
applications and uses for which this product was not intended; altered product or serial
numbers; cosmetic damage or exterior finish; accidents, abuse, neglect, fire, water, lightning
or other acts of nature; use of products, equipment, systems, utilities, services, parts, supplies,
accessories, applications, installations, repairs, external wiring or connectors not supplied or
authorized by Curtis Mathes which damage this product or result in service problems; incorrect
electrical line voltage, fluctuations and surges; customer adjustments and failure to follow
operating instructions, cleaning, maintenance and environmental instructions that are covered
and prescribed in the instruction book; product removal and reinstallation; reception problems
and distortion related to noise, echo, interference or other signal transmission and delivery
problems; picture tube (CRT) brightness related to normal aging, or burned-in images. Curtis
Mathes does not warrant uninterrupted or error-free operation of the product.
LIMITED WARRANTYTO ORIGINAL PURCHASER
41
A
PPENDIX

THERE ARE NO EXPRESSED WARRANTIES OTHER THAN THOSE LISTED AND
DESCRIBED ABOVE, AND NO WARRANTIES WHETHER EXPRESSED OR IMPLIED,
INCLUDING, BUT NOT LIMITED TO, ANY IMPLIED WARRANTIES OF MERCHANTABILITY
OR FITNESS FOR A PARTICULAR PURPOSE, SHALL APPLY AFTER THE EXPRESSED
WARRANTY PERIODS STATED ABOVE, AND NO OTHER EXPRESSED WARRANTY OR
GUARANTY GIVEN BYANY PERSON, FIRM OR CORPORATION WITH RESPECTTO THIS
PRODUCT SHALL BE BINDING ON Curtis Mathes. Curtis Mathes SHALL NOT BE LIABLE
FOR LOSS OF REVENUE OR PROFITS, FAILURE TO REALIZE SAVINGS OR OTHER
BENEFITS, OR ANY OTHER SPECIAL, INCIDENTAL OR CONSEQUENTIAL DAMAGES
CAUSED BY THE USE, MISUSE OR INABILITY TO USE THIS PRODUCT, REGARDLESS
OF THE LEGAL THEORY ON WHICH THE CLAIM IS BASED, EVEN IF Curtis Mathes HAS
BEEN ADVISED OF THE POSSIBILITYOF SUCH DAMAGES. NOR SHALL RECOVERY OF
ANY KIND AGAINST Curtis Mathes BE GREATER IN AMOUNT THAN THE PURCHASE
PRICE OF THE PRODUCT SOLD BY Curtis Mathes AND CAUSING THE ALLEGED
DAMAGE. WITHOUT LIMITING THE FOREGOING, PURCHASER ASSUMES ALL RISK
AND LIABILITY FOR LOSS, DAMAGE OR INJURY TO PURCHASER AND PURCHASER'S
PROPERTY AND TO OTHERS AND THEIR PROPERTY, ARISING OUT OF THE USE,
MISUSE OR INABILITY TO USE THIS PRODUCT SOLD BY Curtis Mathes, NOT CAUSED
DIRECTLY BY THE NEGLIGENCE OF Curtis Mathes. THIS LIMITED WARRANTY SHALL
NOT EXTEND TO ANYONE OTHER THAN THE ORIGINAL PURCHASER OF THIS
PRODUCT, IS NONTRANSFERABLE AND STATES YOUR EXCLUSIVE REMEDY.
Some states do not allow limitations on how long an implied warranty lasts, or the exclusion or
limitation of incidental or consequential damages, so the above limitations or exclusions may
not apply to you. This warranty gives you specific legal rights, and you may also have other
rights which vary from state to state.
42
A
PPENDIX

M
EMO

This product is listed by Underwriter's Laboratories, Inc. It is
designed and manufactured to meet rigid U.L. safety standards
against X-radiation, fire casualty and electrical hazards.
As an ENERGY STAR® Partner,
Curtis Mathes has determined that
this product or product model meets the
ENERGY STAR® guidelines for energy effiency.
3250 W. Big Beaver Rd.
Troy, MI 48084
For more information about this or other Curtis Mathes
products, please visit our web site at: www.curtismathes.com.
AA68-02476A
 Loading...