

19" STEREOMTSCOLORTE
OWNER'SMANUAL
CM 19033S
CustomerSupport: 1-877-456-2788
www.curfismathes.com
Warninq ! |rnportant
ale |nstruct ons
S ty
CAUTION
CAUTION: TO REDUCE THE RISK OF ELECTRIC SHOCK, DO NOT
REMOVE COVER (OR BACK). NO USER SERVICEABLE PARTS INSIDE.
REFER SERVICING TO QUALIFIED SERVICE PERSONNEL.
This symbol indicates high voltage is present inside. It is
dangerous to make any kind of contact with any inside part of
this product.
This symbol alerts you that important literature concerning
operation and maintenance has been included with this product.
Note to CATV system installer: This reminder is provided to (:all CATV system
installer_ attention to Article 820 40 of the National Electrical Code (Section 54 of
Canadian Electrical Code, Part I), that provides guidelines for proper grounding
and, in particular, specifies that the cable ground shall be connected to the
grounding system of the building as close to the point of cable entry as practical.
Caution: FCC/CSA regulations state that any unaottmrized changes or modifica-
tions to this eqoipment may void the user,'s aothority to operate it.
Caution: To prevent electric shock, match the wide blade of plug to the wide slot,
and fully insert the plug.
Attention: pour eviter les dmcs electriqoes, in_rodoire la lame le plus large de la
fiet_e dans la borne correspondante de la prise et pousser josqu'ao fond.
Important: One Federal Court has held that unauthorized recording of
copyrighted TV programs is an infringement of U.S. copyright laws.
Certain Canadian programs may also be copyrighted and any unauthorized
recording in whole or in part may be in violation of these rights.
To prevent damage which may result in fire or electric shock
hazard, do not expose this appliance to rain or moisture.

Thank You for Choosing Curtis Mathes
Thank you fk_r choosing C1ntis h!lathes! Yo111 new C1 ntis Mathes TV receiver represents the lat-
est in television technology It has easy-to-use, on-screen menus and closed-captioning capabib
ities, making this TV one of the best products in its class. This product will provide convenient,
dependable service and ei_joyment fire years to come.
|rnportant Safety Information
To reduce the risk of fire, electrical shock, and other ii_juries, keep these safety precautions in
mind when installing, using, and maintaining your machine.
° Read all safety and operating instnlctions beRme operating the TV receiver.
• Retain the safety and operating instnlctions fk_r flltt me reference.
• Heed all warnings on the TV receiver and in the operating instnlctions.
Follow" all operating instnlctions.
• Unplug the TV receiver florn the wall outlet beRme cleaning, Use a damp cloth, Do not use
liquid or aerosol cleaners.
• Never add any attachrnents and/or equipment without approval of the rnanufacturer. Such
additions may catlse risk of fire, electric shock, or other personal ii!jt n2z
• Do not use the TV l_ceiver where contact with or irnrnersion in water is a possibility, such as
near bath tubs, sinks, washing rnachines, swirnrning pools, etc.
• Do not place the TV receiver on an unstable cart, stand, tripod,
bracket, or table. The TV receiver rnay fall, catlsing ii_jtlry to
people and/or darnage to the TV Use only with a cart, stand,
tripod, bracket, or table recommended by the mant ffactt ner or
sold with the TV receiver.
Follow the rnant ffacU lrer_ instn lctions when mot n_ting the unit,
and tlse a mot rating accessory recornrnended by the rnant ffacttmen
Move the TV receiver and its cart with care. Qt tick stops, excessive
R)rce, and uneven st]Flares rnay cat]se the unit and cart to over-
tl Hn.
° Provide ventilation %r the TV receiver. The unit is designed with slots in the cabinet %r
ventilation to protect it firm overheating. Do not block these openings with any ol_ject, and
do not place the TV receiver on a bed, sofa, rug, or other similar surface. Do not place it near
a radiator or heat register. If"you place the TV receiver on a rack or bookcase, enstlre that
there is adeqt late ventilation and that yot £ve Rfllowed the mare lfi_cttlrer_ instn lctions ft_r
mot rating.
° Operate your TV receiver only flom the type of power source indicated on the marking label.
If you ale not st ne of the type of power st 1pplied to yot n home, const fit yot n appliance dealer
or local power company,
• Use only a grounded or polarized outlet. For your safety, this TV is equipped with a polarized
alternating-ctlrrent line phlg having one blade wider than the other. This phlg will fit into the
power ot ltlet only oi-_e way, If you are ui-_able to insert the pit lg fl flly into the 011tlet, try
reversing the ph lg. If the ph lg still does not fit, contact yot lr electrician to leplace yot lr ot Met.
SA] ] TY ]
Protect the power cord. Power stlpply cords shotlld be rotlted so that they will not be walked
on or pinched by items placed on or against them. Pay partict flar attention to cord placement
at phlgs, convenience receptacles, and at the point where they exit fl'om the unit.
Unphlg the TV leceiver from the wall otltlet and disconnect the antenna or cable system dtlr-
ing a lightning storm or when left unattended and untlsed f_tr long periods of time. This will
prevent damage to the unit ch le to lightning and powelqine st nges.
An otltside antenna system shotlld not be placed in the vicinity of overhead power lines or
other electric light or power circuits or where it can fall into such power lines or circuits.
Avoid overhead power lines: When installing an ot ltsicie antenna system, be extremely carefl fl
to keep flom touching the power lines or circuits. Contact with such lines might be fatal.
Do not overload the wall otltlet or extension cords. Overloading can restllt in fire or electric
shock.
Do not insert fkmeign ol_jects through openings in the unit, as they may touch dangerous
voltages or catlse damage. Never spill liqt rid of any kind on the TV receiver.
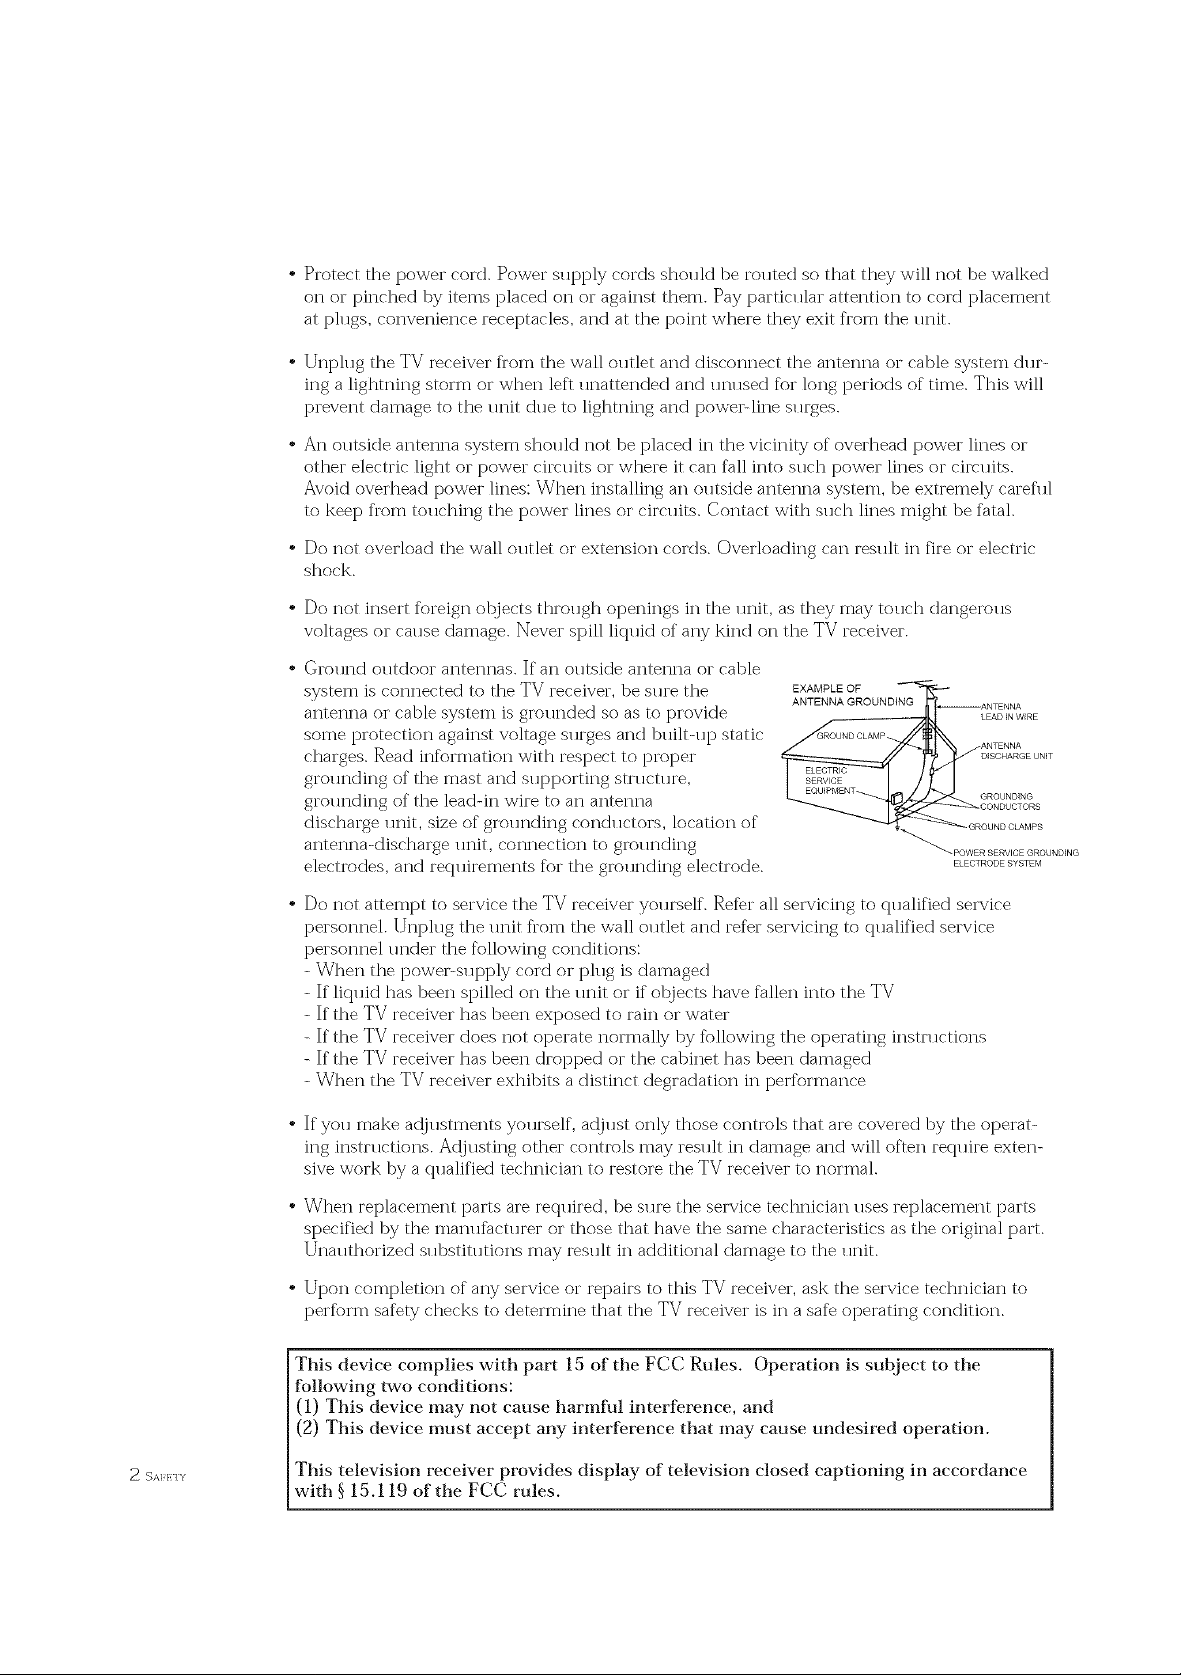
Ground outdoor antennas. If an outside antenna or cable
system is connected to the TV receiver, be stlre the
antenna or cable system is grounded so as to provide
some protection against voltage st lrges and btfilt-t lp static
charges. Read infitrmation with respect to proper
grot mding of the mast and st lpporting stn lctt n-e,
grot mding of the lead-in wire to an antenna
discharge unit, size of grot mding conchlctors, location of
antenna-discharge unit, connection to grounding
elecUrKtes, and reqt firements fk/r the grot n_ding electrode.
EXAMPLE OF
ANTENNA GROUNDING
2 SA]?ETY
Do not attempt to service the TV receiver yourself. Refer all servicing to qualified service
personnel. Unplug the unit f]'orn the wall outlet and ref)r servicing to qualified service
personnel under the fitllowing conditions:
When the power-supply cord or plug is darnaged
If liquid has been spilled on the unit or if olqjects have fallen into the TV
If the TV receiver has been exposed to rain or water
If the TV receiver does not operate normally by fftllowing the operating instnlctions
If the TV receiver has been dropped or the cabinet has been damaged
VVhen the TV receiver exhibits a distinct degradation in perfitrmance
If you make a@ustments yourself, adjust only those controls that are covered by the operat-
ing instructions. Ac!justing other controls rnay result in damage and will often require exten-
sive work by a qtlalified technician to restore the TV receiver to norrnal.
When replacernent parts are required, be sure the selwice technician uses replacernent parts
specified by the rnantlfhcttlrer or those that have the sarne characteristics as the original part.
Unat lthorized st lbstitt ltions rnay rest llt in additional darnage to the unit.
Upon completion of any service or repairs to this TV receiver, ask the service technician to
perfi/rm saf)ty checks to deterrnine that the TV receiver is in a saf_ operating condition.
This device complies with part 15 of the FCC Rules. Operation is subject to the
fol!owing two conditions:
(1) This device may not cause harmfu! interference, and
(2) This device must accept any interference that may cause undesired operation.
This television receiver provides display of television closed captioning in accordance
with § 15.119 of the FCC rules.
CONTENTS ]
Chapter 1: Your New TV ............... 1.1
List of Fe_tures ......................................... 1.1
Familiarizing Yoursdf with The TV.......................... 1.2
Front Pand Buttons .............................. 1.2
SMe Pand Jacks ................................. 1.2
Rear Pand Jacks ................................. 1.3
Remote Conu ol ................................. 1.4
Chapter 2: installation ................ 2.1
Connecting VHF and UHF Antennas ........................ 2.1
Connecting CaNe TV .................................... 2.2
Connecting a VCR ...................................... 2.5
Connecting a Camcorder ................................. 2.(5
Installing Baltelies ill the Remote Control ..................... 2.7
Antennas with 300-ohm Flat Twin Leads .............. 2.1
Antennas with 75-ohm Round Leads ................. 2.2
Separate VHF and UHF Antennas .................... 2.2
CabD without a CaDle Box ......................... 2.2
Conllecting to a Cable Box 1hat Descrambles
All Cham_els .................................... 2.3
Connecting to a Cable Box 1hat Descrambles
some Channels .................................. 2.3
Chapter 3: Operation .................. 3.1
1]nning tile TV On and ()fT................................ 3.1
Viewing tile Metals and OmScreen Displays ................... 3.1
Viewing tile Menus ............................... 3.1
Viewing the Display .............................. 3.1
Sdecting a Menu Language ................................ 3.2
Memorizing the Channds ................................. 3.3
Sdecting tile Video Signabsoulc'e .................... 3.3
Storing Channels ill Memory (Automatic Method) ....... 3.4
Adding and El_sing Channels (Manual Method) ........ 3.5
Changing Channels ..................................... 3.(5
Using the Channel Buttons ......................... 3.(5
Directly Accessing Channels ........................ 3.(5
Using the PRE-CH Button to select the PJe_ious Channel.. 3.(5
Ac!justing tile Volurne .................................... 3.(5
Using Mute ..................................... 3.(5
Setting the Cbck ....................................... 3.7
Custornizing the Picture .................................. 3.8
Using Automatic Picmle Settings ........................... 3.9
Using Automatic Sound Settings ............................ 3.10
Viewing a VCR or Camcorder Tape .......................... 3.11
CONTENTS 1
CONTENTS
Chapter 4: Specia| Features ............ 4.1
(;11stornizing Y/)_11-Remote Control .......................... 4.1
Setting Up Y/t111Remote Control to Operate Y11111VCR.... 4.1
Setting Up Your Remote Control to Operate Your Cable Box.. 4.3
Fine • lning Channe]s .................................... 4.4
Changing the Screen Size ................................. 4.5
Using the Stiff Featllre .................................... 4.(5
Setting the On/Off Timer ................................. 4.7
Setting the Sleep Timer ................................... 4.8
Sound Features ......................................... 4.9
Choosing a Mlllti-Channel Sollnd (MTS) Sollndtrack ..... 4.9
Setting the Slln-ollnd ............................. 4.10
Viewing Closed Captions ................................. 4.11
Using the V-Chip ....................................... 4.12
Setting Up Yo.l Personal ID Number (PIN) ............ 4.12
How to Enable/Disable the V-Chip ................... 4.13
How to Set up Restlictions Using the "TV gllidelines" . . . . 4.13
How to Set up Restlictions using the MPAA Ratings:
G, PC, PC-13, R, NC-17, X ........................ 4.15
How to Reset the TV after the V-Chip Blocks a Channd
("Emergency Escape") ............................. 4.115
Chapter 5: Troubleshooting ............ 5.1
Identif_ying ]-)mblerns .................................... 5.1
Appendix ........................... A.1
Cleaning and Maintaining Yo111"TV.......................... A.1
Usir_gY/tilt TV in Another Collnt U ......................... A.1
Specifications .......................................... A.1
2 CON7 ENTS
YOUR N>W TV
List of Features
Yollr TV was designed with the latest technolog3_ This TV isa high-perf_rlrnance unit that
inchldes the fbllowing special f_atllres:
• Easy-to-use rernote contlol
• gasy-to-_lse oii-screenrllei]11system
• Automatic tirner to turn the TV on and off
• A@lstable pictllre settings that can be stored in the TV_ merno W
• Automatic channel tuning fk_rup to 181 channels
• Fine timing control fk_rthe sharpest pictllre possible
• Builtqn, dual channel speakers
• A special sleep tirner
C_{APrllRON},: Y<>I]}<N};w TV 1 . "1

[
Your NEw TV
Familiarizing Yourself with The TV
Front Panel Buttons
The bl]ttons on the flont panel control yoln- TV_ basic" f'eatl]res, inchMing the onºscreen
rnenl]. To 1]se the more advanced f_at_]res, yoH rn_]st Hse the remote control.
0 0 0 0 0 0
MENU
0
Pressto see an on-screen menu of your TV's fea-
tures.
O Remote Control Sensor
Aim the remote control towards this spot onthe
TV.
0
VOL- , +
Pressto increase or decrease the volume.
Also used to select items on the on-screen menu.
O STAND BY indicator
Lights upwhen you turn the power off.
O POWER
t_ CH V and CH A Pressto turn the TVon and off.
Pressto change channels. Also pressto select
various items onthe on-screen menu.
Side Panel Jacks
YoH can Hse the side panel jacks to connect an A/V component that is Hsed only occa-
sionally, sHch as a camcorder or video game. (For information on connecting eqHiprnent,
see pages 2.1 2.6.)
O AUDIO input jacks
AudiosignalsfromVCRs,DVDplayersandsimilardevices.
O
-0
O VIDEO input jack
VideosignalsfromVCRs,DVDplayersandsimilardevices.
Q HEADPHONE jack
Connect a setof external headphones to this jack for private
listening.
-0
1 . 2 C}]AI:'TI:I_ ()NI: YOUR NI \,'/ TV
[
Your NEw TV
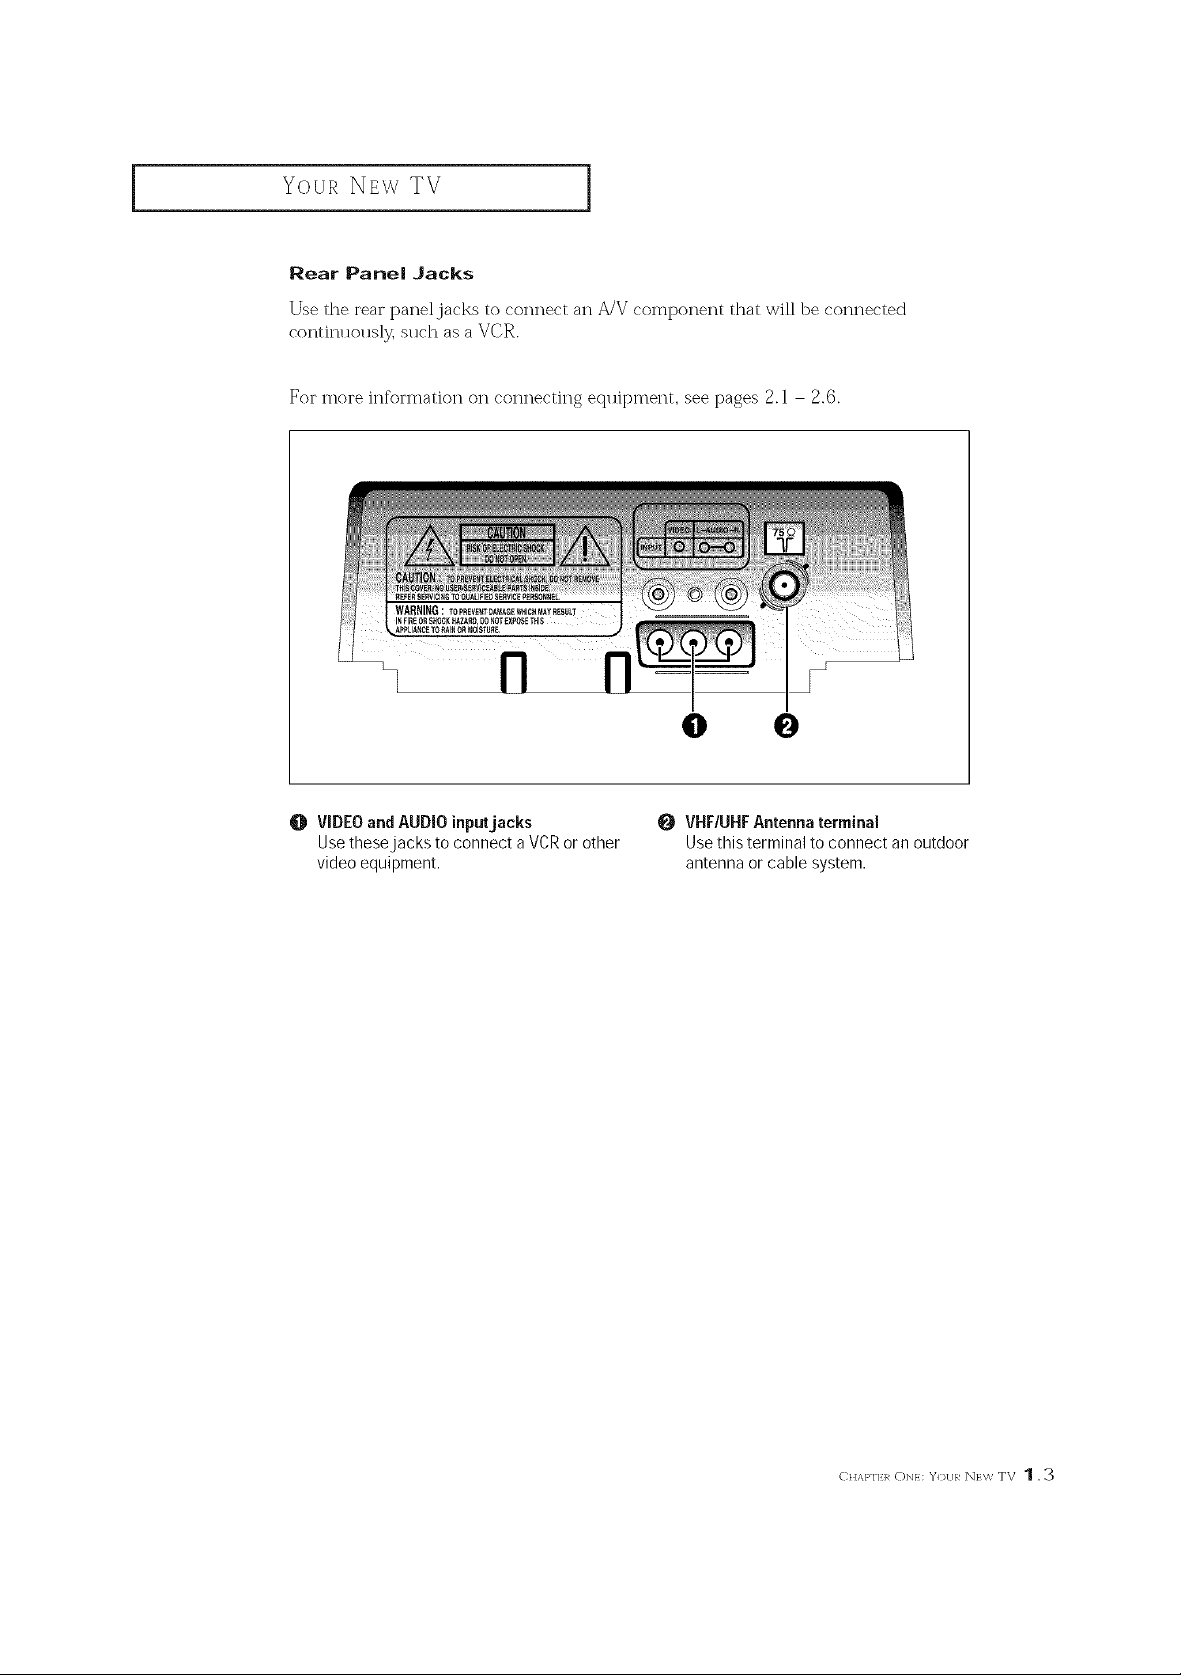
Rear Pane| Jacks
Use the rear pane| jacks to connect an A/V cornponent that will be connected
continuously, such as a VCR.
For more information on connecting eqlfipment, see pages 2.1 2.6.
/
O O
O VIDEO and AUDIO input jacks _ VHF/UHF Antenna terminal
Use these jacks to connect a VCR or other Use this terminal to connect an outdoor
video equipment, antenna or cable system.
C;ID\PF]:]_ C)NI: Y<)tJI? NI \,'_ TV 1 , 3
l
Your NEw TV
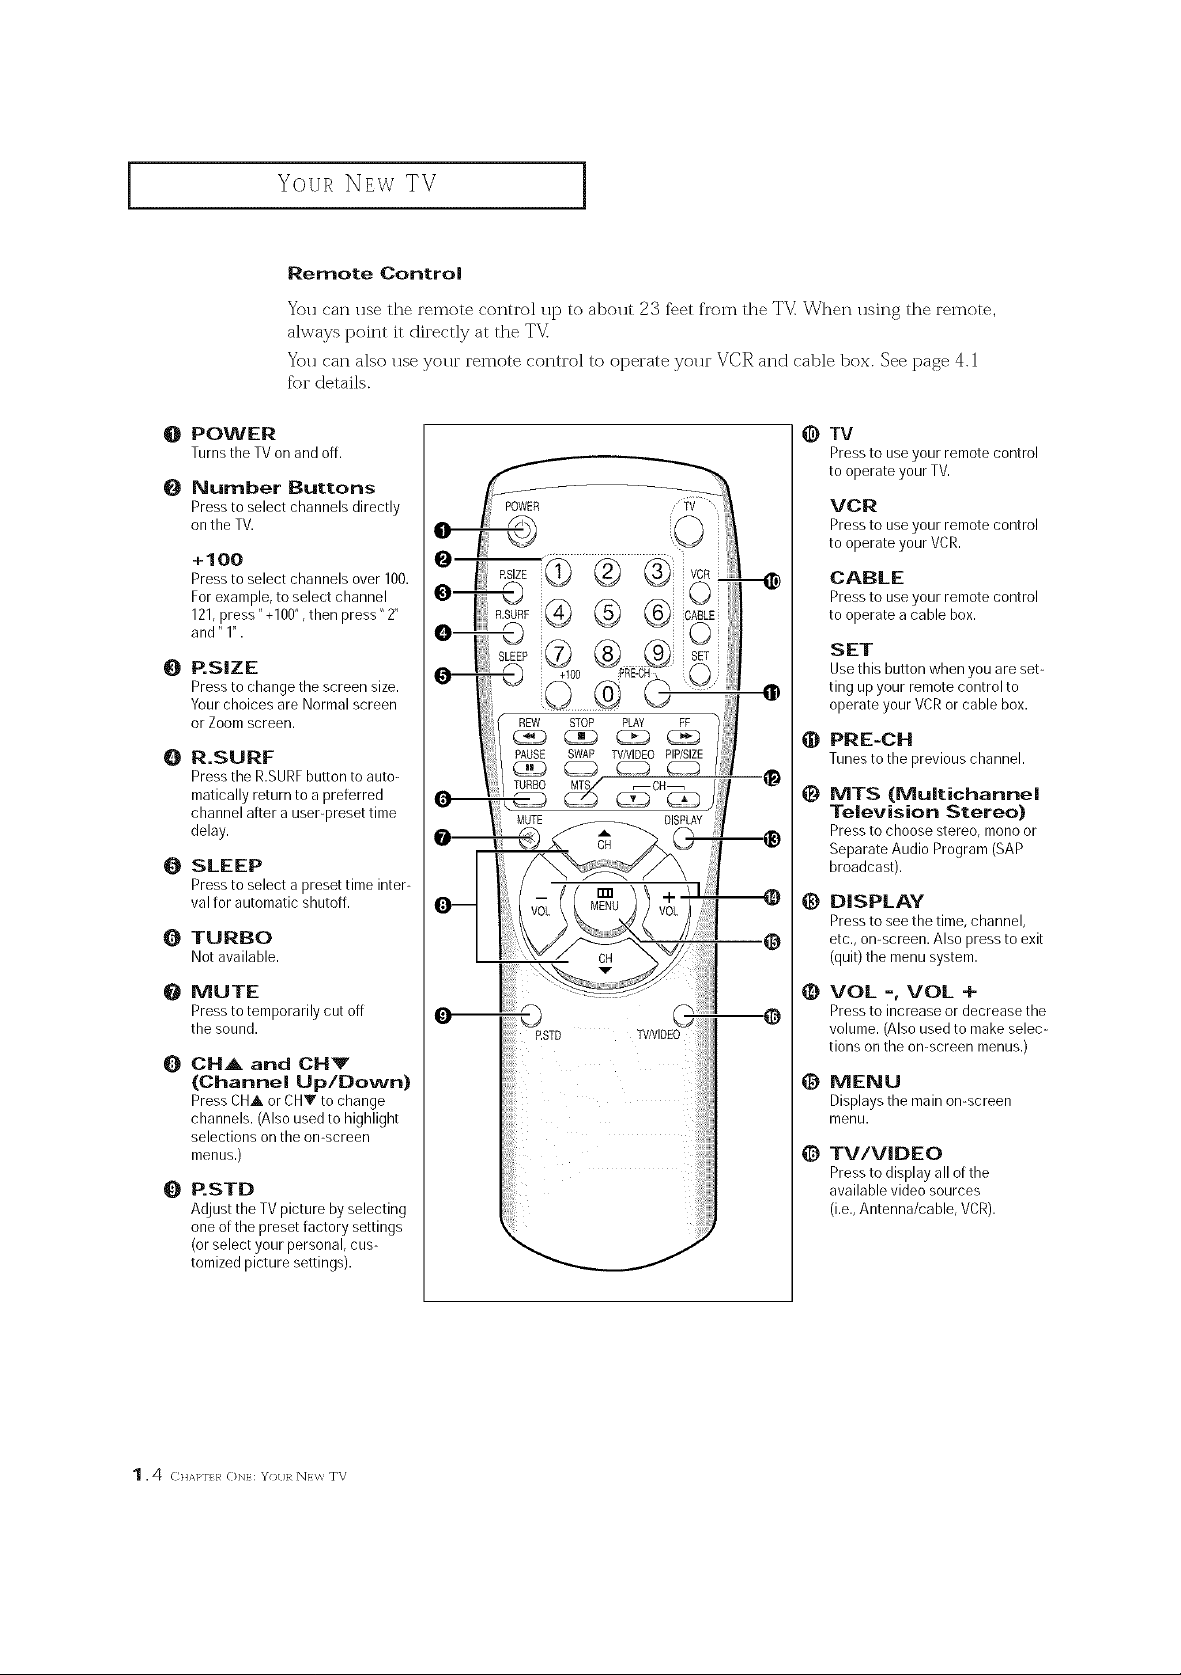
Remote ControJ
Yo. can use the remote control 11pto ab@lt 23 f}et f'rorn the TV_\/Vhen 11sing the remote,
always point it directly at the TV_
Yoll can also 11se yollr remote control to operate yollr V(;R and cable box. See page 4.1
fi_r details.
1
POWER
O
Turnsthe TVonandoff.
Number Buttons
O
Press to select channels directly
on the TV.
+1OO
Press to select channels over 100.
For example, to select channel
121,press" +100",then press" 2"
and" 1".
P.SIZE
O
Press to change the screen size.
Yourchoices are Normal screen
or Zoom screen.
R.SURF
@
Press the R.SURFbutton to auto-
matically return to a preferred
channel after a usergreset time
delay.
SLEEP
O
Press to select apreset time inter-
val for automatic shutoff.
TURBO
Q
Notsailable.
MUTE
O
Press to temporarily cut off
the sound.
CH,A and CH_V
Q
(Channel Up/Down)
Press CHA orCHV to change
channels. (Alsoused to highlight
selections on the on-screen
menus.)
P.STD
Q
Adjust the TV picture byselecting
one of the preset factory settings
(or select your personal, cus-
tomized picture settings).
TV
@
Pressto use your remote control
to operate your TV.
VCR
Pressto use your remote control
to operate your VCR.
CABLE
Pressto use your remote control
to operate a cable box.
SET
Usethis button when you are set-
ting up your remote control to
operate your VCRor cable box.
PRE-CH
@
Tunestothepreviouschannel.
@
MTS (Multichanne|
Television Stereo)
Pressto choose stereo, mono or
Separate Audio Program (SAP
broadcast).
DISPLAY
Pressto see the time, channel,
etc., on-screen. Also press to exit
(quit)the menu system.
@
VOL -, VOL +
Pressto increase or decrease the
volume. (Also used to make selec-
tions on the on-screen menus.)
MENU
@
Displays the main on-screen
menu.
TV/VIDEO
©
Pressto display all of the
available video sources
(i.e.,Antenna/cable, VCR).
1 4 C}]A]:'T] R ONE: YOUR NEW TV

Your NEw TV
Remote Control
i
_) VCR Controls
o REW (Rewind)
Pressto rewind a tape in your
VCR.
o STOP
Pressthis button to stop a tape
during play,record, rewind or
fast forward, Ifthe button is
pressed during Full-Automatic
play,the function will be can-
celled,
o PLAY
Pressthe PLAYbutton to play
back prerecorded tapes.
EF
Pressto fast forward the tape in
your VCR.
o PAUSE
Pressto pause yourVCR'stape.
_) PiP Controls
{Not available)
SWAP
Exchanges the video signal that is
currently displayed on the main
screen with the signal in the PIP
window,
TV/VIDEO
Press to select one of the available
signal sources for the PIPwindow.
PIP/SIZE
Press this button to control the PIP
window. Press repeatedly to cycle
through this sequence: PIPON
with large window, PIPON with
small window, and PIP OFF.
CH
Not available,
CID\I)FI:]_ C)NI: Y<)tJI? NI \,'_ TV "1 . 5
INSTALLATION
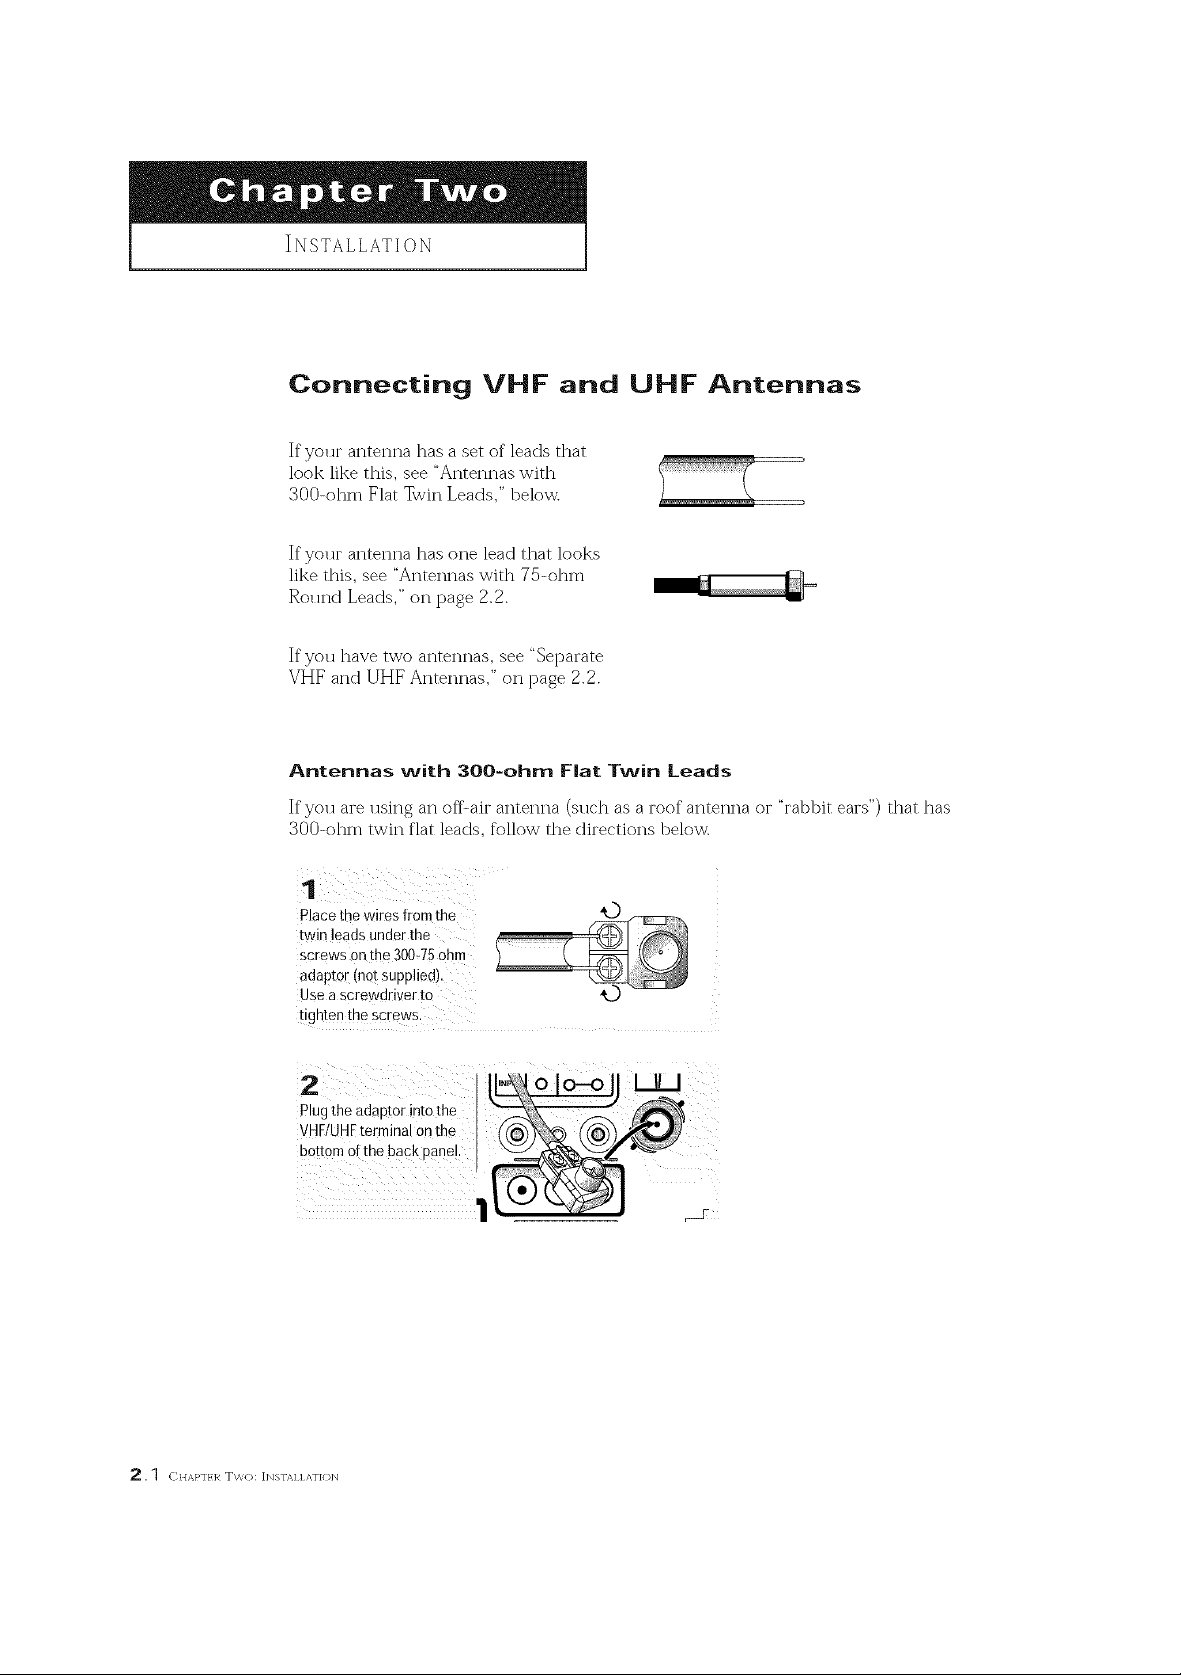
Connecting VHF and OHF Antennas
If yollr antenna has a set of leads that
look like this, see "Antennas with
300-ohm Flat Twin Leads," below:
If 7o_1r antenna has one lead that looks
like this, see "Antennas with 75-ohm
Round Leads," on page 2.2.
If you have two antennas, see "Separate
VHF anct UHF Antennas," on page 2.2.
Antennas with 300-ohm Flat Twin Leads
If"you are using an offUair antenna (slK'h as a roof antenna o1 "rabbit ears") that has
300-ohm twin flat leads, follow the directions below.
Place the wires from the
twin leads under the
screws onthe 300q5 ohm
adaptor (not supplied).
Use ascrewdriver to
t!ghten the screw s
2
Plugthe adaptor into the
VHF/UHFterminal on the
bottom of the back panel
2.1 ClIAlq_£1_ T\,'_'_): ]NSTAI1ATf(}N
INSTALLATION
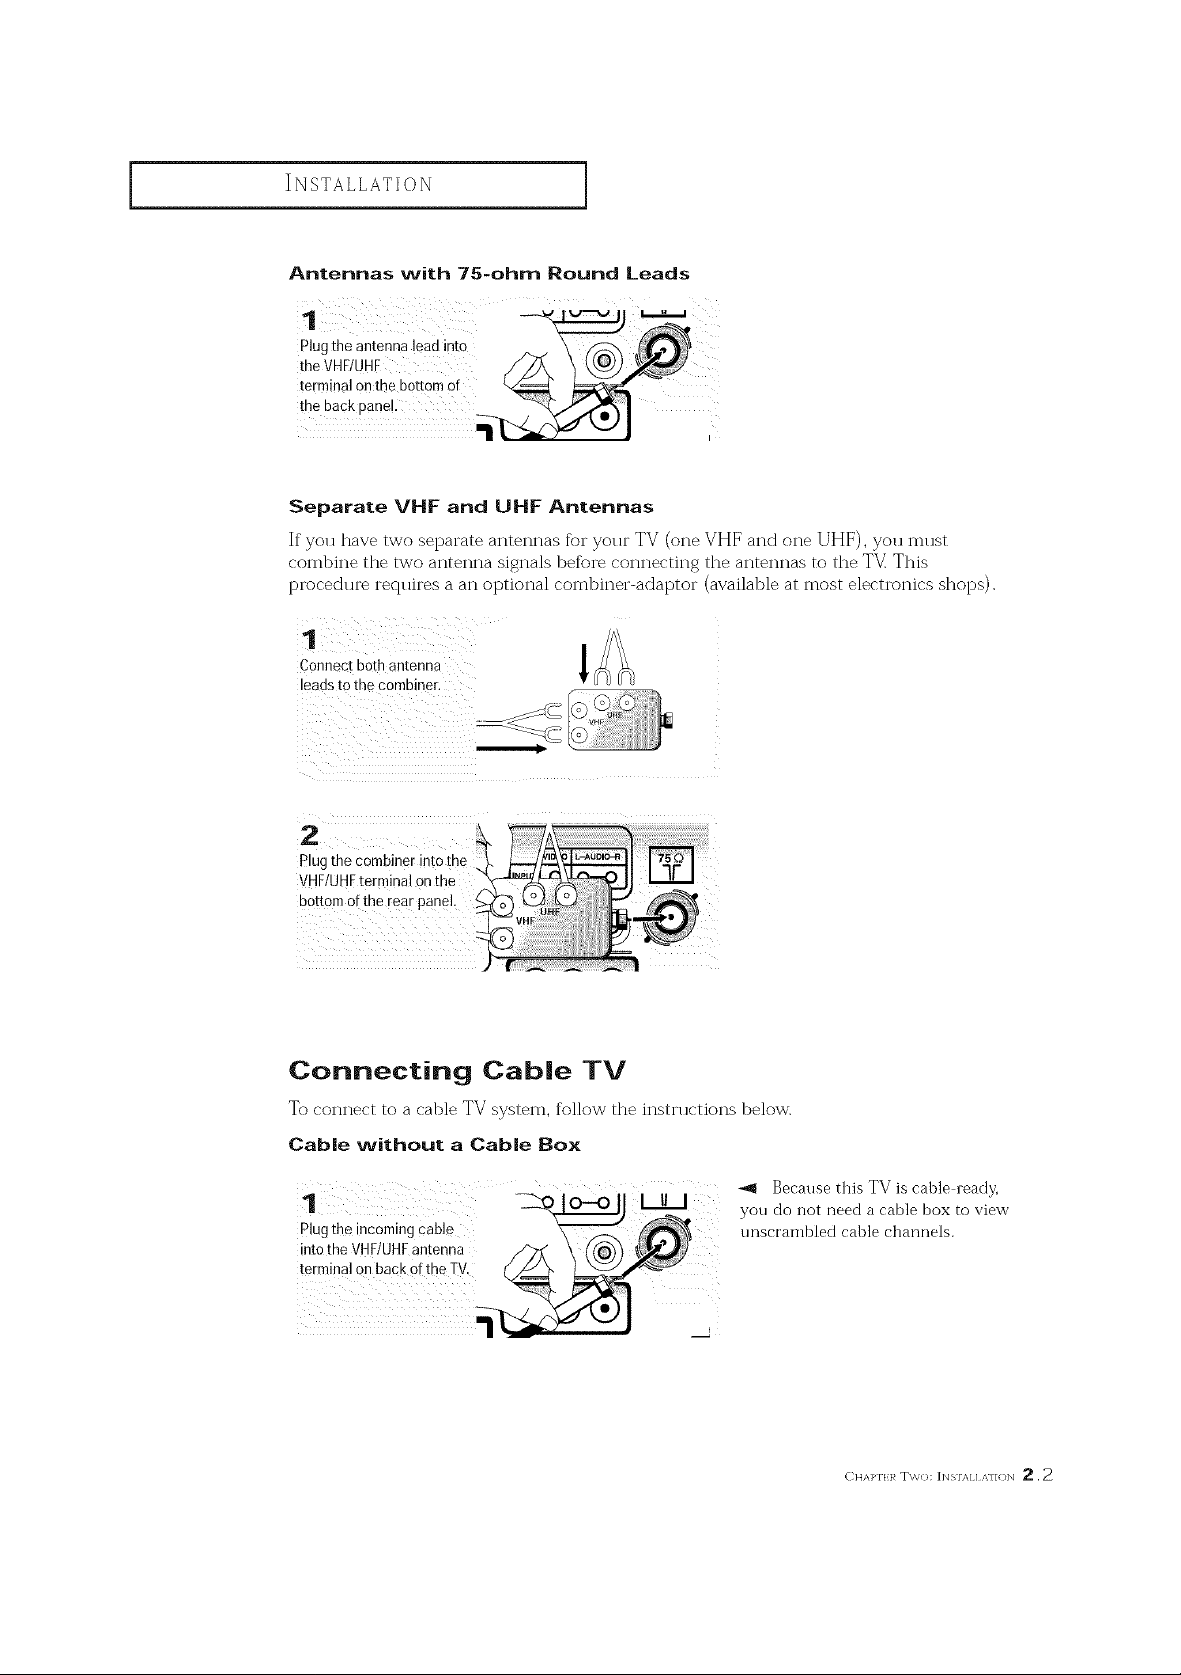
Antennas with 75-ohm Round Leads
Plug the antenna !eadinto
the VHE/UHF
terminal onthe bottom of
the back panel.
Separate VHF and UHF Antennas
If you have two separate antennas fi_r yotlr TV (one VHF and one UHF), you rn_lst
combine the two antenna signals befk_re connecting the antennas to the TV] This
procedure requires a an optional combiner-adaptor (available at most electronics shops).
Connect both antenna
leads to the combiner.
]
2
Plug the combiner into the ....
VHF/UHFterminal on the
bottom of the rear
Connecting Cable TV
To connect to a cable TV systern, follow the instructions below.
Cable without a Cable Box
uu
plug the incoming cane
into the VHF/UHFantenna
terminal on back of the TV
-,4 Because this TV is cable ready,
yon do not need a cable box to view
unscrambled cable channels.
C HAP'Iq I,' TW(_: ]NSTAI I ,\TION _ , 2
INSTALLATION
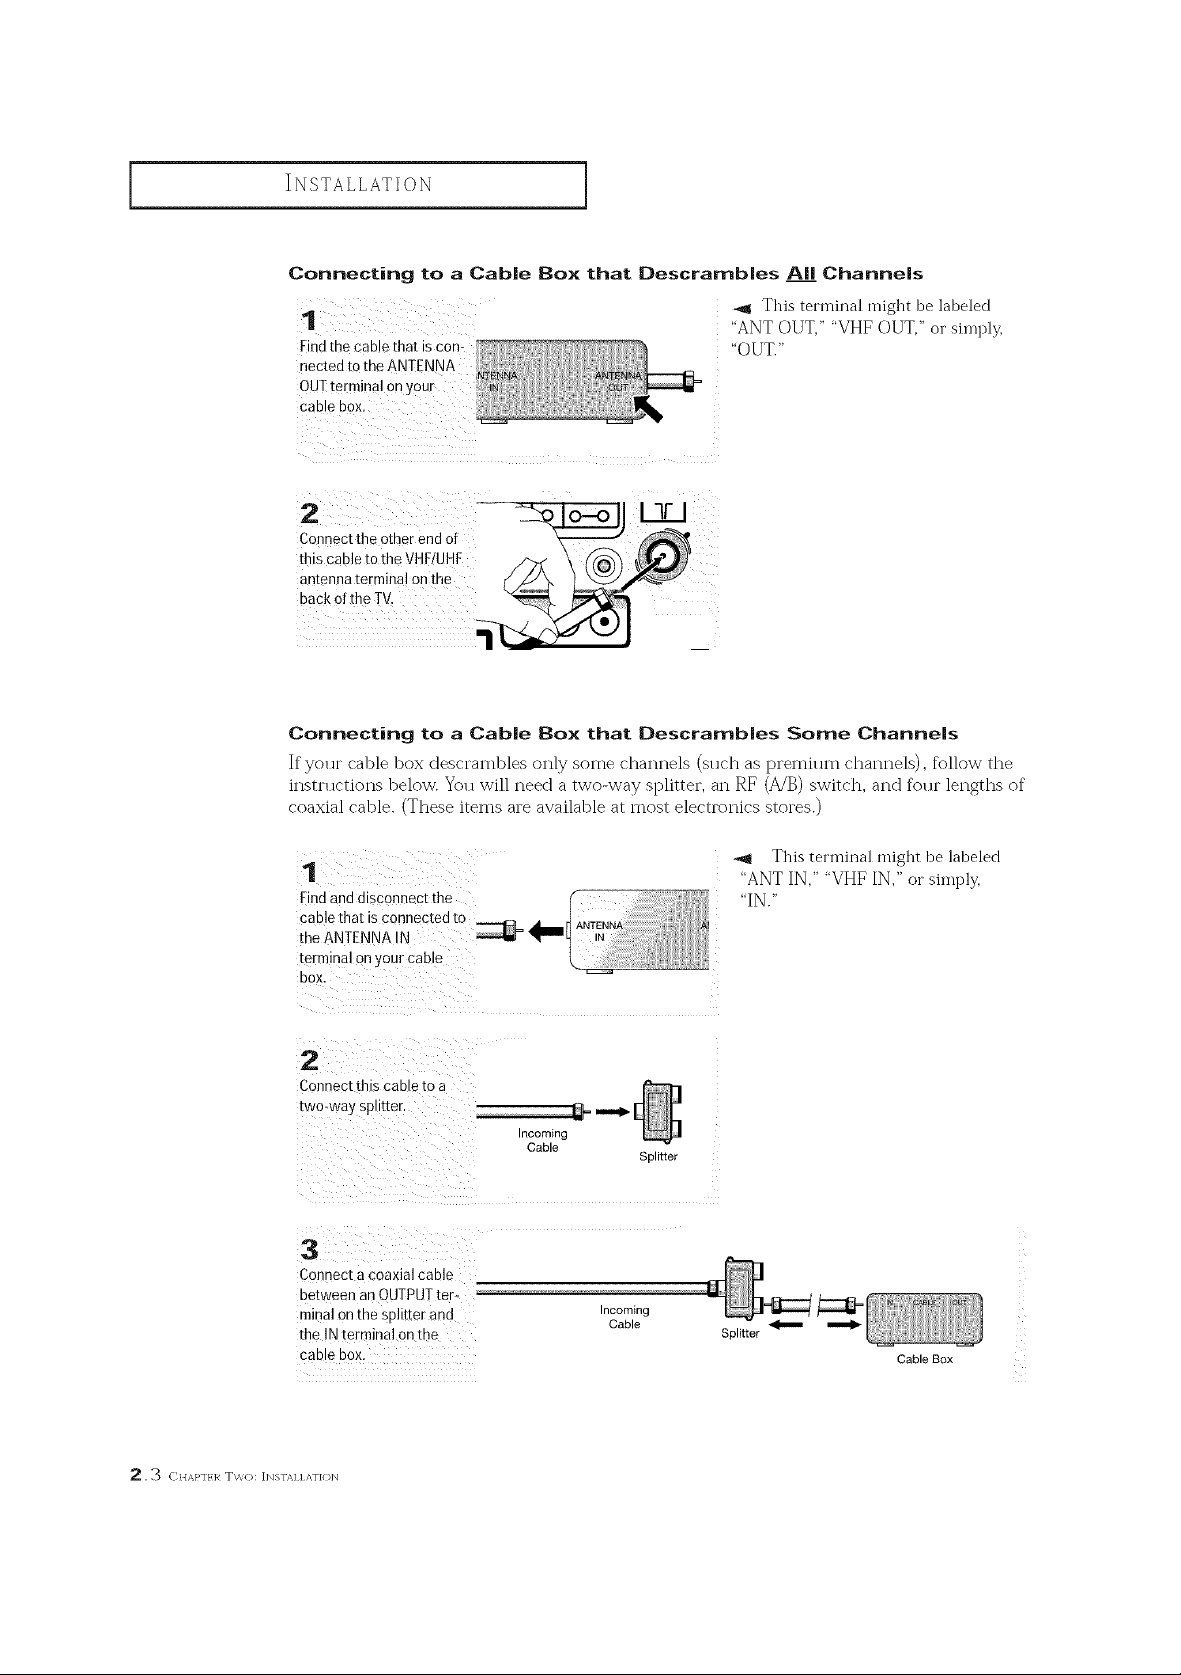
Connecting to a CaMe Box that Descrambles AA Channels
]
-,4 This terminal might be labeled
"ANT OUT," "VHF OUT," o1 simply,
Find the cable that is con-
nected to the /
OUT terminal on your
Cobnect the other end of
tbiscabletotheVH[/UH[ /_ \ (_
antenna termina! on the
Connecting to a Cable Box that Descrambles Some Channels
If yo111-('able box descramb]es on] 7 some channels (sll('h as premillm channels), f_]]ow the
instructions below. You wi]] need a two-way splitter, an RF (A/B) switch, and f_ur lengths of
('oaxia] cable. (These items are available at most electronics stores.)
"OUT."
1
Findanu UlSconnectthe ( :
cab e that s connected to _4ANTENNA
the ANTENNA IN _ ,qp,,,,,L{ IN
terminal on your cable _. _ " ;
bOX,
This terminal might be labeled
"ANT IN," "VHF IN," or simply,
"IN."
2
Connect this cable so a
two- Na) splitter.
Incoming
Cable
Splitter
3
Connect a coaxial cable
between an OUTPUTter-
mina on [ne splitter and Incoming
the INterminal on the Splitter
CaD e DOX. Cable Box
Cable _
. [_ CIIAPq_£}_ T\,\'_}: INSTAl1 ATfON
INSTALLATION
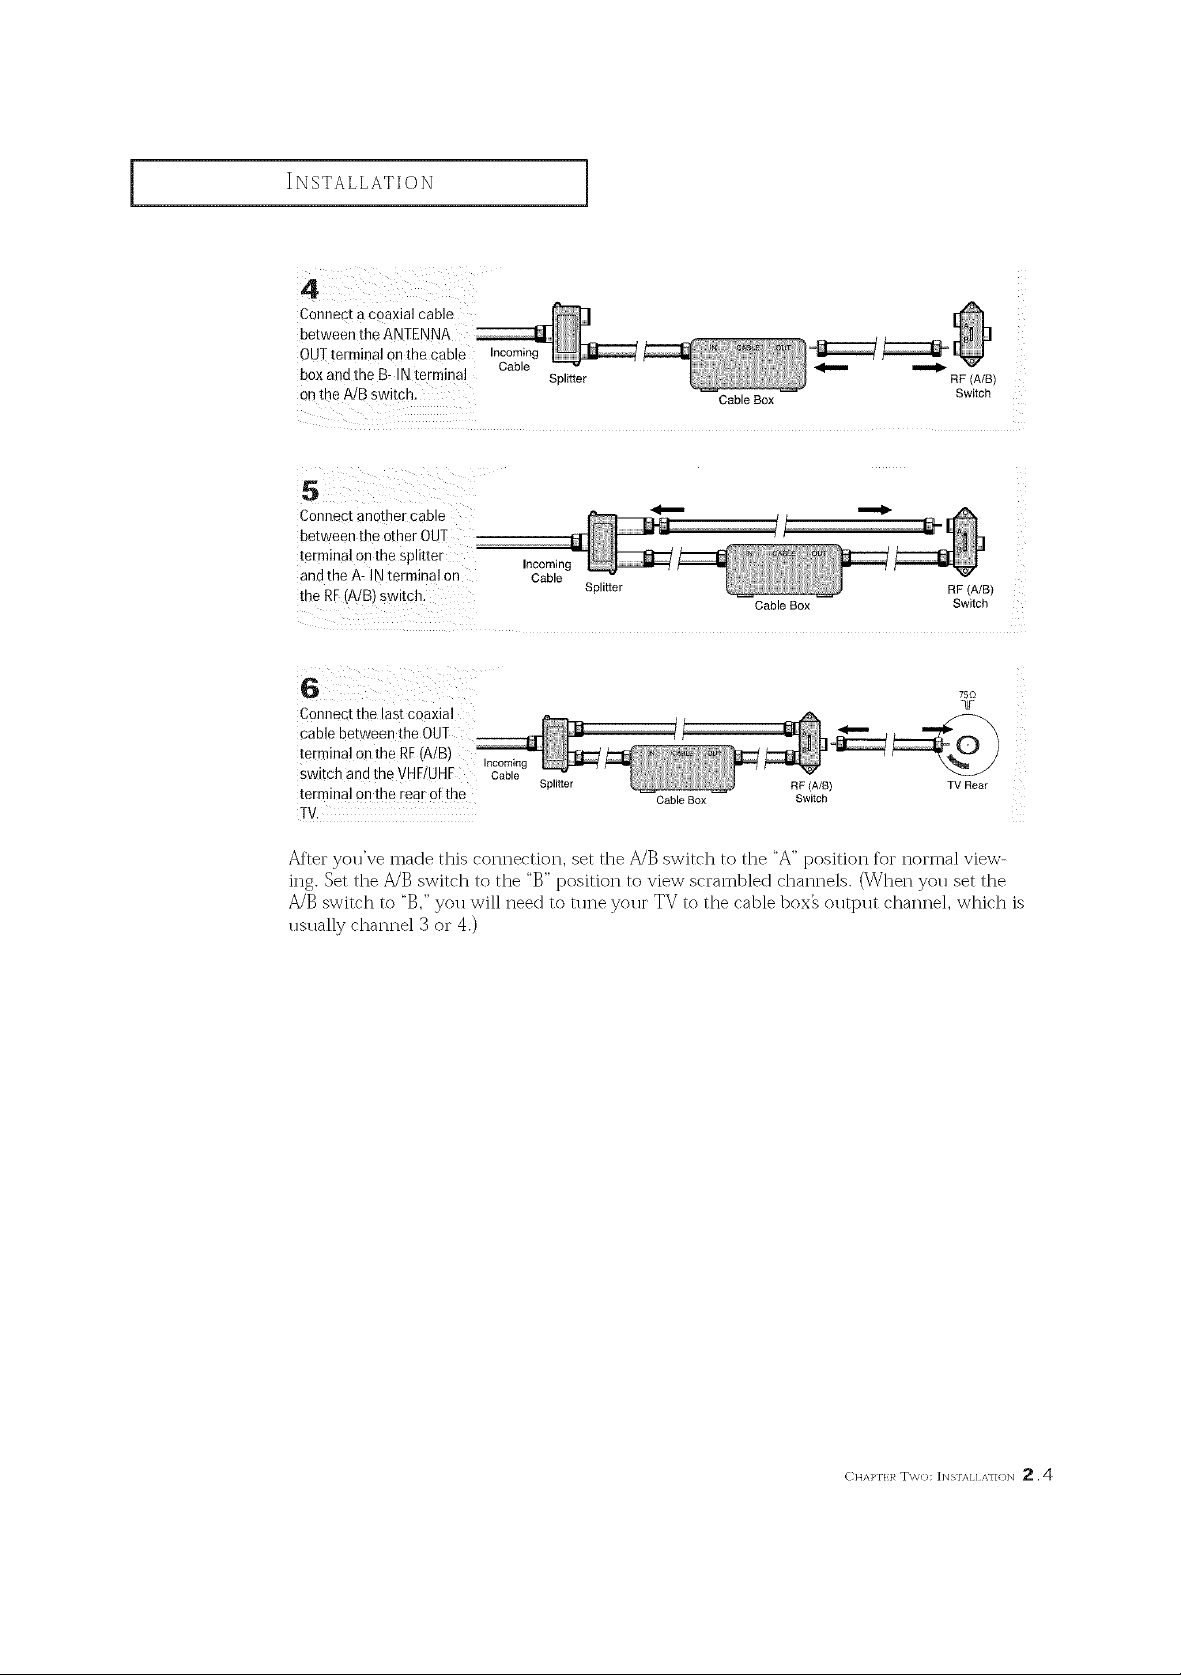
Connect a coaxial cable
between the ANTENI
OUT terminal on the cable Incoming
box and the B_ IN terminal Cable Splitter _ _ RF (A/B)
on the A/B switch. Cable Box Switch
Connect another cable
between the other OUT
teEminal on the splitter
and the A. IN terminal on
the £F(A/B) switch:
Connectthe last coaxial
cable between the OUT
terminal on the RE(A/B)
switch and the VHF/UHE Cable
terminal on the rear of the
TV.
Incoming
Cable
Splitter RF (A/B)
Incoming
Splitter RF (A/B) TV Rear
Cable Box Switch
Cable Box Switch
750
q_r
i
i
i
i
After you've made this connection, set the A/B switch to the "A"position R_r normal view'-
ing. Set the A/B switch to the "B" position to view" scrambled channels. (When you set the
A/B switch to "B," you will need to tune your TV to the cable box_ output channel, which is
usually channel 3 or 4.)
C HAP'r'LI,' TW(_: ]NSTAI I ,\q ION 2,4

INSTALLATION
]
Connecting a VCR
These instructions assume that you have already connected your TV to an antenna or a cable
TV system (according to the instrl]ctions on pages 2.1-2.4). Skip step 1 if you have not yet
connected to an antenna or a cable systern.
Unplug the cable or
antenna from the back of
the TV.
Connect the cable or VCRRearPanel
antenna t° the _- '_C} ,_, _o_',?"d_)
ANTENNA IN terminal on Incom,ng I Q :_1 "A
the back ofthe VCR. CableI.
Connect a coaxial cable
between the AN!ENNA
OUT terminal onthe VCR
and the antenna
terminal on the TV.
A coaxial cable is usually included with a VCR. (If not, check your local electronics
store).
Connect a set of audio
cables between the ,:_,_,
AUDIO OUIjacka onthe
VCR andthe AUDIOjacks AudioCable
ontheTV.
C0nnect a video cable t.... _......... )
between the VIDEOOUT ......... / Video Cable _ _d ........
jack on the VCRand the (_'
VIDEOjack onthe TV. !_ I I _- / I I t_l
VCR Rear Panel
Coaxial Cable
VCRRearPanel TVRearPanel
TV Rear Panel
Follow the instrl]ctions in "Viewing a VCR or Camcorder Tape" to view yol]r VCR tape.
. b CIIAIqE}_ T\,'v_): INSTAl] ATfON

INSTALLATION
Connecting a Carncorder
The side panel,jacks on yol]r TV make it easy to connect a carncorder to yol]r TV[
They allow yol] to view the camcorder tapes without using a VCR. (Also see "Viewing a VCR
or Carncorder Tape" on page 3.11)
Locate the A!V Output
`jacks onthe camcorder. Camcorder
They are usually found On
1 ¸ : __
the side or back Ofthe
camcorder.
Camcorder TV Side Panel
Connect an audio cable
between the AUDIO OUT.
PUT.JackOnthe cam: AudioCable
corder andthe AUDIO
terminals onthe side of
the TV,
Output Jacks
Camcorder TV Side Panel
Connect a video cable O_s
between the VIDEO°UT: ]_] I
PUT,Jackonthe cam. _ VideoCable I
Corder andtheVIDEOter: T I
TVnal onthe SideOfthe
The audio-video cables shown here are usually included with a Carncorder. (If not, check
yol]r local electronics store.)
C HA]:"r'LI,' Tw(): ]NSTAI I ,\TION _ ,6

INSTALLATION ]
installing Batteries in the Remote Contro|
Slidethe cover out corn-
ii i i i i i _i
"4 Make sure to match tile "+" and
install two AA size
batteries.
"-" ends of" tile batteries wifll the
diagram inside tile compartment.
Remove tile batteries and store
them in a cool, dry place if you won't
be using the remote control for a
long time.
Tlle remote control can be used up
to about 23 feet flom tile TV.
(Assuming typical TV usage, tile
batteries last for about one year.)
2.7 CIIAPqE}_ Two): ]NSTAI1 ATfON

OPERATION
Turning the TV On and Off
Pressthe POWERbutton onthe remote control.
You can also use the POWER button on the fl'ont panel.
Viewing the Menus and On-Screen Displays
Viewing the Menus
1
Witn me Dower on. Dress
the MENU button
The main menu appears
on the screen. Its left side
has four icons: Picture.
Sour i Channel and
Function.
Pi_rs
¢_ove ±l_elac_ ITrl E,xit
_1 The on-screen menus disappear
fi'om the screen after about thirty
seconds.
2
Usethe OHm,andCHV buttons to highlight one of the 4 cons
Then pressthe VOL+DuEon[o access the icon's sub-menu
Pressthe MENUbutton to exit.
Viewing the Display
Pressthe DISPLAYbutton. _T io
on the remote control 12=ooam
The 0mscreen disp!ay
shows any or all tithe
[oll0wing:Active channel, MTS : Stereo
Audio source and the s&gnaZ: Mono
time.
You can also use the MENU,
CHANNEL, and VOLUME buttons
on the control panel of the TV to
make selections.
_1 The on screen displays
disappear after about twelve seconds.
When Closed Caption has been set,
the icon(FEEl) will appear by press
ing the Display button.
C}bXP'lHq T} H,_]:I : TV OP_ RATfON 3.

OPERATION
]
Se|ectin 9 a Menu Language
Press MENU to display
Press CH Y three times to
select ':Eunction!',
then press the VOL+ but-
ton.
PressVOL_ to select the
appropriate language:
English,Spanish, or
French.
Press MENUtwice to exit. ___.,
3.2 (IIAPTH_ T}]]_ J : TV ()P] RATION

OPERATION
i
Memorizing the Channels
YoHr TV can rllernorize and store all of the available channels f(_l_both "offUair '' (antenna)
and cable channels. Af_el the available channels are memorized, use the CH A and
CH V bllttons to scan throl]gh the channels. This eliminates the need to change chan-
nels by entering the channel digits. There are three steps fbr memorizing channels:
selecting a broadcast source, memorizing the channels (automatic) and adding and
deleting channels (rnam]al).
Selecting the Video Signal-source
Before yol]r television can begin memorizing the available channels, you rm]st specif,/ ,
the type of signal source that is connected to the TV (i.e., an antenna or a cable system).
Repeatedly press VO[ *
tO pyq!e through these
Choices:
ANT(antenna)
STDI HRCor IRC (all cab!e
Note: ST[), HRC and IRC identif)_ various types of cable TV systems. Contact your local cable
company to identif)_ the type of cable system that exists in your particular area.
ANT/CATV
_ine _ne
#Move +Select []_ Exi%
At this point the signal source has been selected. Proceed to "Storing Channels in Memory"
(next page).
press MENU twice to exit.
C}],%PTHq T} ]I,_KI : TV OP[ RATf(}bl 3. _

OPERATION
Storing Channels in Memory (Automatic Method)
Press the OHV button to
Select 'iAuto programl' .
I
Press the VO[ + button.
The IV will begin
memorizihg all o!the
available chaenelsl
A_'ter allthe available
Auto program menu reap
pears, P[ess the MENU
button twice to exit.
Channels are Stored,the _ ......
"_ The TV automatically eycles
through all of the available channels
and stores them in memor3t This
takes about one to two minutes.
Press the MENU button at any time
to interrupt the memorization
process and return to the Channel
IneI]!].
1314 C,[AP-/H_ T}]R_ I:: TV C)P]:],b\_I()N

OPERATION
Adding and Erasin 9 Channels (Manual Method)
Pressthe MENU button.
Pressthe CHY button
twice to select "Channel'!,
then press the VOL+but=
i
iii I
iii/
2
Pressthe OHA or CHY
ourfon to select
Add/Erase".
Pressthe VOL+button,
Add/Erase •
3
Pressthe VOL-I+ or num-
oer uuEonsto select the
cnanne you wantto add
or erase.
Channel : ANTI]
_arm_l
_ove _elec_ MqE_it
C}],\P'lt R T} H_]:I : TV C)Pt RATfON _, 5

I OPERATION i
Changing Channels
Using the Channel Buttons
Pressthe CH,_,0t CHY butt0n t0 change channels,
When you press CH A or CH Y, tile TV changes channels in sequence. You will see all tile
channels that tile TV has memorized. (The TV must have menlorized at least three channels.)
You will not see channels that were either" erased or not memorized.
Directly Accessing Channels
Use the number buttons to qtfickly tune to any channel.
1
Piess the numbgr buttons to go directly to a Channel.
Forexample, to select chaune127, press "2," theb " 7/'
The TVwi! change channels when yo upress the
second number.
When you use tile number buttons, you can directly select channels that were either erased oi"
not memorized.
To select a channel over" 100, press the +100 button. (For" channel 122, press "+100," then "2/'
then "2.")
To ehanqe to single digit channels (0 9) f_/ster, press "0" beffme tile
single digit. (For eharmel "4," press "0," then "4/')
Using the PRE-CH Button to select the Previous Channel
Pressthe PRE-CHbutton, one channel, then use the t]tullbm _
The TVwill switch to the last channel viewed, button to select the second channel.
Adjusting the Volume
Press theVOL+ or VOb button to increase or decrease the volume.
Using Mute
At any time, you can temporarily cut off the sound using the Mute button.
Press the MUTEbutton and the sound cuts off.
Theword" Mutei' will appear in the !0wer-left comer of the
To turn mute off, press the MUTE butten agai n, or simply Press
either the VOLL or VOL+ button.
3.6 ciiAi,q._ TH]_]:: TV OP]:],u_,TIoN
q.,eMys.,',teh t.,'o
channelsthata,'efa,apa,t,t,u eto
Then. use tile PRECH button to
quickly alternate between them.

OPERATION
Setting the Clock
]
1
Pressthe MENU button to
d_splaythe on-screen
nlenu
Pressthe OH Y button
three [tmes to select
Funcuon
Pressthe VOL+ DU[[On,
2
Pressthe OHT button [o
select the" Time menL
Press[ne VOL+ button:
The Timemenu wl
aDDearonthe screen, ana
"Clock" will be selected.
3
Pressthe VOL+ button
again [the hours d gits will
beselected). Press the OH
A or OH Y button repeat-
edly until the correct nour
aDDears.
_Ftl_ion
-=Move -+Select FVRExit
Time
€ Move ±Select FVRExit
Time
Clock 09:00am
When selectin8 the hours, be sure
to select the proper time of day (AM
oi PM).
You can change the hours by pressing
CH A or CH Y repeatedly (or by
holcth-lg clown either of these buttons).
Akerthe houris en[erea,
DresstheVOL +button
[atthis pomttheminutes
dlgitswill be selected)
4
Pressthe CHA or OHY
DUtton[o select the
correc[ minutes,
Afte/selecting the correct
minutes, press the VOL +
DUZron.
Pressme MENU autton
three times to exit.
YunC_i_n
Time
Clock 09:30am
Cgd_ss_ ±_ve _Exit
The time will appear every time
you piess DISPLAY.
C}],\P'l} I_ T]]I'_]:I : TV C)};} }_A'['fON 3.7

OPERATION
]
Customizing the Picture
You can use the on-screen menus to change the contrast, brightness, tint, color, and
sharpness according to personal preference. (Alternatively, you can use one of the
"automatic" settings. See next page.)
Pressthe MENU button to
display the menu.
Pressthe VOL; or VOL+
button repeatedly,until the
word i Custom"js selected.
(When Customis highlighb
ed;the word "AdJust°wi!!
Press the OHY button to
select 1Adjust!i; then
press the VOL÷button.
(]he words ColorTonel
Contrast, Brightness,
Sharpness, Color, and Iint
Will appear on the screenl)
Pressthe CH A o(CH Y
button to se!#ct a partjcu:
lar item;
_i I _ _ i_ _i i_i i
Pressthe VOL_ orVOL+
button to increase or
decrease the _alue ofa
particular item.
Pressthe MENUbutton
four times to exit,
3,8 (HAPq_}_ THR_ L: TV OP]:]RAT[ON
€ Move + Select [[]] Sxlt
"_ After adjusting an item. the gauge
will automatically disappear (after
about 5 seconds).

OPERATION
]
Using Automatic Picture Settings
Yot11 TV has thlee alltomatic pictl n-e settings ("Standard', "Nat1 n-al', and "Mild") that are
preset at the factory You can activate either Standard, Natln-al or Mild by making a
selection flom the menu. Or, you can select "Custom" which automatically recalls your
personalized picture settings.
1
Pressme MENU button to
display the menu.
Pressthe VOL4 or VOL÷
button to select the
_:Standard,"_:Natura!,il
"Mild,': or ':Custom:: I
pictu[e setting.
/
t
Choose StandaM fbr the standard f_ctory settings.
Natural: ()ptimal indoor screen condition.
Choose Mild ("Mild Contrast") when viewing the TV in low light, or when
playing video games.
Choose Custom if you want to adjust the settings according to personal pref
erence (see "Customizing the Picture, page 3.8).
C}],\P'I} R T}]I,_]:I : TV C)P_ RATfON 3,9

OPERATION
Using Automatic Sound Settings
Your TV has four automatic sound settings ("Standard," "Music," "Movie," and "Speech")
that are preset at the factory. You can activate any of them by making a selection flom the
OI]-SCr_eI] 1TICI]U.
1
Pressthe MtFNLIbutton to
displaythe menu.
Press the CHY button to
select the" Sound" menu
Pressthe UOL4 or VOE÷
Select the_!Standard," _'_ o_:_
!TMusic," t!M0vie,"0r M_s .< stez-_e
buttoa repeatedly tO _ Mode ,I $_andard
'i Speech'_sound settings.
Choose Standard for the standard factory settings.
Choose _/[usic when watching music videos or concerts.
Choose Mo_ies when watchin_ movies.
Choose Speech when watchinR a show that is mostly dialogue (i.e., news).
_, ] O C;[AP17]:lR TIH_ L: TV ()PI:RAq]/)N

OPERATION
l
Viewing a VCR or Camcorder Tape
You must select the a1313ro131iate mode in order to view the VCR OF Camcol_cIer signal
on the TV:
Quick way to view the external
1
Press the MENU button to
display the menu.
signal: Simply press the TV/VIDEO
i:
button on the remote control.
Pressthe OHT button
twice to Select
!:Channeli', then press the .
VOL+button .Move +Select ITRExit
Press the CHY button
twiceb el ct"] /
3 : ! /
Press the VOL or VO[-
button,
You will switch betwe#n
viewing the signals corn:
ing from equipment co m
nected tQthe TV's A/V
jacks, and the lv signal.
Ad_l/t_ase
Press the MENUbutton _
twice to exit. "_
N,
PSTD WHDEO ]_.._
C}]A]:'TLI_ TI[R]:]:: TV C)PI:Ib\T]ON 3, _

SPECIAL FEATURES
Customizing Your Remote Contro|
Yottr TV comes eclttipped with a "ltniversal" remote control. In addition to
controlling the TV_ the ttniversal rernote can also operate a VCR and a cable box
(even if yottr VCR and cable box are made by manttfactttrers other than (h trtis Mathes).
Setting Up Your Remote Contro| to Operate Your VCR
0n your Curtis Nathes ternote c0ntr0!, press SET;
,_ 'modes : 'TV, "VCR", and
Press the VCRbutton 0n the top rightofyour remote control "Cable".
4 4 Makes,,re>te,,ter,,othcfi itsof
Enter bothdigits ofthe VCRcode !istedonthe nextpage f0r If more than one code is listed, try the
#ourbrand0f vc R. first one.
Pressthe POWERbutton onthe remote control. YourVCR of the other codes listed fi_r the
should turn on,If your VCRturns on, your remote control is brand of" your particular VCR.
now Setcorrectly. If no other codes are listed, try each
6
OnceyourremotecontroIissetup,presstheVCRbutton
anytimeY0Uwantt0 usethe rem0tet00potatoy0urvCR.
. "1 C}]APTLR F()UR: SP]:CIA] FIAT1]R]:S
_ The remote control has three
Press the "VCR" button to switch the
remote control to the "VCR" mode.
the code, even if the first digit is a "0."
If your VCR does not turn on,
repeat steps 2, 3, and 4, but try one
cocle, 000 through 72.
_,4 \/Vhen your remote control is in
the "VCR" mode, the volume buttons
still control your TV's volume.
When your remote is in the "TV"
mode, the VCR control buttons (PLAY,
PAUSE, etc.) will still operate your
VCR.

SPECIAL FEATURES
VCR Codes
i
Aiwa 00
Akai 15, 22, 26, 30, 45, 66
Anam 71, 72
Broksonic 47, 53, 59
Capehart 05
Canon] Curtis Mathes 09
Craig 20, 65,67
Daewoo 03, 05,18, 39, 68, 70
Daytron 05
Dynalech 00, 21
Emerson 00, 01, 10, 11,30, 35
40, 47, 53, 56, 57, 59, 60
Fisher 20, 27, 33, 43
Funai 00
GE 09, 29, 32
LG 04, 11, 12
Harman]Kardon 12, 37
Hitachi 00, 15, 16, 32, 44, 51, 64
JCL 09
Jensen 15
JVC 15, 34, 55
Kenwood 15, 19, 34
Lloyd 00
Logik 36
LXI 11
Magnavox 09, 38, 42, 46, 48
Marantz 09, 12, 38, 50
Marta 11
MEI 09
Memorex 00, 09, 11
13, 20, 21,43
MGA 17, 30
Minolta 16, 44
Mitsubishi 30, 37, 52, 61, 66
Mitsubishi (Unified) 17
MTC 00, 65
Multitech 00, 36 STS
NAD 28 Sylvania
NEC 12, 14, 15, 23, 34 Symphonic
Optonica 21, 31 Tan@
Panasonic 09, 63 Tamng
Penney 09, 12, 14, 16, 65 Teac
Pentax 16, 32, 44 Technics
Philco 09
Philips 09, 31, 38, 46
Pilot 11
Pioneer Unified 28, 34
Portland 05
Pulsar 13
Quartz 19, 49
Quasar 09, 41
RCA 09, 16, 32, 44, 48, 54
RCA (Unified) 29
Realistic 00, 09, 11, 19, 20
21,31,33,43,65
Ricoh 08
Samsung 18, 24, 26, 65
Sansui 15, 34, 67
Sanyo 19, 20, 43
Scott 47, 53, 58, 60
Sears 09, 11, 16, 19
Sharp 21, 31
Shintom 36
Sony 02, 06, 07, 08, 09
Teknika 00, 09, 11,25
TMK 10
Totevision 11,65
Toshiba 17, 18, 33, 58, 60
Unitech 65
Vector Research 12, 14
Victor 34
Video Concepts 14, 30, 62
Videosonic 65
Wards 00, 09, 16, 20, 21
Yamaha 12, 15
Zenith 07, 08
Zenith (Unified) 13
20, 27, 33, 43, 44
16
09, 17, 46
00
00, 43
15
00, 15
09
31,36, 48, 60, 65
C}]APTEIq F( )_IR: SP] C]AI FEA] [J}/]S 4 . 2

SPECIAL FEATURES
Setting Up Your Remote Control to Operate Your Cable Box
Turn offyour
cablebox.
On your Curtis Mathes remote COntrol,press SET,
Press the {:ABLEbutton on the top right of your tem0te "CABLE".
Control. Press the "CABLE" button to switch
i
.,T,teremoteco,,tt'ol,,ast,tt'oe
"modes":"TW'"VCR,"and
the remote control to tile "Cable"
mode.
4 _' Makesureyet,e.ter,.ott,digits
Enter b0th digits of the cable b0x c0de listed bel0w lot y0ur "0." (If more than one code listed,
brand of cable box. try the first one.)
Press POWER. YOUrcable box should turn on. !fyour cable one of the other codes listed for your
box turns 0n, your remote control is now '!set up': correctly, particular brand of cable box. (If no
e WI,e,,yor,tremotecontt'olis
Once your remote control is set up, press the CABLE button buttons still control your TV's vol
any time you want to use the remote to operate your cable ume. Also, tile VCR control buttons
box. (PLAY, PAUSE, etc.) will still operate
Cable Box Codes
ABC 0, 07, 09, 12
Antronix 26
Archer 26
Corntronics 18
Eagle Comtronics 18
Eastern 01
Gemini 11
Genera] Instruments 07
Hamlin 06, 14, 30, 32
Hitachi 07
Jerrold 02, 07, 10, ]1, 19, 23
Memomx 00
Oak 04, 13, 28
Panasonic i 5, 24
. 7_} CHAPT]:I_ F()UR: SPl:CIA] FIATUR]:S
Paragon
Pioneer
Pulsar
RCA
Rea]istJc
Regal
Regency
Samsung
Scientific Atlanta
Signal
Signature
SL Marx
Sprucer
of tile code, even if tile first digit is a
"on,t.epe,t,">Urstepsca,,,e_,,,o_3,a.ddoes4,notbuttut'ntt'y
other codes are listed, try each cable
box code, 00 through 35.)
m the"CABLE"mode,the volume
your VCR.
00 Starcom
16, 25,
31 Stargate
00 Tan@
i5 Te]eCaption
26 Texscan
lq, 30, 32,
03,05, 12,
34 Tocom
01 Toshiba
25 Unika
18,
33 United Artists
]8 United Cable
07 Universal
]8 Viewstar
15, 35 Zenith
02, 11, 19,23
I1, 18
29
27
22
08, 09, 21
00
26
04
02
26
29
00, 20

l SPECIAL FEATURES
Fine Tuning Channels
Use fine tunin H to manually adjust a particular channel for optinlal reception.
Select the appropriate
Press the MENU buttonto
display the menu.
P[ess the 1;11V button
twice to se!ect the __e_,e ±se_,el:t _ t_,_it
t'Channer' menu, then
Press the OHV button
three times to select i_Eine
tune" ithen press the
VOL+button.
# Move + Select ITR Exit
Pressthe VOI+ and VOL-
buttons ro aojust the fine
3
tuning.
4
70store the fine tumng
setting in the TV's memo-
ry,press me Ct-IY button
soselect" Se]ect".
Pressthe VOI+ or VO[-
button to selecl Added"
Toreset the fine tuningto
00" 3tess the VOL+or
VO[- buEon soselect
_rased .
gh_
Fine tune
¢_e ±se&ee_ iTTIE_i_
: +3
Press the MENU button to
rest]me isormal viewing.
C}],M_'IHq FOUR: SP]:C]AI F_ATURES _, 4

_PffCIAL FEATURES
i
Changing the Screen Size
1
Pressthe MENU button to
dBplay the menu.
Pressthe VOL+ button [o
select the" Picture" menu
#Move ±Sele_ _it
2
Pressthe CH Y button
[w]ce [o select "Size.'
Size : Nodal
, _Move _Sele_t [m_xlt
!3¸¸¸¸¸:/i T
Press theVO[ Orvo[_
button repeatedly to
select '_Normal" or
'!Zoom'i:
Press the MENUbutton
twice toexit,
" Normal : Sets the t)icture to 4:3 normal mode. This is a standard TV screen size.
, Zoom : Magnifies the size of tl_e picture on screen.
_t
Size : Zoom
_. 5 CHAI_T]:I_ F()U}_: SPI:(2D\] FIATURI:S

SPECIAL FEATURES
]
Using the Surf Feature
This f_atllre allows you to set the TV to reulrn to a particlllar channel after a certain
amount of time. For example, you may be watching a channel when cornrnercials
start. You can set the Slnf to "5 mimltes", then switch channels. After 5 minlltes,
the TV will return to the original channel. To use the Surf f_atlne:
1
While you are watching
snechannel to which you
wars [o re_urn Dresstile
R.SLIR[button. The on-
screen msplay will read
Surf off'.
Surf rJf_
2
Pressthe R,SURFbutton
again sose! the timer In
thirty second intervals, UP
to five minutes.
Sur_ 2:30
The time you set will begin counting down on the screen.
When the time runs out, the IV will return to the channel
you were watching when y0u set the timer.
C}]&P'I}R F/)tq_: SP]:C]AI F_AqU_]:S _, 6

_PECIAL FEATURES
i
Setting the On/Off Timer
Pressthe MENUbutton to
Ydisp!a the menu. ...............
Press the OHY button
three timesto select
"Functiod _menu, then
press the VOL+button. ¢_ove +SeZect rrn _xit
Pressthe CHY button to
select "Time!',then press
the VOL+ button.
Time
€ _ove + Select 0_] Exit
-_ Before using the timer, you must
set the TV's clock. (See "Setting the
('.lock" on page 3.7).
pressthe CHA ocOHV
buttoor poated,yto
select the appropriate
hours (i.e., the hour when
the $V will tum on:)
Press VOL÷tOselect the
"On time" minutes.
(The minutes digits will be
highlighted:)
PressOH ,& or OHY to
Select the appropriate
minutes.
-_ When you set the hours, make
sure the correct time of clay (AM or
PM) appears to the right of the hour.
4.7 CHA]_T]:Iq F()LJt_; SP]:CD\] FtA'FU}_]:S

[
SPEOIAL FEATURES
Pressthe VO/+ button to
select "On/Off.'i
-,4 To deactP_'ate the "On thne,"
select "Off" durin 8 this step.
D '
Press the OHA (QrCH Y)
button to turn the on,
timer'tOn.'! (Repeated!y
pressing the CHA or
CHT button wi!l alter-
hate between on and off,)
When finished, press the
VO[ + button.
iiii iiiiiiiiii
Toset the Off time, press
the CH Y button to
select '!Off time."
Pressthe VOL+ button
andset the hours and
minutes. (Follow the same
procedure as insteps 1--6
above.)
When finished setting the timer, press the MENu buE0nthree
times to exit.
if:j!'o_ti_o o_,3o_o_
#A_j us_ + Move [_ Exit
Setting the Sleep Timer
The sleep timer automatically shuts off" the TV after a preset time
(f]'orrl 10 to 180 rllJnt]tes).
-_1 After about 5 seconds, the sleep
display will disappear from the
Press the SLEEPbutton onthe remote control.
press the S[LEEPbutton repeatedly until the appropriate time
interval appears {any ofthe preset values from '!ore to tl]80f ).
screen, and the time interval will be
set.
C}],%P'IHq F<)LI}_: SPlIC]AI RATtJkZ]IS a_, 8

SPECIAL FEATURES
]
Sound Features
Choosing a Multi-Channel Sound (MTS) Soundtrack
Depending on the partic_llar program being broadcast, you can listen to Stereo, Mono or
a Separate Audio Program. (SAP audio is usually a foreigndanguage translation.
Sometimes SAP has unrelated inforrnation like news or weather.)
Press the MENU button
to disp ay the menu.
Press the OIlY button to
select the" Sound" menu,
then press the VOL+but:
ton.
four times to select
i _i _i_i i I
The text at the bottom of the
meI]tl tells you if the incoming
Press the VOL4.orVOL: audio is stereo, SAEol. mono.
buttontoselect,_Mono!,i _e 4 sb_d
'SAP':' I [
Press the MENU bu!t0n
!wicetgexi! **;_o,e +-select, ITn_,,_;
• Choose Stereo for channels that are broadcasting in stereo.
• Choose Mono for channels that are broadcasting in mono, or if you are
having difficulty receiving a stereo signal.
• Choose SAP to listen to the Separate Audio Program, which is usually a
foreign-language translation.
You can also change the MTS setting by pressing the "MTS" button on the remote
control. (When you change channels, MTS is set to "Stereo" automatically.
To listen in 'SAP' or 'Mono,' change the MTS setting.)
I
_,9 C}]A]rFLR F()[J}_: SP]:CIA] FIAT1]R]:S

SPECIAL FEATURES
]
Setting the Surround
Your Curtis Mathes TV creates a "Surround" effect such that the sound seems to corne
flora all directions. Once the "Surround" is set to "On" or "Off", the setting applies to the
sound effects such as Standard, Music, Movie and Speech.
Note: To listen a "S1]rroln_d" effects, it is necessary that channels are broadcasting in
stereo, and setting the MTS to stereo mode.
Pressthe MENUbutton to
display the menu,
Pressthe CHY button to
select the t,Sound:' menu,
then press the VOL+ but:
ton, #Move +Select Fm Exit
i
2Press the #BY button ..............
three times to Select M#ae 4 S _&sSta£d _"
Surround : Off
Surround"
Pressthe VOL+ button to
select '!On'!,
Press the MENU button
twice to exit
#Move ±Select FmExit
_i ": _i:i _'_'T'! _""'i_!i_i '_ i
Surround On '
# Move ± Select Fm Exit
CfIAP]:]:]R F<)[]t_: SPt C]A] E]:,\TURt S _ . ] 0

SPECIAL FEATURES
i
Viewing C|osed Captions
Yo_]rTVdecodes and displays the closed captions that are broadcast with certain TV shows.
These captions are usually subtitles for the hearing irnpaired or foreignqanguage trans-
lations. All VCI_s record the closed caption signal from television programs, so home-record-
ed video tapes also provide closed captions. Most pre-recorded commercial video tapes pro-
vide closed captions as well. Check for the closed caption symbol in yol]r television sche& fie
and on the tape's packaging: E_ •
1
Pressthe MENU button to
display the menu.
Pressthe Clt Y button
three t_mesto select the
"Function" menu,
Pressthe VOL+button. #Nove ±Seleot
[[]]Exit
2
Press the CH'IF ouEon
twice 10 select the
Caption" menu then
Dressthe VOL+DuEon,
Caption
_CM&p
Move _ Select Fm Exit
3
Pressthe VOL÷or VOL-
button re turn dosed cap-
tioning on/off.
4
Press the CHYbuEon _o
select'Mode."
Press me VOL - or VOL+
DuEon(0 select" Caution"
or" Text."
Captio_ : O_
Ld
€_ve _ Select _Exit
Mode : Caption
© Move _ Select Fm Exit
F_c_ion
m
_tIon
5
Deperdmg on me uarncular broadcast, it reign[Denecessary to
make changes to "Channels" and,tField"
Use the CHA, OH T, VOL + and VOL- buttons to makethe
changes Followthesameurocedureasin _[eps3-4 above.',
Pressthe MENUbutton three times to exit.
-_1 Misspellings and unusual
characters sonletii]les OCCtlr during
closed caption transmissions, especial
ly those of live events. There may be a
small delay beffme captions appear
when you change channels. These are
not malfimctions of the T_
-_1 In caption mode, captions
appear at the/)ottom of the screen,
and they usually cover only a small
portion of the picture.
In text mode, information unrelated
to the program, such as news or
weather, is displayed. Text often
covers a large portion of the screen.
-,4 Different channels and fields
display different infi)rmation: Field 2
carries additional information that
supplements the information in
Field 1. (For example, Channel 1
may have subtitles in English, while
Channel 2 has subtitles in Spanish.)
4 , 1 1 Cl [AI)]]7:]R F<)tJt_: SPtC]AI F]7:,'_TURI S

SPECIAL FEATURES
]
Using the V-Chip
The V-Chip f_atl]re al]tomatically locks out programming that is deemed inappropriate %r
children. The user must first enter a PIN (personal ID number) befbre any of the V-Chip
restrictions can be set up or changed.
Note "When the V-chip feature is active, channel-auto program f_atures do not fl]nction.
Setting Up Your Persona| ID Number (PIN)
1
Pressthe MENU button to
displayme menL
Pressthe OHV button
three times to select the
:unct on menL
Pressthe VOL+button,
Pressthe OHT button
three times [o selec[ rne _te_ Pin
V-chiP menu,
Pressthe VOL+button.
The" _nter pin" screen will appear. Enter your 4-digit P N
number.Note: The default PIN number for a new TVset i_
Tl_e
#Move ±Select []_Exit
Enter Pin
FuSCt_O_
}
"O-O-O-O.'
3
After entering avalid PIN
numoeJ the" V-ch p
screen will aDoear
Press the OHY button
rnree times and highi]gn[
Change pin."
_FU_C_IO_
4
While the" Change pin"
field is selected nress the
VOL÷ 3uuon. The Change
pin screen will appear.
Chooseany 4-digits tot
your PINand enter them.
As soon as the 4 digits are entered, the" Confirm new 3in"
screen appears. Re-enter the same 4 dig ts. When the Confirm
screen alsappears, your PIN has oeenmerr 3rlzed
Pressthe MENUbutton three times to exit.
_ Change 9_n
Comfirmnew p_n
-_1 Note: If you fbrget the PIN,
press the remote control keys in the
following sequence, which resets the
pin to0 0 0 0:
POWER OFF ,* MUTE -_ 8 -_ 2 -_
4 "* POWER ON.
C}[AP]7]],_ F<}UR: SPt C]A] F]b\T1]Rt S _ .] 2

SPECIAL FEATURES
How to Enable/Disable the V-Chip
display the menu,
PresstheCH T button
three times to select the
'!Function" menu,
Pressthe VOL+button.
Press the CHY button
three times to select the
'!V_chip'imenu:
Pressthe VOL+ button.
The _!Enter pin" Screen
will appear. Entery0ur 4:
digit PIN numbe[..
3
The '!V:Chip" screen will
appear, and" V_Chiplock'!
will be selected (turns blue
color).
To enable the V:Chip feat
ture, press the VO[+ but-
# Move ± Select FFR Exit
ton so that the tlV:Chip
lock" field isYes_(P[essing
VOL÷ will alternate
between Yesand No.)
How to Set up Restrictions Using the " TV guidelines"
First, set up a personal identification number (PI]XT), and enable the V;Chip. (See previous
section.) Parental restrictions can be set up using either of two rnethods: The TV guide-
lines or the M]-)AA rating.
Pressthe MENUbutton to
display the menu,
press the CHY button
three times to select the
'!Function" menu.
Pressthe VOL÷button.
,I ]_ C} [AP]7]7]RF{)[J}_: SPHC]AI _]Tb\TIIR}{S

SPECIAL FEATURES
i
2
Pressthe OHY button
three times [o select me
V-chW' menu,
Press the VOL+ button,
The" Enter pin" screen
wmappear. Enteryour 4-
digit PIN number.
3
The V-chip s:reen w
appear.Press the OHY
button, and h ghlight the
field for "TV guidelines."
4
Pressthe %/O1.+button.
The "TV guidelines"
screen will appear, Press
the CH A. Ol'lV buttons
to highlight one of the six
age-based catego.es:
TV-Y Young childre-
TV-Y7 Childrer 7and ovel
TV-G General audience
TV-PG Parental guidance
TVq4 Viewers 14and over
TV-MA Matureaua ence
_Pun_t_el_
Enter Pin
Enter P±n : - - -
0~9 Select TRExIt
TV guidelines •
• Move ± Selec% [FNExi%
_netiDn
f_ &ll FV V 8 L D
TV_Y _ U
#Mere + Selec% []_ Exit
_1 Note: These categories consist of
t\_,'oseparategroups: TV-Y and TVY7
tyoung children through age 7}. ana
TV G through TV MA eve] ybody
else).
The restrictions for these two groups
work independently: If a household
includes ve]y young children as well
as young adults, the TV guidelines
must 10eset t p separately ibr each age
group. See next step.)
5
At this point, one of the TV-Ratings is highlighted lblue colon.
Pressthe VO[+ button: DepenDing onyour extsnng setup, a letter
tU= Unblocked. B= BloCKeD,
While the" U" or" B" is reD.Dressthe OHA or CHY button to block or unblocK rne category
Pressthe MENUbutton once m save me TVguidelines. A TV-Rating wtll be highhghteu, and no etters wtll blink.
Toexit this screen, press MENU ac _in.Toselect a different TV-Rating _ress the CHA or CH Y button and then
repeatthe process.
Note 1:The TV-YT.TV-PG.TV-14 andTV-MA nave aaumonal options. See the nextstep to change any of the
following sub-raungs:
FV:FantasyViolence
D: Dialog
L: Offensive language
S: Sexual situ :mot
V: Violence
Note 2:TheV-Ch p will automaticatty 3]ock certain categories that are" more restrictive." For example, if you block
TW_" category, then TV-Y7will automatically be blocked. Similarly, if you block the TV-Gcategory, men all the
categories in the" young adult" group wtll beblocked TV-G.TV-PG.TV-14 and TV-MAI. Thesub-ratings ID. L.S.V/
work together similarly, See nextsection.
U" or" B" will start bhnking.

SPECIAL FEATURES
]
6
Howto setthe FV.D. L S and V sub-ratmgs:
First,highlight one ofthese TV-Ratmgs:TV-Y7.TV-PG TV-14or TV-MA (See SteD4.on Previous page)
Next. while the W-Rating is highlighted (BLUE),repea[emy E"essthe VO[ + button. This wil cycle throug"
the available sub-ratings (FV,L S,DorV)
A blinking letter ("U" or" B") will bedisptayed for each sub-rating. While the" U" or" B" is blinking, press
the Cil A ot OHT button to change the sub-rating
Press MENUonce to savethe TV gu]dehnes.A W-Rating will be highlighted IB[UE) and no letters will blink
Toextt this screen press MENU agam. Tosetec[ a different TV-Rating,press the Cil A or Cil Y button and
then repeat me process
Note:The V-cNp will automaticallj block certain categories that are" More restrictive". For example, if you
block L" submatinginTV-PG, thenthe"l" sub-ratmgs in TV-14 and TV-MA will automatically be blocked
7
Pressrne MENUbutton three umes to clear all the screens tor proceed _ome next secnon and set up
additional restrictions based on the MPAA codes.
How to Set up Restrictions using the MPAA Ratings: G, PG, PG-
13, R, N0-17, X
The MPAA rating system uses the Motion Picture Association of America (MPAA) system,
and its main applicatior| is for movies. (Eventually, movie videocassettes will be encoded
with MPAA ratings.) When the "VtChip lock is on, the TV will automatically block any
programs that are coded with objectionable ratings (either MPAA or TVtRatings).
Pressthe MENU button to
display the menu.
Pressthe Oil T button
three times to select the
'! Functi0n': menu.
Pressthe V01.+button.
Pressthe Oil T button
three times to select the
'W:chiPi' menu.
Pressthe VOL÷button.
]-he _iEnter pin" screen
will appear. Enter Y0ur 4:
digit PIN number.
_, 1 5 CIIAP]:]7:]R F<)UR: SPt C]AI E]7:,\TURI S

SPECIAL FEATURES
The'W_chiffl screen wi!l
appear.
P[ess the OHY button
twice, and select "MPAA
rating.'I
i
ZZZZZZZZZZZZZZZZZ
While" MPAA rating" is
selected, press the VOL+
button. The" MPAA rat_
ing" screen will appear,
Move +Select ITR SxiE
;J/o
G m" B i
iii I
G...................... .............
PG.................. ............................
Repeatedly press the OH
Y button to select a
particular MPAA category.
pressing the CHV button
will cycle through the
MPAA categodesl
_£:7!_....._#:.!_..!.E_._._![._£9!._.._._._!!£_.@!.............
It R(Restricted. Children under 17should
............................_t£_£_.r_.ml_.r_.!@...!_x._fL_.@!!).:.............................
N.£.:;!.Z......_!_._.h!.!._!.c_r_..y!_.g._.[.._9¢..]._..........................................
X X(Adults only).
NR................._!.£.:_..:_.te.fJ:.........................................................................................
While a particular category is selected, press VOL+to activate it.
A letter CU" or" B") will be displayed. PressOH_, or OH_ to select" U" or" B".
Press MENUfour times to save the settings and to clear all screens.
Note: The V-Chipwill automatically block any category that is" more restrictive." For example, if you
block the" PGq3" category, then" R," "NCq7," and" X" will automaticall _be blocked also.
How to Reset the TV after the V-Chip
Blocks a Channel (" Emergency Escape" )
If the TV is tuned to a restricted channel, the V-Chipwill block it,]h escreen will go blank andthe following
To resume norma! viewing+tune to a different Channe!using the number buttons. Unde[ certain conditions
(depending on the rating o[the local TV programs) the v_Chip mightlock out al!the channels. Inthis case,
use the WChip function for an 7emergency escape" :
press the MENUbutton to display the menu. Pressthe Oil Y button three times tOselept the '![unctio n"
menu and press the I/O[ + button.
Pressthe 6t1Y button three times to highlight the iW_chip" menu and press the I/OL+ button.
Enteryour PIN number, arid press the I/OL÷ button to temporarily disable the WOhip Lock.
C}[APF]7:]7 FI)[Jt?: SFt C]A] F]7:,\TURt S '4 , I f-)

TROUBLESHOOTING
If the TV seems to have a problem, first Uy this list of possible problems and soh]tions.
If"none of" these trol]bleshooting tips apply, then call yol]r nearest (h ]rtis Mathes al]thorized
service ('enter,
Identifying Problems
Problem Possible Solution
Poor picu]re Try another channel.
Ac!jl]st the antenna.
Check all wire connections.
Poor sol n_d ql]alit3_ TW another channel.
Adjust the antenna.
No pictl]re or sol]nd. Try another channel.
No color, wrong colors or tints. Make sure the program is broadcast in color.
Press the TV/VIDEO button.
Make sure the TV is plugged in.
Check the antenna connections.
Ac!jl]st the pictl mesettings.
If the set is rnoved or tl]rned in a diff>rent
direction, the power sholfld be OFF fbr
at least 30 rninl]tes.
Pictl]re rolls verticall_z At!jr]st the antenna.
Check all wire connections.
The TV operates erratically Unph]g the TV fk]r 30 seconds, then Uy
operating it again.
The TV won't tl nn on. Make sl ne the wall ol Met is working.
CHAPTE]_ FIV]: TROUBI] S]tOOTINC 5 , "1

APPENDIX
Cleaning and Maintaining Your TV
With proper care, your TV unit will give you many years of service. Please fi_llow these
guidelines to get the maximum perfi_rrnance flora your TV
Placement
° Do not place the TV near extremely hot, cold, hurnid or dusty places.
° Do not place the TV near appliances with electric rnotors that create rnagnetic fields,
st ]ch as vacl]l n'n cleaners.
° Keep the ventilation openings clear; do not place the TV on a soft surface, such as
cloth or paper.
• Place the TV in a vertical position only.
Liquids
° Do not handle liquids near or on the TV Liquids that spill into it can cause serious
damage.
Cabinet
• Never open the cabinet or touch the parts ii-lside.
° Wipe your TV with a clean, dry cloth. Never use water, cleaning fluids, wax, or
chemicals.
° Do not put heavy olqjects on top of the cabinet.
Temperature
• If"your TV is suddenly rnoved f]orn a cold to a warrn place, unplug the power Col-d,
and allow at least two hours f_r moisture that may have fk_rrned inside the unit to chy
cornpletel_z
. 1 AP}_I:NI)]X
Using Your TV in Another Country
If you plan to take your TV with you to a foreign country, please be aware of the different
television systems that are in use around the world. A TV designed for one system may
not work properly with another system due to differences in the TV channel flequencies.
Specifications
Model
Voltage
Ereql]ency of Operation
CM19033S
AC 120V
60Hz

Curtis Mathes Color Television
ThisCurtisMathesbrandproduct,assuppliedanddistributedbyCurtisMathesanddeliverednew,intheoriginalcartontothe
originalconsumerpurchaser,iswarrantedbyCurtisMathesagainstmanufacturingdefectsin materialsandworkmanshipfor a
limitedwarrantyperiodof:
Ninety(90)DaysLaborandOne(1)YearPartsandTwo(2)YearsWarrantyfor PictureTube(CRT)
Thislimitedwarrantybeginson theoriginaldateof purchase,andisvalidonly onproductspurchasedand usedin the United
States. Toreceivewarrantyservice,thepurchasermustcontactCurtisMathesfordeterminationof problemandserviceproce-
dures. Warrantyservicecanonlybeperformedbya CurtisMathesauthorizedservicecenter.Theoriginaldatedbillofsatemust
bepresenteduponrequestasproofofpurchasetoCurtisMathesor CurtisMathes'sauthorizedservicecenter.
CurtisMatheswillrepairor replacethisproduct,at ouroptionandat nochargeasstipulatedherein,withnewor reconditioned
partsor productsif foundto be defectiveduringthe limitedwarrantyperiodspecifiedabove.All replacedpartsandproducts
becomethe propertyof CurtisMathesand mustbe returnedto CurtisMathes.Replacementpartsandproductsassumethe
remainingoriginalwarranty,orninety(90)days,whicheveris longer.
Toobtainwarrantyservice,pleasecontactCurtisMathesat:1-877-456-2788
Formoreproductandcustomersupportinformation,visittheCurtisMatheswebs!toat:www.curtismathes.eom
In-homeservicewittbe providedduringthewarrantylaborperiodsubjectto availabilitywithinthe contiguousUnitedStates.In-
homeserviceis notavailablein attareas.Toreceivein-homeservice,theproductmustbeunobstructedandaccessibletoservice
personnel.If duringin-homeservicerepaircannotbecompleted,itmaybenecessaryto remove,repairandreturnthe product.If
in-homeserviceis unavailable,CurtisMathesmayelect,at ouroptionto providefor transportationof our choiceto andfroma
CurtisMathesauthorizedservicecenter.Otherwise,transportationto andfromtheCurtisMathesauthorizedservicecenteristhe
responsibilityofthe purchaser.
Thislimitedwarrantycoversmanufacturingdefectsinmaterialsandworkmanshipencounteredin normal,noncommercialuseof
this productandshaltnot applyto thefollowing,including,but notlimitedto: damagewhichoccursin shipment;deliveryand
installation;applicationsandusesfor whichthisproductwasnotintended;alteredproductorserialnumbers;cosmeticdamageor
exteriorfinish;accidents,abuse,neglect,fire,water,lightningor otheractsof nature;useof products,equipment,systems,utili-
ties,services,parts,supplies,accessories,applications,installations,repairs,externalwiringorconnectorsnotsuppliedor autho-
rizedby CurtisMatheswhichdamagethis productor resultin serviceproblems;incorrectelectrica!linevoltage,fluctuationsand
surges;customeradjustmentsandfailureto followoperatinginstructions,cleaning,maintenanceandenvironmentalinstructions
that arecoveredandprescribedin theinstructionbook;productremovaland reinstallation;receptionproblemsanddistortion
relatedto noise,echo,interferenceor othersignaltransmissionand deliveryproblems;picturetube(CRT)brightnessrelatedto
normalaging,orburned-inimages.CurtisMathesdoesnotwarrantuninterruptedor error-freeoperationoftheproduct.
THEREARE NOEXPRESSEDWARRANTIESOTHERTHANTHOSELISTEDANDDESCRIBEDABOVE,ANDNOWAR-
RANTIESWHETHEREXPRESSEDOR IMPLIED,INCLUDING,BUTNOTLIMITEDTO,ANYIMPLIEDWARRANTIESOF MER-
CHANTABILITYOR FITNESSFORA PARTICULARPURPOSE,SHALLAPPLYAFTERTHE EXPRESSEDWARRANTYPERI-
ODSSTATEDABOVE,ANDNOOTHEREXPRESSEDWARRANTYORGUARANTYGIVENBYANYPERSON,FIRMORCOR-
PORATIONWITH RESPECTTOTHIS PRODUCTSHALLBE BINDINGON CurtisMathes.CurtisMathesSHALLNOTBE
LIABLEFORLOSSOF REVENUEOR PROFITS,FAILURETO REALIZESAVINGSOROTHERBENEFITS,ORANYOTHER
SPECIAL,INCIDENTALORCONSEQUENTIALDAMAGESCAUSEDBYTHE USE, MISUSEOR INABILITYTO USETHIS
PRODUCT,REGARDLESSOF THELEGALTHEORYONWHICHTHECLAIMIS BASED,EVENIFCurtisMathesHASBEEN
ADVISEDOFTHEPOSSIBILITYOF SUCHDAMAGES.NORSHALLRECOVERYOFANYKINDAGAINSTCurtisMathesBE
GREATERIN AMOUNTTHANTHEPURCHASEPRICEOF THEPRODUCTSOLDBYCurtis MathesANDCAUSINGTHE
ALLEGEDDAMAGE.WITHOUTLIMITINGTHEFOREGOING,PURCHASERASSUMESALLRISKANDLIABILITYFORLOSS,
DAMAGEOR INJURYTO PURCHASERANDPURCHASER'SPROPERTYANDTOOTHERSANDTHEIRPROPERTY,ARIS-
INGOUTOFTHEUSE,MISUSEOR INABILITYTOUSETHISPRODUCTSOLDBYCurtisMathes,NOTCAUSEDDIRECTLY
BYTHENEGLIGENCEOFCurtisMathes.THISLIMITEDWARRANTYSHALLNOTEXTENDTOANYONEOTHERTHANTHE
ORIGINALPURCHASEROF THISPRODUCT,ISNONTRANSFERABLEANDSTATESYOUREXCLUSIVEREMEDY.
Somestatesdo notallowlimitationson howtongan impliedwarrantylasts,or theexclusionor limitationof incidentalorconse-
quentialdamages,sotheabovelimitationsorexclusionsmaynotapplyto you. Thiswarrantygivesyou specificlegalrights,and
youmayalsohaveotherrightswhichvaryfromstateto state.

This product is listedby Underwriter's Laboratories, Inc. It is
designed and manufactured to meet rigid U.L safety standards
against X-radiation, fire casualty and electrical hazards.
Asan ENERGY STAR ®Partner,
CurtisMatheshasdeterminedthat this
productorproductmodelmeetsthe
ENERGY STAR ®guidelines
for energyeffiency.
CurtisMathes
3250 W. Big BeaverRd.
Troy,MI 48084
Formore information about thisor other CurtisMathes
products, pleasevisit our web siteat: www.curtismathes.com.
AA68-02351 A-00
 Loading...