

Page 1

#TID5030
Caller ID Telephone instruction manual
Location of controls
1. Handset Volume Hi/Low Switch
2. Dialing Tone/Pulse Switch
3. Review Left Up [
4. Delete Button
5. New Call indicator
6. LCD display (for telephone)
7. Review Right Down
8. Out Key
9. Set Key
10. Hook Switch (for telephone)
11. Digital key (0-9 , * and # key pad)
12. Flash key
13. Redial key
14. Store key
15. Auto key
16. Radio Speaker on/off button
17. Ringer High/Low Switch
18. Handset Holder
19. Speaker (for radio)
20. Telephone Line Cord Jack
21. Alarm ON/OFF indicator
22. AM/FM Band Selector
23. Tuning knob
24. LED Clock Display
25. Dial Pointer
26. Volume/Buzzer Switch
27. Minute Set Button
28. Time Set Button
29. Hour Set Button
30. Radio On/Off/Auto Switch
31. Alarm Set Button
32. Sleep Button
33. Snooze Button
34. Battery compartment (for Clock back-up)
] key
[ ] key
REVISED 12-07-04
Page 2
Features
Built-in FSK/DTMF decoder
Clock alarm
Pulse/Tone switch
Compatible with all CID standards (FSK/DTMF) such as Bell
202,U23,BT,CCA,ETSI etc.
Conversation timer
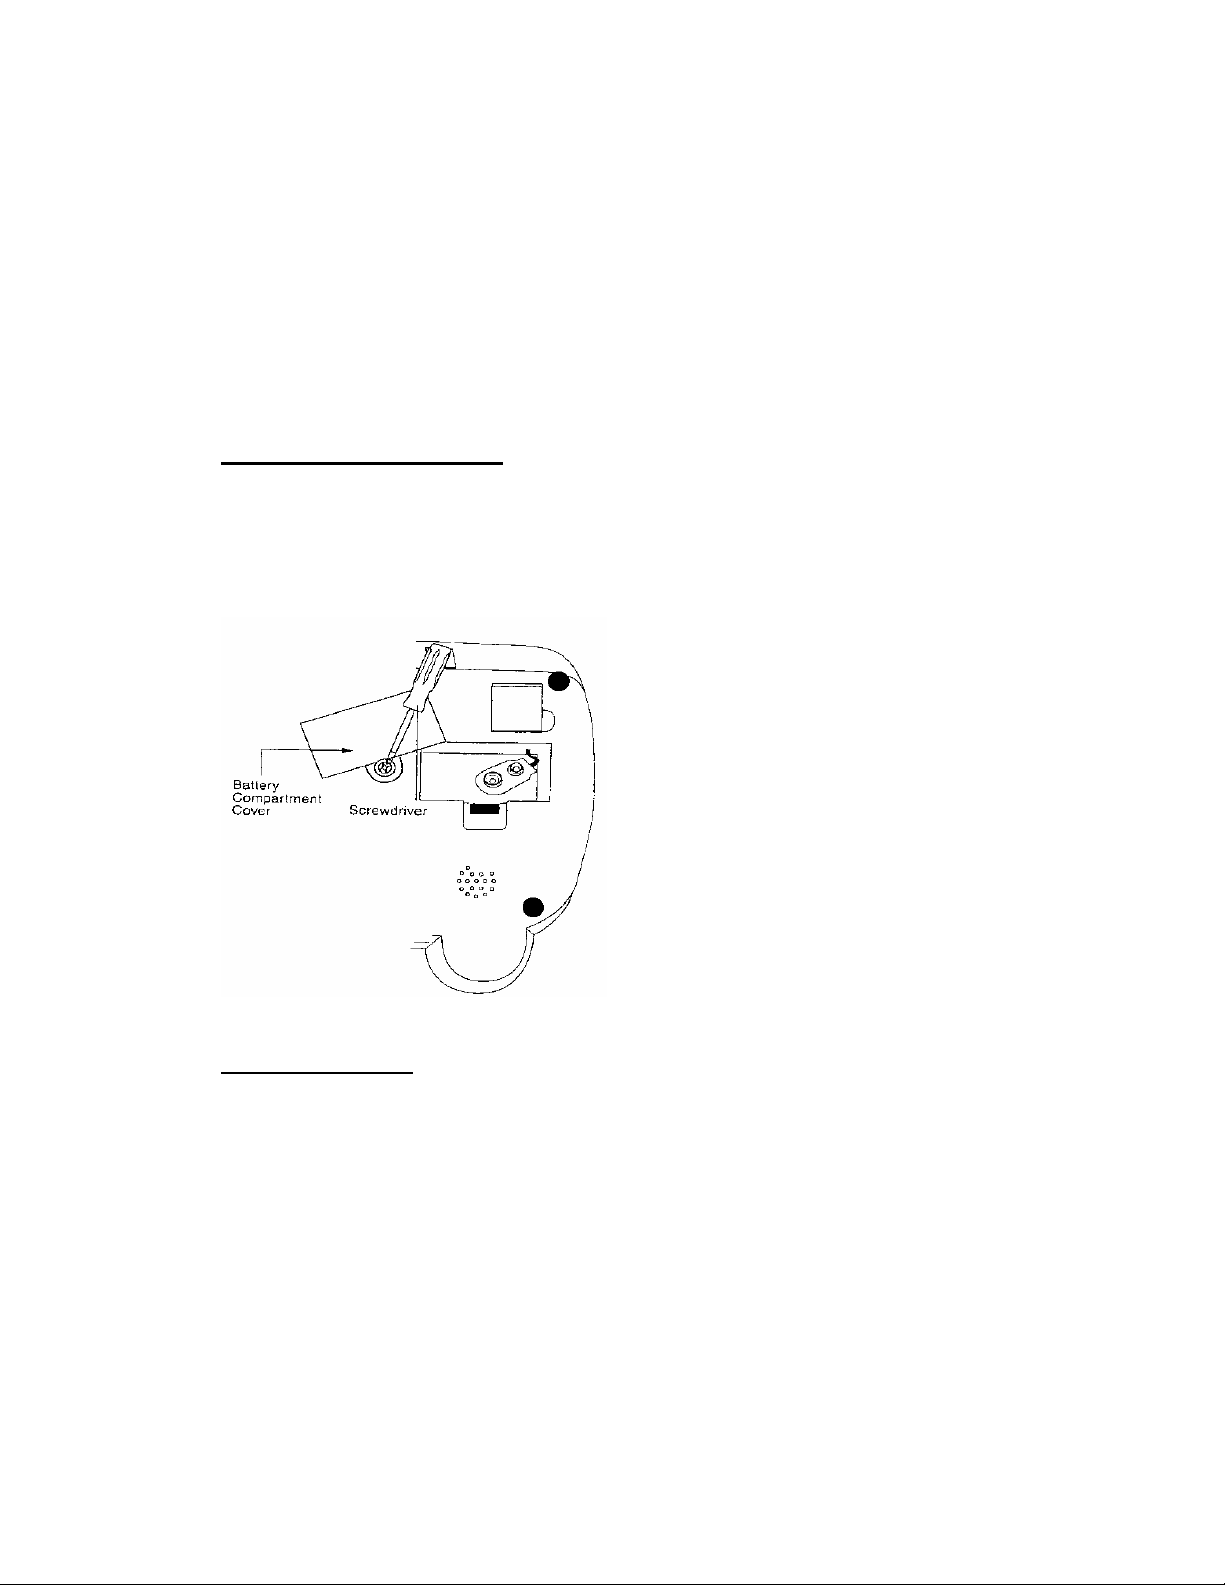
BATTERY INSTALLATION
The unit use one 9V Battery (not included) as a short term backup of the date/time
and speed dial numbers when the power goes out.
Battery installation.
The unit uses one 9V battery (not included) as a short term backup of the date/time
and speed dial numbers when the power goes out.
To install the battery:
1. Use a screwdriver(not included) to remove the screw fastening the battery compartment door
and then pull the battery door up and out.
2. Install a “9V” type alkaline battery(not included)
3. Replace the battery compartment cover, making sure it locks into place.
Note: It is recommended that you replace the 9V backup battery approximately every
6 months to preserve battery freshness.
Note: In the case of extended power outages, the battery will provide power to the
telephone for about 10 hours.
Page 3
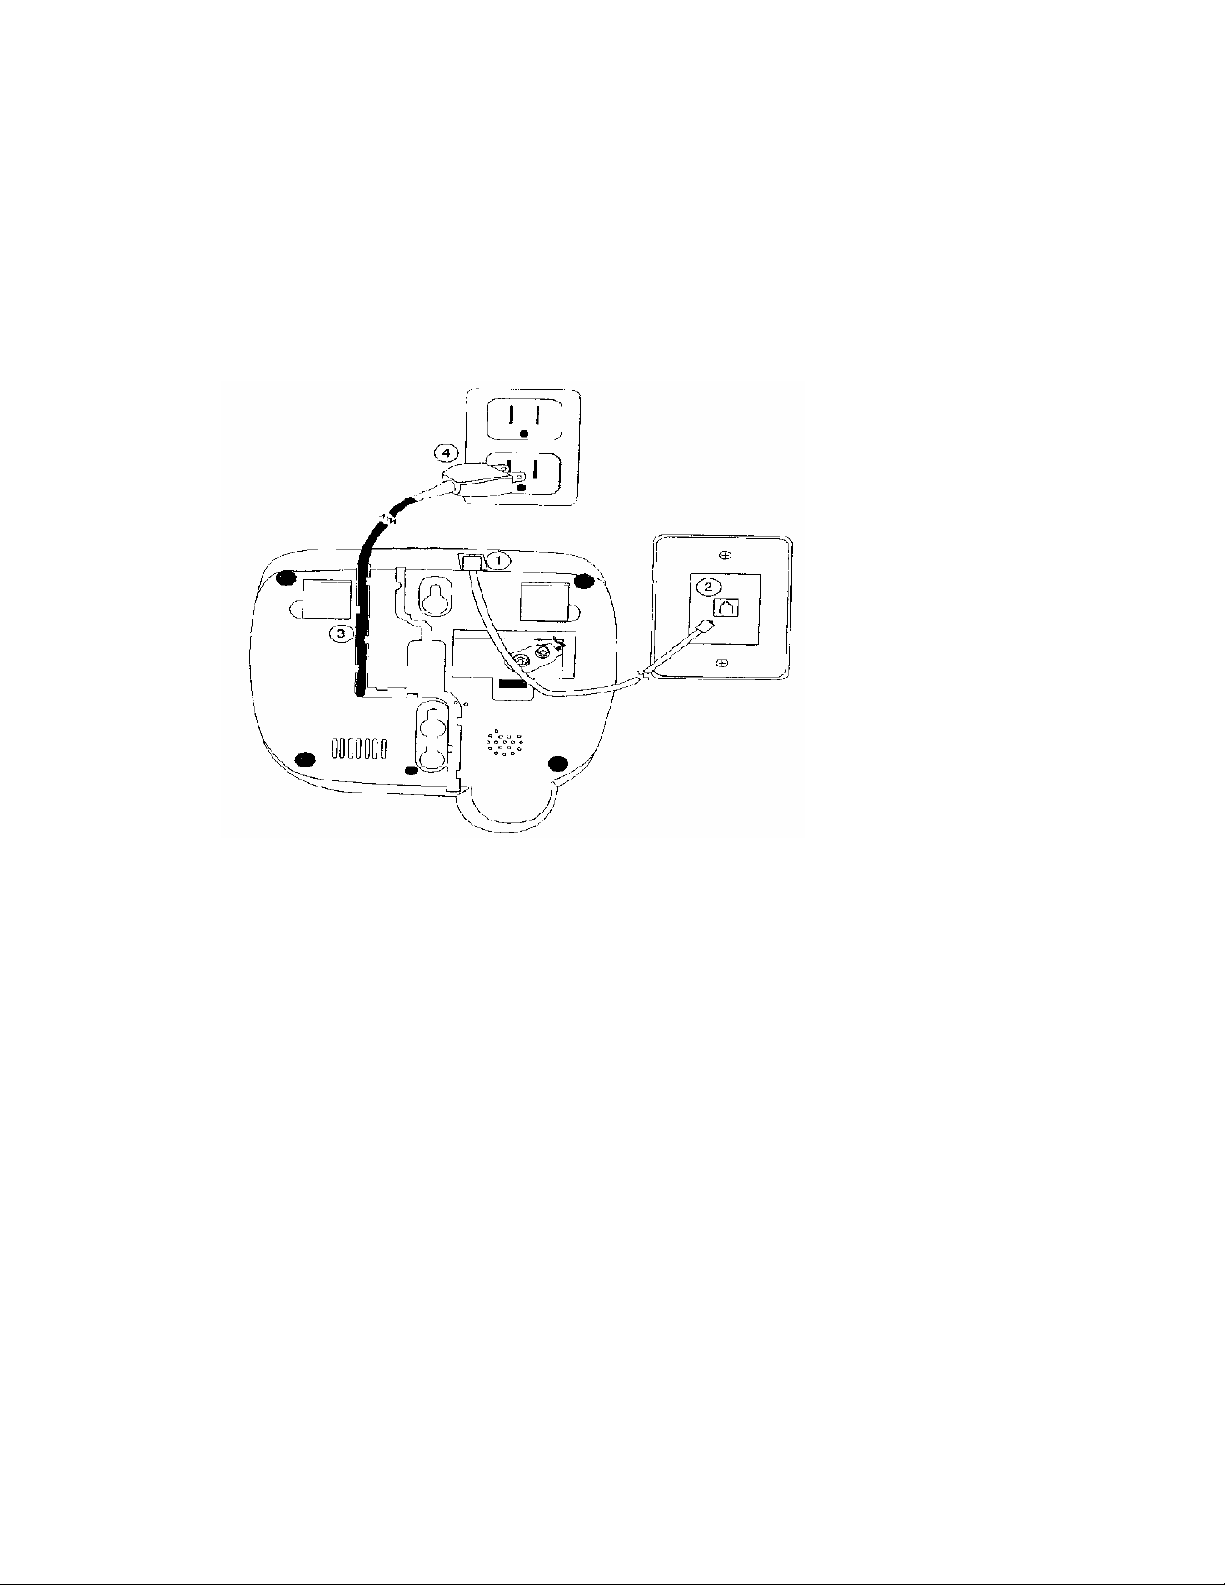
Choosing a location
For best radio performance, be sure to install the unit at least 4 feet away from cordless telephones,
microware ovens, and operating computers.
For ease of installation, choose a location near both a telephone wall outlet and an AC wall jack.
Connecting the telephone.
1. Plug one end of the supplied telephone line cord into the telephone jack located on the top of
the phone.
2. Plug the remaining end of the telephone line cord into an existing telephone wall jack.
3. Run the AC power cord through the provided cable channel for flush desk mounting.
4. Plug the AC power cord into the AC(120V/60Hz) wall jack.
5. Plug the handset coiled cord into the bottom of the handset.
6. Plug the other end of the handset coiled cord into the base.
7. Place the handset into the cradle.
Tip: If your telephone outlet is not modular, contact your telephone company for assistance.
Page 4
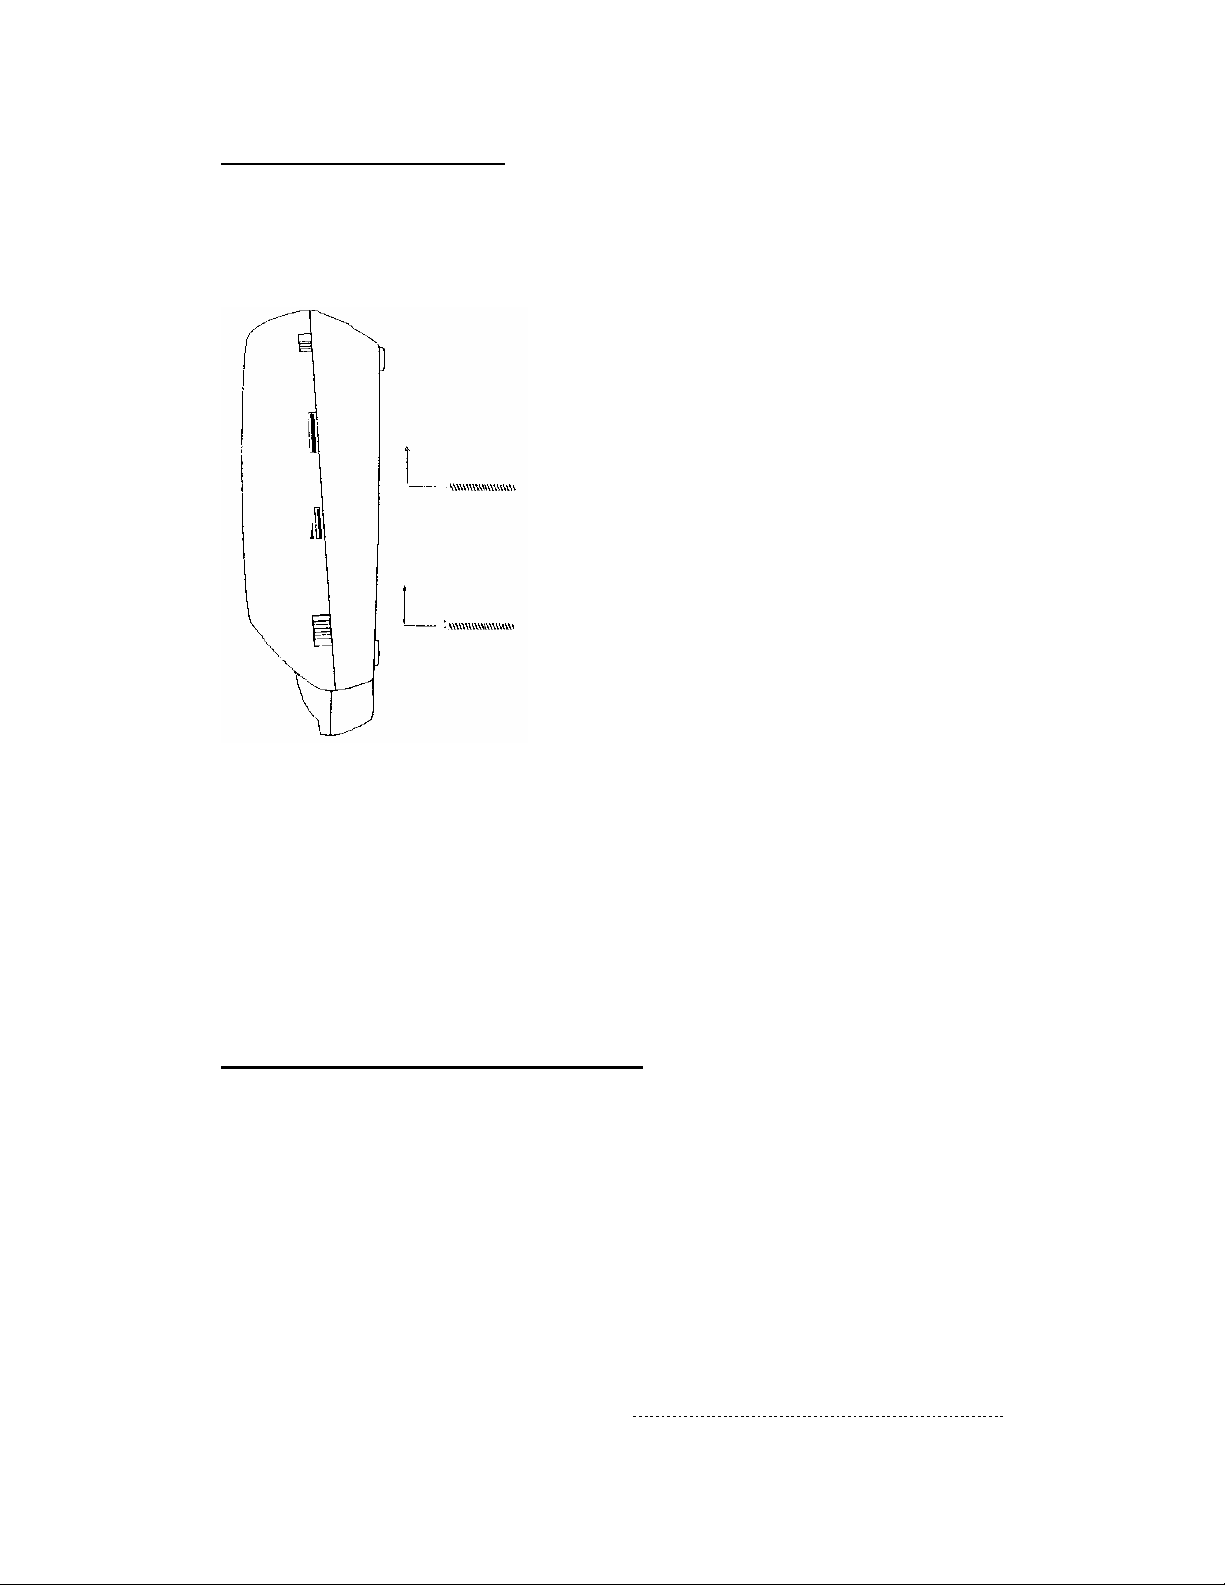
Wall mounting the telephone.
The unit may be wall mounted either on a telephone wall plate or with two screws (not included).
If using screws, insert them into the wall leaving 3/16’’ of each screw extending out from the wall.
When installing screws into plasterboard walls, use wall anchors(not included) to ensure that the
screws remain secure.
1. Run the AC power cord down through the provided cable channel for flush wall mounting.
2. Slip the telephone base onto the wall, lining up the wall mounting holes over the screws. Slide
the telephone base down so it is firmly in place.
3. Finish installation by following steps
TELEPHONE OPERATION
SET KEY
SETTING (for area number/local number/time/date/alarm setting)
While continuously holding down the hook switch or when the telephone line
cord is disconnected.
Press<SET> key to enter the setting mode
z One time- To enter area number
z Two times- To enter local number setting
z Three times- To enter data/time setting (only selectable for 12 hour format with
Page 5

AM & PM indicator).
z Four times- To enter volume setting.(Note: This function is invalid in this unit )
z Five times- To enter ring tone setting(Note: This function is invalid in this unit)
z Six times - To enter flash time setting(600mS/300mS/100mS/80mS)
z Seven times- To enter pause time setting
z Eight times - To enter clock alarm1 setting (Note: this function is invalid in this
unit)
z Nine times- To enter clock alarm 2 setting (Note: this function is invalid in this
unit)
z Ten times – To enter clock alarm 3 setting (Note: this function is invalid in this
unit)
To exit the setting mode, press <Flash> key.
Note: it will automatically go back to normal mode if there is no key pressed within
24 seconds.
During the settings, press
Review Left Up[ ] Key - to change content
Review Right Down[
] Key - to change site
Key to adjust
Press <Delete> or <Set> key to enter next mode
DATE & TIME SETTING
1. Enter into Date & Time setting mode (Press <SET> button, three times for
setting the date and time, Press
Review Right Down[
Enter your desired date by directly pressing the Digital key (0-9) directly for setting the
2.
date.
(For example: Dec, 25th, press “1” “2” for the month, and “2” “5” for
the date/ for Feb, 2
] Key - to change site)
nd
, press “2” for the month and “2” for the date.)
3. Enter your desired time by directly pressing the Digital key (0 -9) directly
(only 12 hours format/ Setting range: Hour: 00- 12; Minute: 00-59)
For example: 3:25pm, press “1” “5” for hour, and “2” “5” for minute. And
the “pm” will show on the display as “pm 3:25”, For 4:00am, press “4” for
the hour, and “0” “0” for the minute. And the “am” will show on the display
as “am 4:00”
Review Left Up[ ] Key to change content,
Page 6

TONE/PULSE (T/P) SWITCH
1. Set the Tone/Pulse Switch on the side of the handset to TONE position if
Tone dialing is offered in your area. If you are not sure what service you have,
set the switch to tone, and if the phone doesn’t work, try Pulse.
2. Set the switch to the PULSE position only if Pulse (rotary) dialing service is
the only service available in the your area.
VOLUME HI/LOW (FOR THE HANDSET)
Use the Volume High/Low Switch on the side of the handset to choose between the
desired handset receiver volume (High or Low).
RINGER HIGH/LOW SWITCH
Use the Ringer High/Low Switch on the left side of the base to choose between the
desired ringer volume (High or Low).
BASIC TELEPHONE OPERATION
Making a call
1. To make a phone call, pick up the handset.
2. When you hear the dial tone, dial the telephone number for the party you wish to
reach. The number dialed will show in the LCD. After several seconds the call
timer will begin keeping track of the elapsed time for the phone call.
3. To hang up, place the handset back in the base.
Last number redial
1. To redial the last number called, pick up the handset.
2. When you hear the dial tone, press the [Redial] key. The number dialed will show
in the LCD. After several seconds the call timer will begin keeping track of the
elapsed time for the phone call.
3. To hang up, place the handset back in the base.
Receiving calls
1. When there is an incoming call, ringing is heard. If you are subscribed to caller ID
service, the caller information is shown after the first ring.
Page 7

2. To answer the call, pick up the handset and begin to speak. After several seconds
the call timer will begin keeping track of the elapsed time for the phone call.
When you have finished your call, place the handset back in the base to hang up.
Review the incoming call messages (up to 80 sets)
Press Review Left Up [ ] Key or Review Right Down[ ] Key repeatedly to review the last
sets of incoming call message. (such as phone number, date and time of the call)
Review the outgoing call messages (9-30 sets)
Press OUT Key repeatedly to review last 9-30 sets of outgoing call messages (such as
the phone number)
Flash
When accessing telephone services, such as call waiting, use the [FLASH] key rather
than the hook switch to access the other call.
The [Flash] key automatically sends the correct signal and duration, no matter how
long the key is pressed.
New Call indicator
When new caller ID information has been received. The new call indicator will being to flashing.
SPEED DIAL OPERATION
Storing speed dial
1. While continuously holding down the hook switch or when the telephone line cord
is disconnected
2. Dial the number you wish to dial (the display can be show up to 12 digits) using
the digital keys or review the incoming or outgoing number.
3. Press <STORE> once.
4. And then press digital<0-9 key> to store the number in the location which you
desire to store in.
Note: there is a time-out for storing numbers, if the times out before the number is
stored, try again please.
MAKING A SPEED DIAL CALL
Page 8

1. Pick up the handset.
2. Press the [AUTO] key, and then press the digital key (1-0) where the number was
stored.
3. The number is dialed automatically.
Note: there is a time-out for storing numbers. If the unit times out before the number
is stored, try again.
CALLER ID
When you are subscribed to caller ID service and a call is received, the unit will
display the caller information sent by the telephone company .including: telephone
number (if available), and the date and the time of the call. Calls are put in sequence
and numbered to indicate their place in the sequence.
When more than 80 calls have been received, the oldest messages are replaced with
the new call information.
When you receive more than one call from the same telephone number, the display
will show REP in the upper right corner to indicate it is a repeat call. Only the most
recent repeat call is recorded, and REP indication goes away after the record has been
viewed.
TO DELETE CALL(S) FROM MEMORY
For Incoming Call(s):
1. Press [
2. Press the (DELETE) button twice within 2 seconds to delete.
For Outgoing Call(s):
1. Press (OUT) & the (DELETE) buttons twice within 2 seconds to delete.
2. ALL the phone number(s) stored in the memory will be delete(d).
Note:
In on-hook mode, Press<DELETE> to delete the pre-dialed numbers one-by-one.
In off-hook mode, Press<DELETE> to start calling timer.
], [ ] to select the phone number(s).
Page 9

IMPORTANT:
All messages will be deleted when battery is removed..
RADIO OPERATION INSTRUCTION
z AM/FM band selector … Slide this selector to either AM or FM to select the desired radio
band.
z TUNING KNOB … Turn this knob to the desired radio station.
z VOLUME KNOB CONTROL … To regulate the loudness of the radio, rotate the
CONTROL clockwise to desired position. If you wish to be aw3akened preset time by the
“Buzzer” rotate the CONTROL counter-clockwise until a “click sound is heard.
z TIME SET BUTTON … press this button simultaneously with the HOUR or MINUTE
button to set the desired time.
z HOUR AND MINUTE button … Use these buttons to set the time, while pressing the Alarm
set button or Sleep button.
z AUTO/OFF/ON/SWITCH … slide the switch to turn radio “ON”, “OFF” or to “AUTO”
position. When the switch is in the “AUTO” position, it will permit automatic turning “ON”
and “OFF” of the radio according to the sleep and alarm settings.
z ALARM SET BUTTON … Press this button simultaneously with the HOPUR or MINUTE
button to set the desired wakeup time.
z SLEEP SET BUTTON … Press this button to display the number of minutes (59 or less)
where the radio will sound for 59 minutes and will automatically turn off after then.
z SNOOZE BUTTON … When you are awakened by music or buzzer but wish to sleep a few
to sleep a few minutes more, simply touch the “snooze” button and it will shut off the music
or buzzer for approximately 5 to 10 minutes before the music or buzzer sounds again. This
can be repeated several times.
USING THE RADIO
1. Adjust the Radio On/Off/Auto switch to the “ON “Position.
2. Set the AM/FM band switch to the desired frequency.
3. Set the radio to the desired station using the TUNING knob.
Page 10

4. Select the desired volume level using the Rotary Volume Control.
5. To turn the radio off adjust the Radio On/OFF/Auto switch to “off”
RADIO SPEAKER ON/OFF BUTTON
During the radio was in using mode. when it had incoming call and you pick up the hand set. The
radio will temporary turn off. After you put down the hand set. The radio will being in using mode
again.
TO SET THE TIME
Step 1--- Press the Time set button together with the HOUR or MINUTE button to set the correct
time.
Note: Repeat the above steps if you run past the correct time.
A glowing dot appears in the lower left hand corner of the display, indicating that the time shown
is PM time.
TO SET THE ALARM
Step 1--- Press the Alarm set button to check the alarm time.
Step 2---Press the Alarm set button together with the HOUR or MINUTE button to adjust the
alarm time, paying close attention on the PM indicator.
NOTE: A glowing dot appears in the lower left hand corner of the display indicating that the alarm
has been set to operate
TO WAKE BY RADIO
Step 1--- Set the alarm as previously instructed.
Step 2 ---Turn the radio on and select the desired radio station and volume setting as previously
instructed.
Step 3 --- Slide the AUTO/OFF/ON switch to “AUTO” position.
Your unit is now set to turn on automatically at the pre-selected alarm time.
TO WAKE BY BUZZER
Step 1-- Follow step 1 to step 3 under “TO WAKE TO RADIO”.
Step 2--- Rotate the VOLUME/BUZZER switch to the “BUZZER” position.
You will be awakened at the pre-selected alarm time by the buzzer tone.
To turn the Buzzer off, slide the AUTO/OFF/ON switch to the “OFF”
position or press ALARM SET/OFF Button.
Page 11

ALARM OFF
Slide the AUTO/OFF/ON switch to “OFF” position if you wish to turn off the radio or buzzer after
the radio or buzzer has sounded in the Wake to Radio or Wake to Buzzer operation. The alarm will
not sound again until the next day unless you switch back to “AUTO” position or use alarm button
to shut off alarm, then the radio or buzzer will automatically sound again in 24 hours at the same
alarm setting.
SLEEP CONTROL
Step 1 --- Turn the AUTO/OFF/ON switch on the “AUTO” or “OFF” position.
Step 2--- Press the SLEEP button to display the sleep time. The display will indicate 59 minutes. If
you wish the radio to play for a shorter period simply press the SLEEP button together with the
MINUTE button to set the desired time period, or if you wish to play longer, press SLEEP button
along with HOUR button top play for 1 hour and 59 minutes (MAX).
Step 3 --- Press the SLEEP button. The radio will turn on automatically and will turn itself off
when the pre-set time has passed.
NOTE: The maximum sleep time is 1 hour and 59 minutes.
The radio will be switched off automatically when the sleep time expires. To turn the radio off
before expiration of sleeping time, simply press the “SNOOZE BUTTON”.
Cleaning and maintenance:
1. Keep the phone away from bathtub, water or very high heat and humidity (Keep
away from stove or radiators).
2. Avoid placing it in very hot sun.
3. Don’t staple phone cord
4. Do not, under any circumstances, disconnect the cord from the telephone without
disconnecting the cord from the telephone line first. Ringer voltage can be high
and dangerous.
5. Cleaning the exterior surface of the set should be done on a regular basis. Use a
cloth slightly dampened with warm, clean water to remove excess dust and dirt.
6. Do Not use waxes, solvents or detergents of any kind to clean your set.
These products can damage the surface of the set. Use only a cloth slightly
dampened wither water and if necessary a little dishwashing liquid. Do not allow any
liquids to get inside the set.
7. Electronic products should never be subjected to extreme temperatures or high
Page 12

humidity to ensure good performance and a long life-time .It should not be placed
in bathing areas, or around stoves and radiators, etc. Always leave sufficient space
around the set for ventilation.
8. If necessary, only clean the cabinet of the set with a soft dampened piece of cloth
Page 13

IN CASE OF DIFFICULTY
PROBLEM SOLUTION
1.No dial tone or
phone will not dial
out.
2.You cannot be
heard by the other
party.
3.Phone is dead 1. Damaged cord.
1. Check cords: Are they inserted properly and securely? Are they
damaged?
2. Check Hook Switch: Does it fully lift from Base when Handset is
removed?
3. You may have pulse service, slide Tone/Pulse Switch to PULSE
1.Is Handset Coiled Cord Inserted properly and securely?
2. Jack improperly wired
3. Line out of order, check phone in another room’s jack or in your
neighbor’s home
4.Phone does not
ring
5.Incoming and
outgoing voice
volume too low or
none at all
6.Can receive but
cannot make calls
1. Are you using too many phones on one line?(the total REN of all
phones on the same line should not be greater than the maximum
REN for your calling area.)
2. Telephone company may be using unusual ringing methods.
1. Are other phones off the hook at the same time?
If so, this is a normal condition as volume drops when several additional
phones are used at once.
1. If your other telephones are rotary type phones, your line may
be conditioned to accept pulse dialing only. Move Tone/Pulse
Page 14

Switch to Pulse position. Or;
2. Contact your phone company to have your line changed to tone and
pulse service
7.Clicking sound or
flutter when dialing
in pulse mode
1. This is normal as power is fluctuating with phone outpulsing.
Also “clicking” sounds are normal when dialing in pulse mode.
 Loading...