

Page 1
Page 2
WARNING
To prevent fire or shock hazard, do not expose this appliance to rain or moisture.
WARNING
!
WARNING: TO REDUCE THE
RISK OF ELEC TRIC SHOCK,
DO NOT REMOVE COVER (OR
BACK) NO USER-SERVICEABLE
PARTS INSIDE REFER
SERVICING TO QUALIFIED
SERVICE PERSONNEL.
IMPORTANT SAFETY INSTRUCTIONS
1. Read these instructions.
2. Keep these instructions.
3. Heed all warnings.
4. Follow all instructions.
5. Do not use this apparatus near water (swimming pool, beach, lake etc.).
6. Clean only with dry cloth.
7. Do not block any ventilation openings. Install in accordance with the manufacturer’s instructions.
8. Do not install near any heat sources such as radiators, heat registers, stoves, or other apparatus
(including amplifiers) that produce heat.
9. Protect the power cord from being walked on or pinch particularly receptacles, and the point
where they exit from the stereo.
10. Only use attachments / accessories specified by the manufacturer.
11. Unplug this apparatus during lightning storms or when unused for long periods of time.
12. Refer all servicing to qualified service personnel. Servicing is required when the system has
been damaged in any way, such as power-supply cord or plug, has been exposed to rain or
moisture, does not operate normally, or has been dropped.
13. This appliance shall not be exposed to dripping or splashing water and objects filled with water,
such as vases, should NOT be placed on his unit.
1
Page 3
2
Page 4

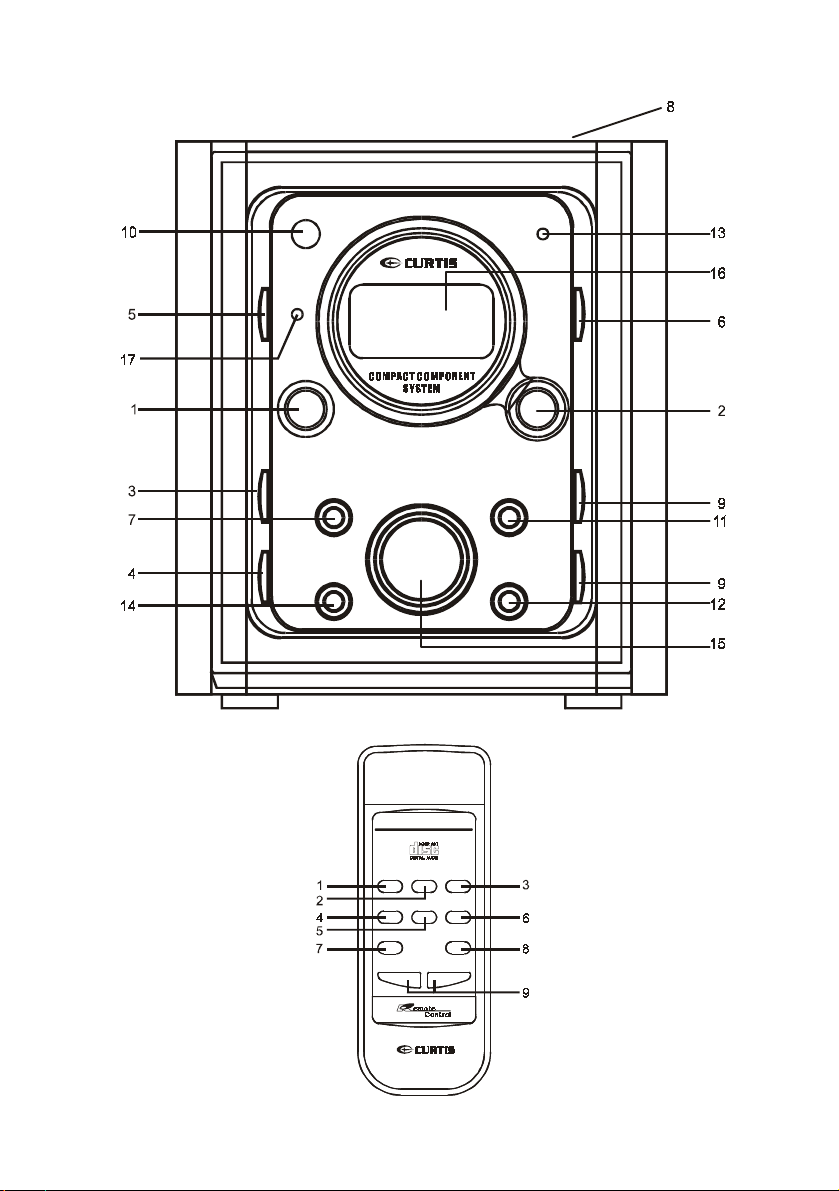
OVERVIEW OF THE COMPONENTS
1.CD STOP button
2.CD PLAY/PAUSE button
3. CD SKIP Search button (ahead)
4. CD SKIP Search button (back)
5.PROGRAM button
6.REPEAT button
7.STANDBY/ON button
8.PUSH/OPEN CD compartment
9.VOLUME-/+ (Volume) button
10.Sensor remote
11.Function selector (CD/TUNER)
12.Band selector (AM/FM)
13.STANDBY/MUTE Indicator
14.BBS ON/OFF
15.TUNING Knob
16.LCD DISPLAY
17.FM ST. Indicator
Remote Control
1. SKIP Search button (back)
2. SKIP Search button (ahead)
3. PALY/PAUSE button
4.REPEAT button
5.PROGRAM button
6.STOP button
7.MUTE button
8.POWER button
9.VOLUME-/+ (Volume) button
3
Page 5

REMOTE CONTROL AND BATTERY
BATTERY INSTALLATION
Insert 2pcs [AAA] size (Alkaline) batteries (not included) into the battery compartment of the remote
control.
Be sure to observe the polarity markings which are engraved inside the battery compartment, then
close the cover.
BATTERY REPLACEMENT
When the batteries become weak, the operating distance of the remote control is greatly reduced.
Replace the batteries when this occurs.
Open the battery compartment cover, take out the old battery (follow the exit direction to push out).
Replace with the new battery in the correct direction. Put the cover back and secure.
Note:
To maintain the accuracy and long life of the transmitter, do not press two or more buttons
simultaneously.
If the remote control is not used for a long time, remove the batteries to prevent possible damage
from leaking batteries.
Do not mix different types of batteries, or old batteries with new ones.
USING THE REMOTE CONTROLLER CORRECTLY
Point the remote control at the Remote Sensor.
The functions of the buttons on the remote control are the same as the corresponding controls on
the main unit.
When there is a strong ambient light source, the performance of the infrared Remote Sensor may be
degraded, causing unreliable operation.
The maximum effective distance for remote control operation is about 15feet.
RADIO OPERATION
Operation
Press the STANDBY button to turn the unit on and the MUTE/STANDBY LED indicator goes "off ".
Press the TUNER/CD button to change the radio mode. Then press the FM ST./AM button to select FM
or AM.
Adjust the TUNING knob to select a station until the frequency of the desired station appears on the
display. If you tuned to an FM station, the FM ST. LED indicator comes "on".
4
Page 6

ANTENNA
For FM reception there is a built-in one-meter FM Antenna wire at the rear of the unit.
Unravel the wire and move it around to obtain the best reception. For AM reception the signals are
picked up through the internal ferrite bar antenna, you may have to move the main unit to obtain the best
reception.
HANDLING COMPACT DISCS
To remove a disc from its storage case, press down on the center of the case and lift the disc out,
holding it carefully by the edges. Fingerprints and dust should be carefully wiped off the discs
recorded surface with a soft cloth. Unlike conventional records, compact discs have no grooves to
collect dust and microscopic debris so gently wiping with a soft cloth should remove most particles.
Wipe in a straight line from the inside to the outside of the disc. Small dust particles and light stains
will have absolutely no effect on reproduction quality.
Never use chemicals such as record sprays antistatic sprays,
benzene, or thinners to clean compact discs. These chemicals can irreparably damage the disc
surface. Discs should be returned to their cases after use. This avoids serious scratches that could
cause the Laser pickup to skip. Do not expose discs to direct sunlight, high humidity, or high
temperatures for extended periods. Long exposure to high temperatures can warp the disc. Do not
stick paper or write anything with a ballpoint pen on the label side of the disc.
's
LOADING AND UNLOADING COMPACT DISCS
Press the STANDBY button to turn the unit on and the MUTE/STANDBY L
Select the CD function by pressing the TUNER/CD button.
Press OPEN/CLOSE to open the CD compartment.
Place a disc carefully in the disc compartment with the label side facing up.
Close the disc compartment by pressing OPEN/CLOSE. When the compartment is fully closed, the
disc will start turning automatically. The total number of tracks will appear on the CD display.
ED indicator goes "off ".
5
Page 7

DISC PLAY
Insert a CD as described in the precious section and close the disc compartment. The display will then
show total number of tracks.
Press the PLAY/PAUSE button. Disc play will begin from the start of the first track of the disc. A
particular track and be selected using either of the or buttons. If this is done before pressing
the PLAY/PAUSE button, disc play will start with the selected track when the PLAY/PAUSE button is
pressed. At the end of the disc, the unit will switch to stop mode.
TO SKIP TO THE NEXT TRACK
For example, to skip ahead to the beginning of track 5 while track 4 is playing, press the button
once. It will resume at the beginning of track 5. The player will skip ahead to the next track each time
the button is pressed. Repeatedly pressing the button makes the CD player skip ahead through
the disc track by track. Once the beginning of the last track is reached the CD player advances to the
first track.
TO SKIP BACK TO PREVIOUS TRACK ON A DISC
For example to skip back to the beginning of track 3 while track 4 is playing, press the button twice.
It will resume at the beginning of track 3. The CD player will skip back one track each time the button
is pressed. In the middle of a track, the CD player will skip back to the beginning of that track. To make
it skip back to the previous track, press the button twice.
Repeatedly pressing the button makes the CD player skip back through the disc track by track.
Once the beginning of the first track is reached, the CD player will go to the last track.
FOR REPEAT DISC PLAY OF ONE OF THE TRACKS
Press the REPEAT button once, the RPT will flash.
Press the Play/Pause button.
The selected track will then begin playing through to its end, at which point it will automatically return to
the beginning of that track. This will continue until the Stop button is pressed.
FOR REPEAT PLAY OF ALL THE TRACKS
Press the REPEAT button twice. The RPT will be displayed.
Select the desired track by pressing the or button. The selected track will be shown on the CD
display.
Press the PLAY/PAUSE button.
The disc will then begin playing through to the end of the last track, at which point it will automatically
return to the beginning of the first track. This will continue until the Stop button is pressed.
STOP REPEAT PLAY
If the Repeat button is pressed 3 times, the RPT will disappear, repeat play will end; normal disc play
will resume from that point.
6
Page 8

ENTERING A PROGRAM
It is possible to program the tracks you wish to play in a sequence of your choice, it is not possible to
enter programs during disc play. Press the STOP button first, and then follow the instructions below.
1. Press the PROGRAM Button. The information will be shown on the display.
2. Select the desired track using
3. Press the PROGRAM Button.
4. Select the next desired track using
5. Press the PROGRAM Button.
Continue entering tracks in this way until all the desired tracks are stored (up to 30.)
NOTES:
If the PLAY/PAUSE Button is pressed before the PROGRAM Button is pressed to store a track, the
track will not be programmed, and the disc will start playing from the first selected track. Any track
can be programmed to play more than one.
LISTENING TO PROGRAMMED TRACKS
1. Enter all tracks you want to program into memory following the instruction above.
2. Press the PLAY/PAUSE Button.
3. Disc play will start at the beginning of the first Programmed track.
TO CLEAR THE PROGRAM MEMORY
If the disc is playing, press the STOP Button twice. The word PRG will disappear.
The Program memory will also be cleared if the disc compartment is opened, if the function is
changed, or if the power is switched off.
or buttons.
or Buttons.
MUTE
Press the MUTE button to switch off the sound. The MUTE/STANDBY LED indicator will flash.
Press MUTE again to restore the sound the previous level. The MUTE/STANDBY LED indicator goes
"off " .
SOUND CONTROLS
Bass Boost
Press the Bass Boost (BBS) button to enhance bass boost sound.
7
Page 9

AC CONNECTION
Plug the power cord into an AC outlet having 120V ,60Hz only. Connecting this unit to other power
sources may damage the unit.
NOTES:
*The AC polarized to help minimize the possibility of electric shock.
If the polarized plug does not fit into a nonpolarized AC outlet,
do not file or cut the wide blade; it is the user`s responsibility
to have an electrician replace the obsolete outlet.
*The power cord should be unplugged from the outlet
when the unit is not going to be used for a long period of time.
TECHNICAL SPECIFICATIONS POWER SUPPLY
Power supply
AC ........................................ 120V 60Hz
Radio frequency coverage
FM ......................................... 87.5 - 108 MHz
AM ......................................... 530 - 1710 KHz
CD player
Pick up .................................. 3-beam, Semi-conductor Laser
General
Speaker ................................. 8 Ohms
8
 Loading...