

Page 1

MODEL NO. SRCD159PL
CD MICRO SYSTEM
INSTRUCTION MANUAL
PLEASE READ BEFORE OPERATING THIS EQUIPMENT
Page 2

WARNINGS AND PRECAUTIONS
TO PREVENT FIRE OR SHOCK HAZARDS, DO NOT EXPOSE THIS
UNIT TO RAIN OR MOISTURE.
This symbol, located on back or bottom of the unit, is intended to alert the user to
the presence of un-insulated “dangerous voltage” within the product’s’s enclosure
that may be of sufficient magnitude to constitute a risk of electric shock to persons.
This symbol, located on back or bottom of the unit, is intended to alert the user to
the presence of important operating and maintenance (servicing) instructions in the
literature accompanying the appliance.
Any use of the controls or an adjustment to the procedures other
than those specified herein may result in hazardous radiation.
CAUTION: TO PREVENT ELECTRIC SHOCK, MATCH WIDE BLADEOF
PLUG TO WIDE SLOT, FULLY INSERT.To reduce the risk of electric shock, do
not remove cover (or back). There are nouser-serviceable parts inside. Please refer
any servicing to qualified service personnel.
WARNING: Changes or modifications to this unit not expressly approved by
theparty responsible for compliance could void the user’s authority to operate
theequipment.
NOTE: This equipment has been tested and found to comply with the limits for a
Class B digital device, pursuant to Part 15 of the FCC Rules. These limits
designedo provide reasonable protection against harmful interference in a residential
installation. This equipment generates, uses, and can radiate radio frequency energy
and, if not installed and used in accordance with the instructions, may cause harmful
interference to radio communications. However, there is no guarantee that
interference will not occur in a particular installation. If this equipment does cause
harmful interference to radio or television reception, which can be determined by
turning the equipment off and on, the user is encouraged to try to correct the
interference by one or more of the following measures:
• Reorient or relocate the receiving antenna.
• Increase the separation between he equipment and receiver.
• Connect he equipment into an outlet on a circuit different from that to which there
ceiver s connected.
• Consult the dealer or an experienced radio/TV technician for help.
are
1
Page 3

PRECAUTION
Follow the instructions below to ensure the product is used safely and correctly.
LOCATION
Do not use the unit in places which are extremely hot, cold, dusty, or humid.
Place the unit on a flat, level surface.
Do not restrict the airflow around the unit by placing it in a place with poor ventilation,
covering it with a cloth, or placing it on a carpet.
Do not place the unit close to heat sources.
Use the unit only in moderate climates.
Do not expose the unit to rain or splash with water.
Do not place objects filled with liquids such as vases on the unit.
SAFETY
When connecting and disconnecting the AC power adapter, take hold of the plug and
not the cord. Pulling the cord may damage it and may be dangerous.
The plug must be easily accessible.
When you are not going to use the unit for a long per
from the AC mains outlet.
AC VOLTAGE
Before use, check that the rated voltage of your unit matches your local voltage.
CONDENSATION
The unit may not work properly if it has condensation inside.
Unplug the unit for 1 to 2 hours before turning the power back on, or gradually heat the
room up and dry the unit before use.
Ensure a space of at least 5 cm around the appar
Do not cover the ventilation openings.
iod of time, disconnect the adapter
atus to enable sufficient ventilation.
BATTERIES
Pay attention to the environmental aspects of battery disposal.
The lightning flash with
an arrowhead symbol
within a triangle is a
warning sign alerting the
user to the presence of
’’ dangerous voltage’’
inside the unit.
ATTENTION: To reduce the risk of
electric shock, do not remove the
cover. there are no user serviceable
parts inside the unit. Refer all
servicing to qualified personnel.
The exclamation mark
within the triangle is
a warning sign
alerting the user to
the presence of
important instructions
accompanying the
product.
2
Page 4
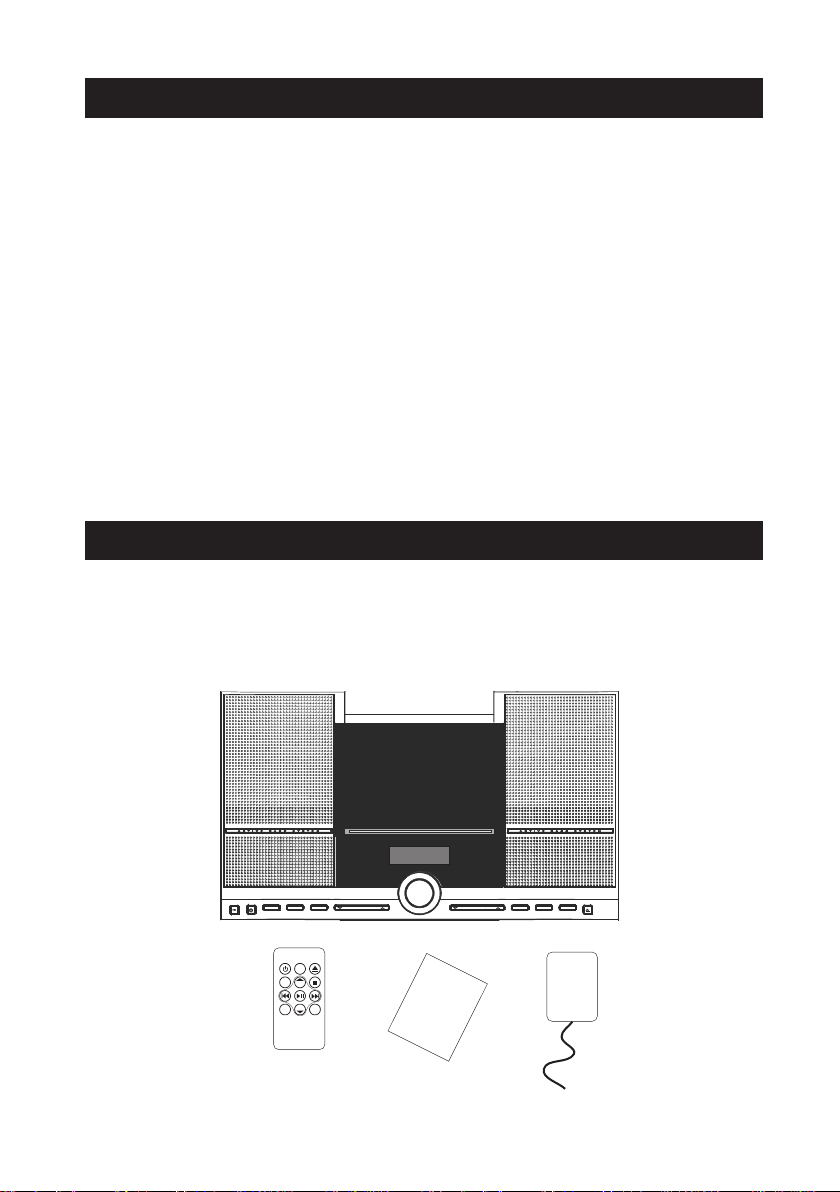
TABLE OF CONTENTS
WARNINGS AND PRECAUTIONS.....................................................................
PRECAUTIONS...............................................................................................
TABLE CONTENTS............................................................................................
BOX CONTENTS................................................................................................
DESCRIPTION OF THE UNIT.............................................................................
DESCRIPTION OF THE REMOTE......................................................................
INSTALLATION..................................................................................................
POWER SUPPLY................................................................................................
BASIC OPERATION............................................................................................
USING OF THE RADIO.......................................................................................
USING OF THE CD............................................................................................
AUX IN FUNCTION
..............................................................................................
MAINTENANCE......................................................................................
TROUBLE SHOOTING...........................................................................................
TECHNICAL SPECIFICATIONS..........................................................................
BOX CONTENTS
1. Unit
2. Remote control with battery
3. AC adapter
4. Instruction manual
1
2
3
3
4
5
5
5
6
6
7
8
8
9
9
BAND
PROG/
MEM
souce
VOL
VOL
-
M
+
M
RE PEAT
MANUAL
EXTERNAL
ADAPTER
3
Page 5
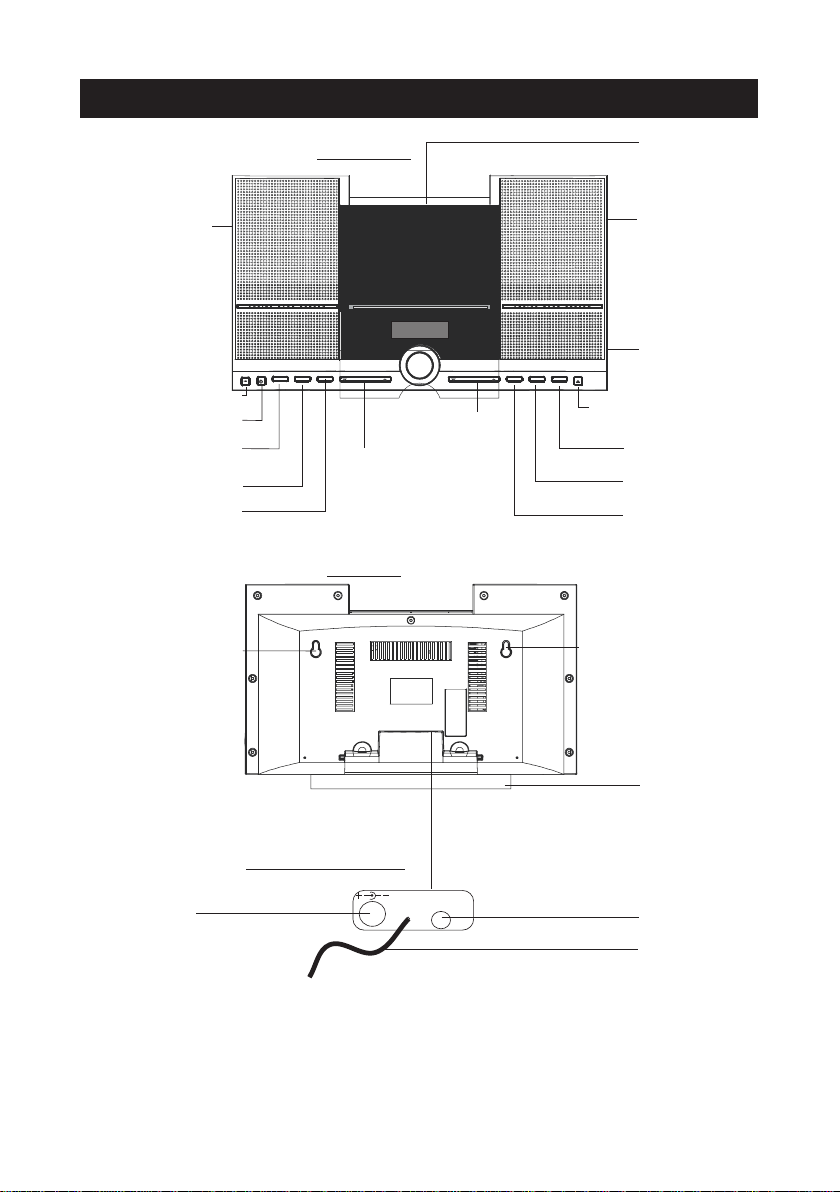
DESCRIPTION OF THE UNIT
FRONT SIDE
CD DOOR
LEFT SPEAKER
INFRARED REMOTE SENSOR
ON/STANDY BUTTON
PROG. (PROGRAM) BUTTON
MEM. (MEMORY) BUTTON
REPEAT BUTTON
BAND SELECT BUTTON
SLOTS FOR WALL MOUNTING
VOLUME BUTTONS
SKIP/TUNE BUTTONS
REAR SIDE
RIGHT SPEAKER
PHONES JACK
DOOR OPEN/CLOSE BUTTON
SOURCE BUTTON
PLAY/PAUSE BUTTON
MEM+ (M+) BUTTON
STOP BUTTON
MEM- (M-) BUTTON
SLOTS FOR WALL MOUNTING
STAND
BOTTOM OF REAR SIDE
DC 9V
DC IN JACK (9V)
FOR EXTERNAL POWER ADAPTER
FM ANT AUX IN
4
AUX IN JACK
FM ANTENNA
Page 6
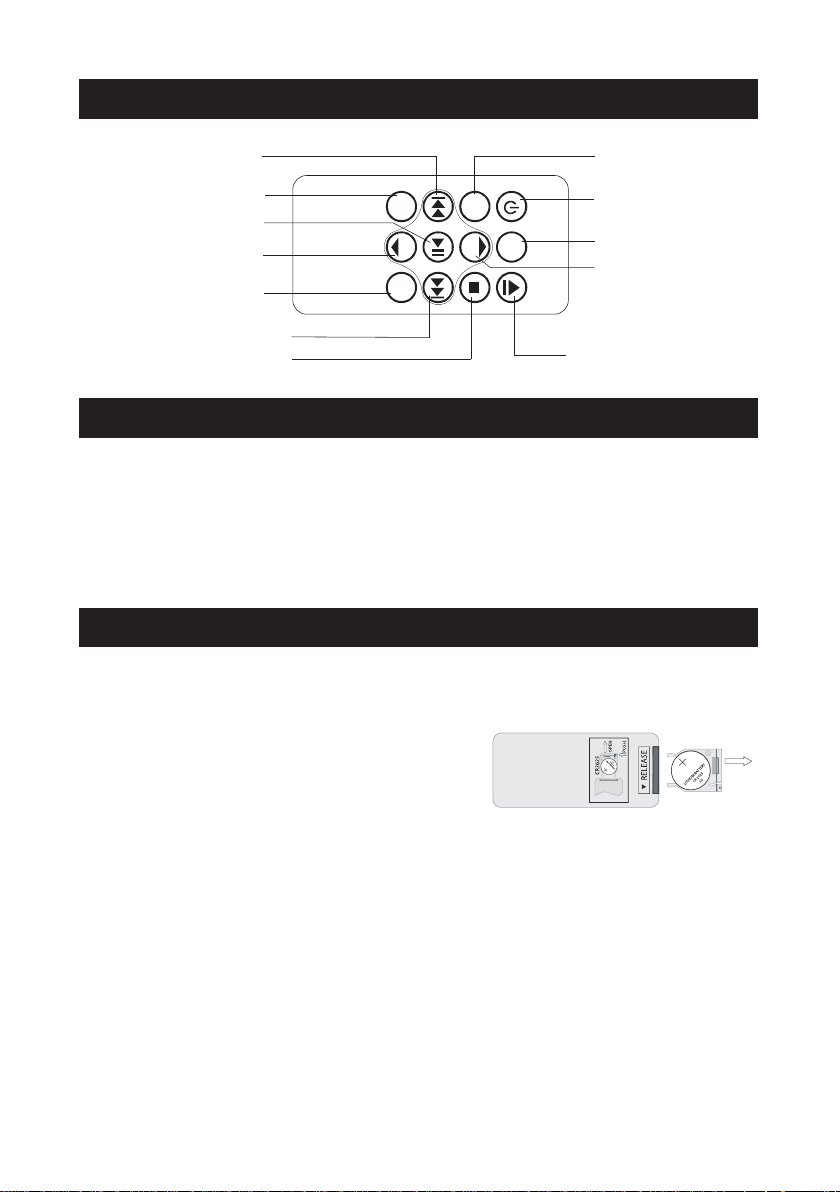
DESCRIPTION OF THE REMOTE
INSTALLATION
POWER SUPPLY
SKIP / TUNE BUTTONS
SKIP DOWN / TUNE DOWN
PROG. (PROGRAM) BUTTON
MEM. (MEMORY) BUTTON
MEM+ (M+) BUTTON
PLAY / PAUSE BUTTON
VOLUME BUTTON
VOLUME DOWN
REPEAT BUTTON
SKIP / TUNE BUTTON
SKIP UP / TUNE UP
MEM- (M-) BUTTON
STOP BUTTON
PR OG/
MEM
VOL
BAND
VOL
M+
REPE AT
STANDB Y
SOURCE
OPE N/CLOSE
M-
BAND SELECT BUTTON
ON/STANDBY BUTTON
SOURCE BUTTON
VOLUME BUTTON
VOLUME UP
DOOR OPEN /CLOSE BUTTON
Using the stand
The stand is already fixed to the unit
Using the two slots for wall mounting
Remove the stand from the unit by pressing the two clips downwards and sliding the stand
back. Use screws (not supplied) and the two slots at the back of the unit to mount the unit
on a wall.
AC power supply
Insert the AC adapter into a 120V AC ~ 60Hz mains outlet and the other end of the cord into
the DC jack on the back of the unit.
Installing the remote control battery
1. Remove the battery compartment cover on the
back of the remote control, by pushing the tab to
CR2025
OPEN
the right while removing the cover.
2. Insert a 3V lithium battery (CR2025 or equivalent)
following the polarity (+) as shown on the diagram inside the compartment.
3. Replace the battery compartment cover.
Note: The remote control battery normally lasts f
or about one year, although it
depends on how often the remote control is used.
If the remote control is not working properly, replace the battery.
Precautions when using batteries
1. CAUTION: Danger of explosion if battery is not inserted correctly. Replace only with the
same or equivalent type.
2. Do not mix different types of battery together (e.g. alkaline, rechargeable and standard
(carbon zinc) or old batter
ies with fresh ones.
3. Exhausted batteries must be removed to prevent possible leakage.
4. Dispose of batteries properly in accordance with the environmental regulations in force.
5
Page 7

ON/ Standby
BASE OPERATION
USING THE RADIO
When it is connected to a power supply (refer to “POWER SUPPLY”), the unit goes to
standby mode.
press it again to go back to standby mode.
Press the ON/STANDBY button of your unit or remote to turn on the unit and
Selecting a source
When the unit is switched on, press the SOURCE button repeatedly on the unit or remote
control to select one of the following sources: RADIO / CD / AUX.
VOLUME control
Use the VOLUME buttons to adjust the volume level.
Connecting the headphones
Plug your headphones (not supplied) into the headphones jack on the right side of the unit
for private listening. The speaker output will shut off automatically.
Listening to the radio
When it is connected to a power supply
button on the unit or remote control to select RADIO mode (radio frequency show on
display). Press the BAND button to select FM /AM band. Hold down the SKIP/TUNE
buttons to start auto scan station up / down step. For
these buttons repeatedly to adjust the frequency step by step.
(refer to
“POWER SUPPLY”), press the SOURCE
manual search, you can briefly press
FM Stereo/Mono
If the unit is receiving a station with FM stereo signal and the “STEREO” icon light on
display.
For optimum reception
In FM mode, extend and position the FM antenna to achieve optimum reception.
In AMmode, rotate the main unit to achieve optimum reception.
Preset radio stations
You can store up to 20 FM -20 AM stations.
1. Use the SKIP/TUNE buttons to search for a station. Press the PROG./MEM button to
enter preset program. One preset number will flash.
2. Press the SKIP/TUNE buttons on the unit or remote control to select the desired preset
number for the station.
3. Press the PROG./MEM button again to confirm the setting.
4. Repeat steps 1 to 3 to store other stations.
Listening to a preset station
When listening to the radio, press M+(PLAY/PAUSE) OR M- (STOP) the button on the unit
or remote control to select a preset radio station.
6
Page 8

Start playback for CDs disc
USING THE CD
1. When it is connected to a power supply
2. Press the SOURCE button of the unit or the remote control to select CD mode.
3. In CD mode, press the DOOR OPEN/CLOSE button to open the CD compartment and
insert a CD or CD-R/RW with the printed side facing up. Press the button again to close
the CD compartment.
4. The unit will read the files and then display the total num
PLAY/PAUSE button will start playback from the first track. During playback, the current
track number will be displayed.
(refer to
“POWER SUPPLY”)and turn on your unit
ber of tracks. Press the
Pause playback
Press the PLAY/PAUSE button to pause playback and triangle icon will flash. Press this
button again to resume playback.
Stop playback
Press the STOP button to stop playback. Then press the PLAY/PAUSE button to start
playback from the first track.
Search functions (Skip to next/ previous track)
During playback, press the SKIP/TUNE buttons to skip to the next / previous track.
Fast forward/backward
During playback, hold down SKIP/TUNE buttons to go fast backwards or forwards. Release
the button once you reach the required section. Normal playback will resume from that
point.
REPEAT playback (use in normal or program playback)
Press the REPEAT button repeatedly until RET icon flash on display. The unit will repeat
playing the desired track.
Press the REPEAT button repeatedly until RET icon light on display. The unit will repeat
playing the all track of CD.
Press the REPEAT button repeatedly until RET icon light off to cancel the repeat function.
PROGRAM playback
This function allows you to program up to 20 tracks to be played in the desired order.
Note: Programming can only be performed when playback is st
opped.
Programming tracks
1. In STOP mode, press the PROG./MEM button that the “- -” will flash on display.
2. Use the SKIP/TUNE buttons to select a track number (digit flash on display).
3. Press the PROG./MEM button to confirm.
4. Repeat steps 2 and 3 to program other tracks
5. To play the program, press PLAY/PAUSE button.
6. To clear the program, press the STOP button twice, remove the CD or go to standby
ode.
m
7
Page 9

This unit has an AUX IN jack which allows you to connect an external audio device such as
AUX IN (LINE IN ) FUNCTION
MAINTENANCE
a MP3 player or earlier iPod model.
(refer to
1. When it is connected to a power supply
2. Connect a 3.5mm stereo connection cable (not supplied) to the AUX IN jack at the back
of the unit and the line out/headphones jack on your external audio device.
3. When the unit is switched on, press the S
AUX mode (“AU” icon show on display).
4. Operate your external audio device as usual to select and play music.
5. Adjust the volume controls on both your external audio device and this unit to the
desired volume level.
Note:
number) for your external audio device.
In AUX mode, this unit cannot display any music information (e.g. track
“POWER SUPPLY”)and turn on your unit
OURCE button on the unit or remote to select
Care and maintenance
To clean the casing, unplug the unit and wipe off dust and stains with a soft, damp cloth. Do
not use benzene, thinner or similar chemicals to clean the casing.
Cleaning CDs
If the music skips or does not play, the disc may need cleaning. In that case, before
playback, wipe the disc from the center out with a clean cloth. After use, store the disc in its
case.
If at any time in the future you want to disp
electrical products should not be disposed of with household waste. Find out
where you nearest recycling centre is consult your local authority or retailer for
more details. (Waste Electrical and Electronic Equipment Directive).
ose of this product, please note that
8
Page 10

Problems Recommendations
TECHICAL SPECIFICATIONS
TROUBLE SHOOTING GUIDE
The player or display
is not working properly.
No sound, poor sound. Check the cable connections.
The disc does not play. Reinsert the disc with the printed side facing up.
Noise or distorted sound
in radio mode.
Press the ON/STANDBY button to go to standby mode
and press it again to turn the unit back on.
Reset the unit by unplugging the AC adapter for 15
minutes, then plugging it back in.
Use the SOURCE button to select the correct mode.
Ensure that the disc is clean and in good condition.
Only CDs format and CD-R/RW discs can be played.
Clean the disc.
FM mode: Extend and position the FM antenna to achieve
the best reception.
AM mode: Remove the unit to achieve the best reception.
CD compatible discs/files
FM frequency range
AM frequency range
General Output power
Power consumption
Speakers
AC adapter
Dimension
Weight
Note:
Due to continuing improvements, the technical specifications are subject to
change without notice
CDs disc format and support CD-R or CDRW playback
87.5 ~108 MHz
530 ~ 1710 kHz
4.4W (2 channel x 2.2W)
16W
2 x 3”, 4 Ohm
Input: AC 120V~60Hz Output: DC 9V DC
250(H) x 400(W) x 110(D) mm
2.2 Kg
9
Page 11

LIMITED PRODUCT WARRANTY
4. No warranty or insurance contained or set out shall apply when damage or repair is caused by power
industrial purposes; service calls resulting in customer education, etc.
Canada
U.S.A
C.I. Service Dept.
Curtis International Ltd
Toronto, Ontario
Vernon Hills, IL
For service assistance and product information, please call: 1-800-968-9853.
6. C.I. reserves the right to repair or replace the parts which have become defective.
Model No.
Date Purchased
Serial No.
This quality product is warranted to be free from manufacturer’s defects in material and workman-ship,
provided that the unit is used under the normal operating conditions intended by the manufacturer.
Should you have any problem with this product, please and it is highly recommended to visit our website
at www.curtisint.com
operating manuals and trouble shooting tips on our website which gives you the answer on most of the
questions you could have in operating the unit.
C.I. Service Dept. warrants this product to be free from defects in materials and workmanship for 90 days on
parts and 90 days on labor. If you originally purchased your
may apply.
Nothing within this warranty shall imply that C.I. will be responsible or liable for any damage to any items
placed in this product, whether due to any defect of the product, or its use, whether proper or improper.
Save as herein provided, C.I. Service Dept. (Canada) or C.I. Service Dept. (USA), there are no other
warranties, conditions, r
authorized distributors and all other warranties, conditions, representations or guarantees, including any
warranties, conditions, representations or guarantees under any Sale of Goods Act or like legislation or
statue is hereby expressly excluded. Save as herein provided, C.I. Service Dept. (Canada) or C.I. S
Dept. (USA), shall not be responsible for any damages to persons or property, including the unit itself,
howsoever caused or any consequential damages arising from the malfunction of the unit and by the
purchase of the unit, the purchaser does hereby agree to indemnify and save harmless C.I. from any claim
for damages to persons or property caused by the unit.
1. The original purchaser must present a copy of the original bill of sale and the service warranty card.
2. Any alterations, abuse, misuse, battery corrosion or accidental damage voids the warranty.
3. The warranty does not cover cabinets and accessories.
before you take any other steps as we have additional copies of instruction manuals,
TERMS OF WARRANTY
product more than 90 days ago, a repair fee
EXCLUSIONS
epresentations or guarantees, express or implied, made or intended by C.I. or its
ervice
TO OBTAIN REPAIRS UNDER THE TERMS OF THIS WARRANTY
failure; damage in transit or when moving the unit; improper power supply; use for commercial or
5. The defective product should be mailed to:
315 Attwell Drive 100 Lakeview Parkway
M9W 5C1 60061
If mailing the product, the freight must be prepaid and a money order for $7.00 should be included
to cover the cost of insurance and the return of the product.
is a registered trademark of OSRAM SYLVANIS Inc. used under licence.
 Loading...