

Page 1
SRCD114P I_M (eng) • A5 • 11 July 2011 • AT
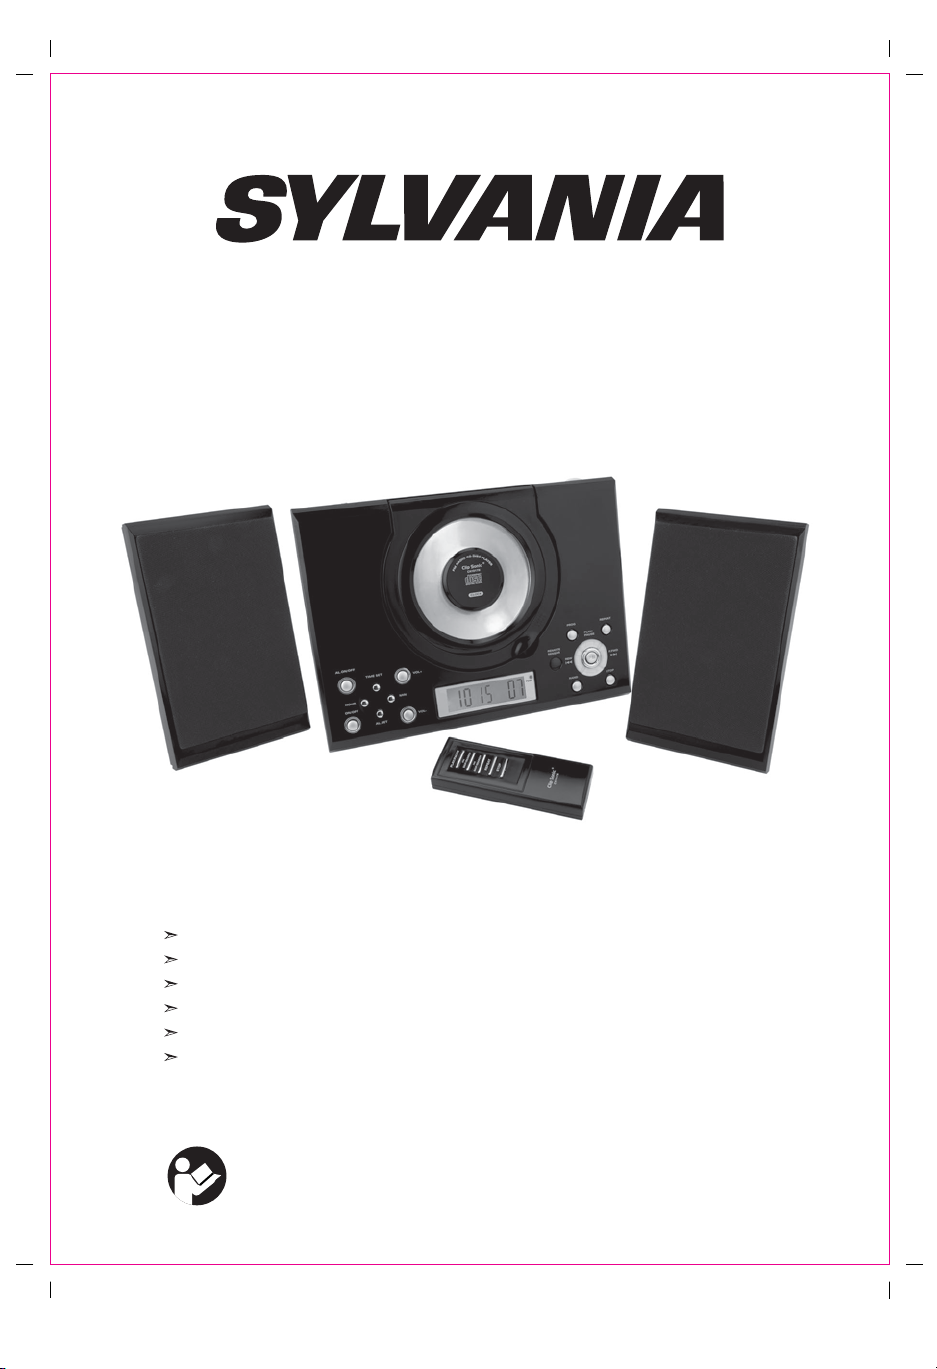
CD PLAYER WITH AM/FM STEREO
ALARM CLOCK RADIO
MODEL SRCD114P
20-TRACK PROGRAMMABLE CD PLAYER
LCD CLOCK
AM/FM STEREO RADIO
ALARM FUNCTION-WAKE TO RADIO,CD PLAYER OR BUZZER
AC POWER SUPPLY WITH CLOCK BATTERY BACKUP
STEREO HEADPHONE JACK
BEFORE OPERATING THIS PRODUCT, READ, UNDERSTAND, AND
FOLLOW THESE INSTRUCTIONS.
Be sure to save this booklet for future reference.
Page 2
SRCD114P I_M (eng) • A5 • 11 July 2011 • AT
SAFETY PERCAUTIONS
RIKS OF ELECTRIC
CAUTION: TO REDUCE THE RISK OF ELECTRIC SHOCK, DO
NOT REMOVE COVER (OR BACK). NO USER-SERVICEABLE
PARTS INSIDE. REFER SERVICING TO QUALIFIED SERVICE
PERSONNEL.
DANGEROUS VOLTAGE:
The lightning flash with arrowhead symbol, within an equilateral triangle is intended
to alert the user to the presence of uninsulated dangerous voltage within the product’s
enclosure that may be of sufficient magnitude to constitute a risk of electric shock to
persons.
ATTENTION:
The exclamation point within an equilateral triangle is intended to alert the user to the
presence of important operating and maintenance (servicing) instructions in the literature
accompanying the appliance.
DANGER
Invisible and hazardous laser radiation when open and interlock failed or defeated.
Avoid direct exposure to beam.
CAUTION
SHOCK
DO NOT OPEN
FCC WARNING:
This equipment may generate or use radio frequency energy. Changes or modifications to this equipment may cause harmful
interference unless the modifications are expressly approved in the instruction manual. The user could lose the authority to
operate this equipment if an unauthorized change or modification is made.
SURGE PROTECTORS:
It is recommended to use a surge protector for AC connection. Lightning and power surges ARE NOT covered under warranty
for this product.
LASER SAFETY : This unit employs a laser. Only qualified service personnel should attempt to service this device due to
possible eye injury.
CAUTION : USE OF CONTROLS, ADJUSTMENTS OR PERFORMANCE PROCEDURE HERENIN MAY RESULT IN
HAZARDOUS RADIATION EXPOSURE.
INFORMATION:
This equipment has been tested and found to comply with the limits for a Class B digital device, pursuant to Part 15 of the
FCC Rules. These limits are designed to provide reasonable protection against harmful interference in a residential installation.
This equipment generates, uses and can radiate radio frequency energy and, if not installed and used in accordance with the
instructions, may cause harmful interference to radio communications. However, there is no guarantee that interference will
not occur in a particular installation. If this equipment does cause harmful interference to radio or television reception, which
can be determined by turning the equipment off and on, the user is encouraged to try to correct the interference by one or
more of the following measures:
• Reorient or relocate the receiving antenna.
• Increase the separation between the equipment and receiver.
• Connect the equipment into an outlet on a circuit different from that to which the receiver is connected.
• Consult the dealer or an experienced radio/TV technician for help.
WARN ING:
TO REDU CE THE RIS K OF F IRE OR ELECTRI C SHOC K, DO NOT EXPOSE THIS PRO DUCT TO RAI N OR MO ISTURE .
WARN ING:
TO REDUCE THE RISK OF FIRE OR ELECTR IC SHOCK, AND ANNOYING INTE RFERENC E, USE THE RECOM MENDED
ACCESSORI ES ONLY.
2
Page 3

SRCD114P I_M (eng) • A5 • 11 July 2011 • AT
Before using the unit, be sure to read all operating instructions carefully. Please note that these are
general precautions and may not pertain to your unit. For example, this unit may not have the capability
to be connected to an outdoor antenna.
1. Read these instructions.
All the safety and operating instructions should be read before the product is operated.
2. Keep these instructions.
The safety and operating instructions should be retained for future reference.
3. Heed all warnings.
All warnings on the product and in the operating instructions should be adhered to.
4. Follow all instructions.
All operating and use instructions should be followed.
5. Do not use this apparatus near water.
Do not use this product near water and moisture, for example: near a bathtub, washbowl, kitchen sink or laundry
tub; in a wet basement; or near a swimming pool.
6. Clean only with dry cloth.
Unplug this product from the wall outlet before cleaning. Do not use liquid cleaners or aerosol cleaners. Use
a dry cloth for cleaning.
7. Do not block any ventilation openings. Install in accordance with the manufacturer's instructions.
Slots and openings in the cabinet and in the back or bottom are provided for ventilation, to ensure reliable
operation of the product and to protect it from overheating. These openings must not be blocked or covered.
The openings should never be blocked by placing the product on a bed, sofa, rug or other similar surface. This
product should never be placed near or over a radiator or heat source. This product should not be placed in a
built-in installation such as a bookcase or rack unless proper ventilation is provided or the manufacturer's
instructions have been adhered to.
8. Do not install near any heat sources such as radiators, heat registers, stoves, or other apparatus (including
amplifiers) that produce heat.
9. Do not defeat the safety purpose of the polarized or grounding-type plug.
A polarized plug has two blades with one wider than the other. A grounding type plug has two blades and
a third grounding prong. The wide blade or the third prong are provided for your safety. If the provided
plug does not fit into your outlet, consult an electrician for replacement of the obsolete outlet.
10. Protect the power cord from being walked on or pinched particularly at plugs, convenience receptacles,
and the point where they exit from the apparatus.
11. Only use attachments/accessories specified by the manufacturer.
12. Use only with the cart, stand, tripod, bracket, or table specified by the manufacturer,
or sold with the apparatus.
PORTABLE CART WARNING
(symbol provide d by RETAC)
When a cart is used, use caution when moving the cart/ apparatus combination to avoid
injury from tip-over
An appliance and cart combination should be moved with care.
Quick stops, excessive force and uneven surfaces may cause the appliance and cart
combination to overturn.
13. Unplug this apparatus during lightning storms or when unused for long periods of time. To protect your
product from a lightning storm, or when it is left unattended and unused for long periods of time, unplug it
from the wall outlet and disconnect the antenna or cable system. This will prevent damage to the product due
to lightning and power-line surges.
14. Refer all servicing to qualified service personnel. Servicing is required when the apparatus has been
damaged in any way, such as power-supply cord or plug is damaged, liquid has been spilled or objects
have fallen into the apparatus, the apparatus has been exposed to rain or moisture does not operate
normally, or has been dropped.
15. Power source.
This product should be operated only from the type of power source indicated on the marking label. If you are
not sure of the type of power supply to your home, consult your appliance dealer or local power company. For
products intended to operate from battery power, or other source, refer to the operation instructions.
3
Page 4

SRCD114P I_M (eng) • A5 • 11 July 2011 • AT
16. Power lines.
An outside antenna system should not be located in the vicinity of overhead power lines or other electric light
or power circuits, or where it can fall into such power lines or circuits. When installing an outside antenna
system, extreme care should be taken to keep from touching such power lines or circuits as contact with them
might be fatal.
17. Overloading.
Do not overload wall outlets and extension cords as this can result in a risk of fire or electric shock.
18. Object and liquid entry.
Never push objects of any kind into this product through openings as they may touch dangerous voltage points
or short out parts that could result in fire or electric shock.
Never spill or spray any type of liquid on the product.
19. Outdoor antenna grounding.
If an outside antenna is connected to the product, be sure the antenna system is grounded so as to provide some
protection against voltage surges and built up static charges. Section 810 of the National Electric Code
ANSI/NFPA 70 provides information with respect to proper to grounding of the mast and supporting structure,
grounding of the lead-in wire to an antenna discharge product, size of grounding conductors, location of
antenna-discharge product, connection to grounding electrodes and requirements for the grounding electrodes.
ANTENNA LEAD IN WIRE
ANTENNA DISCHARGE
UNIT
(NEC SECTION 810-20)
GROUNDING CONDUCTOR
(NEC SECTION 810-21)
GROUND CLAMPS
POWER SERVICE GROUNDING
ELECTRODE SYSTEM
(NEC ART 250, PART H)
20. Service.
Do not attempt to service this product yourself as opening
or removing covers may expose you to
dangerous voltage or other hazards. Refer all
servicing to qualified service personnel.
GROUND CLAMP
ELECTRIC SERVICE
EQUIPMENT
EXAMPLE OF ANTENNA GROUNDI NG AS PER
NATIONAL ELECTRI CAL CODE
21. Replacement parts.
When replacement parts are required, be sure the service technician uses replacement parts specified by the
manufacturer or those that have the same characteristics as the original parts. Unauthorized substitutions may
result in fire or electric shock or other hazards.
22. Safety check.
Upon completion of any service or repairs to this product, ask the service technician to perform safety
checks to determine that the product is in proper operation condition.
23. Wall or ceiling mounting.
The product should be mounted to a wall or ceiling only as recommended by the manufacturer.
24. Damage requiring service.
Unplug this product from the wall outlet and refer service to qualified service personnel under the following
conditions.
a) When the power-supply cord or plug is damaged.
b) If liquid has been spilled or objects have fallen into the product.
c) If the product has been exposed to rain or water.
d) If the product does not operate normally by following the operating instructions. Adjust only those controls
that are covered by the operating instructions, as an adjustment of other controls may result in damage and
will and require extensive work by a qualified technician to restore in the product to its normal operation.
e) If the product has been dropped or the cabinet has been damaged.
f) When the product exhibits a distinct change in performance-this indicates a need for service.
25. Note to CATV system installer.
This reminder is provided to call the CATV system installer's attention to Article 820-40 of the NEC that
provides guidelines for proper grounding and, in particular, specifies that the cable ground shall be connected
to the grounding system of the building, as close to the point of cable entry as practical.
NOTE: Refer all servicing to qualified service personnel. Servicing is required when the unit has been
damaged in any way such as the following: the power-supply co
red or plug has been damaged, liquid has
been spilled into the unit, the unit has been exposed to rain or moisture, the unit has been dropped or
the unit does not operate normally.
4
Page 5

SRCD114P I_M (eng) • ƒ • A5 • 11 July 2011 • AT
LOCATION OF CONTROLS
1 2 3
22
21
20
4
5
6
7
8
9
10
12
14 13151617181929 29
11
31
28
27
30
1. FUNCTION SELECTOR (BUZZ/ CD/ RADIO/ AUX)
2. BAND SWTICH (FM ST/ FM MO/ AM)
3. TUNING KNOB
4. CD DOOR
5. CD REVERSE BUTTON (REW )
6. CD PROGRAM BUTTON
7. CD REPEAT BUTTON
8. CD PLAY/PAUSE BUTTON
9. CD FAST FORWARD BUTTON (F.FWD )
10. CD STOP BUTTON
11. CD RANDOM BUTTON
12. POWER INDICATOR
13. FM STEREO INDICATOR
14. LCD DISPLAY
15. VOLUME INCREASE KNOB
23
24
25
26
16. VOLUME DECREASE KNOB
17. MINTUE SET BUTTON
18. ALARM SET BUTTON
19. POWER BUTTON
20. HOUR SET BUTTON
21. ALARM ON/OFF BUTTON
22. TIME SET BUTTON
23. AUX INPUT JACK
24. HEADPHONE JACK
25. RIGHT SPEAKER JACK
26. LEFT SPEAKER JACK
27. BATTERY COMPARTMENT
28. FM ANTENNA
29. SPEAKERS
30. POWER CORD
31. REMOTE SENSOR
5
Page 6

SRCD114P I_M (eng) ƒ • A5 • 13 July 2011 • AT
REMOTE CONTROL
1. Play/ Pause button
2. Skip/search forward button
3. Skip/search backward button
4. Repeat One/All tracks button
5. Stop button
6. Battery compartment
Unit power supply (mains 120V/60Hz)
Plug the AC line cord into AC 120V 60Hz power outlet.
The unit in now working and the display figures will blink
to show you it is not set correctly.
NOTE: The AC plug supplies with the unit are polarized to
help minimize the possibility of electric shock. If the AC plug does
not f it into a non polarized AC outlet, do not file or cut the wide blade. It is the user’s
responsibility to have an electrician replaces the obsolete outlet.
If the AC cord is disconnected or if there is a power failure, this electronic clock is designed
to continue operating internally (without showing the on the display) with 2 x "AA" size
batteries (not included).
Batteries Installation:
1. Press the tab on the battery door then lift it up.
2. Install 2 x "AA" size batteries (not included) into the battery compartment as the polarity marking inside.
3. Replace the battery door.
AC Plug
AC Outlet
Follow these precautions when using a battery in this device:
1. Use only the size and type of batteries specified.
2. Be sure to follow the correct polarity when installing the batteries as indicated in the battery
compartment. Reversed batteries may cause damage to the device.
3. Do not mix different types of batteries together (e.g. Alkaline and Carbon-zinc) or old
batteries with fresh ones.
4. If the batteries in the device are consumed or the device is not to be used for a long period
of time, remove the batteries to prevent damage or injury from possible battery leakage.
5. Do not try to recharge batteries not intended to be recharged; they can overheat and rupture.
(Follow battery manufacturerís directions.)
6. Do not dispose of batteries in f ire, batteries may explode or leak.
7. Clean the battery contacts and also those of the device prior to battery installation.
BATTERY BACKUP:
Two 1.5V “AA” batteries (not included) may be installed as a backup option to maintain the time if electrical power
fails. In the event of a power outage, the time will not appear on the clock LCD Display, however the clock will
continue to operate and the actual time will be maintained. The Clock LCD Display and other functions will resume
once electrical power is restored if used the backup battery .The backup battery should be replaced as needed;
Remove the battery if the clock is not used or stored for long periods of time.
TO SET THE CLOCK TIME
Connect the AC power cord to a wall outlet. Make sure that it is in “Power off” mode.
1. While pressing and holding the TIME.SET BUTTON, press the HOUR BUTTON to set desired hour.
2. While Pressing and holding the TIME.SET BUTTON, press the MINUTE BUTTON to set desired minute.
TO SET ALARM FUNCTION
1. Power off the unit and enter into “POWER OFF” mode. While pressing and holding the AL.SET BUTTON,
press the HOUR BUTTON to set desired alarm hour.
2. While pressing and holding the AL.SET BUTTON, press the MIN BUTTON to set desired alarm minute.
3. After setting the alarm time as your desired, remember to press AL.ON/OFF button to turn on the alarm function.
(alarm sign “ ” will show on LCD display)
BATTERY PRECAUTIONS
6
Page 7

SRCD114P I_M (eng) • A5 • 11 July 2011 • AT
TO WAKE UP TO ALARM BUZZER:
a. Slide the Function switch (BUZZ/CD/RADIO/AUX) to BUZZ position
b. The alarm buzzer will sound for 3 minutes at the set alarm time.
Note: Press ALARM ON/OFF button to turn off the alarm when it sounds.
TO WAKE UP TO CD:
a. Slide the Function Switch (BUZZ/CD/RADIO/AUX) to CD position
b. Open the CD Door and insert a CD (with the label side facing up) into the CD compartment.
c. Close the CD Door.
d. The CD will sound at the set alarm time playing the first track on the CD.
Note: The unit will automatically be turned off after 1 hour.
To deactivate the alarm (CD playing) manually, press the STOP Button.
TO WAKE UP TO RADIO:
a. Slide the Function Switch (BUZZ/CD/RADIO/AUX) to RADIO position.
b. Slide the Band Switch (FM ST. / FM MO/ AM) to AM or FM position.
c. Press POWER ON/OFF BUTTON to turn on the unit first.
d. Tune the radio to a broadcasting station and adjust the volume as desired.
e. Then press the POWER ON/OFF BUTTON again to turn off the unit.
f. The radio will sound at the set alarm time.
Note: The unit will automatically be turned off after 1 hour.
To deactivate the alarm (Radio sound) manually, press the POWER ON/OFF BUTTON.
HOW TO TURN OFF THE ALARM
To cancel alarm mode:
In “POWER OFF” mode, press ALARM ON/OFF button to turn off the alarm function. (alarm sign “ ” will
disappear on the LCD Display).
ADJUST VOLUME
• Press VOL.+ button to increase the volume.
• Press VOL. – button to decrease the volume.
RADIO OPERATION
1. Select the Function Switch (BUZZ/ CD/ ALARM/ AUX) to RADIO position.
2. Select the Band Switch (FM ST / FM MO / AM) to desired band.
3. Press the POWER ON/OFF BUTTON to switch Power on.
4. Rotate the Tuning Control Knob to the desired radio station
Note: For better AM reception, rotate the radio to better position the built-in directional antenna.
Note: The STEREO Indicator will light when a program is received in FM Stereo. If the FM reception is noisy,
switch the band selector to the FM MO position and the program will be received in Mono radio.
5. Press the Volume Control Knob to a comfortable listening level.
6. To switch off the radio, Press the Power ON/OFF Button once.
HANDING A COMPACT DISC
• Always protect a disc against scratches, soil , dust and etc. If a disc is treated with reasonable care, wiping off
the disc with a soft cloth should be the only maintenance needed to retain its excellent sound reproduction. Discs
should be retained in their original case during periods of non-use.
• Handle a disc only by its edges, Do not touch the surface or rainbow-colored side of the disc
• Handle a disc as shown in the illustrations in this section
• Use a soft cloth to wipe a disc clean. Do not use benzene, thinner, or other chemical cleaners to clean the disc as
damage may result. A disc should always be wiped in a straight line from its center to its edge. Never wipe a disc
in a circular motion.
7
Page 8

SRCD114P I_M (eng) • A5 • 11 July 2011 • AT
• Do not expose a disc to direct sunlight, high humidity, or high temperatures for extended periods of time. Do not
place the Disc on other equipment or near any heat source.
• Dust on the pickup lens can lead to erratic operation and interruption of the sound during play. To clean the pickup
lens, open the disc compartment and blow the dust off . Using a camera lens blower(available at most camera
stores)
• Note: Do not touch the surface of the lens. Do not allow any liquids on the inside of the product.
• To clean the CD player cabinet, use a soft and damp cloth to wire off the exterior surface.
• Never use benzol, benzene, or other strong chemical cleaners, as these could damage the finish.
DO: DO NOT:
PLAYING A COMPACT DISC (CD)
NOTE: Never touch the laser lens inside of the CD compartment. Clean the laser lens with a CD cleaner disc if it
becomes dirty.
1. Slide the Function Switch (BUZZ/CD/ALARM/RADIO) to CD position.
2. Open the CD DOOR and insert a CD into the tray with printed label side facing up.
3. Close the CD DOOR and Press the Power ON/OFF Button to turn on the unit, the disc will rotate for a few
seconds and then stop.
4. Use the REW & F.FWD button to choose a track
5. Press the PLAY/PAUSE BUTTON to start play
6. Press the PLAY/PAUSE BUTTON again to PAUSE play.
7. To stop the album temporarily, press PAUSE button, to resume, press again.
8. Press the STOP BUTTON to STOP play.
RANDOM PLAY
• In CD stop mode, Press the RANDOM BUTTON once, “RAND” will appear on LCD Display.
• Press PLAY/PAUSE BUTTON, this will enable random tracks play.
REVERSE/FORWARD
1. The CD Reverse (REW ) and CD Forward (F.FWD ) Buttons can be used to jump to a different track
number or to scan disc tracks at high speed.
2. Press the CD Reverse Skip Button (SKIP ) once to hear the beginning of the current track. Press it two or
more times to hear previous tracks on the disc.
3. Press the CD Forward Skip Button (F.FWD ) to hear the next track on the disc.
4. Press and hold the CD Reverse Search (REW ) Button, the current track will be scanned and move backwards
to the previous track(s); When the desired track section is found, release the button and normal play will resume.
5. Press and hold the CD Forward Search (F.FWD ) Button, the current track will be scanned and move forward
to the next track(s); When the desired track section is found, release the selected button and normal play will
resume.
REPEAT FUNCTION
The CD REPEAT Button may be used to repeat a single track or repeat all tracks on a compact disc.
1. Press the REPEAT BUTTON once during playback, the “REP” sign will show on LCD Display and WILL NOT
FLASH. The same track will be repeated over and over.
2. Press the REPEAT BUTTON a second time to repeat all tracks. The “REP” sign will show on the LCD display,
but will not flash this time.
3. To cancel REPEAT PLAY, Press the REPEAT BUTTON repeatedly until the “REP” sign disappeared.
8
Page 9

SRCD114P I_M (eng) • A5 • 11 July 2011 • AT
PROGRAM FUNCTION
The Program feature can be used to program up to 20 tracks to play in a selected order.
1. While in the stop mode only (CD is not playing), press the CD PROGRAM “PROG” Button, LCD Display will
show the wording “PROG 01” and “PROG 01” starts to flash.
2. Press the CD Reverse (REW ) /Forward Buttons (F.FWD ) to allocate the desired track.
3. Press the CD PROGRAM BUTTON to select and store the track into memory.
4. Repeat step 2 to 3 to select up to 20 tracks.
5. To play the selected tracks (in the program mode), press the CD PLAY/PAUSE BUTTON. The track number
and the “PROG” appear on LCD Display.
6. Press the CD Reverse (REW ) to hear the previous or press the CD Forward (F.FWD ) buttons to hear next
program track.
Note: After all of the programmed tracks have played, the CD player will return to the stop mode.
7. To clear the programmed tracks from memory, press STOP two times.
AUX INPUT JACK
1. Press POWER button to turn on the unit.
2. Connect the AUX connect wire from the out jack of your Personal Player such as portable MP3 player to the
AUX input jack.
3. Press the FUNCTION button to select the AUX mode on the display.
4. Play Start from your Personal Player.
HEADPHONE JACK
Your radio is equipped with a HEAPHONE JACK for private listening. Simply plug any 3.5 mm plug type
stereo headphone into the HEADPHONE JACK. With the headphone connected the speaker in the radio will
be automatically disconnected.
Handle a disc only by its edges. Do not touch the surface or rainbow-colored side of the disc.
9
Page 10

SRCD114P I_M (eng) • A5 • 11 July 2011 • AT
TROUBLESHOOTING GUIDE
SYMPTOM POSSIBLE CAUSE POSSIBLE SOLUTION
GENERAL
Power does not
come on.
RADIO
No sound.
Noise or sound
distorted on AM or
FM.
CD Player
CD Skips Disc is dirty or badly scratched,
CD will not play
AC line cord not plugged in. Plug in the AC cord.
Function Switch had not set to
CD or RADIO position.
VOLUME control at minimum
position.
Location or direction no good for
radio reception.
or pickup lens is dirty.
Function Switch is not in CD
position.
Disc is inserted incorrectly. Reinsert disc, ensuring center is
CD compartment door is not closed.
Set Function Switch to CD or
RADIO position.
Turn the VOLUME control up.
Remove or turn the unit to a new
location or direction for better
radio reception.
If CD is dirty, clean as
maintenance section
care and
. If badly
scratched. CD cannot be played. Try
another discs. If lens is dirty, clean
with camera brush/ blower.
Slide Function Switch to CD
position.
securely attached to spindle, with
label face up.
Close CD door complete.
General Specifications:
Power Source: AC 1 20V~, 60Hz ,
Power Consumption: 14 W
Aud io Power: 2 x 1 W
Imp enden ce of Spea kers: 8 O hm; 2 W
Rad io Ba nd Covera ge: AM 535 – 1710 kHz
FM 88 – 108 M Hz
10
 Loading...