

Page 1
Outdoor Bluetooth speaker for with
PLL radio and USB/SD
Model: SP303
INSTRUCTION MANUAL
Page 2

IMPORTANT SAFETY INSTRUCTIONS:
1. Read the instructions. All uses guidelines must be read before start device.
2. Keep the instructions for future use.
3. Attention, use and security guidelines must be respected.
4. The device must not be used near water or be put in contact with moisture.
5. Make sure has no liquid is spilled on device and device openings.
6. Move device carefully, avoid shocks.
7. Do not block the breakdown of the device outputs.
8. Do not place the device near from a heat source (e.g. radiator). Do not expose it to the Sun.
9. Plug the device as indicate on this information form.
10. This device has a connection with overload protection (security device) decision-making. If the replacement
of decision-making is required, please you send has an experienced or the device manufacturer technician.
11. For cleaning the device, please follow the recommendations of the notice.
12. The sector cord should be unplugged a long period of use.
13. Device shall be repaired by a qualified person when:
a. the power cord is damaged,
b. objects have fallen into the apparatus or a liquid has been spilled into device,
c. device was exposes to the rain,
d. device does not work correctly without notable exterior change,
14. The user shall not try to maintain device beyond that which is described in this information form. The
guarantee would negate.
14. Unpack all parts and remove protective material.
15. Do not connect the unit to the mains before checking the mains voltage and before all other connections
have been made.
16. Do not cover any vents and make sure that there is a space of several centimeters around the unit for
ventilation.
17. The apparatus shall not be exposed to dripping or splashing and that no objects filled with liquids, such
as vases, shall be placed on the apparatus.
18. The ventilation should not be impeded by covering the ventilation openings with items, such as
newspapers, table-cloths, curtains, etc.
19. No naked flame sources, such as lighted candles, should be placed on the apparatus.
20. The mains plug is used as the disconnect device, the disconnect device shall remain readily operable.
Page 3
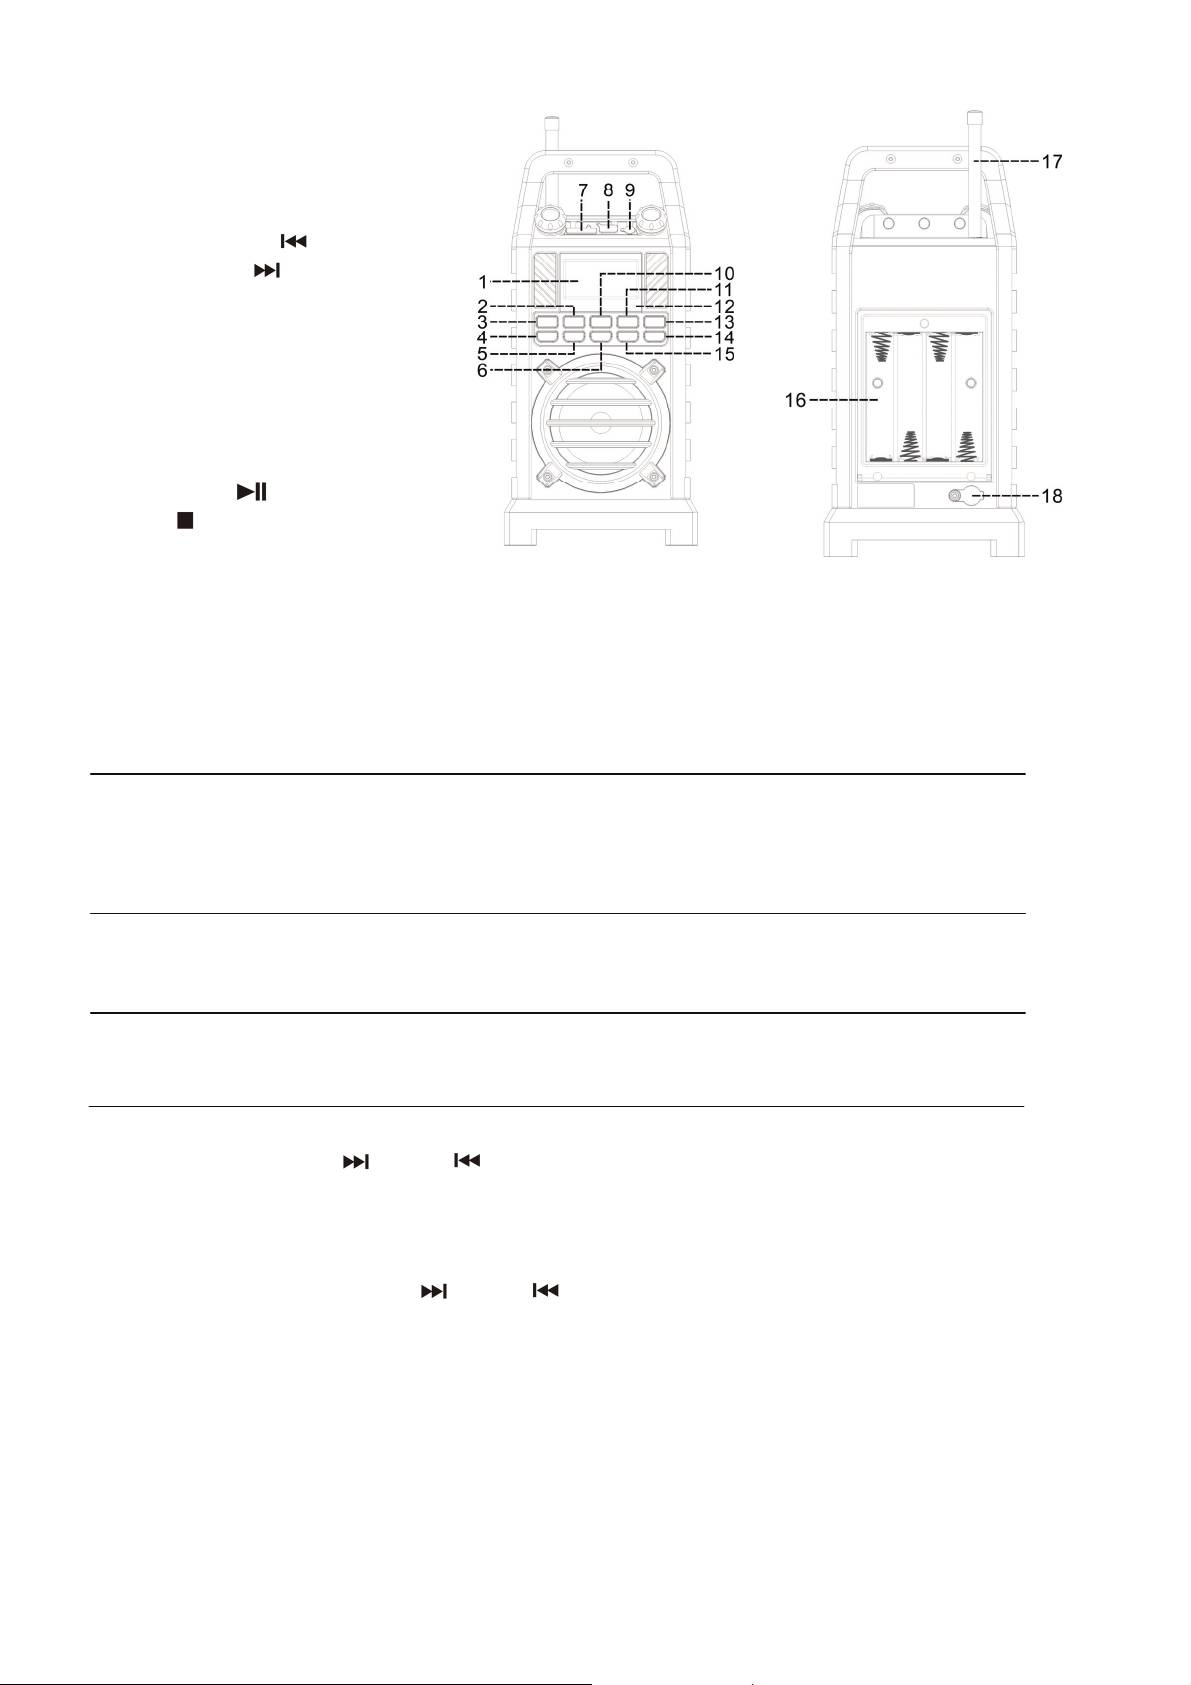
LOCATION OF CONTROLS
1) LCD display
2) Function button
3) On / Off button
4) Repeat/random play button
5) Tune/Skip down
6) Tune/Skip up
button
button
7) SD card slot
8) USB socket
9) 3.5mm Aux-in jack
10) Pre up/+10/Pro button
11) Volume down
12) Bluetooth LED indicator
13) Volume up button
14) Play/pause
15) Stop
button
button
16) Battery compartment
17) FM wire antenna
18) DC in jack
Caution:
Usage of controls or adjustments or performance of procedures other than those specified herein may result in
hazardous radiation exposure.
This unit should not be adjusted or repaired by anyone except qualified service personnel.
Precautions for use
Installation
• Unpack all parts and remove protective material.
• Do not connect the unit to the mains before checking the main voltage and before all other connections have been
made.
• Do not cover any vents and make sure that there is a space of several centimeters around the unit for ventilation.
AC connection
1. Connect the DC plug (19) to the DC jack (18) of the main unit, then, connect the AC/DC adaptor (20) to the AC outlet.
2. Turn on the unit by On/Off (3), if the LCD display (1) is on with backlighting, it means the power supply is normal.
Now your system is ready to play the music.
DC connection
For DC operation, please insert 8 pcs size C (UM-2) battery to the battery compartment (16) as the indication in battery
compartment and remove the DC plug (19) from the DC jack (18).
Listening to radio
Manual tuning
1. Turn on unit by On/Off button (3) & then press the Function button (2) to select “ FM ” mode.
2.
Press the Tune / Skip up “ or down ” (6/5) button to change the received frequency in order to reach your
desired FM channel
3. Adjust volume up/down button (11/13) to the desired volume level.
Auto tuning
1. Press Function button (2) to select “ Tuner ” mode.
2. Press and hold the Tuning / Skip up “
FM channel, repeat this step until the desired radio station is being reached.
3. Adjust volume up/down button (11/13) to the desired volume level.
Hints for best reception:-
The receiver has a build-in FM rod antenna (17) on top of the unit. Extend it as long as possible to get best reception.
Preset stations
You can store up to total of 20 FM radio stations in the memory.
1. Set to FM mode by “Function” (2).
2. Turn to the desired FM station according the above “Listening Radio” instruction.
3. Press and hold “ Pre-up/+10/Pro ” button (10) few second to active program state. Display will flash with “ P 01 “.
or down ” button (6/5), the unit will start searching until reach receive a
EN-1
Page 4
4. Press Tuning / Skip up “ or down ” button (6/5), to select the desired station memory position for storage.
5. Press Pre-up/+10/Pro ” button (10) once again to confirm the setting.
6. Repeat step 2 to 5 to store other stations.
7. Now you can select the presets stations in order by pressing the “ Pre-up/+10/Pro” button (10).
¾ The pre-set memories will be cancelled completely if dis-connecting the main power supply. You are recommended
to switch the system into standby mode for convenience usage.
¾ There are 3 seconds for program state, after 3 sec. This state would resume to normal tuner mode automatically.
¾ You can overwrite a present station by storing another frequency in its place.
Playback of MP3 song via USB storage media or memory card
Connecting
The system is able to decode and playback all MP3 file which stored in the memory media with USB connecting port or
SD/MMC card.
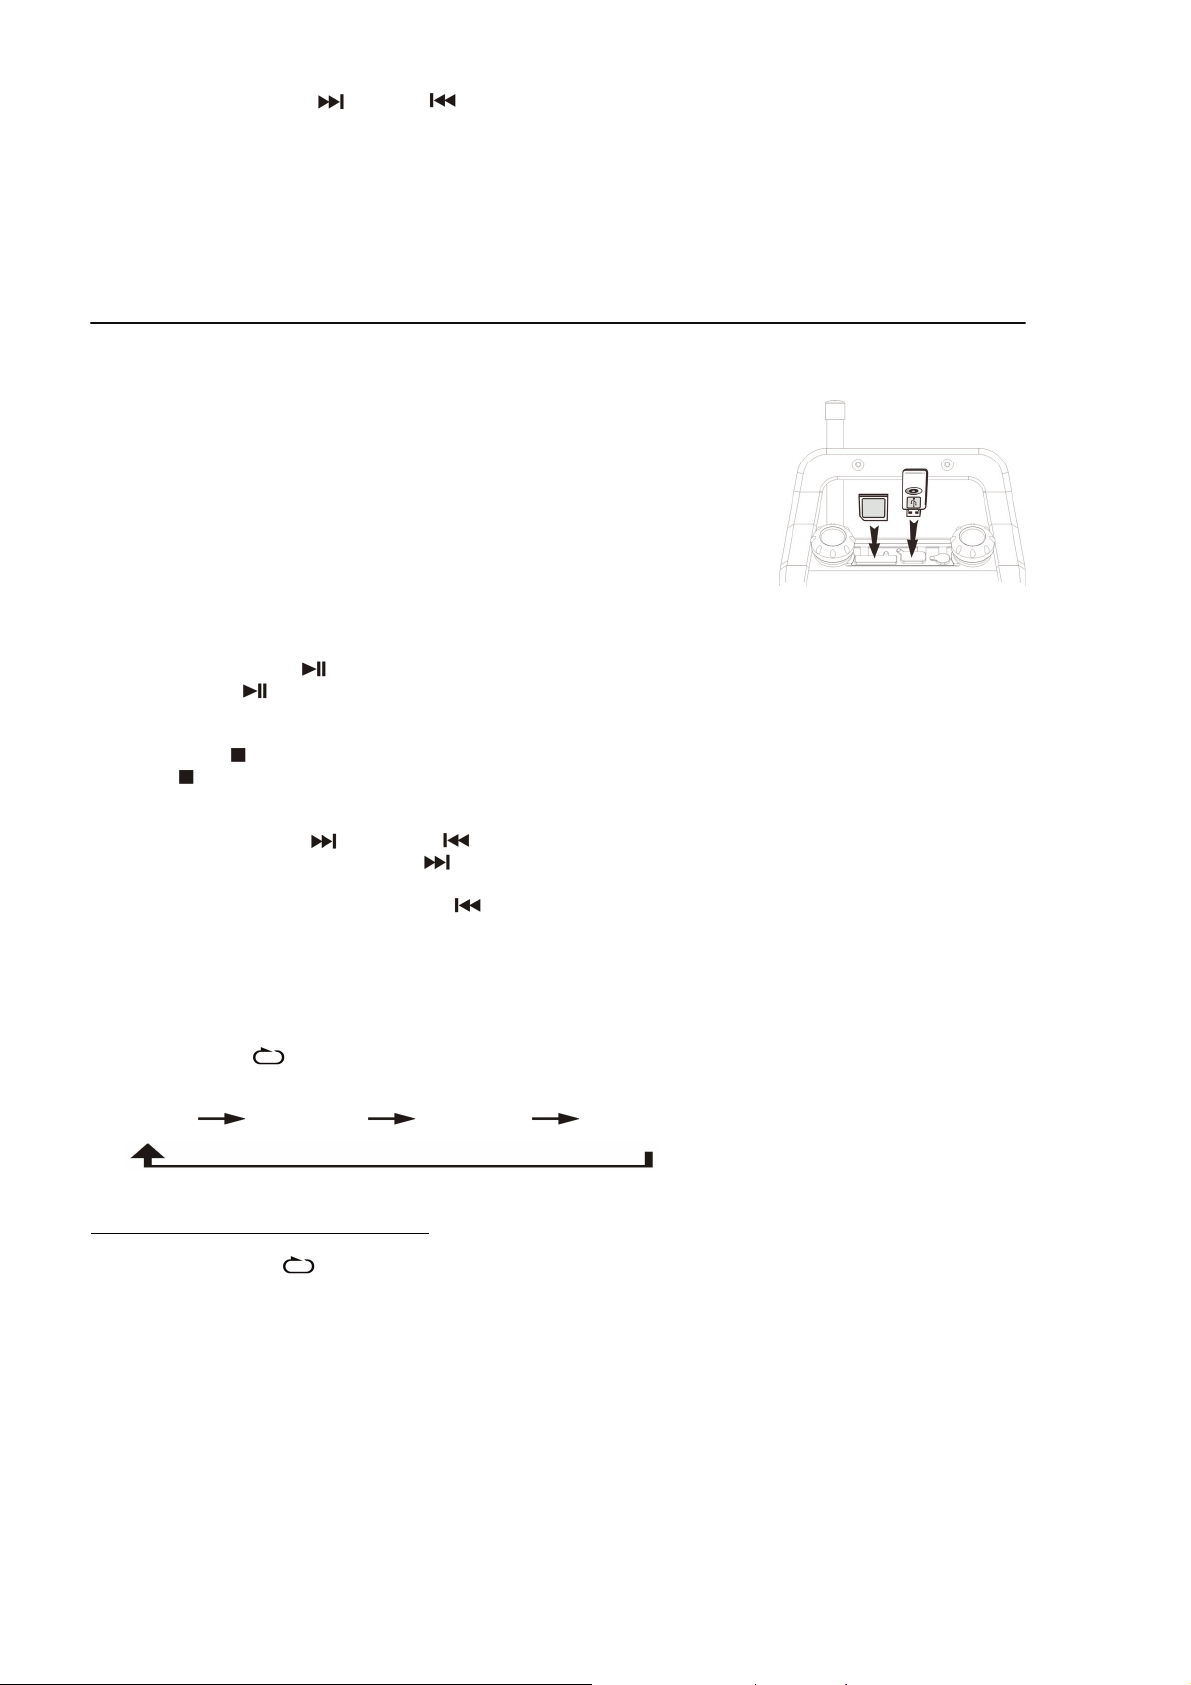
1. Set the system at off mode first or other function except USB/SD mode.
2. Open the USB socket cover then plug-in the USB pen-drive with the face in &
make sure it going into completely or open the SD slot cover then insert the
memory card in the direction of the arrow as shown in the cover of the memory
card slot. Insert straight without bending.
z Connecting the USB pen drive upside down or backwards could damage
the audio system or the storage media (USB thumb drive). Check to be
sure the direction is correct before connection.
3. Turn on the unit again by On/Off button (3) and press Function button (2) to
“ USB ” or “ SD ” mode. The system will start reading the storage media automatically after connecting, and LCD
display (1) will show the running time of MP3 files.
z Play / pause mode
1. If Play/Pause button (14) is pressed during playback, system go to pause mode and the playing time will start
flashing at the LCD display (1). Press again to resume normal playback.
z Stop mode
1. If Stop button (15) is pressed during play or pause mode. Go to stop mode and display total number of track on the
LCD display (4).
z Skip mode (skip up /skip down )
1. During play or pause mode, if skip up button (5) is pressed it will go to next track and display the track no. and
will change to play mode.
2. During play or pause mode, if Skip down
mode.
button (6) is pressed, it will go to the previous track and change to play
z +10 tracks
1. Press “Pre-up/+10/Pro” button (10) to skip 10 track to your favorite track more convenience.
z Repeat/Random mode
Press the “ Rep/Ran “ button (4) during playback to select repeat/ random or intro function, a single track, random and
intro can be played as follow:-
(1) Random
Play mode on LCD display
Random RAN
Repeat track
Intro INTRO
Off mode --------------
(2) Repeat 1 (3) Intro (4) Off mode
Indicator
z Repeat play
You can listen the desired tracks by this function.
z Random play
You can listen all the tracks in a random order by this function.
z Intro play
You can listen the beginning (10 seconds) of each file by this function & saving your time to search the desire
song
EN-2
Page 5

z Repeat all
As this unit repeat all mode was defaulted, if any play mode did not selected, MP3 playback will continuously.
Remark
- The system can detect and read the file under MP3 format only at USB mode but not other music file format.
- If connect the system to MP3 player via the USB socket, due to variances in
MP3 player may not be able to play via the USB socket. This is not a malfunction of the system.
- USB port does not support connection with USB extension cable and is not designed for communication
with computer directly
MP3 encoding format, some
Removing of USB pen drive
To remove the USB pen drive, turn off the power or switch the function mode to either Aux or FM first. For USB port –
un-plug it by pulling out from the USB socket directly.
Remark:-
MP3 track format requirement:-
- Bit rate : 32 kbps~320kbps, sampling rate : 32kHz, 44.1kHz and 48 kHz decodable
- The performance of playing MP3 disc is various from the quality of recording disc and the method of recording.
Furthermore, the searching lead-time for MP3-CD is longer than normal CD due to difference format.
USB charging
This unit can provide DC5V/1A for another electronic device charging (such as mobile phone) through USB
port but USB charging not available during battery operation or USB mode.
Remark : Due to firmware/software of mobile phone was various and update time to time, maybe some of
mobile phone cannot compactible with charging function. This is not the malfunction.
Bluetooth connecting and Playback
1. Select the Main Function selector (2) to “ BT ” mode.
2. The Bluetooth LED indicator (12) will flashing, it means the Bluetooth in non connection / searching mode.
3. Switch on the Bluetooth feature of your Bluetooth device (such as mobile phone) and select “ Goldsound ” Bluetooth
equipment to connecting.
4. Once the connecting was finish and connect successfully, the Bluetooth LED (12) will change to light up.
5. Start to playback your Bluetooth device and enjoy the music by the main unit.
Aux-in connection
Connect another audio device, e.g. (portable) CD player, MP3 player, (portable) cassette player, iPod, etc. To this system
via a cord with 3.5mm dia jack plugs (not supplied). Connect one end of this cord to the headphone jack of the external
device and the other end to the aux-in jack (9) at the side of the unit. Then press Function button (2) to “ AUX ” mode.
Start to playback your external device to enjoy your music.
EN-3
Page 6

Haut-parleur Bluetooth extérieure avec
Radio PLL et USB / SD
Modèle: SP303
MANUEL
Page 7

INSTRUCCIONS IMPORTANTS DE SEGURETAT :
1 . Llegiu les instruccions . Tots els usos directrius s'han de llegir abans de
dispositiu d'inici.
2 . Segueix les instruccions per al seu ús futur .
3 . Atenció , d'ús i de seguretat directrius han de ser respectats .
4 . L'aparell no ha d'utilitzar- prop de l'aigua o de posar en contacte amb la humitat .
5 . Assegureu-vos que no té líquid es vessa en les obertures del dispositiu i de
dispositiu .
6 . Moveu el dispositiu amb cura , evitar ensurts .
7 . No bloquegi el desglossament de les sortides del dispositiu .
8 . No poseu el dispositiu a prop d'una font de calor (per exemple , el radiador ) . No
l'exposeu al sol .
9 . Connecteu el dispositiu com s'indica en aquest formulari la informació .
10 . Aquest dispositiu té una connexió amb la protecció de sobrecàrrega ( dispositiu
de seguretat ) la presa de decisions . Si es requereix la substitució de la presa de
decisions , si us plau envia té una experiència o el tècnic de fabricant del dispositiu .
11 . Per netejar l'equip , si us plau , seguiu les recomanacions de la notificació .
12 . El cable de sector ha de ser desconnectat d'un llarg període d'ús .
13 . Dispositiu haurà de ser reparat per personal qualificat quan:
un. el cable d'alimentació està danyat ,
b . objectes han caigut dins de l'aparell o un líquid s'ha vessat al dispositiu ,
c . dispositiu era exposa a la pluja ,
d. dispositiu no funciona correctament sense canvi exterior notable ,
14 . L'usuari no ha de tractar de mantenir el dispositiu més enllà del que es descriu
en aquest formulari d'informació . La garantia negaria .
14 . Traieu totes les peces i eliminar el material de protecció .
15 . No connecteu l'aparell a la xarxa abans de comprovar la tensió de la xarxa i
abans d'haver realitzat totes les altres connexions .
16 . No cobreixi els orificis de ventilació i assegureu-vos que hi ha un espai de
diversos centímetres voltant de la unitat perquè es ventili .
17 . L'aparell no ha de exposar-se a degotejos ni esquitxades i cap objecte ple de
líquid , com
com gerros , evitant col · locar sobre l'aparell .
18 . La ventilació no ha d'impedir en cobrir les obertures de ventilació amb objectes ,
com
diaris, estovalles , cortines , etc
19 . Cap font de flama sense protecció , com espelmes enceses , haurà de ser col ·
locada en l'aparell .
20 . L'endoll principal s'utilitza com a dispositiu de desconnexió , el dispositiu de
desconnexió ha de ser accessible fàcilment .
Page 8

UBICACIÓ DELS CONTROLS
1) Pantalla LCD
2) Botó de funció
3) Botó d'encesa / apagat
Botó de reproducció 4) Repetir / random
5) Tune / Skip premut el botó
6) Tune / Skip botó dalt
7) Ranura per a targeta SD
8) Connector USB
9) jack 3.5mm Aux-in
10) Pre dalt / 10 botó / Pro
11) per baixar el volum
12) Indicador LED Bluetooth
13) Botó per pujar el volum
14) Botó de reproducció / pausa
15) Botó d'aturada
16) Compartiment de la bateria
17) Antena de cable de FM
18) DC IN
Precaució:
L'utilisation de commandes ou de réglages ou l'exécution de procédures autres que ceux
spécifiés ici peut entraîner une exposition à des rayonnements dangereux.
Cet appareil ne doit pas être réglé ou réparé que par du personnel qualifié.
Précautions d'emploi
Installation
• Déballez toutes les pièces et enlever les matériaux de protection.
• Ne pas brancher l'appareil sur le secteur avant de vérifier la tension principale et avant
toutes les autres connexions ont été faites.
• Ne pas couvrir les orifices de ventilation et assurez-vous qu'il ya un espace de quelques
centimètres autour de l'appareil pour la ventilation.
Raccordement AC
1. Branchez la prise CC (19) à la prise DC (18) de l'unité principale, puis, branchez
l'adaptateur AC / DC (20) à la prise secteur.
2. Allumez l'appareil en marche / arrêt (3), si l'écran LCD (1) est en contre-jour, cela signifie
que l'alimentation est normale. Maintenant, votre système est prêt à jouer la musique.
Connexion DC
Pour un fonctionnement continu, s'il vous plaît insérer 8 pcs taille C (UM-2) de la batterie
dans le compartiment de la batterie (16) que l'indication dans le compartiment de la
batterie et retirez la fiche DC (19) de la prise DC (18)..
Écoute de la radio
Réglage manuel
1.
Allumez l'unité par bouton On / Off (3) et appuyez sur la touche de fonction (2) pour
sélectionner le mode "FM".
2.
2. Appuyez sur TUNE / SKIP jusqu'à " ou vers le bas Bouton "(6/5) pour changer
la fréquence de réception afin d'atteindre votre fréquence FM souhaitée.
3. Régler le volume bouton haut / bas (11/13) au niveau de volume désiré.
FR-1
Page 9

la sintonització automàtica
1. Premeu el botó de funció (2) per seleccionar el mode "Tuner".
2. Premeu el Tuning / Saltar cap amunt "o cap avall" botó (6/5), la unitat començarà a
cercar fins arribar a rebre un canal de FM, repetiu aquest pas fins que s'està arribant a
l'estació de ràdio desitjada.
3. Botó dalt / baix del volum (11/13) Ajusteu el nivell de volum desitjat.
Suggeriments per millorar la recepció: -
El receptor té a construir-en FM antena de vareta (17) a la part superior de la unitat.
Esteneu el major temps possible per obtenir la millor recepció.
Stacions preseleccionades
Pot emmagatzemar fins total de 20 emissores de ràdio FM a la memòria.
1. Seleccioneu el mode FM per "Funció" (2).
2. Al seu torn a l'emissora FM desitjada segons les instruccions de dalt "Escoltar Ràdio".
3. Premeu el botó "Pre-up / 10 / Pro" (10) pocs segons a un altre programa actiu. La
pantalla parpelleja amb "P 01".
4. Premeu Tuning / Saltar cap amunt "o cap avall" botó (6/5), per seleccionar la posició de
memòria de l'estació desitjada per a l'emmagatzematge.
5. 10 Premeu el botó Pre-up / / Pro "(10) un cop més per confirmar l'ajust.
6. Repetiu el pas 2 a 5 per emmagatzemar altres emissores.
7. Ara podeu seleccionar les emissores preseleccionades per tal de pressionar la tecla "10
Pre-up / / Pro" botó (10).
¾
Les memòries preestablertes es cancel · laran totalment si desconnectar la font
d'alimentació principal. Es recomana canviar el sistema en mode d'espera durant l'ús
de conveniència.
¾
Hi ha 3 segons per l'estat del programa, després de 3 seg. Aquest estat es reprendria
a la manera de sintonitzador normal automàticament.
Pot sobreescriure una emissora present emmagatzemant una altra freqüència al seu
lloc.
La reproducció de la cançó de MP3 a través dels mitjans d'emmagatzematge USB o
targeta de memòria
Connexió
El sistema és capaç de descodificar i reproduir tots els arxius MP3 que emmagatzema en
el suport de memòria amb port de connexió USB o targeta SD / MMC.
1. Ajusteu el sistema en mode off primera o una altra funció,
excepte el mode USB / SD.
2. Obriu la tapa del connector USB i plug-in de la pen-drive
USB amb la cara i assegureu-vos d'entrar en completament
o obriu la tapa de la ranura SD i inseriu la targeta de
memòria a la direcció de la fletxa com es mostra a la
portada de la memòria ranura per a targetes. Inseriu recta,
sense doblegar.
z Connexió del pen drive USB al revés podria danyar el sistema d'àudio o dels
mitjans d'emmagatzematge (memòria USB). Comproveu que l'adreça és correcta
abans de la connexió.
2. Enceneu de nou la unitat amb el botó d'encesa / apagat (3) i premi el botó de funció (2)
en la manera "USB" "SD". El sistema començarà a llegir els mitjans
d'emmagatzematge de forma automàtica després de la connexió, i la pantalla LCD (1)
mostrarà el temps d'execució dels arxius MP3
.
FR-2
Page 10

z Mode de reproducció / pausa
1. Si es prem el botó de reproducció / pausa (14) durant la reproducció, el sistema passa
a la manera pausa i el temps de joc començarà a parpellejar a la pantalla LCD (1).
Torneu a prémer per reprendre la reproducció normal
.
z Mode de parada
1. Si la parada es pressiona el botó (15) durant la manera de reproducció o pausa.
Aneu al mode d'aturada i veure el nombre total de pistes a la pantalla LCD (4).
z Manera Skip (saltar fins / Saltar cap avall )
1. Durant la reproducció o la manera de pausa, si saltar fins botó (5) es pressiona el
límit a la següent pista i mostrar la pista no. i canviarà la manera de reproducció.
2.
Durant la reproducció o la manera de pausa, si Salteu botó es prem (6), anirà a la pista
anterior i canviar a la manera de reproducció.
z +10 pistes
1. Premeu el botó "Pre-up / +10 / Pro" (10) per saltar 10 pistes a la pista favorita més
comoditat.
z Repetir / mode aleatori
Premi el "Rep / Ran “botó (4) durant la reproducció per seleccionar la repetició /
aleatòria o la funció d'introducció, d'una sola pista, aleatòria i la introducció es pot jugar
de la següent manera: -
(1) Random (2) Repetir 1 (3) Intro (4) mode de desconnexió
Indicador
mode de reproducció a la pantalla LCD
Atzar RAN
Repetir pista
Introducció INTRO
Mode de desconnexió --------------
z Repetició de la reproducció
Podeu escoltar les pistes desitjades per aquesta funció.
z Reproducció aleatòria
Vostè pot escoltar totes les pistes en un ordre aleatori per aquesta funció.
z Reproducció de la introducció
Vostè pot escoltar el principi (10 segons) de cada arxiu amb aquesta funció i l'estalvi del
seu temps per buscar la cançó desig
z Repetir tot
Com aquesta unitat de repetició de tot estava en mora, sinó seleccioneu cap manera de
reproducció, reproducció de MP3 serà contínua.
FR-3
Page 11

Observació
- El pot Sistema DETECTAR i llegir l'arxiu en format MP3 nomes una manera USB, però el format de
Fitxer no és Altra Música.
- Si connectar El Sistema de les Nacions Unides un Reproductor de MP3 a Través de la Connexió
USB, un format causa de les Variacions en el de Codificació de MP3, Reproductor de MP3 uns quants
olla sense servei Capac de Jugar a Través del connector USB. Això no és una Fallada del sistema.
- Port USB no ADMET la Connexió AMB el cable d'Extensió USB i no està dissenyat per a la
comunicació AMB l'ordinador directament
Extracció del mòdul de memòria USB
Per treure el pen drive USB, desconnecteu l'alimentació o canviar la manera de funció a
Aux o FM primer. Per al port USB - 1-endoll tirant de la presa USB directament.
Observació:-
Format de la pista MP3 requisit: -
- Taxa de bits: 32 kbps ~ 320 kbps, velocitat de mostreig: 32 kHz, 44,1 kHz i 48 kHz
decodificable
- El rendiment de la reproducció de discos MP3 és varia segons la qualitat de
l'enregistrament del disc i el mètode de gravació. D'altra banda, la recerca-temps d'espera
per a MP3-CD és més llarg que el CD normal a causa del format de diferència.
Càrrega per USB
Aquesta unitat pot proporcionar DC5V/1A per a un altre dispositiu electrònic de càrrega
(per exemple, un telèfon mòbil) a través del port USB de càrrega USB, però no està
disponible durant el funcionament de la bateria o al mode USB.
Observació: A causa del firmware / programari del telèfon mòbil era el moment diversos i
actualització en temps, potser una mica de telèfon mòbil no pot compactable amb funció
de càrrega. Aquest no és el mal funcionament.
Bluetooth de connexió i reproducció
1. Seleccioneu el selector de funció principal (2) en la manera "BT".
2. L'indicador LED Bluetooth (12) serà intermitent, vol dir que el Bluetooth en el mode de
connexió / cerca no.
3. Enceneu la funció Bluetooth del dispositiu Bluetooth (com un telèfon mòbil) i
seleccioneu els equips Bluetooth "Goldsound" per connectar.
4. Una vegada que la connexió va ser acabat i connectar amb èxit, el LED Bluetooth (12)
passarà a il · luminar.
5. Començar a reproduir el dispositiu Bluetooth i gaudir de la música de la unitat principal.
Connexió Aux-in
Connecteu un dispositiu d'àudio, per exemple, Jugador (portàtil) CD, reproductor de MP3,
(portàtil) reproductor de cassets, iPod, etc Amb aquest sistema a través d'un cable amb
connectors jack de 3,5 mm de diàmetre (no subministrat). Connecteu un extrem d'aquest
cable a la presa d'auriculars del dispositiu extern i l'altre extrem a la presa d'entrada
auxiliar (9) en el costat de la unitat. (2) a manera de continuació, premeu la tecla de funció
"AUX". Començar a reproduir el dispositiu extern per gaudir de la seva música.
FR-4
 Loading...