

Page 1
SKCR2644A
Operation Instruction
1
Digital Kitchen Television DVD Multimedia Player
Page 2
I. Pre cautions
II. Acc essories
III. Operation of the Rem ote Control and Functions of Its Major
Part s
IV. Appearance
V. Operation Instruction of Remote C ontrol
VI. Op eration Instruc tion for Alar m Clock Radio Sys tem
VII. TV Menu Operation
VIII . DVD Operation Instruction
IX. Be fore Repair
X. Technical P arameters
Page 3
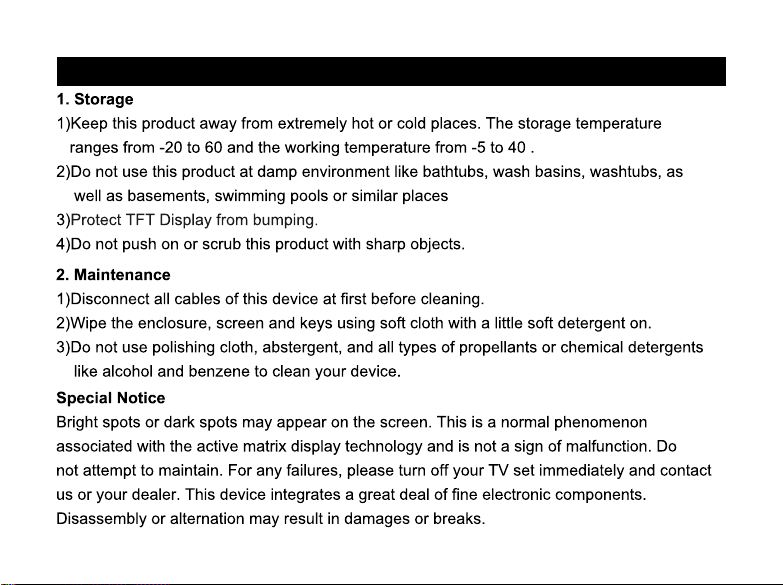
I. Pre cautions
-1-
Page 4

II. Ac cessories
1. Knight head
2. Screw
3. Remote C ontrol
4. AAA type Ba tteries
5. Instal lation di ag ram
6. Operat ion Instr uc tion
* Open the pa ckage and m ak e sure all th e items are i ncluded .
III. Oper ation of th e Remote Co ntrol and F unction s of Its Majo r Pa rts
Precaut ions
* Do no t th row, step o n or strong ly strike t he remote c ontrol to a vo id damage.
* The r em ote contr ol may fail t o functio n if the mach ine is sepa ra ted from th e
remote co ntrol wit h a ba rrier in be tween.
* Do no t ke ep the remo te contro l exposed u nder viol en t light rad iation; i t may
otherwi se lead to ma lf unction .
* Do no t us e a remote co ntrol fro m other dev ices at the s am e time.
* Use t he r emote con trol with in an opera tional ra ng e.
-2-
Page 5
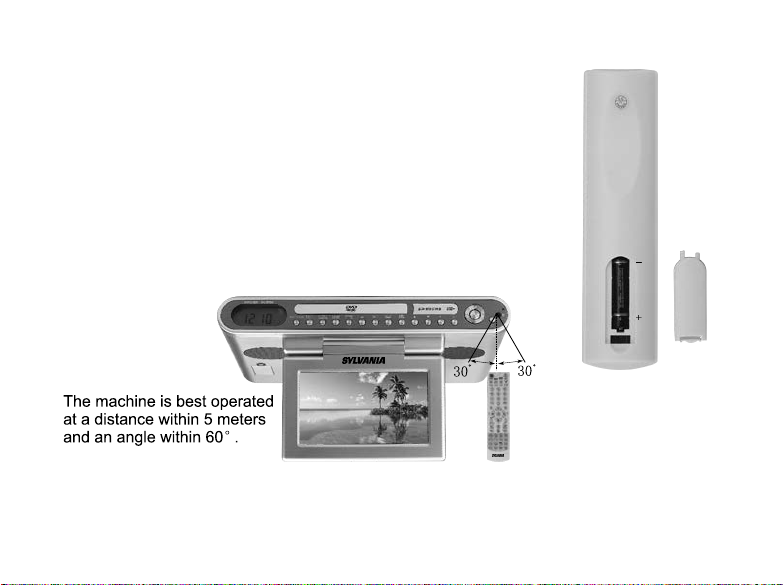
Exch ange the Batterie s
You sh ould exch an ge the batt eries if th e remote co ntrol fai ls to
functio n within a no rm al operat ional ran ge.
* Dra w off the bat tery cove r on the remo te contro l.
* Load new ba tteries i n a co rrect dir ection as i ndicate d on the
remote co ntrol.
* Re- cover th e new batte ries.
Operati onal Rang e of Remote C ontrol
-3-
Page 6
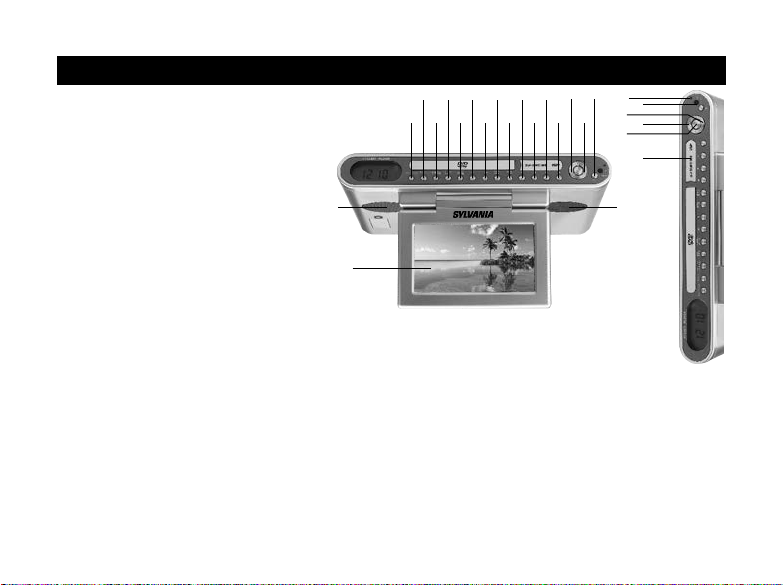
IV. Appearance
1. DVD/TV/AUX (DVD/TV/AUX switch key):
Press this key to switch among DVD/
45678910111213141516
123
TV/AUX modes under a power-on condition.
2. RADIO (RADIO switch key):
Press this key to switch
between RADIO system.
17
3. MEMORY/CARD/USB
(MEMORY/CARD/USB switch key):
Under FM mode of radio search
condition, press this key to enter into
18
MEMORY mode. Press "SKIP+/
TUNER+" key/ "SKIP-/TUNER- " key
or "CH+/-" key to select radio stations.
Press this key again to confirm your selection.For DVD mode, press it to switch modes
among DVD/USB/CARD.
4. CLOCK/ALARM: Time Show key. In power-on or standby state, press shortly to display the time
of current alarm1, alarm2 and the clock; long press to respectively enter the setting state of hours
and minutes of the current time, AL1, AL2 (the number of current hour or minute will flash), then
press "SKIP+/TUNE+" or "SKIP-/TUNE-" to adjust. When these two alarms are set at the same
time, alarm 1 is effective but alarm 2 isn't.
5. SLEEP/SNOOZE: Sleep/Snooze key. In power-on state, press this key repeatedly to set the
system to sleep and shut down after 90/80/70/60/50/40/30/20/10 minutes, then press this key to
-4-
19
20
21
22
23
24
17
Page 7

exit the Sleep power-off Setting function. Press this key in sleep state to cancel this state; in alarm
state, press this key to start snooze function (interval time is 8 minutes), and the screen will show
"SNOOZE" symbol.
6. EQ: Sound Effect key. Press this key in power-on state, you can set the sound effect as Rock
Jazz Popular Classical Normal in turns.
7. TIMER: Timer Setting key. In power-on or standby state, press this key to enter the state of
clockwise time setting from1 to 90 minutes, then press "SKIP+/TUNE+" or "SKIP-/TUNE-" to
adjust minutes, and press again to confirm the set time.
8. SKIP-/TUNE- (Radio tuner/Time adjust key): Under a radio search condition, press this key
shortly to tune backward the radio. A long press on this key is to search backward for radio
stations. The search stops automatically upon receipt of radio station. Under time adjusting
condition, a quick press on this key is to backward adjust the hour or minute figure by figure,
while a long press on it is to backward adjust the hour or minute quickly. For MEMORY mode
of radio, press this key to decreasingly select the station number. For DVD mode, press it to
select the previous track/chapter.
9. SKIP+/TUNE+: Under a radio search condition, press this key shortly to tune forward the radio.
A long press on this key is to search forward for radio stations. The search stops automatically
upon receipt of radio station. Under time adjusting condition, a quick press on this key is to
forward adjust the hour or minute figure by figure, while a long press on it is to forward adjust
the hour or minute quickly. For MEMORY mode of radio, press this key to increasingly select
the station number. For DVD mode, press it to select the next track/chapter.
10. Eject key: In DVD state, press this key to eject the disc.
11. (Stop key): Stop key (Only in DVD state).
12. Play/ Pause key. In DVD playing, press this key to pause,press again to resume playing.
13. OK (Confirm key): In DVD mode, press this key to confirm adjustment/selection.
-5-
Page 8

14. VOL- (Volume decrease key): Under a power-on condition, press this key to decrease volume.
For DVD mode, while in DVD menu interface, a quick press on it is to select leftward and a
long press on it is to decrease volume. In menu interface, press it to leftward select the items
or to decreasingly adjust setting parameters.
15. VOL+ (Volume increase key): Under a power-on condition, press this key to increase volume.
For DVD mode, while in DVD menu interface, a quick press on it is to select rightward and
a long press on it is to increase volume. In menu interface, press it to rightward select the items
or to increasingly adjust setting parameters.
16. STANDBY: Power-on/Standby/Cancel Alarm key.
17. Loudspeaker
18. TFT LCD screen
19. Power Indicator
20. Remote Controller Receiving Window
21. CH- (Channel number decrease key/Alarm 2 adjust key): Under a radio search condition,
press this key to decreasingly select the radio station saved. For MEMORY mode of radio,
press it to decreasingly select the place you prefer to save the radio station. Under standby
condition, press this key to switch modes among Alarm 2, Radio 2 and TV 2. For TV mode,
press it to decrease the channel number. In menu interface, press it to backward select items.
For ZOOM-IN mode, press this key to move the picture downward. Under a condition when
photos are played, press it to turn over the pictures in horizontal direction.
22. CH+ (Channel number increase key/Alarm 1 adjust key): Under a radio search condition,
press this key to increasingly select the radio station saved. For MEMORY mode of radio,
press it to increasingly select the place you prefer to save the radio station. Under standby
condition, press this key to switch modes among Alarm 1, Radio 1 and TV 1. For TV mode,
press it to increase the channel number. In menu interface, press it to forward select items.
For ZOOM-IN mode, press this key to move the picture upward. Under a condition when
photos are played, press it to turn over the pictures in vertical direction.
-6-
Page 9
23. MENU/MONO: For FM mode of radio search condition, press this key to switch modes between
MONO or STEREO modes. For TV/AUX mode, press this key to enter into menu. For
DVD mode, press it to play the menu. For VCD playing mode, press it to switch on PBC.
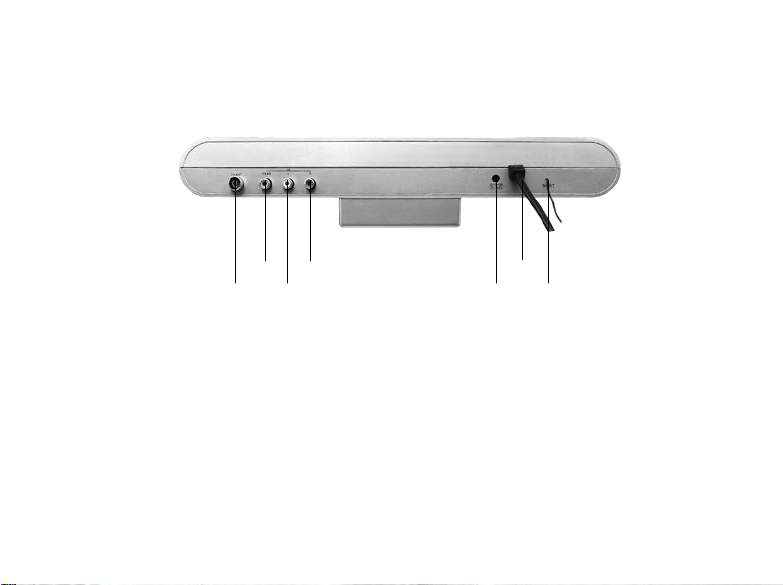
24. USB port/Three-in-one connection
28
252627
25. TV Antenna Input.
26. External video Input
27. External Audio Left Channel Input
28. External Audio Right Channel Input
29. External DC Power socket (Optional)
30. Power Cable
31. FM Antenna
-7-
293031
Page 10
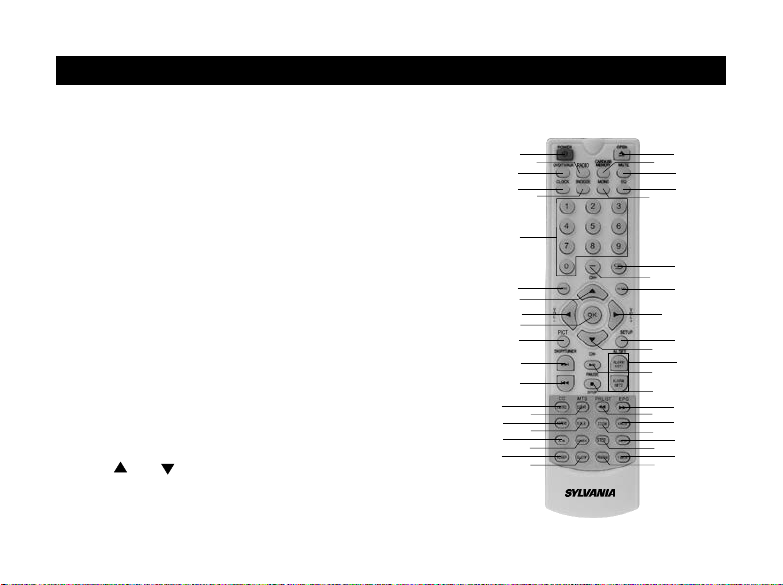
V. Operation Instruction of Remote Control
1. POWER: Standby/off key, press to switch between ON and STANDBY. when the alarm
sounds,press this key to close alarm.
2. DVD/TV/AUX (TV system mode switch key): Press it to switch modes among TV/DVD/AUX.
3. RADIO: Radio key. In power-on state, press this key to
enter the FM RADIO system.
4. OPEN (Open key): In DVD mode, press it to open the
CD deck and again for resetting the deck.
5. CLOCK (LCD clock display key): Press it to circularly
display the time on clock, Alarm 1 and Alarm 2. A long
press on it is to adjust the time on clock, Alarm 1 and
Alarm 2 in turn.
6. SLEEP (SLEEP/SNOOZE switch key): Press it to set the
machine to switch off automatically after a set time.
When alarm rings, press this key to enter into SNOOZE
mode. The alarm rings again and again every 8 minutes
until you switch it off.
7. 0-9(Number Key) :In TV mode, press them to select from
preset TV programs. In DVD, it is used for selection/
composition of songs.
8. MENU (Menu key): In TV/DTV/AUX mode, press this
key to enter into the main menu. In DVD mode, press
it to play the menu. In VCD playing mode, a press
on it is to switch on/off PBC.
9. CH+/ CH-/ (Upward and Downward key): In menu
interface, press it to select items. In ZOOM-IN mode under
DVD condition, press it to move the picture upward under a
condition when the photos are displayed, press it to rotate the
-8-
1
3
2
5
6
7
8
9
10
11
12
14
13
15
16
17
18
17
19
6
20
4
39
38
37
36
35
34
33
10
32
9
30
31
29
28
27
26
25
24
23
22
21
Page 11

picture in a counter-clockwise direction.
10. VOL +/ VOL-/ : Volume Adjusting Direction key. You can press this key to adjust volume
11. OK(Confirm key): In DVD mode, press this key to confirm your adjustment/selection.
12. PICT: Picture mode, In TV/DVD/AUX state, press to select SOFT, PERSONAL, STANDARD,
DYNAMIC.
13. SKIP/TUNER : In MEMORY mode under radio search condition press it to select saving
station. In DVD mode, press it to search and play the previous track/chapter.
14. SKIP/TUNER : In MEMORY mode under radio search condition press it to select saving
station.In DVD mode, press it to search and play the next track/chapter.
15. SUBTITLE/CC (Subtitle key): For TV mode, press to set CC ON, OFF, or CC ON under
MUTE mode. For DVD mode, press it to change a subtitle language.
6. CLEAR/MTS (Clear/MTS key): In DVD mode, press to clear programming. For TV mode
1
press to switch current display program audio language only available when program supports
multi - languages .
17. A-B (A-B repeat key): For DVD mode, press it to set a repeat start point A and again to set
the repeat end point B. To quit repeat, press it for the third time.
18. TITLE: In DVD mode, press it to play title.
19. SEARCH (Search key): In DVD mode, press it to select the title/chapter or starting time to play.
20. SLOW (Slow key): for DVD mode, press it to slow down playing.
21
. PROGRAM (Programming key): In DVD mode, press to edit/play the programming.
. TIMER (Time adjust key): Press it to enter into timer setting. Use the leftward or rightward
22
direction key to adjust the time and press TIMER key to confirm your settings.
23. STEP(step key) :In DVD mode press it to step play.
24. INFO: In DVD mode, press this key to display the data of disc. In TV state, press this key to
display the current program information.
. ZOOM (Zoom key): In DVD mode, press it to zoom in/out the photos.
25
-9-
Page 12

26
. ANGLE (Angle switch key): For DVD mode, press it to change the angle of playing.
27. PRLIST/REV: In TV mode, press it to show the program list. In DVD mode, press it for
backward function.
28. EPG/FAST (E-program guide/FAST key): In TV mode, press this KEY to enter Electronic
programs Guide Interface. In DVD mode press it for fast function.
29. STOP: In DVD mode, press it to stop playing with a memory sustained; press it again to replay
from where you stop last time. Press it twice quickly to stop playing without a memory sustained;
after that, a press on it is to replay from the very beginning.
30. AL.SET: Alarm Clock Set Key. Press this key to set Alarm Clock1 and Alarm Clock2 to
BUZZER/ RADIO/ TV.
31. (PAUSE): Pause key. In DVD state, press this key to enable the screen in pause state,
then press again to exit pause state
32. SETUP: In DVD mode, press it to enter into menu interface.
33. AUDIO: Audio switch key. In TV state, press this key to set sound mode STANDARD, MOVIE,
MUSIC and PERSONAL. In DVD state, press this key to switch audio channel.
34. "-": Channel Directly Selecting key, In ATSC mode, Press digit keys to select main channel
number, then press '-' and insert second digit number key to select program directly.
35. Return Key: In TV mode, press this key to switch between current program and previous
program.
. MONO: FM Stereo Switch key. In FM state, press this key to set the sound as stereo or mono.
36
37. EQ: EQ Key. Press this key to set sound effect as ROCK, JAZZ, POP, CLASSIC and NORMAL
in turns.
38. MUTE (Mute key): In all modes, press it to mute the machine. Press it again to quite from mute
. CARD/USB/MEM (System mode switch key): For DVD mode, press it to switch system modes
39
among DVD/CARD/USB. For FM mode under TV condition, press it to save a preferred program.
-10 -
Page 13

USB/Card Input Connection
.
Keep the machine under DVD mode and plug in corresponding jacks with USB or Card.
Connection jack on the left of the machine
Connection jack on the right of the machine
-11 -
Page 14

VI. Operation Instruction for Clock-control Tuning Function
1. Time Setting
CLOCK/
ALARM
(CLOCK key on remote control)
A long press on it for
.
three seconds
CLOCK/
ALARM
(CLOCK key on remote control)
Press it
e. f.
g. h.
i. j.
k. l.
CLOCK/
ALARM
(CLOCK key on remote control)
Press it
(CLOCK key on remote control)
Press it
(CLOCK key on remote control)
CLOCK/
ALARM
CLOCK/
ALARM
AL1
AL1
Press it
CLOCK/
ALARM
(CLOCK key on remote control)
Press it
AL2
AL2
-12 -
b.
OR
SKIP-/TUNE- SKIP+/TUNE+
Change hour settings
d.
OR
Change minute settings
SKIP-/TUNE- SKIP+/TUNE+
OR
SKIP-/TUNE- SKIP+/TUNE+
Change hour settings for Alarm 1
OR
SKIP-/TUNE- SKIP+/TUNE+
Change minute setting for Alarm 1
OR
SKIP-/TUNE- SKIP+/TUNE+
Change hour settings for Alarm 2
OR
SKIP-/TUNE- SKIP+/TUNE+
Change minute settings for Alarm 2
Page 15

2. Alarm Setting (available only in MEMORY mode under standby condition):
a. "CH-" (also AL2.SET key on remote control) key can use for switch among alarm, RADIO and TV.
b. "CH+" (also AL1.SET key on remote control) key can use for switch among alarm, RADIO and TV.
3. SNOOZE /Stop Alarmin g
a. When the alarm rings, press SLEEP/SNOOZE key and the alarm is to ring in every 8 minutes
unless you stop it.
b. When the alarm rings, press POWER key and the alarm is to be shut down; the alarm is not
to ring again until at the same time of the next day.
4. Setting time for SLEEP mode
Press SLEEP/SNOOZE key to change settings for SLEEP mode (90, 80……10 min).
5. TIMER
Press TIMER key to enter into setting. Press SKIP+/- (TUNE+/-) to change the settings.
90
TIMER
Press TIMER key again to confirm your settings.
6. Listen to RADIO
A. Press RADIO key to activate RADIO mode.
B. Press SKIP+/- (TUNE+/-) key and hold for a while to search radio
stations.
C. Press SKIP+/- (TUNE +/-) key to select radio station number.
Press CARD/USB/MEM key to display:
-13 -
Page 16

Press CH+/- key to find a place to save the radio station:
VII. TV Menu Operation
1. TV/AV Image Quality Adjustment
Press MENU key to enter the menu list and then press left
or right key to enter the above list. Press up and down key
to choose to enter the sub-list, press left and right key to
adjust the numerical value or setup the contents, then press
Menu to confirm and return to previous list. Press Menu
again or press EXIT key on the remote controller to quit the
sub menu list directly after the adjustment of image quality.
-14 -
Pict ure Mod e
Cont rast
Brig htnes s
Colo r
Shar pness
Tint
UP/D OWN
ADJU ST
Pers onal
"MEN U": EXI T
50
50
50
50
0
Page 17

Precautions
There are four options of picture mode, which are Personal, Standard, Dynamic and Soft.
Contrast: Adjust the black and white contrast of the image.
Brightness: Adjust the brightness of the image.
Color: Adjust the color of the image.
Sharpness: Adjust the sharpness of the image.
Tint: Adjust the red and green balance of the image.
2. Sound Adjustment
Press MENU key to enter the menu list and then press left or right key to enter the above list.
Press up and down key to choose to enter the sub-list, press left and right key to adjust the
numerical value or setup the contents, then press Menu to confirm and return to previous list.
Press Menu again or press EXIT key on the remote controller to quit the sub menu list directly
after the adjustment of sound effect.
Precautions
There are four options of sound mode, which are Personal,
ADJU ST
Stan dard
Engl ish
"MEN U": EXI T
50
50
50
Standard, Movie and Music.
Bass: Adjust bourdon.
Treble: Adjust alt.
Balance: Adjust the balance between left and right sound track.
Audio Language can be setup as English, French and Spanish.
-15 -
Soun d Mode
Bass
Treb le
Bala nce
Audi o Langu age
UP/D OWN
Page 18

3. Time Adjustment
Press MENU key to enter the menu list and then press left
or right key to enter the above list. Press up and down key
to choose to enter the sub-list, press left and right key to
adjust the numerical value or setup the contents, then press
Menu to confirm and return to previous list. Press Menu
again or press EXIT key on the remote controller to quit the
sub menu list directly after the adjustment.
OSD Du ratio n
Time Z one
Day Sa ving Ti me
Cloc k
UP/D OWN
Precautions
1. OSD Duration can be setup as 15Sec, 30Sec, 45Sec and 60Sec.
2. Time Zone has seven areas to be chosen.
3. Day Saving Time can be setup as Off or On (Summer time off or on).
4. Clock 2006/05/02 14:00 shows the current program time.
4. Settings
Press MENU key to enter the menu list and then press left
or right key to enter the above list. Press up and down key
to choose to enter the sub-list, press left and right key to
setup the contents.
1>. OSD Language Settings
Press Up and Down Key to choose Menu Language, and press
Menu L angua ge
Tran spare ncy
Colo r Mode
Zoom M ode
Clos ed Capt ion
Rest ore Set ting
UP/D OWN
Left and Right Key to choose among English, French and Spanish.
-16 -
2006 /05/0 2 14:40 -
ADJU ST
ADJU ST
30 Sec
East ern
Off
"MEN U": EXI T
Engl ish
Off
Norm al
Wide
"MEN U": EXI T
Page 19

2>. Menu State Settings
Press UP and Down Key to choose Transparency, and press Left and Right Key to choose Off
(menu transparency off) or On (menu transparency on).
3>. Color Auto-adjustment
Press Up and Down Key to choose Color Mode. Press Left and Right Key to choose among
Normal, Warm and Cool.
4>. Picture Mode
Press Up and Down Key to choose Zoom Mode, and press Left and Right Key to choose
among Wide and 4:3.
5>. Closed Caption Settings
Many TV programs contain closed caption information, and the audience can see the caption
in words on the screen. Not all the channels at any time have closed caption code information.
Press Up and Down Key to choose Closed Caption and press Left and Right Key or OK Key to
enter the following picture.
There are three CC Modes, which are Off (closed caption off), On (closed caption always on
when information is available) and CC on Mute (closed caption on when TV is in mute and
closed caption off when TV is not in mute). Basic Selection can choose among CC1, CC2,
CC3, CC4, Text1, Text2, Text3 and Text4.
Advance Selection can choose among Service1, Service2,
Service3, Service4, Service5 and Service6.
-17 -
CC Mod e
Basi c Selec tion
Adva nce Sel ectio n
UP/D OWN
ADJU ST
Off
CC1
Serv ice1
"MEN U": EXI T
Page 20

6>. Restore Settings
Press VOL+ Key, the hint of "Are you sure?" will show.
As in the following picture, press YES or NO to choose
whether restore or not and press CH+ or CH- to confirm.
5. Program Searching
Press MENU Key to enter the menu list, press Left and
Right Key to enter the following list, press Up and Down
Key to enter the sub-list and then press Left and Right
Key to setup the contents.
1>. Antenna can be setup as CATV and Air.
Are yo u sure?
NO
SELE CT
YES
CONF IRM
Ante nna
Auto S can
Auto S can Add CH
Chan nel Ski p
Chan nel No.
Chan nel Lab le
UP/D OWN
ADJU ST
CATV
"MEN U": EXI T
Ante nna
Auto S can
Auto S can Add CH
Chan nel Ski p
Chan nel No.
Chan nel Lab le
UP/D OWN
-18 -
ADJU ST
Air
4-1
FD 380 3
"MEN U": EXI T
Page 21

2>. In the CATV state, choose Auto scan and press
OK to enter Cable system settings. Four options, AUTO,
STD, IRC, HRC can be chosen.
2). In the Start to scan item, press VOL+ to start
searching. Auto searching will clear the primary program.
Cabl e Syste m
Star t to Scan
UP/D OWN
Cabl e Syste m
Star t to Scan
UP/D OWN
ADJU ST
ADJU ST
AUTO
"MEN U": EXI T
AUTO
"MEN U": EXI T
3>. Press Auto Scan Add Ch will start auto search based
on primary program.
-19 -
Ante nna
Auto S can
Auto S can Add CH
Chan nel Ski p
Chan nel No.
Chan nel Lab le
UP/D OWN
ADJU ST
CATV
"MEN U": EXI T
Page 22

4>. Channel Skip Settings
Choose Channel Skip and press VOL+ to enter Skip item
as following:
Press VOL+ or VOL- to close or open the current channel
skip settings.
5>. Change Channel Number
Choose Channel No. as in the following picture:
Press VOL+ or VOL- to change current channel number.
6>. Change or Edit Program Name
Choose Channel Label and press VOL+ to enter the
following picture. Alter the characters and numbers in
the box to change the program name according to your
preference as in the following picture.
-20 -
No. Prog ram Nam e
Ante nna
Auto S can
Auto S can Add CH
Chan nel Ski p
Chan nel No.
Chan nel Lab le
FD 380 3
4-1
9-2
KQED -SD
"ENT ER": SE LECT "M ENU": E XIT
EDIT
ADJU ST
3
SELE CT
UP/D OWN
F D
Air
4-1
FD 380 3
"MEN U": EXI T
8 0
"MEN U": EXI T
Skip
Off
Off
3
Page 23

VIII DVD Operation Instruction
1. Instruction for basic operation
1>Play/Pause
1) After the disc be read, the disc types information of DVD, VCR or CD could be displayed
on TFT screen.
2) Some disc will play automatically when tray is in.
3) When playing DVD or some VCD2.0 disc, the menu will emerge, you could select the
option by pressing direction key or digital keys, then press OK to confirm. Finally the player
will play according to your selections.
Notice: If playing some VCD disc, you should press "DVD Menu" to turn off the PBC function,
then use digit key (0-9) to select desired track.
4) While playing, press one time to pause, press one more time to continue normal
playback.
-21 -
Page 24

2 Fast Forward/Backward playback
>
While playing, press or to play the disc fast forward or backward at a certain multiple
speeds. DVD/VCD: 2×, 4×, 8× and 20× times speeds.
Note: when play some disc menu or title, the Forward/Backward function is not available.
Slow playing
3>
If you want to enjoy a specific portion, slow playing function can be use. The player provides
six slow speeds. Press SLOW key continuously to shift slow speeds in order of 1/2→1/3→1/4
→1/5 →1/6→1/7→ normal. During slow playing, press to return normal playback.
Note: The slow playing function is not available while playing the menu and title.
4 Last/Next track search&play
>
While playing, you could select and play the last or next track/chapter by pressing or .
Notice: when play some disc menu or title, the last/next search&play
function is not available.
5 Stop playing
>
While playing, press STOP key one time, the player will be to Memory Stop, and OSD will be
displayed on screen. Press , the player will start play from the Memory Stop point. Press
STOP two times continuously, the screen will also display OSD, disc will stop playing totally.
Now press key once more, the player will play disc from very beginning.
2. Special function operation instruction
>
1 Selection of caption language
-22 -
Page 25

While playing, you could select your favor caption language
by press SUBTITLE key directly or pressing SETUP key to
enter system menu to change caption language. Please refer
to system menu operations.
Note:
1) Some disc only contain one language.
2) If you cannot find your favor caption language by pressing
SUBTITLE key continually, that means the disc does not
contain such caption language at all.
2>Select Audio language
When playing DVD disc, you could select your favor dub language by pressing the AUDIO key.
When playing some VCD disc, you also could switch the audio output mode: Stereo → left
sound channel → right sound channel → Mix mono. You can select audio language in system
menu.
Note: Some discs only contain one audio language. How many audio language can be use is
3> Zoom
While playing a video disc, press ZOOM, player will zoom in the image under play/pause status.
Press ZOOM to zoom in ×2→×3→×4→×1/2→×1/3 →×1/4 → zoom off.
Press to see other parts of the picture.
depend on information on the disc.
-23 -
Page 26

4>Different video angle play (ANGLE)
During playback of DVD disc press ANGLE to display the available video angles for disc
contain multi-angle. Press one time to change an angle, how much angle is depend on
information on the disc.
5>Title
Some DVD discs have a title menu recorded within them to use for selecting titles for play.
This feature will only work with these discs.
1) Press TITLE key during playback to enter the title menu.
2) Use keys to control the direction and press OK or PLAY to select the preferred title
or directly press the numeric keys to select the title.
Note: DVD disc are divided into units referred to as titles are divided into chapters. A disc that
contains a movie may have only one title with many chapter divisions.
6>Menu
Some DVD discs have complex contents such as multi-subtitle, multi-audio, or multi-angle. In
these cases, you can use the DVD menu to select audio language, subtitle language, and
video angle.
1) Press MENU during playback to display the DVD menu.
2) Press MENU again resumes to normal playback of the scene when MENU key was first
pressed.
3) Use the arrow keys to select favor item, then press OK or to confirm. Or directly press
the numeric keys to select the item.
-24 -
Page 27

7>System select (NTSC/PAL/AUTO)
Press SETUP to enter setup menu. Use direction key to select submenu of System setup,
choose TV System item, then press OK to change the NTSC/PAL/AUTO output mode.
Note: If connect player with TV and then display without color, please select output system
mode to be same with TV.
8>Repeat play
During playing DVD disc, press REPEAT continually in order to select:repeat off→repeat
chapter→repeat title→repeat off. Repeat a specific portion from point A to point B of the disc.
Press A-B first time to set point A, press second time to set point B, press the third time to
cancel A-B repeat function and return to normal playback.
Notice: 1. For VCD2.0 or above , the repeat function will not work till the PBC have be set off.
2. After power off or open the disc cover, the repeat function will be turned off.
9>Program play
You must create your program in the Edit Program menu before you can access the Program
Playback. By selecting Program Playback in the Play Mode menu, you are telling the DVD
player to play the disc in the order you created in the Edit Program menu.
Program edit
1) While playing a DVD disc, press PROGRAM to enter the program menu.
2) Use the digital key to enter desired title/chapter,
3) High light PLAY item, press OK or to program play. High light CLEAR and press OK to
eliminate the program list.
4) To exit PROGRAM playback, press key two times.
Note: After power off or open disk cover, the program play will be turned off.
-25 -
Page 28

10>Search play
During playback , press SEARCH to display title, chapter, play time, subtitle, audio, angle
information of the disc as follows:
DVD disc Info Display
CD disc Info Display
VCD disc Info Display
If the disc include many Title or chapter, press
"SEARCH" use direction key or digit number key to
select title, chapter and time.
Play CD
CD track select
Playing CD, all track can be select and play:
1. Use the number keys on remote control to enter the number of the track while playing.
2. For example, to select track 12, press 10+ and 2.
Play Mp3
MP3 music list
-26 -
Title selecting
Page 29

MP3 music list will appear automatically while
playing Mp3. Use direction key to select music,
then press "OK" key to play.
Current playing music
Folder list
Viewing JPEG files
JPEG files list
Preview picture
JPEG file list in the current folder
Music list of current folder
Current selected file
-27 -
Page 30

The operation method of viewing JPEG files is similar as the operation method of playing
MP3, the above picture will appear after insert JPEG disc.
1. The image zoom function is available while displaying JPEG file.
2. Press Left arrow, the picture rotate 90°at anti-clockwise, press Right arrow, the picture
rotate 90°at clockwise. Press Up arrow, the picture flip vertically, press Down arrow, the
picture flip horizontally.
11>Storage equipment(USB and Card)
The player support playing of USB storage equipment and Multi Media Card (MMC), SD,
Memory Stick (MS). (The capability of the USB or card must less than 2G).
All kind of storage equipment can be use as same as disc to play MP3/JPEG/AVI etc. media
files. Disc, USB and Card can be inside the player at the same time. Press USB/SD/MS key
to select desired media equipment.
Tip: When playing USB storage device or CARD individually, you should cover the disc cover,
this machine can recognize and play. It can't play any media when the disc cover is opened; in
MP3/PHOTO/MOVIE switching, please press Stop key, then press Left or Right direction key
to select.
3. System menu setup
To setup the mainframe system, Press SETUP to enter
system menu.
Then you could setup the DVD player for Lock, Display,
Audio, Language and Default etc.
-28 -
Page 31

1. Use left/right key to select item on the main option list. The Item list appear.
2. Use up/down key to select desired item, then press OK to enter. Press left/right key to set
the value. Press OK to return option list.
3. After setup, press SETUP key or key to exit system setup menu. System setup menu as
below
System setup menu as below
Main option list
Item list
Parameter list
-29 -
Page 32

The default of this DVD player
MENU
SYSTEM
SETUP
LANGUAGE
SETUP
AUDIO SETUP
VIDEO
SETUP
DIGITAL
SETUP
ITEM
TV SYSTEM
VIDEO
TV TYPE
PASSWORD
RATING
DEFAULT
OSD
LANGUAGE
AUDIO LANG
SUBTITLE LANG
MENU LANG
KEY
BRIGHTNESS
CONTRAST
HUE
SATURATION
Sharpness
DYNAMIC RANGE
DUAL MONO
NTSC/PAL/AUTO
S-VIDEO
4:3PS/4:3LB/16:9
USE NUMBER KEYS TO ENTER A NEW PIN,
THEN SYSTEM WILL START LOCK FUNCTION.
(DEFAULT PIN IS 9999)
KID SAFE/G/PG/PG13/PG-R/R/NC-17/ADULT
RESTORE
ENGLISH/CHINESE/GERMAN/SPANISH/
FRENCH/PORTUGUESE
CHINESE/ENGLISH/JAPANESE/FRENCH/
SPANISH/PORTUGUESE/LATIN/GERMAN
CHINESE/ENGLISH/JAPANESE/FRENCH/
SPANISH/PORTUGUESE/GERMAN/OFF
CHINESE/ENGLISH/JAPANESE
SPANISH/PORTUGUESE GERMAN/
#/+4/+2/0/-2/-4/b
12/10/8/6/4/2/0
12/10/8/6/4/2/0
+6/+4/+2/0/-2/-4/-6
12/10/8/6/4/2/0
0/2/4/6/8
FULL
6/8
4/8
2/8
OFF
STEREO/MONO L/MONO R/MIX MONO
/FRENCH/
/ LATIN
-30 -
DEFAULT
Page 33

IX Before Repair
The following phenomenon does not indicate failures. Before you contact us for repair, please
check your device according to the approaches below.
Problems
No picture or sound
Power wire is not properly connected;
the functioning power source is not recognized;
or there're breaks in the power wire.
Causes
No signal
No sound
Mosaic images
Too-dark images
Check whether the antenna is located well;
Check the parameter of image or region is set
correctly; if not, please set or search again.
If the volume is turned down to the minimum;
single is too weak, and Silence function is active.
The signal strength is too weak.
Check whether the brightness and contrast of your
display is adjusted well; if not, readjust it.
-31 -
Page 34

X Technical Parameters
DVD Technical parameters
Laser wave length: DVD 650nm; CD 780nm
Optical pickup: DV34 (SANYO)
Compatible disc: MPEG-4, DVD, VCD, CD, MP3, WMA, JPEG CD, CD-R, CD-R/W,
DVD+R/-R(nonsupport DIVX 3.11 version)
Other Compatible media: USB/Multi Media Card(MMC)/SD/Memory Stick(MS)
Shockproof: DVD 3seconds; VCD/CD 10seconds; MP3 90seconds
Frequency response: 20Hz-20KHz
Audio signal-noise ratio(S/N): ≥60dB
Dynamic scope: ≥60dB
TV system: PAL/NTSC/AUTO
Menu language: Chinese/English/Japanese/French/Spanish/Portuguese/German/Latin
Radio Receiving Frequency Range: FM87.5MHz-108MHz
Radio Adjustment Step: FM: 50KHz
Radio Sensitivity: FM≤15dBuV
Radio Signal-to-noise ratio: FM≥40dB
Input
ATSC Frequency:54MHZ-803MHZ
NTSC Receiving Frequency: 55.25MHz - 801.25MHz
-32 -
Page 35

DTV Receiving Input Power: 85dBm - 0dBm
LCD Size: 7 inch
LCD Aspect Ratio: 16:9
LCD Resolution: 480 ×RGB ×234
LCD Light Source: LED
Power Supply: AC INPUT 100~240V 50/60Hz DC INPUT 12V/2A
Speaker Output Power: more than1.2W×2CH(when Distortion is less than 10%)
Power Consumption: less than 20W
Dimensions: 360mm×290mm×78mm
Weight: about 2500g
Note:
Batteries only power the system clock. When main power is off, clock and memory remains
the same and the TV receiver stops playing. Because system clock is powered by batteries,
the time display will be still correct when the TV receiver is reconnected to main power and
begins to play.
-33 -
Page 36

WARNING:
●This operation instruction is only intended for reference. No further notice is available to
any modification of all information contained therein. Due to continuing improvements, the
features and design are subject to change without notice.
●No repairable components exist in the machine. Don't try to dismantle and improve the monitor,
and the high voltage in the machine may cause danger. Maintenance and adjustment of the
monitor is subject to professionals.
WARNING:
●To prevent injury, this apparatus must be securely attached to the floor/wall in accordance
with the installation instructions.
●The mains plug is used as the disconnect device, the disconnect device shall remain readily
operable, and it shall be disconnected from the mains completely.
●The plug is used as disconnect device form the mains supply, the plug shall remain readily
operable.
●The apparatus should not be exposed to dripping or splashing and that no objects filled with
liquids, such as vases, shall be placed on the apparatus.
●No naked flame sources, such as lighted candles, should be placed on the apparatus.
【 after some items in this manual means it is available with this function. 】
-34 -
 Loading...