

Page 1

Digital Photo Frame Operation Manual
Model NO.:SDPF787
Page 2

Contents
Important Safety Precautions……………………………………………………………………… 3
1. Performance……………………………………………………………………………… ..….. 5
2. Product Appearance……………………………………………………………………………. 5
3. Package Contents………………………………………………………………………………. 6
4. Function of Host Computer……………………………………………………………………. 7
4.1 ON/OFF…………………………………………………………………………………….. 7
4.2 Memory/USB/SD card……………………………………………………………………… 7
4.3 Function mode………………………………………………………………………………. 8
4.4 PHOTO mode……………………………………………………………………………….. 8
4.5 CALENDAR mode…………………………………………………………………………..9
4.6 SETUP interface…………………………………………………………………………….10
4.7 System setup………………………………………………………………………………...11
5. Fault Diagnosis………………………………………………………………………………….16
6. Technical Parameters………………………………………………………………………… 17
2
Page 3

Important Safety Precautions
1. Please read the operation manual.
2. Please keep the operation manual.
3. Please pay attention to cautions.
4. Please follow the operation manual.
5. Please don’t use this device near water source. Warning: to reduce the risk of fire or electric
shock, please don't expose the device into rain or moisture environment.
6. Please use soft dry cloth to clean any dirt on device surface. If the dirt still cannot be cleared,
please refer to Matters Needing Attention to gain further instructions.
7. Please don’t install the device near instrument which can produce heat, such as radiator, heat
recorder, stove and so on.
8. Protect the plug, socket and its other parts connecting with device of power line from being
treaded by persons or squeezed by other things. Make sure to install power socket near the
device, for the convenience of use.
9. Please plug out the power plug in lightning weather or when it is left unused for long time.
10. Only professional can carry out its repair work. When the device is damaged, such as the power
line or plug damaged, splashed with fluid or other things falling onto device, or the device
cannot work normally due to be caught in the rain, be affected with damp or fall to ground, it is
necessary to maintain device.
Matters Needing Attention
1. This device is fragile product. Please place it on flat surface at the time of using. It cannot bear
the crash caused by falling down.
2. This device is not moisture proof or moisture resistant. It will be easily damaged if it is affected
by damp or splashed with fluid.
3. The device screen (LCD panel) is made of glass. Therefore, it is easily damaged when being
affected by abnormal outside force or injured by sharp instrument.
4. This device is LCD display. Please don't press the screen at will. Otherwise, the screen may be
damaged.
5. This device support hot plug operation. However, it is necessary to cut off power supply before
plugging in/out the memory card as far as possible to prevent your memory card or device from
being damaged due to static electricity or other reasons.
6. To ensure the device display quality, our company strongly recommends you to use original
power adaptor.
7. It is necessary to keep screen clean. Cut off power supply and then clean it with wet soft cloth.
Please don’t clean the screen with alcohol, petrol or other chemical regents. Otherwise, the
device may be damaged.
8. To ensure the normal operation of device, please don’t store or use device in too cold or too hot
place or place the displayer in moisture place or place with long-term direct sunshine. Besides,
don't use the device in severe environment (e.g. strong shock), in order to avoid accident.
9. During operation, the device may be slightly heated. It is normal and doesn’t indicate the device
is faulty.
3
Page 4

10. Please pull out power socket if the device is left unused for long time.
11. Please refer to manufacturer’s instructions of color LCD: the color LCD is allowed to have
0.01% of pixel defect. If the defect is found during use, please kindly understand.
Statement
Our company reserves all rights for final explanation of alteration of the operation manual. In
consideration of the continuous improvement of product, our company reserves the right for
alteration of product specifications. The product is subject to change without notice. The content in
this operation manual may be changed without informing users. It is prohibited to copy, reprint or
spread any part of this operation manual for any purpose in any form without the prior written
permission of our company.
Note: don’t scrap electronic products together with household waste. Please pay attention to the
notice of local professional institute or dealer for the purpose of recycling.
4
Page 5
1. Performance
1) 7 inch TFT screen resolution 480 * 234 pixels
2) Support the JPEG format picture
Support USB and the memory cards such as SDǃMMCǃMS
3)
4) Simple humanized interface
5) A variety of picture play effect picture, has the slide automatic playback
function
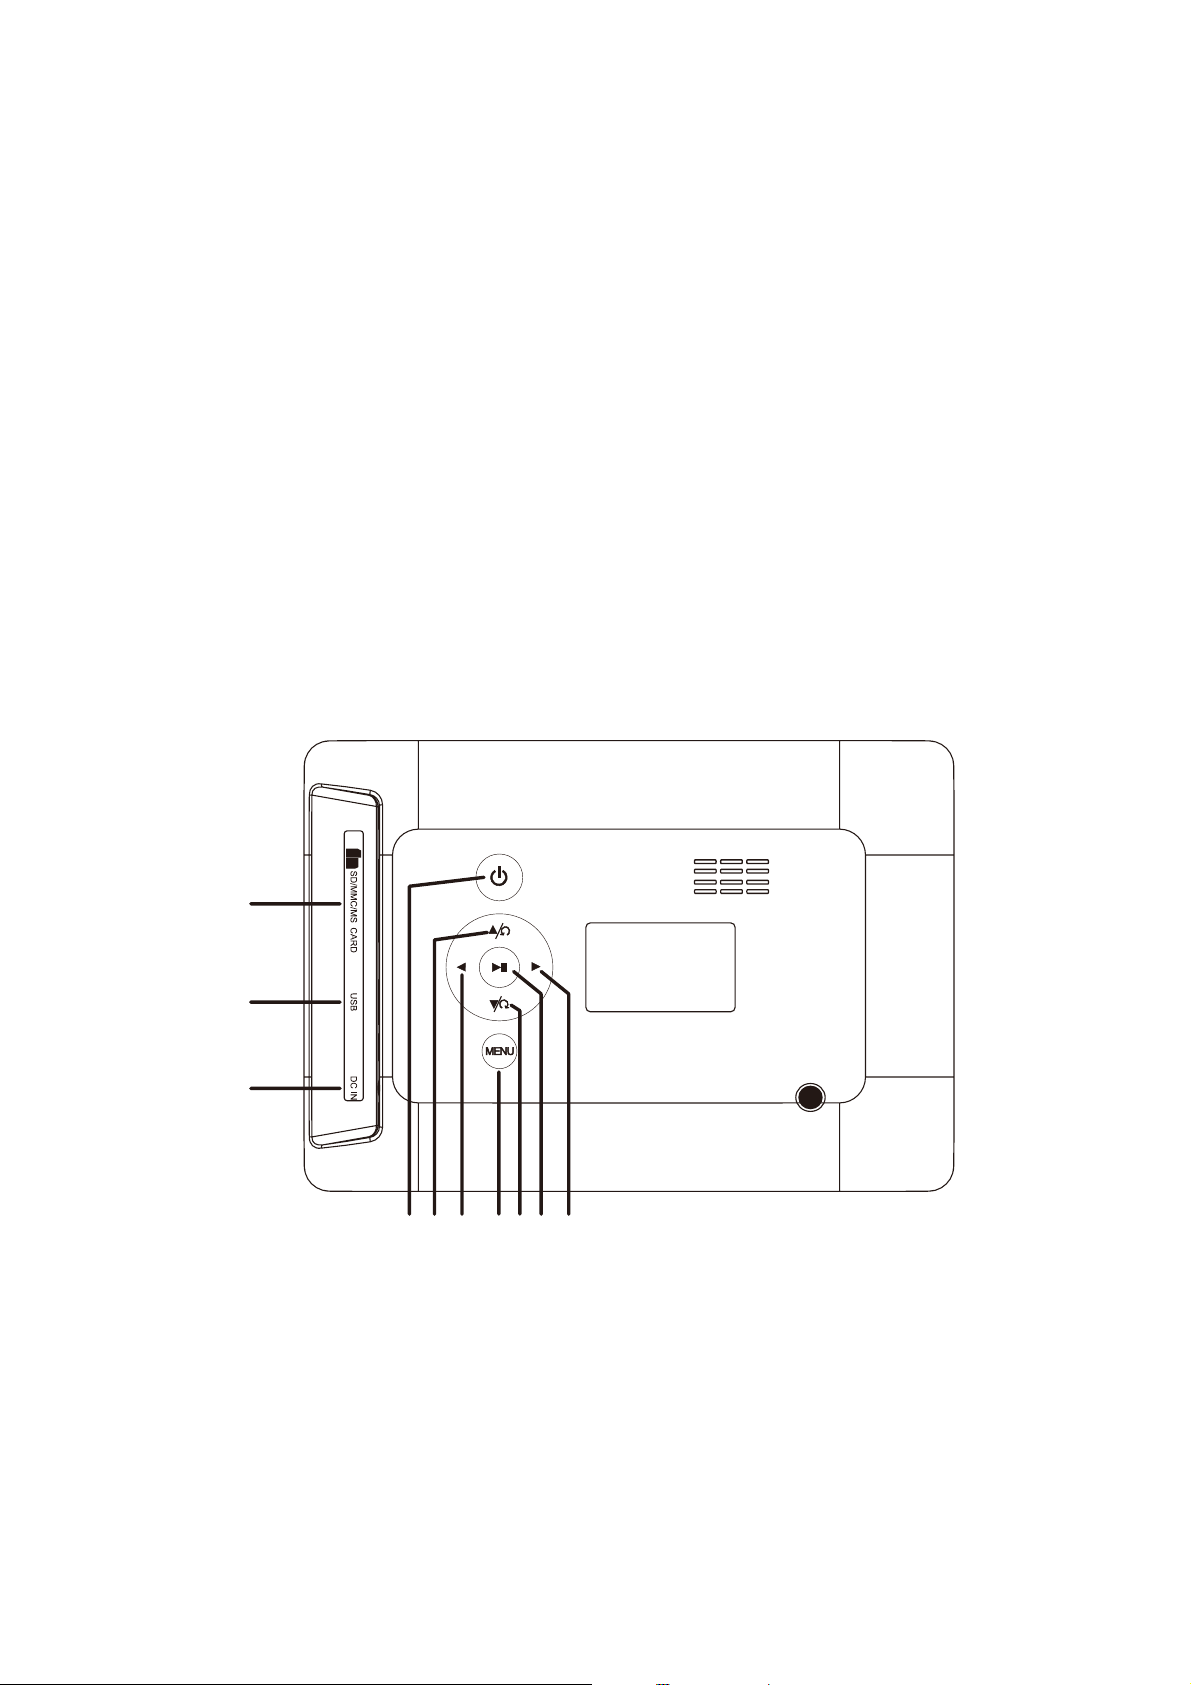
2. Product Appearance
1
2
3
4 5 6 78910
1. SD/MMC/MS memory card 4. Power switch 7. Menu/Return
2. USB interface 5. Up/rotate 8. Down/rotate
3. Power input 6. Right select 10. Left select
5
Page 6

3. Package Contents
Digital Photo Frame+ Bracket 1PCS
User’s Manual 1PCS
DC 5V/1.0A Power Adapter 1PCS
Digital Photo Frame+ Bracket
User’s Manual
DC 5V/1.0A Power Adapter
6
Page 7

4. Function of Host Computer
4.1 ON/OFF
* Startup: power on the device to enter boot screen and then into main menu.
DIGITAL PHOTO FRAME
* Shutdown: press for three seconds to shut down the device.
4.2 Memory/USB/SD card
In this mode, press the key to select the memory device (including memory). After device selection, press
/
the key to enter function mode.
* Note: this mode operation is valid only after inserting USB or SD card.
7
Page 8

4.3 Function mode
There are 3 function options in this mode, i.e. PHOTO, CALENDAR and SETUP.
After selection, press ENTER to enter the corresponding functional operation. Press menu to return to the mode
“Select Card”.
4.4 PHOTO mode
1. Press the key to preview six pictures, as shown in the figure.
* Press to select picture; press MENU for 3s to delete the picture.
/
* Press to preview the six pictures on next pate.
* Press to select any favorite picture. Press to realize full-screen browse. During browsing,
press to browse the previous or next picture.
/
/
/
8
Page 9

* At the time of full-screen browsing, press MENU for 3s to realize operation of picture, as shown in the figure.
* Save picture: Press to save picture into local memory (note: only 5-6 pictures can be saved into local
memory due to limited memory. No picture can be saved again if memory is full).
Rotate: rotate picture.
Zoom: realize 5*ZOOM of picture.
Exit: quit the menu.
2. Slide mode
* The device will automatically read pictures saved in Memory/USB/SD card to realize slide play.
* At the time of full-screen browsing, press
this case, press MENU for 3s , operation as Save Picture, Rotate and Zoom can be carried out to pictures.
to realize slide
play and press it again to pause slide play. In
4.5 CALENDAR mode
In function mode, press to select CALENDAR, as shown in the figure below.
/
9
Page 10

* Press to enter calendar time display. Press the key or to view the information of
previous and future calendar.
/
/
4.6 SETUP interface
1. Press to enter menu setup.
2. Press to select setup item; press to set sub-items of selected item.
3. Press to save corresponding content after setup.
4. Press Menu to exit SETUP mode.
/
10
Page 11

4.7 System setup
Language: OSD language setting.
Press to select this option and set the mode of slide play. Press to set sub-items (including
English, French, Italian, German, Spanish, Portuguese, Swedish and Dutch). After selection, press the key
to confirm it. Then, press MENU to exit.
Slide mode: used to set the mode of slide play.
/
Press to select this option and set the mode of slide play. Press to set sub-items (including
/
Single window, Four windows and Triple windows). After selection, press the key to confirm
it. Then, press MENU to exit.
11
Page 12

Slide Speed: set the slide play speed.
Press to select this option and set the play speed of slide. Press to set sub-items (minimum 3
seconds; maximum 1 hour
Photo effect: used to set photo effect.
/
). After selection, press the key to confirm it. Then, press MENU to exit.
to select this option and set photo effect. Press to set sub-items (Color, Mono and Sepia
Press
/
After selection, press the key to c
).
onfirm it. Then, press MENU to exit.
Slide Effect: used to set slide effect.
Press
Random, Split Horizontal in, Split Horizontal out, Jalou
/
to select this option and set slide effect. Press to set sub-items (15 optional effects:
12
sie, Split Vertical in, Split Vertical out, Radiation,
Page 13

Surround, Fade, Right refresh, Next refresh, On pan, Roll from Down To Up, Roll from Up To Down Brick ).
After selection, press the key PLAY to confirm it. Then, press MENU to exit.
Photo mode: used to set photo mode.
Press to select this option and set photo mode. Press to set sub-items (3 optional effects: Auto
Fit, Optimal and Full (full screen)
exit.
/
). After selection, press the key to confirm it. Then, press MENU to
13
Page 14

Display: used to set displayer.
Press to select this option and set displayer. Press to set sub-items (3 adjustable display effects:
Contrast, Brightness, Saturation and Tint).
to adjust proper value. Then, press MENU to exit.
/
After selection, press the key to confirm it and
/
Set Time/date: used to set time/date.
Press to select this option and set time/date. Press to set sub-items. In this case, press
/
/ /
ear, Month, Date, Hour, Minute and Second.
to set. After setting, select Save Time to save it. Then, exit the setting.
After selection, press the keyto set Y to enter and
14
Page 15

Set time format: used to set time zone.
Press to select this option and set time zone. Press to enter sub-item setting. Press to
set sub-item into 12 hours or 24 hours.
Reset setting: used to set default value.
Press
/
to select this option and set the default value of all options. Press to enter sub-items
/
/
setting NO and YES. Press to select Yes. Then, enter to confirm the selection. Finally, press
MENU to exit the setting interface.
Exit: quit the interface.
/
Press to select this option. Press to exit the setting interface.
/
15
Page 16

5. Fault Diagnosis
Fault Reference Solutions
Unable to boot Check whether the power adaptor is connected well.
Check whether the file format is supported by this device.Unable to display picture
Check whether there is file in memory card or U disk.
Picture not clear The resolution of picture is too low. Try to view the picture with higher
resolution.
Slow response of device Too many files may cause this problem. Don’t save too many or too large files.
16
Page 17

6. Technical Parameters
Type of display screen
Resolution of display screen
7inch TFT LCD screen
480*234 pixel
USB interface USB HOST (compatible with USB2.0 and USB1.1)
Picture format
Type of memory card
Capacity of memory card
JPEG
SD/MMC/MS
SD CARD 8G
USB flash memory capacity Maximum 8G
Power adaptor
Operating temperature
Overall power consumption
AC 100-120V/ 60HZ DC 5V-1A
0ć—+45ć
Less than 5W
Note: all above parameters are only for reference and subject to update without further notice.
17
 Loading...