

Page 1

CD CLOCK RADIO USB IPHONE CHARGING
SYLVANIA
MODEL NO. SYLVANIA SCR4986
PLEASE READ BEFORE OPERATING THIS EQUIPMENT
Page 2
Page 3
Page 4
4
Page 5

3
Page 6

LOCATION OF CONTROLS
Page 7
1.
PLAY/PAUSE/BAND
2.
STOP/PRESET BUTTON
3.
STANDBY ON/OFF BUTTON
4.
DISPLAY
5.
TIME-DISP BUTTON
6.
REPEAT/PROG BUTTON
7.
CD DOOR
8.
FUNCTION BUTTON
9.
OPEN/CLOSE DOOR RELEASE
10.
REV/TUN- BUTTON
11.
FWD/TUN+ BUTTON
12.
TIME-SET BUTTON
13.
AL 1-SET/VOL- BUTTON
14.
AL 2-SET/VOL+ BUTTON
15.
SLEEP/RDM BUTTON
16.
SNOOZE/DIMMER BUTTON
17.
BATTERY COMPARTMENT
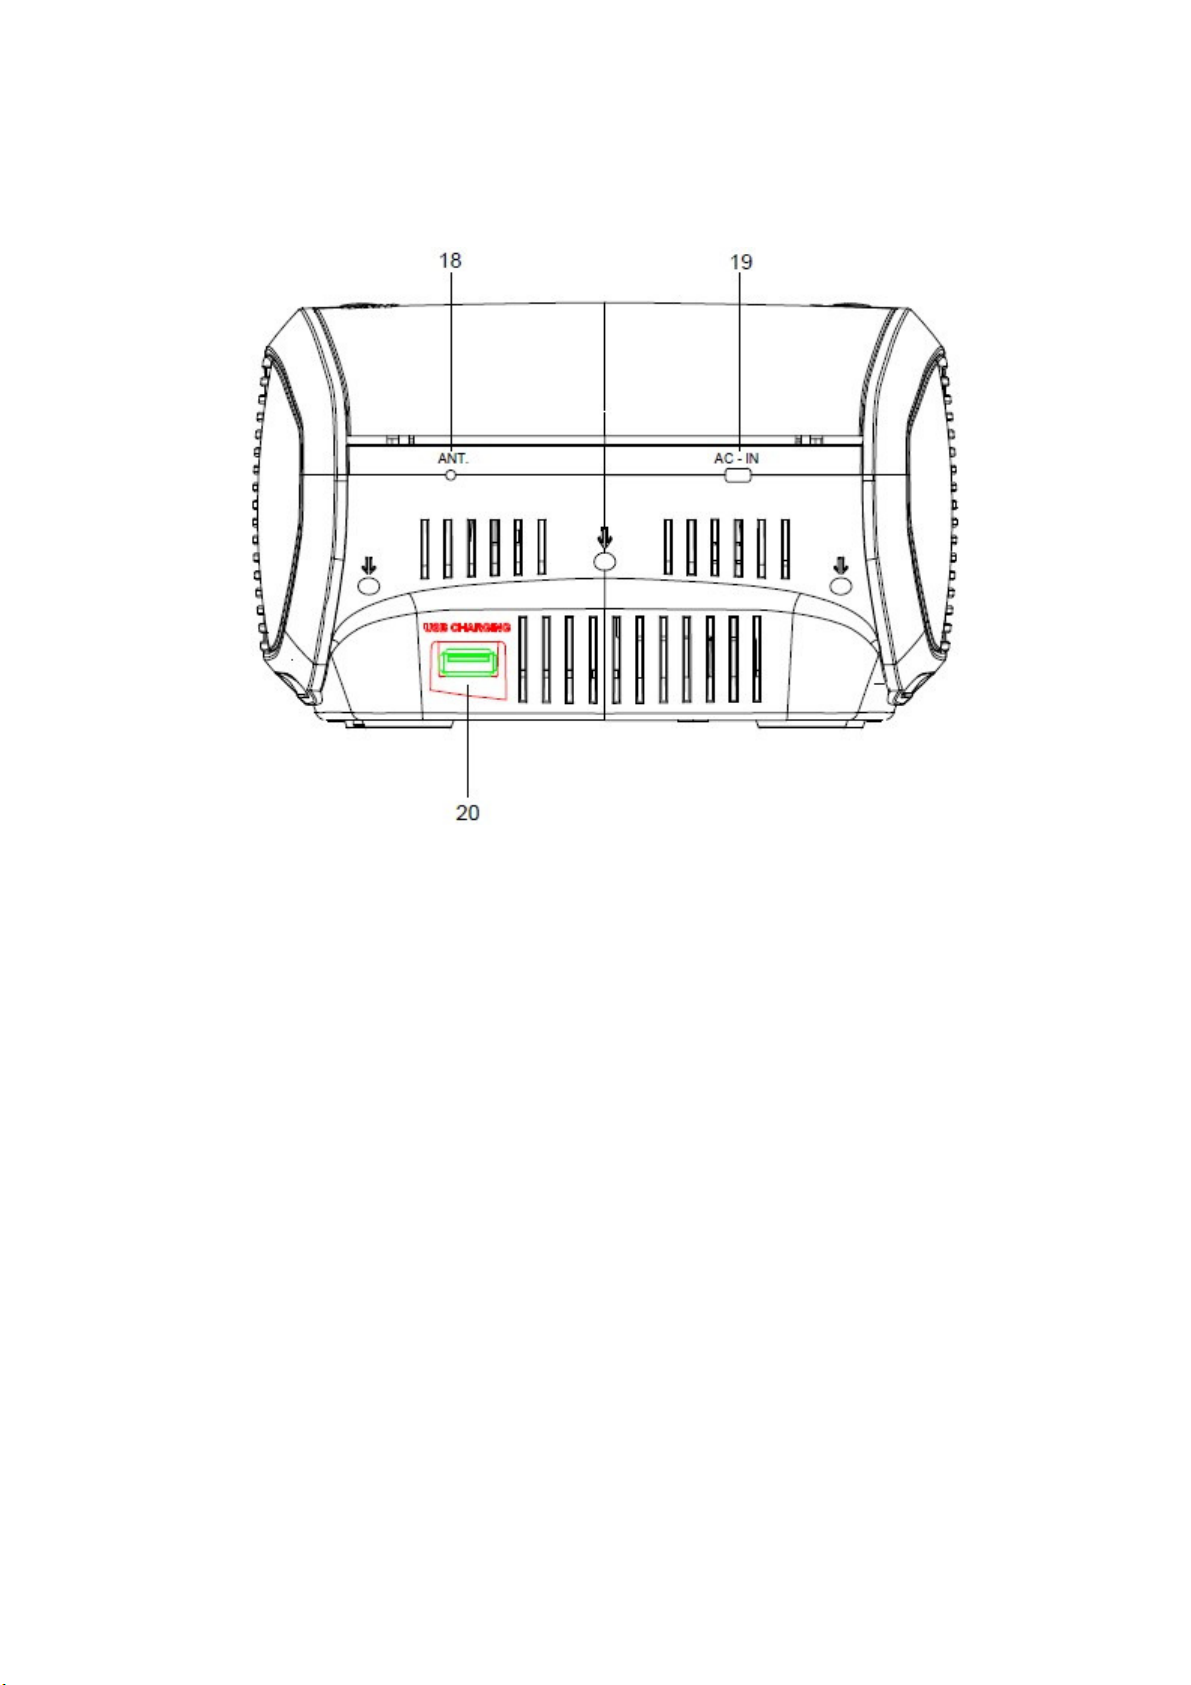
18.
ANTENNA
19.
AC IN/POWER CABLE
20.
USB CHARGING
Page 8

POWER SOURCE
This unit operates from AC120V/60Hz line power supply.
AC OPERATION
Connect AC Power Cord to a wall outlet with AC120V/60Hz power supply.
RADIO OPERATION
1. Power the unit ON if STANDBY mode by pressing the STANDBY ON/OFF button(#3)
The default mode is RADIO,if the unit was already ON, and in CD mode,you will need to press
the FUNCTION button(#8) to switch to the RADIO mode.
2. Set the band to either AM or FM by pressing the PLAY/PAUSE/BAND button(#1) while in
RADIO mode.
3. To tune a station,press either REV/TUN- or FWD/TUN+ buttons(10,11) to skip up or down
the frequency range.Press and hold either button to fast search up or down the frequency
range.When a station is found the search will stop&the station will begin playback.
4. Use the AL 1/VOL- or AL 2/VOL+ buttons(13,14) to adjust the volume level.
NOTE: To improve FM reception you can relocate the antenna cable.To improve AM reception
the unit will need relocating to an area with better reception.
Storing@recalling presets
You can store up to 10 preset radio stations per radio band.
1. While listening to a tuned radio station,press and hold the STOP/PRESET button(#2) to
display the preset location option.Use the REV/TUN-& FWD/TUN+(10,11) buttons to cycle
through the available preset location 1-10.
2. When the location is selected press the STOP/PRESET button once more to store the current
station in the selected preset location.
3. To recall a preset station press the STOP/PRESET button(#2),use the
REV/TUN-&FWD/TUN+(10,11) buttons to cycle through the available preset locations
1-10.When the correct location is selected leave all buttons untouched for 2 seconds to begin
playback.
BASIC CD OPERATION
1. Power the unit ON if STANDBY mode by pressin the STANDBY ON/OFF(#3).The default
mode is RADIO,so press the FUNCTION button(#8) to switch to the CD mode.
2. Open the CD door by pressing the OPEN/CLOSE door release button(#9).Inset a CD with the
label facing upwards and close the door.
3. The unit will read the disc and display the total number of tracks found on the disc on the
display
4. To begin playback press the PLAY/PAUSE/BAND button(#1).The first brack on the disc will
play.
5. To pause playback press the PLAY/PAUSE/BAND button(#1) once more.Pressing again
Page 9

resumes playback.
6. Press the STOP button(#2) to stop playback.
7. Use the AL 1/VOL- or AL 2/VOL+ buttons(13,14) to adjust the volume level.
Advanced CD operation
1. Press the FWD/TUN+ button to skip to the next track.Press and hold to fast forward the
current track.Release the button to resume normal playback.
2. Press the REV/TUN- button to skip to the previous track.Press and hold to fast rewind the
current track.Release the button to resume normal playback.
Random playback
1. Press and hold the SLEEP/RDM button(#15) either during playback or in STOP mode for 2
seconds and then release.You will see the letters RDM appear on the display to indicate the
RANDOM mode in active.
2. If you enable the RANDOM function in STOP mode,press the PLAY/PAUSE/BAND button
to begin playback.If you enable the function during playback the next track will begin the
random order
3. To cancel the RANDOM playback mode,press and hold the SLEEP/RDM button(#15) for 2
seconds and release again.The letters RDM will disappear from the display to indicate the
function has been cancelled.
Repeat function
1. Before or during playback press the REPEAT/PROG button(#6) to repeat a single track
indefinitely.You will see REP appear on the display when active.
2. To repeat all tracks on the disc,press the REPEAT/PROG button(#6) twice(or once more if
you have already activated the repeat once function).You will see REP on the display blinking
to indicate the repeat ALL function is active
3. To cancel any repeat modes,press the REPEAT/PROG button(#6) once more(if in repeat all
mode or twice if in repeat once mode).The letters REP will disappear from the display.
CD program playback.
NOTE:You can only program a playback sequence while the disc is in STOP mode.
1. Press and hold the REPEAT/PROG button(#6).You will see P01 appear on the display to
indicate the program function has been initiated.
2. Use the FWD/TUN+&REV/TUN- buttons to select the track you want to play in slot No 1.
3. Press the REPEAT/PROG(#6) to store the selected track in slot 1.The display will now
display P02 to indicate your selecting the track for slot 2.
4. Repeat steps 2 to 3 for every track you wish to program up to a maximum of 20 tracks. If you
try to program more than 20 tracks the display will revert back to P01 and will overwrite the
first slot again.
5. Press the PLAY/PAUSE/BAND button(#1) to begin the programmed sequence playback.
6. Should you wish to cancel the programming you can press the STOP button to resume normal
function.
Page 10

Clock Setting
The clock can be only set while the unit is in standby mode
1. While the unit is in standby mode, press the TIME_SET button into clock setting. The LED
display will start flashing, press REV/DOWN or FF/UP to select 12h display or 24h display.
Confirm your setting by press TIME_SET again
2. While the unit is in standby mode, press and hold the TIME_SET button for 2-3 seconds, the
hours will start flashing, press REV/DOWN or FF/UP to set the current hour, press the
TIME_SET button to confirm the setting, then the minutes will start flashing, press
REV/DOWN or FF/UP to set the current minutes, press the TIME_SET again to confirm all
setting. The time is now set
Alarm Setting
1. While the unit is in standby mode, press ALARM1/2 to open and close the alarm function
2. While the unit is in standby mode, press and hold ALARM1/2 for 2-3 seconds, the alarm hour
will start flashing, press REW/TUN- or FF/TUN+ to set your desired hour, press the ALARM
1/2 again, then the alarm minutes will start flashing, press REW/TUN- or FF/TUN+ to set
your desired minutes, press the ALARM 1/2 again to set alarm mode, you can press
REW/TUN- or FF/TUN+ to set alarm buzzer or alarm radio or alarm CD, press the ALARM
1/2 to confirm the setting
3. When the current time is same as the alarm set time, ALARM 1/2 will start flashing, the alarm
will be activated (the alarm will be closed 1 hour later if without any operation). Press
SNOOZE button into sleep mode, the alarm will activated again 9 minutes later, press any
buttons (except the SNOOZE button) to close the alarm today
Remark: If can’t read the CD information, the alarm CD will change to alarm buzzer automatic
Sleep function
Auto power-off function
When the unit is powered on, press SLEEP button to set the sleep time to “90-60-30-15-OFF”, the
unit will power off then
USB Charging mobile Battery
Please be noted that unit only go with USB charge while Stand-By mode , Not CD playing mode.
1. Connect to your mobile phone to USB socket when unit is in Stand-By mode.
2. At this moment,your mobile will start charging and battery charge icon will show on
mobile phone display.
Page 11

Page 12
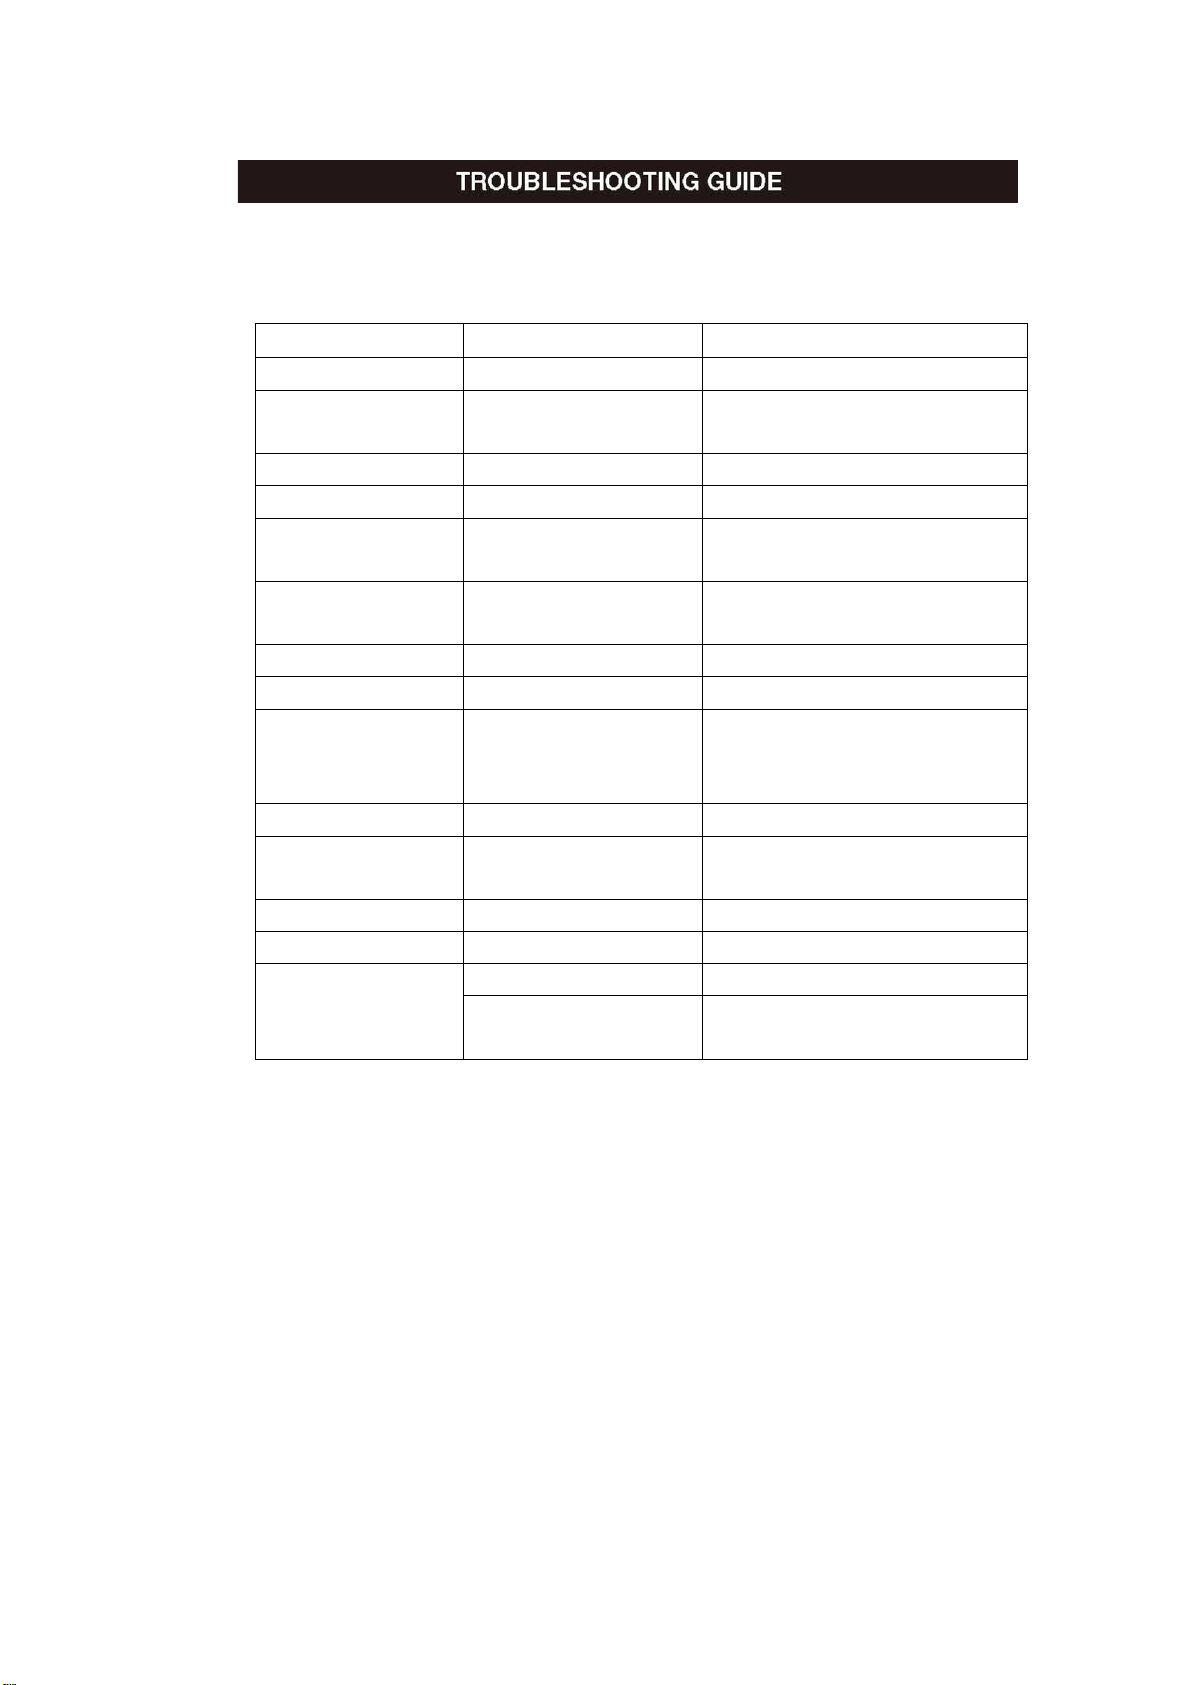
If you experience a problem with this unit, check the chart below before calling for service.
SYMPTOM CAUSE SOLUTION
Unit will not turn on. AC cord not connected. Check AC cord connection.
Disc will not play. CD compartment door
not closed.
No sound. VOLUME control set to
Erratic playback. Dirty or defective disc. Clean or replace disc.
Time reset to "12:00" Battery connected
Alarm does not turn
on.
Disc inserted incorrectly. Reinsert disc correctly.
Dirty or defective CD. Try another disc.
Moisture condensation
on disc.
minimum.
Defective disc. Try another disc.
improperly, not
connected or dead.
Clock not set. Set the clock.
ALARM MODE switch
not in correct position.
Clock is not set. Set the clock.
Alarm time is not set. Set the alarm time.
Power is not on. Press the POWER button. AM or FM, no sound.
VOLUME control set to
minimum.
Close CD compartment door.
Wipe disc with soft cloth.
Increase volume.
Check the battery.
Press AL1 or AL2 SET button to
activate alarm.
Increase volume.
Page 13

Specifications are subject to change without notice.
General: Power Source Battery Audio Power Output
120V~AC, 60Hz 3V DC(for back up of the clock)
Radio Section: Frequency Range (FM) Frequency Range (AM)
FM: 87.5 - 108 MHz
AM: 520 - 1710 KHz
 Loading...