

Page 1
RADIO, CD-R/RW PLAYER WITH ALARM CLOCK
SYLVANIA
MODEL NO. SYLVANIA SCR4975
PLEASE READ BEFORE OPERATING THIS EQUIPMENT
Page 2
LASER SAFETY: This unit employs a laser. Only
qualified service personnel should attempt to
service th
CAUTION: USE OF CONTROLS, ADJUSTMENTS
OR PERFORMANCE PROCEDURE HEREIN MAY
RESULT IN HAZARDOUS RADIATION
EXPOSURE.
INFORMATION
This equipment has been tested and found to
comply with the limits for a Class B digital device,
pursuant to Part 15 of the FCC Rules. These limits
are designed to provide reasonable protection
against harmful interference in a residential
installation. This equipment generates, uses, and
can radiate radio frequency energy and, if not
installed and used in accordance with the
instructions, may cause harmful interference to
radio communications. However, there is no
guarantee that interference will not occur in a
particular installation. If this equipment does caus e
harmful interference to radio or television reception
which can be determined by turning the equipment
off and on, the user is encouraged to try to correct
the interference by one or more of the following
measures:
This equipment may generate or use radio
frequency energy. Changes o
cations to
this equipment may cause harmful interference
unless the modifications are expressly approved
in the instruction manual. The user could lose the
authority to operate this equipment if an
unauthorized change or modification is made.
FCC WARNING:
SURGE PROTECTORS:
It is recommended to use a surge protector for
AC connection. Lightning and power surges ARE
NOT covered under warranty for this product.
· Reorient or relocate the receiving antenna.
·
·
·
technician for help.
is device due to possible eye injury.
r modifi
Increase the separation between the
equipment and receiver.
Connect the equipment into an outlet on a
circuit different from that to which the receiver
is connected.
Consult the dealer or an experienced radio/TV
Page 3

Before using the unit, be sure to read all operating instructions carefully. Please note that these are
general precautions and may not pertain to your unit. For example, this unit may not have the
capability to be connected to an outdoor antenna.
All the safety and operating instructions should be read before the product is operated.
2. RETAIN INSTRUCTIONS
1. READ INSTRUCTIONS
2. RETAIN INSTRUCTIONS
The safety and operating instructions should be retained for future reference.
3. HEED WA
7. WATER AND MOISTURE
All warnings on the product and in the operating instructions should be adhered to.
4. FOLLOW INSTRUCTIONS
Use a dry cloth for cleaning.
Do not use this product near water–for example: near a bathtub, washbowl, kitchen sink or laundry tub
in a wet basement; or near a swimming pool.
All operating and use instructions should be followed.
Unplug this product from the wall outlet before cleaning. Do not use liquid cleaners or aerosol cleaners.
10. POWER SOURCES T his product shoul d be operated only from the type of power source
indicated on the marking label. If you are not sure of the type of power supply to your home, consult
your appliance dealer or local power com
or other sources, refer to the operating instructions.
9. VENTILATION Slots and openings in the cabinet and in the back or bottom are provided for
ventilation, to ensure reliable operation of the product and to protect it from overheating. These
ope
product on a bed, sofa, rug or other similar surface. This product should never be placed near or over
a radiator or heat source. This product should not be placed in
bookcase or rack unless proper ventilation is provided or the manufacturer's instructions have been
adhered to.
8A. An appliance and cart combination should be moved with care. Quick stops,
excessive force and uneven sur
combination to overturn.
6. ATTACHMENTS
5. CLEANING
11. GROUNDING OR POLARIZATION This product is equipped with a polarized alternating-c urrent line
plug (a plug having one blade wider than the other). This plug will fit into the power outlet only one way. This
is a safety feature. If you are unable to insert the plug fully into the outlet, try reversing the plug. If the plug
should still fail to fit, contact your elec
purpose of the polarized plug.
13. LIGHTNING To protect your product from a lightning storm, or when it is left unattended and
unused for long periods of time, unplug it from the wall outlet and disconnect the antenna or cable
system. This will prevent damage to the product due to lightning and power-line surges.
12. POWER-CORD PROTECTION Power-supply cords should be routed so that they are not
likely to be walked on or pinched by items placed upon or against them, paying particular
cords at plugs, convenience receptacles, and the point where they exit from the appliance.
14. POWER LINES An outside antenna system should not be located in the vicinity of overhead
power lines or other electric light or power circuits, or where it can fall into such power lines or circuits
When installing an outside antenna system, extreme care should be taken to keep from touching
such power lines or circuits as contact with them might be fatal.
PORTABLE CART WARNING (symbol
provid
WARNING
RETAC)
RNINGS
faces may cause the appliance and cart
nings must not be blocked or covered. The openings should never be blocked by placing the
a built-in installation such as a
pany. For products intended to operate from battery power,
trician to replace your obsolete outlet. Do not defeat the safety
attention to
ed by RETAC)
(symbol provided by
Page 4
15. OVERLOADING
Do not overload wall outlets and extension cords as this can result in a risk of fire or electric shock.
16. OBJECT AND LIQUID ENTRY Never push objects of any kind into this product through openings
as they may touch dangerous voltage points or short out parts that could result in fire or electric shock
Never spill or spray any type of liquid on the product.
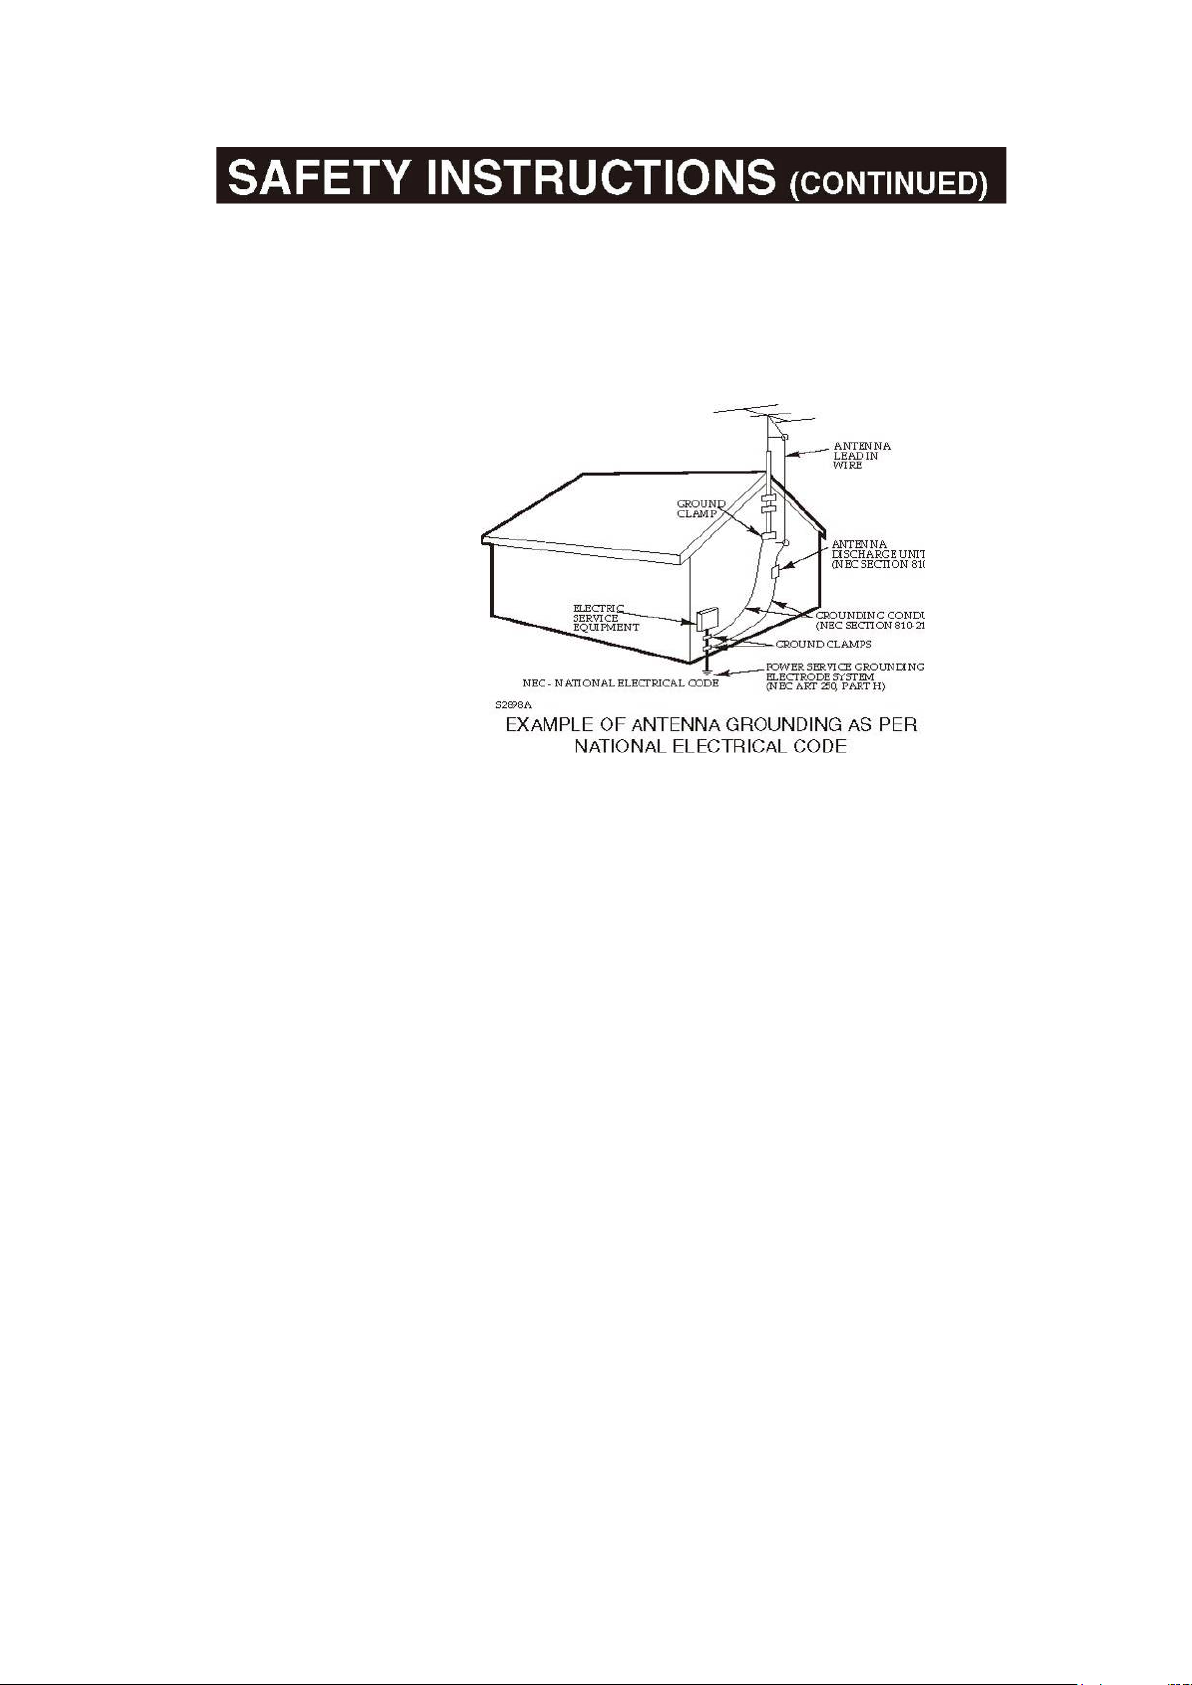
17. OUTDOOR ANTENNA
GROUNDING If an outside ant enna is
connect
ct, be sure the
antenna system is grounded so as to
provide some protection against
voltage surges and built
charges. Section 810 of the National
Electric Cod
provides informa
proper grounding of the mast and
sup
the lead
charge product, size of grounding
conductors, location of antenna
discharge product, connection to
grounding electrodes and require
ments for grounding electrodes.
18. SERVICING Do not attempt to service this product yourself as opening or removing covers may
expose you to dangerous voltage or other hazards. Refer all servicing to qualified service personnel.
19. REPLACEMENT PARTS When replacement parts are required, be sure the service technician
uses replacement parts specified by the manufacturer or those that have the same characteristics as
the original part. Unauthorized substitutions may result in fire, electric shock or other hazards.
20. SAFETY CHECK Upon completion of any service or repairs to this product, ask the service
technician to perform safety checks to determine that the product is in proper operating condition.
21. WALL OR CEILING MOUNTING
? When the power-supply cord or plug is damaged.
?
?
?
instructions. Adjust only those controls that are covered by the operati
instructions, as an adjustment of other controls may result in damage and
will often require extensive work by a qualified technician to restore the
product to its normal operation.
?
?
indicates a need for service.
The product should be mounted to a wall or ceiling only as recommended by the manufacturer.
22. DAMAGE REQUIRING SERVICE
qualified service personnel under the follow
23. HEAT The product s houl d be s ituated away from heat so urce s s uch as r adi ators, heat
registers, stoves or other products (including amplifiers) that produce heat.
24. NOTE TO CATV SYSTEM INSTALLER This reminder is provided to call the CATV
system installer's attention to Article 820
proper grounding and, in particular, spe cif ie s that the cable gr ound sha ll be con
to the grounding system of the building, as close to the point of cable entry as practical.
ed to the produ
-up static
e,ANSI/NFPA 70,
tion with respect to
- porting structure, grounding of
-in wire to an antenna dis-
-
Unplug the product from the wall outlet and refer servicing to
ing conditions:
ng
If liquid has been spilled or objects have fallen into the product.
If the product has been exposed to rain or water.
If the product does not operate normally by following the operating
If the product has been dropped or the cabinet has been damaged.
When the product exhibit s a distinc t c hange in perform ance–this
-40 of the NEC that provides guidelines for
nected
Page 5
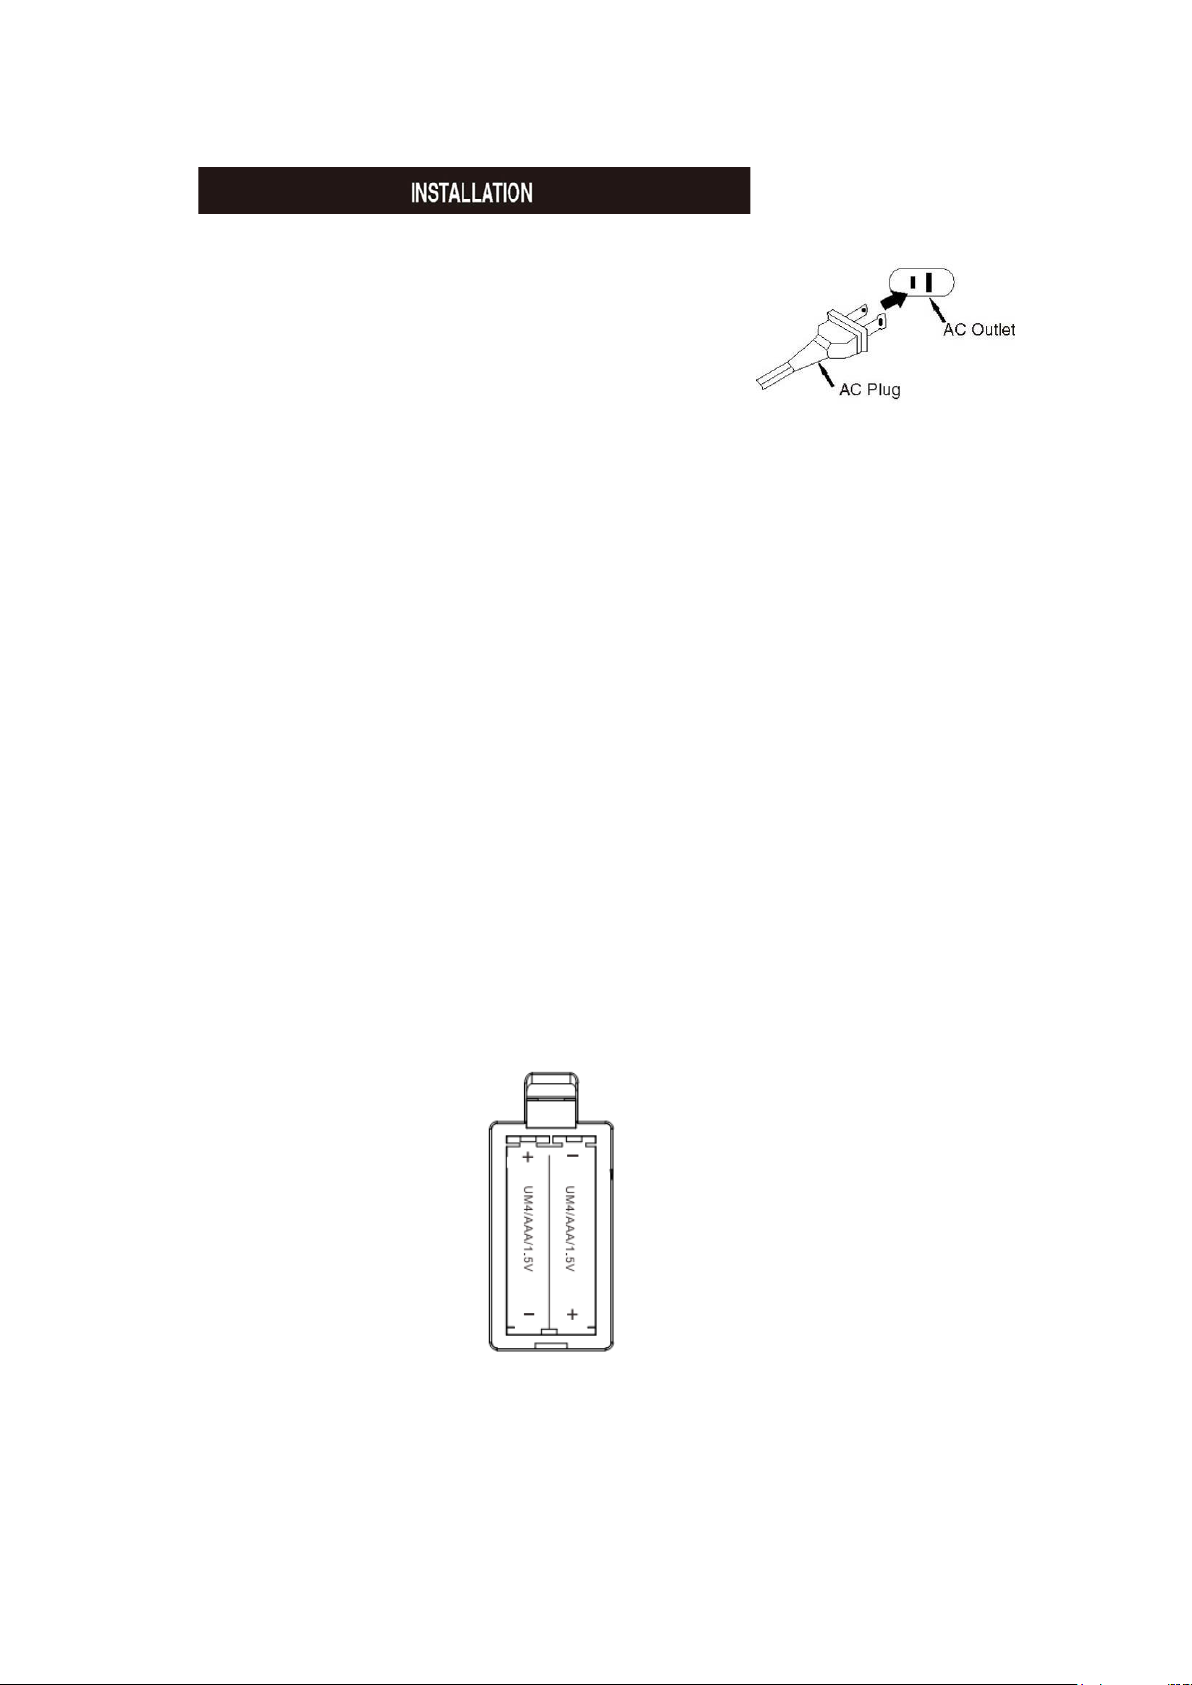
Unravel the AC cord and connect it to a conveniently
located AC outlet having 120V and 60Hz only. The Clock
Display will illuminate and "12:00" will appear in the window.
NOTE: If the AC plug does not fit into a nonpolarized outlet,
do not file or cut the wide blade. it is the user's responsibility
to have an electrician replace the obsolete outlet.
If the AC cord is disconnected or if there is a power failure, this electronic clock is
designed to continue operating internally (without showing the time on the Clock Display)
with a
compartment cover. Connect the battery to the termi
compartment (use of an alkaline battery is recomme
compartment cover back into place.
BATTERY PRECAUTIONS
Follow these precautions when using a battery in this device:
1
2.Be sure to follow the correct polarity when installing the battery as indicated in the
battery compartment. A reversed battery may cause damage to the device.
3. If the device is not to be used for a long period of
prevent
damage or injury from possible battery leakage.
4. Do not try to recharge a battery not intended to be recharged; it can overheat and
rupture. (Follow battery manufacturer's directions.)
3 volt battery (not included). To install the battery, press and lift open the
nals of the battery snap inside the
nded) and snap the battery
.Use only the size and type of battery specified.
time, remove the battery to
Page 6

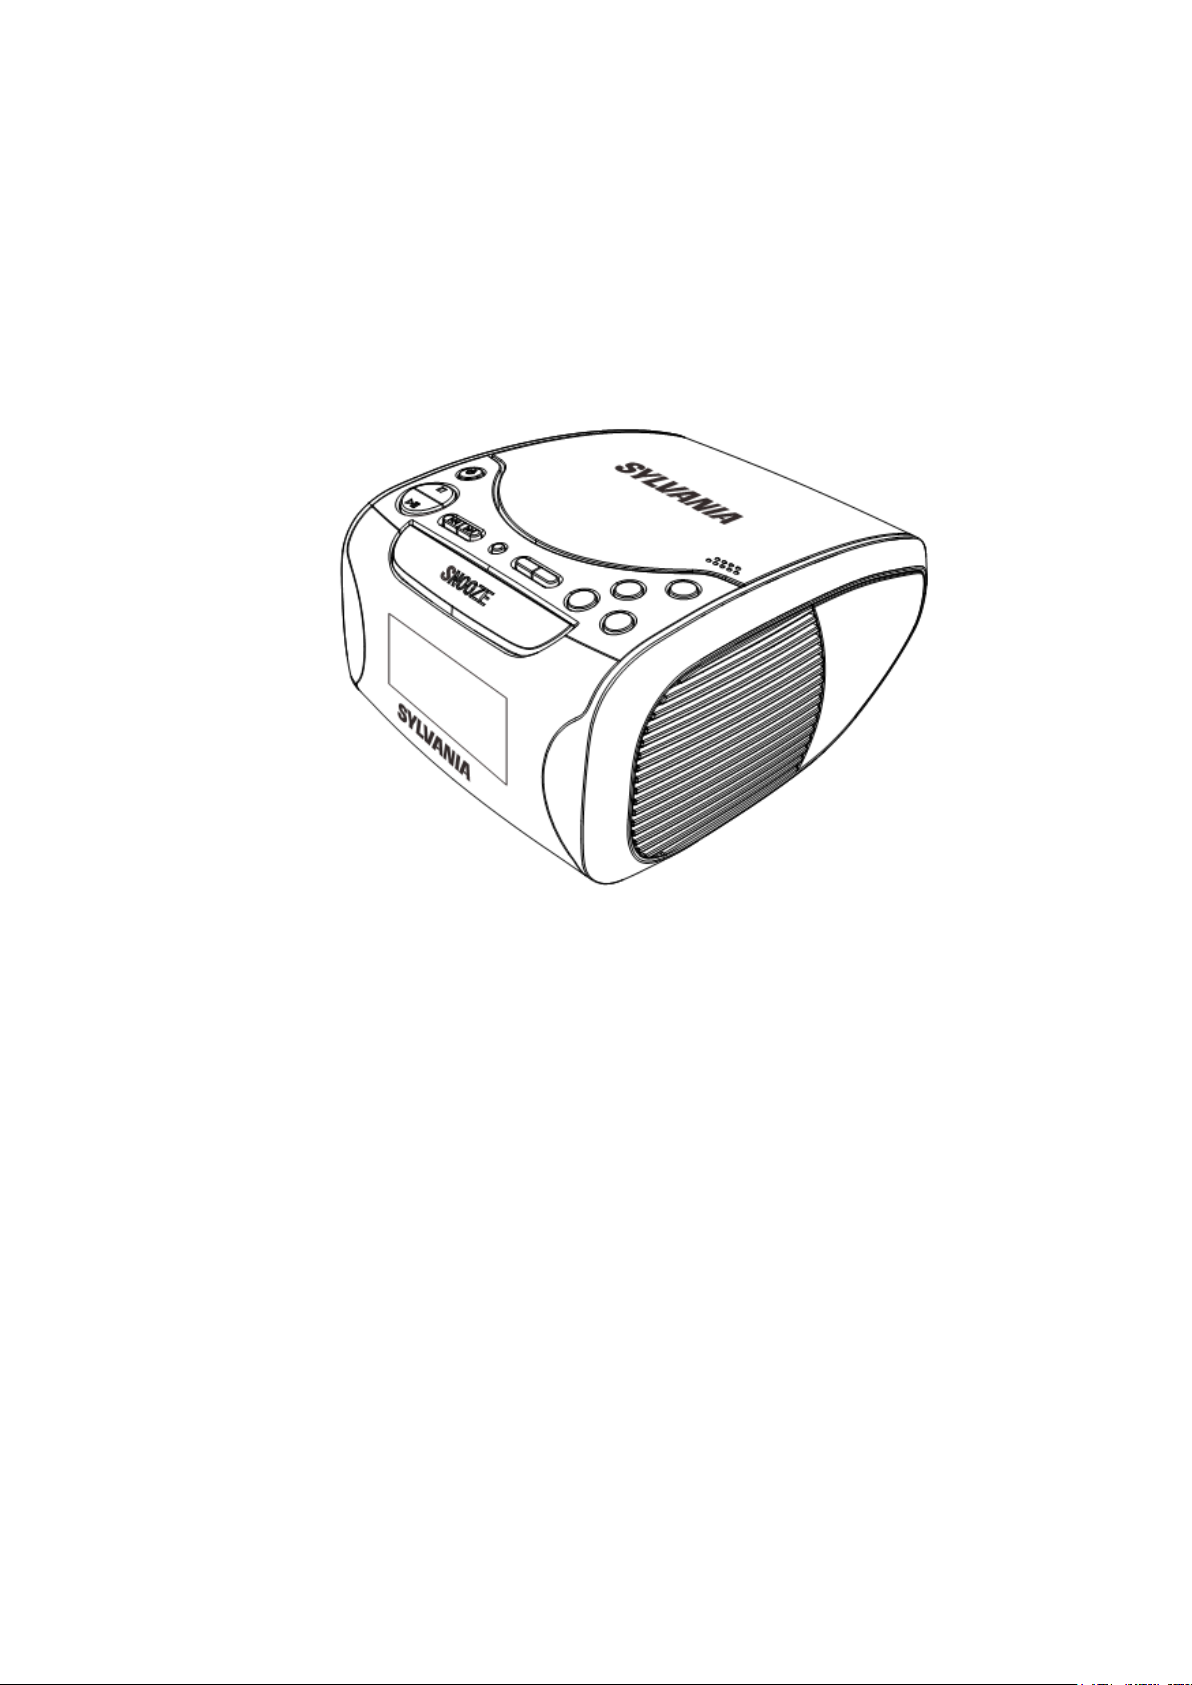
LOCATION OF CONTROLS
Page 7

1. PLAY/PAUSE
2. STOP Button
3. ON/OFF Button
4. DISPLAY
5. TIME-DISP
6. REP/PROG
7. CD DOOR
8. FUNCTION
9. OPEN/CLOSE
10. REV/MIN
11. FWD/HR
12. TIME-SET
13. AL1-SET
14. AL2-SET
15. SLEEP /RANDOM Button
16. SNOOZE Button
17. VOLUME Control
Page 8

18. DIMMER
19. FM/AM Selector
20. Tuning Button
21. Battery compartment(For clock back up)
22. FM Antenna wire(rear of unit)
23. AC~IN
POWER SOURCE
This unit operates from AC120V/60Hz line power supply.
AC OPERATION
Connect AC Power Cord to a wall outle t w i th AC120V/60Hz power supply .
RADIO OPERATION
TO PLAY THE RADI O
Connect AC Power Cord to a wall outle t w i th AC120V/60Hz power supply .
1) Press the ON/OFF (#3) to turn the unit on. The unit will default into “Radio” station.
2) Slide the FM/AM Switch (# 19) to the desired band (AM or FM).
3) Tune a station by turning the TUNING control (#20).
Please note the unit default into FM STEREO.
4) Adjust the VOLUEM control as desired.
Antennas
FM: Extend the FM antenna wire (#22) for better FM reception.
AM: Turn the unit for better AM reception.
CD OPERATION
TO PLAY A CD
1) Press the ON/OFF (#3) to turn the unit on. The unit will default into “Radio” station.
2) Press the FUNCTION Button (#8) to change into “CD” position.
3) Open the CD compartment door (#7) by pressing the OPEN/CLOSE area (#9).Insert a disc
and close the CD compartment door.
4) To play a disc from the beginning, press the P LAY/PAUSE Button (#1).The track which is
playing is light. Press the P LAY /PAUSE Button (#1) again to pause playback; Press the
PLAY/PAUSE Button (#1) once again to continue playback.
5) Adjust the VOLUME control(#17)as desired
6) Press the STOP Button (#2) to stop the disc before it is finished.
7) Press the ON/OFF Button (#3) to turn off the unit.
Page 9

TO SKIP/SEARCH
1) Press the ON/OFF Button (#3) to turn on the unit, insert a C D and press the PLAY/PAUSE
(#1) Button to begin playback.
2) Press FWD/HR button (#11) or REV/MIN button (#10) to select a desired track. Press and
hold the FWD/HR button (#11) or REV/MIN button (#10) to quickly search for a musical
passage.
NOTES:
If a disc is inserted incorrectly, dirty or damaged, it will not play.
To prevent damage to the disc, never open the CD door while the disc is rotating. Wait for the
disc to stop before opening the CD door . Nev er touch the lens when the CD door is open.
The CD player should only be used on a steady surface.
RANDOM PLA YBACK
To randomly playback the tracks on a CD, press the SLEEP/RANDOM button (#15) for 2seconds,
the RDM indicato r light. Press FWD/HR button (#11) or REV/MIN button (#10) to select random
track. TO CANCEL, press SLEEP/RANDOM button (#15) again for 2 seconds. The RDM
indicator disappear.
TO REPEATEDLY PLAY BACK ONE TRACK/ALL TRACKS
1) To repeat a single track, press the REP/PROG button (#6) once; the REP indicator will light.
Press the PLAY/PAUSE button (#1) to begin playback. Press the FWD/HR button (#11) or
REV/MIN button(#10) to select the specific track that you wish to repeat.The specific track
you selected will be repeated continuously.
2) To repeat all of the tracks on a disc continuously, press the REP/PROG button(#6) twice,the
REP indicator will blink.Press the PLAY /PAUSE button(#1) to begin playback.All tracks will
be repeated continuously.
TO CANCEL,press the REP/PROG(#6) again,the REP indicator will turn off.
CD PROGRAMMED PLAY
1. Under CD stop condition,long press the REP/PROG button(#6) to enter programmed station.
2. Press FWD/HR button(#11) or REV/MIN button(#10) to select the song to be programmed.
3. Press the REP/PROG Button (#6) again to store selection. The Display (#4) will advance to
“02”.
4. Press the
programmed
5. You may repeat steps #2 - #3
more than 20 tracks, the Display(#4) will revert to “01” and the old entry will be
overwritten by the current new entry!
6. Press STOP Button (#2) to end programming and return to normal play mode.
7. To c heck th e pro gra mm ed t racks , press REP/PROG Button (#6) continuo us to sho w all the
programmed songs. The Display (#4) will display the program number first and then
followed by the flashing track number.
8. Press PLAY/PAUSE Button (# 1) to begin p rogramm ed play. The first track in program will
appear in the Display (#4) and the PROG Indicator will light steadily .
9. To cancel programmed play, press the STOP Button (#2).
FWD/HR button(#11) or REV/MIN button(#10) to select the next so ng to be
and press the REP/PROG Button (#6) to store selection.
to program as many as 20 tracks. If you attempt to program
Page 10

CLOCK/AL A RM SE T TI N G
TO SET OR RESET THE ACTUAL TIME
When unit turn off:
1) Press the TIME-SET(#5) to select 12hours style and 24hous style.
2) Long press the TIME-SET(#5) to adjust the time.The time on display will flash.
3) Press the REV/MIN(#10) and FWD/HR(#11) to set the minuteds and hours.Long press the
REV/MIN or RWD/HR to quicly select the time.
4) After adjusting the time,press the TIME-SET to keep the tim e.
When unit on:
1) Press TIME-SET(#5) to show the time,press TIME-SET(#5) again to select 12hours or
24hours style.
2) Long press the TIME-SET(#5) to adjust the time.The time on display will light.
3) Press the REV/MIN(#10) and FWD/HR(#11) to set the minuteds and hours.Long press the
REV/MIN or RWD/HR to quicly select the time.
4) After adjusting the time,press the TIME-SET to keep the time.
TO SET OR RESET T HE ALARM TIME
1) Press the ALM1-SET(#13) or ALM2-SET(#14) once to check the time ,press twice to check
the ALARM style(CD/RADIO/BUZZ),press third time to open or close the ALARM.
2) Long press ALM1-SET(#13) or ALM2-SET(#14) to set the alarm and also the ALARM be
opened
3) Press REV/MIN(#10) and FWD/HR(#11) to set the hour and minutes. Long press the
REV/MIN or RWD/HR to quicly select the time.
4) After seting,press ALM1-SET(#13) or ALM2-SET(#14) to keep the alarm time.Then press the
REV/MIN(#10) and FWD/HR(#11) to chose the alarm style((CD/RADIO/BUZZ),at last press
ALM1-SET(#13) or ALM2-SET(#14) to keep it.
Remark:if chose alarm style as CD or RADIO,when alarm ringing,then 59 minutes later,unit will
turn off automatically.If BUZZ style,1 minute later,it will turn off.
5) When ringing,ALARM 1 or ALARM 2 indicator will flash accordingly.
6) Press any buttom to turn off the ALARM function except the SNOOZE button.
When ringing,press SNOOZE button (#16) to turn off the alarm and the unit enter SNOOZE
station,the SNOOZE indicator will light and the indicator of ALARM 1 or ALARM 2 will
flash.The alarm will turn back on automatically 5 minutes later,the indicator of SNOOZE will tur n
off.The unit can be repeated endlessly.
TO ACTIVATE THE SLEEP FUNCTION
1.When the unit turn off,press SLEEP /RDM button(#15) to set in “90minutes” and the un it will
turn on automatically.At this time,the SLEEP indicator will light.Press twice to set
“60minutes”,press third times to set “30minutes”,press four times to set “15 minutes”,press five
times to turn off the unit automatically.
Remark:if press ON/OFF button(#3) to turn on the unit,it will show “off” when press at fifth time
and cancel the SLEEP seting automatically after a moment.
automatically.At this time,ALARM1 or ALARM 2 indicator will flash.
SNOOZE FUNCTION
SLEEP FUNCTION
Page 11

2.After seting the SLEEP time a moment ,press SLEEP/RDM button(#15) once again to check the
rest of the time and then it will change into the station to set the SLEEP time.
BATTERY POWER OPERATION for back-up clock
1. Open the Battery compartment(For clock back up)(#21) on the underside of the
unit.replace the cover properly.
2. Insert(2)"AAA"1.5V batteries (not included) following the polarity as indicated
in the compartment to the right. Alkaline batteries are recommended for long
using time.(2)"AAA"1.5V batteries for back-up,after cutting off the AC Power
supply,the Time information will be kept.
The Time information will be lost when the battery is moved.
DIMMER BUTTOM
Slide the DIMMER selector(#18) to the HI position to make the display brighter or to the LO
position to make the display dimmer.
Page 12

Page 13

If you experience a probl em with this unit, check the chart below before c alling for
service.
SYMPTOM CAUSE SOLUTION
Unit will not turn on. AC cord not connected. Check AC cord connection.
Disc will not play. CD compartment door
not closed.
Disc inserted incorrectly. Reinsert disc correctly.
Close CD compartment door.
Dirty or defective CD. Try another disc.
No sound. VOLUME control set to
Moisture condensation
on disc.
minimum.
Defective disc. Try another disc.
Wipe disc with soft cloth.
Increase volume.
Erratic playback. Dirty or defective disc. Clean or replace disc.
Time reset to "12:00" Battery connected
improperly, not
connected or dead.
Clock not set. Set the clock.
Check the battery.
Alarm does not turn
on.
AM or FM, no sound. Power is not on. Press the POWER button.
ALARM MODE switch
not in correct position.
Clock is not set. Set the clock.
Alarm time is not set. Set the alarm time.
VOLUME control set to
minimum.
Press AL1 or AL2 SET button to
activate alarm.
Increase volume.
Page 14

Specifications are subject to change without notice.
General: Power Source Battery Audio Power Output
120V~AC, 60Hz 3V DC(for back up of the clock)
Radio Section: Frequency Range (FM) Frequency Ra nge (AM)
FM:88 - 108 mHz
AM:530 - 1710 kHz
 Loading...