

Page 1
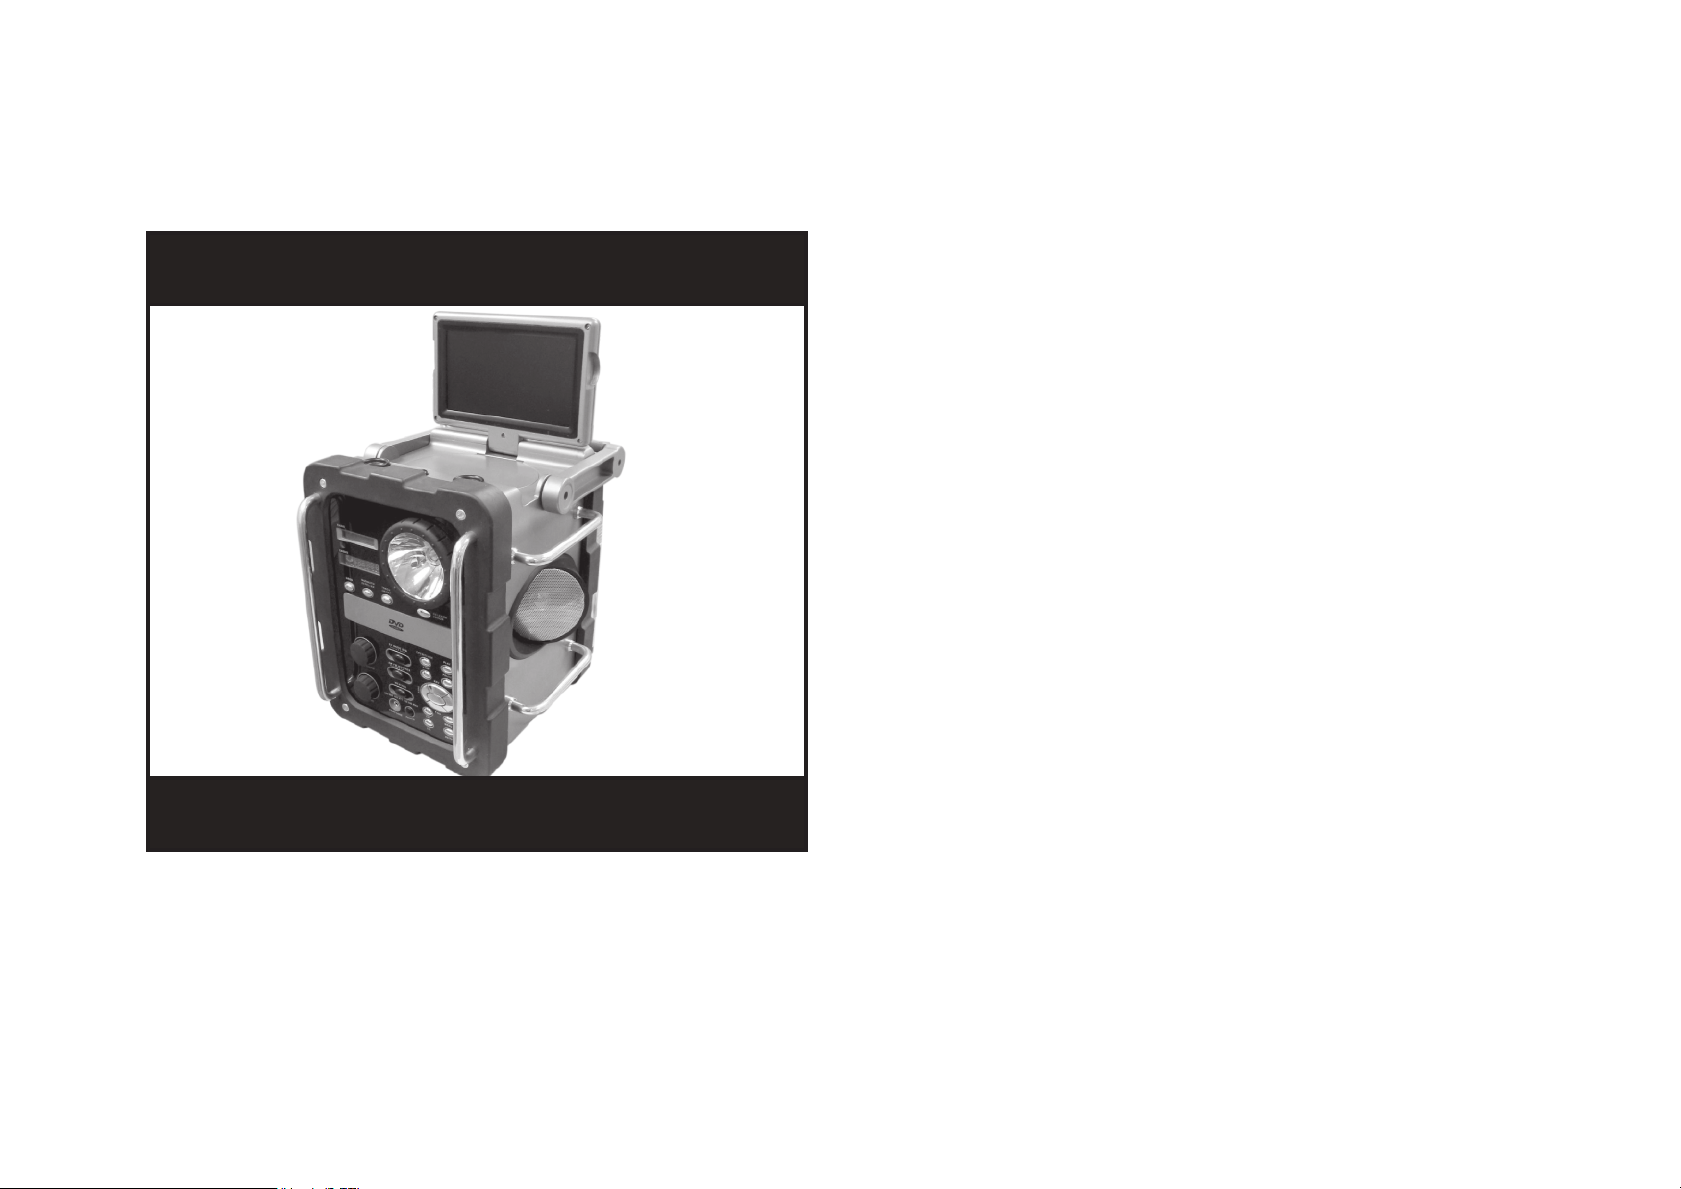
7" COLOR TFT LCD TV DVD PLAYER
OWNER'S MANUAL
IMPORTANT SAFETY INFORMATION
SAVE THESE INSTRUCTIONS
THIS MANUAL CONTAINS IMPORTANT INFORMATION REGARDING THE OPERATION
AND WARRANTY OF THIS PRODUCT. PLEASE READ CAREFULLY BEFORE USE AND
RETAIN FOR FUTURE REFERENCE.
Page 2
0-5
5A-11
Page 3
Page 4

OPERATION PROCEDURE / DVD PLAYER OPERATION
OPERATING PROCEDURES
RADIO OPERATION
1. Slide the Power Sourcs Selector to
a correct position (ref. page 7-9)
2. Press the power button once.
3. Slide the TV-RADIO-OFF Switch to 'RADIO'
postion
4. For FM, slide the Band Selector to centre position.
For AM, slide the switch to the left. For Weather Band, switch
to right position.
5. Weather Band:
Select 162.400-162.475-162.550 Mhz to the best reception
depending on which states you are staying.
6. Tune the AM/FM radio to your desired station, The frequency
will show on the LCD Display.
7. For FM, fully extend the telescopic rod antenna for best
reception. For AM, the antenna is built into the unit. Reception
may be improved by changing the direction in which the unit
is facing.
8. Adjust the Volume control to desired sound level.
9. To turn the receiver off, press the power button.
10. Select Ant switch for best reception (See Page 7)
DVD OPERATION
1. Slide the Power Sourcs Selector to
a correct position (ref. page 7-9)
2. Press POWER to turn on the unit
3. Press OPEN
Power Source Selector
Power
EXT BATT CHARGE
Power Source Selector
Power
EXT BATT CHARGE
4. Insert a DVD disc
5. Press 'Close'
6. Use the cursor buttons on the unit or remote control to navigate the DVD
menu. Press ENTER to confirm selections.
During Play
Pausing and stopping playback :
- Press STOP once to hold place.
- Press PAUSE to pause the disc.
- Press PLAY to continue playback.
- Press " " to skip between scenes.
- Press << or >> on remote control to search the disc, rewind or forward.
- Press MENU on remote control to return to DVD menu.
- Press SLOW on remote control for slow motion.
- Press ANGLE on remote control for selecting movie angles.
- Press ZOOM on remote control for 1.5x, 2x, 4x and zoom off.
- Press SUBTITLE on remote control for subtitle options.
DVD Display
TORCH LAMP OPERATION
1. Press the power button once.
2. Slide the 'OFF-Torch-Lantern' switch to the torch position.
3. Press 'Release' button and pull out the torch for independent
use, Make sure to put it back properly (Arrow to Arrow) to
prevent damage.
4. To turn the lamp off, press power switch to off position.
Note: The torch and radio can work at the same time.
Torch and TV can only work independently.
LANTERN OPERATION
1. Slide the 'Lantern' switch to 'ON' to light up the lantern.
2. To turn the Lantern off, slide switch to off position.
SIREN OPERATION
1. Press the power button once.
2. Press the 'Siren' button, siren sound will activate and all
other product functions will cease.
3. Turn siren off to resume other product functions in
operation.
HOW TO REPLACE THE LAMP TUBES
SPECIFICATION: Flourescent tube 4W/150mm
A. Release lamp cover screw
B. Lift up the lamp cover
C. Replace lamp tube and reassemble in
reverse procedures.
HOW TO REPLACE LIGHT BULB FOR TORCH
SPECIFICATION : Light bulb 3V/500mA
A. Turn counter-clockwise and lift up
the lamp cover.
B. Replace lamp tube and reassemble in reverse
procedures.
C. Be careful ! Don't drop any metal parts inside
when you lift up the lamp cover.
Chapter
Hrs
Mins Secs
P.12
P.13
Page 5

OPERATING PROCEDURE
OPERATING PROCEDURE
TV OPERATION
TV Channel (outdoor)
1. Press the power button once.
2. Slide the Lamp/TV/Radio/OFF Switch to
the 'TV' position to turn the TV ON.
3. How to program
a) Press TV/VIDEO/DVD switch to the
TV screen. (fig.1)
b) Press the "Menu" switch once.
c) Press the 'CH-' button once. Make
sure the COLOR-SYS is 'Auto' and
the SOUND-SYS is correct. (fig.2)
(e.g. U.S.A. : Sound system : M)
d) - Press the 'CH-' button to 'PRESET' column.
- Press the 'DOWN' button once to jump to the
Sub menu. (fig.3)
- Press the 'CH-' button 3 times to the
'AUTO PROGRAM' column. (fig.4)
- Press the 'DOWN' button once and the TV
Channels will be auto scanned.
4. Adjust the antenna for the best picture quality.
5. Adjust the Volume control to desired sound level.
6. To turn the receiver off, press the power button.
7. Select Ant switch for best reception.
(See Antenna Page 7)
TV Channel (indoor)
1. Connect the cable with the 'Cable ready ant / Ext
ant ', insert it to the extant jack. (fig.5)
2. Repeat the 'TV Channels (outdoor)' step.
Cable Ready antenna
fig.5
Color System
Sound System
fig.1
fig.2
fig.3
fig.4
Channel No.
Contol the picture
Press the 'MENU' button to menu screen.
Press the 'CH-' button to 'PICTURE' column,
Press the 'DOWN' button once to jump to the
Sub menu.
Select 'Contrast', 'Bright', 'Color', 'Tint' and 'Sharpness'
by pressing Ch+ or Ch- and adjust the level by
pressing 'UP' and 'Down'.
Change the system
Press the 'MENU' button to menu screen.
Press the 'CH-' button once to 'SYSTEM' column,
Press the 'DOWN' button once to jump to the
Sub menu.
Select 'COLOR-SYS', 'SOUND-SYS' by pressing
Ch+ or Ch- and adjust the level by pressing
'UP' and 'Down'.
Change the TV Channel
Press the 'MENU' button to menu screen.
Press the 'CH-' button 3 times to 'PRESET' column,
Press the 'DOWN' button once to jump to the
Sub menu.
Select 'CH NO.', 'SKIP CH', 'AREA', 'AUTO
PROGRAM' by pressing Ch+ or Ch- and adjust the
level by pressing 'UP' and 'Down'.
EXTRA
Press the 'MENU' button to menu screen.
Press the 'CH-' button 4 times to 'EXTRA' column,
Press the 'DOWN' button once to jump to the
Sub menu.
Select 'BACKGROUND.', 'LANGUAGE' by pressing
Ch+ or Ch- and adjust the level by pressing
'UP' and 'Down'.
CAUTION
TFT PANEL
The design of this TFT is as follow :
a) Swivel : 180 degree (90 degree each left and right)
b) Up and Down : 120 degree
DO NOT TURN THE PANEL BY FORCE AS THIS WILL BREAK
THE HINGES.
Ext antenna
P.10
Before you adjust for the picture problems make these few simple
checks:
1. Adjust the Tuning Control to obtain the best picture.
2. Adjust the antenna for the best picture quality.
3. Check the power source.
P.11
Page 6

POWER SUPPLY
Car Battery Operation Using the Car Cord
Plug one end of the DC car cord into the DC 12V Power Input Jack
of the receiver and the other end into the cigarette lighter of your
vehicle. Battery power will automatically cut off.
CAUTION:
Do not plug the AC cord directly into the unit as this is dangerous and will
burn the unit. The AC cord should always plug into the AC adapter with
the other end DC 12V jack into the unit (See diagram)
WRONG
CORRECT
NOTE : This receiver is designed to operate on 12V DC.
Power Source Selector must be set to 'EXT.' position.
DC car cord
(12V DC) Neg.
Ground Only the
Cigarette Lighter
Socket of Car
To DC socket
Unserew the cap to
replace the fuse.
(replace only with
same type fuse
3A 125/250V)
Fuse 3A, Screw cap
Replacing Fuse
CAUTION:
1. Remove plug from cigarette lighter receptacle when the
receiver is not in use
2. To prevent electrical shock and possible damage to your unit
or vehicle, always unplug the car cord from the cigarette lighter
socket BEFORE you remove the plug from the DC 12V Jack
of the receiver.
Internal Battery Operation
1. Open the battery cover on the bottom of the unit.
2. Insert 12 pcs "D" size dry batteries (not included). Be sure
negative and positive terminals are positioned as indicated
in battery compartment.
3. Replace the cover.
4. Slide Power Source Selector to the position 'BATT'.
3-WAY POWER SUPPLY
CAUTION:
1. Be sure to observe polarity as indicated in the battery
compartment. Improper placement of batteries may damage
the unit.
2. Replace all batteries at the same time.
3. Replace with equivalent type batteries of standard carbon zinc
or alkaline types. Do not mix batteries of different compostion
or old with new batteries.
4. Do not mix alkaline or standard (carbon zinc) with rechargeable
(nickel cadmium) batteries.
5. To prevent damage, do not allow moisture to enter the battery
compartment.
6. If the unit will not be used for an extended period of time,
make sure the unit is unplugged from the AC power supply
and/or remove the batteries. Old batteries may leak causing
corrosion to internal components.
Note:
1. When the battery power is low, the picture will shrink. Replace
the batteries with fresh ones or use an alternate source of
power.
2. The DC plug from the car cord or the AC adaptor must be
removed from the DC socket to operate the receiver using
battery power.
3. Dry battery operating time and efficiency decreases at low
temperatures (usually below +41'F/5' C).
4. Always turn off the unit and ' Mosquito Repeller ' to save
battery life.
To Recharge Ni-Cad Batteries (Not Included)
1. Slide Power Source Selector to the 'CHARGE' position.
2. Connect the DC plug coming out of the AC adaptor (included
with this set) into the DC 12V socket in the receiver and then
plug the AC adaptor into the wall outlet.
3. Charge the batteries for about 15-20 hours before use.
IMPORTANT:
1. Only use the AC adaptor included with this unit. An incorrect
AC adaptor may damage your unit and the batteries.
2. Charge only Ni-Cad batteries. Do not charge Carbon zinc or
Alkaline batteries.
3. Do not overcharge as this will shorten the service life of the
Ni-Cad batteries.
4. Before use, be sure that the Ni-Cad batteries have been fully
charged.
AC adaptor
P.8
DC 12V Jack
P.9
Page 7

CONTROLS AND FUNCTION
ANTENNA / POWER SUPPLY
Telescopoic Rod Antenna
31. Video OUT
32. Audio OUT
33. Ant Switch (See Page 7 for details)
DVD Functions :-
34. OPEN/CLOSE of DVD door
35. PLAY/PAUSE
36. STOP
37. REPEAT
38. REV - Rewind
39. NEXT
40. FWD - Fast Forward
41. PREV - Previous
REMOTE
RESUME
PLAY / PAUSE
TIME
Keypad
REPEAT
RETURN
ANGLE
A-B-
REPEAT
Setup
Direct selection
from root menu
ENTER
Stop
Prev
Next
PROG
OPEN / CLOSE
MUTE
LANGUAGE
SUBTITLE
ZOOM
RAN
OSD
CATALOGUE
STEP
SLOW
TITLE
PBC ( Root Menu for VCD only )
CLEAR
Fast Rewind
Fast Forward
In a normal reception area, the telescopic rod antenna will deliver
a sharp picture and clear sound. Adjust the length, direction and
angle for best reception when using outside.
Note:
To avoid damaging the antenna, always close the antenna one
section at a time, starting with the largest diameter section first. To
avoid bending the antenna do not push the top section of the antenna.
External Antenna / Cable Ready
Where TV receiving conditions are unfavorable, an external antenna
may be used with an antenna adaptor.
Cable Ready antenna and the Ext antenna are packed with the car
adaptor.
Cable Ready antenna
Ext antenna
External antenna jack
POWER SUPPLY
AC Power (House Current) Operation Using the AC
Adaptor:
Connect the DC plug coming out of the AC adaptor into the DC
12V Power Input Jack in the receiver and then plug the AC adaptor
into the wall outlet.
NOTE : Power Source Selector must be set to 'EXT.' position.
P.6
AC adaptor
DC 12V Jack
P.7
Page 8

CONTROLS AND FUNCTION CONTROL ADJUSTMENTS
9
28
21
19
20
1
3
33
4
5
6
7
8
22
26
24
39
42
36
35
10
1. Function selection : TV(DVD)-OFF-RADIO
2. Menu
3. Radio : AM/FM/WEATHER BAND
4. Tuning Control
5. Volume Control
6. Earphone Jack
7. Battery Compartment
8. Battery Cover
9. Telescopic Antenna
10. Power ON/OFF Button
11. Lantern ON/OFF Selector
12. Torch
13. S-socket A/V output
14. DC12VPower Input Jack
15. Power Source Selector
16. Lantern
17. Thermometer
18. Compass
19. Mosquito Repeller switch
20. Siren
18
11
12
17
9
1.TV(DVD)/OFF/RADIO
Slide switch to correct position of function you choose to use.
2.Menu :
Contol the picture, System, TV Channels and Language
3. Radio : For FM, slide the switch to the center position, For AM, slide
switch to left. For Weather Band, slide switch to right
4. Tuning Control
Tune the radio or TV to your desired station
16
2
23
27
25
40
41
38
37
34
15
13
14
REMOTE
29
30
31
32
5.Volume Control
Tune the control to the desired listening level
6.Earphone Jack
Inserting the earphone (not included) plug into this jack for private
listening. The speaker will be cut off automatically
7.Battery Compartment
8.Battery Cover
9.Telescopic Rod Antenna
This antenna is common to FM radio and all TV VHF/UHF channels
10.Power Switch
Push switch to power on, push again to power off
11. Lantern ON/OFF selector
12.Torch ON/OFF switch
13.S-socket A/V output
14.DC 12V INPUT Jack
When you want to use your unit in a car or recreational vehicle,
connect the DC plug from the car cord into the DC12V input
jack and the other end into the cigarette lighter of your vehicle.
21. Torch ON/OFF switch
22. Flashlight Release Button
23. TV/VIDEO/DVD
24. CH+ : Channel UP
25. CH- : Channel down
26. UP - MENU UP
27. DOWN- MENU DOWN
28. DLL Radio Station display
29. Video IN
30. Audio IN
31. Video Out
32. Audio Out
33. Weather Band Station Switch
34. Ant switch
When you want to use it in the house, plug the DC end of the
AC adapter into the DC12V input socket and the other end into a
wall outlet. (See page 9)
15.Power Source Selector
To select :
(1) "Ext" for external power (AC adapter or car battery)
(2) "BATT" for internal batteries
(3) "CHARGE" for charging Ni-Card rechargeable batteries
16.Lantern
17.Thermometer
18.Compass
19.Mosquito Repeller Switch
20.Siren
Press button to put emergency siren 'ON',
press again to 'OFF'
When siren is on, all other functions will be automatically cut off
21.Torch ON/OFF switch
22.Flashlight Release
The torch is detachable, press 'RELEASE'
button and pull out the torch for independent use.
Please put it back properly (Arrow to Arrow) to prevent damage.
23. TV / Video / DVD selector
24. CH+ : Channel UP
25. CH- : Channel down
26. UP : MENU UP
27. DOWN : MENU DOWN
28. DLL Radio Station display
29. Video IN
30. Audio IN
P.4 P.5
Page 9

Page 10

CAUTION
RISK OF ELECTRIC SHOCK
DO NOT OPEN
CAUTION: TO REDUCE THE RISK OF ELECTRIC
SHOCK, DO NOT REMOVE COVER (OR BACK),
NO USER SERVICEABLE PARTS INSIDE. REFER
SERVICING TO QUALIFIED SERVICE
PERSONNEL.
WARNING: To reduce the risk of fire or electric shock, do not
expose this appliance to rain or moisture.
ATTENTION
The Owner's Manual contains important
operating and maintenance
instructions. For your safety, it is
necessary to refer to the manual.
DANGEROUS VOLTAGE
Uninsulated Dangerous Voltage, that
may be of sufficient magnitude to
constitute a risk of electric shock, is
present within the cabinet of this unit.
Dear Customer:
This receiver is designed in accordance with
and cannot be used in countries that have a different broadcasting
system.
CAUTION: Remove AC Adapter from wall outlet and batteries from
battery compartment when receiver will not be used for a prolonged
period.
WARNING: To prevent damage by hazards such as fire or shock,
do not expose this unit to rain or moisture.
High Voltage: Live parts are accessible when the rear cover is removed.
Please read the following IMPORTANT SAFETY INSTRUCTIONS.
IMPORTANT SAFETY INSTRUCTIONS
1.Save these instructions for later use.
2.Unplug this television receiver from the wall outlet before
cleaning. Do not use liquid or aerosol cleaners. Use a damp
cloth for cleaning.
3.Use only attachments recommended by the television receiver
manufacturers.
4.Do not use this television receiver near water, i.e., near a bath
tub, sink, laundry tub, in a wet basement, or near a swimming
pool, etc.
5.Do not place this television receiver on an unstable cart, stand,
or table. The television receiver may fall, causing serious injury
to a child or an adult and serious damage to the television
receiver.
6.This television receiver should never be placed near or over a
radiator or heater. This television receiver should not be placed
in a built-in installation such as a bookcase unless proper
ventilation is provided.
7.This television receiver should be operated only from the type
of power source indicated on the marking label. If you are not
sure of the type of power supply to your home, consult your
television dealer or local power company.
8.Do not allow anything to rest on the power cord. Do not place
this television receiver where the cord will be abused by
persons walking on it.
9.Follow all warnings and instructions marked on the television
receiver.
10. If an outside antenna is connected to the television receiver, be
sure the antenna system is grounded so as to provide some
protection against voltage surges and built-up static charges.
Section 810 of the National Electrical Code, NFPA 70-1984.
provides information with respect to proper grounding of the
mast and supporting structure, grounding of the lead-in wire to
an antenna discharge unit, size of grounding conductors,
location of antenna-discharge unit, connection to grounding
electrodes, and requirements for the grounding electrode. See
Figure A on page 4
11.For added protection of this television receiver during a lightning
storm, or when it is left unattended and unused for long periods
of time, unplug it from the wall outlet and disconnect the
antenna. This will prevent damage to the receiver due to
lightning and power-line surges.
12.An outside antenna system should not be located near overhead
power lines or other electric lights or power circuits, or where it
can fall into such power lines or circuits. When installing an
outside antenna system, extreme care should be taken to keep
from touching such power lines or circuits as contact with them
might be fatal.
P.1
 Loading...