

Page 1
MODEL NO. RCD674
PORTABLE CD PLAYER WITH RADIO
OWNER'S MANUAL
PLEASE READ BEFORE OPERATING THIS EQUIPEMNT
Page 2
SAFETY INSTRUCTIONS
CAUTION
RISK OF ELECTRIC SHOCK
DO NOT OPEN
CAUTION:
SHOCK,
USER-SERVICE AB LE PARTS INSIDE. R EF ER
SERVICING TO QUALIFIED SERVICE PERSONNEL.
FCC WARNING:
This equipment may generate or use radio
frequency energy. Changes or modifications to
this equipment may cause harmful interference
unless the modifications are expressly
approved in the instruction manual. The user
could lose the authority to operate this
equipment if an unauthorized change or
modification is made.
SURGE PROTECTORS:
It is recommended to use a surge protector for
AC connection. Lightning and power surges
ARE NOT covered under warranty for this
product.
TO REDUCE THE RISK OF ELECTRIC
DO NOT REMOVE COVER (OR BACK). NO
DANGEROUS VOLTAGE
The lightning flash with arrowhead symbol,
within an equilateral triangle is intended to alert
the user to the presence of uninsulated
dangerous voltage within the product’s
enclosure that may be of sufficient magnitude to
constitute a risk of electric shock to persons.
ATTENTION
The exclamation point within an equilateral
triangle is intended to alert the user to the
presence of important operating and
maintenance (servicing) instructions in the
literature accompanying the appliance.
DANGER:
Invisible and hazardous laser radiation
when open and interlock failed or defeated.
Avoid direct exposure to beam.
LASER SAFETY: This unit employs a laser.
Only qualified service personnel should attempt
to service this device due to possible eye injury.
CAUTION: USE OF CONTROLS,
ADJUSTMENTS OR PERFORMANCE
PROCEDURE HEREIN MAY RESULT IN
HAZARDOUS RADIATION EXPOSURE.
INFORMATION
This equipment has been tested and found to
comply with the limits for a Class B digital
device, pursuant to Part 15 of the FCC Rules.
These limits are designed to provide
reasonable protection against harmful
interference in a residential installation. This
equipment generates, uses, and can radiate
radio frequency energy and, if not installed and
used in accordance with the instructions, may
cause harmful interference to radio
communications. However, there is no
guarantee that interference will not occur in a
particular installation. If this equipment does
cause harmful interference to radio or television
reception, which can be determined by turning
the equipment off and on, the user is
encouraged to try to correct the interference by
one or more of the following measures:
• Reorient or relocate the receiving antenna.
• Increase the separation between the
equipment and receiver.
• Connect the equipment into an outlet on a
circuit different from that to which the receiver
is connected.
• Consult the dealer or an experienced radio/TV
technician for help.
1
Page 3

PREPARATION FOR USE
Unpacking and Setup
•
Carefully remove the unit from the display carton and remove all packing
material from the unit itself.
•
The detachable AC power cord is packed in the carton separately from the
unit. Make sure the AC power cord is not accidentally discarded with the
carton or packing material.
•
Press the CD Door OPEN/CLOSE area to open the CD compartment door.
There is a white card in the CD compartment which intended to prevent the
CD pickup from moving during shipment of the product. Remove this card
from the CD compartment before use.
Power Sources
This portable audio system is designed to operate on AC 120V~60Hz or by
using eight (8) "C" batteries, (batteries not included). Attempting to operate this
unit from any other power source may cause damage to the unit, which is not
covered by your warranty.
AC Operation
Unwind the AC cord and extend it to its full length. Insert the small end of the
AC cord into the AC power socket on the rear of the unit. Insert the other end of
the AC cord into any convenient AC 120V~60Hz household outlet.
Battery Installation
To use this unit with battery power, remove the battery compartment on the
bottom of the unit by sliding it towards the rear of the unit and lifting the battery
door off. Insert eight (8) "C" size batteries (batteries not included) following the
diagram in the compartment.
NOTE: The power cord must be disconnected from the AC power socket on the
rear of the unit in order for the unit to operate on battery power.
2
Page 4
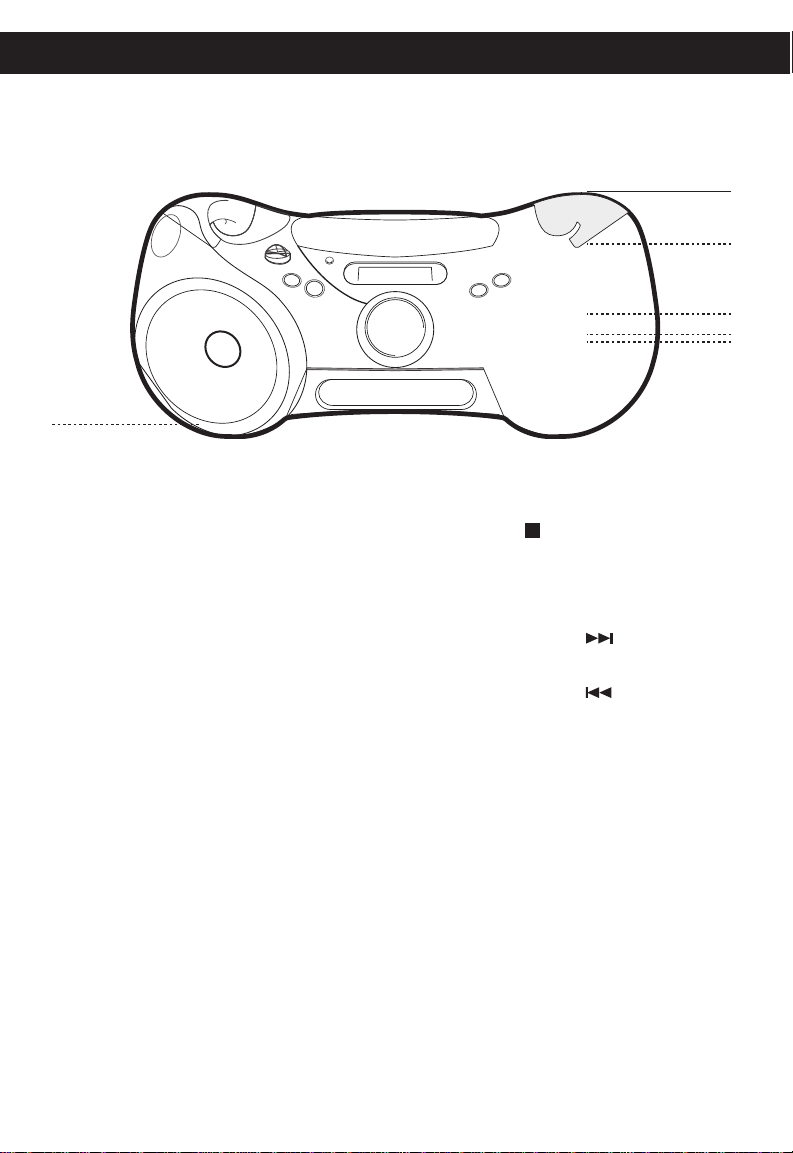
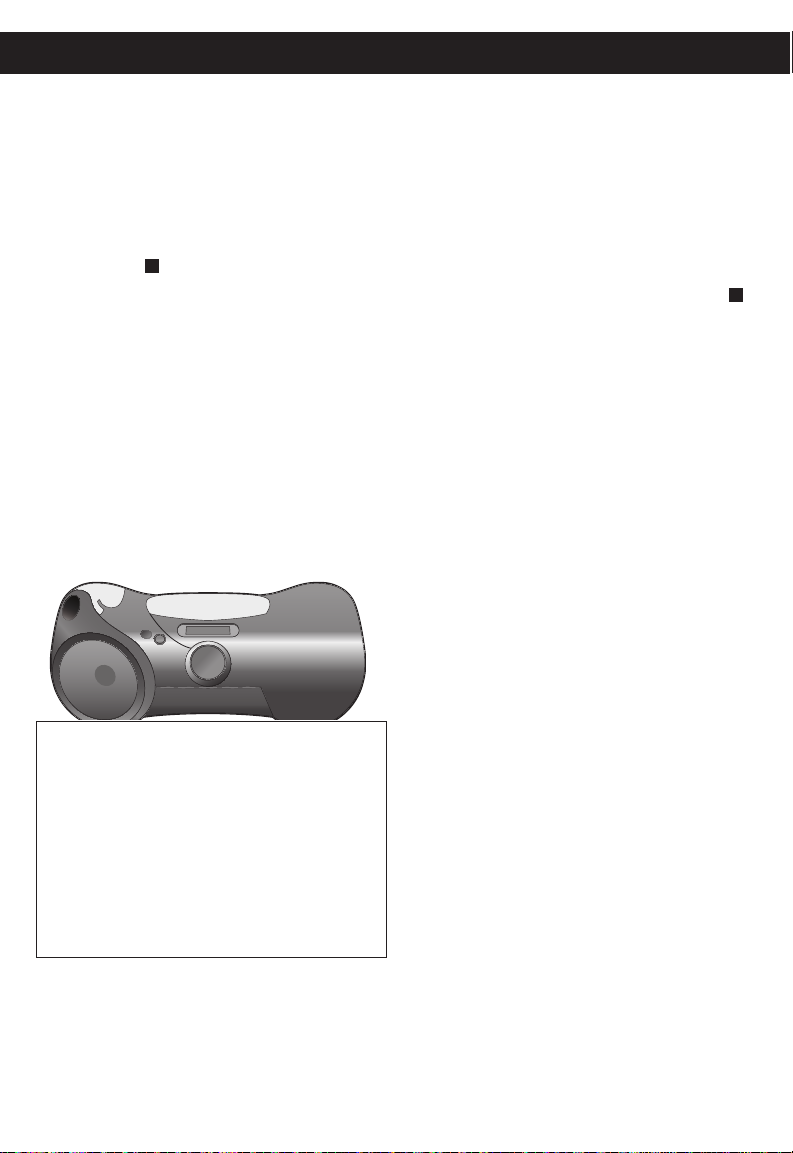
LOCATION OF CONTROLS
1. Left Carrying Handle
2. Disc Compartment
3. Function Control (OFF/CD/FM
ST/AM)
4. CLK (Clock) SET Button
5. Display
6. BASS BOOST Button
7.
RAND (Random) Button
8. Left Speaker
9. Battery Compartment
(Bottom of Unit)
10. FM Antenna
11. Right Carrying Handle
12. OPEN/CLOSE Area
13. AC Jack (Rear of Unit)
14. STOP (
) Button
15. PROG (Program) Button
16. PLAY/PAUSE Button
17. REPEAT Button
18. Skip/Search ( )/MIN (Minute)
Button
19. Skip/Search ( )/HR (Hour)
Button
20. TUNING Control (Side of Unit)
21. VOLUME Control
22. AUX IN Jack (Side of Unit)
23. PHONES (Headphones) Jack
(Side of Unit)
24. Right Speaker
3
Page 5

OPERATION
Make sure the Function control is set
to OFF.
4
Page 6

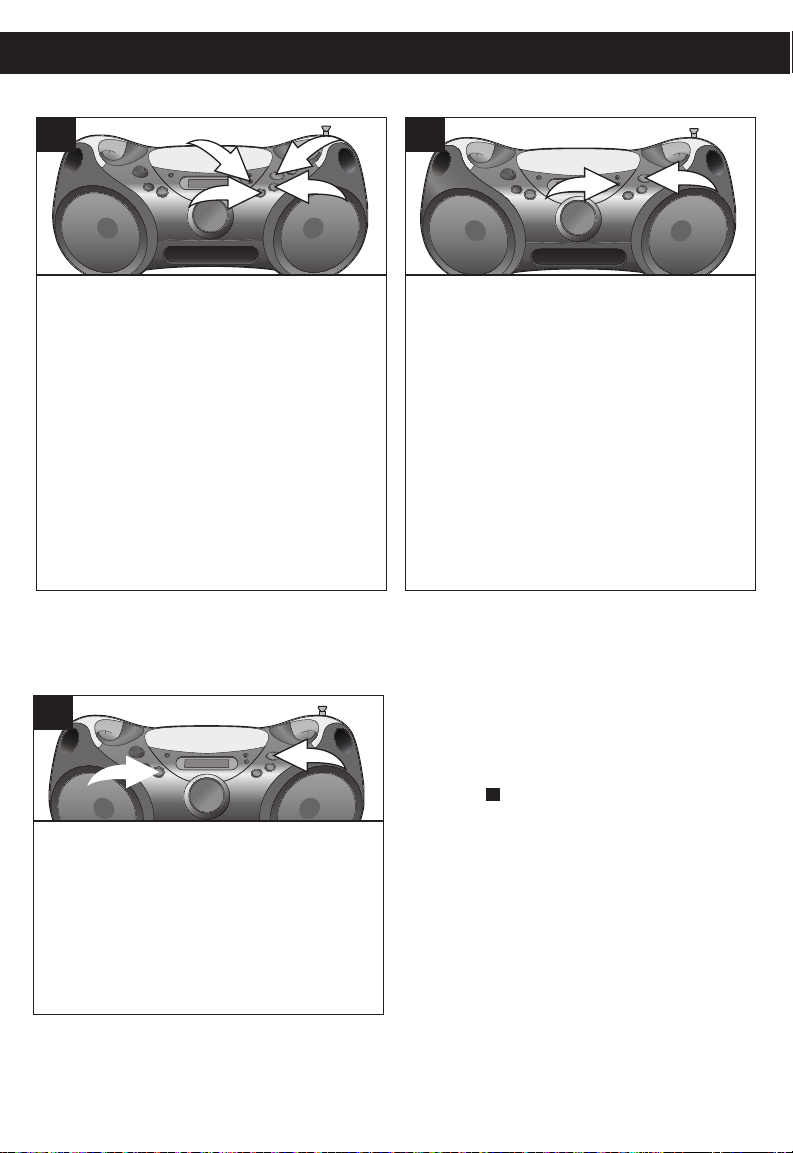
OPERATION (CONTINUED)
2
1
LISTENING TO THE RADIO
1
Rotate the Function control to the AM
or FM ST position to turn the unit on
and select AM or FM ST (Stereo); the
band and the frequency will appear in
the display.
3
Adjust the VOLUME control 1 and
BASS BOOST button 2 as desired.
Press the BASS BOOST button 2 to
the “in” position to enhance the bass
sound.
2
Tune a desired station by turning the
TUNING control.
4
To turn the radio off, rotate the
Function control to the OFF position.
ANTENNAS
AM–This unit has a built-in ferrite rod antenna, which provides adequate reception in most
areas. If reception is weak, turn the unit to improve reception.
FM–The FM Antenna is for FM reception only. If reception is weak, adjust the length and the
angle of the antenna.
5
Page 7

1
2
3
TO PLAY A DISC
OPERATION (CONTINUED)
1
Rotate the Function control to the CD
position to turn the unit on and select
CD mode.
3
To play a disc from the beginning,
press the PLAY/PAUSE button;
and the track number
appear in the display.
Press the PLAY/PAUSE button
again to pause playback; will blink
in the display. Press the PLAY/
PAUSE button once again to
continue playback; will stop blink-
ing in the display.
will
2
Open the Disc Compartment door by
pressing the OPEN/CLOSE area.
Place a disc on the center spindle,
with the printed label side facing up.
Close the Disc Compartment door;
the total tracks/files on the disc will
appear in the display.
4a
To start from a specific track on a
CD, while in the Stop mode, locate
the track using the Skip/Search 1
or 2 button, then press the
PLAY/PAUSE button 3 to start
playback from the track selected.
and the track number will appear in
the display.
CONTINUED ON THE NEXT PAGE
6
Page 8

OPERATION (CONTINUED)
1
2
2
1
1
2
TO PLAY A DISC (CONTINUED)
5
Adjust the VOLUME control 1 and
BASS BOOST button 2 as desired.
Press the BASS BOOST button 2 to
the “in” position to enhance the bass
sound.
6
To skip forward or backward through
the tracks on the disc, press the
Skip/Search 1 or 2 button.
8
When the disc is through playing, it will
stop rotating. Press the STOP ( ) button to stop the disc before it is finished.
SEE NOTES ON THE NEXT PAGE
7
To search forward or backward
through the playing track, press
and hold the Skip/Search 1 or 2
button; a chattering noise will be
heard. Stop pressing the button to
return to normal playback.
9
To turn the unit off, rotate the Function
control to the OFF position.
7
Page 9

OPERATION (CONTINUED)
NOTES:
• As each track is played, the track number is shown in the display.
• To prevent damage to the disc, never open the Disc Compartment door while the disc
is rotating. Wait for the disc to stop before opening the Disc Compartment door. Never
touch the lens when the Disc Compartment door is open.
• DO NOT use the carrying handles when playing a disc. The unit should only be
used on a steady surface.
8
Page 10
OPERATION (CONTINUED)
2
3
1
4
1
2
1
2
TO REPEATEDLY PLAY BACK ONE/ALL TRACKS
1
To repeat a single track, press the
REPEAT button 1 once while in the Stop
mode; “REP” will appear in the display.
Press the Skip/Search 2 or 3 button
to select the specific track/file that you
wish to repeat. When the desired
track number appears in the display
press the PLAY/PAUSE button 4
to begin playback.
TO RANDOMLY PLAY BACK ALL TRACKS
1
2
To repeat all of the tracks on a
disc continuously, press the REPEAT
button 1 twice
while in the Stop mode; “REP ALL”
will appear in the display. Press the
PLAY/PAUSE button 2 to begin
playback.
NOTES ON RANDOM MODE:
• The unit will play all of the tracks on
• To cancel Random playback, press the
the disc randomly, and then stop.
STOP(
) button.
To randomly play all of the tracks
on a disc, press the RAND button 1
while in the Stop mode; “RAND” will appear
in the display. Press the PLAY/PAUSE
button 2 to begin playback.
9
Page 11

1
OPERATION (CONTINUED)
Rotate the Function control to the CD
position to turn the unit on and select
CD mode. Insert a disc
Press the PROG button; “PROG” and
“00” will blink in the display.
10
Page 12
OPERATION (CONTINUED)
NOTES ON PROGRAMMED PLAY:
• Programming is the ability to preselect the order in which a series of tracks
will be played.
• As each track is played, its track number will be displayed. You can
move forward or backward through the programmed tracks with the
Skip/Search
• The unit will stop after all programmed tracks have been played or the
STOP (
• To clear the Program memory, while in the Stop mode, press the STOP (
button.
) button is pressed.
)
It is also possible to use the Program
and Repeat functions together to
repeat a specific program indefinitely.
First, program the tracks/files you
wish to hear in the order you wish to
hear them
Then, press the REPEAT button
twice.
11
Page 13
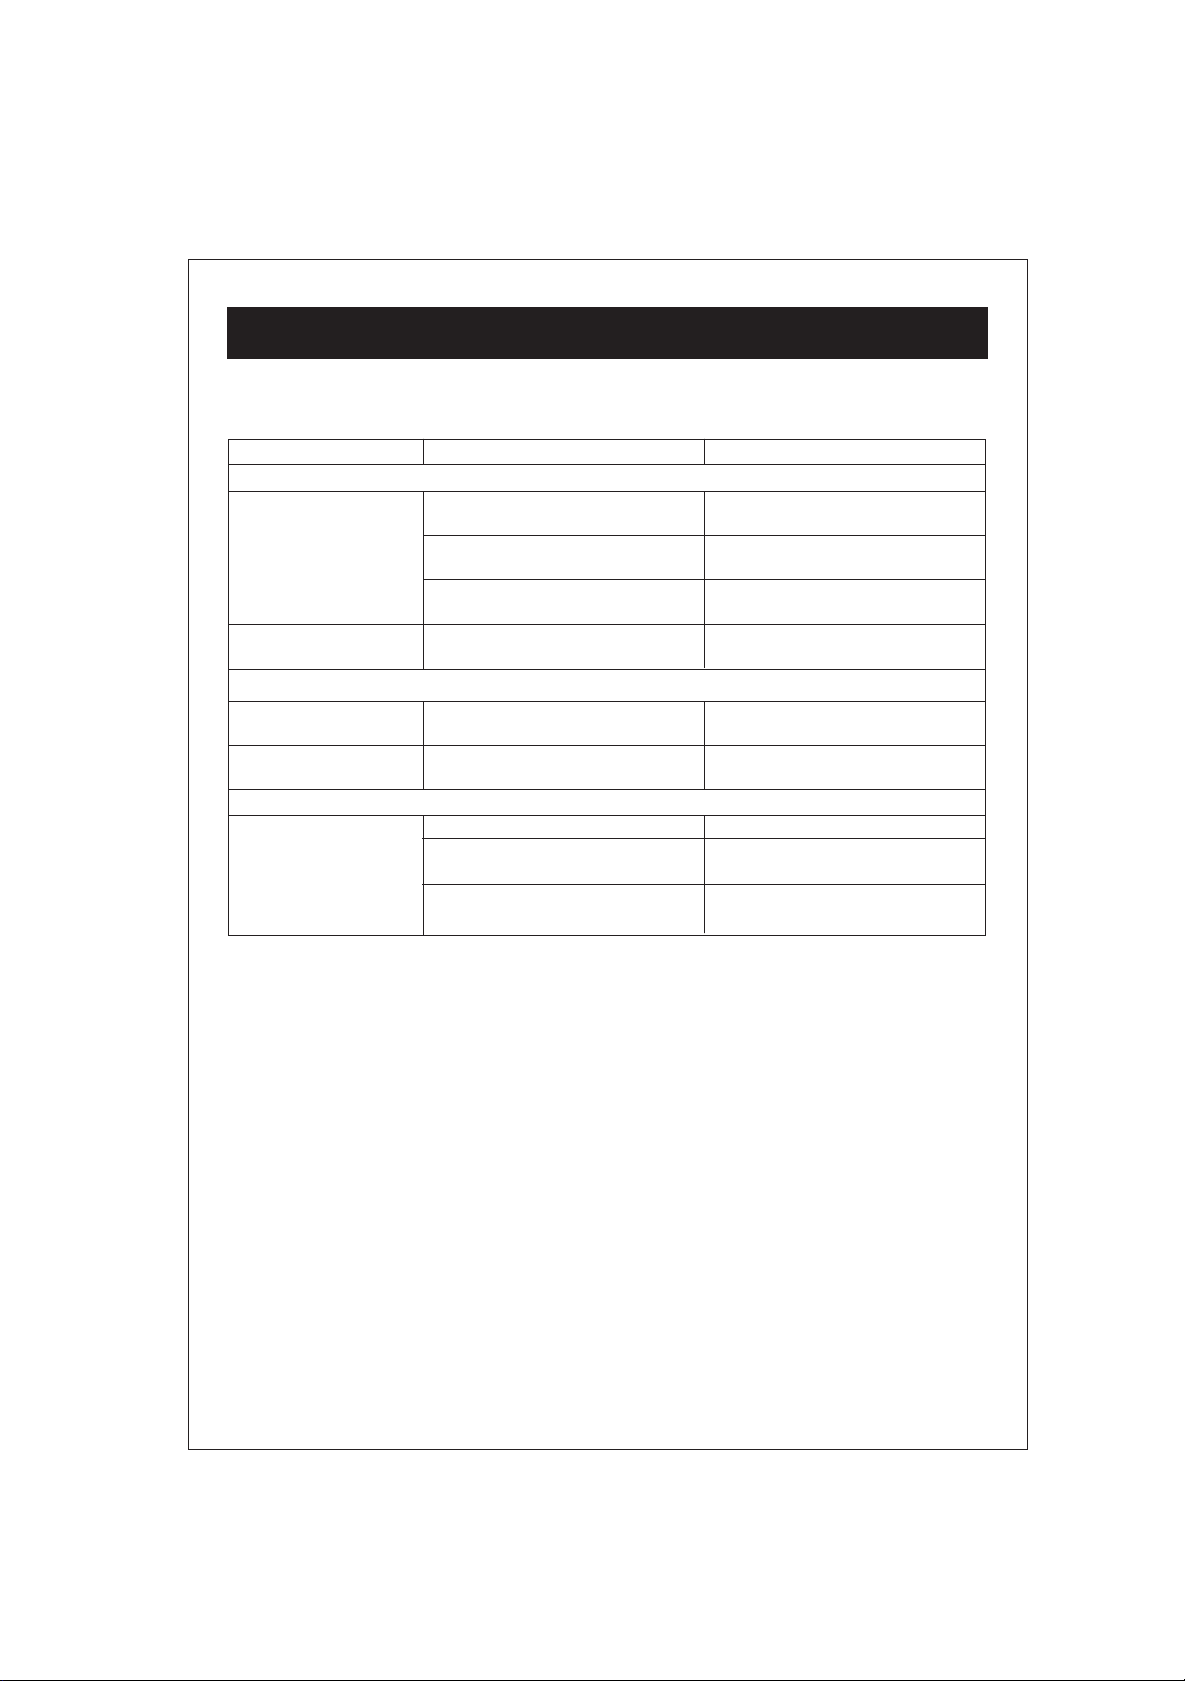
TROUBLESHOOTING GUIDE
Should this unit exhabit a problem, check the following before seeking service:
Symptom Possible Cause Solution
Radio
Noise or sound distorted Station not tuned properly for Retune the AM or FM broadcast
on radio broadcasts. AM or FM. station.
FM: Antenna Wire is not Extend FM Antenna Wire.
extended.
AM: Unit is not positioned Rotate unit until best reception is
correctly. obtained.
AM or FM, no sound.
Compact Disc Player
CD Player will not play.
CD skips while playing. Disc is dirty or scratched. Wipe disc with cloth or use
General
No sound. Power cord disconnected. Connect power cord.
Volume at minimum. Increase volume.
CD is not installed or installed Insert CD with label facing up.
incorrectly.
another disc.
No batteries, dead btteries or
batteries not installed properly
Power is off. Press the POWER button to the in
Insert fresh batteries properly.
position to turn the unit on.
12
Page 14

SPECIFICATIONS
GENERAL:
Power Source ..............................................................................120V, 60Hz AC
Battery...........................................................DC 12V, 8 x 1.5V ‘C’ size batteries
Alkaline is recommended for longer life
Speaker.....................................................................................................2 x 3W
Output Power............................................................................................2 x 2W
RADIO SECTION:
Frequency Range (FM)....................................................................87.5–108 MHz
Frequency Range (AM) ................................................................530–1720 kHz
DISC SECTION:
Disc Diameter...............................................................................4.72" (120mm)
3.15" (80mm) Single CD
Optical Source....................................................................Semiconductor Laser
Specifications are subject to change without notice.
13
Page 15

LIMITED PRODUCT WARRANTY
This quality product is warranted to be free from manufacturer’s defects in material and workman-ship,
provided that the unit is used under the normal operating conditions intended by the manufacturer.
Should you have any problem with this product, please and it is highl y recommended to visit our website at
www.curtisint.com
before you take any other steps as we have additional copies of instruction manuals,
operating manuals and trouble shooting tips on our website which gives you the answer on most of the
questions you could have in operating the unit.
TERMS OF WARRANTY
C.I. Service Dept. warrants this product to be free from defects in materials and workmanship for 1 year on
parts and 90 days on labor.
Nothing within this warranty shall imply that C.I. will be responsible or liable for any damage to any items
placed in this product, whether due to any defect of the product, or its use, whether proper or improper.
EXCLUSIONS
Save as herein provided, C.I. Service Dept. (Canada) or C.I. Service Dept. (USA), there are no other
warranties, conditions, representations or guarantees, express or implied, made or intended by C.I. or its
authorized distributors and all other warranties, conditions, representations or guarantees, including any
warranties, conditions, representations or guarantees under any Sale of Goods Act or like legislation or
statue is hereby expressly excluded. Save as herein provided, C.I. Service Dept. (Canada) or C.I. Service
Dept. (USA), shall not be responsible for any damages to persons or property, including the unit itself,
howsoever caused or any consequential damages arising from the malfunction of the unit and by the
purchase of the unit, the purchaser does hereby agree to indemnify and save harmless C.I. from any claim
for damages to persons or property caused by the unit.
TO OBTAIN REPAIRS UNDER THE TERMS OF THIS WARRANTY
1. The original purchaser must present a copy of the original bill of sale and the service warranty card.
2. Any alterations, abuse, misuse, battery corrosion or accidental damage voids the warranty.
3. The warranty does not cover cabinets and accessories.
4. No warranty or insurance contained or set out shall apply when damage or repair is caused by power
failure; damage in transit or when moving the unit; improper power supply; use for commercial or
industrial purposes; service calls resulting in customer education, etc.
5. The defective product should be mailed to:
For service assistance and product information, please call: 1-800-968-9853.
Canada U.S.A
C.I. Service Dept. C.I. Service Dept.
315 Attwell Dr 181 Cooper Avenue
Unit 104
Toronto, Ontario Tonawanda, N.Y.
M9W 5C1
If mailing the product, the freight must be prepaid and a money order for $7.00 should be included
to cover the cost of insurance and the return of the product.
6. C.I. reserves the right to repair or replace the parts which have become defective.
Model No. Date Purchased Serial No.
14150
 Loading...