

Page 1
PORTABLE CD SYSTEM
RCD341
COMPACT
DIGITAL AUDIO
WARNING
-TO PREVENT FIRE OR SHOCK HAZARD, DO NOT USE THIS PLUG WITH AN EXTENSION
CORD, RECEPTACLE OR OTHER OUTLET UNLESS THE BLADES CAN BD FULLY INSERTED TO
PREVENT BLADE EXPOSURE.
-TO PREVENT FIRE OR SHOCK HAZARD, DO NOT EXPOSE THIS APPLIANCE TO RAIN OR
MOISTURE.
CAUTION
RISK OF ELECTRIC SHOCK
DO NOT OPEN
The lightning flash with arrowhead
symbol, within an equilaler al
triangle, is intended to alert the user
to the presence of uninsulaled
Dangerous voltage within the
products enclosure that may be of
sufficient magnitude to constitute
a risk of electdc shock to persons
CAUTION: TO REDUCE THE
RISK OF ELECTRIC SHOCK,
DO NOT REMOVE COVER(OR
BACK) NO USERSERVICEABLE PARTS INSIDE.
REFER SERVICING TO
QUALIFIED SERVICE
PERSONNEL.
The exclamation point within an
equilateral triangle os intended to
alert the user to the presence of
lmportant operating and
maintenance (servicing)
instructions in the literature
accomparying the appliance
IMPORTANT SAFETY INSTRUCTIONS
1) Read these instructions.
2) Keep these instructions.
3) Heed all warnings.
4) Follow all instructions.
5) Do not use this apparatus near water.
6) Clean only with dry cloth.
7) Do not block any ventilation openings, Install in accordance with the manufacturer s
instructions.
8) Do not install near any heat sources such as radiators, heat registers, stoves, or other
Apparatus (including amplifiers) that produce heat.
9) Do not defeat the safety purpose of the polarized or grounding-type plug. A polarized
plug has two blades with one wider than the other. A grounding type plug has two blades
and a third grounding prong. The wide blade or the third prong are provided for your
Safety. If the provided plug does no t fit into your outlet, consult an electrician for
replacement of the obsolete outlet.
10) Protect the power cord from being walked on or pinch particularly at plugs, convenience
receptacles, and the point where they exit from the apparatus.
11) Only use attachments/accessories specified by the manufacturer.
12) Unplug this apparatus during lightening storms or when unused for long periods of time.
13) Refer all servicing to qualified service personnel. Servicing is required when the apparatus
has been damaged in any way, such as power-supply cord or plug is damaged, liquid
has been spilled or objects have fallen into the apparatus, the apparatus, has been
exposed to rain or moisture, does not operate normally, or ths been dropped.
This appliance shall not be exposed to dripping or splashing water and that no object filled
with liquid such as vases shall be placed on the apparatus.
810-00000S-190
OPERATING INSTRUCTION
1
Page 2
1
2
3
4
5
6
27
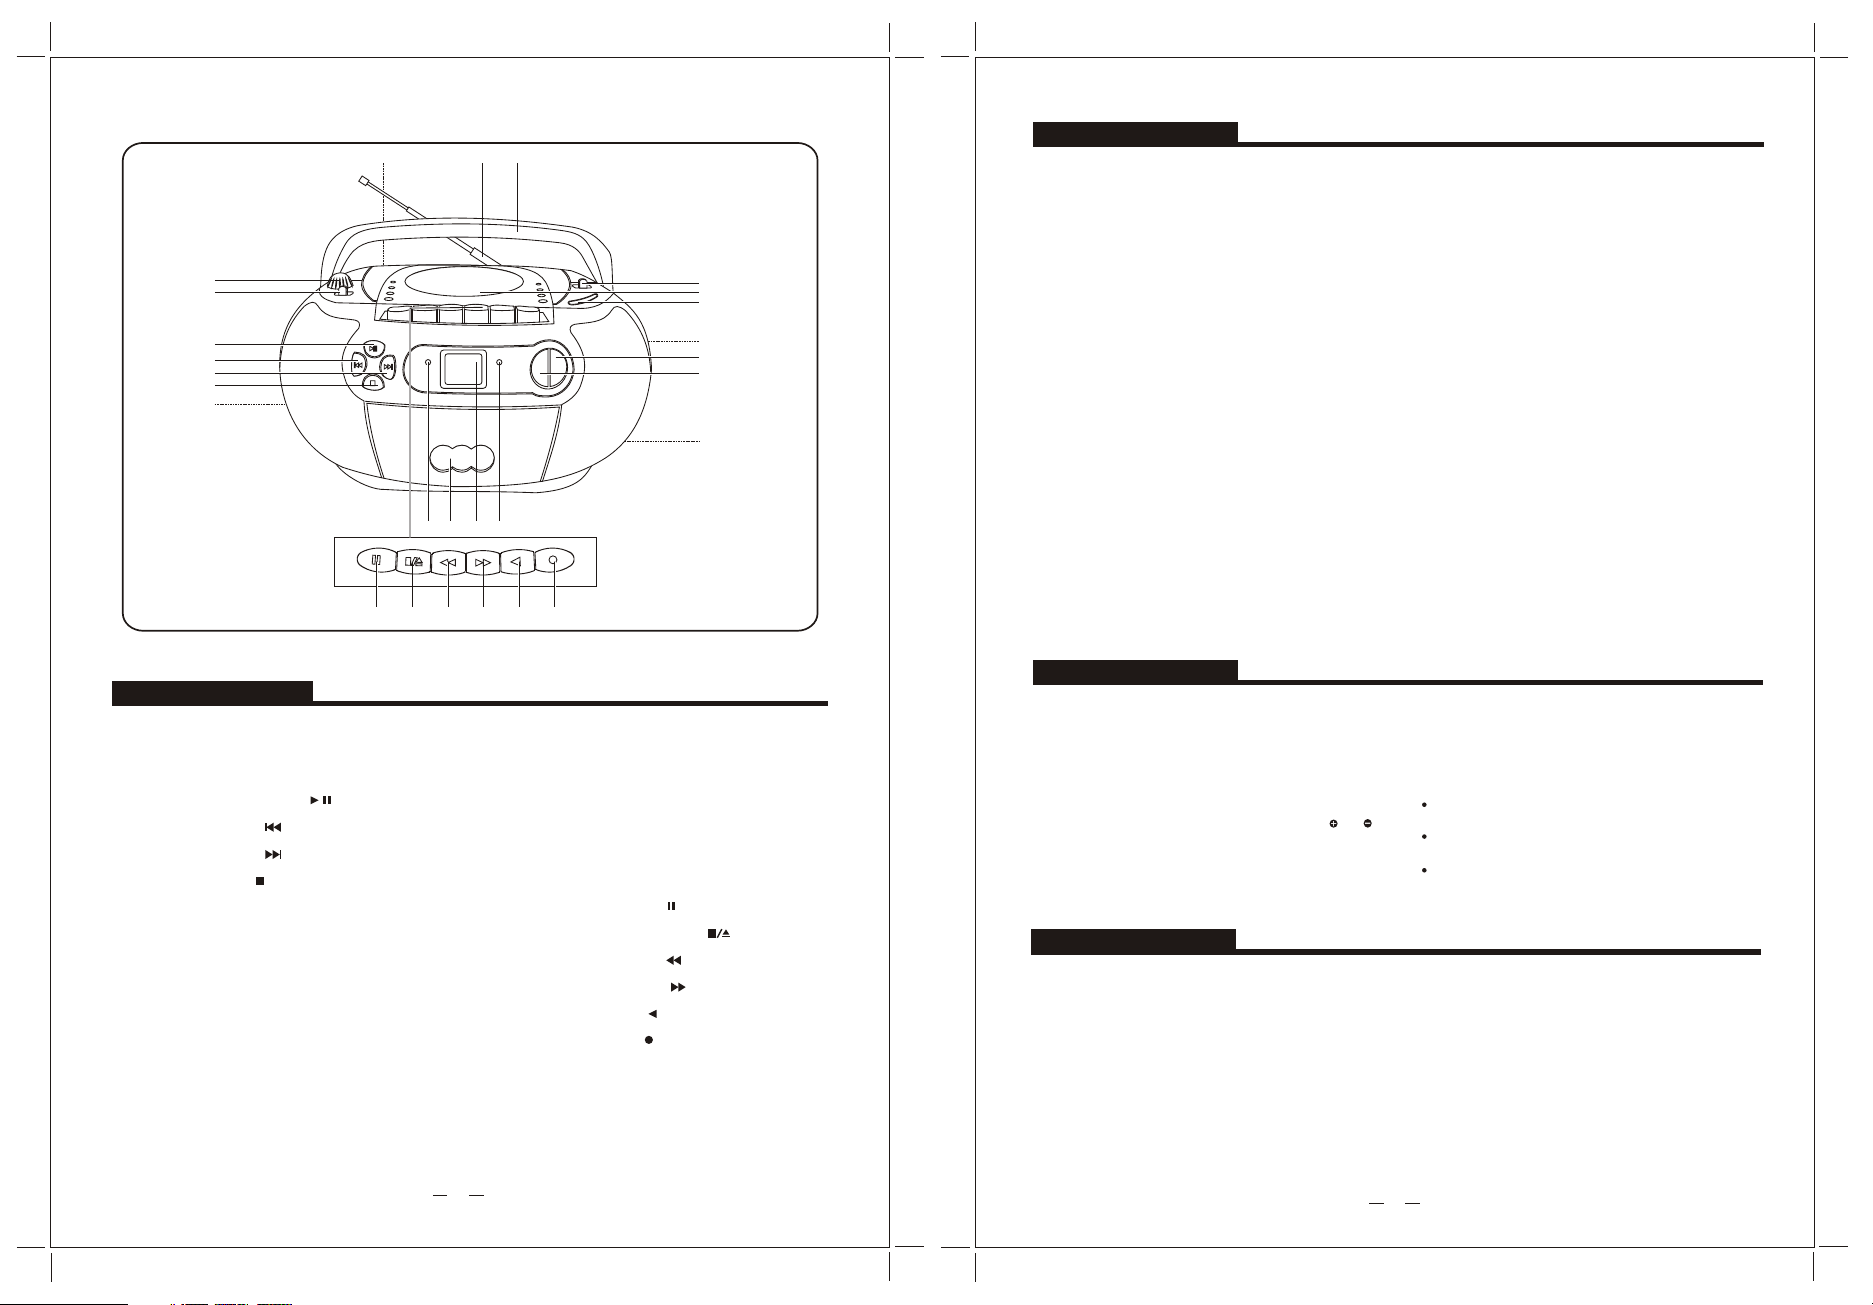
A CONTROLS
1 VOLUME
2 FUNCTION ( CD/TAPE/RADIO )
3 CD PLAY/PAUSE ( )
4 CD B. SKIP( )
5 CD F. SKIP ( )
6 CD STOP ( )
7 PHONES
8 FM ANTENNA
9
HANDLE
10 BAND ( AM/FM/FM ST )
11
DISC COMPARTMENT
12 DIAL SCALE
TUNING
13
14 CD PROGRAM
7 8 9
17 181920
10
11
12
13
14
15
16
2621 22 23 24 25
15 CD REPEAT
16 BATTERY
17 POWER INDICATOR
18 CASSETTE COMPARTMENT
19 LCD DISPLAY
20 FM ST INDICATOR
21 TAPE PAUSE ( )
22 TAPE STOP/EJECT ( )
23 TAPE F. FWD ( )
24 TAPE REWIND( )
25 TAPE PLAY ( )
26
TAPE REC ( )
27 AC IN
B PRECAUTIONS
Read the Operating Instructions carefully and completely
before operating the unit. Be sure to keep the Operating
Instructions for future reference. All warnings and cautions
in the Operating Instructions and on the unit should be
strictly followed, as well as the safety suggestions below.
Installation
1 Water and moisture - Do not use this unit near water,
such as near a bathtub, washbowl, kitchen sink, laundry
tub, in a wet basement, swimming pool, or the like.
2 Heat - Do not use this unit near sources of heat, including
heating vents, stoves, or other appliances that generate
heat.
3 Mounting surface - Place the unit on a flat, even surface.
4 Ventilation - The unit should be situated with adequate
space around it so that proper heat ventilation is assured.
Allow 10 cm(4 in.) clearance from the rear and the top of
the unit and 5 cm (2 in.) from each side.
- Do not place the unit on a bed, rug, or similar surface
that may block the ventilation openings.
- Do not install the unit in a bookcase, cabinet,
or airtight rack where ventilation may be impeded.
5 Objects and liquid entry - Take care that objects
or liquids do not get inside the unit through the
ventilation openings.
6 Condensation - Moisture may form on the CD Pickup
lens when:
- The unit is moved from a cold spot to a warm spot
C POWER SUPPLY
IMPORTANT
Make sure that f is set to TAPE before connecting
the AC cord or inserting batteries.
Using on batteries
Open the lid of the battery compartment on the rear and
insert six (size C) batteries, not supplied, with the and
marks correctly aligned. then close the lid.
Disconnect the AC cord from the AC inlet.
unction
D MAINTENANCE
To clean the cabinet
Use a soft cloth lightly moistened with mild detergent
solution. Do not use strong solvents such as alcohol.
benzine or thinner.
To clean the heads and tape paths
After every 10 hours of use, clean the Recording heads
and Playback head , the pinch roller and capstan .Use
a cotton swab 5 slightly moistened with cleaning fluid
or denatured alcohol.
- the heating system has just been turned on
- the unit is used in a very humid room
- the unit is cooled by an air conditioner
When this unit has condensation inside, it may not
function normally. Should this occur, leave the unit for
a few hours, then try to operate again.
Electric Power
1 Power sources - Use on batteries or AC house current,
as specified in the Operating Instructions and marked
on the unit.
2 AC power cord
- When disconnecting the AC power cord, pull it out by
the AC power plug. Do not pull the cord itself.
- Never handle the AC power plug with wet hands, as
this could result in fire or shock.
- Power cords should be firmly secured to avoid being
bent, pinched, or walked upon. Pay particular attention
to the cord from the unit to the power socket.
- Avoid overloading AC power plugs and extension
cords. beyond their capacity, as this could result in fire
or shock.
3 When not in use - Unplug the AC power cord from the
AC outlet or remove all the batteries if the unit will not
be used for several months or more. When the cord is
plugged in ,a small amount of current continues to flow
to the unit, even when the power is turned off.
The batteries need to be replaced when:
The tape speed slows down, volume decreases, or
sound is distorted during operation.
Notes on batteries
Do not mix different types of batteries or old batteries
with new ones.
Never recharge the batteries, apply heat to them or
take them apart.
Remove dead batteries.
If liquid leaks from the batteries, wipe thoroughly to remove.
Cassette tapes
To prevent accidental erasure, break off the plastic tabs
on the cassette tape after recording with a screwdriver
or other pointed tool.
To record on the tape again, cover the tab openings with
adhesive tape, etc.
3
4
Page 3

E CD OPERATION
1 Set to CD.
function
2 OPEN the disc compartment and
the printed side up. The total number
is displayed.
3 Press PLAY/PAUSE to start play.
The number of the track being played is displayed.
4 Turn VOLUME to adjust the sound.
STOP - Stops play.
PLAY/PAUSE - Pauses play. To resume play, press
again.
SKIP/SEARCH - Searches for a particular
,
point during playback. Keep or pressed and then
release it.
- Skips to the beginning of a track. Press or
repeatedly
REPEAT
Press REPEAT once- Display the solid " 1 " symbol:
A single track is played repeatedly. Select a track
with or .
place a disc with
of tracks
F TUNER OPERATION
1 Set function to RADIO.
2 Select a band with BAND.
3 Tune to a station with TUNING.
4 Turn VOLUME to adjust the sound.
For better reception - Extend the FM antenna and orient
it for the best reception; AM antenna is inside the unit.
Position the unit for the best reception.
FM /FM ST
Sets the FM sound to stereo or monaural.
G TAPE OPERATION
Press REPEAT twice- Display the solid " ALL" symbol:
All tracks are played repeatedly.
PROGRAM
In stop state, Press program, the PROG. indicator
flashes, use or to select the track you wish
to program. Press PROG. button to memorize the track
you choose. Repeat this step for more tracks you wish
to program.( maximum up to 20 tracks) Then press PLAY
to start.
To erase the programmed tracks, Press STOP and open
the CD door.
NOTE
Do not use irregular shape CDs(example: heart-shaped,
octagonal ones). It may result in malfunctions.
Do not place more than one disc in the disc
compartment.
Do not try to open the disc compartment during play.
Do not touch the lens. Doing so may cause malfunctions.
FM ST: Reception is stereo.
FM: When an FM stereo broadcast contains noise,
set to FM. Noise is reduced, although reception is
monaural.
NOTE
If the unit picks up noise from other electrical appliances
nearby, like a TV or fluorescent lights, move the unit away.
H GENERAL
To turn off the unit, set function to TAPE.
To listen with the headphones, connect headphones with a stereo mini plug to the PHONES jack.
If an erroneous display or malfunction occurs, disconnect the AC cord and remove all the batteries to turn off the
display. Then turn the power back on.
COPYRIGHT
Please check the copyright laws relating to recordings from disc, radio or external
tape for the country in which the machine is being used.
I SPECIFICATIONS
Tuner section
Frequency range, FM: 88-108 MHz
AM: 530-1710 KHz
Deck section
Track format- 2 track, 4 channels / Frequency rangeNormal tape / Recording system- DC bias /
Erasing system-Magnet erase / Heads- Recording /
playback head , Erasure head
CD player section
Disc- Compact disc / Scanning method - Non-contact
optical scanner (semiconductor laser)
General
Speaker- 77 mm cone type (2) / Output- Headphones jack
( 3.5mm stereo jack) / Power output - 0.8 W +0.8 W /
Power requirements- DC 9 V using six size C batteries,
AC 120V, 60Hz / Weight - 2.1Kg (excluding batteries) /
Dimensions - 295(W)x152(H)x212.5(D) mm
Specifications and external appearance are
subject to change without notice.
Use Type 1 (normal) tapes only.
PLAYING BACK A TAPE
function
1 Set to TAPE.
2 Press STOP/EJECT to open the cassette
holder and insert a tape with the exposed side up and
the side to be played facing out.
3 Press PLAY to start play.
4 Turn VOLUME to adjust the sound.
STOP/EJECT - Stops play.
PAUSE - Pauses play. To resume play, press again.
F FWD/ REW - Fast forwards/rewinds.
RECORDING
Note that recording is done on only one side of the tape.
1 Insert a tape with the side to be recorded facing out.
Wind up the tape to the point where recording starts.
2 Get ready to record from the source.
To record from a CD: set function to CD and start play.
To record from the tuner: set function to RADIO and
tune to a station.
3 Press REC to start recording.
PLAY is pressed simultaneously.
To stop recording, press STOP/EJECT.
To erase a recording, set function to TAPE and start
recording.
5
6
Page 4

PORTABLE CD SYSTEM
NX-217
 Loading...