

Page 1
USER MANUAL
MPK8990UK
Page 2

What’s in the box?
Operating Unit
User Manual
USB Cable
Earphone
2
Page 3

Content
Overview
Basic Operation & Charging
Main interface
Explorer
Operation of Music Mode
Operation of Video Mode
Operation of Photo Mode
Operation of Record Mode
Operation of E-Book Mode
File Explorer
Calculator
System Setting
Trouble Shooting
Technical information
3
Page 4
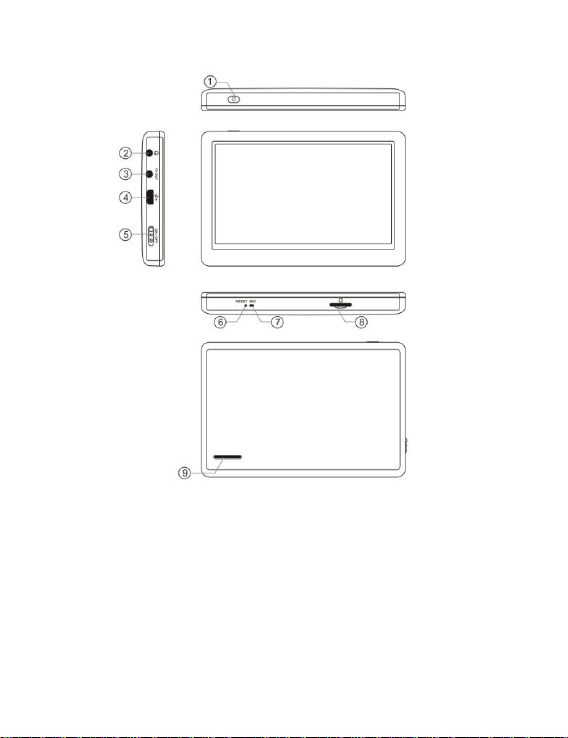
Overview
1. Power button
2. Earphones Jack
3. TV out
4. USB Port
5. ON/OFF
6. Reset
7. MIC
8. Micro SD Card Slot
9. Built-in Speaker
4
Page 5

Basic Operation
Power ON
a. Turn the power switch to “ON” position.
b. Press the power button for 3sec. to turn on the player and
enter to the main menu..
Power Off
c. Turn the power switch to “OFF” position.
d. Press the power button for 3sec. to turn off the player.
Dark Screen Mode
Press the Power button shortly to enter the dark screen mode and
lock the player.
Activate Dark Screen Mode
In the Dark Screen Mode, press the Power button shortly to return
the light screen and unlock the player.
Reset
If the player doesn’t work suddenly when it is working, press the
Reset button by a needle, then turn on the player again.
Removable disk function
Use the USB cable to connect with PC, you can use the removable
disk properly after the icon show up at the right bottom of the
PC. It is better to use the USB cable provided
Note: To avoid any malfunction caused, please turn off the player
before connect PC.
Charging
In order to charge the battery, please make sure disconnect the
removable disk from the computer, but do not pull USB cable out
from, and enter the charging mode
It will stop charging automatically when the player is fully charged.
5
Page 6

Touch the screen to enter the main menu. The display automatically
turns off if no action is taken.
Note:
﹒
It takes 4.5 hours to fully charge the units battery.
Please charge unit battery before use.
﹒
﹒
Charging time will be extended if unit is in play mode or screen
is activated while being charged.
To save charging time, please do not operate the player during
﹒
while unit is charging.
When power is low it is advised to immediately charge the unit.
﹒
Damage may occur if the player's power is turned on when
battery is low.
How to insert and pull out Micro SD card
To insert: with the front (the side with characters) of the Micro SD card
facing upwards (towards the screen of the player), slightly push to insert
the card into the slot on the unit. You will now be able to access the files
stored on your Micro SD card.
To remove: gently push the Micro SD card and the Micro SD card will
partially eject from the unit. You may then fully remove the card.
Note: please insert or remove the card when the player is turned off, or the
internal files of the player will be lost or damaged.
6
Page 7
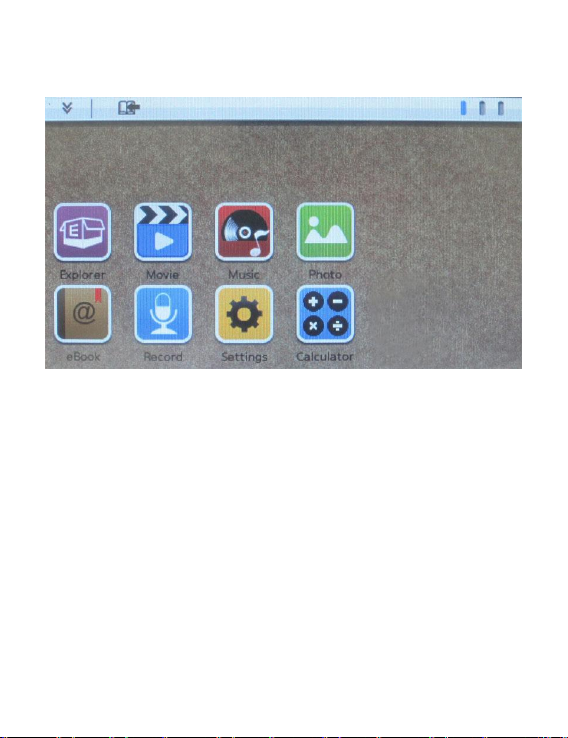
Main Interface
Turn on the player to enter the main menu as below. Click any
particular icon at the bottom of the screen to enter the select mode.
Drag the widget out of the widget toolbar to the screen to activate it.
To move the widget back to the widget toolbar, drag it to the
position you want on the widget toolbar
***With the Widget toolbar function on the screen, you can organize
the customization menu, panel of the desktop screen, playing music,
etc, and you can touch gently & drag horizontal to re-setup the
desktop toolbar anyway you like.
7
Page 8

Explorer
Click the Explorer icon in the main menu to enter the Explorer
menu.
In the Explorer menu, you can select any files or folders from local
memory, SD card or USB folders.
Copy / Paste / Delete files
Tap on the right hand side of the selected files to select copy,
paste or delete function. For delete file, click yes to double confirm.
8
Page 9

Operation of Music Mode
Music explorer
Click the Music icon in the main menu to enter the Music explorer.
Click the small icon in the bottom of the screen, your library of
music can be sorted by Artist, Album, Style.
Artist: Sort the music by all artists and unknown artist
Album: Sort the music by all album and unknown album.
Genre: Sort the music by all genre.
Star: Sort the music by number of stars.
Year: Sort the music by year
All music: Sort out all music.
1. Return to main menu.
2. Adjusting volume
3. Return to previous menu
4. Battery power
9
Page 10

5. Previous
6. Play / Pause
7. Next
8. Play mode setting
9. Current playing time
10. Total playing time
11. EQ mode
Play / Pause
Click the song name on the middle of screen in playing mode to
pause, click song name again to resume playing.
Fast Forward / Fast Backward
When playing music, press and hold / icon to fast
backward / forward, press / once to jump to the previous /
next track.
Adjusting Volume
When playing music, drag the volume bar to adjust volume.
10
Page 11

Play mode setting
- Click , return to previous menu
- Click to set “Only once”, “Rotate one”, “Rotate all”,
Sequential”, “Random” of repeat mode.
- Click to set “Nature”, “Base”, “Pop”, “Rock”, “Classic”,
“Jazz”, “Language”, “Dance” of EQ mode.
- Click to set “Spectrum” or “Lyric” mode.
- Click to set range of 1 – 5 brightness of screen
- Click to rate number of stars.
- Click to set “Blue / Red”, “Red / Blue”, “Yellow / Green”,
“Green / Yellow”, “ Orange / Blue”, “Red / Yellow”, “Blue
/Green” color of lyric.
Operation of Video Mode
Click the Video icon in the main menu to enter the Video explorer,
click any particular movie in the list to start playing.
Resume Play: It will show up “Play for break point?” when you
enter the movie which is not the first time play in the player.
Click ”yes” to resume play, and “No” to start play at the beginning.
11
Page 12

1. Return to main menu
2. Adjusting volume
3. Return to previous menu
4. Battery power
5. Previous
6. Play / Pause
7. Next
8. Play mode setting
9. Current playing time
10. Total playing time
11. Display size
12
Page 13

Play / Pause
Click Center of display in playing mode to pause, click center of
display again to resume playing.
Fast Forward / Fast Backward
When playing video, press and hold / icon to fast backward
/ forward, press / once to jump to the previous / next movie.
Adjusting Volume
In the playing mode, drag the volume bar to adjust volume.
Showing display rate
While playing video files, click icon to choose the ratio of the
display: Full Screen – video ratio / Full Screen – screen ratio /
Default / 4:3 / 16:9.
Play mode setting
- Click , return to previous menu
13
Page 14

- Click , to select number of tracks
- Click , to switch on/off of subtitle.
- Click , to set range of 1-5 brightness of screen.
- Click to select “Full Screen – video ratio”, “Full Screen –
screen ratio”, “Default”, “4:3”, “16:9” of resize mode.
- Click to set “Only once”, “Rotate one”, “Rotate all”,
Sequential”, “Random” of repeat mode.
- Click to select “Stereo”, “Left channel”, “Right channel”
- Click to select “Sub: Zoom in”, “Sub: Zoom out”, “Subtitle
size”
- Click to select “default”, “Blue”, “Red” color of lyric
Operation of Photo Mode
Click the Photo icon in the main menu to enter the Photo explorer,
click any particular photo to open it.
14
Page 15

- Click , return to previous menu.
- Click , auto play photos.
- Click resize photo and rotate photo clockwise and
anti-clockwise.
- Click , review photo by choosing photo on right hand side.
- Click review photos by different background music.
- Click reviewing photo by different effects.
- Click select time slot “1s”, “3s”, “5s”, “10s” between
photos.
- Click enter play mode “Next”, “Previous”, “Random
switch”.
- Click to set range of 1-5 brightness of screen.
- Click set current photo as wallpaper.
15
Page 16

Operation of Record Mode
Click Record icon in the main menu to enter the Record mode.
Click icon to start recording, click 【】 icon to pause recording,
click again to resume recording. Click to stop recording.
16
Page 17

Click to enter the recording playback list. In record file list, click
X to delete selected record file. Click on the file to playback.
Play mode setting
- Click , delete current record file
- Click , select sound quality “Good Quality”, “Normal
Quality”, “Poor Quality”.
Operation of E-book
Click E-BOOK icon in the main menu to enter the E-BOOK mode.
Tap on the file that you want to read from the list.
Resume read: It will show up “Play from breakpoint?” enter the
page which is not the first time read in the player. Click “Yes” to
resume read, and “No” to start read at the beginning.
- Click , return to previous menu.
17
Page 18

- Click , E-book auto go to the next page.
- Click , rotate page and view in vertical or horizontal.
- Click , add bookmark by selecting a number in order.
- Click , open bookmark by tapping on bookmark that you
want to open.
- Click set font size “16”, “20”, “24”, “28”, “32”.
- Click set font color “Black”, “Blue”, “Green”, “Red”, White”.
- Click select background among 4 defaulted background.
- Click to set range of 1-5 brightness of screen.
- Click insert music in reading mode.
- Click select auto turn page by a preset time among “5s”,
“10s”, “15s”, “20s”, “30s”.
- Click select font width from 0-4.
Calculator
From main menu, select calculator icon
Use the keys that correspond to the calculator display to perform
mathematical operations.
18
Page 19

System Setting
From main menu, select system setting icon to enter system setting
menu.
1. TV output
Select “TV output” among “LCD”, “NTSC”, “PAL”.
No te: Do not disconnect the AV cable directly once the player
connected to your output device.Such action may cause
problems to the player.
You should click Esc icon on the display to exit first, and
then disconnect the player from your output device.
2. Power
Show battery power and discharging time of unit.
3. Language
Select different language from the list.
4. Wallpaper
Select different wallpaper from the list.
5. Auto Off
Select switching off time “5mins”, “10mins”, “30m
“Always on”.
6. Screen shutdown
Select screen shutdown time “5s”, “10s”, “15s”, “30s”, “1mins”,
“5mins”, “Always on”.
. Key Tone
7
Select on/off of key tone.
ins”, “1hour”,
19
Page 20

8. Brightness
Select from level 1 to 5 of screen brightness
9. Calibration
To calibrate touch screen. Tap the cross on touch screen until
calibration is finished.
10. System Information
Show the details of unit: software version; local memory size(used
and total); memory card size(used and total).
11. Color temperature adjustment
Adjust color temperature level from 1 to 10 “Red – R” “Green –
G” ”Blue – B”.
12. Restore default
Restore factory setting (files stored in player will not be deleted.)
Trouble Shooting
If you experience any of the following difficulties while using the
player, use this Trouble-shooting guide to help you remedy the
problem. Should any problem persists, consult the service center
immediately
No power
1. Check if the battery have been inserted properly.
2. Check if the player is switched ON.
3. Check if the player has run out of battery.
4. Connect the player with charger or PC via USB and check again.
5. If the player still cannot be charged, please contact the service
center.
No sound is heard from earphone
1. Check if volume is set to “0”.
2. Check if earphone plug is clean and being connected firmly.
20
Page 21

3. Make sure music files are not corrupted.
Noise
1. Check if earphones is connected securely.
2. Check if earphones plug is clean, residue attached on earphones
plug may cause unnecessary noise.
3. Check if audio source is not damaged. Try to play other audio
files for comparison. Damaged audio files could cause unnecessary
noise and cause skip track.
Display characters corrupted
1. Check if the correct display language is selected.
Problem with downloading files
1. Check if the player is connected to PC properly.
2. Check if the player’s memory is full.
3. Check if USB cable is working properly.
21
Page 22

Technical Information
Distortion
0.03%
Power Supply 3.7V Lithium battery(800mAh)
Dimensions
Net Weight 120 g
Display
Display resolution 480x272 pixel
Operating System Window Me/2000/XP/Vista/
Interface USB 2.0 High Speed
Earphones
TV output 3.5mm
Built in speaker
External memory extension Micro SD card (up to 32GB)
Audio playback MP3, WMA, OGG, APE,
Video playback RM, RMVB, AVI, WMV, MP4,
Photo browsing
Recording format MP3
E-Book TXT, PDF
S/N ratio 85dB
Earphone max output power (L) 5mW + (R) 5mW, 32Ohm
Frequency response
111.7mm x 73.8mm x 12.6mm
4.3 inch touch color display
Window 7
3.5mm
1W
FLAC, AAC, WAV
MPG
BMP, JPG, GIF, PNG
20Hz – 20KHz
22
Page 23

Specifications are subject to change without notice.
No part of this document may be reproduced or transmitted
in any form or by any mean, electronics or mechanical
including photocopying and recording
or translated to another language for any purpose
23
 Loading...