

Page 1

MPK8230BUK
USER MANUAL
Page 2

What's in the box?
Operating Unit
User Manual
Quick Start Guide
USB Cable
Earphone
Battery Charger
2
Page 3

Content
Buttons Location and Usages
Basic Operation
Operation of Music Mode
Operation of Video Mode
Operation of Photo Mode
Operation of eBook Mode
Operation of Explorer Mode
Operation of Record Mode
Operation of Other Mode
Operation of Settings Mode
Technical Specification
Trouble Shooting
9-13
13-14
15
16-17
17
17-18
18-19
19-20
3
Page 4
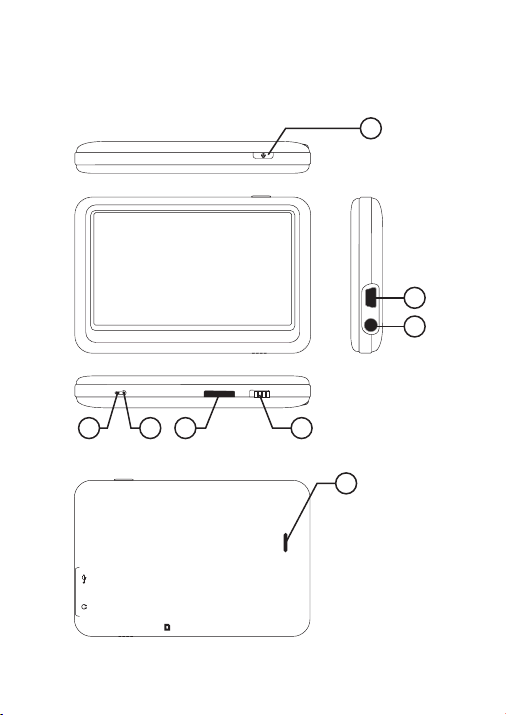
Buttons Location and Usages
1
4567
8
1.ON/OFF
2.USB PORT
3.Earphone Jack
4.HOLD
5.MICRO SD CARD SLOT
6.RESET
7.MIC
RESET
HOLD
MIC
8.SPEAKER
2
3
4
Page 5

Basic Operation
Power on/off and Enter function
Pres s th e Po wer button and ho ld f or 3 s econds to
swit ch o n th e device and hold f or 3 s ec onds to switch
off.
When u si ng t his device, Pow er b ut ton also act as a
ENTE R fu nc tion for select in g op tions.
Lock
Slid e th e Lo ck button towar d th e Mi cro SD card slot
posi ti on t o key-lock the pl ay er a nd slide for oppo si te
posi ti on f or unlock.
Reset
If the p la ye r encounters de ad h al t during use, pre ss
RESE T button t o re st art the player.
How to insert and pull out Micro SD card
How to i ns er t: with the front ( th e si de with charact er s)
of the M ic ro S D card up (toward s th e sc reen of the
play er ), s lightly push to i ns er t into the card hol de r of
the pl ay er t o connect. After t he c ar d is inserted, th e
play er c an p lay the files in th e Mi cr o SD card.
How to p ul l ou t: slightly pus h th e Mi cro SD card and
the Mi cr o SD c ard will partly c om e ou t, and then pull
the ca rd o ut .
Note : pl ea se insert or pull o ut t he c ard when the play er
is off, or the int er na l files of the play er w il l be lost or
dama ge d.
5
Page 6
Connection to PC and Data Exchange
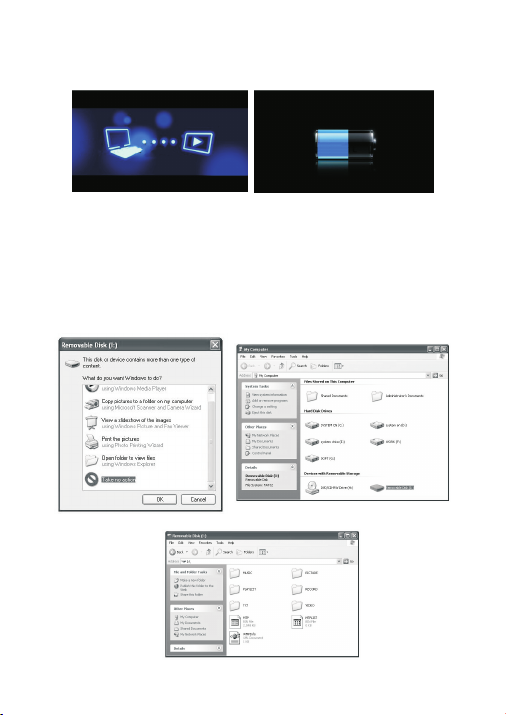
Conn ec t th e player to PC with t he U SB c able, and the
play er w il l enter “U disk” mo de . Pr ess MENU button o r
safe ly r em ove U disk, and the p la ye r will be under
USB ch ar gi ng mode. In USB cha rg in g mode, touch the
scre en o r pr ess MENU to enter t he m ai n application s
inte rf ac e.
6
Page 7

The ab ov e sc reen would appe ar. ( Ap ply only to
Wind ow X P) C hoose Take n o action and clic k OK t o
clos e th e wi ndow. Double cli ck M y Co mputer on your
desk to p an d the above windo w wo ul d appear. Look for
the Re mo va ble Disk Icon.
Doub le c li ck the Removabl e Di sk i con. Note: Do not
disc on ne ct the USB cable on ce y ou c lick into the
remo va bl e disk window. Suc h ac ti on may cause data
loss o r pr ob lems to the playe r.
Drag a nd d ro p your media file s in to t he removable
disk . You ca n cr eate any folder o r di re ctory in the
remo va bl e disk. Close the r em ov able disk windo w an d
disc on ne ct the player fro m yo ur P C after the data
tran sf er.
Charging
This p la ye r has high capaci ty l it hium battery. For
char gi ng , connect the pla ye r to t he USB port of the PC
or to a ch ar ge r. When the charge r is u se d for charging,
the ba tt er y blue bar will kee p mo vi ng; when batter y is
full y ch ar ged, it will stop m ov in g.
Low Power
When b at te ry power is low, the p la ye r will prompt and
powe r off and en te r St andby mode auto ma ti cally. Do
not po we r on a nd charge the pla ye r in stead.
7
Page 8

Touch Calibration
Init ia l se tup or if you canno t se le ct objects accu ra te ly
with y ou r fi nger or a stylus, You m ay n ee d to
reca li br ate the touch scr ee n:
- Ente r th e ca libration set ti ng s creen by short ke y: I n
the ma in m en u interface, pr es s po wer button of the
play er t o en ter touch calib ra ti on screen direc tl y.
- Or pre ss “ Se tt ings” optio n on t he m ain menu, enter
into s ub me nu. Choose “Touch P an el C alibration” t o
ente r th e se tting mode.
- Afte r th e pl ayer enters thi s mo de , touch the cente r
of cal ib ra tion sign + three t im es b y stylus (optio na l)
or you r fi ng er to calibrate .
Note s: N ev er use sharp, har d, o r ab rasive tools on t he
touc h sc re en, they will dam ag e th e screen. If the to uc h
scre en h as b een contamina te d by c hemicals, it mu st
be cle an ed i mmediately wi th a s of t and clean cloth .
The cl ot h ca n be dry or dampene d wi th n eutral
dete rg en t or alcohol.
8
Page 9

Main interface
Once y ou s wi tch the player on y ou 'l l reach to the main
inte rf ac e as below.
Operation of Music Mode
Doub le c li ck the Music icon o n th e ma in menu to enter
the mu si c mo de. Once you've e nt er ed the music
mode , th e fo llowing scree n wo ul d show up.
Current play
Doub le c li ck the Current Pl ay i co n to resume playi ng
the cu rr en t song.
All Music
Doub le C li ck the All Music ic on t o sh ow your library o f
musi c, d ou ble click any par ti cu lar song to start
play in g.
9
Page 10

Artist
Doub le C li ck the Artist ico n to s ho w all of your artis ts ,
doub le c li ck any particul ar a rt ist to show the son gs o f
that a rt is t. Double click a s on g to s tart playing.
Album
Doub le C li ck the Album icon t o br ow se all of your
albu ms , do uble click any pa rt ic ular album to bro ws e
the so ng s of t hat album. Doub le c li ck a song to start
play in g.
Genre
Doub le C li ck the Genre icon t o br ow se all of your
genr es , do uble click any pa rt ic ular genres to br ow se
the so ng s of t hat album. Doub le c li ck a song to start
play in g.
My Favorite
Doub le C li ck the My Favorit e ic on t o browse all song s
that y ou 'v e added to be your fa vo ri te. Double clic k a
song t o st ar t playing.
Record
Doub le C li ck the Record ico n to b ro wse all recorde d
file s. D ou ble click a file to s ta rt p laying.
Dir List
Doub le C li ck the Dir List ico n to b ro wse all folders o f
the di re ct ory. Do ub le click a folder f or s el ect file to
open .
Medi aL ib U pdate
Doub le C li ck the MediaLib U pd at e icon to update al l
song s in fo rmation and det ai ls .
Clic k to j um p back to the main me nu .
10
Page 11

Music Player interface
When ev er y ou start playin g a so ng y ou'll reach the
Musi c Pl ay er Interface as b el ow.
Play Music
Clic k th e Pl ay button to star t pl ay ing, click agai n to
paus e. D ra g the horizonta l ba r to a djust playing
prog re ss w ith specified t im e sl ot.
Volume
Clic k or t o ad just the volume .
Previous / Next
Clic k ju mp t o the next song, an d cl ic k to jump
back t o th e pr evious song.
11
Page 12

Add songs into Favorite List
Open a p la yl ist and choose th e se le cted song and
then c li ck t o add song into fav or it e list. Click
Yes to c on firm once the win do w po p-up.
Play Option
Clic k th e to e nter the Play Opt io n Me nu. You
can se t yo ur p reference in Re pe at M ode / Play Mode /
MSEQ / E Q Se tt in g / User EQ Setup.
Repeat Mode
Doub le c li ck Repeat Mode to c ho os e from Repeat /
All / All R epeat / Intro. Do ub le c lick selected o pt io ns
to con fi rm s etting. Once yo u' ve s elected, clic k
retu rn t o su b-menu.
Play Mode
Doub le c li ck Play Mode to cho os e fr om In Order or
Shuf fl e. D ou ble click sel ec te d options to conf ir m
sett in g. O nc e you've sele ct ed y our choice, cli ck
to ret ur n to s ub-menu.
MSEQ
Doub le c li ck MSEQ to choose d iffere nt s ou nd eff ect
from 3 D / Ba ss / L EQ . Double clic k se le cted options to
conf ir m se tting. Once you 'v e se lected your cho ic e,
clic k to r et urn to sub-menu .
12
Page 13

EQ Sel
Doub le c li ck EQ Sel to choose d iffere nt E Q fr om
Norm al / M SE Q / Ro ck / Pop / Classic / Ba ss / J az z /
User EQ . Do uble click sele ct ed o ptions to confi rm
sett in g. O nce you've sele ct ed y our choice, cli ck
to ret ur n to s ub-menu.
USER EQ Setup
Doub le c li ck User EQ Setup to a dj us t your own EQ
Sett in g. D ouble click sel ec te d options to conf ir m
sett in g. O nce you've sele ct ed y our choice, cli ck
to ret ur n to s ub-menu.
A – B Repeat
Clic k on ce t o se t the starting po in t of t he A-B
Repe at , th en click again to s et t he e nd ing point.
The A-B r ep ea t setting is done . To cancel A-B r ep ea t
mode , cl ic k ag ain.
Lyrics
Clic k to c ho os e to display ly ri cs .
*The p la ye r only supports . LR C ly ric.
Operation of Video Mode
Doub le c li ck the Vid eo icon on the main m en u to e nter
the Video mode . On ce y ou've entered t he v id eo mode,
the fo ll ow ing screen woul d sh ow u p.
13
Page 14

Clic k an y pa rticular movi e in t he l ist to start play in g.
Basic Video Control
The fo ll ow ing control pan el w il l show up when a vide o
star t pl ay ing.
Clic k to c ho ose previous mo vi e, h old to rewind.
Clic k to c ho ose next movie, h ol d to f ast-forward .
Clic k / to a dj us t the volume. C li ck t o re sume
play in g fr om where the vide o st op ped last time.
14
Page 15

Operation of Photo Mode
Doub le c li ck the Photo icon o n th e ma in menu to enter
the Ph ot o mo de. Once you've e nt er ed the photo
mode , th e fo llowing scree n wo ul d show up.
Basic photo control
Doub le c li ck on a particula r ph ot o to open it. Click
to rot at e 90 d egree clockwi se , an d click to rotate
90 deg re e an ti-clockwis e. C li ck to zoom in and
clic k to z oo m ou t the photo. Cl ic k to p la y
phot o in s li de show.
15
Page 16

Operation of eBook
Doub le c li ck the eBook icon o n th e ma in menu to enter
the Re co rd m ode. Once you'v e en te red the e-book
menu , th e fo llowing scree n wo ul d show up.
Basic eBook control
Doub le c li ck on a particula r .t xt f ile to open the eBo ok .
When o pe ne d an eBook file, cl ic k to g o back to
prev io us p age, click to ski p to t he n ext page.
Clic k to e nt er t he E-book Optio n Me nu . You can
set yo ur p re ference with fo ll ow ings:
16
Page 17

E-book Option Menu
Page J um p: I nput the page num be r th at you'd like to
jump t o.
Save Ma rk : Choose any empt y sl ot t o save your
book ma rk t o.
Load Ma rk : Load any previo us ly s aved bookmark s.
DelM ar k: D elete any unwan te d bo okmark from slo ts .
SetF on t: S et t he font size fr om S ma ll, Middle to Big
SetC ol or : Set the font colo r
Brow se r Mo de: Choose from a ut om atic flipping a nd
manu al f li pping
Flip Time: Choose fro m th e ti me interval b et we en
ever y au to f lip, from 10 sec to 3 0 se c.
Operation of Explorer Mode
Clic k on “ Ex plorer” to ente r th e fi le managing mod e.
An add it io nal folder “TF Ca rd ” wi ll be shown after
inse rt in g a SD card. To delete a file, clic k a fi le t o
high li gh t it, and then clic k to d el ete it.
Operation of Record Mode
Doub le c li ck the Record ico n on t he m ain menu to
ente r th e Re cord mode. Once y ou 'v e entered the
reco rd m od e, the followin g sc re en would show up.
17
Page 18

Basic record control
Clic k to s ta rt r ecording. C li ck t o pa use
reco rd in g, click again to r es um e recording. Cl ic k
to sto p re co rding and then cl ic k “Yes” to save t he
reco rd f il e.
Doub le c li ck the to enter the R ec or d Option
Menu . You ca n se t your preferen ce i n qu ality of record
file . There ar e tw o op tions : Low rate an d Hi gh r ate.
Once y ou 'v e selected, cli ck t o re tu rn to submenu .
Operation of Other Mode
Doub le c li ck the Other icon o n th e ma in menu to enter
the Ot he r mo de. Once you've e nt er ed the Other mode ,
the St op wa tch option coul d be d ou ble clicked to
sele ct .
18
Page 19

Stopwatch
Clic k on t he “ Stopwatch” to e nt er t he stopwatch mo de .
Pres s th e po wer button or cli ck o nc e to s tart
coun ti ng t ime, click to pau se i t an d cl ick once
agai n to r es ume counting. P re ss t he power button o r
clic k on ce a ga in to finish th e ti me c ounting. Clic k
to res et t he c ur rent time cou nt t o be z ero.
Operation of Settings Mode
Doub le c li ck the Settings i co n on t he main menu to
ente r th e Se ttings mode. On ce y ou 've entered the
sett in gs m enu, the follow in g sc reen would show u p.
19
Page 20

Display Setting
Clic k in t o ad just Light Time, B ri gh tness, Light Mo de .
System Setting
Clic k in t o up grade firmwar e, t o re store to defaul t
sett in g or t o calibrate you r sc re en.
Language
Clic k in t o ch oose your desir ed l an guage.
System Information
Clic k in to s ystem informa ti on t o check the firmw ar e
vers io n, t he memory size an d ca rd m emory size.
Slide Show
Clic k in to s elect from 5 to 20 se c fo r th e slideshow for
revi ew in g photo.
AutoShut Time
Clic k in to Au toShut Time to set t he a ut o shut down
time o f th e pl ayer, from 3 minut es t o No Au tomatic
Shut do wn .
20
Page 21

Technical Specification
Flas h Me mo ry
MP3 Fo rm at S upported
Video Format S up po rted
Phot o Fo rm at
Supp or te d
Batt er y
Inte rf ac e
Disp la y
Spea ke r Ou tput
Weight
Dime ns io ns
128M B / 25 6M B / 512MB
/ 1GB / 2GB / 4G B / 8G B
MP3/ WM A/ FL AC/WAV
RM/R MV B/ AVI /W MV
JPG/ BM P/ GI F
Lith iu m Re chargeable
Batt er y
USB2 .0 H ig h Speed
3.6” C ol or TFT Touch
Scre en
8ohm 1W
75g
96(W ) x 63 .6 (D) x
12.7 (H ) mm
21
Page 22

Trouble Shooting
What shou ld I d o if t he re's no sound w he n pl ay ing?
You s ho uld check the v ol um e fi rst. If the vol um e ha s be en
turned up , ma yb e th e me mory form at o f th e de vi ce is
incorre ct ..
Cannot se le ct o bj ec ts accurate ly w it h yo ur finger o r a
stylus (opt io na l)
You m ay n eed to recali br at e th e touch scree n.
Specifica ti on s ar e subject to ch an ge w it hout notice .
No part of th is d oc um en t may be reprod uc ed o r tr ansmitted i n
any form or by an y me an , el ectronics o r me ch an ical includ in g
photocopy in g an d re cording
or translat ed t o an ot her languag e fo r an y pu rpose
We tr us t you a re c omp le tel y sa tis fi ed wi th t his p ro duc t fr om Arg os L td,
howev er plea se feel f ree to co ntact u s if you ex perie nce any d iff ic ult ie s,
or if you w ould li ke to exp ress yo ur view s regar ding ou r produ cts.
Pleas e write t o:
Custo mer Ser vices
Arg os L td
489-4 99 Ave bu ry Bo ul eva rd
Saxon G ate Wes t
Centr al Milt on Keyn es
MK9 2 NW
Telepho ne: 087 0 600 303 0
Thr ou gh the pr ocess o f conti nuous i mprov ement , Argos Lt d. rese rves
the r ig ht to c ha nge or al ter spe cific ation s witho ut prio r notic e. E&OE
22
 Loading...