

Page 1

Page 2
1
PREFACE
3
2
3
4
SAFETY
PRECAUTIONS
IN THE CARTON
FRONT AND
BACK
CONNECTIONS
OF LCD TV
Power Cord Connection
Antennas Connection
5
BASIC
INSTALLATION
AV Connection
YPbPr Connection
3
5
6
7
7
8
8
9
9
6
8
REMOTE CONTROL
Basic Operation
7
TV Operation
Select Input Source
Picture Menu
Sound Menu
Setting Menu
Function Menu
Channel Menu
10
11
12
13
14
14
16
Page 3
9
TROUBLESHOOTING
AND ADVIC E
17
SPECIFICATIONS
10
Wall mounting
Assembly
11
Instruction
18
19
Page 4

1. PREFACE
Thank you for buying this TV ! Please read this manual throughly before operating the TV.
Make sure the TV was not damaged in transit. Should the TV is damaged , do not install
it and contact
your dealer. Check that you h av e al l the accessories according to the m od el .
2. SAFETY PRECAUTIONS
Put the TV on a stable surface.
Min imum dis tance s
25m m 25m m 6 0mm
25m m
Do not place a ny mat er ia l on t he TV.
Do not u se the with fixtures other than those provided o r
TV
suggested by the manufac tu re r.
Do not block o r cover the ventilatio n openings on the TV.
If you have a wall mount, check that it is s te ad y.
Power cord and c ab le s mu st b e prop er ly routed and protected to pr ev en t
people from stepping on them and causing the TV to fall.
3
Page 5
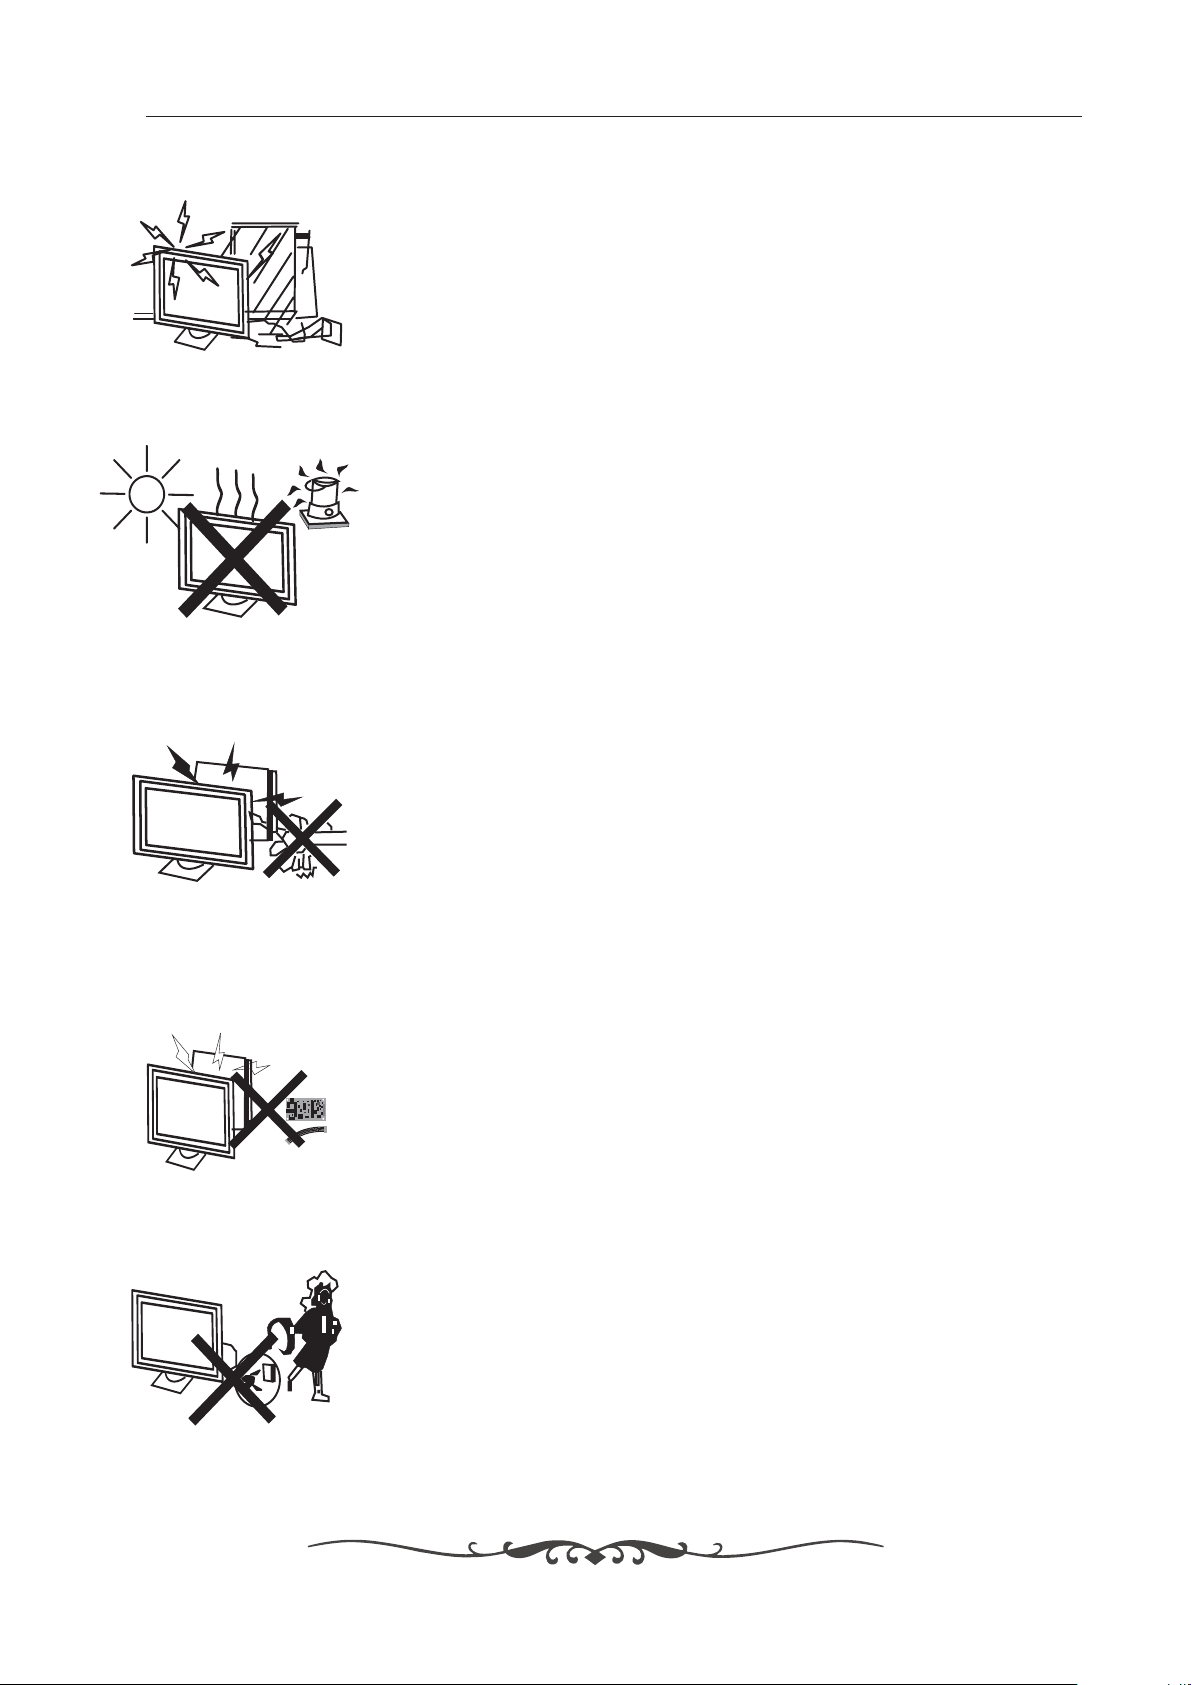
Keep the TV dry and away from humidity.
Keep the TV away from heat sources
.
Unplug the before cleaning it. Do not use solvent or l iquidTV to clean
the TV.
Only clean the TV with a soft and dry cloth.
In case of troub le sh oo ting, do not u se spare parts other than t ho se
suggested by
the manufacturer. U si ng i na de quate sp are parts can
shocks, short-circuits fire or other incidents.lead to electric
Unplug the TV during lightening storms or when unuse d for long periods
of time.
4
Page 6
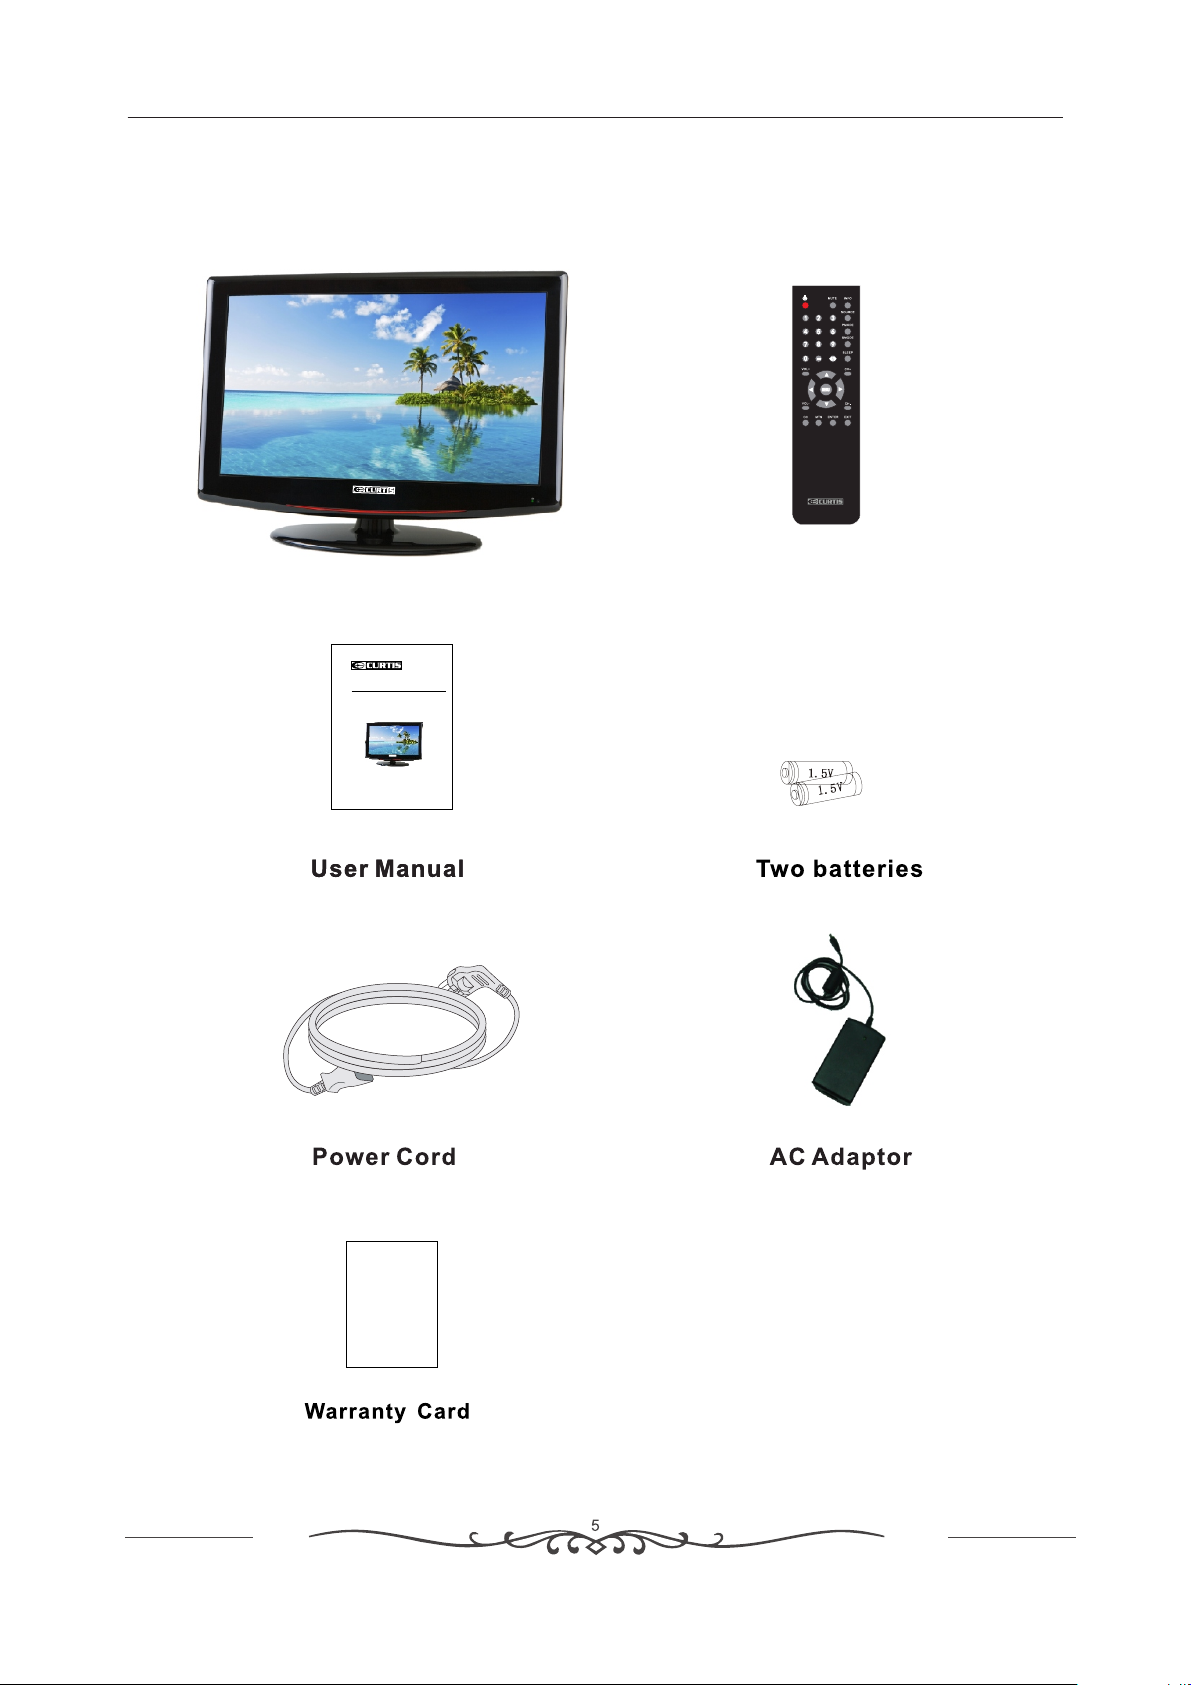
3. IN THE CARTON
3. IN THE CARTON
TV SET
MANU EL D'INS TRUCT ION
Veuillez li re atten tive ment ce ma nuel e t le reten ir pou r futur
référenc e avant d' util iser la Té lé.
Remote Control
Remote Control
MODEL E: LCD1 933
LIMITED PRODUCT WAR RANT Y
This quality pro duct is wa rrante d to be fr ee from ma nufa cturer 's def ects
in material and wo rkman- ship , provid ed tha t the unit i s used u nder the
normal operati ng condi tion s intend ed by th e manufa cturer.
Should you have an y proble m with thi s prod uct, ple ase an d it is high ly
recommended to vis it our w ebsite a t www.c urtisi nt.c om befor e you ta ke
any other steps as we ha ve add itiona l copi es of inst ruct ion manu als,
operating manual s and tr ouble sh ooti ng tips on o ur web site whi ch giv es
you the answer on most o f the qu estion s you co uld have i n oper ating th e
unit.
TERMS OF WARRANTY
C.I. Service Dept. w arra nts this p rodu ct to be fre e from d efects i n
materials and wo rkmans hip fo r 1 year on pa rts an d 90 days on l abor. If
you originally p urchas ed you r produc t more t han 90 day s ago, a r epair
fee may apply.
Nothing within thi s warr anty sha ll imp ly that C. I. wil l be respo nsib le or
liable for any dam age to any i tems pla ced in t his prod uct, w hether d ue to
any defect of the prod uct, o r its use, w heth er prope r or imp roper.
EXCLUSIONS
Save as herein provi ded, C .I. Serv ice De pt. (Can ada) o r C.I. Ser vice
Dept. (USA), there a re no ot her warr anti es, cond itio ns, repr esen tation s
or guarantees, exp ress o r implie d, mad e or inten ded by C .I. or its
authorized distr ibut ors and al l othe r warran ties , condit ions ,
representation s or gua rant ees, inc luding a ny war rantie s, con dition s,
representation s or gua rant ees unde r any Sale o f Good s Act or like
legislation or s tatue is h ereb y expres sly ex cluded . Save as he rein
provided, C.I. Ser vice D ept. (Ca nada ) or C.I. Se rvic e Dept. (U SA), s hall
not be responsib le for any d amag es to pers ons or pro pert y, inclu ding the
unit itself, howso ever c aused or a ny con sequen tial d amages a risi ng
from the malfuncti on of th e unit and b y the pu rchase o f the un it, the
purchaser does h ereby ag ree to i ndemni fy and s ave harm less C .I. from
any claim for dama ges to per sons o r proper ty cause d by the u nit.
Page 7
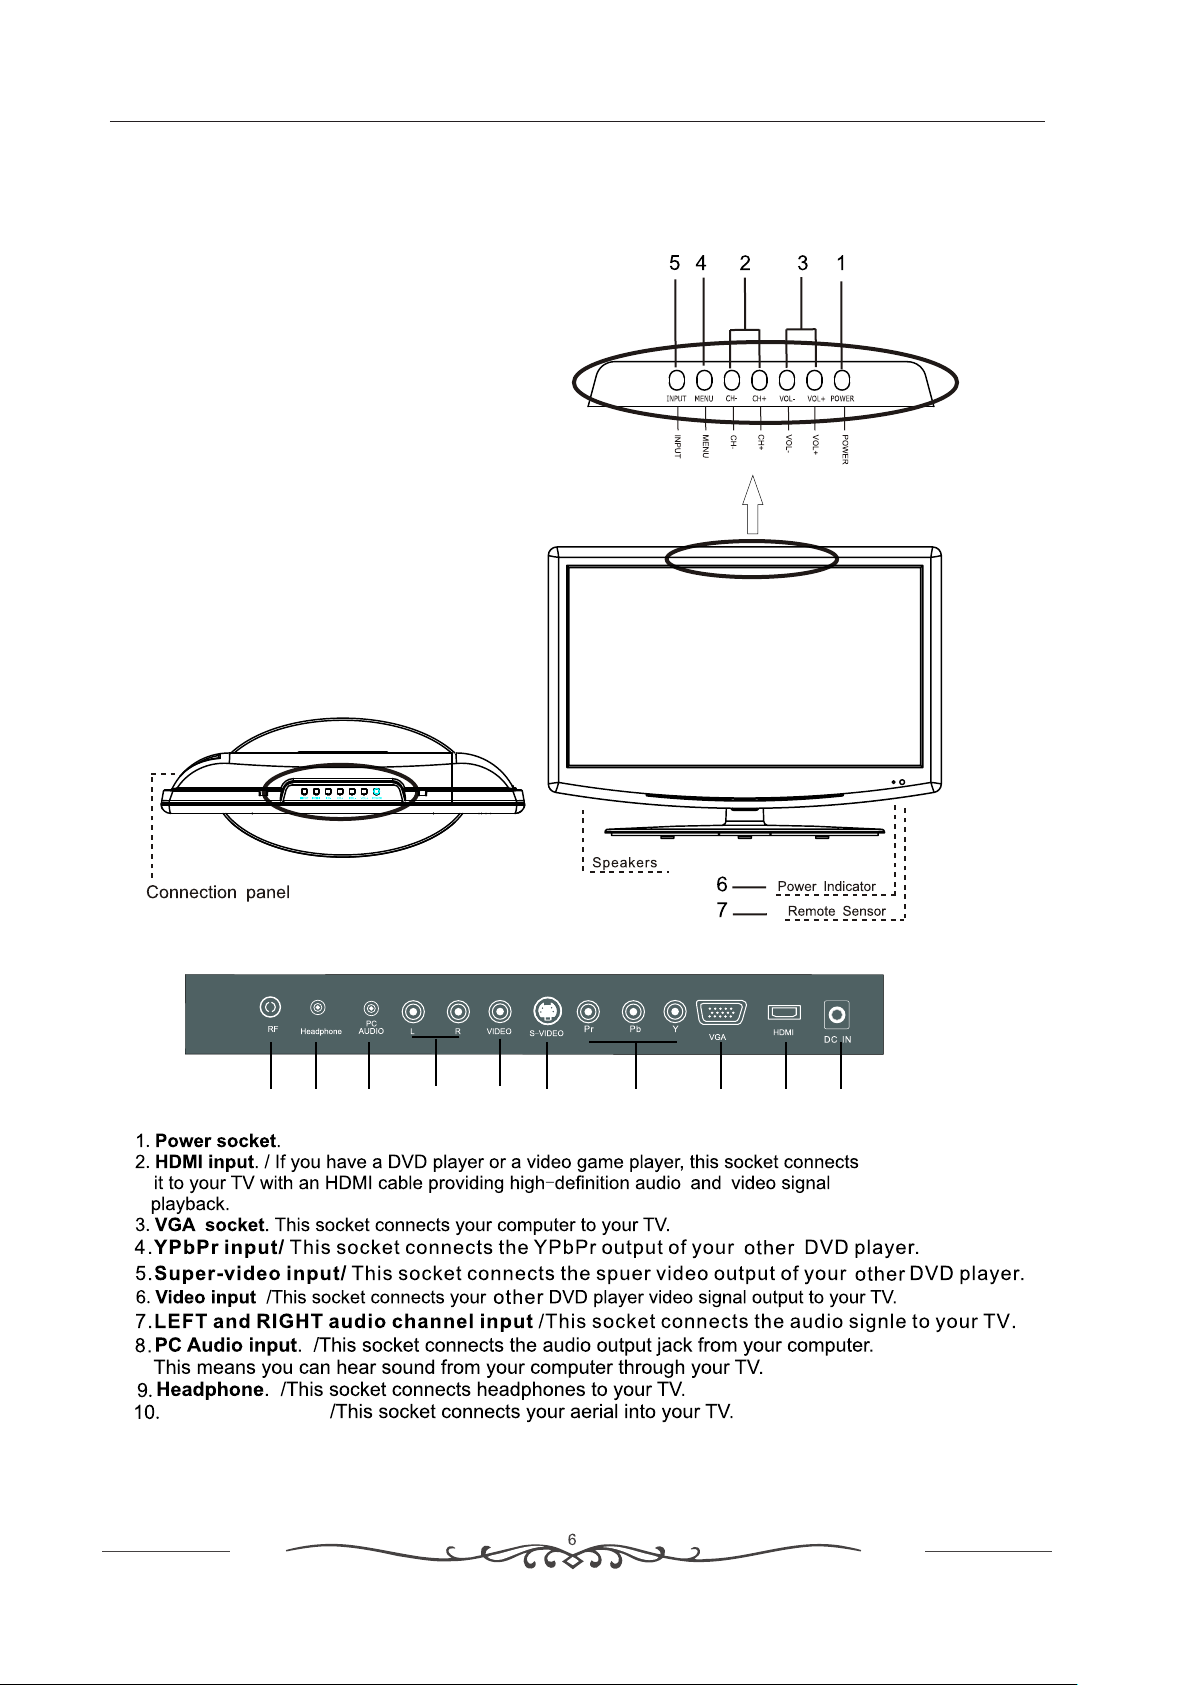
4. AND TVFRONT BACK CONNECTIONS OF LCD
Front View
1.Press “PO WER” button to tu rn standby
mode on or off.
2.Press “CH +” or “CH-” to scan t hrough
channels.
3.Press “VO L+” or “ VOL-” to in crease or
decrease th e volume.
4.Press “ME NU” to bring up the m ain menu
on the screen .
5.Press “IN PUT” to select th e input sourc e.
6.POWER IND ICATOR : Show red in sta ndby
mode, show bl ue when your TV is
switched on .
7. REMOTE SEN SOR: Infrared s ensor for the
remote cont rol.
(HDMI cable not inclued)
Antenna Input.
891 0
7
5
6
4
123
Page 8
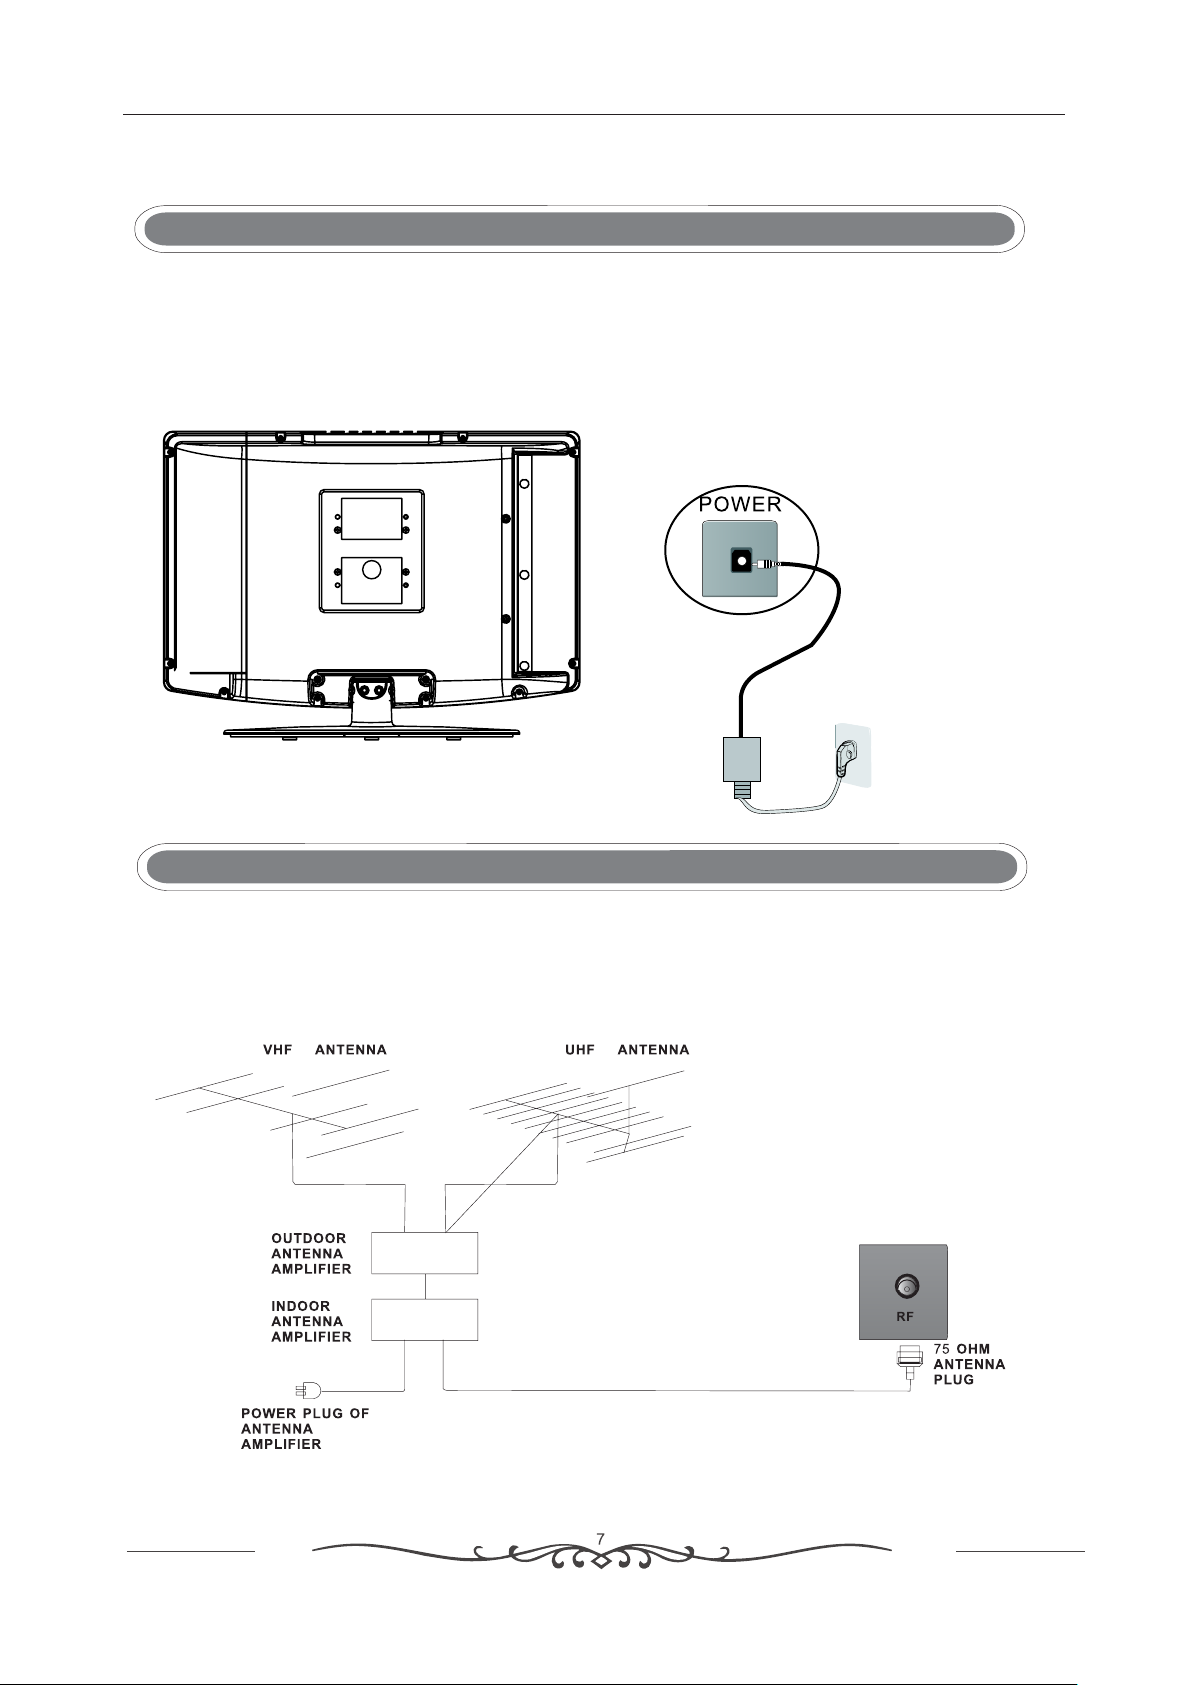
5. BASIC AINSTALL TION
Power Cord Connection
- Connect the pow er cord and AC adaptor corr ectly as shown.
- Press the POWER s witch of your L CD TV to swit ch the unit on. The power indi cator on the
front panel lig hts up in blue.
AC Adaptor
POWER Cord
Antennas Connection
To ensure good pict ure and sound, TV antenna sy stem needs to b e in stalled. The antenna s ystem as
shown can be sour ced from TV e quipment shop s, which will p ro vide servic e for correct ins tallation
and connectio n. After insta llation, inse rt the 75-OHM ant enna plug into th e antenna jac k as s hown.
Page 9
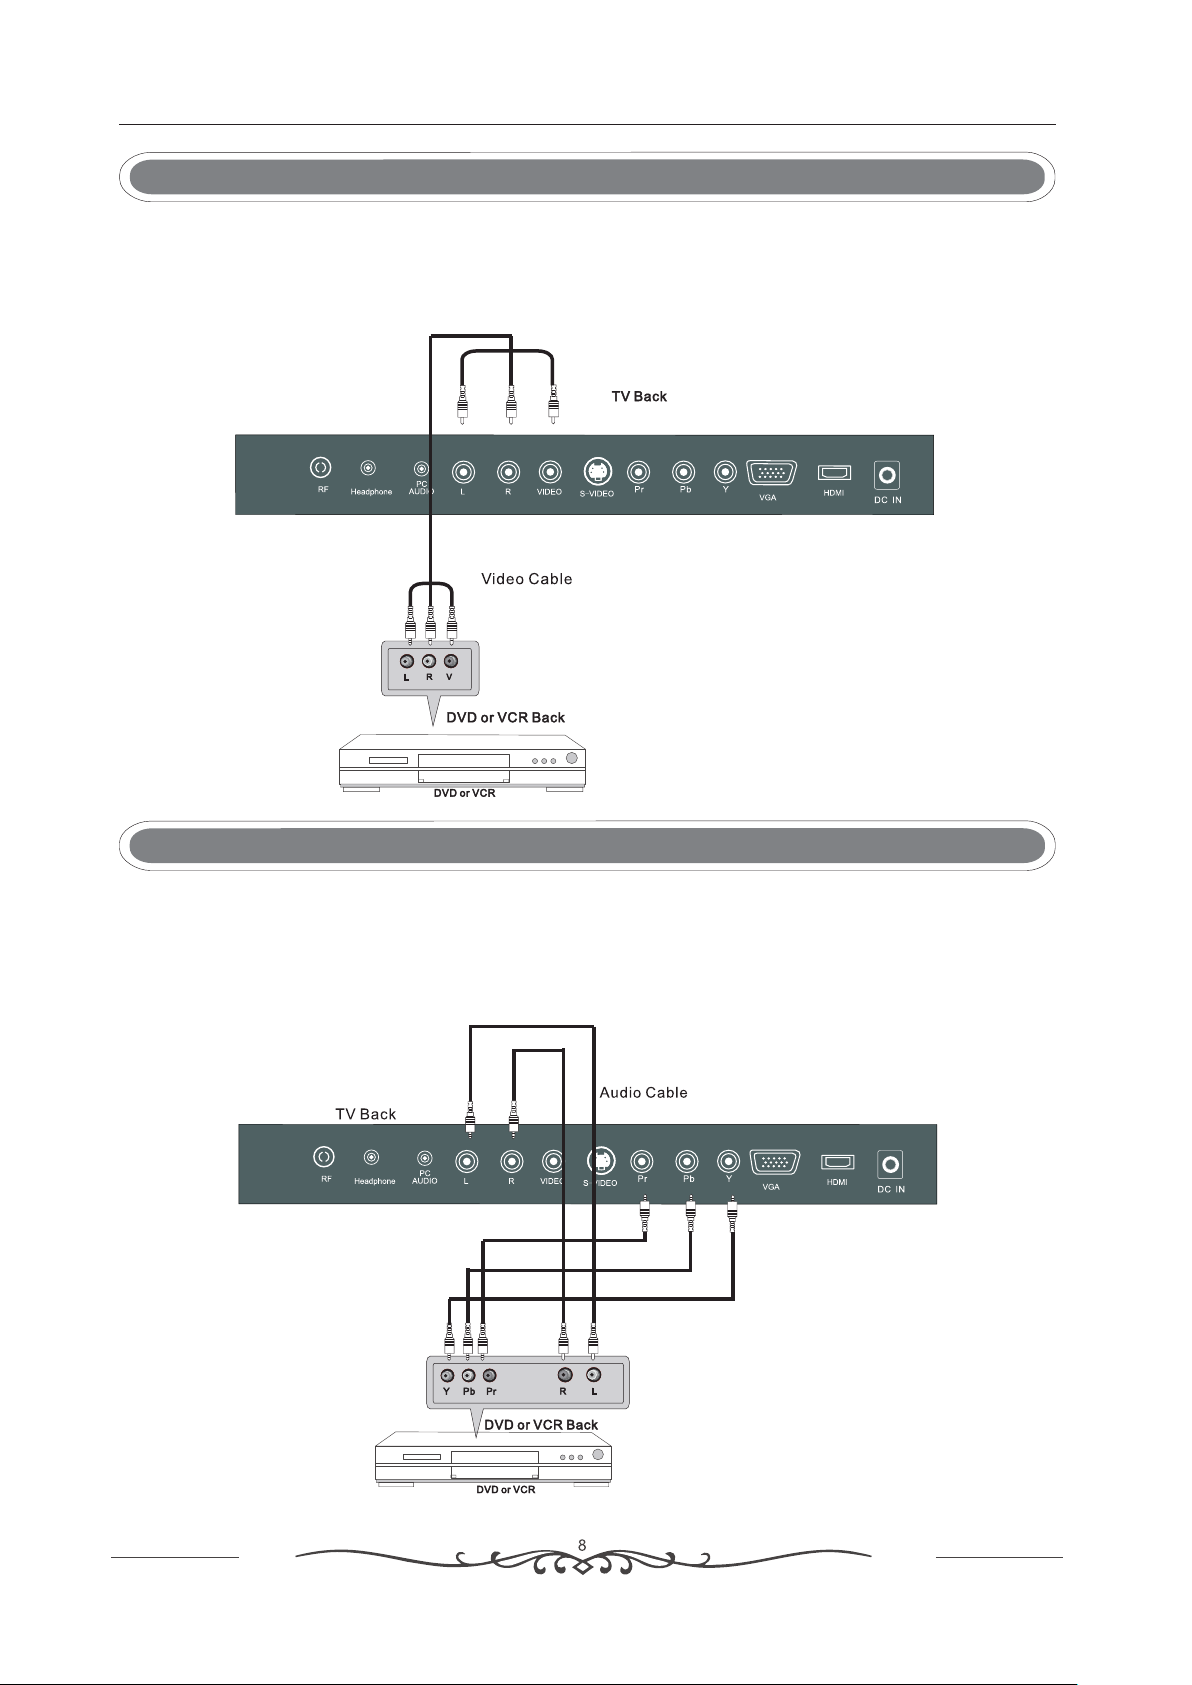
AV Connection
Connect the V IDEO and AUDIO out put jack of the D VD or VCR to the AV IN jacks on the set us ing
the RCA ca ble (Yel low [video] , White and RED [le ft & Right audi o]).
Select the AV input source u sing the SOURCE b utton on the re mote control.
YPbPr Connection
Connect the YPbPr outp ut of the DVD or VCR to t he YPbPr in put on the set. The pictur e quality is impr oved
compared to c onnecting a reg ular VCR to the v ideo input. Con nect the Audio o utput of the DVD or V CR to
the Audio inpu t jacks on the set us ing the RCA cable.
Match the jac ks colours: Y is g reen, Pb is blue, P r is red, Au dio left is white a nd Audio right i n red.
Select YP bPr input sou rce using the SOU RCE button on t he remote contr ol.
YPbPr C abl e
(3.5mm plug -2 X RCA plug)
Page 10
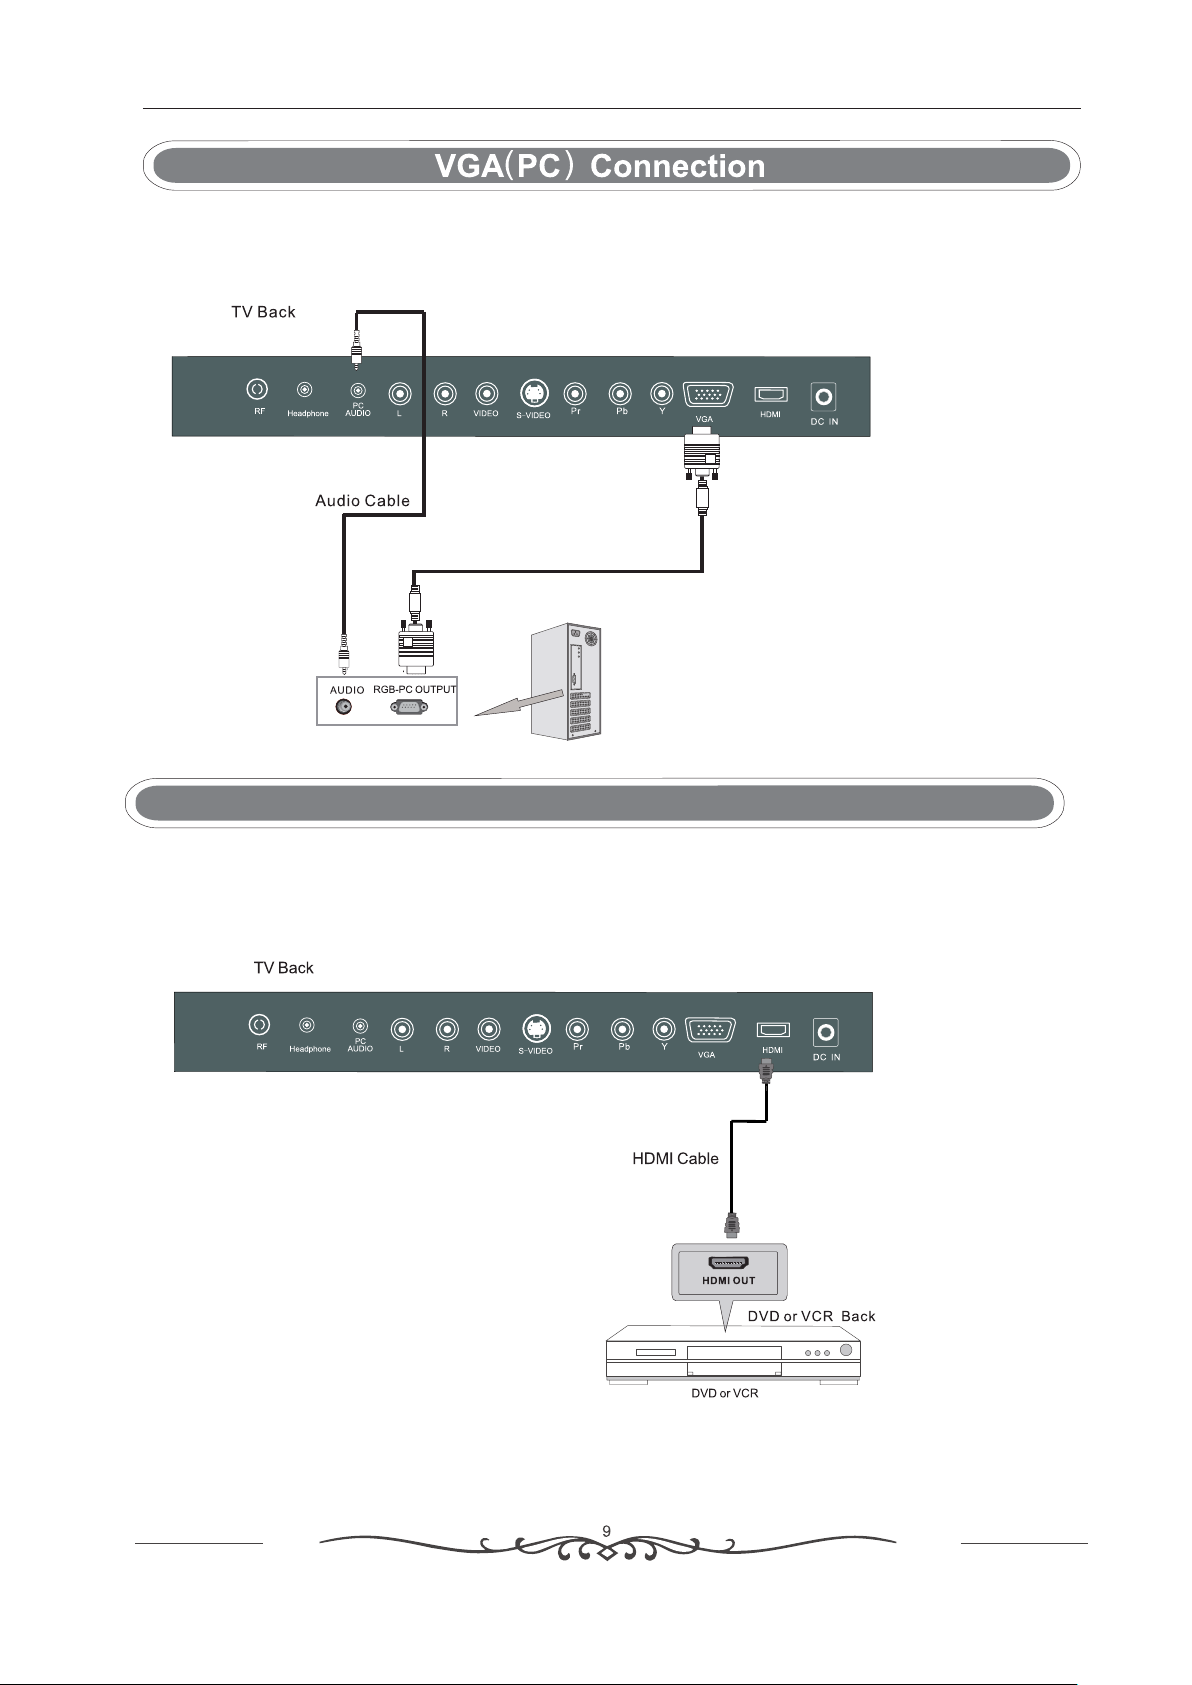
Connect the RGB o utput of the PC t o the VGA jack o n the set. Connec t the AUDIO outp ut of the PC to the PC
AUDIO jack on the s et. Select th e PC input source u sing SOURCE but ton on the remote c ontrol.
VGA Cable
HDMI Connection
HDMI connecti on allows the u ser to transfer b oth audio and vid eo control si gnals through o ne cable only.
These signals a re transfer red in digital.
Page 11
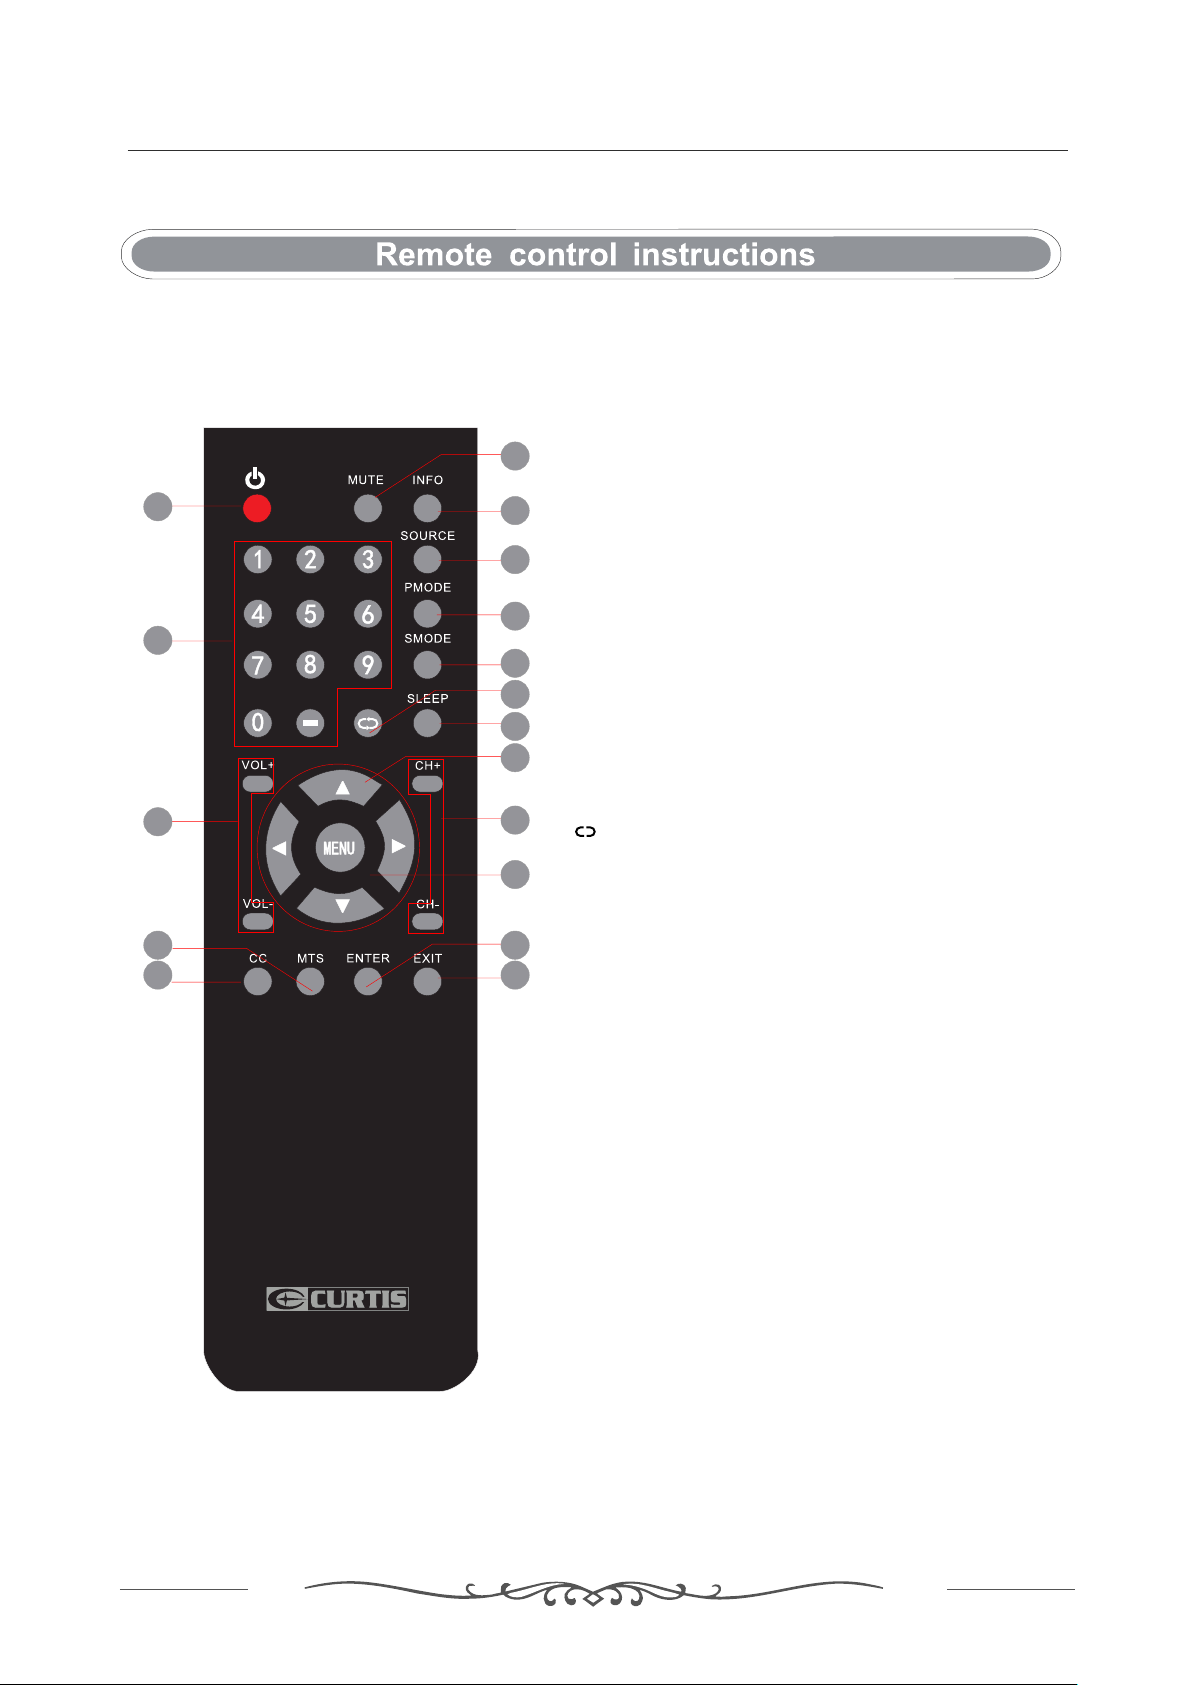
6. REMOTE CONTROL
1.STANDB Y
To switch on the Tv or make the TV into
standby mode.
2.MUTE
Press this butt on to mute or res tore sound.
2
7
10
15
14
1
3.INFO
Show the inform ation of the pr ogram you are wat ching.
3
4.SOURCE
4
Press this butt on to select an i nput source.
5.PMODE
5
Press this butt on to select a pi cture mode for di fferent
picture quali ties.
6
6.SMODE
8
Press this butt on to select so und setting for d ifferen t
9
sound eff ects.
12
7.0-9
Allows you to cha nge the chann el o f the TV.
11
8.
Switches back a nd forth betw een the current a nd
previous chan nels.
13
9.SLEEP
To select the amoun t of time befor e your TV turns
16
Off autom atically.
17
10.VOL+/VOL Increases/D ecreases th e Vol ume control .
11.CH+/C HSkips to the next /previous c hannel on TV mo de.
12.UP/DOWN/ LEFT/RIGH T
Moves the curso r upward/do wn ward/to the l eft/to the righ t
when making a sel ection.
13.MENU
Displays the OS D Menu of the TV.
14.CC
Press the butto n to enter into t he CC mode.
15.MTS
To change among STE REO, MONO and S AP. If there is no
second langua ge available fo r the signal re ceived, LCD
Display audio w ill output to m on o.
16.ENTER
Enters the func tion select ed.
17.Exit
Press this butt on to exit the on s creen display.
10
Page 12
OSD Manual
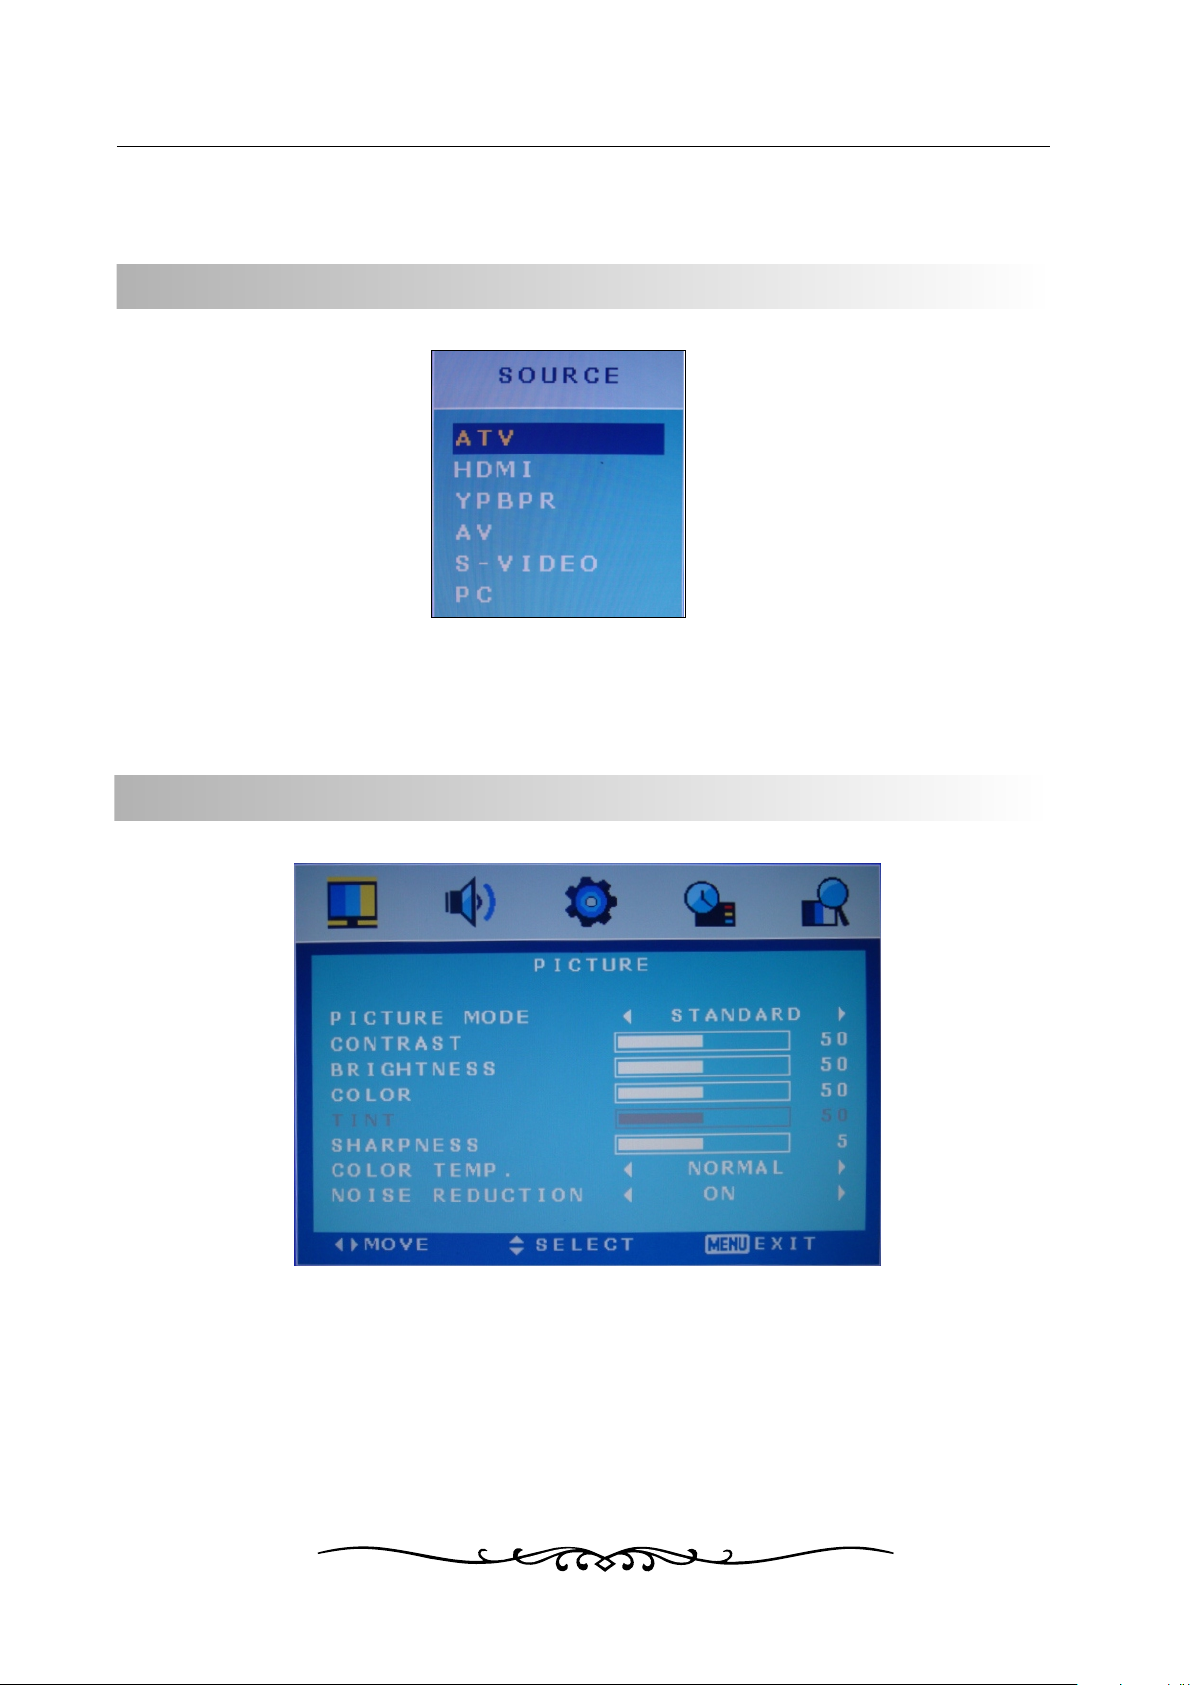
7. BASIC OPERATION
SELECT INPUT SOURCE
INPUT SOURCE
·Use INPUT button to display the input source list;
·Use 【▲】 /【▼】 button to select the input source you want to watch;
·Use ENTER button to enter the input source;
BASIC OPERATION
·Use MENU button to display the MAIN OSD MENU;
·Use 【▲】 /【▼】button to select the MENU you want;
·Use 【 ► 】 button to enter the sub menu;
You can use MENU or EXIT button to save and return back to the previous menu .
·Use 【▲】 /【▼】 button to select the option and then press 【◄】 /【 ► 】to adjust the value in the sub menu;
11
Page 13

OSD Manual
8. TV Menu
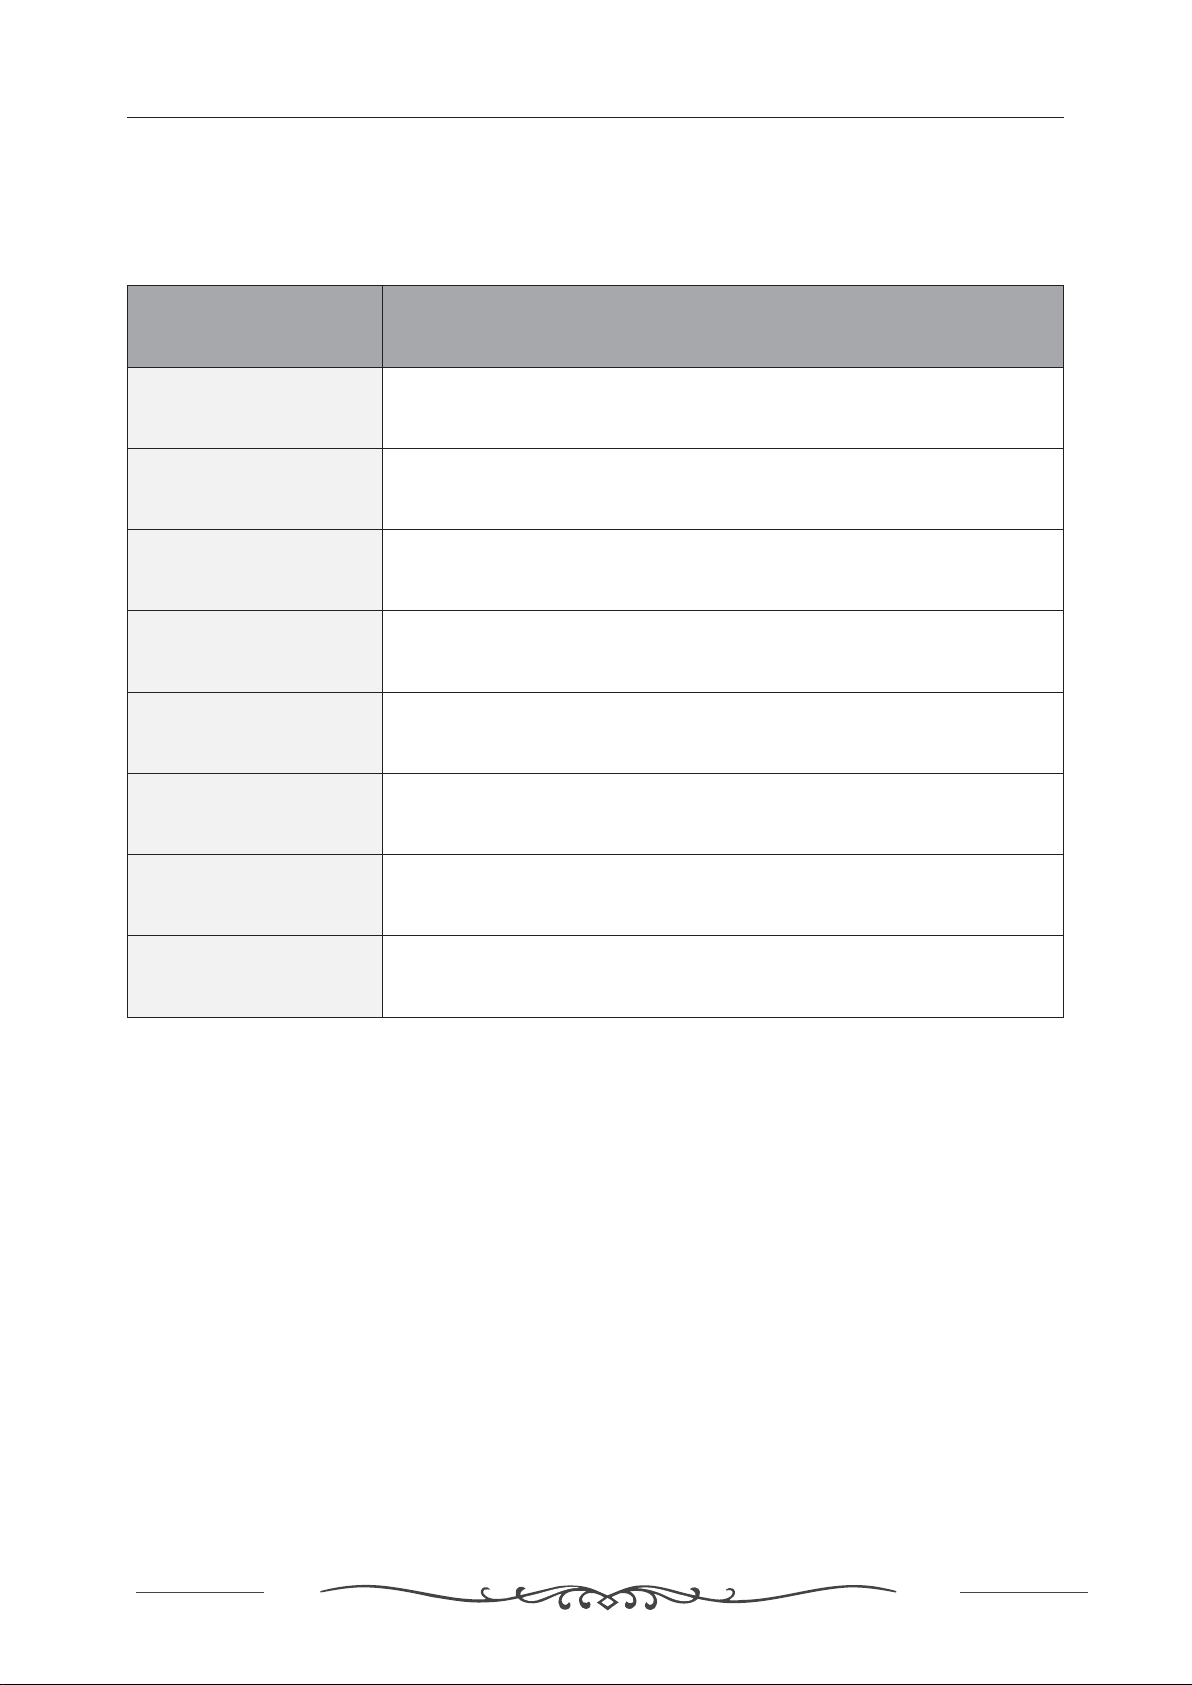
PICTUREPICTURE
The PICTURE menu offers options to enhance and refine the picture displayed on your TV based on ambient room light
and personal prefer-ences. Adjustment options include , BRIGHTNESS, COLOR, TINT,
SHARPNESS, COLOR TEMP. and NOISE REDUCTION.
PICTURE MODE, CONTRAST
How to Navigate:
Press the MENU button on the remote control. Navigate using arrow buttons to select PICTURE. Press
the down arrow button to highlight PICTURE MODE, then press the arrow button to select your viewing
Preference.
The STANDARD setting is recommended for most viewing environments. Depending on the ambient light level in the
room, you may select one of the other options more pleasing.
▼ 【◄ 】 /【 ►】
【◄ 】 /【 ►】
CATV
To make more critical adjustments based on your own preferences in PERSONAL:
• Use down arrow button to highlight CONTRAST. Navigate using the arrow buttons to increase or
decrease contrast intensity.
• Use down arrow button to highlight BRIGHTNESS. Navigate using the arrow buttons to increase or
decrease overall brightness.
• Use down arrow button to highlight COLOR. Navigate using the arrow buttons to increase or decrease
color intensity.
• Use down arrow button to highlight TINT. Navigate using the arrow buttons to adjust colors toward
green or reddish tint.
• Use down arrow button to highlight SHARPNESS. Navigate using the arrow buttons to soften or view
crisper edges in the picture.
• Use down arrow button to highlight COLOR TEMP.. Navigate using the arrow buttons to select COOL
(more bluish tone), NORMAL or WARM. The default setting is NORMAL.
• Use down arrow button to highlight NOISE REDUCTION. Navigate using the arrow buttons to select
it ON or OFF.
【▼】 【◄ 】 /【 ►】
【▼】 【◄ 】 /【 ►】
【▼】 【◄ 】 /【 ►】
【▼】 【◄ 】 /【 ►】
【▼】 【◄ 】 /【 ►】
【▼】 【◄ 】 /【 ►】
【▼】 【◄ 】 /【 ►】
12
Page 14

OSD Manual
SOUNDSOUND
The SOUND menu offers options to make sound enhancements while listening through the built-in speakers
How to Navigate:
Press the MENU button on the remote control. Navigate using arrow buttons to select . Press the
【▼】 【◄ 】 /【 ►】
arrow button to highlight SOUND MODE, then press the arrow button to select your sound preference.
To make more critical sound adjustments based on your own preferences in PERSONAL:
• Use down arrow button to highlight Bass. Navigate using the arrow buttons to increase or decrease
low frequency intensity.
• Use down arrow button to highlight TREBLE. Navigate using the arrow buttons to increase or decrease
high frequency intensity.
【▼】 【◄ 】 /【 ►】
【▼】 【◄ 】 /【 ►】
【◄ 】 /【 ►】 SOUND
• Use down arrow button to highlight BALANCE. Navigate using the arrow buttons to adjust sound
towards the left or right speaker.
• Use down【▼】arrow button to highlight AVL. Navigate using the【◄ 】 /【 ►】arrow buttons to select it ON or OFF.
【▼】 【◄ 】 /【 ►】
13
Page 15

OSD Manual
SETTINGSETTING
In the SETTING menu you may change the initial set up of preferences that include LANGUAGE, OSD TIMER, TRANSP-
-ARENCE, OVERSCAN, and RESET your TV back to its factory default status.
How to Navigate:
Press the MENU button on the remote control. Navigate using arrow buttons to select SETTING. Gain access
to display options by pressing the down arrow button to highlight LANGUAGE or other options, then press
【 ►
arrow buttons on your remote to select.
【▼】 【◄ 】 /
【◄ 】 /【 ►】
·Use down【▼】arrow button to highlight LANGUAGE. Navigate using 【◄】 /【 ► 】arrow button to select the OSD
language. There are 6 language for selection: ENGLISH > GERMAN> FRENCH> SPANISH> ITALIAN> PORTUGUESE.
·Use down【▼】arrow button to highlight OSD TIMER. Navigate using 【◄】 /【 ► 】arrow button to select the OSD
timer. There are 6 modes for selection: 5 SEC>10 SEC> 15SEC> 20SEC> 25 SEC> 30 SEC.
·Use down【▼】arrow button to highlight TRANSPARENCE. Navigate using 【◄】 /【 ► 】arrow button to select the
transparence of the OSD.
·Use down【▼】arrow button to highlight OVERSCAN. Navigate using 【◄】 /【 ► 】arrow button to select it ON or
OFF. But this option is only available in the HDMI source.
·Use down【▼】arrow button to highlight RESET. Navigate using【 ► 】arrow button to reset the options in the SETTING
menu.
FUNCTIONFUNCTION
In the FUNCTION menu you may change the function set up of preferences that include SLEEP TIMER, ASPECT, CCAPTION
PARENT CTRL and BLUE SCREEN.
How to Navigate:
Press the MENU button on the remote control. Navigate using arrow buttons to select FUNCTION. Gain
access to display options by pressing the down arrow button to highlight SLEEP TIMER or other options, then press
【◄ 】 /【 ►】
arrow buttons on your remote to select.
【▼】
【◄ 】 /【 ►】
14
Page 16

OSD Manual
·Use down【▼】arrow button to highlight SLEEP TIMER. Navigate using 【◄】 /【 ► 】arrow button to select the sleep
timer, and the TV will turn off automatically in the setting time . There are 9 modes for selection: 15 Min>30 Min> 45 Min>
60 Min> 75 Min> 90 Min> 105 Min> 120 Min> OFF.
·Use down【▼】arrow button to highlight ASPECT. Navigate using 【◄】 /【 ► 】arrow button to select: FULL> ZOOM
> SUBTITLE > 4:3>14:9>AUTO. The default setting is FULL. .
·Use down【▼】arrow button to highlight C.CAPTION. Navigate using 【◄】 /【 ► 】arrow button to select: OFF> Cc1
> CC2 >CC3>CC4>TEXT1>TEXT2>TEXT3>TEXT4. The default setting is OFF.
·Use down【▼】arrow button to highlight PARENT CTRL. Navigate using 【 ► 】arrow button to select this option.
Enter your 4 digit code (factory default code is "0000") unless previously changed to enter the submenu.
·Use down【▼】arrow button to highlight CHANGE PASSWORD. Navigate using 【 ► 】arrow button to change the password
of the system lock. A dialog as above will appear, the enter the new password can change the password successfully.
·Use down【▼】arrow button to highlight V-CHIP. Navigate using 【◄】 /【 ► 】arrow button to select this option
ON or OFF. When set the system lock OFF, the locks below will be unavailable.
·Use down【▼】arrow button to highlight TV-RATING. Navigate using 【 ► 】arrow button to enter the submenu and select.
·Use down【▼】arrow button to highlight MOVIE-RATING. Navigate using 【◄】 /【 ► 】arrow button to select this option.
NONE、G、PG、PG-13 、R、NC-17 or X.
·Use down【▼】arrow button to highlight ENGLISH-RATING. Navigate using 【◄】 /【 ► 】arrow button to select this option
EMPTY、C、C8 +、G、PG、14 + or 18 +.
·Use down【▼】arrow button to highlight FRENCH-RATING. Navigate using 【◄】 /【 ► 】arrow button to select this option
EMPTY、G、8 ANS +、13 ANS +、16 ANS + or 18 ANS +.
·Use down【▼】arrow button to highlight BLUE SCREEN. Navigate using 【◄】 /【 ► 】arrow button to select this option
ON or OFF.
15
Page 17

OSD Manual
CHANNELCHANNEL
In the CHANNEL menu you may change the channel set up of preferences that include SOURCE, AUTO SCAN and MANUAL
PROGRAM .
How to Navigate:
Press the MENU button on the remote control. Navigate using arrow buttons to select CHANNEL. Gain
access to display options by pressing the down arrow button to highlight SOURCE or other options, then press
【◄ 】 /【 ►】
arrow buttons on your remote to select.
【▼】
【◄ 】 /【 ►】
·Use down【▼】arrow button to highlight SOURCE. Navigate using 【◄】 /【 ► 】arrow button to select the option
CATV or AIR.
·Use down【▼】arrow button to highlight AUTO SEARCH. Navigate using 【 ► 】arrow button to start auto scan.
·Use down【▼】arrow button to highlight MANUAL PROGRAM. Navigate using 【 ► 】arrow button to enter the submenu.
·Use down【▼】arrow button to highlight PROGRAM. Navigate using 【◄】 /【 ► 】arrow button to select the program
that you want to watch.
·Use down【▼】arrow button to highlight SYSTEM. Navigate using 【◄】 /【 ► 】arrow button to select the option.
·Use down【▼】arrow button to highlight AFT. Navigate using 【◄】 /【 ► 】arrow button to select this option ON or OFF.
·Use down【▼】arrow button to highlight ADD/ERASE. Navigate using 【◄】 /【 ► 】arrow button to select this option.
·Use down【▼】arrow button to highlight FINE. Navigate using 【 ► 】arrow button to select this option.
16
Page 18
9. TROUBLESHOOTING AND ADVICE
Should your unit d ev elop a pro blem, please refer to the below troubleshooting table before
requesting assistanc e.
Troubleshooting
No signal
No colour shades
Stain show on the
screen
Double or multiple
display image
Snow on the screen
The remote control
does not work
"Zip" noise on
coming from TV
Control
Please check that al l ca bl es a re cor re ct ly plu gg ed in.
Adjust the contrast, c ol ou r an d bright ne ss
Maybe result from a lighting signal from c ar, motor, n eo n li gh t and
other electrical devices o r ap pl ia nc es .
Maybe the result o f an electrical wave d is tu rb fro m ot he r TV,
Computer and Game ma ch in e or R ad io
The cables of the antenna are not co rr ectly pl ugged in .
Please check the p ol ar it y of the batteries. Check that the r ec ei ve r
of the remote contro l is not sheltered b y so me th in g.
Even if the displa y image is correct, th e no is e ma y co me from an
unsteady fixation of t he pan el .
No sound
Make sure that you have not press th e MU TE b ut to n o n t he remote
control.
17
Page 19

10. SPECIFICATIONS
Screen Size
Resolution(Pixel)
Aspect Ratio
Power Input
TV System
Video Input Format
Antenna Input
Audio Output
HDMI
Input
(Video/S-Video/YPbPr/PC)
Audio (AV/S-Video/YPbPr/PC)
19 Inch
1366 X 768
16:9
DC12V 4A
NTSC
NTSC
L / R W2X3
Standards TMDS Max. 1080P
1366 X 768/60 Hz
R/L 200mVrms (max3.0vp-p) 20K RCAΩ
This ma nua l is only for you r ref ere nce, any c hange to the des ign and specifi cation wil l not
be advi sed .
18
Page 20

11. Wall mounting assembly instruction
19
Page 21

1
PREFACE
3
2
3
PRECAUTIONS
DE SECURITE
DANS LE CARTON
CONNECTIONS
DE DEVANT ET
4
DE DERRIERE DE
LA TELE LCD
5
6
INSTALLATION
DE BASE
TELECOMMANDE
Connection Fil d'Alimentat io n
Connection Antenne
Connection AV
Connection YPbPr
Connection VGA (PC)
Connection HDMI
Instructions de la Télécommande
3
5
6
7
7
8
8
9
9
10
OPERATION DE
7
BASE
8
OPERATION TELE
Sélectionner Entrée Source
Menu Image
Menu Son
Menu Réglage
Menu Fonction
Menu Chaîne
11
12
13
14
14
16
Page 22

DEPANNAGE ET
9
CONSEILS
17
10
11
SPECIFICATIONS
INSTRUCTION
D'ASSEMBLAG
E MONTAGE
MURAL
18
19
Page 23

1. PREFACE
Merci d'avoir acheté cette Télé! Veuillez lire attentivement ce manuel avant de manipuler la télé.
Assurez-vous que la Télé n'a pas été endommagé en transit. Si la Télé est endommagée, ne pas
l'installez et contactez votre fou rn is se ur. V ér if iez que vous avez tous les accessoires selon le
modèle.
2. PRECAUTIONS DE SECURITE
Posez la Télé sur une surface stable.
Ne placez aucun matériel sur la Télé.
Min imum dis tance s
25m m 25m m 6 0mm
25m m
N'utilisez pas la Télé avec des appareils autres que ceux fournis ou
suggérés par le fabricant.
Ne bloquez pas et ne couvrez pas les o uv er tu re s de v en ti lation de la Télé.
Si vous avez un montage mural, vérif ie z qu e c' es t st ab le .
Fil d'alimentation et câbles d oi ve nt ê tr e ro ut és e t pr otégés pour éviter que
les gens marchent dessus et que la Télé tombe.
3
Page 24

Garder la Télé sec et loin de l'humidité.
Garder la Télé loin des sources de chaleur.
Débranchez la Télé avant de le nettoyer.
N'utilisez pas de solvant ou liq ui de p ou r ne tt oy er la Télé.
Nettoyez la Télé seulement avec un chiffon doux et sec.
En cas d'anomalies, n'utilis ez p as d es p iè ce s de r ec hange autres
que celles suggérées par le fabr ic an t. L 'u ti li sa tion de pièces de
rechange inadéquat peut abou ti r à de c ho qu es é le ctriques,
feu de court-circuit et autres incid en ts .
Débranchez la Télé s'il y a orage et éclair ou si la Télé n'est pas
utilisée pendant une longu e pé ri od e.
4
Page 25

3. DANS LE CARTON
Poste Télé Télécommande
MANU EL D'INS TRUCT ION
Veuillez lire a tten tiveme nt ce ma nuel et le r eten ir pour fu tur
référence av ant d' utilis er la Té lé.
MODELE : LCD19 33
Manuel de l'Utilisateur
Fil d'alimentation
2 piles
Adapteur AC
Page 26

4. CONNECTIONS DE DEVANT ET DE DERRIERE DE LA TELE LCD
VUE DE FACE
1. Appuyer le bout on "POWER" po ur allumer ou éte indre.
2. Appuyer "CH+" o u "CH-" pour pa rcourir les cha înes.
3. Appuyer "VOL+ " ou "VOL-" pou r augmenter
ou descendre le v olume.
4. Appuyer "MENU " pour affi cher le menu
principal sur l 'écran.
5. Appuyer "INPU T" pour entre r la source.
6. INDICATEUR D'ALIMENTATION : lumière
rouge veut dire m ode veille, l umière
bleu quand la Télé est allum ée.
7. CAPTEUR A DI STANCE: ca pteur infra rouge
pour la télécom mande.
891 0
7
5
6
4
123
1. Douille d'alimentation de c ou ra nt .
2. Connection HDMI. / Si vous avez un lect eu r DV D ou u n le ct eu r jeu vidéo, cette douille le
relie à la Télé avec un câble HDMI fournissant un playback audio et vidéo à haute définition.
3. Prise VGA. / Cette prise relie votre ordi na te ur à v ot re Télé.
4. Connection YPbPr/ Cette douille relie la sortie YPbPr de votre lecteur DVD.
5. Connection Super-Vidéo/ Cette douille relie la sortie super vidéo de votre lecteur DVD.
6. Connection Vidéo/ Cette douille relie la sortie du signal vidéo du lecteur DVD de votre Télé.
7. Connection chaîne audio Gau ch e et D ro it e/ C et te d ouille relie le signal audio à votre Télé.
8. Connection PC Audio/ Cette dou il le r el ie l a pr ise de sortie audio à votre ordinateur.
9. Casque Ecouteur/ Cette douill e re li e le c as qu e écouteur à votre Télé.
10. Connection Fréquence Rad io / Ce tt e do ui ll e relie votre antenne à votre Télé.
Page 27

5. INSTALLATION DE BASE
Connection Fil d'AlimentationConnection Fil d'Alimentation
- Branchez correctement le fil d'a li me nt at io n et l 'a dapteur AC comme montré.
- Appuyez l'interrupteur POWER de v ot re Télé LCD pour allumer. L'indicateur d'alimentation
sur le panneau avant s'allume en b le u.
Adapteur AC
Fil d'alimentation
Connection AntenneConnection Antenne
Pour obtenir de bonnes image s et d e bo ns s on s, l e sy st èm e de l'antenne Télé doit être installé.
Le système de l'antenne comme mont ré , pe ut ê tr e al im en té p ar des magasins d'équipement de
Télé qui fournissent des service s po ur i ns ta ll at ion et connection. Après installation, insérez la
fiche d'antenne 75-OHM dans la p ri se d 'a nt en ne c omme montré.
ANTENNE VHF ANTENNE VHF
AMPLIFICATE UR
ANTENNE
EXTERIEUR
AMPLIFICATE UR
ANTENNE
INTERIEUR
PRISE D'ALIMENTATION
D'AMPLIFICATEUR
D'ANTENNE
75 OHM
PRISE D'ANTENNE
Page 28

Connection AVConnection AV
Branchez la prise de sortie VIDEO et AU DI O du D VD o u VC R à la p ri se AV IN en utilisant le câble
RCA (Jaune [vidéo], Blanc et ROUGE [audio g au ch e & dr oi t] .
Sélectionnez Entrée Source AV en utilisant le bouton SOURCE de la Télécommande.
Télé arrière
Câble Vidéo
DVD ou VCR arrière
DVD ou VCR
Connection YPbPr
Branchez la prise sortie YPbPr de votre DVD ou VCR à la prise entrée YPbPr du poste. Comparé
à un branchement d'un VCR normal à l a pr is e en tr ée d e vi déo, la qualité d'image est bien améliorée.
Branchez la prise sortie Audio du D VD o u VC R à la d ou il le entrée Audio du poste en utilisant un
câble RCA. (Fiche 3,5mm fiche 2X RCA)
Assortissez les couleurs des dou il le s : Y en vert, Pb en bleu, Pr en rouge, Au di o gauche est blanc
et Audio droit en rouge.
Sélectionnez la source entré e YPbPr en utilisant le bouton SOURCE de la télécommande.
Télé arrière
Câble YPbPr
Câble Audio
DVD ou VCR arrière
DVD ou VCR
Page 29

Connection VGA (PC)
Branchez la prise sortie RGB du PC à la fi ch e VG A du po st e. B ra nc hez la prise sortie AUDIO du
PC à la fiche PC AUDIO du poste. Sélectio nn ez l 'e nt ré e so ur ce du PC en utilisant le bouton
SOURCE de la télécommande.
Télé arrière
Câble Audio
Câble VGA
Connection HDMI
La connection HDMI permet à l'util is at eu r de t ra ns fé rer les signaux de contrôle audio et vidéo
grâce à un seul câble. Ces signaux s on t tr an sf ér és e n di gital.
Télé arrière
Câble HDMI
DVD ou VCR arrière
DVD ou VCR
Page 30

6. TELECOMMANDE
Instructions de la Télécommande
1. EN VEILLE
Pour allumer la Télé ou mett re la Télé en m ode veille.
2. EJECT
Pour ouvrir ou fe rmer le charg eu r du lecteur DV D.
7
10
15
14
2
1
3
3. INFO
Affiche l es informatio ns du programme q ue vous
regardez.
4. SOURCE
Appuyez ce bout on pour sélec ti onner une ent rée source.
4
5. PMODE
5
6
8
9
12
11
13
16
17
Appuyez ce bout on pour sélec ti onner un mode d 'image
pour diff érents qualit és d'images.
6. SMODE
Appuyez ce bout on pour sélec ti onner le régl age de son
pour diff érents effets sonores.
7. 0-9
Vous permet de cha nger la chaîn e de l a Télé.
8.
Changer entre l es chaînes pr éc édent et actu el.
9. SLEEP
Pour configur er la durée de te mp s avant que la Télé
s'éteigne aut omatiquem en t.
10. VOL+/VOLAugmente/di minue le volu me .
11. CH+/CH Pour aller à la cha îne suivant e/ précédent e en mode
Télé.
12. Haut/Bas/ Gauche/Dr oite
Pour déplacer l e curseur ver s le h aut/vers le b as/vers la
gauche/vers l a droite quan d vo us faites un ch oix.
13. MENU
Affiche l e Menu OSD de la Télé.
14. CC
Appuyez le bout on pour entre r en m ode CC.
15.MTS
Pour changer en tre STEREO, M ONO et SAP. S'il n' y a
aucun langage v alable pour le si gnal récept ionné,
l'audio de l'LC D Display chang era en mono.
16. ENTER
Entre la foncti on sélectio nnée.
17. EXIT
Appuyez ce bout on pour quitt er ce qui est aff iché à l'écra n.
10
Page 31
Ma nu el OSD
7. OPERATION DE BASE
SELECTIONNER ENTREE SOURCE
ENTREE SOURCE
Utilisez le bouton INPUT pour afficher la liste entrée source ;
Utilisez les boutons ▲/▼ pour sélectio nn er l 'e nt ré e so urce que vous voulez voir ;
Utilisez le bouton ENTRER pour e nt re r en tr ée s ou rc e ;
OPERATION DE BASE
Utilisez le bouton MENU pour afficher MENU PRINCIPAL OSD ;
Utilisez le bouton ▲/▼ pour sélectio nn er l e ME NU q ue v ou s voulez ;
Utilisez le bouton ► pour entrer le so us -m en u ;
Vous pouvez utiliser le bouto n ME NU o u EX IT pour enregistrer ou retourner au menu précédent.
Utilisez le bouton ▲/▼ pour sélectio nn er l 'o pt io n pu is appuyez ◄/►pour régler la valeur dans le
sous-menu ;
11
Page 32

Ma nu el OSD
8. Menu Télé
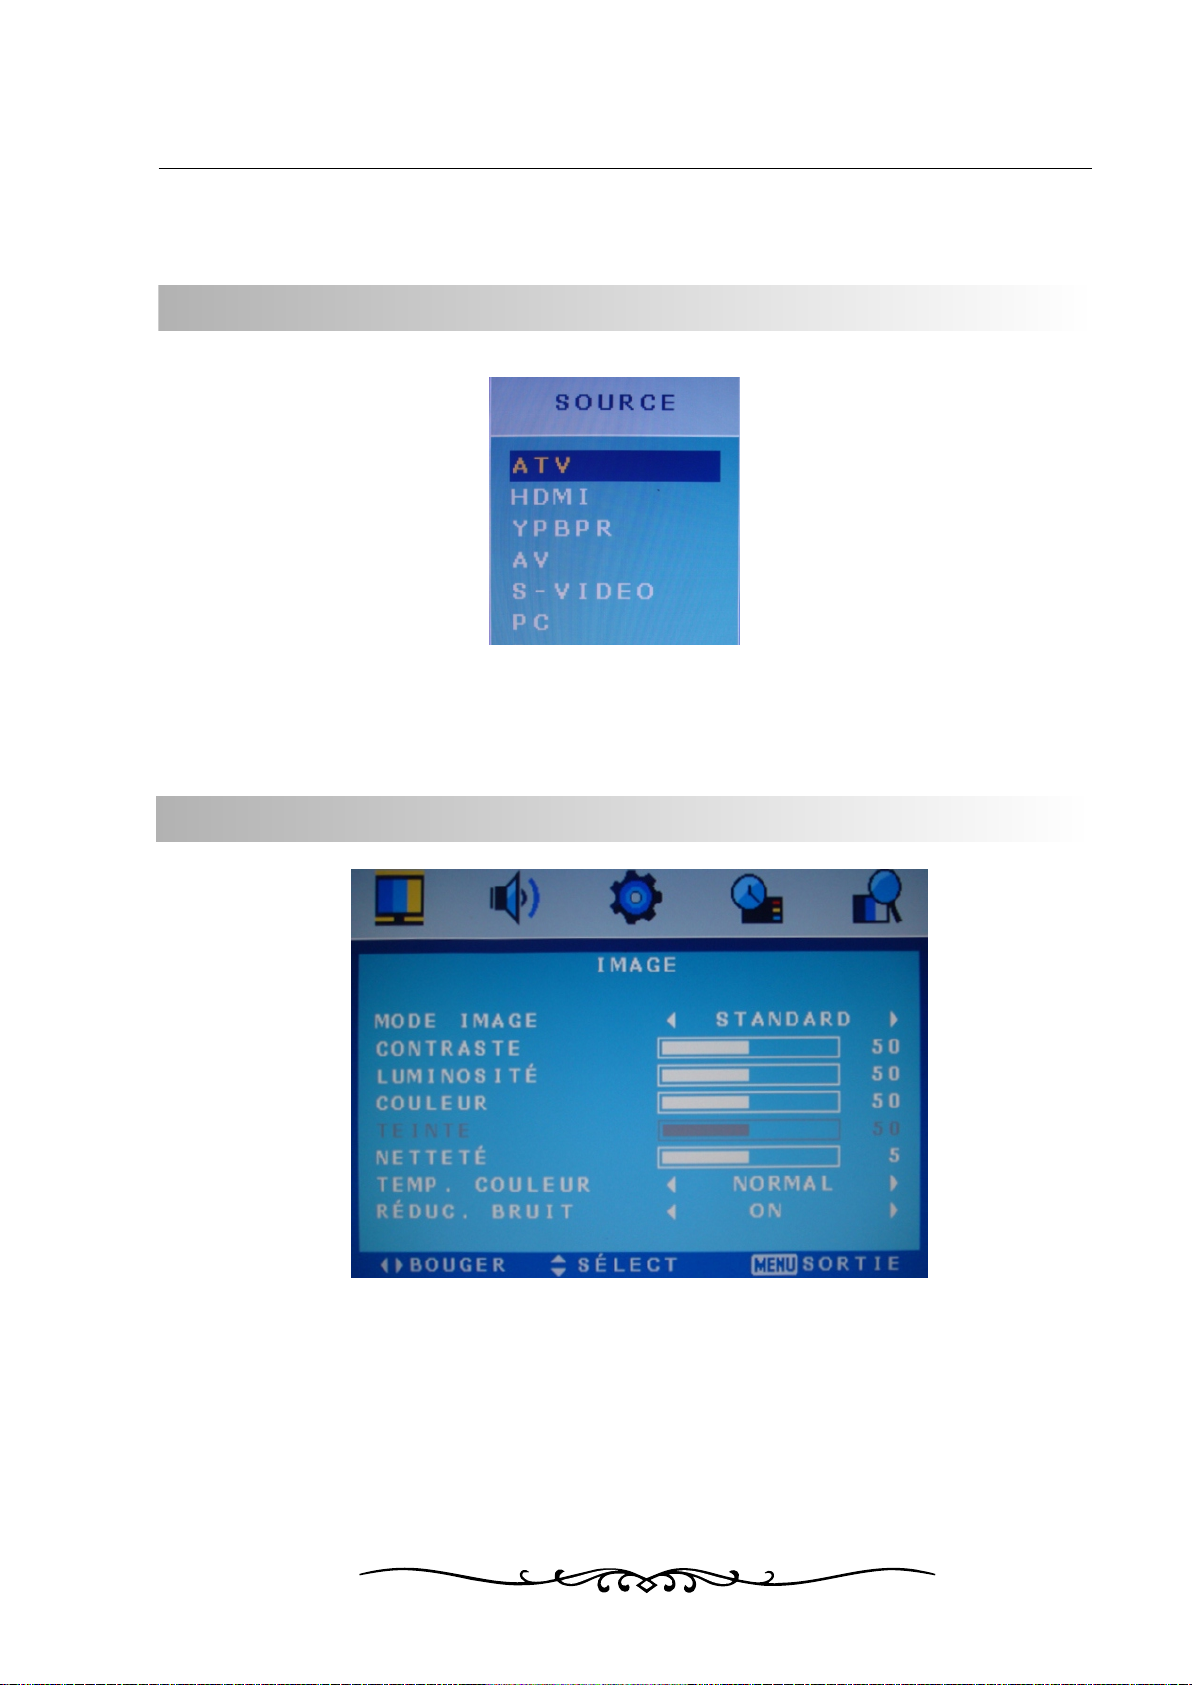
IMAGE
Le menu IMAGE offre des options pour améliorer et affiner l'image affiché à la Télé basé sur la
lumière ambiante et les préfér en ce s pe rs on ne lles. Les options de réglage comprennent MODE
IMAGE, CONTRASTE, LUMINOSITE, COULEUR, TEINT, NETTETE, COULEUR TEMP.
Et REDUCTION DE BRUIT.
Comment Naviguer :
Appuyez le bouton MENU de la téléc om ma nd e. N av ig uer en utilisant les boutons de direction
◄/► pour sélectionner IMAGE. Appuyez le b ou to n de d ir ec ti on vers le bas ▼ pour marquer
MODE IMAGE, puis appuyez le bouton de di re ct io n ◄/ ► po ur s él ec tionner la préférence de
visualisation de votre choix .
Le réglage STANDARD est recommandé pour la plupart des visualisations. Dépendant de la
lumière ambiante de la pièce , vo us p ou ve z sé le ct ionner un des options que vous voulez.
Pour effectuer des ajustements plus cruciaux basés sur votre propre préférence dans
PERSONAL :
Utilisez le bouton de directio n ve rs l e ba s ▼ po ur m ar qu er CONTRASTE. Naviguez en
utilisant les boutons de direc ti on ◄ /► p ou r au gm en te r ou diminuer l'intensité de contraste.
Utilisez le bouton de directio n ve rs l e ba s ▼ po ur m ar qu er LUMINOSITE. Naviguez en
utilisant les boutons de direc ti on ◄ /► p ou r au gm en te r ou diminuer la luminosité générale.
Utilisez le bouton de directio n ve rs l e ba s ▼ po ur m ar qu er COULEUR. Naviguez en utilisant
les boutons de direction ◄/► pour au gm en te r ou d im in uer l'intensité de couleur.
Utilisez le bouton de directio n ve rs l e ba s ▼ po ur m ar qu er TEINT. Naviguez en utilisant les
boutons de direction ◄/► pour régl er l es c ou le ur s ve rs l e vert ou teint rougeâtre.
Utilisez le bouton de directio n ve rs l e ba s ▼ po ur m ar qu er NETTETE. Naviguez en utilisant
les boutons de direction ◄/► pour ad ou ci r ou a fficher de meilleures images.
Utilisez le bouton de directio n ve rs l e ba s ▼ po ur m ar qu er COULEUR TEMP . Naviguez en
utilisant les boutons de direc ti on ◄ /► p ou r sé le ct io nner COOL ( plus de bleuté), NORMAL
ou VIF. La configuration par défau t es t NO RM AL .
Utilisez le bouton de directio n ve rs l e ba s ▼ po ur m ar qu er REDUCTION DE BRUIT.
Naviguez en utilisant les bo ut on s de d ir ec ti on ◄/► pour choisir ON ou OFF.
12
Page 33

Ma nu el OSD
SON
Le menu SON offre des options pour effectuer des améliorations de son tout en écoutant à
travers l'haut-parleur.
Comment Naviguer :
Appuyez le bouton MENU de la Télécommande. Naviguez en utilisant les boutons de direction
◄/► pour sélectionner SON. Appuyez le b ou to n de d ir ec ti on ▼ pour marquer MODE SON, puis
appuyez le bouton de direction ◄/► pou r sé le ct io nn er v otre son préféré.
Pour effectuer des ajustements de son plus cruciaux basés sur votre propre préférence dans
PERSONNEL:
Utilisez le bouton de directio n ve rs l e ba s ▼ po ur m ar quer Bass. Naviguez en utilisant les
boutons de direction ◄/► pour augmen te r ou d im in ue r l' intensité de basse fréquence.
Utilisez le bouton de directio n ve rs l e ba s ▼po ur m ar quer TREBLE. Naviguez en utilisant les
boutons de direction ◄/► pour augmen te r ou d im in ue r l' intensité de haute fréquence.
Utilisez le bouton de directio n ve rs l e ba s ▼po ur m ar quer BALANCE. Naviguez en utilisant les
boutons de direction ◄/► pour régler l e so n ve rs l e ha ut p ar leur gauche ou le haut parleur
droit.
Utilisez le bouton de directio n ve rs l e ba s ▼ po ur m ar quer AVL. Naviguez en utilisant les
boutons de direction ◄/► pour sélect io nn er O N ou O FF.
13
Page 34

Ma nu el OSD
REGLAGE
Dans le menu REGLAGE, vous pouvez ch an ge r le s ré gl ag es initiaux tels LANGUE, OSD TIMER,
TRANSPARENCE, OVERSCAN, et RESET votre Tél é au s ta tu t pa r dé fa ut par le fabricant.
Comment Naviguer :
Appuyez le bouton MENU de la téléc om ma nd e. N av ig uez en utilisant les boutons de direction
◄/► pour sélectionner REGLAGE. Ayez accès pour afficher les options en appuyant le bouton
de direction vers le bas▼ pour marq ue r LA NG UE o u au tr es o ptions, puis appuyez les boutons
de direction ◄/► sur votre télécommand e po ur c ho is ir.
Utilisez le bouton de directio n ve rs l e ba s▼ po ur m ar quer LANGUE. Naviguez en utilisant les
boutons de direction ◄/► pour sélect io nn er L an gu e OS D. Il y a 6 langues de sélection :
ANGLAIS>ALLEMAND >FRANÇAIS>E SPAGNOL>ITALIEN>PORTU GUAIS.
Utilisez le bouton de directio n ve rs l e ba s▼ po ur m ar quer OSD TIMER. Naviguez en utilisant
les boutons de direction ◄/► pour séle ct io nn er O SD Ti me r. Il y a 6 modes de sélection :
5SEC>10SEC >15SEC>20SEC> 25 SE C> 30 SE C.
Utilisez le bouton de directio n ve rs l e ba s▼ po ur m ar quer OVERSCAN. Naviguez en utilisant
les boutons de direction ◄/► pour séle ct io nn er O N ou O FF. Ma is c ette option n'est valable
qu'en Source HDMI.
Utilisez le bouton de directio n ve rs l e ba s▼ po ur m ar quer RESET. Naviguez en utilisant les
boutons de direction ◄/► pour refuse r le s op ti on s da ns l e me nu REGLAGE.
FONCTION
Dans le menu FONCTION, vous pouvez cha ng er l a co nf ig ur ation de fonctions de votre choix
tels SLEEP TIMER, ASPECT, C.CAPTION PARENT CTRL et ECRAN BLEU.
Comment Naviguer :
Appuyez le bouton MENU de la téléc om ma nd e. N av ig uez en utilisant les boutons de direction
◄/► pour sélectionner FONCTION. Ayez accès pour afficher les options en appuyant le bouton
de direction vers le bas▼ pour marq ue r SL EE P TIMER ou autres options, puis appuyez les
boutons de direction ◄/► sur la téléco mm an de p ou r ch oi sir.
14
Page 35

Ma nu el OSD
Utilisez le bou ton de direct io n vers le bas▼ pou r marquer SLEEP TIMER. N aviguez en ut ilisant le
bouton ◄/► pour s électionn er le sleep timer, e t la télé s'étein dra automatiq uement selo n le temps
configuré. Il y a 9 m odes de sélec tion : 15 Min >30 Min >45 Min>60 Min> 75 Min>90 Min>1 05
Min>120 Min>O FF.
Utilisez le bou ton de direct io n vers le bas▼ pou r marquer AS PECT. Naviguez en u tilisant le
bouton ◄/► pour s électionn er : PLEIN >ZOOM> SOUS-TITRE> 4 :3>14 :9>AU TO. Le réglag e par
défaut est FULL . .
Utilisez le bou ton de direct io n vers le bas▼ pou r marquer C.CAP TION. Navigue z en utilisan t le
bouton ◄/► pour s électionn er : OFF>Cc1>CC 2>CC3>CC4>T EXT1>TEXT2> TEXT3>TEX T4>. Le
réglage par déf aut est OFF.
Utilisez le bou ton de direct io n▼ pour marque r PARENT CTRL. Naviguez e n utilisant l e bouton
◄/► pour sélect ionner cett e option.
Entrez votre co de à 4 chiffr es (code par défa ut de l'usine e st « 0000 ») à moins qu e le code a été
changé en entra nt au sous-me nu .
Utilisez le bou ton de direct io n vers le bas▼ pou r marquer CHANG ER LE MOT DE PASSE. Navig uez en
utilisant les b outons de dir ec tion ◄/► pour c hanger le mot de pa sse du système de v errouilla ge . Une
boîte comme sur l 'image ci-d essus s'aff ichera, l'e ntrée d'un nouv eau mot de passe pe ut changer le mot
de passe.
Utilisez le bou ton de direct io n vers le bas▼ pou r marquer V-CHIP. Naviguez en u tilisant les bo utons de
direction ◄/► p our sélecti onner cette opt ion ON ou OFF. Qu and le systèm e de verouillag e est au OFF, le
verrouillag e ci-dessous n' est plus vali de.
Utilisez le bou ton de direct io n vers le bas ▼ pou r marquer CLASS EMENT-TV. Naviguez e n utilisant le
bouton de direc tion ► pour ent rer au sous-men u et sélectionn er.
Utilisez le bou ton de direct io n vers le bas ▼ pou r marquer CLASS EMENT-FILM. Na viguez en uti li sant
les boutons de di rection ◄/► p our sélection ner cette optio n. NONE, G, PG, PG- 13, R, NC-17 ou X .
Utilisez le bou ton de direct io n vers le bas ▼ pou r marquer CLASS EMENT-ANGLAI S. Naviguez e n
utilisant les b outons de dir ec tion ◄/► pour s électionner c ette option VID E, C, C8+, G, PG, 1 4+ ou 18+.
Utilisez le bou ton de direct io n vers le bas ▼ pou r marquer CLASS EMENT-FRANCA IS. Naviguez en
utilisant les b outons de dir ec tion ◄/► pour s électionner c ette option VID E, G, 8 ANS+, 13 ANS+, 16 ANS
+, ou 18 ANS+.
Utilisez le bou ton de direct io n vers le bas ▼ pou r marquer ECRAN B LEU. Naviguez e n utilisant les
boutons de dire ction ◄/► pou r sélectionne r cette option au O N ou OFF.
15
Page 36

Ma nu el OSD
CHAINE
Dans le menu CHAINE, vous pouvez cha ng er l e ré gl ag e des chaînes de votre choix tels
SOURCE, AUTO SCAN et PROGRAMME MANUEL.
Comment Naviguer:
Appuyez le bouton MENU sur la télé co mm an de . Na vi guez grâce aux boutons de direction ◄/►
pour sélectionner CHAINE. Ayez accès pour afficher les options en appuyant le bouton de
direction ▼ pour marquer SOURCE ou a ut re s op ti on s, p ui s appuyez les boutons de direction
◄/► de votre télécommande pour sélec ti on ne r.
Utilisez le bou ton de direct io n ▼ pour marque r SOURCE. Navig uez en utilisan t le bouton ◄/► pou r
sélectionne r l'option CATV ou AIR.
Utilisez le bou ton de direct io n ▼ pour marque r RECHERCHE AUTO. Nav iguez en utilis ant le bouton
◄/► pour commen cer une reche rche automati que.
Utilisez le bou ton ▼ pour marq ue r PROGRAMME M ANUEL. Navigu ez en utilisant l e bouton ► pour e ntrer
le sous-menu.
Utilisez le bou ton de direct io n ▼ pour marque r PROGRAMME. Na viguez en utili sant le bouto n ◄/► pour
sélectionne r le programm e qu e vous voulez v oir.
Utilisez le bou ton de direct io n ▼ pour marque r SYSTEME. Navi guez en utilisa nt le bouton ◄/ ► pour
sélectionne r cette optio n.
Utilisez le bou ton de direct io n ▼ pour marque r AFT. Naviguez en uti lisant le bouto n ◄/► pour séle ct ionner
cette option ON o u OFF.
Utilisez le bou ton de direct io n ▼ pour marque r AJOUTER/SUPP RIMER. Navigu ez en utilisa nt l e bouton
◄/► pour sélect ionner cett e option.
Utilisez le bou ton de direct io n ▼ pour marque r FINE. Navigue z en utilisant le b outon ► pour sé le ctionner
cette option.
16
Page 37

9.DEPANNAGE ET CONSEILS
Si votre unité encontre un probl èm e, v eu il le z vo us r éférer au tableau de dépannage ci-après avant
demande d'assistance.
Anomalies
Aucun signal
Pas de nuances de
couleur
Tâche sur l'écran
Image affiché en
double ou multiple
Neige apparaissant
à l'écran
La télécommande
ne fonctionne pas
Bruit "zip" venant
de la Télé
Contrôle
Vérifiez que tous les câbles son t co rr ec te me nt b ra nc hés.
Ajuster le contraste, couleur et lum in os it é.
Pourrait résulter d'éclair ag e d' un e vo it ur e, m oteur, néon et autres
dispositifs électriques ou a pp ar ei ls .
Pourrait résulter d'une pertur ba ti on d e so nd e él ectrique d'autres
télé, ordinateur et machine de j eu o u ra di o.
Les câbles de l'antenne ne son t pa s br an ch és c or re ctement.
Veuillez vérifier les polar it és d es p il es . Vé ri fiez si le receveur de
la télécommande n'est pas cach é pa r qu el qu e ch os e.
Même si l'image affiché est correct, le bruit pourrait venir d'une
fixation instable du panneau .
Pas de son
Assurez-vous que vous n'avez pas a pp uy é le b ou to n MU ET sur le
panneau ou sur la télécomman de .
17
Page 38

10.SPECIFICATIONS
Taille d'écran
Résolution (Pixel)
Aspect Ratio
Entrée alimentation
Système Télé
Format entrée Vidéo
Entrée Antenne
Sortie Audio
HDMI
Input
Entrée(Vidéo/S-Vidéo/YpbPr/PC)
Audio (AV/S-Video/YPbPr/PC)
19 Inch
1366 X 768
16:9
DC12V 4A
NTSC
NTSC
Prise d'antenne standard 75 Ω
L / R W2X3
Standards TMDS Max. 1080P
1366 X 768/60 Hz
R/L 200mVrms (max3.0vp-p) 20K RCAΩ
Ce manuel est seulement pour réf ér en ce , to ut c ha ng ement au design et spécification ne sera
pas informé d'avance.
18
Page 39

11. INSTRUCTION D'ASSEMBLAGE MONTAGE MURAL
1. Fixez la télé sur une surface non-abrasive.
2. Enlevez les 3 vis montrés sur la figure A avec un tournevis.
3. Enlever le stand de la Télé, voir Figure B.
4. Fixer les 4 vis comme sur la Figure C. (Vis spéc: M4X10)
5. Attachez le support de montage mural utilisant les 4 vis.
19
 Loading...