

Page 1
MODEL NO. KCR2610
UNDERCOUNTER LCD TV CLOCK RADIO
OWNER'S MANUAL
PLEASE READ BEFORE OPERATING THIS EQUIPMENT
Page 2
CAUTION
RISK OF ELECTRIC SHOCK
DO NOT OPEN
CAUTION:
SHOCK,
USER-SERVICEABLE PARTS INSIDE. REFER
SERVICING TO QUALIFIED SERVICE PERSONNEL.
TO REDUCE THE RISK OF ELECTRIC
DO NOT REMOVE COVER (OR BACK). NO
DANGEROUS VOLTAGE
The lightning flash with arrowhead symbol,
within an equilateral triangle is intended to alert
the user to the presence of uninsulated
dangerous voltage within the product’s
enclosure that may be of sufficient magnitude to
constitute a risk of electric shock to persons.
ATTENTION
The exclamation point within an equilateral
triangle is intended to alert the user to the
presence of important operating and
maintenance (servicing) instructions in the
literature accompanying the appliance.
1
Page 3
PREPARATION FOR USE
Unpacking and Setup
•
Carefully remove the unit from the display carton and remove all packing
material from the unit itself.
AC Operation
Unwind the AC cord and extend it to its full length. Insert the AC cord into any
convenient AC 120V~60Hz household outlet.
2
Page 4
16
12
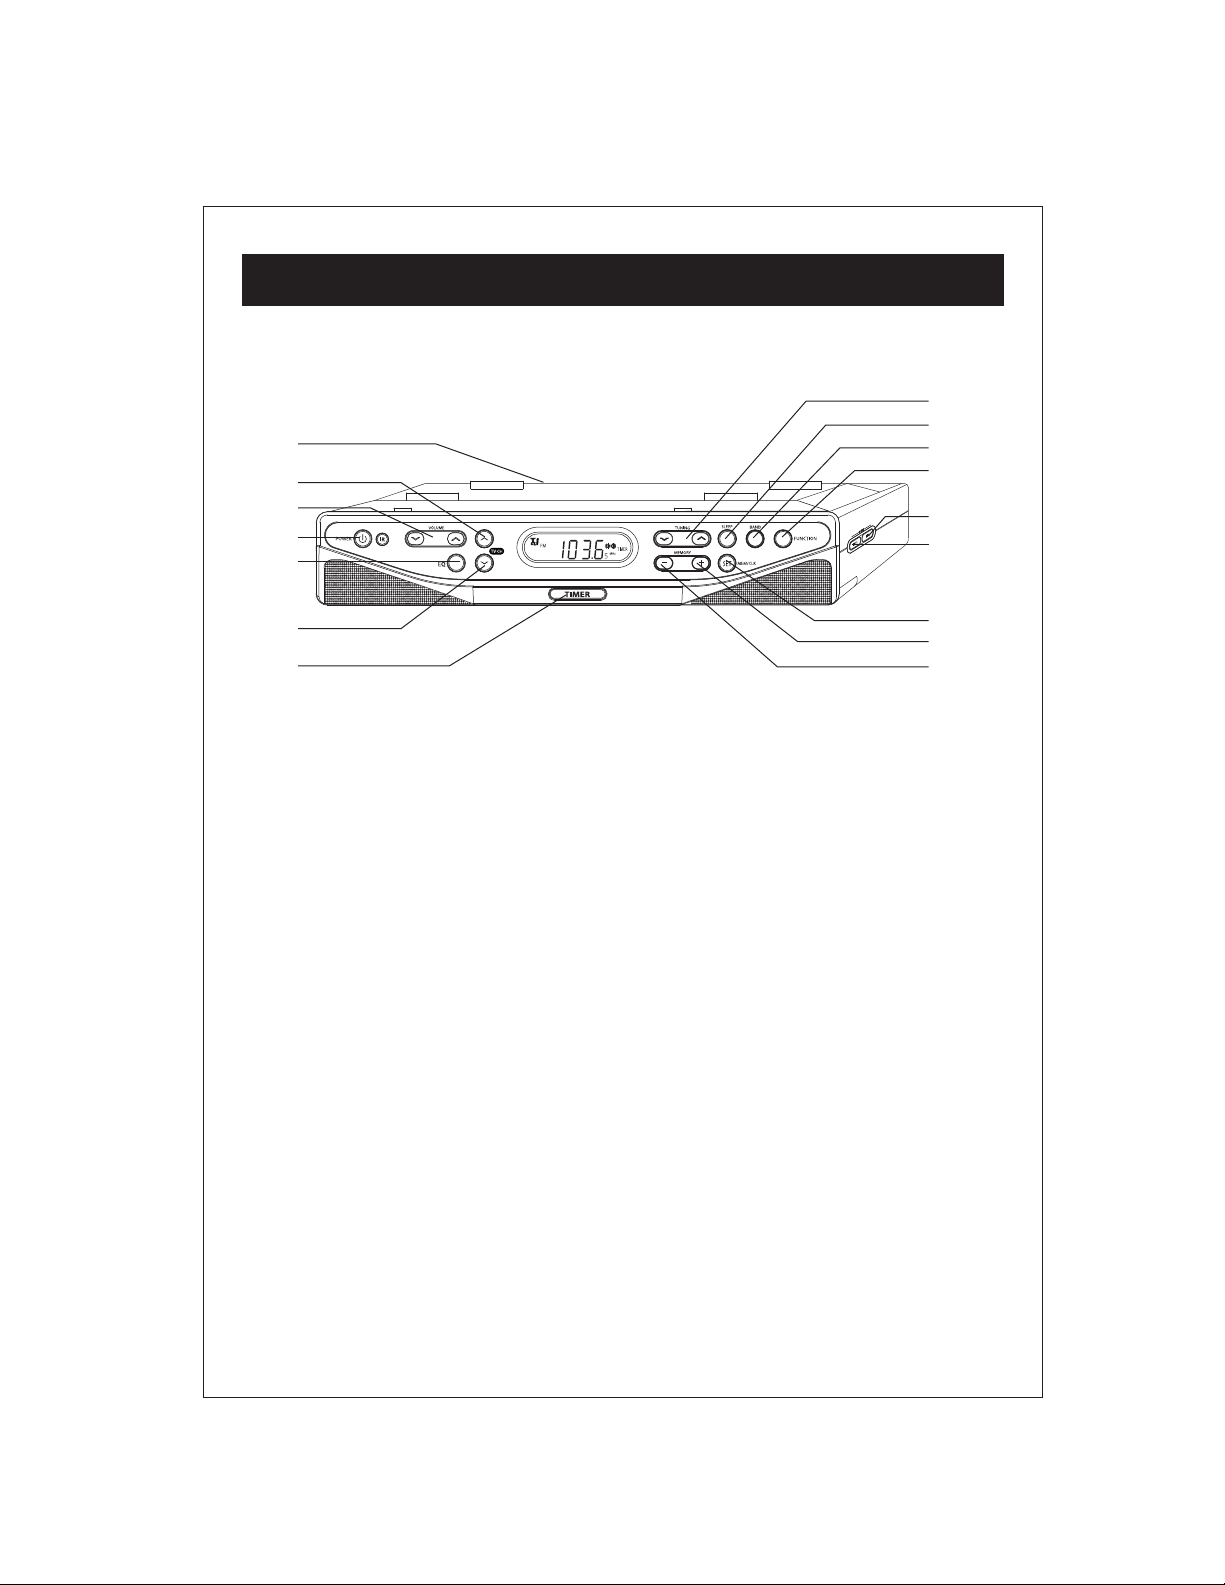
LOCATION OF CONTROLS
4
14
5
7
8
13
6
10
9
11
15
2
1
1. TIMER BUTTON
2. MEM UP BUTTON
3. MEM DN BUTTON
4. TUNER/CLK BUTTON
5. MOUNTING BRACKET
6. FUNCTION BUTTON
7. CH. UP BUTTON
8. VOLUME BUTTON
9. ENTER BUTTON
10. ITEM BUTTON
11. CH. DN BUTTON
12. EQ BUTTON
13. BAND BUTTON
14. SLEEP BUTTON
15. MEM/CLK SET BUTTON
16. POWER BUTTON
3
3
Page 5
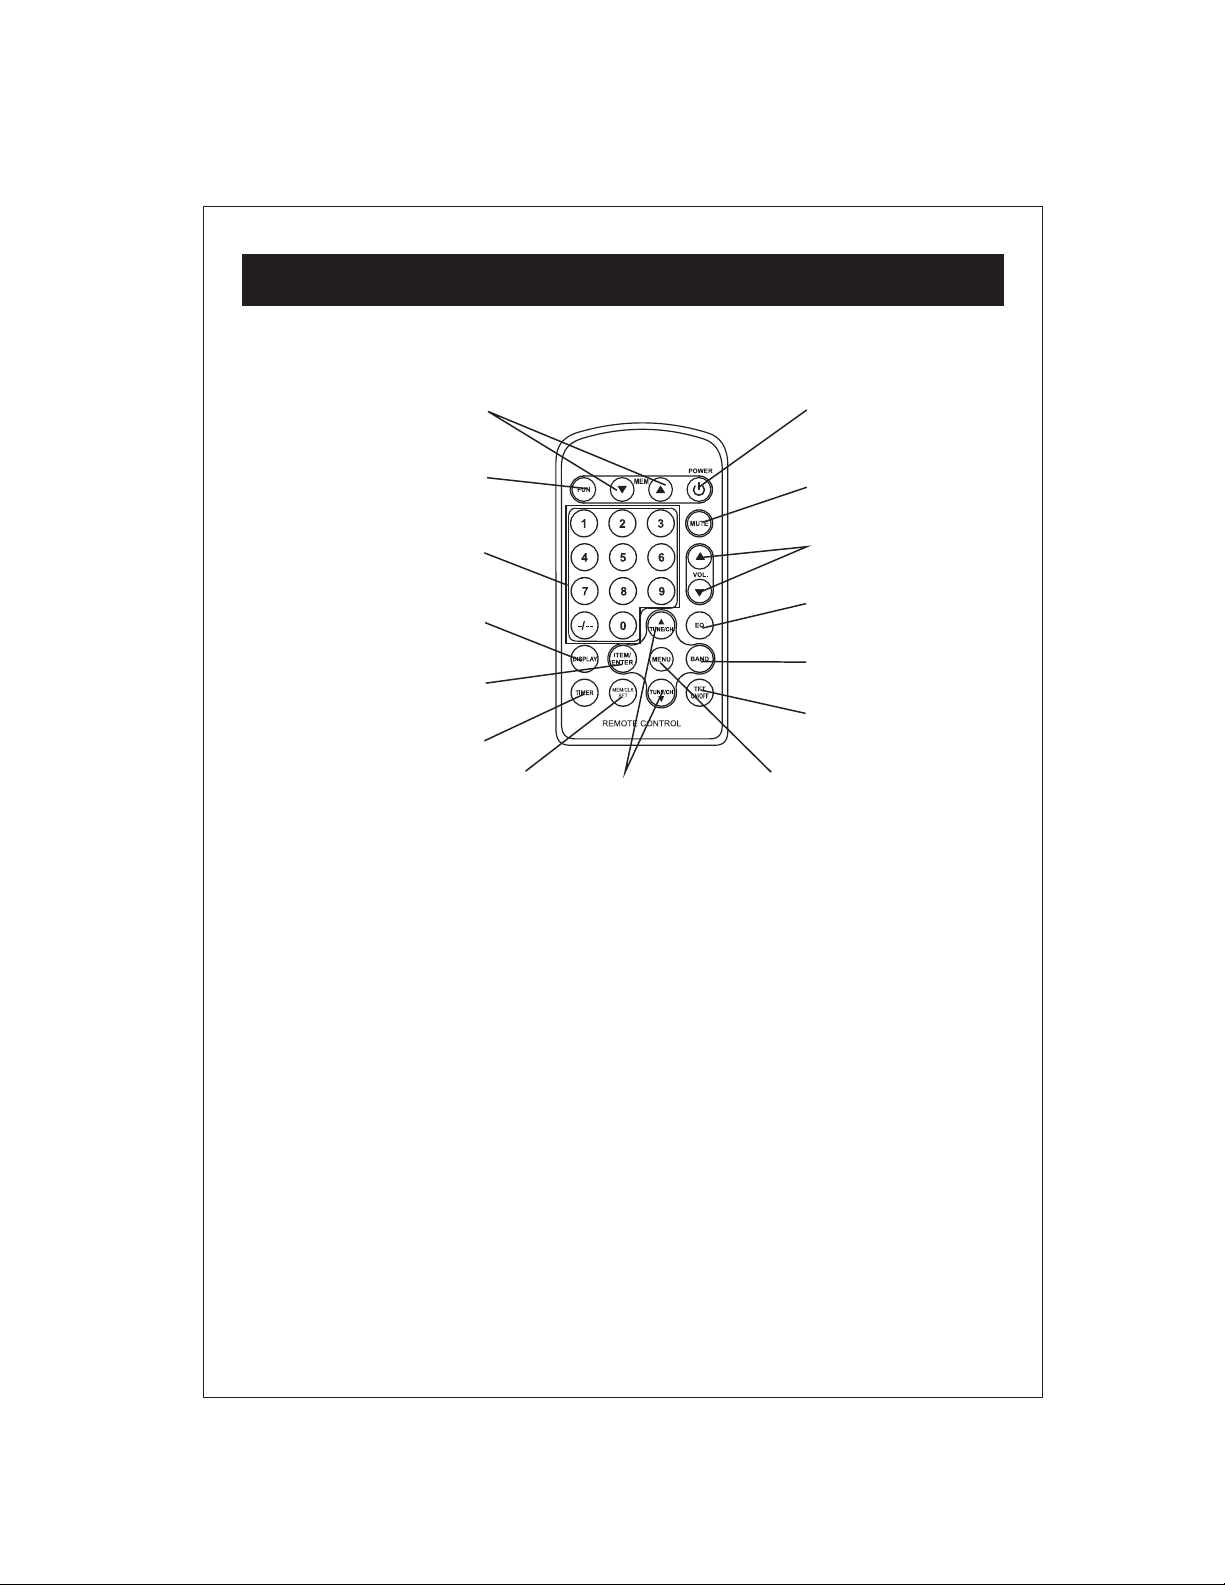
LOCATION OF CONTROLS
1
2
3
4
5
6
7
1. MEM. CH. UP/DN BUTTON
2. FUNCTION BUTTON
15
14
13
12
11
10
8
9. MENU BUTTON
10. TFT ON/OFF BUTTON
9
3. NUMBERDIAL BUTTONS
4. DISPLAY BUTTON
5. ITEM/ENTER BUTTON
6. TIMER BUTTON
7. MEM/CLK SET BUTTON
8. TUNE/CH BUTTON
11. BAND BUTTON
12. EQ BUTTON
13. VOLUME BUTTON
14. MUTE BUTTON
15. POWER BUTTON
4
Page 6

POWER SOURCES
(FOR REMOTE CONTROL)
BATTERIES
NOTE:
The button cell battery contains mercury, don’t put in the trash. Recycle or
dispose as hazardous waste.
NOTE:
You may need to remove a protective covering from the remote’s battery
compartment before using the remote control.
5
Page 7

OPERATING INSTRUCTIONS
1. SETTING THE TIME (POWER OFF MODE)
MEM/CLK SET MEM/CLK SET
PRESS AND HOLD
TUNING
TUNING
TO SELECT 24 HR OR 12 HR
MEM/CLK SET
2. LISTENING TO THE RADIO
FUNCTION
SELECT RADIO
TUNING
TO ADJUST MINUTE
BAND
SELECT AM/FM
MEM/CLK SET
TUNING
PRESS AND HOLD TO SCAN TO
THE NEXT AVAILABLE CHANNEL
6
Page 8

OPERATING INSTRUCTIONS
PROGRAM RADIO STATIONS
TUNING
TUNING
MEM/CLK SET
3. TELEVISION OPERATION
TUNING
CHANNEL
ENTER
TV MODE
FINE TUNE
MANUAL TUNE
AUTO SCAN
CHANNEL SWAP
MEM/CLK SET
PRESS AND HOLD
ENTER
TUNING
CHANNEL
TV MODE
FINE TUNE
MANUAL TUNE
AUTO SCAN
CHANNEL SWAP
TUNING
CHANNEL
TV MODE
FINE TUNE
MANUAL TUNE
AUTO SCAN
CHANNEL SWAP
REPEATEDLY
7
Page 9

4. SET UP
PICTURE
OPERATING INSTRUCTIONS
BRIGHTNESS
CONTRAST
ENTER
SHARPNESS
ENTER
COLOR
ENTER
PICTURE
BRIGHTNESS
CONTRAST
SHARPNESS
COLOR
HUE
DISPLAY MODE
DEFAULT
ENTER
ENTER
ENTER
FULL
PICTURE
BRIGHTNESS
CONTRAST
SHARPNESS
COLOR
HUE
DISPLAY MODE
DEFAULT
PICTURE
BRIGHTNESS
CONTRAST
SHARPNESS
COLOR
HUE
DISPLAY MODE
DEFAULT
PICTURE
BRIGHTNESS
CONTRAST
SHARPNESS
COLOR
HUE
DISPLAY MODE
DEFAULT
FULL
FULL
FULL
8
Page 10

OPERATING INSTRUCTIONS
HUE
ENTER
DISPLAY MODE
ENTER
RESET TO DEFAULT SETTING
PICTURE
BRIGHTNESS
CONTRAST
SHARPNESS
COLOR
HUE
DISPLAY MODE
RESETING
PICTURE
BRIGHTNESS
ENTER
ENTER
5
ENTERENTER
6
CONTRAST
SHARPNESS
COLOR
HUE
DISPLAY MODE
DEFAULT
PICTURE
BRIGHTNESS
CONTRAST
SHARPNESS
COLOR
HUE
DISPLAY MODE
DEFAULT
PICTURE
BRIGHTNESS
CONTRAST
SHARPNESS
COLOR
HUE
DISPLAY MODE
DEFAULT
PICTURE
BRIGHTNESS
CONTRAST
SHARPNESS
COLOR
HUE
DISPLAY MODE
DEFAULT
CHOOSE 4:3
OR FULL
EXIT PICTURE MENU
ENTER
TUNING CHANNEL
ENTER
TUNING
CHANNEL
TV MODE
FINE TUNE
MANUAL TUNE
AUTO SCAN
CHANNEL SWAP
9
Page 11

OPERATING INSTRUCTIONS
TV MODE (AIR/CABLE)
ENTER
ENTER
TUNING
CHANNEL
TV MODE
FINE TUNE
MANUAL TUNE
AUTO SCAN
CHANNEL SWAP
CABLE
TUNING
CHANNEL
TV MODE
FINE TUNE
MANUAL TUNE
AUTO SCAN
CHANNEL SWAP
FINE TUNE
ENTER ENTER
MANUAL TUNE
ENTER
AUTO SCAN
ENTER
CHANNEL SWAP
ENTER
EXIT TUNING MENU
ENTER
ENTER
ENTER
ENTER
TUNING
CHANNEL
TV MODE
FINE TUNE
MANUAL TUNE
AUTO SCAN
CHANNEL SWAP
PLEASE INPUT 0 OR 1
TUNING
CHANNEL
TV MODE
FINE TUNE
MANUAL TUNE
AUTO SCAN
CHANNEL SWAP
PLEASE INPUT 0 OR 1
TUNING
CHANNEL
TV MODE
FINE TUNE
MANUAL TUNE
X 4
X 5
AUTO SCAN
CHANNEL SWAP
PLEASE INPUT 0 OR 1
TUNING
CHANNEL
TV MODE
FINE TUNE
MANUAL TUNE
AUTO SCAN
CHANNEL SWAP
PLEASE INPUT 0 OR 1
CABLE
CABLE
CABLE
CABLE
X 1
10
Page 12

OPERATING INSTRUCTIONS
5. LISTENING TO AN AUXILIARY SOURCE
FROM VIDEO
OUTPUT
FROM RIGHT
AUDIO OUTPUT
TV, VCR, STEREO,
VIDEO GAME SYSTEM, ETC.
FROM LEFT
AUDIO OUTPUT
6. SETTING KITCHEN TIMER
7. EQ
HOLD TIMER BUTTON
TO SHUT OFF TIMER
REPEATEDLY
11
Page 13

CARE AND MAINTENANCE
GENERAL
*
Use a soft, clean cloth moistened with plain, luke-warm wafer to clean the
exterior of the unit.
*
Never use solvents such as benzene or other strong chemical cleaners since
these could damage the unit’s finish.
*
It is important that no liquid reaches the inside of the unit.
12
Page 14

TROUBLESHOOTING GUIDE
PROBLEM SOLUTION
No sound is heard.
No sound is heard.
Snowy picture; noisy
sound.
Dotted lines or stripes.
Double images or
“ghosts”.
POSSIBLE CAUSE
GENERAL
Power is not on.
VOLUME Control is set
to minimum.
Mute is on.
RADIO
Station has not been
tuned properly.
FM reception is weak.
Wrong function is
selected.
TV
Station has not been
tuned properly.
This may be caused by
local interference
(e.g. Cars, neon signs,
hair dryers, etc.)
This may be caused by
reflections from nearby
mountains or buildings.
Press the POWER button.
Adjust the VOLUME
Control.
Press Mute on remote.
Tune station properly.
Extend the FM cord.
Press the FUNCTION
button to the radio
position.
Align the antenna or
connect an external
antenna.
Adjust the antenna for
minimum interference or
connect an optional
external antenna.
A highly directional
antenna may improve the
picture.
Good picture; no sound.
Good picture; noisy
sound.
Good picture; no sound.
No picture
to minimum.
This may be caused by
reflections from nearby
mountains or buildings.
This may be caused by
reflections from nearby
mountains or buildings.
Power is not on. Set the FUNCTION Switch
Adjust the volume.VOLUME control is set
A highly directional
antenna may improve the
picture.
A highly directional
antenna may improve the
picture.
to the TV position.
13
 Loading...