

Page 1
MODEL NO. iP9844
DVD PLAYER DOCKING STATION FOR iPOD VIDEO
INSTRUCTION MANUAL
PLEASE READ BEFORE OPERATING THIS EQUIPMENT
Page 2

Warnings and Precautions
TO PREVENT IRE OR HOCK AZARDS, DO NOT EXPOSE THIS UNIT TO RAIN
OR MOISTURE.
This symbol, located on back or bottom of the unit, is intended to alert the
user to the presence of un-insulated “dangerous voltage” within the product’s’s
enclosure that may be of sufficient magnitude to constitute a risk of electric
shock to persons.
This symbol, located on back or bottom of the unit, is intended to alert the
user to the presence of important operating and maintenance (servicing)
instructions in the literature accompanying the appliance.
Any use of the controls or an adjustment to the procedures other than those
specified herein may result in hazardous radiation.
CAUTION : TO PREVENT ELECTRIC SHOCK, MATCH WIDE BLADE
OF PLUG TO WIDE SLOT, FULLY INSERT.
To reduce the risk of electric shock, do not remove cover (or back). There are no
user-serviceable parts inside. Please refer any servicing to qualified service personnel.
WARNING: Changes or modifications to this unit not expressly approved by the
party responsible for compliance could void the user’s authority to operate the
equipment.
2
Page 3
Location of Controls
1
2
3
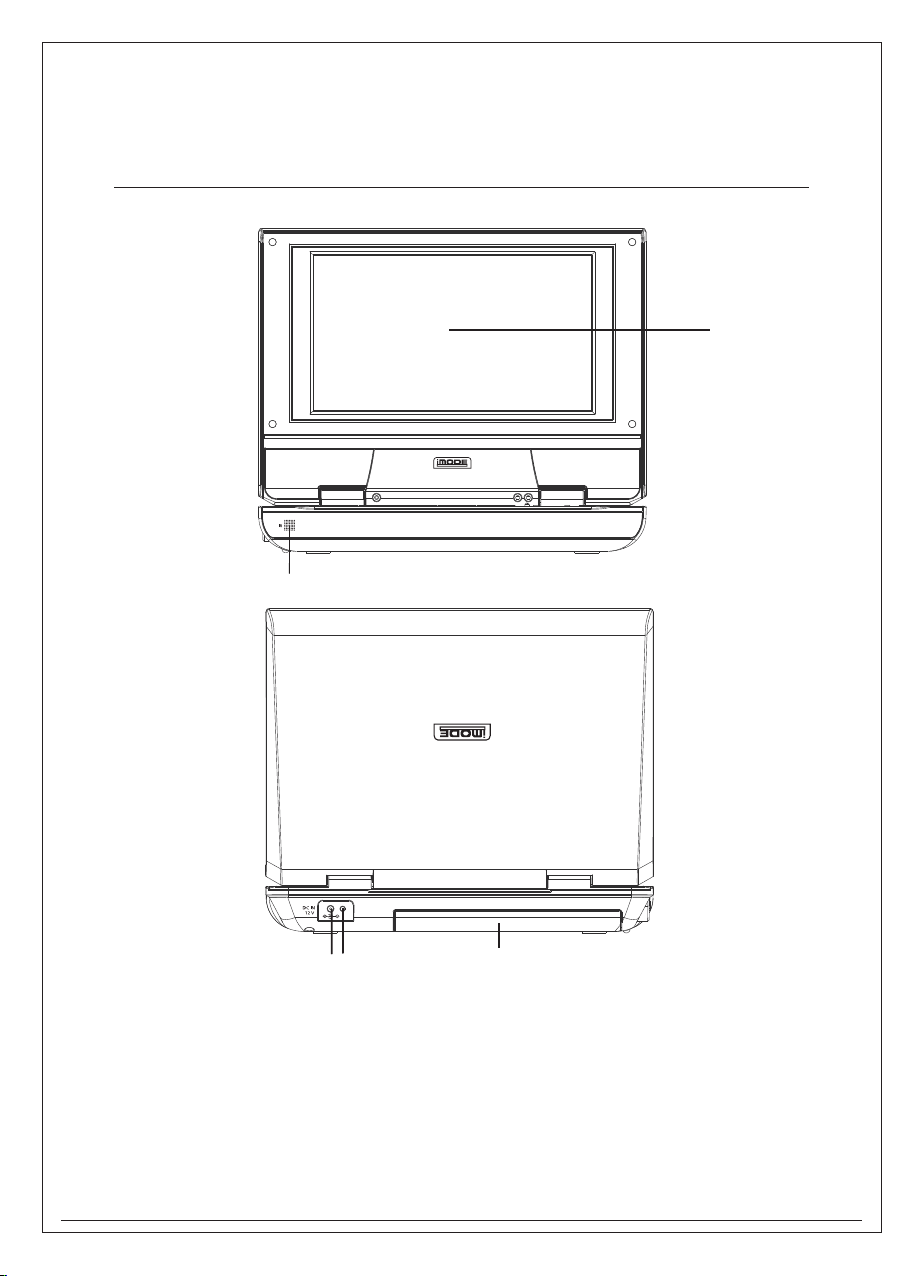
1. REMOTE SENSOR
2. TFT PANEL
543
3. POWER ADAPTOR JACK
4. POWER INDICATOR
5. BATTERY COMPARTMENT
Page 4
Location of Controls
32
31
30
29
28
27
STANDBY
26
25
23
24
22
21
4
6 9 12 13 191715
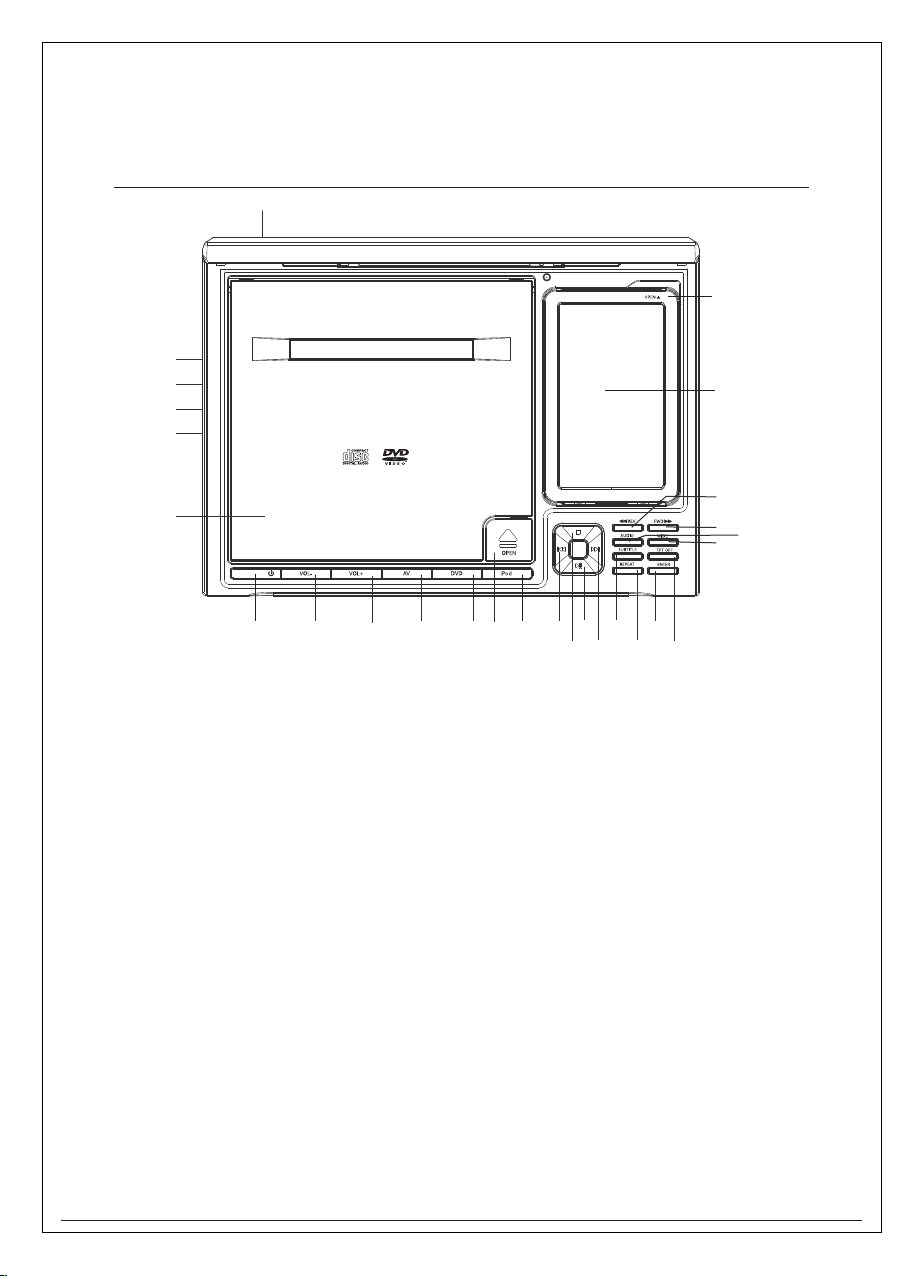
6. STANDBY BUTTON
7. VOLUME DOWN BUTTON
8. VOLUME UP BUTTON
9. AV BUTTON
10. DVD BUTTON
11. DVD COMPARTMENT
DOOR BUTTON
12. IPOD BUTTON
13. SKIP BACKWARD BUTTON
14. STOP BUTTON
15. PLAY/PAUSE BUTTON
16. SKIP FORWARD BUTTON
17. SUBTITLE BUTTON
18. REPEAT BUTTON
111087
14 16 18 20
19. ENTER BUTTON
20. TFT OFF BUTTON
21. WIDESCREEN BUTTON
22. AUDIO BUTTON
23. REWIND BUTTON
24. FAST FORWARD BUTTON
25. IPOD COMPARTMENT
26. IPOD COMPARTMENT
OPEN SWITCH
27. DVD COMPARTMENT
28. POWER ON/OFF
29. PHONES
30. AUDIO IN/OUT
31. VIDEO IN/OUT
32. DC IN JACK
Page 5

Features Defined
1
REMOTE SENSOR Using remote control pointing at the remote sensor window to control the unit.
2
TFT PANEL Show the video / picture in the TFT panel.
3
POWER ADAPTER JACK To connect power adapter.
4
POWER INDICATOR If use power adapter, the indicator will be light.
5
BATTERY COMPARTMENT Rechargeable battery (LI-POLYMER 7.2V)
6
STANDBY BUTTON Press the button between standby and power on mode.
7
VOLUME DOWN BUTTON Press to decrease the volume sound.
8
VOLUME UP BUTTON Press to increase the volume sound.
9
AV BUTTON Press to select AV mode.
10
DVD BUTTON Press to select DVD mode
11
DVD COMPARTMENT DOOR BUTTON Press to open DVD door and insert a disc.
12
IPOD BUTTON Press to select iPod mode.
13
SKIP BACKWARD BUTTON Press to select previous track.
14
STOP BUTTON To stop the playback.
15
PLAY/PAUSE BUTTON Press to play / pause the unit.
16
SKIP FORWARD BUTTON Press to select next track.
17
SUBTITLE BUTTON Press to turn on DVD subtitles.
18
REPEAT BUTTON Press to repeat mode.
19
ENTER BUTTON Press to confirm a choice, or select an option on one of the setup menus.
20
TFT OFF BUTTON Press to off the TFT screen.
21
WIDE SCREEN BUTTON Press to select wide screen DVD output.
22
AUDIO BUTTON Press to select the audio channel.
23
REWIND BUTTON Press to select fast reverse playing.
24
FAST FORWARD BUTTON Press to select fast-forward playing.
25
IPOD COMPARTMENT Insert iPod to playing.
26
IPOD COMPARTMENT OPEN SWITCH To move up the iPod compartment and insert an iPod.
27
DVD COMPARTMENT Insert a DVD disc.
28
POWER ON/OFF Slide the switch to select power on or off.
29
PHONES Connect a headphone or earphone.
30
AUDIO IN/OUT Use the AUX-OUT jack to connect other audio device to the unit. During AV mode,
using the AUX-IN jack connect other audio device and receive the signal to sound in the unit.
31
VIDEO IN/OUT Uses the AV cord to connect TV video in and send the signal to TV. During AV mode,
using the AV cord connect TV video out and receive the signal to play in the unit.
32
DC IN JACK Use DC IN JACK to connect power adapter or car adapter to provide power for player.
5
Page 6
Location of Controls
31
30
1
2
3
4
5
6
7
8
9
10
11
12
13
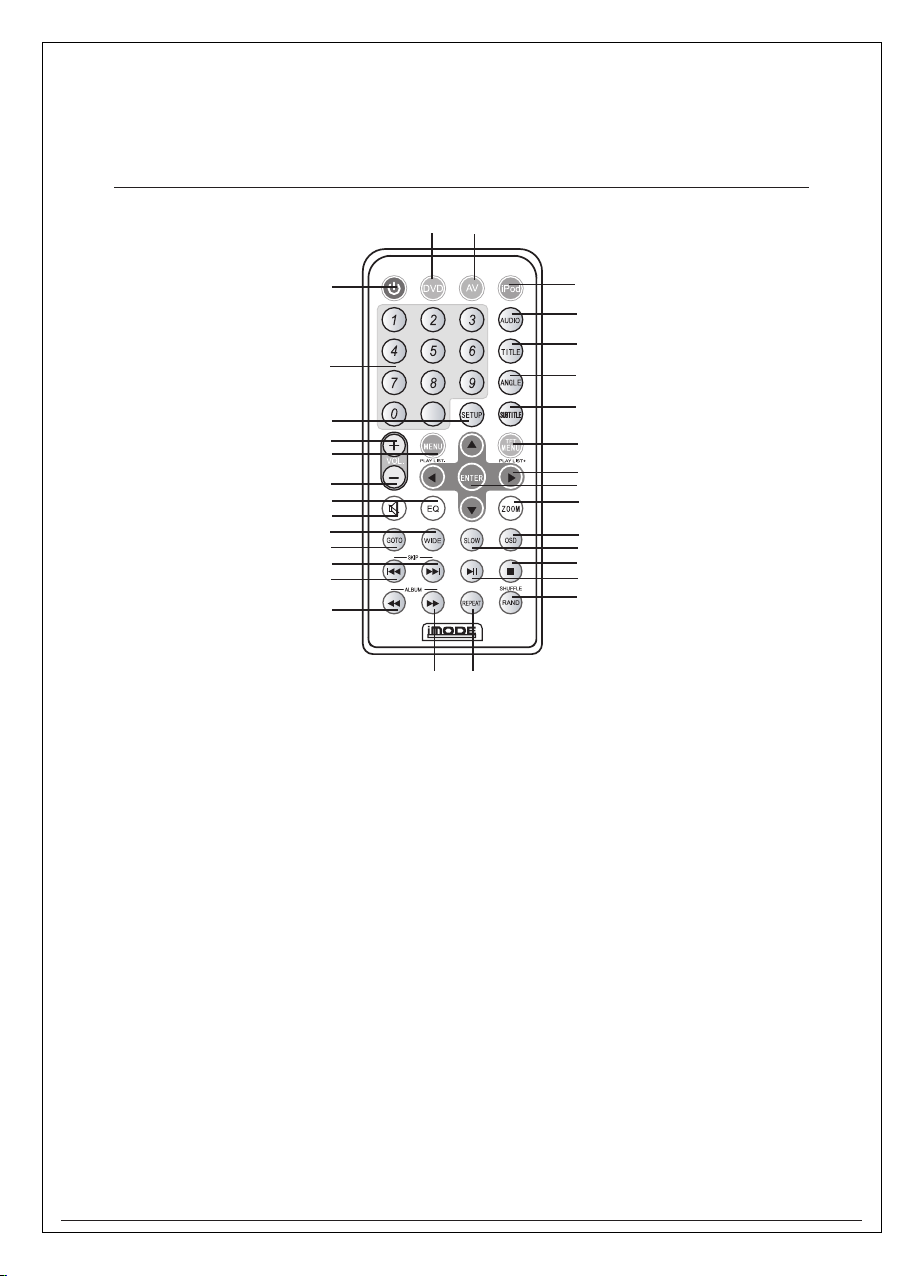
1. POWER/STANDBY BUTTON
2. NUMBER PAD BUTTON
3. SETUP BUTTON
4. VOLUME UP BUTTON
5. MENU/PLAY LIST – BUTTON
6. VOLUME DOWN BUTTON
7. EQ BUTTON
8. MUTE BUTTON
9. WIDESCREEN BUTTON
10. GOTO BUTTON
11. SKIP FOWARD BUTTON
12. SKIP BACKWARD BUTTON
13. REWIND/ALBUM BUTTON
14. FORWARD/ALBUM BUTTON
15. REPEAT BUTTON
STANDBY
+10
14
29
28
27
26
25
24
23
22
21
20
19
18
17
16
15
16. RANDOM/SHUFFLE BUTTON
17. PLAY/PAUSE BUTTON
18. STOP BUTTON
19. SLOW BUTTON
20. OSD BUTTON
21. ZOOM BUTTON
22. ENTER BUTTON
23. NETVIGATION BUTTON
24. TFT MENU/PLAY LIST + BUTTON
25. SUBTITLE BUTTON
26. ANGLE BUTTON
27. TITLE BUTTON
28 AUDIO BUTTON
29. IPOD BUTTON
30. AV BUTTON
31. DVD BUTTON
6
Page 7

Features Defined
1
POWER / STANDBY BUTTON Press the button between standby and power on mode.
2
NUMBER PAD BUTTON Press to select DVD chapters.
3
SETUP BUTTON Press to open setup menu.
4
VOLUME UP BUTTON Press to increase the volume sound.
5
MEMU/PLAYLIST BUTTON To open DVD menu or select play-list down.
6
VOLUME DOWN BUTTON Press to decrease the volume sound.
7
EQ BUTTON Press to select one of four equalizer presets (CLASSIC / JAZZ / ROCK AND POP)
8
MUTE BUTTON Press to mute the speakers. Press again to cancel.
9
WIDE SCREEN BUTTON Press to select wide screen DVD output.
10
GOTO BUTTON Press to go directly to the DVD sub-menu, then use arrow and number keys to select a
title / chapter or time you want.
11
SKIP FORWARD BUTTON Press to select next track.
12
SKIP BACKWARD BUTTON Press to select previous track.
13
REWIND/ALBUM BUTTON Press to select fast reverse playing or scroll down album.
14
FORWARD/ALBUM BUTTON Press to select fast-forward playing or scroll up album.
15
REPEAT BUTTON Press to repeat mode.
16
RANDOM/SHUFFLE BUTTON In playback mode, press to start random or shuffle playback.
17
PLAY/PAUSE BUTTON Press to play / pause the unit.
18
STOP BUTTON To stop the playback.
19
SLOW BUTTON Press to turn slow motion.
20
OSD BUTTON Press to turn on the text screen display.
21
ZOOM BUTTON Press to zoom in a DVD picture (not available on all DVDs).
22
ENTER BUTTON Press to confirm a choice, or select an option on one of the setup menus.
23
NETVIGATION BUTTON Press to navigate the setup menus.
24
TFT MENU/PLAY LIST+ BUTTON Press to open TFT menu or select play-list up.
25
SUBTITLE BUTTON Press to turn on DVD subtitles.
26
ANGLE BUTTON Press to select a viewing angle from those available on the DVD (not available on
all DVDs).
27
TITLE BUTTON Press to display the title of the DVD playing.
28
AUDIO BUTTON Press to select the audio channel.
29
IPOD BUTTON Press to select iPod mode.
30
AV BUTTON Press to select AV mode.
31
DVD BUTTON Press to select DVD mode
7
Page 8
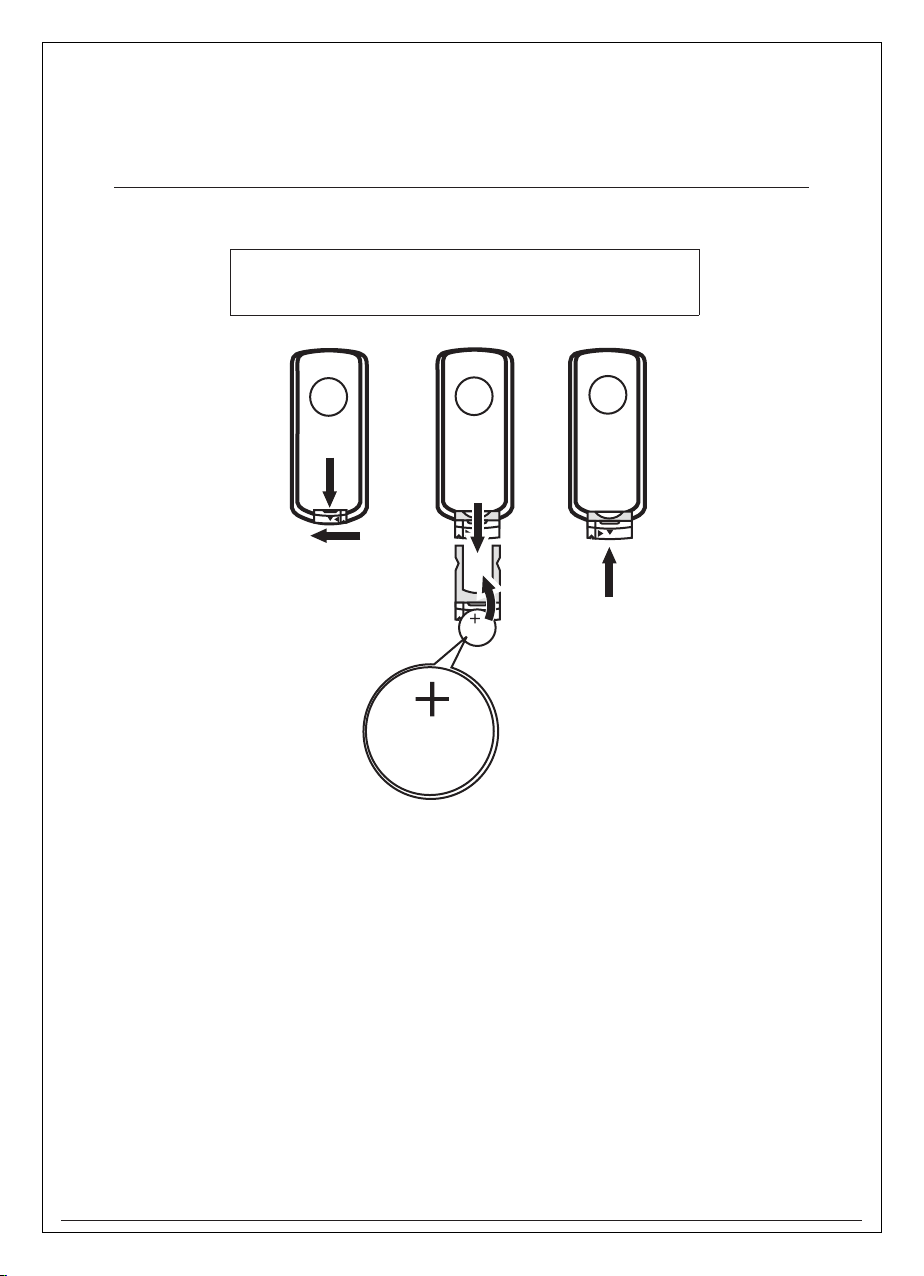
Installing a Battery in the Remote
Warning
There is danger of an explosion if you replace the battery
incorrectly. Replace only with the same or equivalent battery.
1
LITHIUM BATTERY
To install or replace the battery:
1 Pull the battery tray out of the remote.
2 If you are replacing the battery, remove the old battery and
dispose of it properly. Note the orientation of the + and - sides of
the battery.
3 Insert the new battery into the battery tray, orienting it the same
way the old battery was placed.
4 Close the battery tray.
2
CR2025
3V
3
8
Page 9

iPod Adaptors
iPod Photo 40GB, 60GB
iPod Color 60GB
1
iPod Photo 20GB
iPod Color 30GB
4
iPod 20GB
iPod U2
iPod Nano 1st Gen.
iPod Nano 2nd Gen.
2
iPod 40GB
5
iPod Video 60GB
iPod Mini
3
iPod 3rd Gen. 10GB, 15GB, 20GB
6-
iPod Video 30GB
9
Page 10

UNPACKING
First inventory the contents of your Portable DVD player package:
If any item should be damaged or missing, please contact your dealer without
delay.
Keep the packaging materials, you may need them to transport your player in the
future.
WARNING: Changes or modifications made to this equipment, not expressly approved
by us or parties authorized by us will void all manufacture warranties.
Portable DVD Player x 1
RCA Cable x 1 pair
Li-Polymer Battery Pack x 1
Remote Control x 1
External Power Adapter x 1
Cigarette Lighter Adapter 1
Operating Manual 1
Stereo Headphone 1
10
Page 11

Quick Starting Guide
1. Connecting to an External Power Source
Connect the power adapter (supplied with the player) to the side input and to a wall
outlet. Do not use any other device otherwise specified by your dealer.
2. Open the protective cover
The cover opens to a maximum 135 degree only, so please do not try to open it any
further.
3. Press the open button to open the disc cover
4. Inserting a DVD disc
Align the center of the DVD disc with the center of the disc guide. Press gently
down on the DVD to snap the disc into place, and then close the disc cover.
5. Slide the side power switch to ‘ON’.
6. Press the PLAY button on the player face
In general, the DVD already inserted into the player will start reading automatically
when power is turned on.
The DVD player will immediately start rendering the DVD program.
When you want to stop, press the STOP button, it will return to the power-on logo. To
power off the unit, slide the ON/OFF switch.
Connecting to an External Power Source
USING THE CAR ADAPTER
Plug the small end of the car adapter into the DC IN jack and then plug the other end
into the cigarette lighter socket. This indicator lights when the power is on.
HOW TO USE DC IN JACK
Use DC IN JACK to connect power adapter or car adapter to provide power for player.
11
Page 12

Quick Starting Guide
Connecting to a TV
Step 1:connect the audio cables to AUDIO IN/OUT of the DVD player..
Step 2:connect the yellow cable to the VIDEO IN/OUT on the side of your player.
CONNECTING HEADPHONES
1. Connect the headphones.
Headphones with a 3.5 mm stereo plug can be connected.
2. Adjust the volume by VOL – / VOL +.
DVD PLAYER
VIDEO IN/
OUT
AUDIO CABLE
12
Page 13

Quick Starting Guide
SYSTEM CONNECTION
Use audio cable (Red / White), video cable (Yellow) to connect from player to TV set
and amplifier.
CONNECT THE PLAYER TO TV SET BY AUDIO / AV CABLE
Use audio cable (Red / White), video cable (Yellow) to connect the player and TV set.
CONNECT OTHER MEDIA TO THE PLAYER
Use audio cable (Red / White), video cable (Yellow) to connect from other media to
player.
DVD SETUP
Language
13
OSD >
Disc >
Audio >
Subtitle >
Version >
Reset >
Language
OSD > English
Disc > Espanol
Audio > Francais
Subtitle > Deutsch
Version > Italiano
Reset >
Press “SETUP” on remote control and go
into DVD setup
Press Enter and use the navigations key
on remote control to select the OSD
language then press Enter to confirm.
Page 14

Quick Starting Guide
Language
OSD > English
Disc > Spanish
Audio > French
Subtitle > German
Version > Italian
Reset > Others
Language
OSD > English
Disc > Spanish
Audio > French
Subtitle > German
Version > Italian
Reset > Others
Language
OSD > English
Disc > Spanish
Audio > French
Subtitle > German
Version > Italian
Reset > Others
Press Enter and use the navigations key
on remote control to select the disc
language then press Enter to confirm.
Press Enter and use navigations key on
remote control to select the audio channel
language then press Enter to confirm.
Press Enter and use navigations key on
remote control to select the subtitle
language then press Enter to confirm.
14
Language
OSD >
Disc >
Audio >
Subtitle >
Version > View Ver.
Reset >
Press Enter and use navigations key on
remote control to select the version to
display the unit software version then
press Enter to confirm.
Page 15

Quick Starting Guide
Language
OSD >
Disc >
Audio >
Subtitle >
Version >
Reset > Restore
Display
TV display >
Pause Mode >
Message >
Black Level >
Display
TV display > Wide
Pause Mode > 4:# L-Box
Message > 4:3 PS
Black Level >
Press Enter and use navigation key on
remote control to select the Reset to
restore the factory default setting then
press Enter to confirm.
Press Enter and use navigations key
“Right” on remote control to select the
Display mode then press Enter to confirm.
Press Enter and use navigations key on
remote control to select the TV display
to choose the screen output then press
Enter to confirm.
15
Display
TV display > Auto
Pause Mode > Frame
Message > Field
Black Level >
Press Enter and use navigation key on
Pause Mode to select which method to
pause then press Enter to confirm
Page 16

Quick Starting Guide
Display
TV display >
Pause Mode >
Message > Off
Black Level > On
Display
TV display >
Pause Mode >
Message > Off
Black Level > On
Speaker
3D/EQ > Off
Virtual 3D
Jazz
Rock
Pop
Classic
Press Enter and use navigations key on
Message to switch on Message or switch
off Message then press Enter to confirm
Press Enter and use navigations key on
Black Level to switch on or off the TFT
panel black levels of brightness then press
Enter to confirm.
Press Enter and use navigations key on
3D/EQ to select which EQ and 3D sound
to perform in the unit then press Enter to
confirm.
16
Page 17

Quick Starting Guide
Playing Back a Disc
1. Press TITLE to access the menu screen.
2. Press or the number buttons to select the title.
3. Press the ENTER or PLAY button.
The DVD video player will start playback from the title selected.
Note:
You also can input the assigned number of the title to select it directly
HOW TO PAUSE PLAYBACK (STILL PLAYBACK)
Press the PAUSE once during playback.
The player is pause mode.
Press the STOP button.
The player is stopped
FAST FORWARD & REWIND
You can playback a disc at 2x, 4x, 8x, 16x or 32x the normal speed for fast forward or
rewind.
Press the REV or FWD button during playback.
The playback speed becomes double the normal speed.
The playback speed changes, each time you press the REV or FWD button.
TO RESUME NORMAL PLAYBACK. Press PLAY.
Press the SLOW button during playback
The playback speed becomes 1/2, 1/4, 1/8, or 1/16 of the normal speed each time you
press the SLOW button.
TO RESUME NORMAL PLAYBACK. Press PLAY.
17
Page 18

Quick Starting Guide
LOCATING A TITLE USING THE TITLE MENU
You can locate a specific title using the title menu function, if a DVD video disc
contains a title menu.
1 . Press the TITLE button
On the LCD or TV screen, the title menu will appear.
2 . Press the button to select the title you want.
You can also directly locate a specific title by pressing its assigned number with the
number buttons.
3 . Press the PLAY button
This will cause the DVD video player to start play back from chapter 1 of the title
selected.
You also can use skip buttons to select a title or track desired:
Press or button repeatedly till the one displays.
HOW TO REPEAT A TITLE, CHAPTER, OR DISC
During normal playback, press the REPEAT button (set shift on).
The repeat mode changes, each time you press the REPEAT button.
18
Page 19

Quick Starting Guide
Zooming a Picture
This DVD video player allows you to zoom into a picture as well as shift the zoom point.
Press ZOOM during normal playback or slow - motion. (To use the ZOOM button,
it should be set ‘SHIFT ON’ by pressing SHIFT.)
The player magnifies in the center of the picture. If you press during zoom playback, the
zoom point shifts.
To cancel the zoom function, press ZOOM again.
Selecting Subtitles
HOW TO DISPLAY SUBTITLES
You have the option to select a preferred subtitle from those included on the DVD
video disc.
Press the SUBTITLE button during playback.
To TURN OFF the subtitles.
Press the SUBTITLE during playback until the subtitles disappear.
Using the On-Screen Display
THIS UNIT ALLOWS YOU TO VIEW THE OPERATIONAL STATUS AND DISC
INFORMATION ON YOUR TV SCREEN.
With this function you can view on your TV the following:
- Current title
- Track number
- Total playing time
Press the OSD during playback to turn on the ON SCREEN DISPLAY
Press it again to turn it off.
19
Page 20

Quick Starting Guide
Selecting the Camera Angle
THIS DVD VIDEO PLAYER ALLOWS YOU TO SELECT FROM SEVERAL
DIFFERENT ANGLES.
If the DVD video disc was recorded with multiple angles, you have the option to change
the camera angle of the scene you are watching.
Press the ANGLE button while playing back a scene recorded with multiple angles
(set shift on).
• You may only press the ANGLE button when the angle icon is flashing on the DVD
display.
• Press the corresponding number of your desired angle.
To Playback iPod
Lift the Dock Release button. Locate the correct holder to use as shown on page 10.
Insert the holder onto the dock and slip the side tabs into place.
Insert the iPod onto the holder.
Gently push down so the connector on the iPod slides onto the connector on the unit.
Press the edge area of the holder down gently (as shown) until it clicks into place.
Once you connect the iPod, it will start charging the battery until it is full. (The iPod can
charge only when the unit is connected with the AC adapter.)
With an iPod connected, turn the unit on by slide the Power button (if it is not on already);
Operate the iPod as per its owner’s manual.
For music selections, the sound will be heard through the unit speakers.
For photo selections, the image will be seen on the unit screen.
For video selections, the sound will be heard through the unit speakers and the image
will be seen on the TFT screen.
Make sure to go into the Settings menu of your iPod and set the TV Out setting to ON and
set the TV Signal to NTSC; otherwise, you may not be able to view the videos/ photos on
your external TV.
• The photo and video selections are for iPod with video (5th generation). The photo
selection is also suitable for iPod photo.
20
Page 21

Quick Starting Guide
When done, slide the Power button to OFF and also turn off the iPod.
With the unit on, press the TFT MENU button on the remote
The menu will appear. To adjust the Brightness,
Contrast, Sharpness, Color, Hue or Reset
select the desired option by using the navigation button on the remote control.
Then adjust the option by pressing the - / + (Volume/Setting)
Followed by the TFT MENU button again.
To adjust the Screen Mode, press the WIDE Button.
Then select between 16:9 (Wide Screen) and 4:3 (Pan Scan: video material formatted in
this style is played back with the left and right edges cut off)
Rechargeable Battery Installation & Use
INSTALLING & REMOVING THE BATTERY PACK
1 . Make sure the unit is powered off and unplugged.
2 . Attach the battery pack to the outlet of the unit, push it forward align them with
each other till you hear a click sound.
Removing the Battery Pack
1 .Make sure the unit is powered off and unplugged.
2 . Pull the battery pack back ward while sliding the latch (at the bottom of the unit).
21
Page 22

Quick Starting Guide
USE AND MAINTENANCE
THIS UNIT IS SUPPLIED WITH HIGHLY- EFFECTIVE RECHARGEABLE
BATTERY (LI-POLYMER). SUCH BATTERY PACK
A HIGH STORAGE CAPACITY AND LOW LEVEL OF DEGRADATION. THE
LATTER MEANS THAT THE BATTERY CAN ALSO BE RECHARGED WHEN
ONLY PARTLY SPENT.
Plug the AC adapter into the battery.
Please fully charge the battery prior to first use.
Rechargeable Battery Installation & Use
The provided battery can be recharged for about 300 times. It takes about 4-5 hours to
recharge the battery, then the red indicator is put out. A fully charged battery can power
the unit for about 2.5 hours. Power consumption depends on the operations of the player
such as brightness of the screen, volume level, etc.
Recharge the battery when fully spent in order to maximize its life.
Never recharge the battery already fully charged .
Under no circumstance should you short out the battery, store it in a metal container, or
leave it in a humid or damp environment. Store the battery in an airtight container if
possible. Recharge effectiveness will degrade when environmental temperatures drop
below 10 ºC or exceed 35 ºC.
Battery Storage
1 . Storage Temperature and Humidity (Short - term)
In a dry location with low humidity (Max.85%), no corrosive gases, at a temperature
range of -20ºC to 45ºC.
In a location where humidity is extremely high or with temperature below -20ºC or
above 45ºC, the metallic parts of battery will rust and result in electrolyte leakage
due to expansion or contraction in parts composed of organic materials.
22
Page 23

Quick Starting Guide
2 . Long-term Storage (2 years , -20ºC to 35ºC)
As long-term storage can accelerate battery self-discharge and lead to the
deactivation of reactants, locations where the temperature ranges between 10ºC and
30ºC are suitable for long-term storage.
When charge for the first time after long-term storage, deactivation of reactants may
have led to increased battery voltage and decreased battery capacity. Restore such
batteries to original performance through repeating several cycles of charge and
discharge.
When storing battery for more than 1 year, charge at least once a year to prevent
leakage and deterioration in performance due to self discharge. When using a rapid
charger of voltage detection type, carry out charge and discharge at least once every
6 months.
Note :
To get the best performance, charge your battery for more than 12 hours at the first
time after unpacking, and carry out 3 cycles of charge and discharge under proper
conditions.
Specifications
Power requirements: AC~100-240V, 50-60HzDC 12V, 1.5A
Power consumption: 45W maximium
Signal system: NTSC
Operating temperature range: +5°C to +35°C
Battery charging time: Approximately 4-5 hours
Battery life(Fully charge): Approximately 2 1/2 hours
Discs played:
DVD-VIDEO disc
12cm single-sided, single-layer
12cm single-sided, dual-layer
12cm double-sided, single-layer
8 cm single-sided, single-layer
8 cm single-sided, dual-layer
8 cm double-sided, single-layer.
Compact disc
Compact disc 12cm disc
8 cm disc
23
Page 24

 Loading...