

Page 1

User Guide
iPhone/iPod Docking Station with Clock Radio
IP320UKT
Now you have purchased a TEVION® product you
can rest assured in the knowledge that as well as your
manufacturer’s warranty you have the added
peace of mind of dedicated helplines and web support:
• User guide
• Remote control
www.curtisint.com
MODEL : IP320UKT
Page 2

Contents
01 Safety Information
03 Features - Main Unit
04 Features Defined
05 Peripherals - Remote Control
05 Peripheral Defined
06 Connecting Power
06 Remote Controls Operation
07 Changing the Lithium Battery
07 Operations
11 iPod Insert
12 Specifications
13 Warranty Card
www.curtisint.com
MODEL : IP320UKT
• User guide
• Remote control
Page 3
www.curtisint.com
MODEL : 48652
• User guide
• Remote control
1
Page 4
www.curtisint.com
MODEL : 48652
• User guide
• Remote control
2
Page 5
Features
1
2
3
12
11
10
13
MODEL : 48652
www.curtisint.com
4
14
5
6
15
• User guide
• Remote control
16
89
7
17
3
Page 6
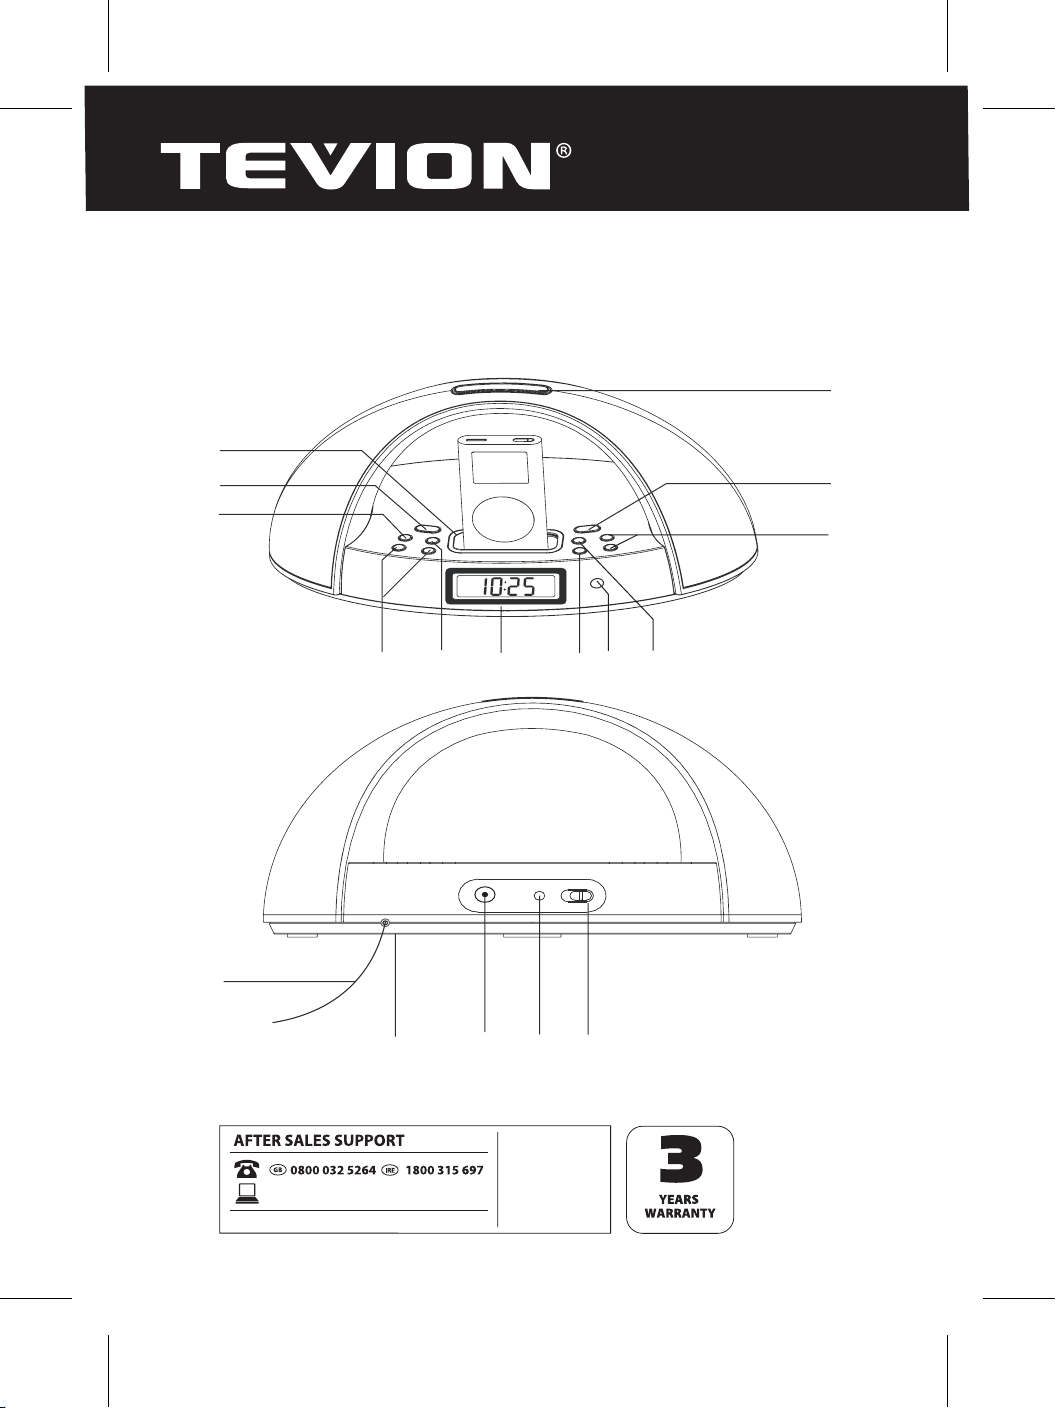
Features Dened
iPod Docking Station Connect your iPhone / iPod.
1
POWER Press the POWER button to turn the unit on or o.
2
ALARM SET 1 Use the ALARM SET 1 button to view and adjust the alarm-1 time, and to
3
set alarm-1 wake up to buzzer, radio, or iPod / iPhone.
4
VOLUMES Press the up/down arrow to increase/decrease the volume sound.
5
ALARM SET 2 Use the ALARM SET 2 button to view and adjust the alarm-2 time, and to
set alarm-2 wake up to buzzer, radio, or iPod / iPhone.
6
LCD View the Time, iPod Indicator, and radio frequency through this Display.
7
PLAY/PAUSE/M+ Press the PLAY/PAUSE/M+ button to play / pause an iPod/iPhone, or
cycle up through the preset radio stations.
8
SENSOR Area Use the remote pointing to SENSOR area and press the remote key to
control the unit.
9
CLK SET/ MEM Press the MEM/CLK SET button to program a radio station into the presets,
or to adjust the clock time.
10
FWD/TUNE or REV/TUNE Press the FWD/TUNE or REV/TUNE buttons to decrease/increase
the radio frequency, or to decrease/increase the clock time. In iPod mode, press this
buttons to search next / previous music track.
11
FUNCTION Press the FUNCTION button to witch between Radio / iPod / Line-In(Aux).
12
SNOOZE Press the SNOOZE button to delay the alarm for nine minutes after the alarm
sounds. Press the SNOOZE button to set the player to automatic turn o after 10-90
minutes (SLEEP function).
13
FM Antenna The FM Wire Antenna provides exibility and range when adjusting the FM
reception.
14
Battery for Back-Up (2xAA batteries) The Battery (for Back-Up) will save the clock / alarm
/station memory settings in case of power outage. The display will not be active without
AC power (batteries not included).
NOTES: DO NOT MIX OLD AND NEW BATTERIES.
15
DC INPUT Use the DC input jack connect AC adapter to provide unit power.
16
LINE IN (AUX) Use the LINE IN jack to connect an iPod shue or other audio device to the
player.
17 DIMMER Toggle the DIMMER witch between LO and HI to adjust the brightness of the
LCD Display.
www.curtisint.com
MODEL : 48652
• User guide
• Remote control
4
Page 7

Peripherals
WARNING: Danger of explosion
if batteries are incorrectly installed.
Replace only with the same or
equivalent type.
The button cell battery contains
mercury. Do not put in the trash,
instead recycle or dispose of as
hazardous waste.
If you suspect a battery to have
been swallowed, seek immediate
medical advice.
22
23
19
20
AL OFF
AL 1
SHUFFLE
TUN
-
MENU
SNOOZE
SLEEP
M+
MENU
FUNCTION
AL 2
CLK SET
MEM
TUN+
M-
REPEAT
SELECT
21
Notes: Buttons that are not dened in the Periperals section, are dened in the Features
section.
Peripherals Dened
SHUFFLE Press the SHUFFLE button to randomly play songs on an iPod / iPhone.
19
MENU UP/ DOWN Use to Controls to move through an iPod / IPhone menu system.
20
MENU Press the MEMU button to enter the menu on an iPod / IPhone.
21
REPEAT/M- Press the REPEAT button to switch between REPEAT 1, REPEAT ALL, or O
22
(iPod/iPhone playing only). In radio mode, press this button to cycle down through the
preset radio stations.
SELECT Press the SELECT button to select a song, photo, video, menu item on our iPod /
23
iPhone menu.
www.curtisint.com
MODEL : 48652
• User guide
• Remote control
5
Page 8

Connecting Power
Connect small end of adapter to main unit DC
jack and plug the supplied adapter into
standard AC wall socket.
Warning!
The unit is designed to operate from a mains
supply of AC 230V~50Hz. If the adapter does
not t properly, turn it over and again. Do not force it. When the unit not operation by the
AC power or unused for long periods of the time. Please press the POWER button to o
unit power and remove the power adapter from the wall outlet and unplug from the
main unit.
Remote Controls Operation
You must remove the spacer before using the remote for the rst
time. To remove the spacer, pull on the small tab that is extending
outside the battery compartment as shown. The main functions of
this system can be operated by pressing the controls on the front
panel of the main unit, or by pressing the corresponding buttons on
the remote control.
You should point the remote control at the remote sensor on the
front panel. The eective operating range of the remote control is approximately
10 - 13 feet.
Please note that bright sunlight can interfere with the operation of the remote
control. If the remote operation is unsatisfactory, try darkening the room before
changing the remote battery. The battery should last at least 12 months or longer
under normal operating conditions.
www.curtisint.com
MODEL : 48652
• User guide
• Remote control
6
Page 9
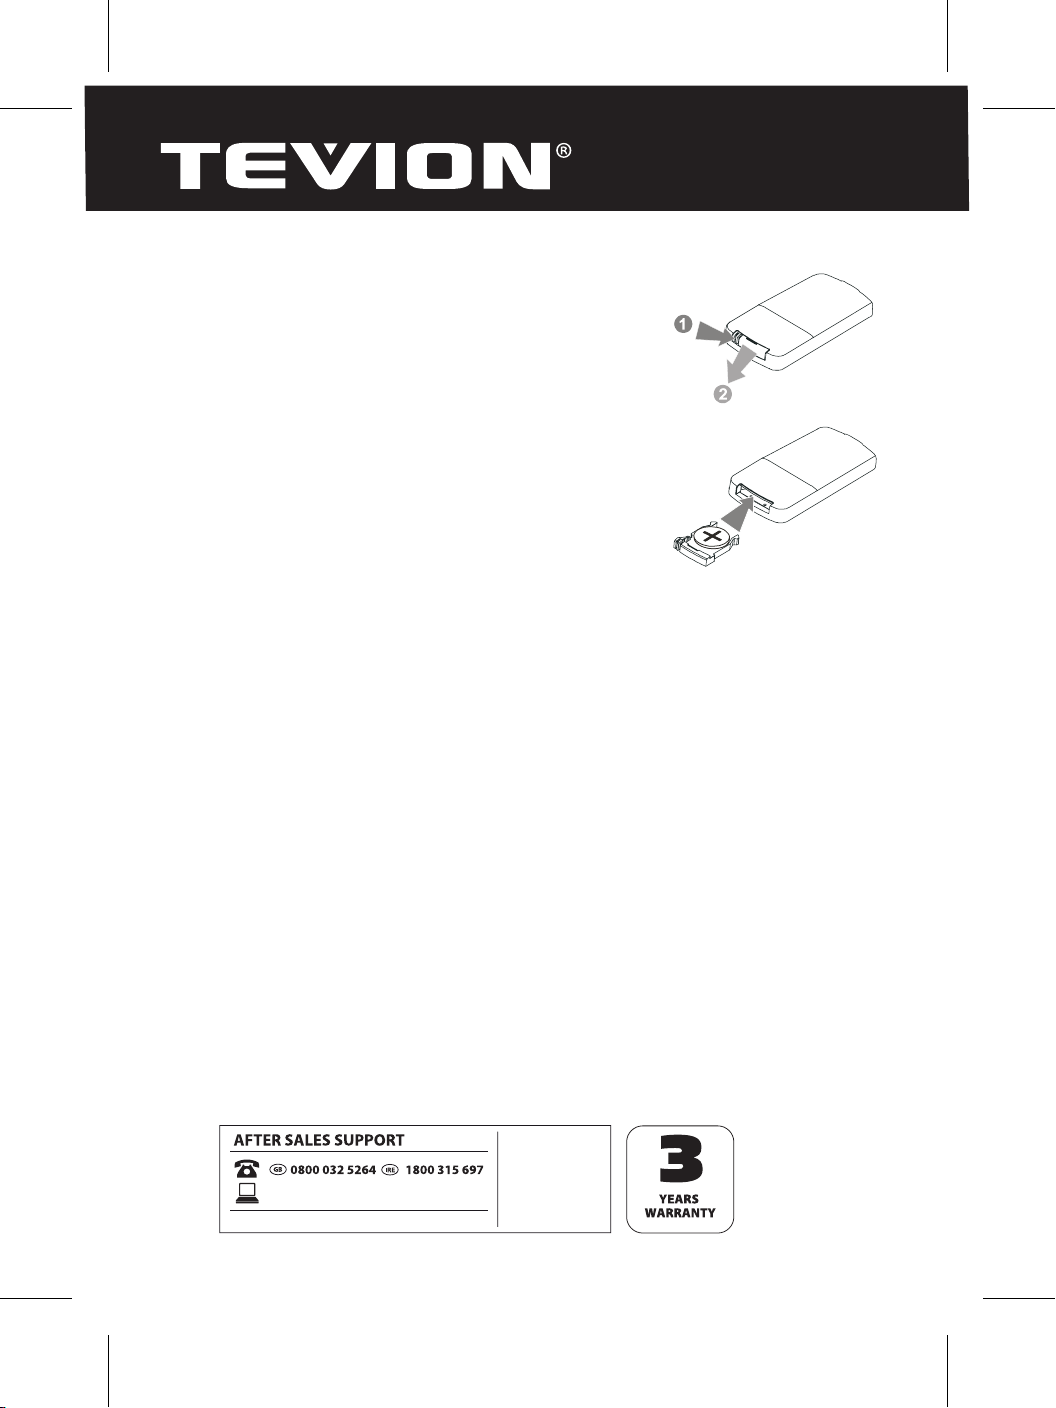
Changing the Lithium Battery
When the operation of the remote becomes intermittent
or the main unit no longer responds to the remote
commands, it is probably time to change the remote
battery.
Open the battery compartment by squeezing the battery
compartment-locking tab as shown and slide the battery
holder out of the battery compartment.
Remove the exhausted battery and install a fresh CR2025
battery in the battery holder with the “ + ” facing up as
shown, then slide the battery holder back into the battery
compartment.
Operations
Setting the Clock
a. With the power o, hold the CLK SET/ MEM button.
b. Press the FWD/TUNE or REV/TUNE buttons to toggle between 12HR and 24HR
time, and press the CLK SET/MEM button to select either option.
c. Press the FWD/TUNE button to cycle up through the hours, or press the REV/TUNE
button to cycle down through the hours. Press the CLK SET/MEM button to select
the hour.
d. Press the FWD/TUNE button to cycle up through the minutes, or press the REV/
TUNE down button to cycle down through the minutes. Press the CLK SET/ MEM
button to select the minute, and nish setting the time.
www.curtisint.com
MODEL : 48652
• User guide
• Remote control
7
Page 10

Setting the Alarm
a. Press the ALARM SET 1 button and the alarm icon show on display. Setting the
Alarm
b. Press and hold the ALARM SET 1 button.
c. Press the FWD/TUNE button to cycle up through the hours, or press the REV/TUNE
button to cycle down through the hours. Press the ALARM SET 1 button to select
the hour.
d. Press the FWD/TUNE button to cycle up through the minutes, or press the REV/
TUNE button to cycle down through the minutes. Press the ALARM SET 1 button to
select the minute.
e. Press the FWD/TUNE or REV/TUNE buttons to cycle through the dierent alarm
source (Radio, Buzzer, or iPod). After a mode is selected press the ALARM SET 1
button to nish setting the alarm.
Warning:
This operation also applies to setting alarm two.
•
Alarm will not operation when the unit in power on mode.
•
If wake up mode was set to iPod (iPod/iPhone), make sure the iPod/ iPhone was inserted
•
in the docking properly and the volume was set to suitable level. Otherwise, when Alarm
goes o, no sound output from the speaker or sound weak.
When alarm sounding, press the POWER button to stop the alarm sound and the alarm
•
will automatic repeat next day.
Active or Deactivate the Alarm Function
a. To turn o the alarm completely(not reset for next day). Press and hold the AL 1
(AL 2) Button approx. 1 second then release. The AL 1 (AL 2) Indicator will disappear
on the display.
b. To active the alarm again at the same time . Press and hold the AL 1 (AL 2) Button
approx. 1 second then release. The AL 1 (AL 2) Indicator will appear on the display.
The alarm will goes o as the previously set time.
• User guide
• Remote control
www.curtisint.com
MODEL : 48652
8
Page 11

How to Using Radio
a. Power on the unit, press the FUNCTION button to Radio mode. How to Using Radio.
b. Automatic Tuning - Press and hold the FWD/TUNE or REV/TUNE buttons until the
display begins to move then release the buttons. The tuner will scan up or down
the band until it nds the rst strong station, and then stop on that station. Repeat
this process until the tuner stops on your desired station.
c. Manual Tuning - Press and release the FWD/TUNE or REV/TUNE buttons repeatedly
until the display is showing the frequency of your desired station. Use the manual
tuning method to tune to weaker stations that are bypassed during Automatic
Tuning.
Warning!
If reception is weak, adjust FM Wire Antenna length and the angle to improve reception.
Programming Radio Station Presets
You can program as many as 20 radio station presets.
a. During power on mode, press FUNCTION button to select Radio
b. Press the FWD/TUNE or REV/TUNE buttons to desire station you want store.
c. Press and hold the CLK SET/MEM button to activate the programming mode.
d. Press the FWD/TUNE or REV/TUNE buttons to select the preset number you want
to store.
e. Press and hold the CLK SET/MEM button to store the station. f. Repeat Steps “b”
through “e” to program additional presets.
To Recall the Radio Station Preset
Press the M- (REPEAT) or M+ (PLAY/PAUSE/M+) Button repeatedly until the preset
number you want appears on the display and the preset station will be sound.
Connecting Other Digital Audio Devices
a. Use a line-in cord to connect an iPod shue or other audio device to the Line-In
(AUX) port.
b. Press the FUNCTION button to select the Line-In (Aux) mode. c. The iPod shue
or other audio device will now play through the speakers of the unit.
• User guide
• Remote control
www.curtisint.com
MODEL : 48652
9
Page 12

Using the Docking With iPhone / iPod
a. Power o the unit , dock an iPod / iPhone onto the unit. Using the Docking With
iPhone / iPod
b. After the correct connection, press the POWER button to turn the unit on.
c. Press FUNCTION button to select iPod mode and the docked iPod / iPhone will
auto play.
d. If necessary, press the PLAY button to begin playing the docked iPod / iPhone.
e. During iPod playing , press the PLAY button to pause playing and press again to
resume.
f. Press the FWD/TUNE or REV/TUNE buttons to skip from one song to the next /
previous song.
g. Press and hold the FWD/TUNE or REV/TUNE buttons to search through an
individual song from a docked iPod / IPhone.
h. Press the MENU button enter iPod / iPhone menu and press the MENU UP/DOWN
buttons to select menu next or previous page.
Warning!
When the unit is plugged in power, the docked iPod / iPhone will automatic charge iPod /
iPhone the battery power.
www.curtisint.com
MODEL : 48652
• User guide
• Remote control
10
Page 13

iPod Insert
Warning:
The number engrave in the backside of the inserts.
1 3G iPod 10GB, 15 GB, 20 GB 7 iPod photo 40GB, 60GB
2 3G iPod 30 GB, 40GB 8 1G iPod nano 2GB, 4GB
3 iPod mini 4GB, 6GB 9 iPod with video 30GB
4 4G iPod, U2 iPod 20GB 10 iPod with video 60 GB, 80GB
5 4G iPod 40GB 11 2G iPod nano 2GB, 4GB, 8GB
6 iPod photo, Color U2 iPod 20 GB,30GB
www.curtisint.com
MODEL : 48652
• User guide
• Remote control
11
Page 14

Specications
Power Requirement
Main Power Input: AC adapter = AC~230V/50Hz / DC 5V, 1.5A
Battery for Back-up 2 x 1.5V ”AA” (LR-6) Size
Battery for remote control handset 1 x CR2025
Frequency Range
Radio Receiving: FM 87.5 - 108 MHz (50KHz by step)
Power Consumption
Max.Power Consumption: 20 Watts
Standby Power Consumption: Under 2 watts
Warning!
Specications are typical, individual units might vary. They are subject to continuous
improvement without notice and withoutincurring any obligation.
www.curtisint.com
MODEL : 48652
• User guide
• Remote control
12
Page 15

W
arranty Card
iPhone/iPod Docking Station with Clock Radio 48652
rd
www.curtisint.com
MODEL : 48652
• User guide
• Remote control
13
Page 16
www.curtisint.com
MODEL :IP320UKT
• User guide
• Remote control
14
 Loading...