

Page 1
Read Carefully Before Using
Cautions in use of DVD-Video player are described below. Please read carefully before using a DVDVideo player.
Installation place and handling
• When you place this player near other devices, they may affect poorly together.
• When you place DVD-Video player and TV in the upper and lower sides, it may cause flickering of
pictures or failure (tape is not ejected).
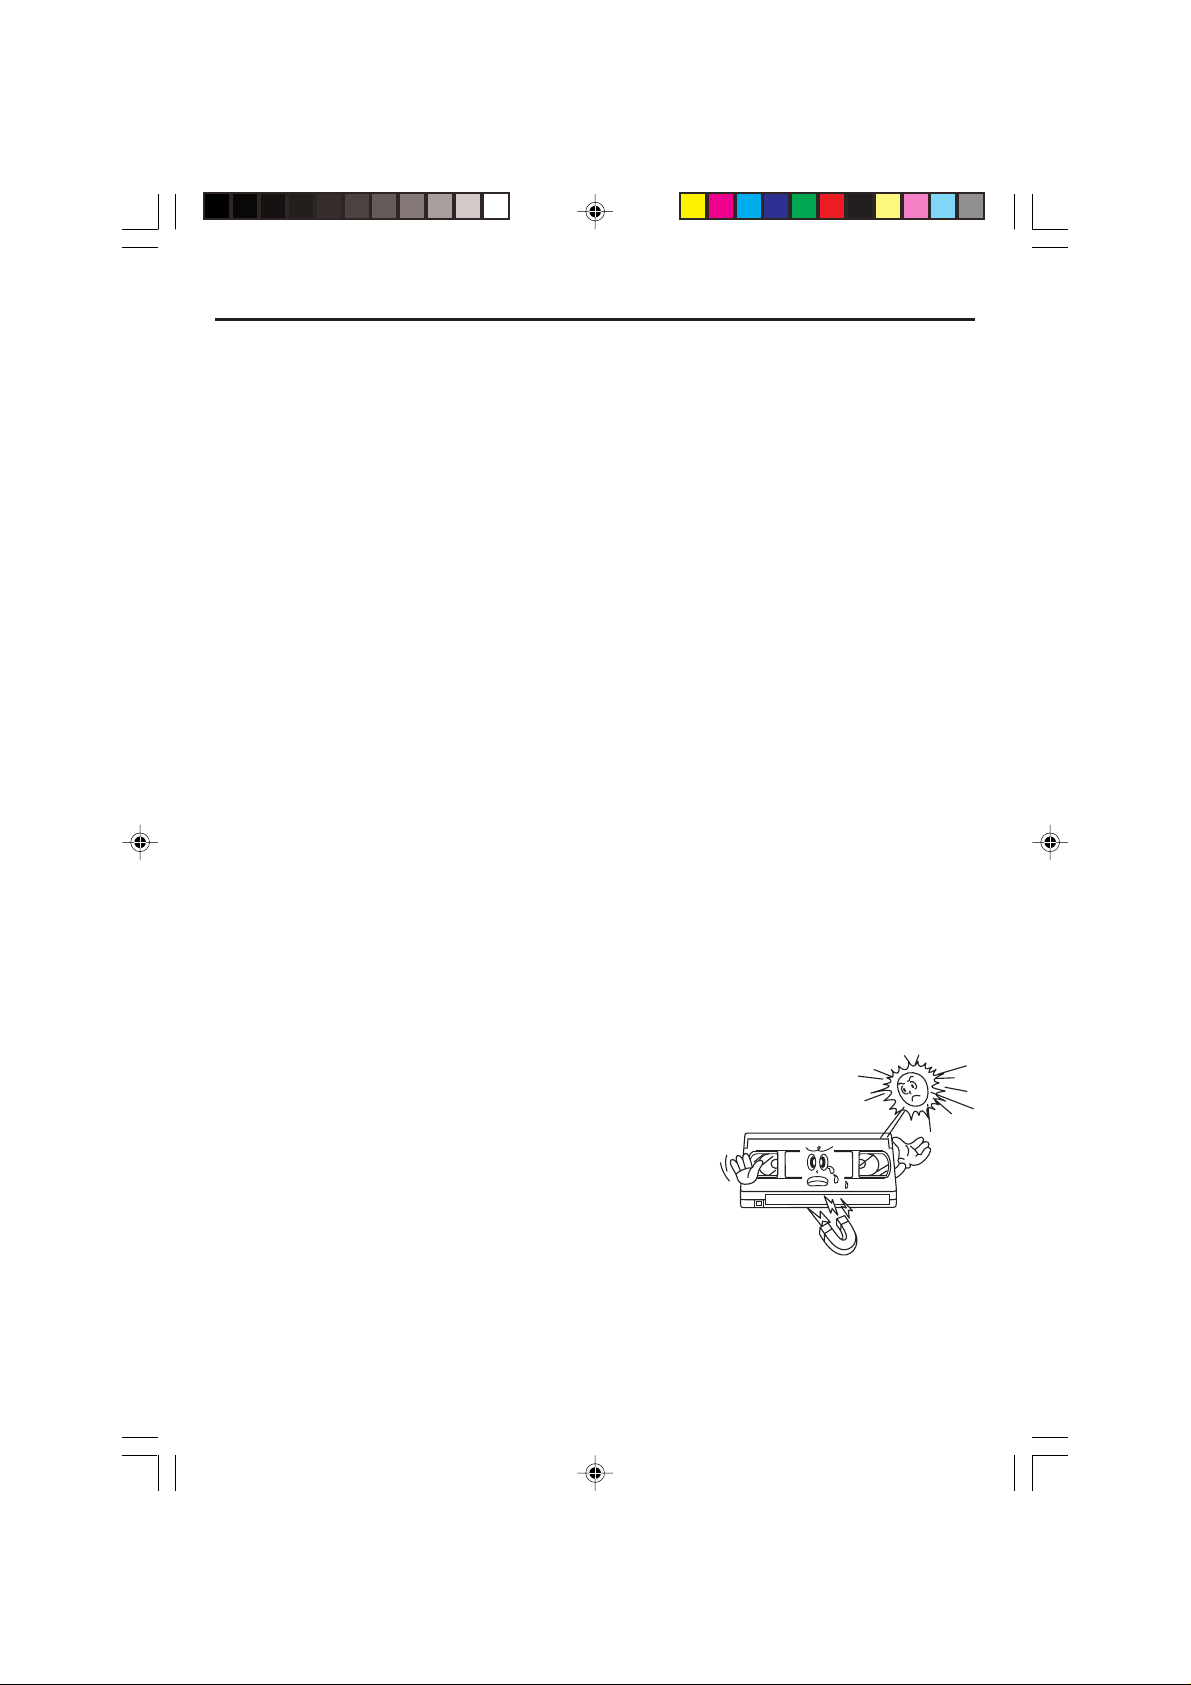
• When you place this player near strong magnetic materials, it may affect image or voice poorly or
damage recording.
• Do not spill volatile liquids like insect spray over the player. Do not leave rubber or plastic products in
contact with the player for a long time. They will cause deterioration or paint peel-off.
Not in use
• When the unit is not in use, be sure to remove the disc or tape and turn off the power.
• If you do not use the unit for a long period, remove batteries in REMOTE to prevent leakage.
• In case you don’t use the unit for a long time, the unit may not function properly in the future. Turn on
and use the player occasionally.
Cleaning
• Dust off dirt in cabinet or control panel part smoothly with a soft cloth.
• For heavy dirt, soak the cloth in a weak detergent solution, wring it well and wipe. Use a dry cloth to
wipe it out.
• Follow instructions in using chemical cleaners.
• Do not use any type of solvent such as gasoline or benzene, as they may cause deterioration or
paint peel-off.
Tape and Disc Handling
• Do not use any tape and disc below. Damage of video head or cut/coiling of tape may cause failure.
– Tape with mold
– Tape or disc stained with juice or attachments
– Tape having breakage connection
– Disassembled tape
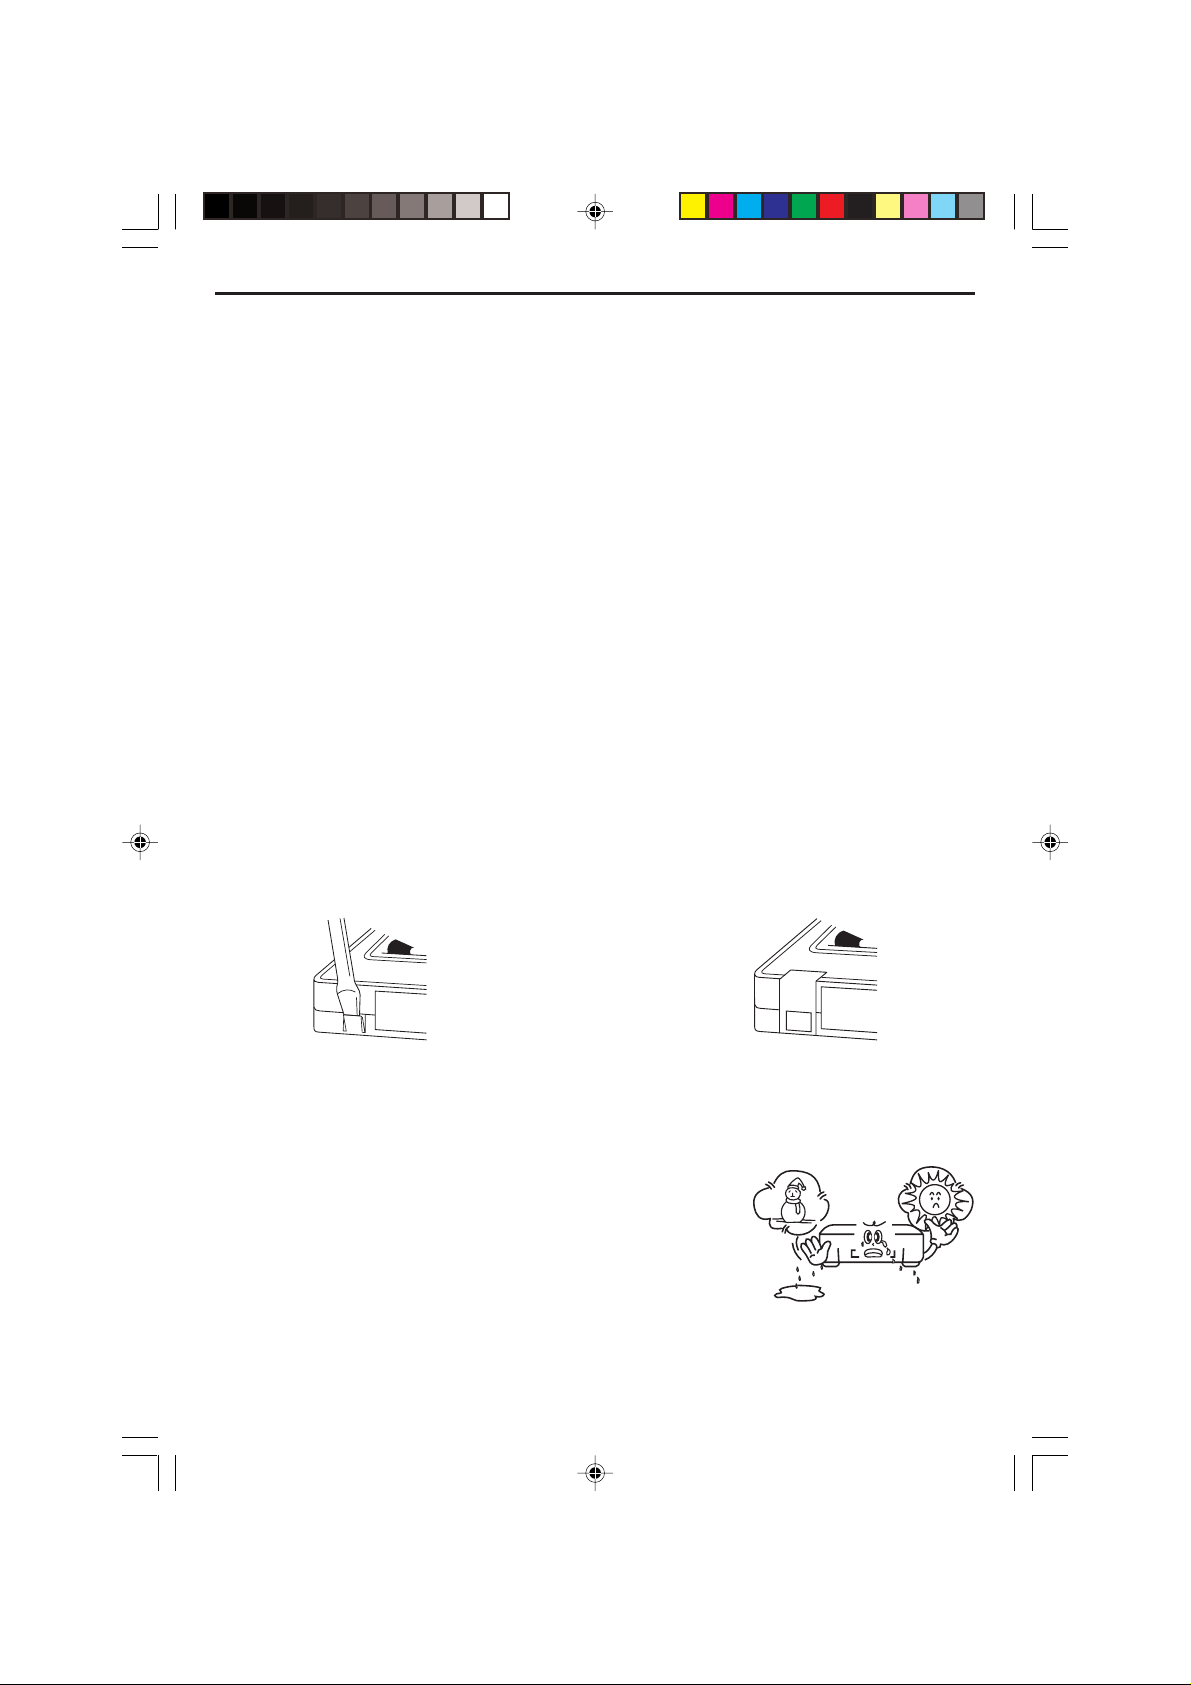
– Disc with severe scratch
• Moisture condensation may occur in tape. Moisture condensation
damages the tape. Please use the tape after the moisture
condensation is disappeared.
• After use, store tape vertically in a case to prevent loose.
• Do not store the following places.
– High temperature and humidity
– Subject generation of mold
– Much dirt or dust
– Near strong magnetic materials such as speaker
- 1 -
CURTIS DVD7620_Engib.p65 5/3/2007, 11:35 AM1
Page 2
Copyright
• Do not use your recordings without permission of a copyrighter except personal usage.
Video Head Cleaning
The video heads enable the VCR to read video information pictures from the tape during playback.
In the unlikely event that the heads become clogged with dirt video playback will be impossible. This
can easily be determined during playback of a known good tape, there is good sound, but the picture
is extremely snowy. If this is the case, have the video cassette recorder checked by qualified service
personnel.
Notes
• During normal operation of the VCR, the video and audio heads can accumulate dirt over a period of
time, especially when using an old or poor quality tape.
• When the heads are dirty, the picture can get snowy and the tracking control will have little or no
effect. If this condition occurs, head cleaning cartridges may take care of the problem and restore
normal picture.
• We recommend that head cleaning cartridges be used sparingly since they are very abrasive and
can damage the video heads during prolonged use.
• If the problem is not resolved with the head cleaning cartridge then the unit needs to be checked by
a qualified service personnel.
Erasure Protection
Video cassettes are equipped with a safety tab to prevent accidental erasure. When the tab is
removed, recording can not be performed.
To Prevent Accidental Erasure To Record Again
– After recording, break off the safety tab – Cover the hold with cellophane tape.
with a screwdriver if you don't want
to record over the tape.
What is Dew Condensation Symptom?
If a VCR is moved from a cool place to a warm and damp place or a place facing a direct cool wind
from air-conditioner ............. and others, temperature varies sharply, which makes dew on head drums
of VCR.
If Dew Condensation Occurs
1. First, turn it on for one or two hours before using it.
2. Do not use it because it may develop troubles of a VCR
or videotape.
- 2 -
CURTIS DVD7620_Engib.p65 5/3/2007, 11:35 AM2
Page 3
Maintenance and Care
Caring for the player
• Keep it dry. If water should get on it, wipe if off immediately. Water contains minerals that can
corrode electronics circuits.
• Do not store in hot areas. High temperatures can shorten the life of electronic devices and
can even distort or melt certain plastics.
• Do not use or store in areas of high level of dirt or dust. The electronic parts may be
contaminated or will wear prematurely.
• Do not drop your product. This will likely result in failure to operate. Circuit boards can crack
and the cases may not survive the impact. Handing your product roughly will shorten its useful
life.
• Always make sure any batteries used are fresh and are of the correct type. Old or almost-dead
batteries are also dangerous. A worn out battery can leak chemicals which will damage the
electronic circuits.
• If anything falls into the cabinet, unplug the unit and have it checked by qualified personnel
before operating it any further.
Cleaning the Unit
• To prevent fire or shock hazard, disconnect your unit from the AC power source when cleaning.
• Do not use harsh chemicals or strong cleaning solvents to clean your unit. You need only wipe
it with a slightly moist, never wet cloth.
Inclination
• Do not install the unit in an inclined position. It is designed to be operated in a horizontal
position only.
Condensation
• If the unit is brought directly from a cold to a warm location, moisture may condense inside the
unit and cause damage to the lenses. When you first install the unit, or when you move it from
a cold to a warm location, wait for 30 minutes before operating the unit.
Avoid Interference
• Depending on the reception condition of the TV, interference may appear on the TV screen
while you watch a TV broadcast and the unit is left on. This is not a malfunction of the unit or
the TV. To watch a TV broadcast, turn off the unit.
Disconnect Power
• If you are not going to use the player for a long time, be sure to disconnect the player from the
wall outlet. To disconnect the AC power cord (main leads), grasp the plug itself, never pull the
cord.
• Never use benzine, thinner, cleaning fluid, static electricity prevention liquids or any other
solvent.
Disc Maintenance
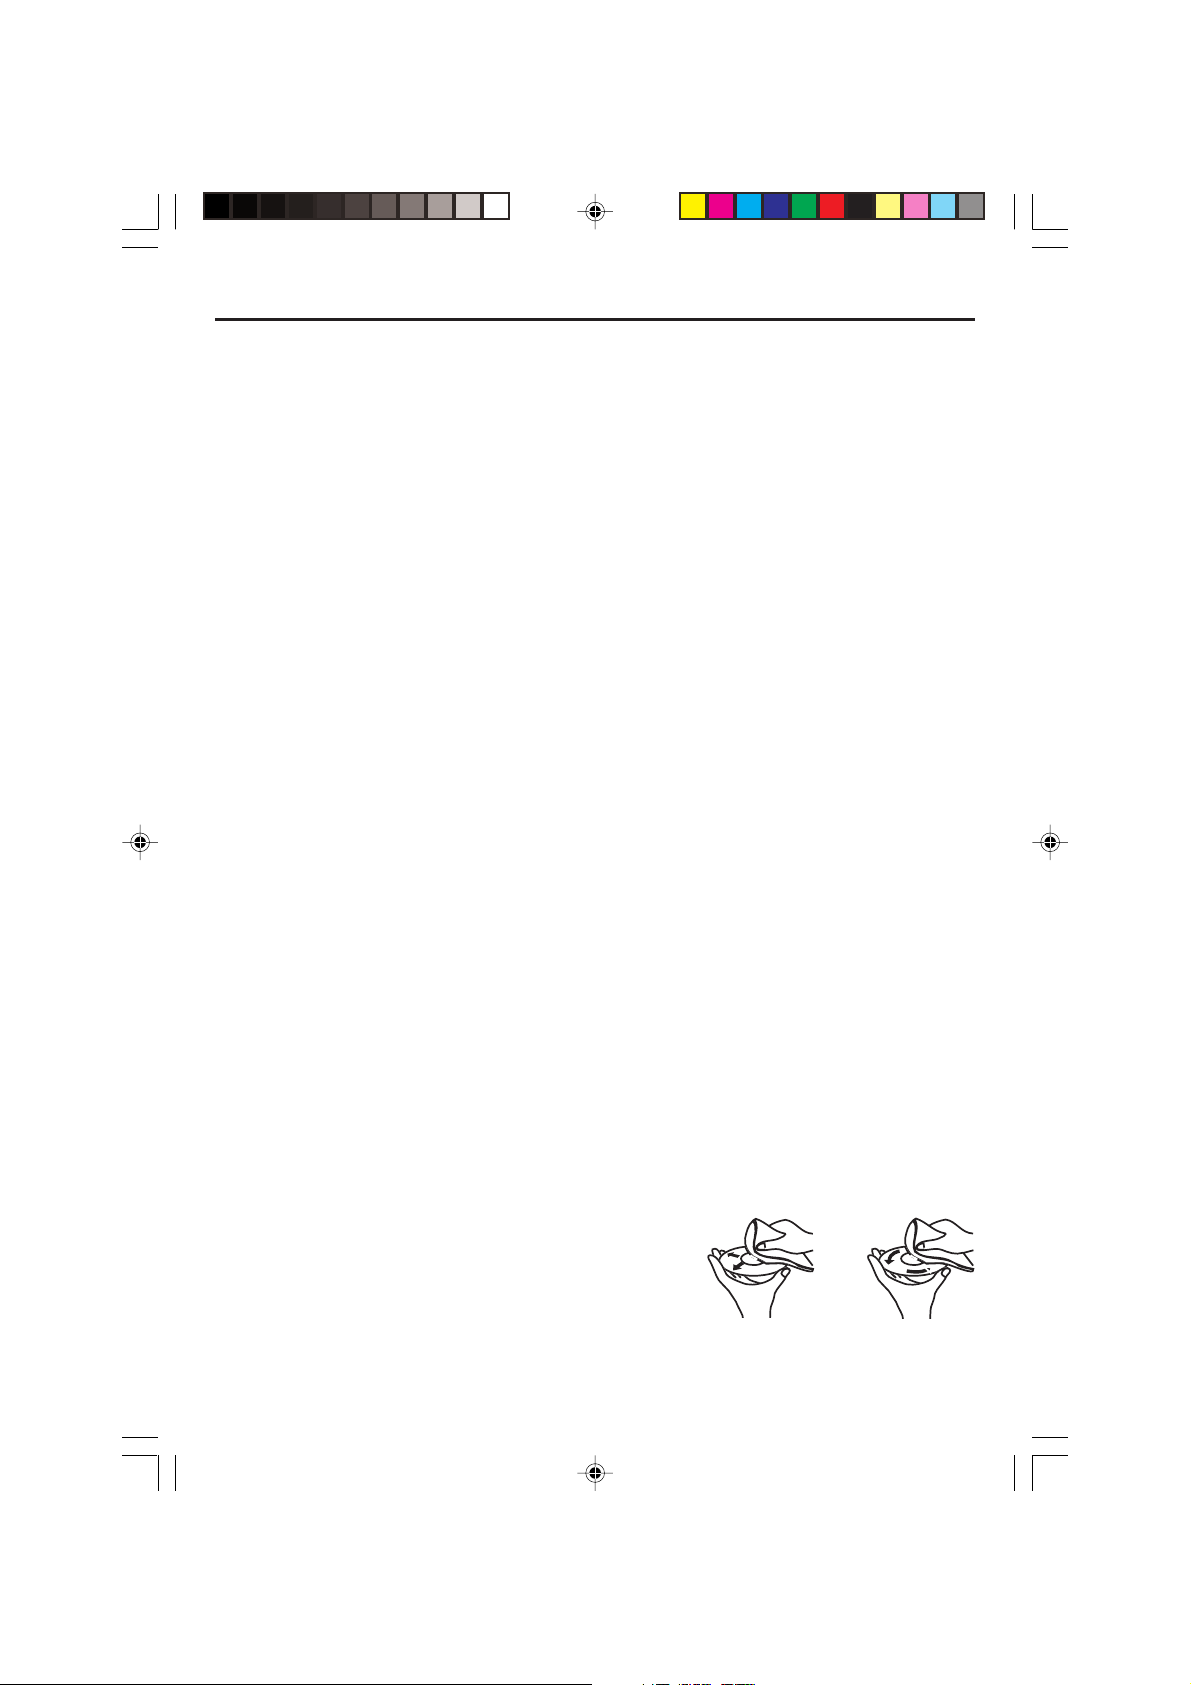
• Before playback, wipe the disc from the center hole toward
the outer edge with a clean cloth.
• Never use benzine, thinner, cleaning fluid, static electricity
prevention liquids or any other solvent.
- 3 -
CURTIS DVD7620_Engib.p65 5/3/2007, 11:35 AM3
Right Wrong
Page 4
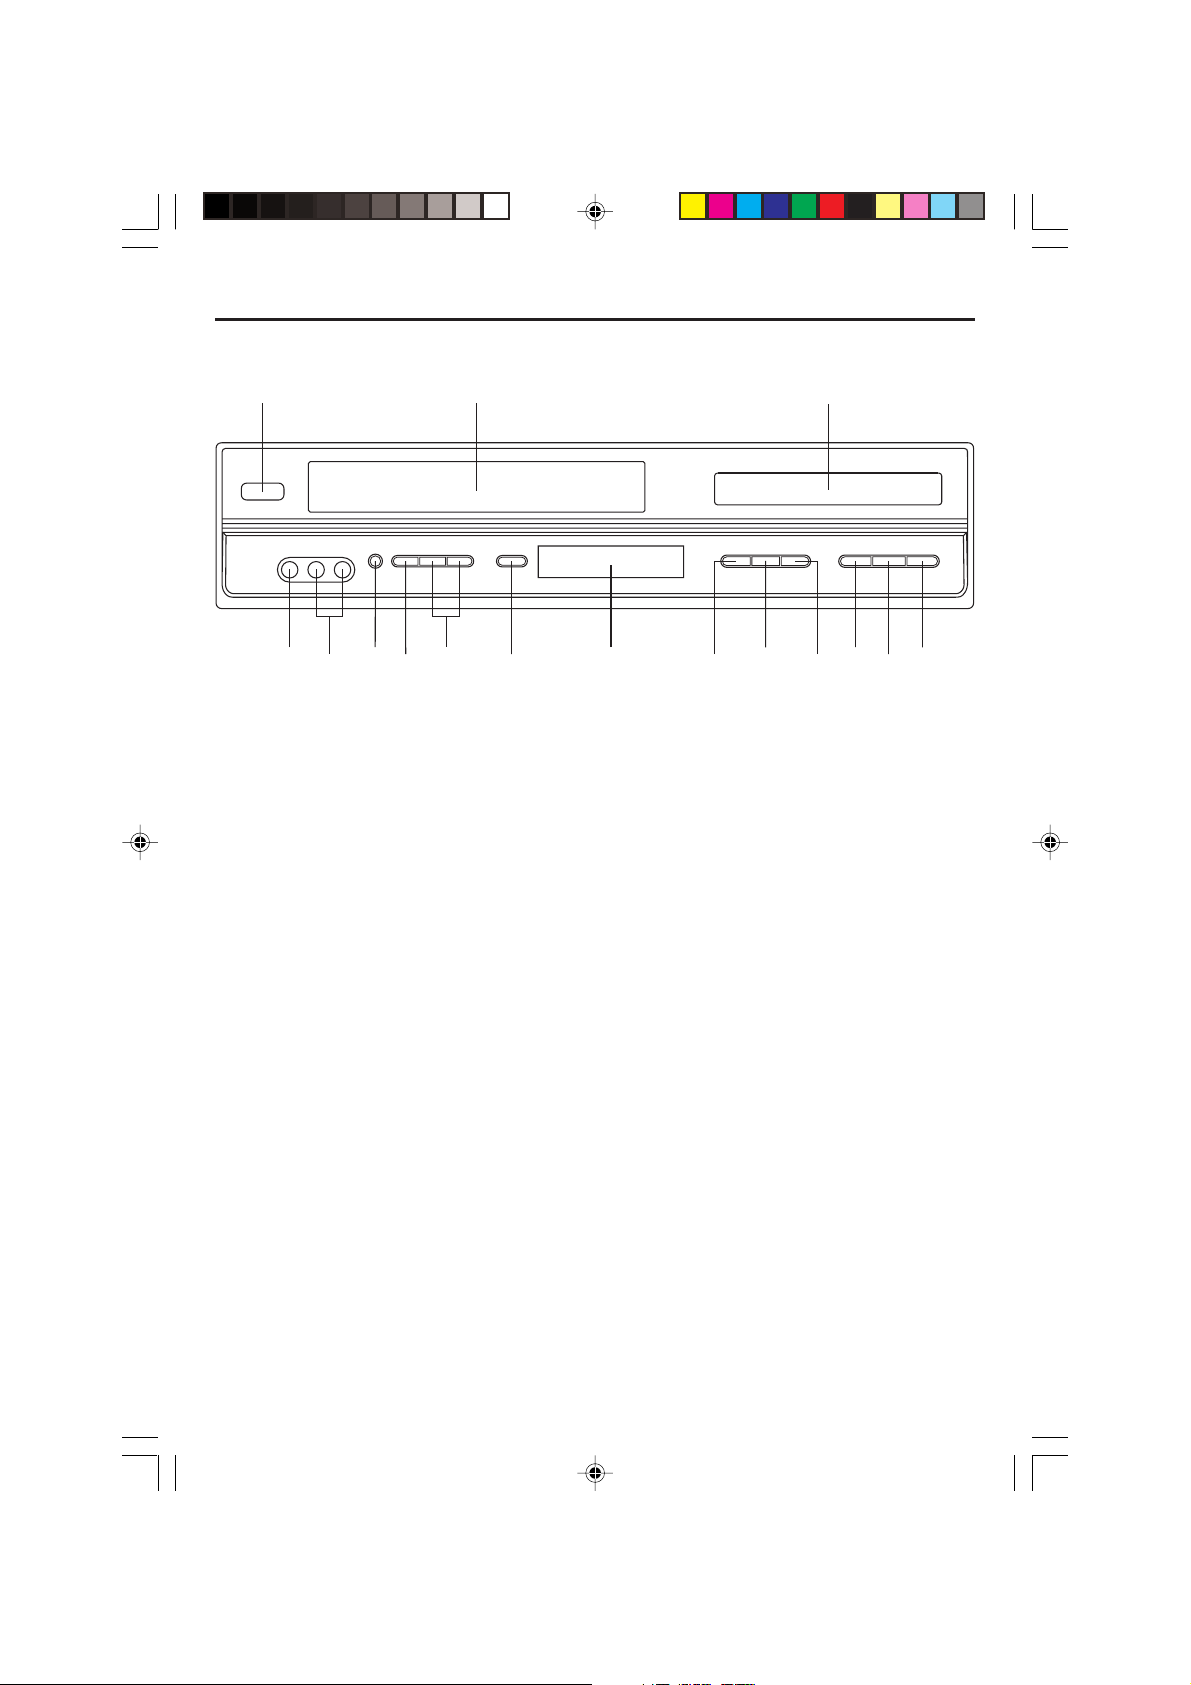
Location of Controls and Indicators
Main Unit (Front View)
1
15
14
13
16
1. POWER (STANDBY/ON) Button 9. SELECT Button
2. Videotape Compartment 10. Display window
3. Disc Tray 11. RECORD Button
4. FAST FOR WARD Button 12. CHANNEL Up/Down Button
5. PLAY/PAUSE Button 13. TV/VCR Button
6. REWIND Button 14. EJECT Button (VCR)
7. STOP Button 15. AUDIO L & R Input jack
8. OPEN/CLOSE Button (DVD) 16. VIDEO Input jack
12
2
11
10
8
9
3
6
7
4
5
CURTIS DVD7620_Engib.p65 5/3/2007, 11:35 AM4
- 4 -
Page 5
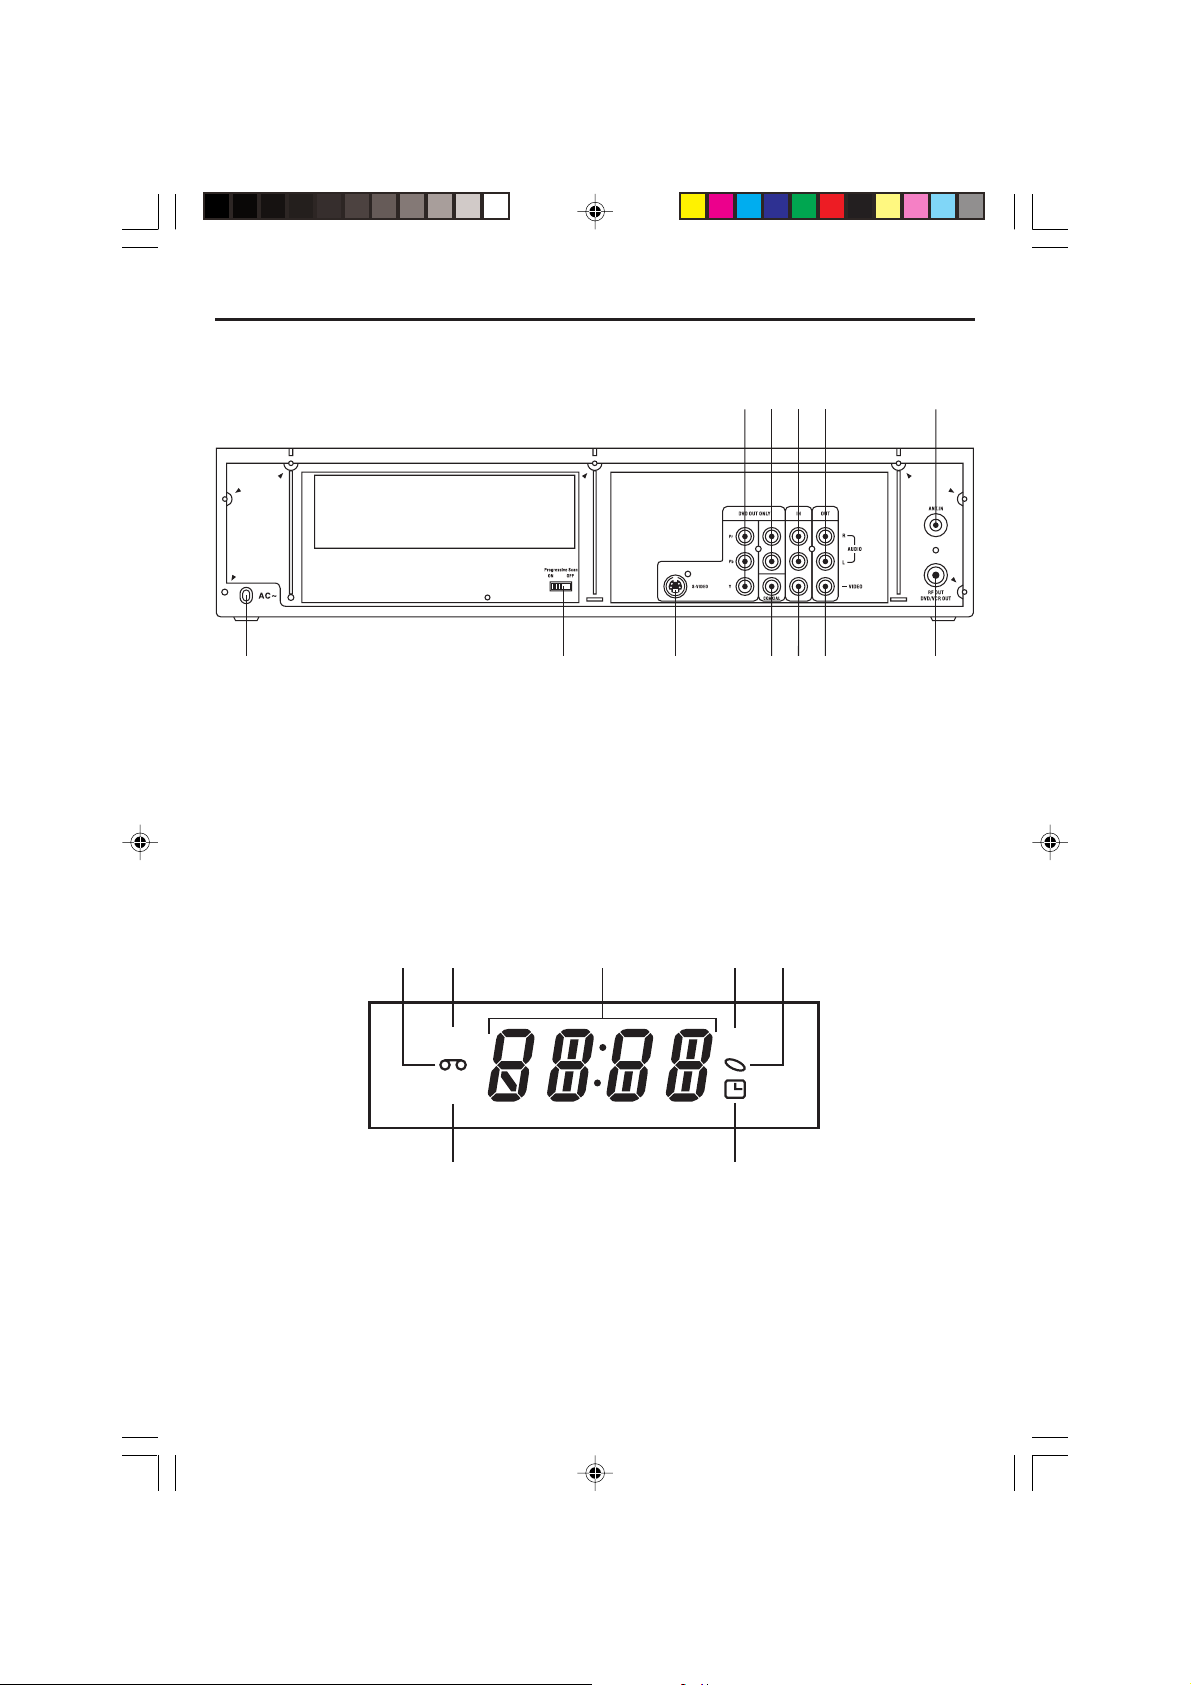
Location of Controls and Indicators
Main Unit (Rear View)
3
4
2
1
12
1. Component Video Out Jacks (Y, Pb, Pr) 7. VIDEO OUT Jack
2. DVD AUDIO R & L OUT Jacks 8. VIDEO IN Jack (For Video 1)
3. AUDIO R & L IN Jacks (For Video 1) 9. COAXIAL Digital Out Jack
4. AUDIO R & L OUT Jacks 10. S-VIDEO OUT Jack
5. ANTENNA IN 11. Progressive Scan ON/OFF Switch
6. RF OUT 12. AC Power Cord
11
10
7
9
8
5
6
Display Window
12
3
5
4
VCR
REC
7
1. VCR in operation 5. DVD in operation
2. VCR Tape operation 6. Timer indicator
3. Status Bar 7. REC indicator
4. DVD Disc operation
- 5 -
CURTIS DVD7620_Engib.p65 5/3/2007, 11:35 AM5
DVD
6
Page 6
Control Reference Guide
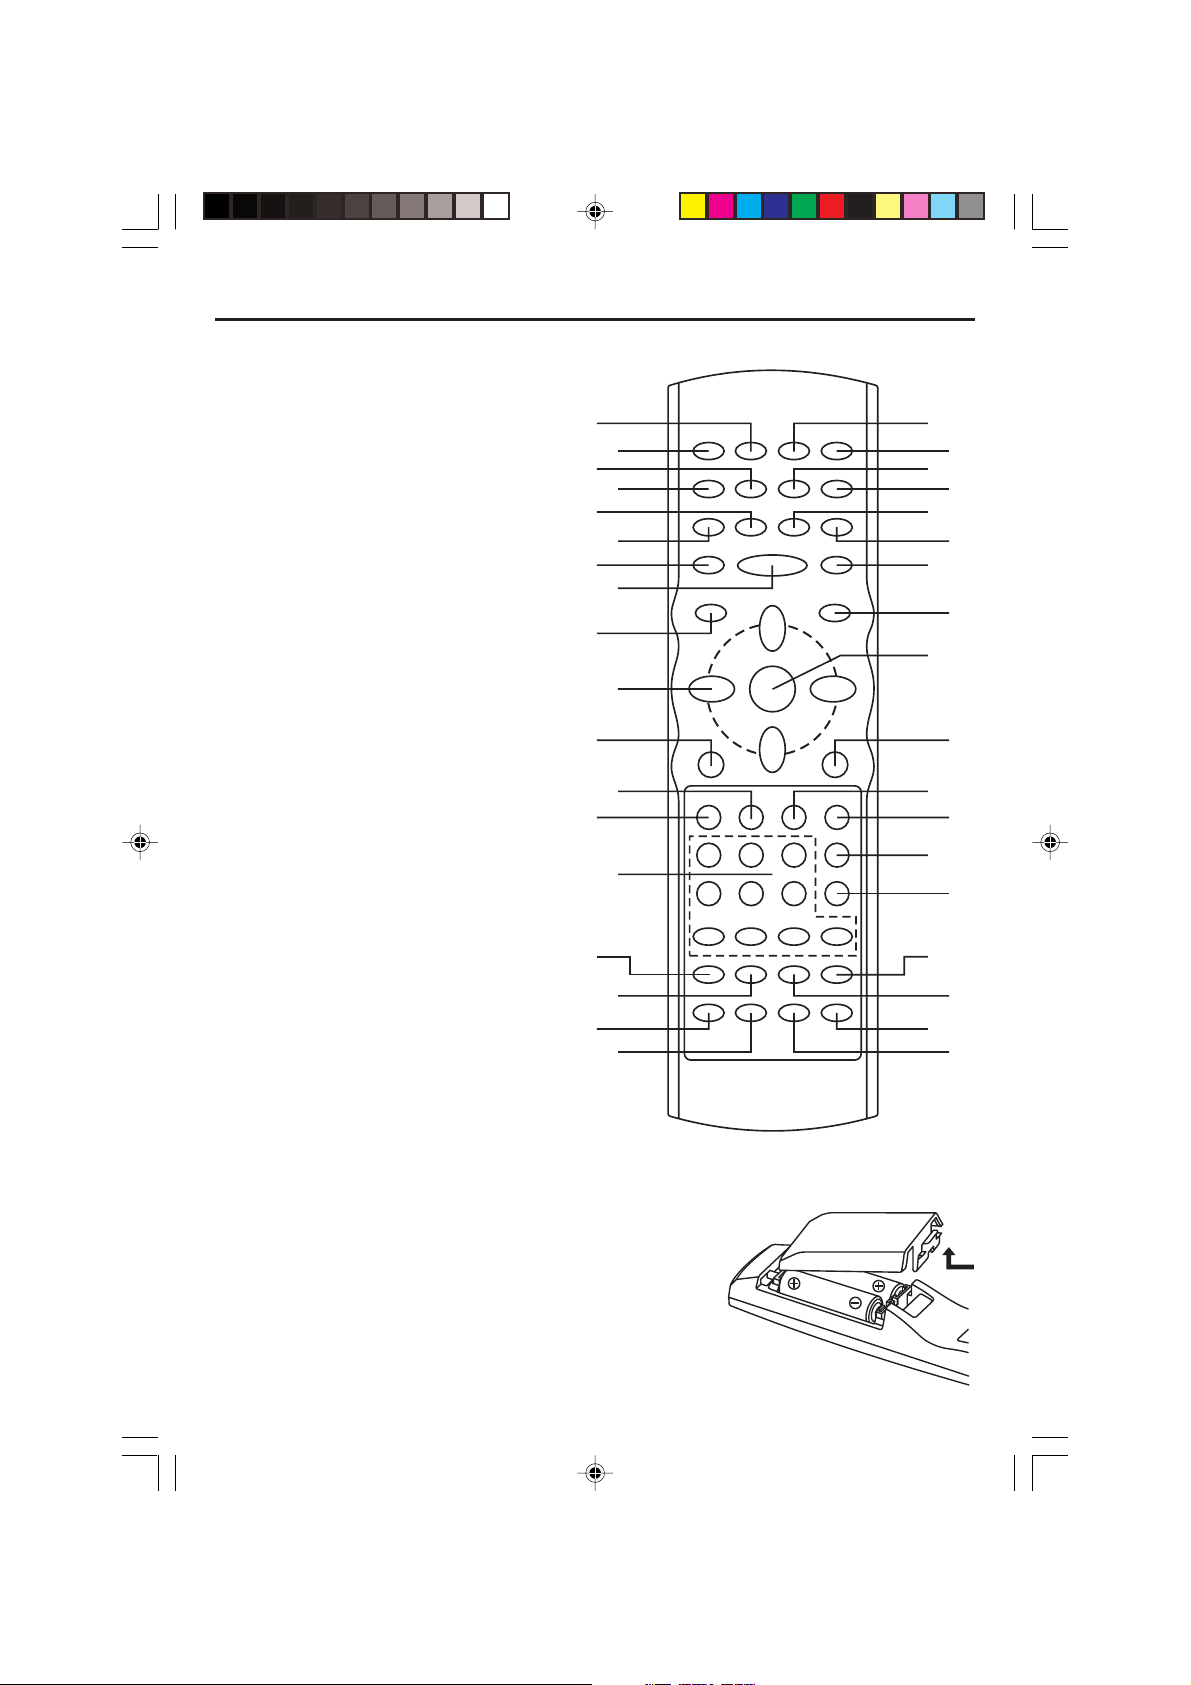
Remote Control Unit
1. CLEAR Button
2. POWER Button
3. TITLE Button
4. SUBTITLE Button
5. ZOOM Button
6. STEP Button
7. REC Button (VCR)
8. PLAY/P AUSE Button
9. VCR Button
10.NAVIGATION Buttons (///)
11. SETUP Button
12. NEXT Button
13. PREVIOUS Button
14.NUMBER Button (DVD, VCR)
15.SP/SLP Button (VCR)
16. AV1/AV2 Button
17.ANGLE Button
18. REPEAT Button
19.REREAT A-B Button
20.DISPLAY Button
21.TV/VCR Button
22. COUNTER RESET Button
23.100 Button
24.VCR PROGRAM Button
25. FORWARD SEARCH Button
26. REVERSE SEARCH Button
27.DVD MENU Button
28.OK Button
29.DVD Button
30.STOP Button
31.SLOW/F Button
32.MTS/AUDIO Button
33.PBC Button (DVD)
34.RETURN Button (DVD)
35.OPEN/CLOSE Button (DVD,VCR)
36. SEARCH Button
Note: The Navigation (/) buttons are also used as CHANNEL UP/DOWN buttons when in VCR or TV
mode.
1
2
3
4
5
6
7
8
9
10
11
12
13
14
15
16
17
18
36
35
34
33
32
31
30
29
28
27
26
25
24
23
22
21
20
19
Batteries Installation
1. Remove the battery cover .
2. Insert two battery (AA, R6, UM-3 types) making sure
the polarity (+/–) matches the marks inside the unit.
3. Replace the cover .
• Do not attempt to recharge, short-circuit, disassemble,
heat or throw the batteries into the fire.
• Do not mix different types of batteries or old and new batteries.
- 6 -
CURTIS DVD7620_Engib.p65 5/3/2007, 11:35 AM6
Page 7
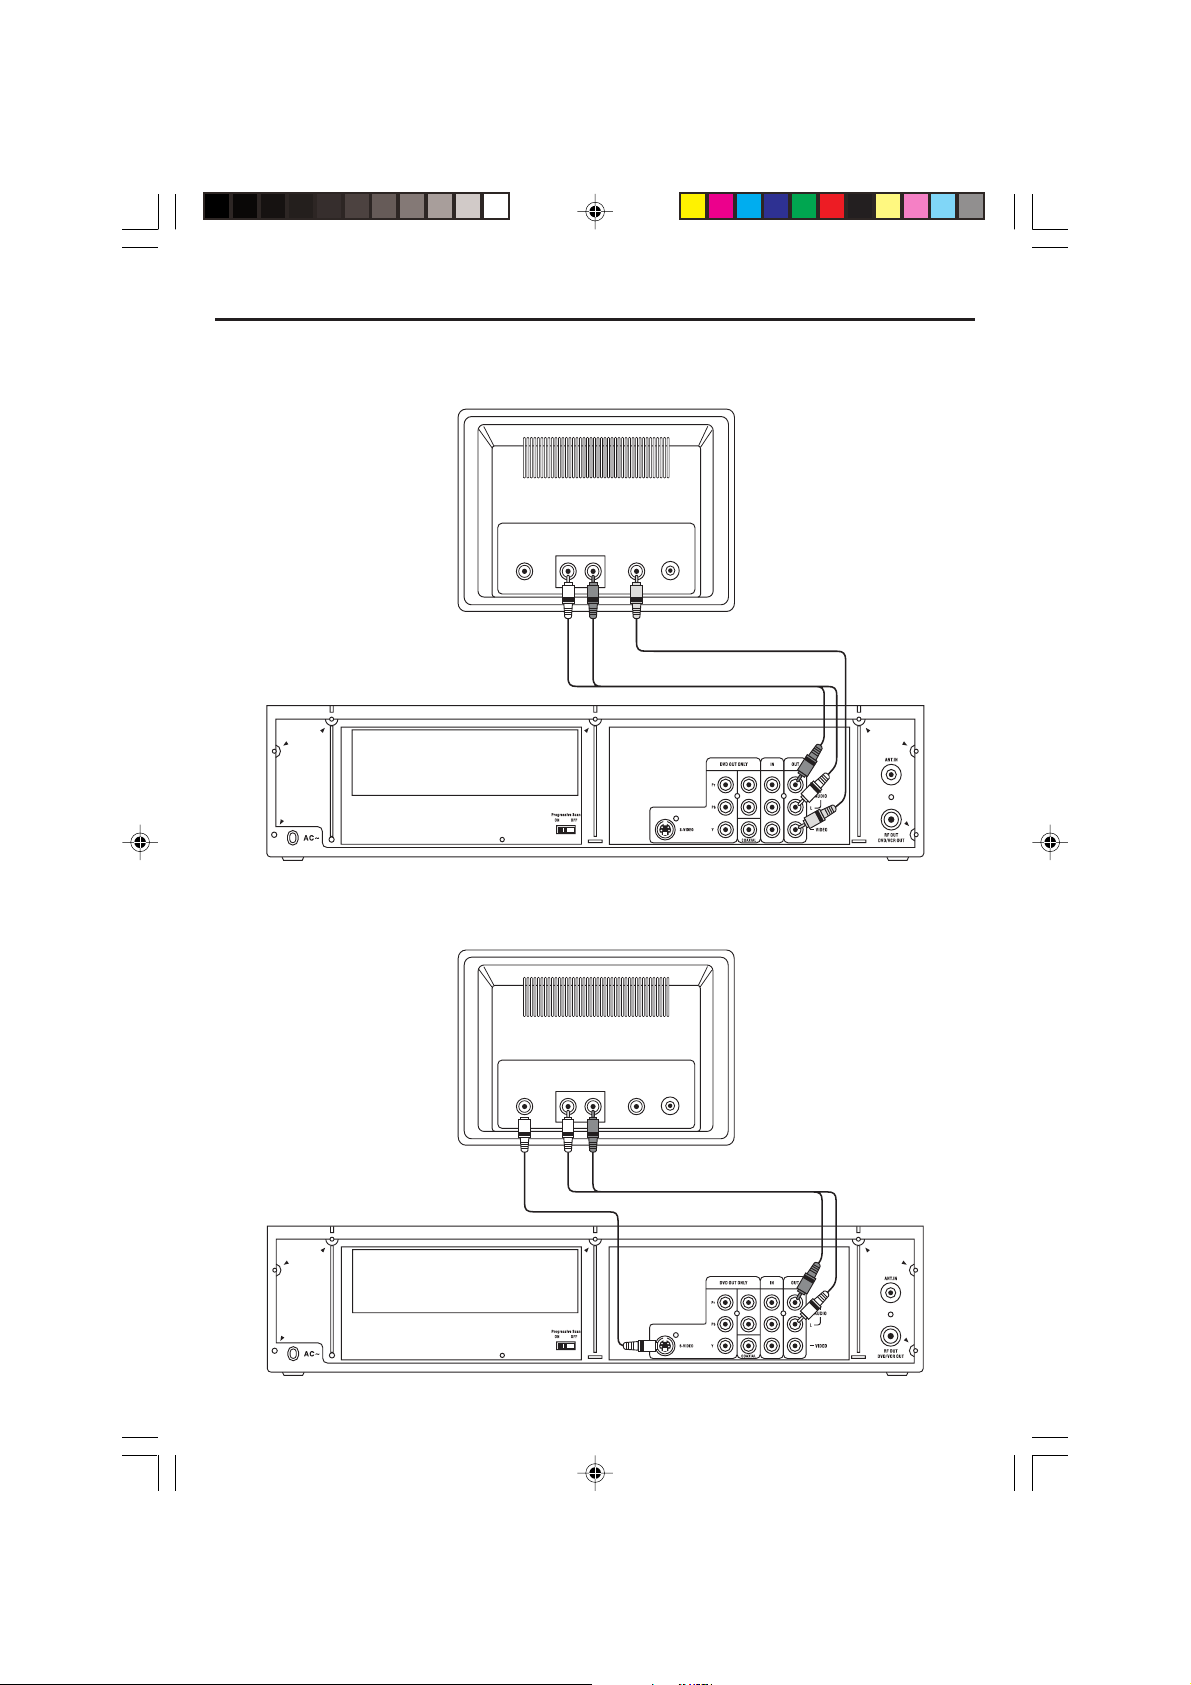
Connections
Connect the player to TV set by Audio / AV Cables (Output)
Use Audio cable (Red/White) and Video cable (Yellow) to connect the unit.
TV
S-VIDEO
IN
VIDEO
IN
AUDIO
IN
RL
Video Cable
Audio L & R Cables
Connect the player to TV set by S-Video Socket
Use S-Video cable to connect the player with your TV.
TV
S-VIDEO
IN
VIDEO
IN
AUDIO
IN
RL
ANTENNAIN
ANTENNAIN
S-Video Cable
CURTIS DVD7620_Engib.p65 5/3/2007, 11:35 AM7
Audio L & R Cables
- 7 -
Page 8
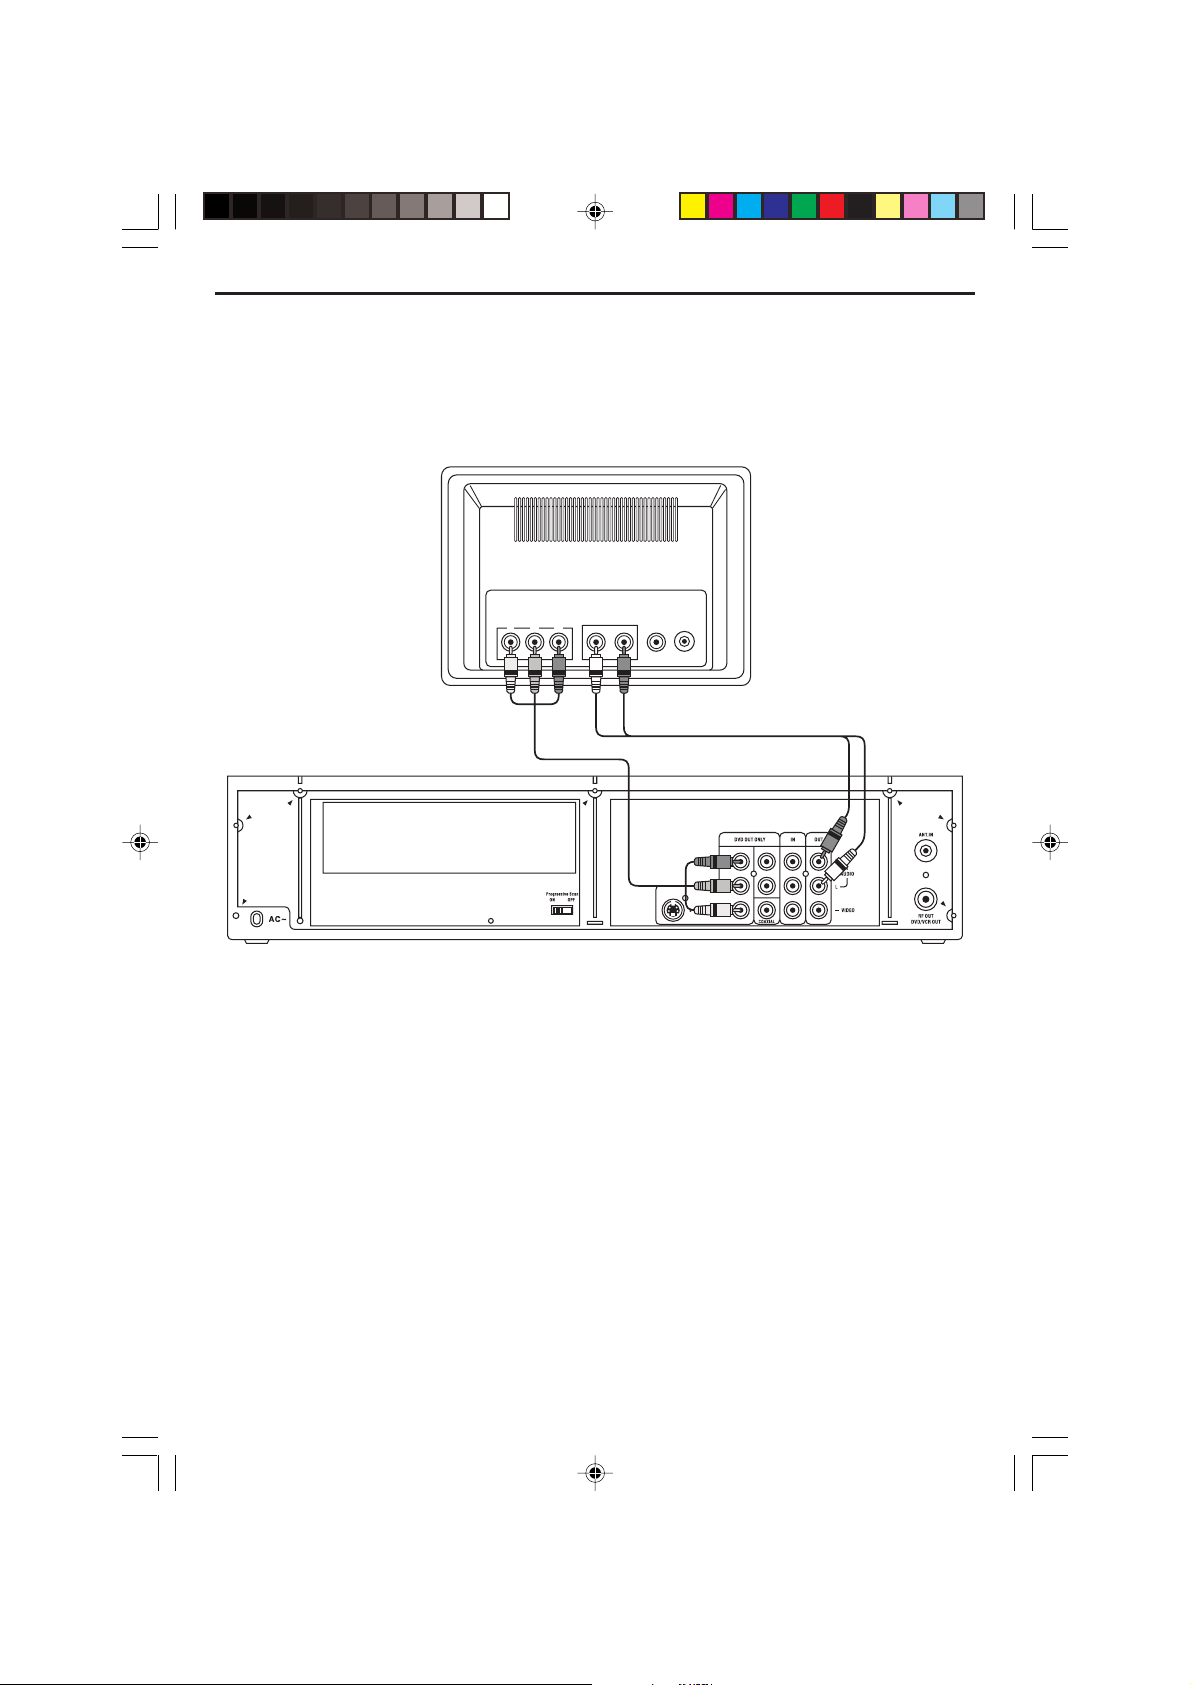
Connect the player to TV set by Y, Pb, Pr Jacks
TV Connection – Component Video
If your TV set has a Component Video Input Jack you can connect your TV to the Component Video
Out Jack on the back of this system. The Component Video will provide the best picture quality if your
TV is equipped to handle Component Video signals. We recommed using the Component Video
connection.
TV
VIDEO
PBP
R
Y
AUDIO
IN
ANTENNAIN
IN
RL
Component Video
Audio L & R Cables
Cables
Component (Y , Pb, Pr) Video Out
Use these jacks to connect to a TV with progressive video input jacks and then set the PROGRESSIVE
SCAN switch to ‘ON’. Progressive Scan is a video scanning system that displays all lines in a frame in
one pass, as opposed to the traditional system, interlaced scan. This connection provides optimum
quality. To ensure maximum picture quality use three video-grade cables for connections. Note that it is
essential to match the color-coded connectors with a compatible TV.
525 Line Digital Progressive-Scan Component Video Output
Compared to standard interlaced video, progressive scan effectively doubles the amount of video
information fed to your TV or monitor. The result is a stable, flicker-free image. (Check your TV/monitor
for compatibility with this feature.)
For the highest picture quality, try watching a DVD movie on a Progressive-Scan compatible TV.
Notes:
• If you connect a TV that is not compatible with a progressive scan signal and set the PROGRESSIVE
SCAN switch to the ON position, you will not be able to see any picture at all.
• Consumers should note that not all high definition television sets are fully compatible with this product
and may cause artifacts to be displayed in the picture. In case of 525 progressive scan picture
problems, it is recommended that the user set the PROGRESSIVE SCAN switch to ’OFF’.
CURTIS DVD7620_Engib.p65 5/3/2007, 11:35 AM8
- 8 -
Page 9
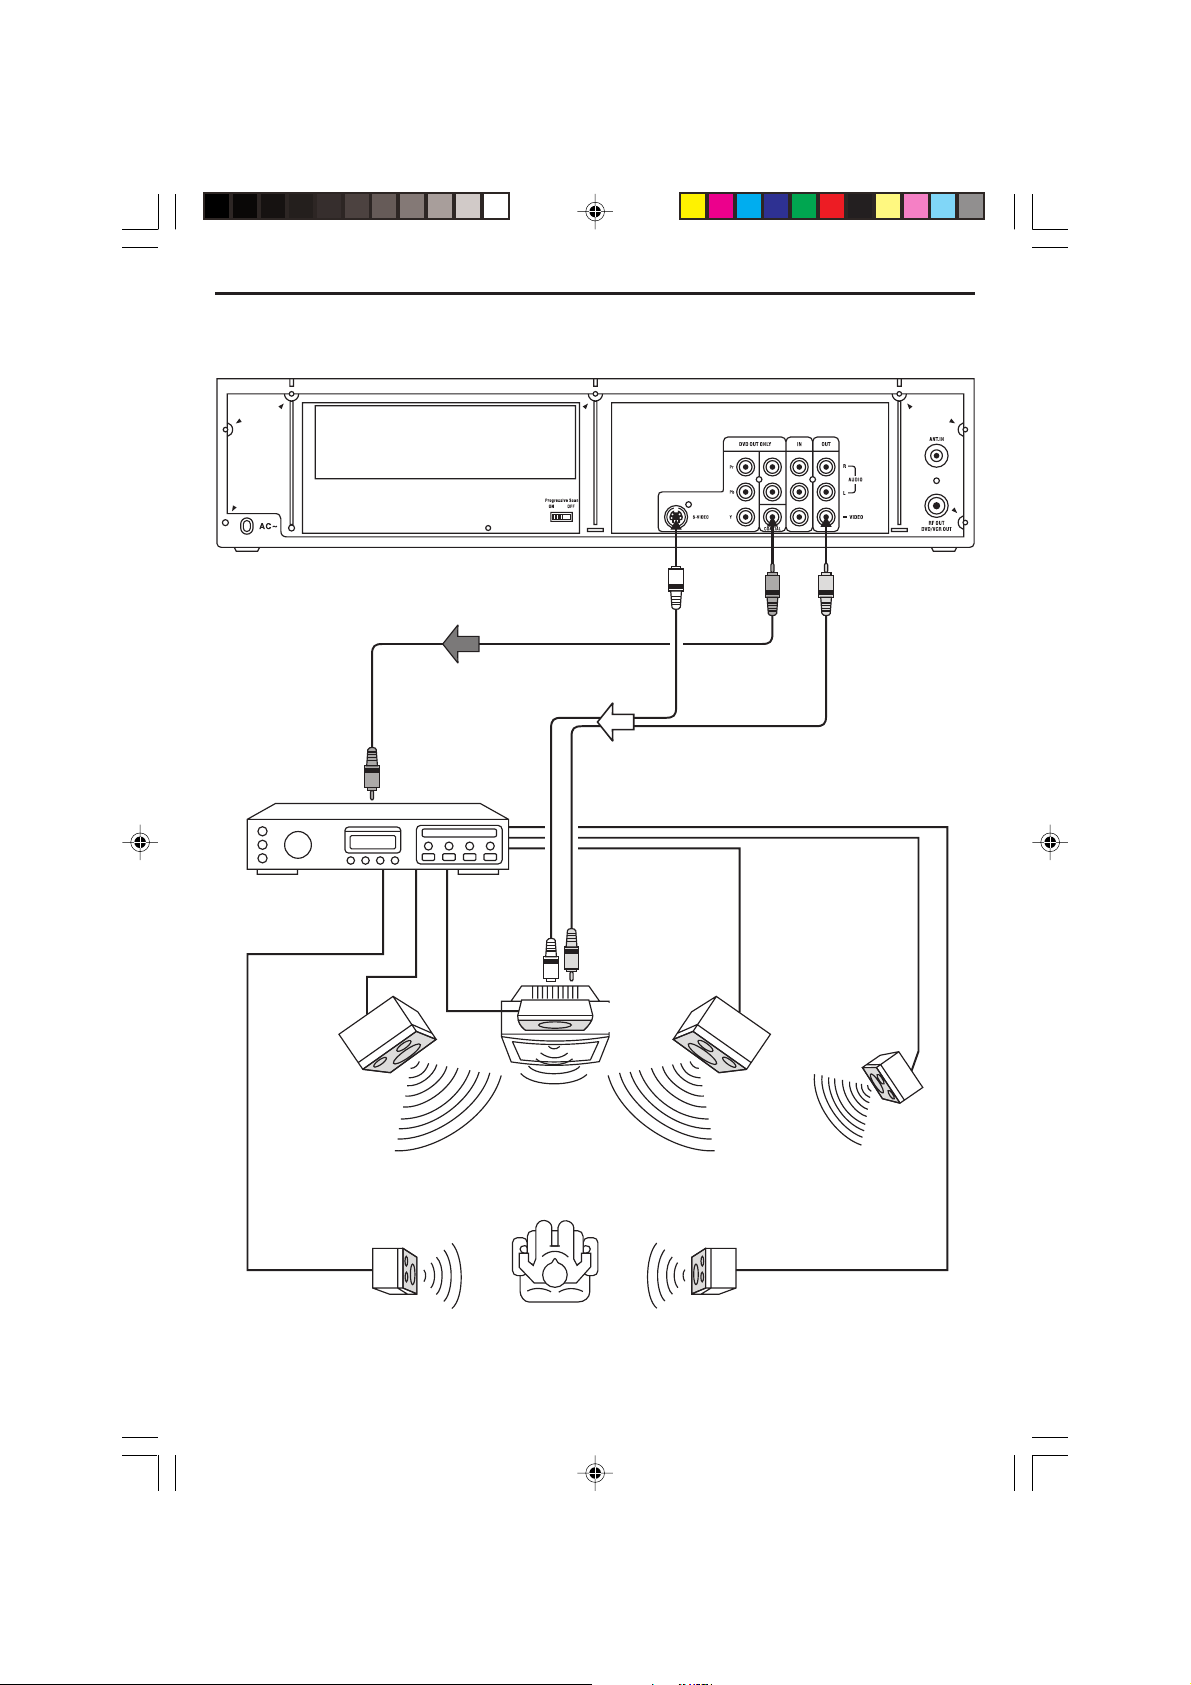
Connect the Coaxial digital out terminal to the amplifier if the amplifier has
the corresponding digital input terminals.
Coaxial Cable
AV amplifier with a
Dolby Digital decoder
Front left
speaker
To digital audio input
S-Video Cable
To TV video input
Center
speaker
Front right
speaker
Video Cable
Subwoofer
speaker
Surround left
speaker
CURTIS DVD7620_Engib.p65 5/3/2007, 11:35 AM9
- 9 -
Surround right
speaker
Page 10
Connect the player to AUX Equipment from AV Jacks (Input)
If your auxiliary equipment has AV output jacks, connect the left audio (white) cable and
Video cable to the input jacks of the player and output the auxiliary signals to the TV set as
illustrated below diagram.
TV
AUX Equipment
VIDEOOUT
AUDIOOUT
RL
VIDEO
ANTENNAIN
IN
AUDIO
IN
RL
AV Input Cable
AV Ouput Cable
Connect the TV Antenna and RF Out to TV set if you do not have AV Jacks
If your TV set is old style and do not have AV jacks, use the below connections to record and display
your desired TV program on your old TV set.
TV
VIDEO
ANTENNAIN
IN
AUDIO
IN
RL
Aerial or Cable TV
CURTIS DVD7620_Engib.p65 5/3/2007, 11:35 AM10
- 10 -
Page 11

VCR Basic Operation
To Start Playback
1. Press [ / POWER] to power on.
2. Press VCR of the remote control or TV/VCR of
the front panel to enter VCR mode.
3. Insert the desired videotape.
4. Press VCR/PROG. of the remote control to
select PROGRAM 1 of the VCR mode.
5. Press PLAY/PAUSE to play the videotape.
6. To Stop Playback, press STOP.
7. To pause playback, press PLAY/PAUSE.
8. To play fast forward or to rewind playback,
press F.F or F.R. .
9. Press OPEN/CLOSE of the remote control or
EJECT of the front panel to remove the
videotape.
Copying from DVD to Videotape
1. Insert the desired DVD disc. If the DVD disc
has copy protect function, you cannot copy it.
2. Insert a recordable tape.
3. Correct the AV (Video and Audio L) jacks with
RCA cables to the TV.
4. Press DVD of the remote control to select DVD
mode and play the disc.
5. Go to desired DVD chapter of the disc and
press REC of the remote control or of front
panel to start recording desired DVD chapter.
• DVD plays and VCR starts recording.
6. To exit copying, press STOP.
7. Press VCR to select VCR mode.
8. Press F.R. (Rewind) of the remote control to
go back to the beginning of the recording track.
Press STOP and then PLAY/PAUSE to play the
recorded portion.
Select External Input
Press AV1/AV2 of the remote control to select
between broadcasting mode: AV1 or AV2.
Recording from External Input
1. Insert a recordable tape.
2. Press AV1/AV2 of the remote control repeatedly to select desired external input.
3. Press REC to start recording.
4. Press STOP to stop the recording.
Recording from Antenna Input
1. Insert a recordable tape.
2. Press AV1/AV2 of the remote control repeatedly to switch to broadcasting mode.
3. Use (, ) or number buttons to select your
desired TV station.
• If you cannot receive a TV station, follow the
procedures of “Setting the Channel Set” page
in this manual to automatically scan all TV
stations receivable.
4. Press REC to start recording.
5. Press STOP to stop the recording.
One T ouch Timer Recording (OTR)
1. Follow the steps 1 to 4 in “Recording with VCR”.
2. Press REC as much as you want.
• See the recording times below.
Press once.. continuous recording until you press
STOP.
Twice.......... recording for thirty minutes from
current time.
3(times)....... recording for one hour
5.................. recording for two hours
7.................. recording for three hours
9.................. recording for four hours
11................ recording for five hours
13................ recording for six hours
15................ recording for seven hours
17................ recording for eight hours
18................ recording as pressing REC once only .
3. To Stop Recording mode, press STOP more
than 8 seconds.
Enjoying another TV Program During
Recording
Press TV/VCR on the remote control or front
panel, “TV” appears on the TV screen. Now you
may enjoy another TV program with your TV.
Press TV/VCR again to return to VCR mode,
“VCR” appears on the display.
CURTIS DVD7620_Engib.p65 5/3/2007, 11:35 AM11
- 11 -
Page 12

Clock Set
CLOCK SET
Quit : Setup
Date
11 02 07//20
(mm / dd / yy)
Time
02 : 50PM
• Press VCR on remote control to change into VCR mode and follow the procedure below.
1. Press SETUP on the remote control. The setup menu
is displayed.
2. Press OK button, the CLOCK SET is displayed.
3. Set the current date and time with [,] Navigation
buttons or Number 0-9 button.
For TIME SET, follow the order of Hour/Minute; for
DATE SET, follow the order of Month/Day/Year in
CLOCK SET SCREEN. Use [,] Navigation Buttons
to Select AM or PM.
SETUP
Clock set
Program Set
Channel Set
Language Select
Search
Option
Select : Ok
CLOCK SET
Date
--/--/20--
(mm / dd / yy)
Quit : Setup
CLOCK SET
Date
--/--/20--
(mm / dd / yy)
Quit : Setup
Time
:-- --
Time
:-- --
Quit : Setup
4. When CLOCK SET is completed, press SETUP.
- 12 -
CURTIS DVD7620_Engib.p65 5/3/2007, 11:35 AM12
Page 13

Program Set
The Program set feature allows you to preset
the player to record a programme to be broadcast. Up to 8 programmes can be preset. Before
presetting a recording, check that the date and
time are correct.
1. Press SETUP on the remote control. The setup
menu is displayed.
SETUP
Clock set
Program Set
Channel Set
Language Select
Search
Option
Select : Ok
Quit : Setup
2. Press [ ] Navigation button to select the
“Program Set” and press OK button.
SETUP
Clock set
Program Set
Channel Set
Language Select
Search
Option
Select : Ok
Quit : Setup
3. Press “Channel” and then select the channel
connection method and the channel source
number.
PROGRAM 1
Channel
Start Date
REC Cycle
Time
Start
End
Time
Tape Speed
Page : PROG +/
-
Antenna - -
--/-One Time
--:--AM
--:--AM
SP
Quit : Setup
4. Select “Start Date” and enter the recording
date of the programme channel.
PROGRAM 1
Channel
Start Date
REC Cycle
Time
Start
End
Time
Tape Speed
Page : PROG +/
-
Antenna - -
--/-One Time
--:--AM
--:--AM
SP
Quit : Setup
5. Select “REC Cycle”. Press the navigation []
button to select your record cycle. one time D
Daily D Weekdays D Weekly.
PROGRAM 1
Channel
Start Date
REC Cycle
Time
Start
End
Time
Tape Speed
Page : PROG +/
-
Antenna - -
--/-One Time
--:--AM
--:--AM
SP
Quit : Setup
6. Select “Start Time”. Enter the recording start
time.
PROGRAM 1
Channel
Start Date
REC Cycle
Time
Start
End
Time
Tape Speed
Page : PROG +/
-
Antenna - -
--/-One Time
--:--AM
--:--AM
SP
Quit : Setup
7. Select “End Time”. Enter the recording date
end time.
PROGRAM 1
Channel
Start Date
REC Cycle
Time
Start
End
Time
Tape Speed
Page : PROG +/
-
Antenna - -
--/-One Time
--:--AM
--:--AM
SP
Quit : Setup
8. Select “Tape Speed”. Press the Navigation []
button to select “SP” (short play) or “SLP”
(super long play).
PROGRAM 1
Channel
Start Date
REC Cycle
Time
Start
End
Time
Tape Speed
Page : PROG +/
-
Antenna - -
--/-One Time
--:--AM
--:--AM
SP
Quit : Setup
9. Press SETUP to store the programmed data.
Press PREV. [] or NEXT [] to go to previous
or next program list.
- 13 -
CURTIS DVD7620_Engib.p65 5/3/2007, 11:35 AM13
Page 14

Channel Set
SETUP
Select : Ok
Clock set
Program Set
Channel Set
Language Select
Search
Option
Quit : Setup
SETUP
Select : Ok
Clock set
Program Set
Channel Set
Language Select
Search
Option
Quit : Setup
CHANNEL SET
Select : Ok
CH 01
Antenna/Cable
Manual Set
Auto Preset
Quit : Setup
Cable
Erase
CHANNEL SET
Select : Ok
CH 01
Antenna/Cable
Manual Set
Auto Preset
Quit : Setup
Cable
Add
CHANNEL SET
Select : Ok
CH 01
Antenna/Cable
Manual Set
Auto Preset
Quit : Setup
Cable
Add
• Press VCR on remote control to change into VCR mode.
1. Press SETUP on the remote control. The setup menu is
displayed.
2. Press [ ] Navigation button to select “Channel Set” and
press OK .
3. The Channel Set menu is displaye. Press [] Navigation
button to select “Antenna/Cable” and press OK repeatedly to
select “Antenna” or “Cable”.
4. Press [] Navigation button to select “Manual Set”. Press
OK repeatedly to select “Add” or “Erase”.
5. Press [] Navigation button to select “Auto Preset”. Press
OK button to start the Auto Preset. “Please wait” appears on
the screen.
6. When the auto scanning has finished, the unit switches
automatically to channel 1.
7. If you wish to cancel the auto scanning before the end, press SETUP to exit.
- 14 -
CURTIS DVD7620_Engib.p65 5/3/2007, 11:35 AM14
Page 15

Language Set
• Select the OSD language of the VCR mode.
1. Press SETUP to enter the setup menu.
2. Press [] Navigation button to select “Language
Select” and press OK to display the language
options available.
3. Press [ or ] Navigation button to select your
desired OSD Language.
SETUP
Clock set
Program Set
Channel Set
Language Select
Search
Option
Select : Ok
SETUP
Clock set
Program Set
Channel Set
Language Select
Search
Option
Select : Ok
LANGUAGE SELECT
ENGLISH
SPANISH
Quit : Setup
Quit : Setup
4. Press OK to confirm your selection of language.
- 15 -
CURTIS DVD7620_Engib.p65 5/3/2007, 11:35 AM15
FRENCH
Quit : Setup
Page 16

Searching
SETUP
Select : Ok
Clock set
Program Set
Channel Set
Language Select
Search
Option
Quit : Setup
SETUP
Select : Ok
Clock set
Program Set
Channel Set
Language Select
Search
Option
Quit : Setup
SEARCH
Select : Ok
Go To Zero Search
Counter Search
Index Search (+)
Index Number Search
Index Search ( )
Quit : Setup
-
COUNTER SEARCH
Select : Ok
Go To Counter
Quit : Setup
-:--:00
00011::
INDEX NUMBER SEARCH
Select : Ok
Reverse
Quit : Setup
Forward
• Use this feature to search for your desired counter position on cassette. The VCR will rewind or
fast foward to search for your desired counter position, and then automatically stop at that position.
1. Press SETUP on the remote control. The setup menu is displayed.
2. Press [] Navigation button to select “Search” and press OK.
3. Press [] Navigation button to select the “Go To Zero Search”,
“Counter Search”, “Index Search +”, “Index Search –” or “Index
Number Search” and press OK.
• Go to zero search – the VCR will stop at the point of counter.
• Counter Search – enter your desired counter number by the
number buttons. Press OK to activate the counter search. The
VCR will stop at that counter position on your cassette.
• ”Index Search +” and “Index Search –” – the unit will go to the
first index found and play from that index onward.
• Index Number Search – press [] Navigation button to select
the reverse or forward direction and your desired index
number. The pointer will indicate the forward or reverse
direction on the TV screen. Press OK to start the Index Number
search and play from that index.
- 16 -
CURTIS DVD7620_Engib.p65 5/3/2007, 11:35 AM16
Page 17

Searching
SETUP
Select : Ok
Clock set
Program Set
Channel Set
Language Select
Search
Option
Quit : Setup
SETUP
Select : Ok
Clock set
Program Set
Channel Set
Language Select
Search
Option
Quit : Setup
SEARCH
Select : Ok
Go To Zero Search
Counter Search
Index Search (+)
Index Number Search
Index Search ( )
Quit : Setup
-
COUNTER SEARCH
Select : Ok
Go To Counter
Quit : Setup
-:--:00
00011::
INDEX NUMBER SEARCH
Select : Ok
Reverse
Quit : Setup
Forward
• Use this feature to search for your desired counter position on cassette. The VCR will rewind or
fast foward to search for your desired counter position, and then automatically stop at that position.
1. Press SETUP on the remote control. The setup menu is displayed.
2. Press [] Navigation button to select “Search” and press OK.
3. Press [] Navigation button to select the “Go To Zero Search”,
“Counter Search”, “Index Search +”, “Index Search –” or “Index
Number Search” and press OK.
• Go to zero search – the VCR will stop at the point of counter.
• Counter Search – enter your desired counter number by the
number buttons. Press OK to activate the counter search. The
VCR will stop at that counter position on your cassette.
• ”Index Search +” and “Index Search –” – the unit will go to the
first index found and play from that index onward.
• Index Number Search – press [] Navigation button to select
the reverse or forward direction and your desired index
number. The pointer will indicate the forward or reverse
direction on the TV screen. Press OK to start the Index Number
search and play from that index.
- 17 -
CURTIS DVD7620_Engib.p65 5/3/2007, 11:35 AM17
Page 18

Output Channel
ACS Set (Auto Clock Set)
• Press TV/VCR on remote control to change into
VCR mode.
1. Press SETUP on the remote control. The setup
menu is displayed.
SETUP
Clock set
Program Set
Channel Set
Language Select
Search
Option
Select : Ok
2. Press [] Navigation button to select “Option”
and press OK.
Quit : Setup
SETUP
Clock set
Program Set
Channel Set
Language Select
Search
Option
Select : Ok
3. Press [] Navigation button to select “Output
Channel”. Press OK repeatedly to select
channel. (“Ch3” or “Ch4”)
Quit : Setup
OPTION
OSD Display
Auto Power Off
Output Channel
ACS Set
Select : Ok
On
Yes
Ch3
Off
Quit : Setup
Automatically sets the time and date once the VCR
is plugged in and the antenna/cable is hooked up.
Clock and date information is based on signal from
your local public broadcasting service station. This
feature can reset the time and date after power
outages, and for daylight savings time. Press VCR
on remote control to change into VCR mode.
1. Press SETUP on the remote control. The setup
menu is displayed.
SETUP
Clock set
Program Set
Channel Set
Language Select
Search
Option
Select : Ok
2. Press [] Navigation button to select “Option”
and press OK.
Quit : Setup
SETUP
Clock set
Program Set
Channel Set
Language Select
Search
Option
Select : Ok
3. Press [ ] Navigation button to select “ACS
Set”. Press OK repeatedly to select On or Off.
Quit : Setup
OPTION
OSD Display
Auto Power Off
Output Channel
ACS Set
On
Yes
Ch3
Off
4. Press SETUP to exit the menu.
CURTIS DVD7620_Engib.p65 5/3/2007, 11:35 AM18
Select : Ok
4. Press SETUP to exit the menu.
- 18 -
Quit : Setup
Page 19

DVD Basic Operation
Important Notes:
• “ ” will appear on the TV screen during operation if you try to access a function that is not
available on the disc.
• Some discs may take a few seconds to load.
• If a disc is inserted incorrectly, is dirty and/or damaged, or is not present at all. “NO DISC” will
appear in the display.
• Always hold the disc without touching either of its surfaces. When inserting a disc, position it with
the printed title side facing up, align it with the guides and place it in its proper position.
• It is important that you read the manual that accompanies the DVD disc as there are features that
are on this player that cannot be used with certain DVDs. There are also extra features that are
different for each DVD disc, so they are not explained in this owner’s manual.
Playback of a DVD
1. Press the POWER button to turn on the unit.
2. While in the DVD mode (DVD button pressed first), press the OPEN/CLOSE button to open the disc
tray. “OPEN” will appear on the screen of the TV. Insert a disc with the label side facing up on the
disc tray. Press the OPEN/CLOSE button to close the disc tray. “CLOSE” will appear on the screen
of the TV.
3. After loading, “DVD VIDEO” will appear on the screen and the menu screen of the DVD should appear.
Use the Navigation (,,,) buttons to select the desired option and the OK button to select it.
4. To stop playback, press the STOP button, “PRESS PLAY KEY TO CONTINUE” will appear on the TV
screen. Because the unit will remember where you stopped, simply press the PLAY/PAUSE button
to resume playback where you left off (resuming playback). If the Stop button is pressed twice, the
unit will stop completely.
Notes:
• If a MENU appears on the TV screen, press the Navigation (,,,) buttons to select the
desired option/item, then press the OK button. Please make sure to refer to the disc’s jacket or case
for additional information.
• Resuming playback may not work on all discs.
Skip
• Press the NEXT button to advance the DVD to the beginning of the next chapter.
• Press the PREV. button to move the DVD to the beginning of the previous chapter.
Search
During playback, press either the F.F or F.R Search button to move the DVD forward or
backward at double (x2) speed to locate a specific section. Repeatedly press these buttons and the
speed will increase to x4, x8, x16 and resume normal playback. You can also resume normal playback
by pressing the PLAY/PAUSE button.
Slow/F
• Use this feature to move the DVD in slow motion.
During playback, press the SLOW/F button to move the DVD forward in slow motion speeds of 1/2,
1/4, 1/8, 1/16 and resume normal playback. You can also resume normal playback by pressing the
PLAY/P AUSE button.
- 19 -
CURTIS DVD7620_Engib.p65 5/3/2007, 11:35 AM19
Page 20

Freeze Frame and Frame Advance
While a disc is playing, press PAUSE to freeze the picture. To advance one frame at a time, press
STEP repeatedly. To resume normal playback, press PLAY.
Note: After opproximately one minute in PAUSE with no user interaction, the player goes into screen
saver mode.
Title/Chapter Search
• Use this feature to directly go to a specific title and/or chapter.
– Press the SEARCH button once. Press the Navigation (,) buttons to select the Title (“TT”), then
use the Number buttons to select the desired title number (i.e. for number 5, press “0”, “5”). Playback will start immediately. OR
– Press the Navigation (,) buttons to select the Chapter (“CH”), then use the Number buttons to
select the desired chapter number (i.e. for number 2, press “0”, “2”). Playback will start immediately.
Title/Chapter/Time Search
• Use this feature to directly go to a specific title and/or time.
– Press the SEARCH button twice. Press the Navigation (,) buttons to select the Title (“TT”), then
use the Number buttons to select the desired title number. (i.e. for number 5, press “0”, “5”). Playback will start immediately. OR
Press the Navigation (,) buttons to select the Title Time (“T”), then use the Number buttons to
select the desired Title Time (Hour/Minutes/Seconds); playback will start immediately.
– Press the SEARCH button a third time. Press the Navigation (,) buttons to select the chapter,
then use the Number buttons to select the desired chapter number. (i.e. for number 5, press “0”, “5”).
Playback will start immediately. OR
Press the Navigation (,) buttons to select the Chapter Time (“T”), then use the Number buttons
to select the desired Title Time (Hour/Minutes/Seconds); playback will start immediately.
Repeat Playback
• While playing back a DVD, this unit can repeatedly play back a chapter or title.
• While in the Playback mode, press the REPEAT button once; “ CHAPTER” will appear on the TV
screen for a few seconds and the currently playing Chapter will repeat continuously
• While in the Playback mode, press the REPEAT button a second time; “ TITLE” will appear on the
TV screen for a few seconds and the currently playing Title will repeat continuously. Press the
REPEAT button once more to cancel Repeat mode; “OFF” will appear on the TV screen for three
seconds then disappear.
A-B Repeat Playback
• While playing back a DVD, this unit can repeatedly playback a specific section.
• While in the Playback mode, press the Repeat A-B button to define where you want the section to
start. Press the Repeat A-B button again to define where you would like the section to end, the unit
will then play the selected area continuously. Press the Repeat A-B button again to cancel A-B
Repeat mode.
Notes:
• If you enter a time that exceeds the time limit of the DVD, then “ ” will appear, and you must try
again.
• Repeat may not work properly with some discs.
- 20 -
CURTIS DVD7620_Engib.p65 5/3/2007, 11:35 AM20
Page 21

DVD Menu
Press the DVD MENU button, and the Main Menu of the disc will appear. Use the Navigation
(,,, ) buttons to select the desired option, and then press the OK button. This is not available on
all discs.
Title Menu
Press the TITLE button, and the Title Menu of the disc will appear. Use the Navigation (,,,)
buttons to select the desired option, and then press the OK button. This is not available on all discs.
Subtitle Menu
Press the SUBTITLE button repeatedly to select a subtitle language, and to turn the subtitle menu
on/off. This feature is not available on all discs.
MTS/AUDIO
• While playing a disc, you can cycle between the audio modes as follows:
DVD Disc: Press the MTS/AUDIO button to cycle through the audio modes. The audio modes vary
VCD Disc: Press the MTS/AUDIO button to cycle through the audio modes including MONO LEFT,
Note: “ ” will appear if the disc does not support audio mode changing.
depending on the disc inserted.
MONO RIGHT , MIX MONO and STEREO.
Display
Each press of the DISPLAY button will display the elapsed time and remaining time of a playing disc.
Each press of the DISPLAY button will cycle through, depending on the playback mode as follow:
DVD: Title Elapsed Time
ÖÖ
Ö Off
ÖÖ
VCD: Track Elapsed Time
Off
CD/MP3: Press the DISPLAY button to select between the Track Elapsed Time and Track Remaining
Note: For VCD, if the PBC is on, the Total Elapsed Time and Total Remaining Time will not be available.
Time.
ÖÖ
Ö Title Remaining Time
ÖÖ
ÖÖ
Ö Track Remaining Time
ÖÖ
ÖÖ
Ö Chapter Elapsed Time
ÖÖ
ÖÖ
Ö Total Elapsed Time
ÖÖ
ÖÖ
Ö Chapter Remaining Time
ÖÖ
ÖÖ
Ö Total Remaining Time
ÖÖ
ÖÖ
Ö
ÖÖ
Zoom
Press the ZOOM button once during normal, slow or still playback modes, and the unit will zoom x2.
Press once or twice more and the unit will zoom x3, x4. Use the Navigation (,, ,) buttons to
move the image on the TV screen. Press the ZOOM button once more to cancel the zoom function. This
is not available on all discs.
Angle
Some discs may contain scenes which have been shot simultaneously from a number of different
camera angles. The feature only works on discs with more than one camera angle. The jacket will be
marked with “ ”.
While in the playback mode, press the ANGLE button; the total number of angles will appear on the
screen. Repeatedly press the ANGLE button to select the desired angle, the angle will change in one to
two seconds. This is not available on all discs.
- 21 -
CURTIS DVD7620_Engib.p65 5/3/2007, 11:35 AM21
Page 22

MP3 Basic Operation
Playback of an MP3 disc
1. Press the POWER button to turn on the unit.
2. While in the DVD mode (DVD button pressed first), press the OPEN/CLOSE button to open the disc
tray. “OPEN” will appear on the screen of the TV. Insert an MP3 disc with the label side facing up on
the disc tray. Press the OPEN/CLOSE button to close the disc tray. “CLOSE” will appear on the TV
screen and the display.
3. After loading, the FOLDER/TRACK menu will appear on the TV screen. Press the Navigation (,)
buttons to select the desired folder/file.
4. Press the OK button to confirm. If there are no folders on the disc, playback will begin immediately. If
there are folders, then press the the Navigation (, ) buttons to select the desired folder, then
press the OK button. Press the the Navigation (,) buttons to select the desired track, then press
the OK button to stop playback. To return to select another folder, while in the stop mode, repeatedly
press the Navigation () button. The FOLDER/TRACK menu will appear again on the TV screen.
Selecting Folders / Tracks using the or buttons
During playback, simply press the NEXT or PREV. button to select a track to be played.
Selecting Folders / Tracks using the number buttons
During playback, press the Number buttons corresponding to the track numbers to select your desired
track, and the unit will playback the desired track automatically. Enter a 3 digit number for the track
number; i.e., to playback the second track, enter “002”.
F.F (Forward) / F.R (Reverse)
Each press of the F.F or F.R Search button will increase the search as follows:
1st press: 2 x
2nd press: 4x
3rd press: 8 x
4th press: 1 6x
5th press: Resume normal playback
Press the PLAY/PAUSE button to resume normal playback.
Repeat Play
• To Repeat play a track/file, simply select the track/file as described previously, then press the
REPEAT button once; “ TRACK” will appear on the TV screen and the unit will repeat the selected
track/file continuously until the STOP button is pressed.
• Press the REPEAT button a second time; “ ALL” will appear on the TV screen and unit will repeat
the tracks/files inside the folder until the STOP button is pressed.
• If there are no folders on the disc, it will repeat all the tracks/files on the disc. To cancel Repeat play,
press the REPEAT button until the Off indicator appears on the TV screen.
- 22 -
CURTIS DVD7620_Engib.p65 5/3/2007, 11:35 AM22
Page 23

MP3 Basic Operation
Playback of an MP3 disc
1. Press the POWER button to turn on the unit.
2. While in the DVD mode (DVD button pressed first), press the OPEN/CLOSE button to open the disc
tray. “OPEN” will appear on the screen of the TV. Insert an MP3 disc with the label side facing up on
the disc tray. Press the OPEN/CLOSE button to close the disc tray. “CLOSE” will appear on the TV
screen and the display.
3. After loading, the FOLDER/TRACK menu will appear on the TV screen. Press the Navigation (,)
buttons to select the desired folder/file.
4. Press the OK button to confirm. If there are no folders on the disc, playback will begin immediately. If
there are folders, then press the the Navigation (, ) buttons to select the desired folder, then
press the OK button. Press the the Navigation (,) buttons to select the desired track, then press
the OK button to stop playback. To return to select another folder, while in the stop mode, repeatedly
press the Navigation () button. The FOLDER/TRACK menu will appear again on the TV screen.
Selecting Folders / Tracks using the or buttons
During playback, simply press the NEXT or PREV. button to select a track to be played.
Selecting Folders / Tracks using the number buttons
During playback, press the Number buttons corresponding to the track numbers to select your desired
track, and the unit will playback the desired track automatically. Enter a 3 digit number for the track
number; i.e., to playback the second track, enter “002”.
F.F (Forward) / F.R (Reverse)
Each press of the F.F or F.R Search button will increase the search as follows:
1st press: 2 x
2nd press: 4x
3rd press: 8 x
4th press: 1 6x
5th press: Resume normal playback
Press the PLAY/PAUSE button to resume normal playback.
Repeat Play
• To Repeat play a track/file, simply select the track/file as described previously, then press the
REPEAT button once; “ TRACK” will appear on the TV screen and the unit will repeat the selected
track/file continuously until the STOP button is pressed.
• Press the REPEAT button a second time; “ ALL” will appear on the TV screen and unit will repeat
the tracks/files inside the folder until the STOP button is pressed.
• If there are no folders on the disc, it will repeat all the tracks/files on the disc. To cancel Repeat play,
press the REPEAT button until the Off indicator appears on the TV screen.
- 23 -
CURTIS DVD7620_Engib.p65 5/3/2007, 11:35 AM23
Page 24

Picture CD
1. Press the POWER button to turn on the unit.
2. While in the DVD mode (DVD button pressed first), press the OPEN/CLOSE button to open the disc
tray. “OPEN” will appear on the screen of the TV. Insert a picture disc with the label side facing up on
the disc tray.
3. Press the OPEN/CLOSE button to close the disc tray. “LOADING” will appear on the TV screen. After
loading, playback will start automatically. Press the NEXT or PREV. button to skip through the
pictures. The unit will playback all the pictures on the disc then the menu will appear on the TV
screen. Press the Navigation (,) buttons to select the desired picture and press the OK button
to playback the desired picture again. If the screen saver option is set to on, the screen saver will
turn on in about one minute when the menu appears on the TV screen.
4. To stop playback of the picture CD, press the STOP button.
DVD SETUP MENU
The SETUP MENU lets you customize the DVD section by allowing you to select various language
preferences, set up a parental level, turn captions and screen saver on/off, adjust what type of
television screen you have and more.
While in the DVD mode (DVD button pressed first), enter the SETUP MENU by pressing the SETUP
button. Use the Navigation (,,, ) buttons to navigate through the menus/screens and press the
OK button to select the highlighted option. To exit the SETUP MENU, press the SETUP button.
Audio Setup Page
General Setup Page
-- General Setup Page --
TV Display
TV Type
Video Out
Angle Mark
OSD Lang
Captions
Screen Saver
Go To General Setup Page
PS
NTSC
ON
ENG
ON
ON
Dolby Digital Setup
Preference Page
PreferenceDolbyAudioGeneral
To access the DVD player menu:
• Press the SETUP button to display the main menu.
• Select a menu item using the Navigation and buttons.
• Use the Navigation and buttons to select one of the options in the menu.
• Press the Navigation button to access the submenu.
• Use the Navigation and buttons select one of the options in the submenu.
• Press the OK button to confirm your selection.
• Return to a previous menu using the Navigation button.
• To exit from the player menus, press the SETUP button repeatedly.
- 24 -
CURTIS DVD7620_Engib.p65 5/3/2007, 11:35 AM24
Page 25

General Setup Page:
TV Display
You can choose a display that affects how a disc’s content appears on your TV screen.
1. Normal/PS (Pan Scan):
Select when the unit is connected with a normal TV. Wide-Screen images are shown on the screen,
but with some parts cut automatically.
2. Normal/LB (Letterbox):
Select when the unit is connected to a normal TV. Wide-screen images are shown on the screen
with a black band at the top or bottom.
3. Wide (16:9 Widescreen):
Select when the unit is connected to a wide-screen TV.
TV Type
You may select according to the color system of the TV to be connected. The TV type feature allows
you to choose NTSC or PAL.
Video Out
Select the color video type and switch mode to fit your connector type:
S-VIDEO: Select when using CVBS and S-Video Out.
YUV: Select when using Component Video Out.
Angle Mark
To select angle mark display ON/OFF when angle mark is available.
OSD Lang
The OSD Lang feature enables you to set the preferred on-screen menu language: English, French or
Spanish.
Captions
Select this option when some newer DVD movies include closed captioning for hearing impaired
viewers.
• Select “ON” to switch on the captioning feature that describes other sounds being heard together
with the dialog.
Screen Saver
Setting the screen saver to on the screen saver image appears when the unit stops or the image is
motionless for approximately 1 minute. This saver can keep the screen from being demaged.
• ON: Start the screen saver.
• OFF: Remove the screen saver.
Audio Setup Page:
Select Audio and then select the desired option using the Navigation (,,,) buttons to navigate
through the menus/screens and press the OK button to select.
Downmix: Sets the Audio Output mode.
LT/RT: The front speaker are in theatrical LT/RTdownmix mode.
Stereo: The front speaker are in stereo downmix mode.
- 25 -
CURTIS DVD7620_Engib.p65 5/3/2007, 11:35 AM25
Page 26

Dolby Digital Setup:
Select Dolby and then select the desired option using the Navigation (,,,) buttons to navigate
through the menus/screens and press the OK button to select.
Stereo: Select this to set the Dolby Digital output to stereo mode.
L-Mono: Select this to set the Dolby Digital output to left mono mode, meaning it will reproduce the
R-Mono: Select this to set the Dolby Digital output to right mono mode, meaning it will reproduce the
Mix-Mono: Select this to reproduce both channels mixed together.
left mono signal to the left and right channels.
right mono signal to the left and right channels.
Preference Page:
Select Preference and then select the desired option using the Navigation (, , , ) buttons to
navigate through the menus/screens and press the OK button to select.
Audio
Select the language the DVD will be played back in (English, French, Spanish, German, or Japanese).
The DVD must be recorded in the selected language, otherwise the default language of the DVD will
be played.
Subtitle
Select the language the Subtitle (OSD) will be in (English, French, Spanish, German, Japanese or Off).
The DVD must be recorded in the selected language, otherwise the default language of the DVD will
be shown.
Note: Discs are created differently. The DVD player can’t override some language preferences. If a
disc’s software was created to play the movie (title) in a perferred language, the preference
you set might be ignored. Also, if the language isn’t available on the disc you’re playing the
disc’s default language will be chosen. if the disc wasn’t created with subtitles, you won’t be
able to use the Subtitle feature.
Disc Menu
Select the language the Disc Menu will be in (English, French, Spanish, German, or Japanese). The
DVD’s Disc Menu must be made in the selected language, otherwise the default language of the DVD
will be shown.
Password
• Press the Navigation (,) buttons to select Password. Press the Navigation () button to select
Change.
• Press the OK button to change the password.
• Input your old password (the factory default password is “1234”), and then enter your desired
4-digit code new Password to the new Password column. The player will jump to the Confirmed
Password column automatically. Press the OK button again. The desired new password will then be
set; be sure to write it down for future reference.
Default
Select this option to reset all preferences to their original factory settings.
- 26 -
CURTIS DVD7620_Engib.p65 5/3/2007, 11:35 AM26
Page 27

Specifications
Power Requirements: AC 120V ~ 60Hz
Power Consumption: 25W
Signal System: NTSC / PAL
Weight: 4.5Kg (main unit)
Dimensions: 432(L) x 267(W) x 102(H)mm (excluding protrusions)
Operating Temperature Range: +5 to +35°C
Operating Humidity Range: 5 to 90% (no condensation)
Discs Played:
(1) DVD-VIDEO Disc: 12 cm single-sided, single-layer
12 cm single-sided, dual-layer
12 cm double-sided, single-layer
8 cm single-sided, single-layer
8 cm single-sided, dual-layer
8 cm double-sided, single-layer
(2) Compact Disc: 12 cm disc
8 cm disc
Video Output Level: 1 Vp-p
Audio Output Level: 2 Vrms (1 KHz, 0dB)
Audio Signal Output Characteristics:
Frequency Responses:
• DVD (Linear Audio): 20Hz-20KHz (48KHz Sampling)
20Hz-20KHz (96KHz Sampling)
• CD Audio: 20Hz-20KHz
S/N Ratio: 70dB
Wow and Flutter: Below Measurable Level
Pickup: Wave Length: 655nm
Laser Power: CLASS 1
Specifications are subject to change without notice.
Weight and dimensions are approximate.
CURTIS DVD7620_Engib.p65 5/3/2007, 11:35 AM27
- 27 -
Page 28

Troubleshooting (DVD)
Before requesting service for this player, check the chart below for a possible cause of the problem
you are experiencing. Some simple checks or an adjustment on your part may eliminate the problem
and restore proper operation.
Symptom
The DVD does not play.
No sound comes through.
A disc is playing but picture does
not appear or with poor picture
quality.
Sound is irregular.
Remote control does not work.
Checks
• If a DVD is from overseas, it may not be played. Please
check the DVD's region code whether it has the relative
region code 1 or All.
• Please check whether a DVD is inserted in a right
direction.
• If it is a CD-ROM for PC or DVD-ROM, it cannot be played.
• Playback may be in slow motion or pause (In special
speed playback, no sound is available).
• Did you connect the audio cable correctly?
• Please check the operative condition of your TV or
amplifier.
• From setup menu, please check "AUDIO" settings.
• Did you turn on your TV set?
• Did you connect the video cables correctly?
• The playback may be paused.
• Disc may be dirty or damaged.
• Please check the connection with Dolby Digital amplifier.
• Please check the plugs are connected with one another
tightly.
• Connection terminals may be dirty.
• Make sure you are pointing at the player when using the
remote control and no interruption in-between.
• Batteries may be weak or exhausted.
“MENU”, "AUDIO", “ANGLE” or
"SUBTITLE" button does not work.
The file name of MP3 (CD-R)
appears with strange letters.
CURTIS DVD7620_Engib.p65 5/3/2007, 11:35 AM28
• The DVD playing may not include the function required.
• The player only recognizes alphabet (A-Z, a-z), numbers
(0~9) and special symbol on keyboard (~, !, @, #, $ ....).
• The letters other than the above will be displayed as
"----".
- 28 -
Page 29

Troubleshooting (VCR)
Symptom
Power button does not work.
Cannot insert a videotape.
Videotape cannot be ejected.
Cannot watch TV channels
through the player
Screen noise appears on
screen.
Sound and screen are irregular.
Sound comes out but screen
does not appear. Stripes
appears on screen.
While recording and playing
videotape, the top of screen
extremely waves.
Checks
• Check whether the power plug is inserted properly in an electric
outlet.
• Check if you have switched on the player.
• Check whether a videotape is already inserted.
• Check whether a videotape is inserted in the right direction (the side
with transparent window should be facing upward).
• Did you insert the videotape again just after the tape was ejected?
Please try again only after the tape is fully ejected.
• In case the player has not been used for a long time with a videotape inserted, the videotape may not be ejected. Please unplug
power for about 10 min. Plug for power again and then press
EJECT button.
• Check your antenna's connection and check if signal is weak. If
necessary, use a frequency amplifier.
• TV channel should be set on the video channel.
• Screen noise may appear when you are watching a TV channel
while recording another channel’s program.
• Use a head-cleaner to clean VCR heads. VCR heads may be dirty.
• Since VCR playback signals are not stable like TV signals, screen
may be unstable or curved during playback.
VCR playback quality is poor.
While duplicating, screen is not
clean and distorted.
Unable to record TV programs.
Once record button is pressed,
the videotape is ejected
automatically.
Timer recording of cable TV
does not work.
Cable broadcasting can not be
selected.
CURTIS DVD7620_Engib.p65 5/3/2007, 11:35 AM29
• When videotape is too old or has been used many times, stripes
may appear on the screen.
• Try to use a head-cleaner.
• Some tapes or discs distributed in the rental market are set to
prevent copying. These tapes cannot be duplicated in a good quality.
• For recording, you should use videotape with a safety tab. (If it is
broken, please scotch-tape it)
• Please check whether the timer recording info is right.
• Check if the RF cable (antenna) connection is correct.
• Check whether the clock is right.
• Check whether the timer recording info is right.
• For recording, you should use videotape with a safety tab. (If it is
broken, please scotch-tape it)
• Did the cable data output cable connect correctly?
• Select "CABLE" not "NETWORK" from the "CHANNEL SETTING".
- 29 -
Page 30

Region Management Information
This DVD/CD player is designed and manufactured to respond to the Region Management Information
that is recorded on a DVD disc. If the Region number described on the DVD disc does not correspond
to the Region number of this DVD/CD player, this DVD/CD player cannot play this disc.
The Region number for this DVD player is
1
DVD Disc
There are the marks on some DVD disc package.
Notes:
• Only the above types of discs can be played on this unit.
DVD-ROM, CD-ROM, CDV , etc. cannot be played.
Some CD-R and CD-RW discs cannot be played depending on the condition of the player and the
disc.
• This unit is to be used exclusively with the NTSC or PAL colour system. SECAM system discs cannot
be used with this unit.
DVD Disc
DVD discs are divided into titles, and the titles are sub-divided into chapter.
Music CD Disc
Music CD discs are divided into tracks.
Notes on handling discs
• Do not expose the disc to direct sunlight, high humidity, or high temperatures for extended periods of
time.
• Discs should be returned to their cases after use.
• Do not apply paper or write anything on the disc surface.
• Handle the disc by its edge. Do not touch the playing surface (glossy side).
Fingerprints and dust should be carefully wiped off the playing surface of the disc with a soft cloth.
Wipe in a straight motion from the centre to the outside of the disc.
• Never use chemicals such as record cleaning sprays, antistatic sprays or fluids, benzene or thinner
to clean discs.
This product incorporates copyright protection technology that is protected by
method claims of certain U.S. patents and other intellectual property rights owned by
Macrovision Corporation and other rights owners. Use of this copyright protection
technology must be authorized by Macrovision Corporation, and is intended for
home and other limited viewing uses only unless otherwise authorized by
Macrovision Corporation. Reverse engineering or disassembly is prohibited.
Apparatus Claims of U.S. Patent Nos. 4,631,603; 4,819,098; 4,907,093; 5,315,448 and 6,516,132.
licensed for limited viewing uses only.
Dolby and the double-D symbol are trademarks of Dolby Laboratories. Manufactured
under License from Dolby Laboratories.
- 30 -
CURTIS DVD7620_Engib.p65 5/3/2007, 11:35 AM30
Page 31

DVD PLAYER WITH VCR
MODEL NO.: DVD7620
Instruction Manual
CURTIS DVD7620_Engib.p65 5/3/2007, 11:35 AM31
- 31 -
 Loading...