

Page 1
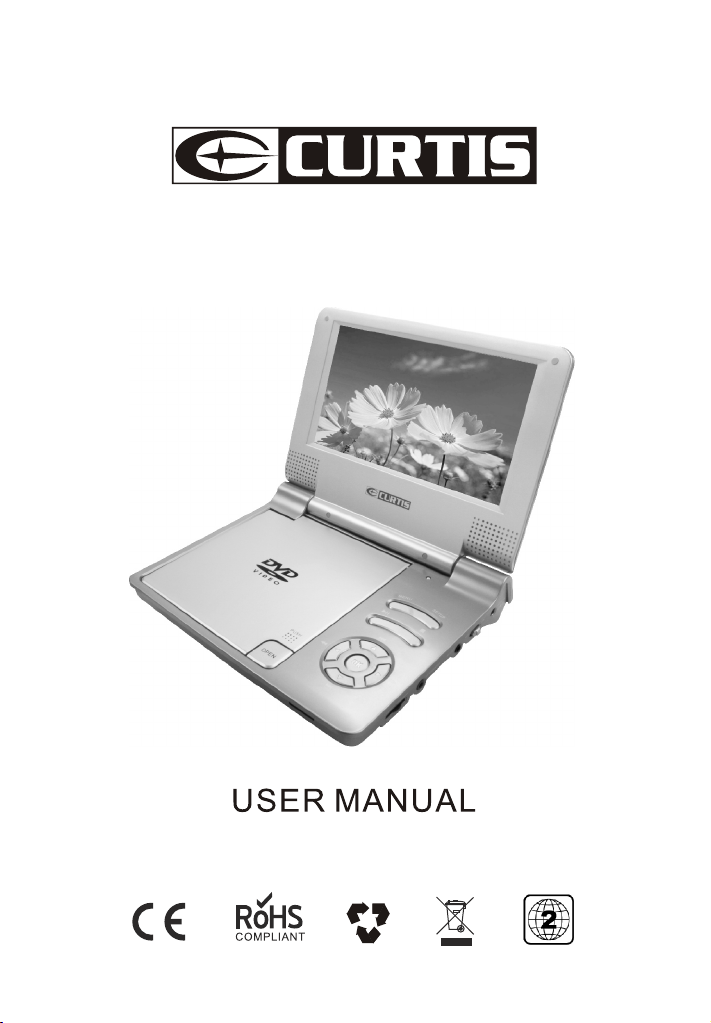
DVD7015UK
Page 2

A. Introduction 1
B. Cautions and Warnings 1
C. Important safety instructions 1
D. Contents 2
E. Powering and installation 2
F. Controls,Indicators, and Connectors 3
G. Loading and Playing a Disc 4
H.Setup 4
I. Basic Operation 8
J. Playing Audio CDS 12
K. Playing MP3 Discs 13
L. Playing JPG files 14
M. Connecting to TV or another monitor 15
N. Rechargeable battery use 15
O. Specifications 16
P. Troubleshooting 16
Page 3

A. Introduction
Thank you for choosing our portable DVD player. The main features include a 7" Wide Screen
(16:9 Aspect Ratio) Liquid Crystal Display (LCD) monitor and a DVD player. The unit applies the
latest state of art electronics and is designed for use in hotels, offices or homes. The unit is
constructed to provide years of reliable, trouble-free service, and is compact to take it with you
anywhere and is designed for quick and easy installation. Prior to use please read the entire
instruction manual supplied with this product . Please save this manual for future reference.
B. Cautions and Warnings
Warning: To reduce the risk of fire or electric shock, do not expose this apparatus to rain or
moisture.
Caution: Danger of explosion if battery is incorrectly replaced. Replace only with the same or
equivalent type.
RISK OF ELECTRIC SHOCK
DO NOT OPEN
C. Important safety instructions
1 Read these Instructions
) .
2 Keep these Instructions
) .
3 Heed all warnings
) .
4 Follow all instructions
) .
5 Do not use this unit near water
) .
6 Clean only with dry cloth
) .
7 Do not block ny ventilation opening Install in accordance with the man facturer s instructions
) a , u ' .
8 Do not install near any heat sources such as radiators heat registers stoves or other
) , , ,
apparatus including amplifiers that pro uce heat
( ) d .
9 main p is used as the disconnect device. It shall remain readily operable and
) The ower switch
should not be obstructed during intended use.
10 Protect the power cord from being walked on or pinched particularly at plugs convenience
) .
receptacles and the point whe e they exit from the unit
, r .
11 Only use attachments accessories specified by the manufacturer
) / .
12 Replace only with the same or equivalent type. danger of explosion if battery is
) this is a the
replaced.
improperly
13 Unplug this unit during lightning storms or when unused for long periods of time
) .
14 Refer all servicing to qualified service personnel servicing is required when the unit has been
) ,
damaged in any way such as power suppl cord or plug is damaged liquid has been spilled
, y ,
or objects have fallen into the unit the unit has been moisture does not operate
, exposed to ,
normally or has been dropped
, .
1)
5 Cleaning Unit
When cleaning, make sure the system is unplugged from the power source. Do not use liquid
cleaners or aerosol cleaners. Use a cloth lightly dampened with water for cleaning the exterior
of the system only.
1)
6 Disc
Do not use irregular shaped discs such as heart or star-shaped discs as they may cause the
unit to malfunction. Do not stick paper, tape or glue on the disc. Do not expose the disc to
direct sunlight or heat sources. Do not touch the surface of disc. Handle the disc by its edge.
1
Page 4
Clean the disc by wiping the disc from the center out with a cleaning cloth. Remove
the disc from the unit and store it in its case after playing. Some playback
operations of discs may be intentionally fixed by software producers. Since this
unit plays discs according to the disc contents the software producers designed,
some playback features may not be available. Also refer to the instructions
supplied with the discs.
D. Contents
1. 1 x 7'' DVD Player Combo with built-in rechargeable lithium Polymer battery
2. 1 x Remote Control with battery
3. 1 x Audio/Video Cable
4. 1 x AC/DC Adapter
5. 1 X Cigarette Lighter Adapter
6. 1 x Instruction Manual
7. 1 X Earphone
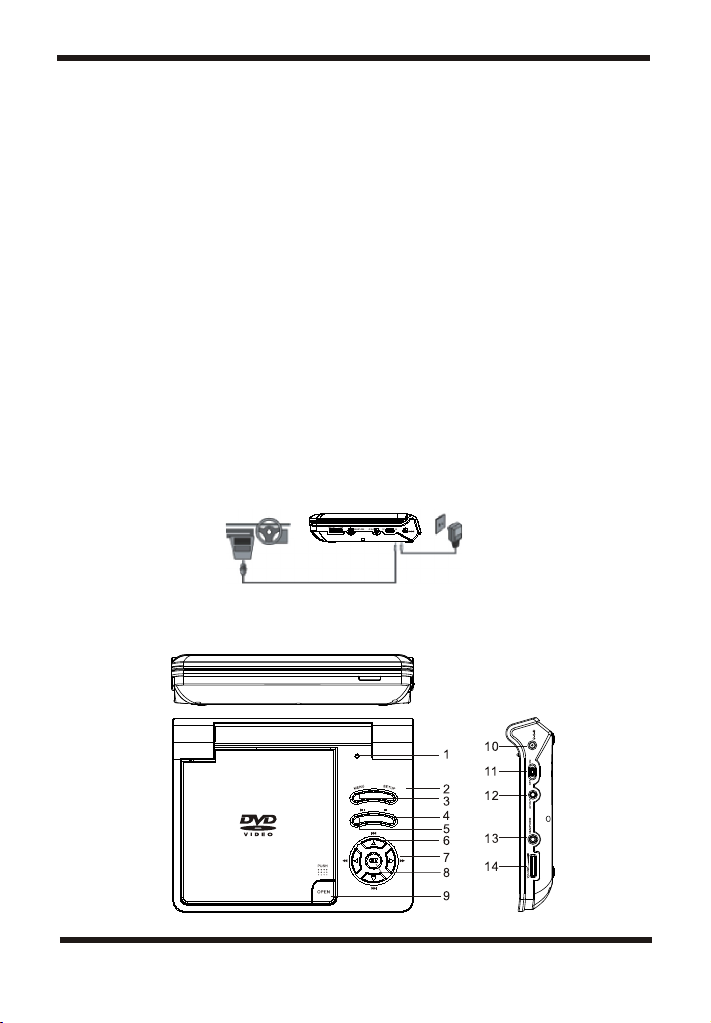
E. Powering and installation
1. Powering the system indoors
Plug one end of the AC to DC adapter into the DC input 9-12V jack on the back of the
main unit, then plug the other end into the AC power receptacle.
2. Powering the system in a car
Plug one end of the cigarette lighter adapter into the DC input 9-12V jack on the unit,
then plug the other end into the cigarette lighter socket
DC IN 9-12V
F. Controls, Indicators, and Connectors
1. Unit View
DC IN 9-12V
2
Page 5
2.Controls
1.LCD Panel Shut Off Switch
2.SETUP
3.MENU
4.STOP
5.PLAY/PAUSE
6. BUTTON
7. BUTTON
8.OK BUTTON
9.OPEN
10.DC IN 9-12V
11.POWER ON/OFF SWITCH
12.AV OUT
13.HEADPHONE
14.VOLUME
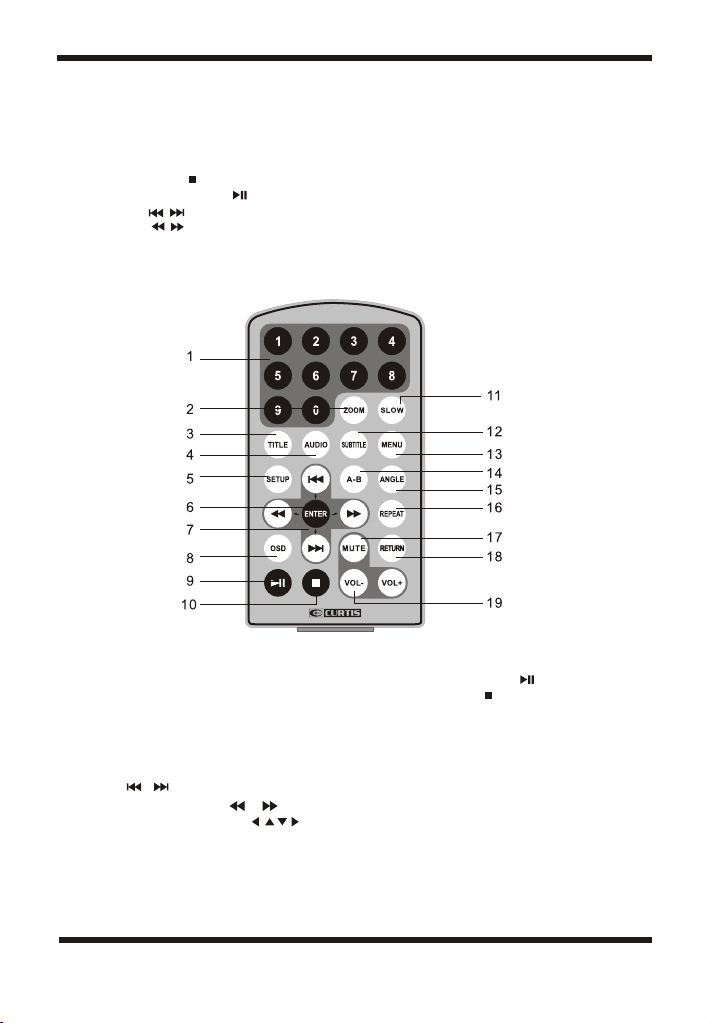
1.Number buttons
2.Zoom(To zoom in/out picture)
3.Title
4.Audio
5.Setup
6.Enter
7.Previous/Next(when playing)
Fast backward/FF
(when playing)
Direction buttons
(when at menu setup)
8.OSD
9.Play/Pause
10.Stop
11.Slow
12.Subtitle
13.Menu
14.A-B
15.Angle
16.Repeat
17.Mute
18.Return
19.Volume + -
3
Page 6

G. Loading and Playing a Disc
a. After connecting power to the unit, turn on DVD player with the ON/OFF switch.
The power indicator will light.
b. Open the disc tray by "OPEN" , and place a disc into the tray with the label side facing
up.
c. Close the tray. The unit will load the disc and start playing.
d. Adjust picture quality by entering into video quality setup via SETUP button on the unit
or from the remote control.
e. To stop playing a disc, press STOP.
H. Setup
Press 'SETUP' to display the Main screen of the Setup Menu on the screen.
Press 'SETUP' again to exit the Setup Menu and the unit will resume its last playback
mode.
-- General setup page --
TV Display Wide
Angle Mark On
TV Type PAL
Screen Saver On
Osd Lang ENG
Go To General Setup Page
1) Press SETUP , the 'General Setup Page' will display on screen.
a).Select 'Angle Mark' using the / button, and then press the button to enter the
submenu. Choose Angle Mark on or off using the / button and then press OK to
confirm the setting. Press the button to return.
* On: The screen will show the angle mark icon. (*If an angle option is available).
* Off: The screen will not display the Angle Mark
NOTE: Not all discs contain above features. The above features are disc dependent.
b). Select 'Screen Saver' using the / button, and then press the button to enter the
submenu. Choose Screen Saver on or off using the / button and then press OK
to confirm the setting. Press the button to return.
*On: Enables screen saver
*NOTE: The DVD player will enter the Screen Saver mode after approximately five
minutes if the same image remains on the screen.
*Off: Disables screen saver (off)
C) Select 'OSD LANG' by / button ,and then press the button to enter the submenu.
4
Page 7

2) Select Video Quality Setup by using the / button, press OK to enter
the video quality setup page.
-- Video setup page --
Panel Quality
Go To Video Setup Page
a).Select 'Contrast' by using the / button, then press OK. You can adjust the
Contrast by pressing the / button.
-- Video setup page --
Brightness 00
Contrast 00
Hue 00
Saturation 00
Go To Video Setup Page
To exit 'Contrast' Setting, press OK again to return.
3) Select Password using the / button, then press the OK button to enter the
submenu.
-- Password setup page --
Password
Go To Password Setup Page
Press OK twice to enter the Password Change Page. Input the Old
Password or the Default Password, the New Password, and the Confirmed New
Password. Press OK to confirm the change.
Old Password
new Password
Confirm PWD
OK
Please Enter Old Password
5
Page 8

Note: The default password is 8888.
4).With no disc inside the player or open operation, select 'Preference Page'
using the / button, then press OK to enter the preference page.
a. Select 'Audio' using the UP/DOWN button, then press to enter
the submenu. Select the audio language you desire using the /
button, then press OK to confirm the setting. Press to return.
-- Preference Page --
Audio ENG
Subtitle Off
Disc Menu ENG
Parental
Default
Preferred Audio Language
b. Select 'Subtitle' using the / button, then press to enter the
submenu. Select the desired subtitle language or Subtitle Off using the
/ button, then press OK to confirm the setting. Press to return.
English
-- Preference Page --
Audio ENG
Subtitle Off
Disc Menu ENG
Parental
Default
Preferred Subtitle Language
c. Select 'Disc Menu' using the / button, then press to enter
the submenu. Select the Disc Menu Language you desire using the
/ button, then press OK to confirm the setting. Press to return.
Note: Language and subtitle selection are only available for discs that are
recorded in the above listed languages. If the selected language is
not available, the player will display the original recorded language
contained in the disc on the screen.
English
Off
-- Preference Page --
Audio ENG
Subtitle Off
Disc Menu ENG
Parental
Default
Preferred Menu Language
6
English
Page 9

d. Select 'Parental' using the / button, then press to enter the
submenu.
-- Preference Page --
Audio ENG
Subtitle Off
Disc Menu ENG
Parental
Default
Select the parental level you desire using the / button for discs
with lock-out function or multiple rating levels. These are listed from the
lowest level (1 Kid Safe) to the highest level (8 Adult). Press OK and
input 4 digit password, then press OK again to confirm the parental
level setting.
NOTE: The level of 8 Adult is the factory default. The parental password is 8888.
e. Select 'Default' using the / button, then press to enter the
submenu. Press OK to make the setting return to the factory-set mode.
NOTE: The parental setting is not affected by the default reset function.
Set Parental Control
1 KID SAFE
2 G
3 PG
4 PG-13
5 PG-R
6 R
7 NC-17
8 ADULT
-- Preference Page --
Audio ENG
Subtitle Off
Disc Menu ENG
Parental
Default
Set Factory Setting
To avoid the possibility of the others using the parentalpassword to
set the parental level and change the password, you can record this
parental password in another area and delete it from this manual.
Some discs can be limited depending on the age of users while some
discs cannot.
RESET
7
Page 10

I. Basic Operation
ON/OFF
OPEN
PLAY
PAUSE
STOP
( ON the remote)
( ON the remote)
( ON the remote)
( ON the remote)
OK (ON the remote)
NUMBERS
MENU
REPEAT
A-B
ANGLE
SUBTITLE
AUDIO
ZOOM
SETUP
RETURN
TITLE
SLOW
Menu
A DVD is divided into two sections called titles and chapters. When you play a
DVD, a root menu of the disc will appear on the screen of your TV or
Monitor. The contents of the menu vary from disc to disc. Press MENU
during playback to display the menu. Some DVDs only allow you to select
disc playback options using the DVD root menu.
ANGLE
During playback a disc, press 'ANGLE' to display the available angles for
discs containing multi-angles*, with the current angle number (1) and the
total number of angles (2) displaying. Press 'ANGLE' to select another
angle, then press again to exit and return to the normal viewing angle. The
angle display will disappear automatically if the 'ANGLE' button is not
pressed again within 3 seconds.
*NOTE: Not all discs contain this feature.
Turn the unit on/off
Remove/load the disc
Start Play/Execute item or setting
Still Picture
(1 time) Stop at the present playing point /
(2 times) Stop playing
Go to the next chapter, track or scene
during play back(also used for Menu
Navigation)
Go back to the previous chapter, track or
scene during playback(also used for Menu
Navigation)
Scan forward at 2, 4, 8,16 or 32 times speed
(also used for Menu Navigation)
Scan backward at 2, 4, 8, 16 or 32 times
speed (also used for Menu Navigation)
Execute item or confirm setting
Select item or setting
Display the main menu of the disc
Repeat playing title, chapter, or track
Repeat a specific portion from point A to
point B of the disc
Change the viewing angles on the scene
Select the subtitle language and turn it
on/off
Select the audio language
Enlarge an image to 2, 3, or 4 times the
original size.
Display the setup menu to select and set items,
and exit the setup menu.
To return to main menu when PBC on for
VCD;To return to root menu during DVD
playing and resume playing when in title
menu or root menu by pressing it again
Root title
Slow
8
Page 11

1/3
2
1
SUBTITLE
During disc playback press 'SUBTITLE' to select the subtitle language you
desire*, with the current Subtitle Language Number (1) and the total Number
of Subtitle Languages (2) displayed. If there are multiple languages press
'SUBTITLE' again to select another subtitle language. To turn subtitles
OFF, press the 'SUBTITLE' button until 'Subtitle Off' is displayed. The
Subtitle display will disappear automatically if the 'SUBTITLE' button is not
pressed again within 3 seconds.
Subtitle 01/02
2
1
* Some DVDs only allow access to this function through the DVD menu.
AUDIO
During playback press 'AUDIO' to select the audio language you desire*,
with the current Audio Channel Number (1) and the total number of Audio
Channels (2) displayed. Press AUDIO again to select another audio
language. The audio display will disappear automatically if the 'AUDIO'
button is not pressed within for 3 seconds.
Audio 1/2:AC3 5.1CH
2
1
* Some DVDs only allow access to this function through the DVD menu.
ZOOM
During playback press 'ZOOM' to enlarge the picture by 2x, 3x,4X, 1/2,1/3,1/4
with the current zoom multiple.(1)Press "zoom"one time ,the picture will be enlarged
9
Page 12

2X.(2)Press "zoom" at the second time ,the picture will be enlarged 3X.(3)
Press "zoom" at the 3rd time, the picture will be enlarged 4X.(4)Press "zoom"
repeatedly, the picture will zoom out, press “zoom” at the seventh time, the
picture will return to the normal size.
2X
1
A-B REPEAT
a. During playback press a first time 'A-B' to set the Starting Point A
A
b. Press 'A-B' a second time to set the Ending Point B and the player will
repeatedly play the part between Point A and Point B.
AB
C. Press A-B a third time to cancel A-B repeat and resume normal playback.
Repeat Off
10
Page 13

REPEAT
a. During playback press 'REPEAT' once to repeatedly play the current chapter.
Chapter
b. During playback press 'REPEAT' again to repeatedly play the current title.
Title
c. During playback press 'REPEAT' a 3rd time to repeat all Chapters and Titles.
All
D. Press 'REPEAT' a 4th time, to resume normal playback.
Repeat Off
11
Page 14

J. Playing Audio CDS
When playing an audio CD press the OSD button on the remote to view time information.
The options below show you what information is available using this function.
a. The current track and playing time of that track will be displayed on the screen.
Single Elapsed
Track 1/24 00:00
B. Press 'OSD' one time and Single Remain appears along with the current track playing
and the amount of time left.
Single Remain
Track 1/24 00:00
C. Press 'OSD' a 2nd time and Total Elapsed appears along with the current track playing
and the total time that the CD has been playing.
Total Elapsed
Track 1/24 00:00
D. Press 'OSD' a 3rd time and Total Remain appears along with the current track playing
and the amount of time remaining on the CD.
Total Remain
Track 1/24 00:00
E. Press 'OSD' a 4th time and " Display Off " will appear momentarily thendisappear . The
CD time Information will not be displayed.
12
Page 15

USING THE REPEAT FEATURE
The default mode for the Repeat feature is OFF. Pressing REPEAT
consecutively changes the repeat options:
o Track- repeats the track that is playing.
o All- repeats the disc that is playing.
O Off
As you toggle through the options, the repeat option changes. The selected repeat
option loops repeatedly until you turn it off.
K. Playing MP3 Discs
MP3 is a format for storing digital audio. An audio CD-quality song is compressed into the
MP3 format with very little loss of audio quality while taking up much less disc space.
CD-R /RW discs that have been encoded in MP3 format are compatible with this system.
When a MP3 disc is inserted into the unit, the menu screen appears automatically. You
can use the menu screen to select your desired folders and songs or the system plays the
songs in the order they were burned onto the disc.
1. Press the or button to choose a folder from the folder list on the left side of the
screen.
2. Press ENTER to select the highlighted folder. The songs available under the folder
will be listed.
3. Use or button to choose a song from the list. Press ENTER to select and begin
playback of the highlighted song.
USING THE REPEAT FEATURE
The default mode for the Repeat feature is OFF(Folder). Pressing REPEAT consecutively
changes the repeat options:
o Repeat One (repeat playback of a song)
o Repeat Folder (repeat playback of a specific folder)
o Repeat off
As you toggle through the options, the repeat mode changes. The selected repeat mode
loops repeatedly until you turn it off.
NOTICE
" " icon in front of a file name indicates that this is a folder, not an MP3 file.
"MP3" icon in front of a file name indicates that this is a MP3 file.
13
Page 16

L. Playing JPG files
1) Load the JPG Disc into tray.
2) The pictures will be played automatically ,press number buttons to select picture to
view. Press “ MENU” or “ STOP”, pictures will be display in thumbnail mode.
3) When you browse the JPG file, press "OSD ", there will be different refresh mode
below.
a. When "WIPE TOP" is displayed on the screen, the picture will refresh from top to
bottom.
b. When "WIPE BOTTOM" is displayed on the screen, the picture will refresh from bottom
to top.
c. When "WIPE LEFT" is displayed on the screen, the picture will refresh from left side to
right side.
d. When "WIPE RIGHT" is displayed on the screen, the picture will refresh from right side
to left side.
e. When "DIAGONAL WIPE LEFT TOP" is displayed on the screen, the picture will
refresh from left top to right bottom.
f. When "DIAGONAL WIPE RIGHT TOP" is displayed on the screen, the picture will
refresh from right top to left bottom.
g. When "DIAGONAL WIPE LEFT BOTTOM" is displayed on the screen, the picture will
refresh from left bottom to right top.
h. When "DIAGONAL WIPE RIGHT BOTTOM" is displayed on the screen, the picture will
refresh from right bottom to left top.
i. When "EXTEND FROM CENTER H" is displayed on the screen, the picture will refresh
from horizontal center to both sides.
j. When "EXTEND FROM CENTER V" is displayed on the screen, the picture will refresh
from vertical center to both sides.
k. When "COMPRESS TO CENTER H" is displayed on the screen, the picture will refresh
from top and bottom to center.
l. When "COMPRESS TO CENTER V" is displayed on the screen, the picture will refresh
from right and left to center .
m.When "WINDOW H" is displayed on the screen, the picture will refresh from four
window's top side to bottom side.
n. When "WINDOW V" is displayed on the screen, the picture will refresh from four
window's left side to right side.
o. When "WIPE FROM EDGE TO CENTER" is displayed on the screen, the picture will
refresh from 4 edges to center.
4) When previewing the file, pressing "ANGLE", "SUBTITLE", "AUDIO", "AB", "RETURN",
"SLOW” a “ ” icon will appear on the display meaning that these options are not
available.
5) Press "STOP" to browse the JPG file, "SLIDE SHOW" "MENU" will display on the
screen.
6) When browsing the picture, press "STOP" and thumbnail size picture will be displayed
. You can select the picture you desire by using the / / / /ENTER key.
14
Page 17

M. Connecting to a TV or another monitor
You can also connect the DVD player to a TV to enjoy high quality stereo sound and
picture on another monitor.
DC IN 9-12V
N. Rechargeable Battery Use
The player utilizes long-life Li polymer battery, built inside the unit, for portable power
supply. Li battery features high storage capacity and low level of degradation. This
means the battery doesn't have "Memory Effect" and thus can be recharged safely
regardless of whether the battery is fully or partially discharged. A full recharge for the
batter can be obtained in 6H, Fully recharged battery can last about 2 hours.
Precautions related to Battery Recharge
The battery can be only recharged when turning power to OFF state, and keep
continuous power supply, the red light will be on, indicating the unit is under recharging.
When it's fully charged, the light will turn green.
Using and Maintaining Rechargeable Battery
1.The normal working temperature is: 0 ~45 ;
2.Always unplug AC/DC power supply for the unit whenever not playing, unless
recharging the battery;
3.Heat will be generated during playing, it's normal, avoid long periods where the unit is
playing and unattended;
4.Avoid having the unit collide with any objects, and place away from all possible heat
sources or damp ares.
15
Page 18

O. Specifications
Compatible DISC: VCD/DVD/CD/MP3
Signal system: PAL/NTSC
Panel size: 7 inch
Frequency response: 20 Hz to 20 kHz
Video output: 1 Vp-p/75 Ohm, unbalanced
Audio output: 1.4Vrms/10kOhm
Audio S/N: Better than 80 dB
Dynamic range : Better than 85 dB
Laser: Semiconductor Laser, Wave Length: 650 nm/795 nm
Power source: DC 9-12V
Power consumption: 10 W
Operating temperature: 5~40 C
Weight : 0.791 kg
Dimensions (W x D x H): 199.6 x 160.5 x 41.5mm
Battery Type: Li Polymer
P. Troubleshooting
PROBLEM
No sound or
distorted sound
Can't advance
through a movie
The icon “ ”
appears on
screen
Picture is
distorted
No forward or
reverse scan
SOLUTION
Make sure your DVD is connected properly. Make sure
all cables are securely inserted into the
appropriate jacks.
You can't advance through the opening credits and
warning information that appears at the beginning
of movies because the disc is programmed to
prohibit that action.
The feature or action cannot be completed at this time
because:
1. The disc's software restricts it.
2. The disc's software doesn't support the feature
(e.g., angles)
3. The feature is not available at the moment.
4. You've requested a title or chapter number that is
out of range.
The disc might be damaged. Try another disc.
It is normal for some distortion to appear during
forward or reverse scan.
Some discs have sections that prohibit rapid
scanning or title and chapter skip.
If you try to skip through the warning information
and credits at the beginning of a movie, you won't be
able to. This part of the movie is often programmed
to prohibit skipping through it.
DESIGN AND SPECIFICATIONS ARE SUBJECT TO CHANGE WITHOUT NOTICE
16
 Loading...