

Page 1
DVD5091UK
USER'S MANUAL
PLEASE READ BEFORE OPERATING THIS EQUIPMENT.
Please read instructions carefully before use and retain for future reference.
Page 2

Table of Content
Important safety instructions....................................................................1-2
Precautions................................................................................................3
Remote control...........................................................................................4
Preparations Before Using.....................................................................5-10
Basic Operations..................................................................................11-17
MP3 Playback..........................................................................................18
Picture CD Operations..............................................................................19
System Setup......................................................................................20-22
About discs..........................................................................................23-24
Care and maintenance..............................................................................25
Troubleshooting........................................................................................26
Specifications...........................................................................................27
Page 3
IMPORTANT SAFETY INSTRUCTIONS
Use only with a cart, stand, tripod, bracket, or
table recommended by the manufacturer, or sold
with the product. Any mounting of the product
should follow the manufacturer’s instructions, and
The lightning flash with arrowhead
symbol within an equilateral triangle
intended to alert the user to the
presence of uninsulated dangerous voltage
within the product’s enclosure that may of
sufficient magnitude to constitute a risk of electric
shock to persons.
The exclamation point within an
equilateral triangle is intended to alert
the user to the presence of important
operating and maintenance (servicing)
instructions in the literature accompanying the
appliance.
1. READ INSTRUCTIONS - All the safety and
operating instructions should be read before the
product is operated.
2. RETAIN INSTRUCTIONS - The safety and
operating instructions should be retained for future
reference.
3. HEED WARNINGS - All warnings on the
product and in the operating instructions should
be adhered to.
4. FOLLOW INSTRUCTIONS - All operating and
use instructions should be followed.
5. CLEANING - Unplug this product from the wall
outlet before cleaning. Do not use liquid cleaners
or aerosol cleaners. Use a soft dry cloth for cleaning.
6. ATTACHMENTS - Do not use attachments not
recommended by the product manufacturer as they
may cause hazards.
7. WATER AND MOISTURE - Do not use this
product near water - for example, near a bath tub,
wash bowl, kitchen sink, or laundry tub; in a wet
basement; or near a swimming pool; and the like.
should use a mounting accessory recommended by
the manufacturer.
A Product and Cart Combination Should Be Moved
with Care - Quick stops, excessive force and uneven
surfaces may cause the product and cart combination
to overturn.
9. VENTILATION - Slots and openings in the cabinet
are provided for ventilation and to ensure reliable
operation of the product and to protect it from
overheating, and these openings must not be blocked
or covered. The openings should never be blocked
by placing the product on a bed, sofa, rug or other
similar surface. This product should not be placed in
a built-in installation, such as a bookcase or rack,
unless proper ventilation is provided or the
manufacturer’s instructions have been adhered to.
10. POWER SOURCES - This product should be
operated only from the type of power source
indicated on the marking label. If you are not sure
of the type of power supply to your home, consult a
professional electrician or local power company. For
products intended to operate from battery power,
or other sources, refer to the operating instructions.
11. POWER-CORD PROTECTION - Power supply
cords should be routed so that they are not likely to be
walked on or pinched by items placed upon or against
them, paying particular attention to cords at plugs,
convenience receptacles, and the point where exit
from the product.
-1-
8. ACCESSORIES - Do not place this product on
an unstable trolley, stand, tripod, bracket, or table.
The product may fall, causing serious injury to a
child or adult, and serious damage to the product.
Page 4
IMPORTANT SAFETY INSTRUCTIONS(CONTINUED)
-2-
12. NONUSE PERIODS - The power cord of the
product should be unplugged from the outlet when
left unused for long periods of time.
13. OUTDOOR ANTENNA GROUNDING - If an
outside antenna or cable system is connected to
the product, be sure the antenna or cable system is
grounded so as to provide some protection against
voltage surges and built-up static charges.
Below diagram provides information with regard to
proper grounding of the mast and supporting structure,
grounding of the lead-in wire to an antenna
discharge unit, size of grounding conductors,
location of antenna-discharge unit, connection to
grounding electrodes, and requirements for the g
rounding electrode. See Figure 1.
EXAMPLE OF ANTENNA GROUNDING
GROUND
CLAMP
ELECTRIC
SERVICE
SQUIPMENT
ANTENNA
LEAD WIRE
ANTENNA DISCHARGE UNT
GROUNDING CONDUCTORS
GROUD CLAMP
POWER SERVICE GROUNDING
ELECTRODE SYSTEM
14. LIGHTNING - For added protection for this
product during a lightning storm, or when it is left
unattended and unused for long periods of time,
unplug it from the wall outlet and disconnect the
antenna or cable system. This will prevent damage
to the product due to lightning and power-line surges.
15. POWER LINES - An outside antenna system
should not be located in the vicinity of overhead
power lines or other electric light or power circuits,
or where it can fall into such power lines or other
electric light or power circuits. When installing an
outside antenna system, extreme care should be
taken to keep from touching power lines or circuits
as contact with them might be fatal.
16. OVERLOADING - Do not overload wall outlets,
extension cords, or integral convenience receptacles
a s this can result in a risk of fire or electric shock.
17. OBJECT AND LIQUID ENTRY - Never push
objects of any kind into this product through
openings as they may touch dangerous voltage
points or short-out parts that could result in a fire or
electric shock. Never spill liquid of any kind on the
product.
18. SERVICING - Do not attempt to service this
product yourself as opening or removing covers may
expose you to dangerous voltage or other hazards.
Refer all servicing to qualified service personnel.
19. DAMAGES REQUIRING SERVICE Unplug this product from the wall outlet and refer
servicing to qualified service personnel under the
following conditions.
a) When the power-supply cord or plug is damaged.
b) If liquid has been spilled, or objects have fallen
into the product.
c) If the product has been exposed to rain or water.
d) If the product does not operate normally by
following the operating instructions. Adjust only
those controls that are covered by the operating
instructions as an improving adjustment of other
controls may result in damage and will often
require extensive work by a qualified technician
to restore the product to its normal operation.
e) When the product exhibits a distinct change in
performance - this indicates a need for service.
20. REPLACEMENT PARTS - When replacement
parts are required, be sure the service technician
has used replacement parts specified by the
manufacturer or have the same characteristics as
the original part, Unauthorized substitutions may
result in fire, electric shock or other hazards.
21. SAFETY CHECK - Upon completion of any
service or repair to this product, ask the service
technician to perform safety checks to determine
that the product is in proper operating condition.
22. HEAT - The product should be situated away
from heat sources such as radiators, heat registers,
stoves or other products (including amplifiers) that
produce heat.
23. Keep minimum distances (5cm) around the apparatus
for sufficient ventilation.
24. The ventilation should not be impeded by covering the
rear panel for ventilation with items, such as newspapers,
table-cloths, curtains, etc.
25. No naked flame sources, such as lighted candles,
should be placed on the apparatus.
26. Don’t use the apparatus in tropical climates.
27. Where the mains plug is used as the disconnect
device, the disconnect device shall remain readily
operable.
28. The apparatus shall not be exposed to dripping or
splashing and that no objects filled with liquids, such as
vases, shall be placed on the apparatus.
29. Attention should be drawn to the environmental
aspects of battery disposal. Don’t throw used batteries
in dustbin. Please contact your retailer in order to
protect the environment.
Page 5

PRECAUTIONS
-3-
NOTES ON HANDLING:
When shipping the DVD player, always use the
original shipping carton and packing materials.
For maximum protection, repack the unit as it
was originally packed at the factory.
Do not use volatile liquids, such as insect spray,
near the DVD player . Do not leave rubber
or plastic products in contact with the DVD player
for a long time. They will leave marks on the finish.
The top and rear panels of the DVD player
may become warm after a long period of use.
This is normal and not a malfunction.
When the DVD player is not in use, be sure
to remove the disc and turn off the power.
If you do not use the DVD player for a long period,
the unit may not function properly in the future.
Turn on and use the DVD player occasionally.
NOTES ON LOCATING THE DVD PLAYER:
When you place this DVD player near a TV, radio
or VCR, the playback picture may become poor
and the sound may be distorted. In this case, move
the DVD player away from the TV, radio or VCR.
NOTES ON CLEANING:
Use a soft, dry cloth for cleaning
For stubborn dirt, soak the cloth in a weak
detergent solution, wring well and wipe. Use a
dry cloth to wipe it dry. Do not use any type
of solvent, such as thinner and benzene, as they
may damage the surface of the DVD player.
If you use a chemical-saturated cloth to clean
the unit, follow that product's instructions.
Warning: Cleaning and adjustment of lenses and /or
other components of playback mechanism should be
performed by a qualified service technician.
TO OBTAIN A CLEAR PICTURE:
The DVD player is a high technology, precision device,
If the optical pick-up lens and disc drive parts are
dirty or worn down, the picture quality becomes poor. To
obtain a clear picture, we recommend regular inspection
and maintenance (cleaning or parts replacement) every
1,000 hours of use depend ing on the opera ting
environment. For details, contact your nearest dealer.
NOTES ON MOISTURE CONDENSATION:
Moisture condensation damages the DVD player.
Please read the following carefully.
Moisture condensation occurs, for example, when you
pour a cold drink into a glass on a warm day. Drops
of water form on the outside of the glass. In the same
way, moisture may condense on the optical pick-up
lens inside this unit, one of the most crucial internal
parts of the DVD player.
Moisture condensation occurs during the
following cases:
When you bring the DVD player directly from a cold
place to a warm place.
When you use the DVD player in a room where you
just turned on the heater, or a place where the cold
wind from the air conditioner directly hits the unit.
In summer, when you use the DVD player in a hot
and humid place just after you moved the unit from
an air conditioned room.
When you use the DVD player in a humid place.
Do not use the DVD player when moisture
condensation may occur.
If you use the DVD player in such a situation,
it may damage discs and internal parts. Remove
the disc, connect the power cord of the DVD
player to the wall outlet, turn on the DVD player and
leave it ON for two or three hours. After two or
three hours, the DVD player will have warmed up
and evaporated any moisture. Keep the DVD player
connected to the wall outlet and moisture
condensation will seldom occur.
Page 6
REMOTE CONTROL
-4-
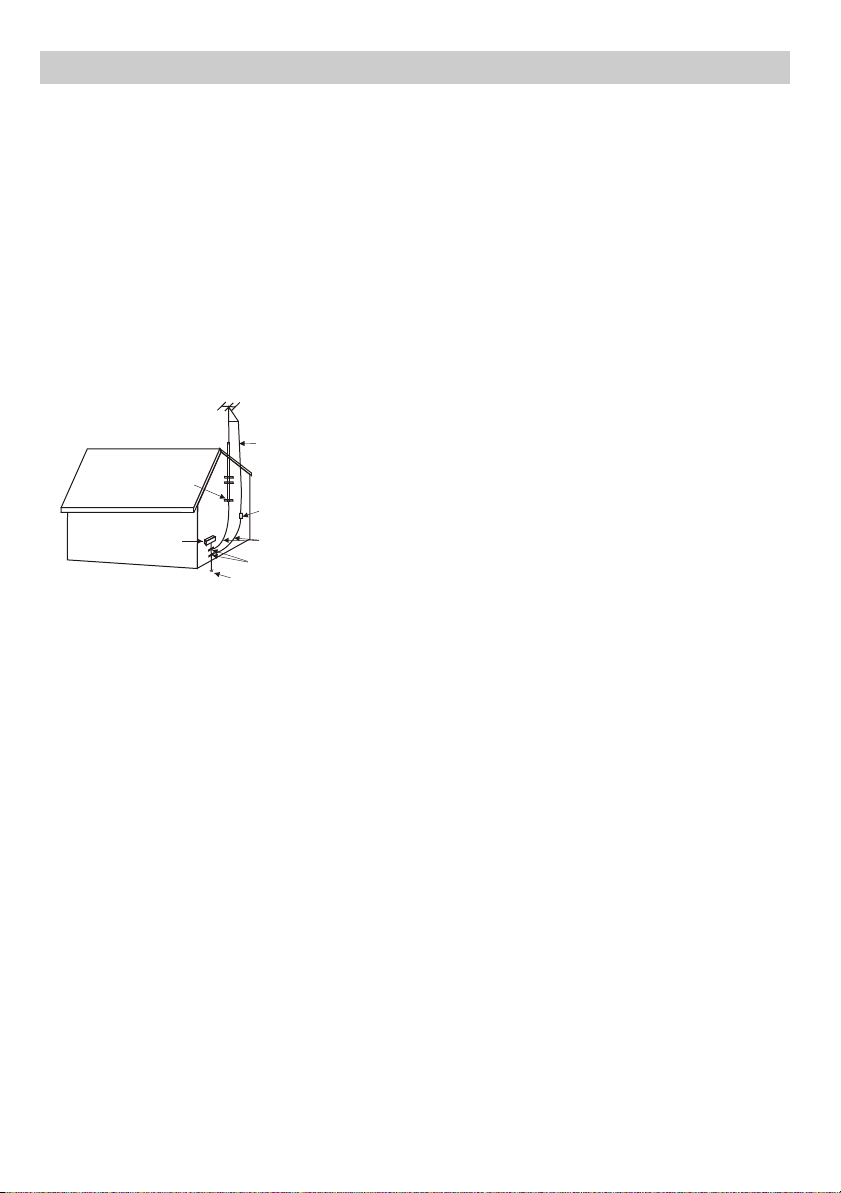
Loading batteries to the remote control
Remove the battery compartment cover.
A
AA
AA
A
Load two AAA batteries into the battery compartment.
Make sure that the batteries have been inserted
in the correct polarities matching to the symbols
+, - marked in the battery compartment. Close
the battery compartment cover.
When replacing batteries, replace both batteries.
Do not mix new and used batteries operating
together, otherwise, the operation lifetime will
be much shorter than normal.
Remove the batteries if the unit will not be used
for a long period of time.
BATTERY PRECAUTIONS
Follow these precautions when using batteries in this device:
1. Use only the size and type of batteries specified.
2. Be sure to follow the correct polarity when installing the
batteries as indicated next to the battery compartment.
Reversed batteries may cause damage to the device.
3. Do not mix different types of batteries together
(e.g. Alkaline, Rechargeable and Carbon-zinc)
or old batteries with fresh ones.
4. If the device is not to be used for a long period of time,
remove the batteries to prevent damage or injury from
possible battery leakage.
5. Do not try to recharge batteries not intended to be recharged;
they can overheat and rupture.
(Follow battery manufacturer`s directions.)
6. Do not dispose of batteries in fire, batteries may explode or leak.
AAA
A
AA
Remark: Batteries (battery pack or batteries installed) shall not be exposed to excessive
heat such as sunshine, fire or the like.
Page 7
Preparations Before Using
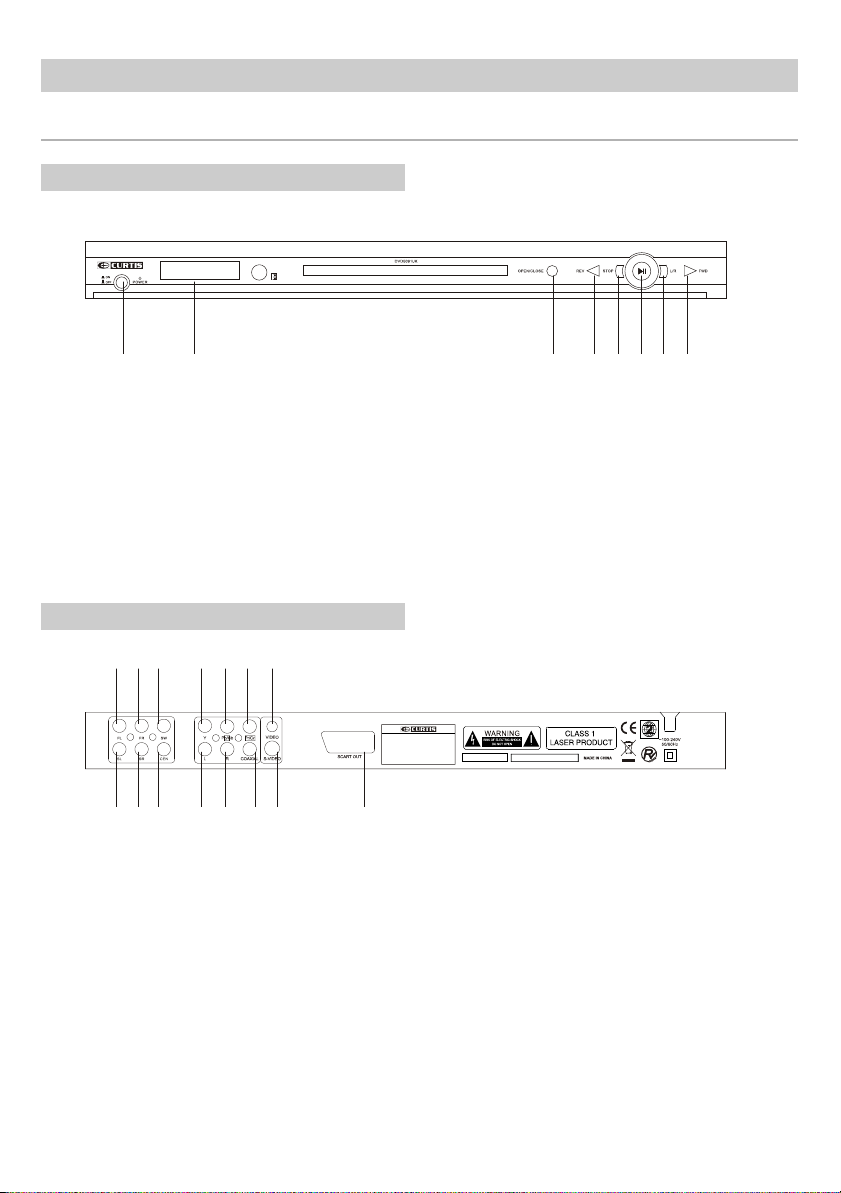
Rear panel/Front panel
FRONT PANEL INFORMATION
-5-
1 2
1.POWER
2.VFD DISPLAY
3.OPEN/CLOSE
6.PLAY/PAUSE
7.L/R
8.FWD
4.REV
5.STOP
REAR PANEL INFORMATION
9 10 11 12 13 14 15
DVD PLAYER
MODEL NO.:DVD5091UK
~100-240V 50/60Hz
POWER:10W
1 2 3 4 5 6 7 8
1. 5.1-channel surround left-channel output
2. 5.1-channel surround right-channel output
3. 5.1-channel center-channel output
4. Left audio output
5. Right audio output
COAXIAL
6. output
7. S-VIDEO output
Scart output(option)
8.
3 4 5 6 7 8
9. 5.1-channel front left-channel output
10. 5.1-channel front right-channel output
11. 5.1-channel sub output
12. Component Y output
13. Component Pb/Cb output
14. Component Pr/Cr output
15. Component VIDEO output
Page 8

FUNCTIONS EXPLANATION
1.FRONT panel:
Power LED
Power LED
-6-
Front view of woofer
DVD5091UK
Rear panel
2.Rear panel:
(1).Audio input(5.1 CH)
(2).Loudspeaker output
(3).Power on-off
(4).AC power supply line input
(5).2CH/5.1CH change switch
(1)
(5)
(2)
(3)
(4)
Page 9
Preparations Before Using
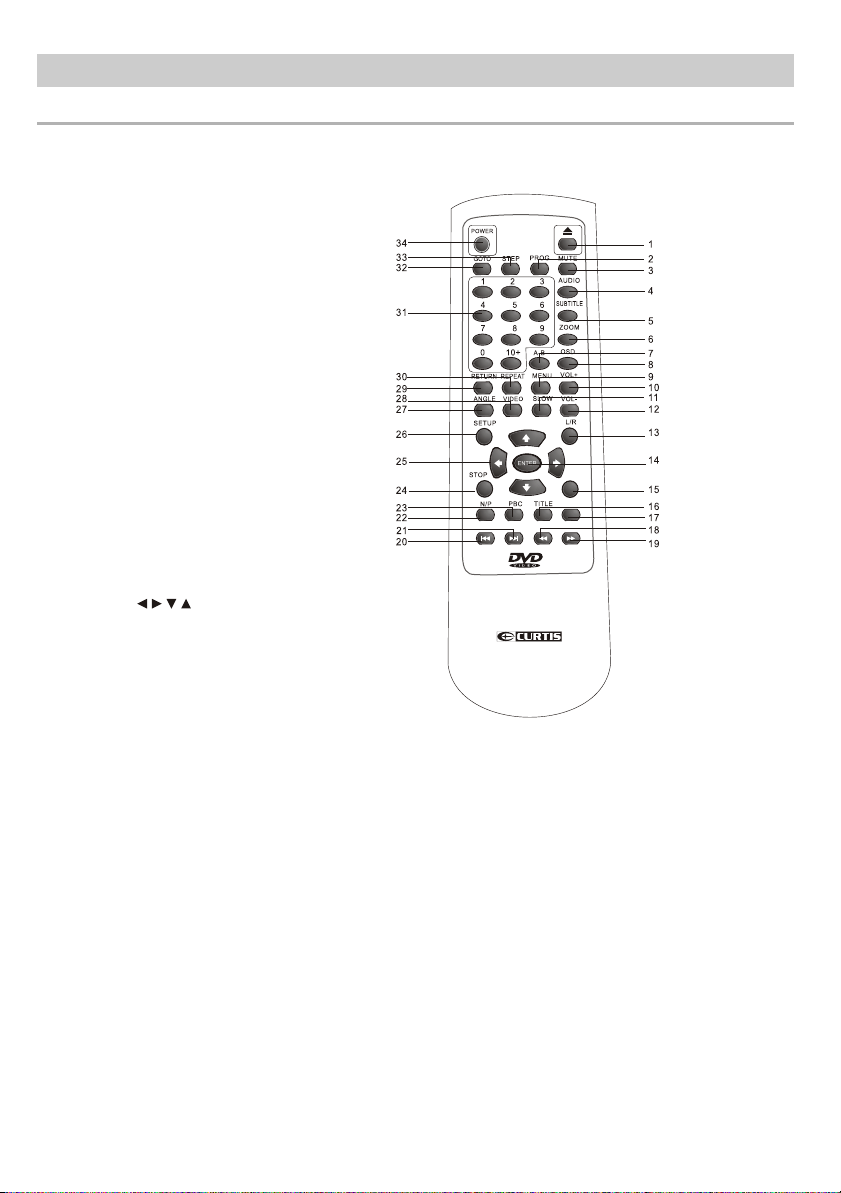
Remote control
1. OPEN/CLOSE button
2. Program button
3. Mute button
4. Audio button
5. Subtitle button
6. Zoom button
7. A-B button
8. OSD button
9. Menu button
10. VOL+ button
11. Slow button
12. VOL- button
13. L/R button
14. Enter button
15. Play button
16. Title button
17. Pause button
18. Fast reverse button
19. Fast forward button
20. Prev button
21. Next button
22. N/P button
23. PBC button
24. Stop button
25. button
26. Setup button
27. Angle button
28. Video button
29. Return button
30. Repeat button
31. Number (0-9) button
32. GO TO button
33. Step button
34. Power button
-7-
PLAY
PAUSE
DVD5091UK
Note:
The same buttons on remote control and front panel have identical functions.
Page 10

FL FR SW
SL SR CEN
Y Pb/Cb Pr/Cr
L R COAXIAL S-VIDEO
-8-
Scart cable
VIDEO
Page 11

FUNCTIONS EXPLANATION
-9-
FL FR SW
SL SR CEN
FR
Y Pb/Cb Pr/Cr
L R COAXIAL S-VIDEO
VIDEO
FL
SR
Power requirement : AC 230V~50Hz
Power consumption : 45W
Subwoofer Dimension : W150mm x H230mm x D210mm
Satellite speaker Dimension : W95mm x H125mm x D106mm
Power out(R.M.S):
Subwoofer : 15W
Satellite speaker : 2Wx5
CEN
SL
Page 12

Preparations Before Using
Connections-Connecting to TV using S-Video cable(Not Supplied)
Normally, the TV set will
be built-in one or more
S-Video input socket.
FL FR SW Pr/Cr
Use the S-Video cable
to connect between the
DVD player and the TV
correctly. Make sure
plug the plugs hardly.
Please read your TV`s
instruction manual
carefully about how to
use S-Video.
S-VIDEO Output
TV Set
Remarks:
Please refer to TV operation manual at the same time. This DVD player can output
multi audio/video signals such as 2 channel audio(downmix)output,S-Video
output, Component video output, coaxial digital signal output. You can choose any
of these options when connecting up your system to a suitable TV.
Y Pb/Cb
L RSL SR CEN
-10-
VIDEO
COAXIAL S-VIDEO
NOTE: Both the power of the TV and the DVD player should be OFF when making
the appropriate connections. If the TV has a S-Video input, it can be connected to
the DVD player by S-Video cable (not included ). The DVD player should be
connected to your TV set directly. If it is connected to a VCR player or other
similar equipment, the video/picture may be distorted because DVD discs
may have copy protection.
Page 13

Basic Operations
TV System Setting
-11-
Volume Control
To set up the DVD player output TV
system according to the connected TV
set, When playing DVD and CD discs:
If the TV set is NTSC, press P/N
button, TV screen shows:
NTSC
If the TV set supports both TV
system, i.e. Auto-system,select
AUTO by pressing P/N button again,
TV screen shows;
AUTO
If the TV set is PAL, press P/N
button once more, the TV screen
shows:
PAL
Play/Pause
Press (VOLUME) button on the
remote control to adjust the master
volume of the system. All of the 2
channels volume will be adjusted at
the same time.
VOL+ VOL-
To decrease the master volume
press button.
VOL-
To increase the master volume
press button.
VOL+
Press MUTE button to mute the
audio output. TV screen will show:
MUTE
To cancel mute function, press
MUTE button again.
When playing DVD and CD discs.
When PLAY/PAUSE button is pressed
for the first time, play will be stopped
temporary.
Press PLAY/PAUSE button to release
pause state and resume playing.
Page 14

Advanced Operations
Menu play for DVD discs
-12-
Menu play for DVD discs
When playing DVD discs, some discs
contain title menus or chapter menus,
press PBC button to access this
feature.
The TV screen will show menu picture
and use buttons to scroll. To
confirm selection, press ENTER button.
Menu 1
2
3
11
For example: To select the 13 song
Menu
12
13
14
15
Alternatively, you can also select
directly by using the numeric
buttons
For example: To select the 13 song.
Menu 1
2
3
11
Direct select by numeric button:
10+ 3
Press to enter into the desired
page.
Press ENTER button to select and
start playing.
Press TITLE button to return to title
menu if there is a title menu.
Press PBC button to return to the
root menu.
Audio CD disc track selection
Load an audio CD, upon reading the
disc;you can select/play songs with
numeric button. If the track number is
less than 10, press numeric button 1
9 to select.
For example: To select the 8 song
press number button 008.The TV
screen will show.
008
008/018
To select song number beyond 10.
Followed by the number 0-9.
For example: To select the 12th
song press 0,1,2.
The TV screen will show:
012
012/018
Page 15

Advanced Operations
Fast Forward&Fast Backward
-13-
Slow Motion
When playing DVD and other discs.
Press button to e nter fast forward
mode. There are 5 different speeds
available and depends on how many
time of the button pressed.
2X
4X
8X
16X
32X
Play
Pressing button will enter fast
rewind mode. Select fast rewind
speed by pressing the button.
2X
4X
8X
16X
32X
Play
To resume to normal play modem,
press ENTER or PLAY/PAUSE
button.
When playing video discs, press
SLOW button to play video in slow
motion. By pressing the SLOW button
1-4 times, video is played in slow
motion forward in different speed.
(SLOW)
1/2
1/
4
1/8
1/16
Play
Press ENTER or PLAY/PAUSE button
to resume normal play at any speed.
Track or Chapter skip
When playing a DVD disc, press the
button to skip to the pervious
chapter, When other types of disc
played, press this button to skip to
previous track.
When playing a DVD disc, press the
button to skip to the next
chapter. When other types of disc
played, press this button to skip to
next track.
Note: Whether this function works
depends on the disc type in used.
Page 16

Advanced Operations
Repeat
-14-
When playing DVD discs, the player
can play a specified title, chapter,
track or other content repeatedly or
repeat the whole disc or repeat play
from point A to point B
For DVD Disc
Chapter Repeat
Press REPEAT button once, to
repeat the current chapter:
Chapter
Title Repeat
Press REPEAT button twice, to
repeat the current title:
Title
Disc Repeat
Press REPEAT button 3 times, to
repeat the whole disc:
All
To cancel repeat function press
REPEAT button for the 4 time.
Repeat-All
Press REPEAT button again to
repeat the entire discs:
All
Repeat off
Press REPEAT button again to
cancel the repeat function.
Repeat A-B
When playing a disc, you can
repeatedly play the desired part
with repeat A-B function.
Set point A:
Set the repeat play starting point A
by pressing A-B button:
A
Set point B:
Set the repeat play ending point B
by pressing A-B button again:
For disc type other than DVD.
Repeat-One
Press REPEAT button to repeat a
single track.
Track
AB
Then the player will repeatedly play the
part between points A to B.
Cancel A-B repeated play, press A-B
button again.
Page 17

Advanced Operations
Memoried Play
-15-
Angle Selection
This player can memorize the last stop
point and play form this point onwards
when ENTER button is pressed again
When playing, press STOP/RETURN
button once to stop playback. The player
will memorize the current point. In this
state, Press ENTER button to resume
play from that point.
Press STOP/RETURN button twice will
clear the memory that if play is
resumed, the disc will be played
from the beginning.
Sound Channel Selection
When playing DVD discs, the AUDIO
button is used to select the desired
audio channel. This is only applicable if
the disc has a different audio channel
function incorporated.
Example: Press the AUDIO button
to select an optional dialog
language.(Only for reference)
Press AUDIO button first time for
English dialog, press it again to
select French Dialog, press this
button once more to select Spanish
dialog etc.
Audio 1/ 4 :AC-35.1CH English
Audio 2/ 4 :AC-3 2 CH French
Audio 3/ 4 :AC-3 2 CH Spanish
Some DVD discs have multi angle
views, which allows you to view from
different screen or camera angles.
You can select a different viewing
angle with the ANGLE button.
For example: There are 4 angles
recorded on the DVD disc.
Press ANGLE button to select first
angle.
1/ 4
Select other angles by pressing
ANGLE button repeatedly. The screen
will be shown in sequence as:
2/ 4
3/
4/ 44
Note: It is suggested that the angle
mark display function set to ON in
system setting so that when multiangle available, an angle make OSD
is displayed on the TV screen.
1/ 4
Audio 4/ 4 :AC-3 2 CH unknown
Refer to DVD setup menu for details.
Page 18

Advanced Operations
Select Subtitle Language OSD-On Screen Display
-16-
When playing a DVD disc with multi
subtitles, you can choose a desired
subtitle with the SUB-Tbutton:
For example: There are 3 different
language subtitles available on the
DVD disc.
Press the SUB-T button repeatedly
to select a subtitle with desired
language as shown on the TV screen.
Subtitle 01/03: French
To disable subtitle display, press
SUB-T button repeatedly until
Subtitle off is shown on TV screen.
Remarks:
The function of subtitle is only
available for discs with multi
subtitles. The subtitle language
varies as per discs.
OSD can be displayed to check the
playing time and remaining time for
each title/chapter/track.Also,it can
display the remaining time for the
whole discs.
For DVD discs
Press OSD button once, the screen
will show the elapsed time for the
current title.
TITLE ELAPSED
TT:02/02 CH:02/12
0:51:45
Press OSD button twice, the screen
will show the remaining time for
title.
TITLE ELAPSED
TT:02/02 CH:02/12
0:51:45
Press the OSD button for the third
time, the screen will show the
elapsed time for the current chapter.
Press the OSD button for the fourth
time, the screen will show the
remaining time for the current
chapter.
Press the OSD button for the fifth
time; the on-screen-display will be
turned off.
Page 19

Advanced Operations
OSD-On Screen Display
For VCD discs
Press OSD button, The TV screen
shows the elapsed time of the
current track.
-17-
Zoom
The feature is used to zoom in the
motion picture or still images when
playing Video Discs.
Single Eleasped
Track 01/15
0:02:33
Press the OSD button twice, the
screen shows the remaining time
of the current track.
Single Remain
Track 01/15
0:00:41
Press OSD button third times,
the screen shows the total elapsed
time of the current disc.
Press OSD button fourth
times, the screen shows the total
remaining time of the current disc.
Press the OSD button fifth times;
the on-screen-display will be
turned off.
There are 3 levels of Zoom in mode.
Press ZOOM button repeatedly
to choose.
2X
3X
4X
When picture zoomed in, you can use
arrow buttons to s hift and pan to
display the part you want to view.
To return to normal size. Press
ZOOM button repeatedly until
picture become to normal
Program play
Press the PROG (Program) button,the Program
menu will appear on the screen.Select the
1 for first track to be played back using
the direction buttons( , , , ).Enter the
desired track number by press Number
Buttons(0-9).
title,first ENTER the title number by press
Number Buttons(0-9),then enter the desired
chapler number.By press Number buttons
(0-9). until all
desired chapters have been programmed.
You can repeat more than once if desired.
To program more than 10 programs,scroll
to the Next at the bottom right of the screen
and press the ENTER Button.To play,scroll to
to START then press the ENTER button.
Playback will begin on the first track that you
Programmed and the player will continue to
play all of the programmed tracks.Press the
STOP button to stop programmed play.
When the DVD DISC has multi-
Repeat the same procedure
Page 20

Mp3 Playback
-18-
The DVD Player can Playback the
following discs:
CD, CD-R CD-RW,DVD-R,
DVD-RW,DVD+R or DVD+RW
recorded with Mp3 audio files.
Multiple and multi-level directories
are supported.
Upon loading an Mp3 disc, the
screen shows a menu as:
00:00 00:00
00 :002
\Mp3\
Mp3
02-08-22
Mp3
02-08-23
Mp3
02-08-24
Mp3
02-08-25
Mp3
02-08-26
To go to a preferred directory, use
the arrow keys to scroll to
your selection and then press
ENTER key to confirm.
Use the arrow keys to select
song and press ENTER button to
start playing.
Play mode:
There are four play modes available,
when playing, press REPEAT button
to choose the Mp3 play mode:
SINGLE
Play one file of current directory once.
REPEAT ONE
Play the selected file repeatedly.
REPEAT FOLDER
All file in the selected folder will be
played repeatedly.
FOLDER
All files in selected folder will be
played only once.
Other Functions
Functions such as MUTE, VOLUME,
PAUSE, PREVIOUS, NEXT etc. are
also available for Mp3 discs and their
function same as playing audio C
Ds
Press left arrow button can return
to the parent directory, you can
then select other directory.
Page 21

Picture CD Operations
Playing Kodak Picture CD or JPEG files
The DVD player is compatible to
Kodak Picture CD and discs
containing JPEG image files (with
.JPEG file extension).This function is
similar to MP3 playback function.
Upon loading a Kodak Picture CD or
disc containing JPEG files, TV screen
shows:
00:00 00:00
001 :005
\JPEG01\
A001
A002
A003
A004
A005
Operations
Picture selection
Press arrow buttons to select the
target picture and press ENTER button
to show.
-19-
Previous and Next selection
You can press button to show
previous picture or button to
show next picture manually.
When playing, press STOP/RETURN
button to stop and return to menu
interface .Press the left arrow button to
return to root directory.
Page 22

System Setup
General setup
-20-
Press SETUP button and enter into
the general setup menu
TV Shape
Osd Lang
HDCD
Last Memory
Spanish
French
German
Portugal
1X
Off
1X
2X
Off
On
Off
Press the move , , or button
to move the cursor as desire. Press
ENTER button to confirmed the selection
TV Display
NORMAL/PS(Pan Scan)
Select this option when the player is
connected to a standard 4:3 aspect
ratio TV set. 16:9 Wide screen
source picture shown on the screen
with some part cut off automatically.
NORMAL/LB(Letter Box)
Angle Mark
Select ON option, when the playing
DVD disc having multi-angle option
available, an angle mark will be
shown on the TV screen.
Select OFF option, NO angle mark
will be show on the screen when
multi-angle option available.
OSD Language
To select the On-Screen-Display
language.
Captions
ON: To display captions on TV
Screen when available.
OFF: To disable captions display.
NOTE: Only when the TV set supports
captions display that the feature can
function well.
Screen saver
When there is no activity of the player
for about 3-4 minute, screen saver will
be displayed to prevent potential
damage to the TV screen.
ON: To activate screen saver.
OFF: To disable screen saver
Select this option when the player is
connected to a standard 4:3 aspect
ratio TV set. The full 16:9 wide
screen pictures will show on the
screen, with black bars on the top
and bottom.
WIDE
Select this option when the player is
connected to a wide screen TV set.
If Hdcd is selected,press the direction button
( )to enter.Press the direction buttons( )
to select Off,x1 or x2 as desire then press the
enter button to confirm your selections.Press
the SET UP button to save the setting and exit.
This setting only activate while HDCD CD playing.
Page 23

System Setup
Audio Setup
The setup structure is as below:
--Speaker Setup Page-Downmix LT/RT
Stereo
5.1CH
Front speaker Large
Small
Center speaker Large
Small
off
Rear speaker Large
Small
off
Subwoofer
Note:The DVD player will change subwoofer to
off when play Mp4 disc.You must reset the subwoofer
to ON when play DVD VCD CD or Mp3.
--Spdif Setup Page--
DIGITAL OUT
DOWNMIX:
LT/RT: Select this option when the
DVD player is connect to external
amplifier with Pro-Logic decoding
function.
STEREO: Select this option when
you want to use only the front-left
& front-right speakers with normal
sound effect.
Dolby Digital Setup
Dual Mono Stereo
L-Mono
R-Mono
MIX-Mono
DYNAMIC
Dual Mono
Stereo: The player will output Left
Channel and Right channel audio.
L-Mono: The player will output left
channel audio only from the 2 front
channels.
R-Mono: The player will output right
channel audio only from the 2 front
channels.
MIXMono: The player will output
the average signal of the mixed Left
channel and Right channel audio
from the 2 front channels.
on
off
--Dolby Digital Setup--
FULL
3/4
1/1/2
4
OFF
-21-
Dynamic
This is to setup the Dynamic
compression ration. Press right
arrow button to enter the setup
column; adjust the rate of the
dynamic range by pressing up or
down arrow button, Default setting
is full.
Video Setup
Output Mode
Video Output
This menu is to set the component
video output format.
Off: Is to disable component video
output. DVD player will output
Video signal and S-Video signal
only
YUV: Is to set component video
output format in Y-Cb-Cr for
interlaced scan mode or Y-Pb-Pr for
progressive scan mode.
Sharpness Brightness Contrast
Set to different values according to
the connected TV set and the video
source to get best picture quality or
your liking.
To change values, scroll to the item
and press ENTER button to enter,
and change setting values with
left/right button, press ENTER button
to confirm new value and return to
the setup menu parent page.
RGB
OFF
YUV
RGB
Page 24

System Setup
Preference Page
--Preference Page--
TV type PAL PAL
Auto
NTSC
Audio ENG English
French
Spanish
Chinese
Japanese
Korea
Russian
Thai
Subtitle ENG English
French
Spanish
Chinese
Japanese
Korea
Russian
Disc Menu ENG English
French
Spanish
Chinese
Japanese
Russian
Thai
Others
Parental 1 KID SAF
2 G
3 PG
4 PG 13
5 PGR
6 R
7 NC 17
8 ADULT
Password Change
Default Reset
TV TYPE
The output TV system can be set to
PAL, MULTI or NTSC.
Others
Thai
Off
Others
-22-
SUBTITLE
Choose the default language you
would prefer to for movie subtitles or
select OFF all DVD offer subtitles in
multiple languages.
DISC MENU
Choose the default language you
would prefer to for disc menu.
PARENTAL CONTROL
Allows the user to set a maximum rating
of movie that can be played(e.g.PG
rating).Movies rated higher than the
level set will not be played. The parental
lock can only be changed after input the
correct password.
Note: This function is available only when
the discs have rating encoded on.
CHANGE THE RATING
1.Press UP or DOWN button to select the
desire level.
2.Press ENTER button to confirm.
3.Input parental control password. The
factory setting of the password is:
136900 .
4.Press ENTER button to active the new
setting.
Password
To changed the password, you need to:
1.Input old password.
2.Input a 4-digit new password.
3.Input the new password again to
confirm.
Note: If you forget the old password,
you can always use the factory setting
password 136900.
Default
To restore all setup parameters to the
factory settings EXCEPT the
password.
This function available in stop state
or tray opened.
AUDIO
Choose the default language you
would prefer to for DVD titles.
Note: Not all DVD discs are recorded
with multiple languages.
Page 25

ABOUT DISCS
-23-
The region number for this DVD Player is:
See the following page for information regarding region numbers.
PLAYABLE DISCS:
The following discs can be played back on this DVD player:
VIDEO CD
MP3
When playing an MP3,the TV screen will list the folders/tracks.
MP3 is the abbreviation of MPEG 1 Audio Layer 3. MPEG Audio is a format
that compresses the audio portion only.
IMPORTANT NOTES:
Due to many variables, including recording condition , type of disc ,
writing software , etc., this unit does not guarantee playback of all MP3 discs .
DISC TYPES:
DVD
Data on most DVDs is divided into sections called titles
and then into subsections called chapters, each of which
is giver a title or chapter number. Some features of this
DVD player will not operate with some DVD discs as they
are preset. If a function you selected does not run as
desired , refer to the manual accompanying the DVD disc.
DIGITAL VIDEO DIGITAL AUDIO
Chapter 1 Chapter 2 Chapter 3 Chapter 4 Chapter 5 Chapter 6
KODAK PICTURE CD
Title 1
2
Title 2
AUDIO CD
Data on an audio CD is divided into sections called tracks ,
each of which is given a track number.
KODAK PICTURE CD
Data on a Kodak picture CD is usually not divided into
separate folders , they should appear in the root directory.
IMPORTANT:
It is important that you read the manual that accompanies the DVD disc , as there are
features that are on the DVD player that cannot be used with certain DVDs .
There are also extra features on the DVD disc that are different for each DVD disc ,
so they are not explained in this owner's manual.
This player conforms to the NTSC and PAL color systems . However , if you are in
the USA , leave this setting on NTSC . If incorrectly set to PAL ,the TV picture will
roll vertically. In this case , simply turn the DVD off , and then back on .
Track 1 Track 2 Track 3 Track 4 Track 5 Track 6
Page 26

ABOUT DISCS(CONTINUED)
-24-
Notes on Copyright:
It is forbidden by law to copy, broadcast, show, broadcast on cable, play in public and rent copyrighted
material without permission. DVD video discs are copy protected, and any recordings made from these
discs will be distorted. This product incorporates copyright protection technology that is protected by
method claims of certain U.S. Patents and other intellectual property rights owned by Macrovision
Macrovision Corporation, and is intended for home and other limited viewing uses only, unless
otherwise authorized by Macrovision Corporation. Reverse engineering or disassembly is prohibited.
Region Management Information:
This DVD Player is designed and manufactured to respond to the Region Management Information that
is recorded on a DVD disc. If the Region number described on the DVD disc does not correspond to
the Region number of this DVD player, this DVD player cannot play that disc. You may not be able to
play back some DVD video discs on this player if they were purchased from outside your geographic
area or made for business purposes. When you try to play back an unauthorized disc, Wrong Region
appears on the TV screen.
Discs Compatibility
Some DVD discs may have special
requirements for playing, with
which this player may not be
compatible. Please refer to
specifications on individual disc.
Discs types
This DVD player can play the
types of discs as the list on above: Discs other
than the above list cannot be play by this player.
This player uses NTSC/PAL color
system. It cannot play discs recorded
with other systems, such as SECAM.
Page 27

CARE AND MAINTENANCE
Caring for Discs
Treat the disc carefully. Handle the disc only by its edges.
Never allow your fingers to contact with the shiny, unprinted
side of the disc.
Do not attach adhesive tape, stickers, etc. to the disc label.
Clean the disc periodically with a soft, lint-free,dry cloth,
Never use detergents or abrasive cleaners to clean the disc.
If necessary, use a CD cleaning kit.
If a disc skips or gets stuck on a section of the disc,
it is probably dirty or damaged(scratched).
When cleaning the disc, wipe in straight lines from the center
of the disc to the outer edge of the disc. Never wipe in
circular motions.
CLEANER
BENZENE
-25-
Discs should be stored in their cases after each use to avoid damage.
Do not expose discs to direct sunlight, high temperatures or dust, etc.
Prolonged exposure or extreme temperatures con warp the disc.
Do not stick or write anything on either side of the disc. Sharp writing
Instruments, or the ink, may damage the surface.
Cleaning the Unit
To prevent fire or shock hazard, disconnect your unit from the
AC power source when cleaning.
The finish on your unit may be cleaned with a dust cloth and
cared for as other furniture. Use caution when cleaning and
wiping the plastic parts.
Mild soap and a damp cloth may be used on the front panel.
Page 28

Troubleshooting
Problems and Solutions
-26-
Problems
No power
indication
No picture
No sound
Picture distortion
Brightness
unstable or noisy
The player does
not work
No response to
button press
Remote control
does not work
Cause
Power plug not connected
TV has not been set to the correct
video input
Video cable not firmly connected.
Audio cable not connected tightly
Power of audio apparatus is off
Audio output setting is incorrect
Disc is dirty
Fast forward/backward is activated
Affected by anti-piracy circuit
No disc
Disc not compatible
The disc is placed upside down
The disc not put in the tray correctly
Disc is dirty
Player setting are incorrect
Parental lock is in effect
Interference of power wave or other
factors such as static interference
The remote control not pointed at the
remote sensor on the front panel of
the player
The remote control is out of specified
range
Battery power exhausted
Solution
Plug the power cord into the power supply
Set correct TV video input format for receiving
the player`s output signals.
Firmly insert the video cable ends to the
related terminals.
Firmly insert the audio cable ends to the
related terminals.
Turn on the power of audio apparatus.
Setup audio output correctly via the setup
menu.
Take out the disc and clean.
The picture may be distorted during
fast-forward/backward playback.
Connect the player directly to TV.
Load a disc.
Load a compatible disc(Check the disc format
and its color system.)
Replace the disc with label side face up
Put the disc in correctly
Clean the disc.
Change the setting via the setup menu.
Disable this function or reset the rating level.
Turn off the main switch or pull out the power
plug. plug in and turn on the power again.
Point the remote control at the remote sensor.
Make sure the remote control range within 7
meters to the remote sensor.
Replace with new batteries.
Page 29

Specifications
-27-
DVD PLAYER/OUTPUT/ACCESSORIES
DVD PLAYER:
Power supply ~100-240V 50/60Hz
Watts 10 W
Weight 3.6 LBS
Dimension 12.6x1.5x9 (INCH)
Color system PAL/NTSC
Laser Semi-conductor laser, wave length 650nm,780nm
S/N >90dB
Audio dynamic range >85dB
Operation condition Temp:0 C~40 C, Operation state: Level surface
OUTPUT
Video output 1.0 V (P-P), 75 ohm
S-Video output (Y) 1.0 V (P-P), 75 ohm
(C) 286mV (P-P), 75 ohm
Analog audio output 2.0 V (rms)
Component video output (Y) 1.0 V (P-P), 75 ohm
(C) 0.7 V (P-P),75 ohm
ACCESSORIES:
Owners Manual
Audio Cable
Video Cable
Remote Control
...........................................
...........................................
...........................................
...........................................
1
1
1
1
Page 30

2
Environmental Protection
Waste electrical products should not be disposed of with household
waste. Please recycle where facilities exist. Check with your Local
Authority or retailer for recycling advice.
 Loading...