

Page 1
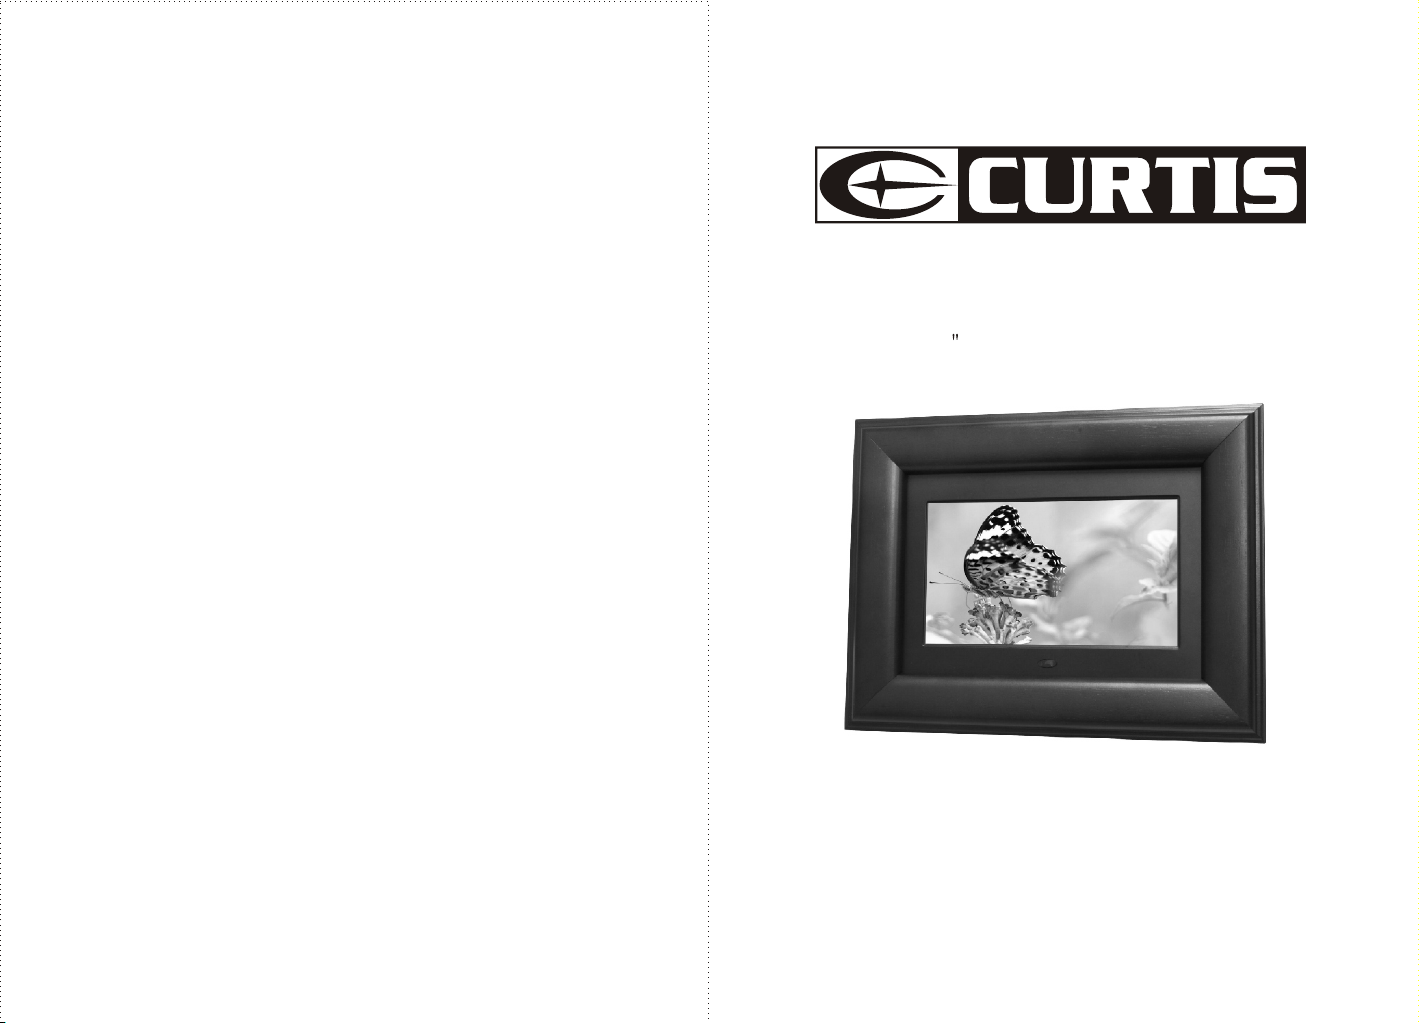
DPB702A
7 Digital Photo Frame
USER MANUAL
Page 2
Contents
Important Safety Instructions
Safety Information……………………………………………………………1
Main features………………………………………………………………2
Unit View…………………………………………..………………………… 2
Powering…………………………………………………………………………3
Using Your SD Card ……………………………………………………………3
Stretching the Bracket……………………………………………………3
Remote Control………………………………………………………………4
Basic Operation…………………………………………………………5
Accessories …………………………………………………………………5
Operation Instructions...……………………………………………………6
Play Image File……………………………………………………………… 6
Play Audio File…………………………………………………………………6
Play Image + Audio File………………………………………………………6
Setting………………………………………………………………………7
Photo Setting……………………………………………………………………7
Automatic Play…………………………………………………………………7
Display Setting…………………………………………………………………8
Custom Setting…………………………………………………………………8
Exit…………………………………………………………………………8
Calendar………………………………………………………………………9
Clock……………………………………………………………………………9
Alarm………………………………………………………………………10
Specifications and Troubleshooting…………………………………11
CAUTION
RISK OF ELECTRIC SHOCK
DO NOT OPEN
Warning:To alert the user to dangerous
voltage on the spot
Caution:To remind the user of important
operating and maintenance instructions
attached
Warning: To reduce the risk of fire or electric shock, do not expose this apparatus to rain
or moisture.
Note
1) Please read the instruction manual carefully and follow all the requirements of safe
operation to operate the device.
2) Do not use this unit near water. Do not place over the unit any container with liquid inside.
3) Do not install near any heat sources such as radiators, heat registers, stoves, or other
apparatus (including amplifiers) that produce heat.
4) Unplug this unit during lightning, storms or when not use for long.
5) About Cleaning: Unplug the system, use only wet cloth to clean. Do not use liquid
detergent or aerosol.
6) Only use accessories specified by the manufacturer.
7) Refer all servicing to qualified service personnel, servicing is required when the unit has been
damaged in any way, such as power supply cord or plug is damaged, liquid has been spilled
or objects have fallen into the unit, exposed to moisture, does not operate normally. Don't
try to repair the machine by yourself because of the danger of high voltage and electric shock.
1
Page 3
Main Features
Support JPEG, BMP image decoding;
Fast browse and enjoy high definition JPEG, BMP image.
USB interface function;
Connect with USB disk, browse images in format of JPEG, BMP in the USB disk, and
play audio in format of Movie, MP3, and WMA.
Compatibility
While playing SD\MMC\MS card, it is compatible with the multimedia file in format of
MP3, WMA, JPEG, Movie, and BMP.
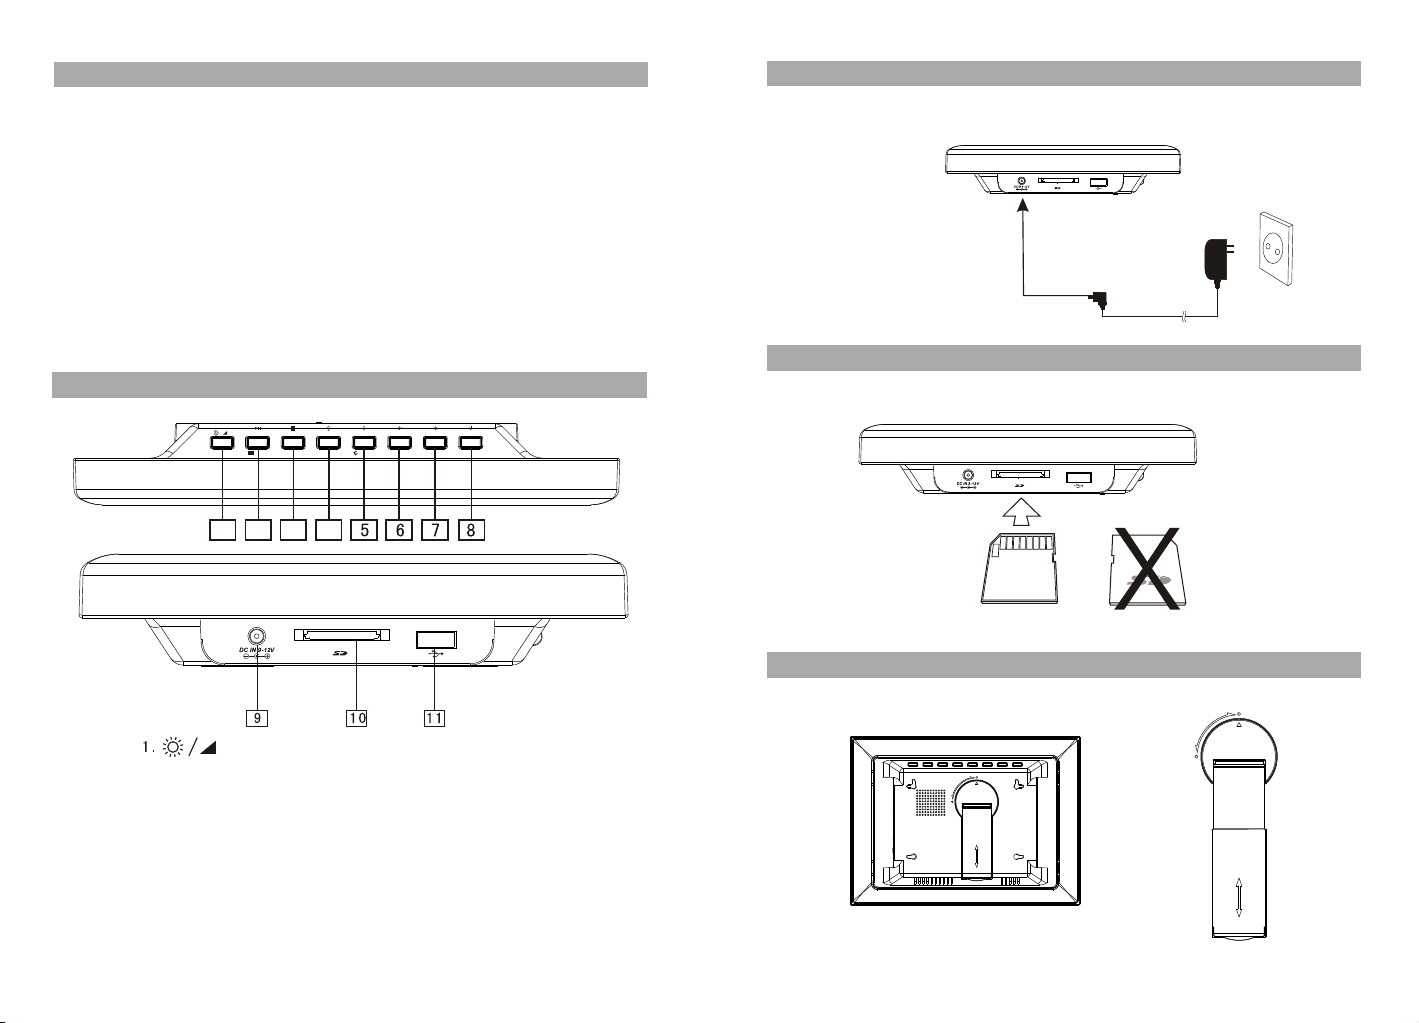
Unit View
MENU
PLAY/PAUSE
MODE
COPY/
DELETE
UP
DOWN
ROTATE
PREV. NEXT
POWER
Powering and installation
Plug one end of the supplied AC/DC power adaptor into the DC input jack of the machine, then
plug the other end into the AC power receptacle. Please refer to the following illustration:
Using Your SD Card
Upon using an SD card, insert it to the corresponding slot flatly with the label side backward
until you hear a click.
1 2 3
(Brightness/Volume)
2.Play/Pause/Mode
3. Menu
4.Up/Copy/Delete
5. Down/Rotation
6.Left/Prev/Vol-
4
Note: Do not remove the SD/MMC card while your device is playing a media file
Stretching the Bracket
Please stretch the bracket as the illustration below, and remember not to pull too hard in case
the bracket is pulled out from the clutch.
7. Right/Next/Vol+
8. Power On/Off
9.DC IN 9-12V
10.SD/MS/MMC jack
11. USB port
32
Page 4

Remote Control
1.Repeat
While playing MP3 and video, press this key to repeat one, repeat more, repeat all files.
2.Volume+/-
Press this key for volume up and down.
3.Left/Right key
While play video, press this key to select the previous or next part of video.
While browsing image, press this key to select the previous or next image.
While zooming out the image, press this key to move this image leftward or rightward.
4.Menu
Menu: While playing video, press this key to enter into file folder menu; while browsing
JPEG file(only photo browse is set as thumbnail ), press this key to enter into review
mode, repress this key for split preview on the image, press it again to return to the
main menu.
5.View/Stop
View: while browsing JPEG file(only photo browse is set as thumbnail), press this key
for split preview on the image; if there is no SD or USB connected, press this key to
browse the images stored in the unit.
Stop: While playing video, press this key for stop.
6.OK/Play/Pause
OK: In the file list, press this key to enter into play state. While selecting item in the menu,
press this key to confirm your selection.
Play/Pause: In music mode and movie mode Press this key to enter into play/pause state.
7.Up/Down
While playing JPEG image, press to copy the image, while press key for 90
counterclockwise rotation.
While playing video , press to go fast backward ,press to go fast forward .
While zooming out the image, press this key to move the image upward and downward.
Baisc operation
Basic Operation
Power: Power On/Off
Menu: While playing image, press this for selection to enter into manual browsing.
Press this key again to enter into 15-frame browsing.
Play: Start playing/start implementing operation directives.
Pause: Pause while playing
Directional key: In main menu/15-frame interface/MP3/WMA, press this key to move
cursor upward, and press the play key to confirm the selection.
While playing CARD/USB image file, press this key to copy the image and save it in the
photo frame; while playing the images in this album, press this key to delete; while
playing Movie, press this key for fast forward.
Directional key: In main menu/15-frame interface/MP3/WMA, press this key to move
cursor downward, press the play key to confirm the selection. While playing Movie,
press this key for fast forward.
Directional key: In main menu/15-frame interface, press this key to move cursor
leftward, press the play key to confirm the selection. While browsing the image
manually, press this key to return to the previous image. While playing Movie, press
this key for the previous.
Directional key: In main menu/15-frame interface, press this key to move cursor
rightward, press the play key to confirm the selection. While browsing the image
manually, press this key to return to the next image. While playing Movie, press this
key for the next.
: Press this key to adjust the screen brightness and volume. In photo mode,
when Brightness is displayed in the screen after pressing this key, press Left/Right
key to adjust the brightness; while playing audio, when Volume is displayed after
pressing this key, press Left/Right key for volume up and down.
: While playing image, press this key to rotate the image counterclockwise.
Accessories
Power adaptor
User manual
Remote control
1
1
1
54
Page 5

Operation instructions
1.Insert USB or SD/MMC/MS card.
2.Select the file (e.g. photo, audio) to play from the main
interface, press OK key to start playing.
Play image file
After selecting image option from the main menu, press OK
key for automatic test of the availability of storage device
(USB, memory card).If it does not connect with the storage
device, it will skip to the main menu. After connecting the
storage device and confirming correct reading, it will enter
into the mode the user selects.
In image mode, the system supports to play image in
format of JPG/BMP only.
Upon the user opens the automatic play function of image,
it will perform automatic play after entering into the image mode.
While playing image in USB or memory card, press copy key to copy the image to Flash
memory.
While playing image in Flash memory, press delete key to delete the selected image.
While playing BMP image, the system will display the reading process.
Play audio file
After selecting audio option in the main menu, press OK
key for automatic test of the availability of storage device
(USB, memory card) . If it does not connect with the
storage device, it will skip to the main menu. After
connecting the storage device and confirming correct
reading, it will enter into the mode the user selects.
In audio mode, the system supports to play audio in
format of MP3/WMA only.
If the user opens the automatic play function of audio, it
will perform automatic play after entering into the audio mode.
Play image + audio file
After selecting image + audio option in the main menu, press OK key for automatic test
of the availability of storage device (USB, memory card). If it does not connect with the
storage device, it will skip to the main menu. After connecting the storage device and
confirming correct reading, it will enter into the mode the user selects.
In image + audio mode, the system supports to play audio in format of JPG/BMP/MP3/
WMA only.
After the user enters into image + audio mode, it will perform automatic play.
Operation instructions
Setting
“Setting”: Press / key to select “Setting” item. And then to press “OK” key to enter into
the sub-menu. Users can set “Photo Setting”, “Auto-play”, “Display Setup”, and “Custom
Setup” as per demand. Press OK key to enter into sub-menu for setting; press / key
for switchover between the two pages above. After entering into “Exit from setting menu”,
press OK key tips to exit from “Setting menu”: press / key to select the option to be set;
press / key to adjust parameters.
1. Photo Setting
1.Interval Time
This is used for setting playing time of the image:
four options available including 5 seconds, 10
seconds, 15 seconds and 30 seconds.
2.Transition Effect
This is used for setting repeat playing mode of
image: six options available including No Effect,
Random, Cover Up, Cover Down, Cover Left and Cover Right.
3.Show Type :
Fit Screen, Full Screen optional
4.Browse
This is used for setting the access mode of image function, and there are two
options: Thumbnail, file manager
2. Auto-play
1.Photo
It provides the On/Off function for image automatic
play function. In case of automatic play On, when
user uses [Image] function, it will automatically
enter into [Slide show mode]; in case of automatic
play Off, it will enter into [thumbnail mode] or [file
manager ] for user to browse the image.
2.Music
It provides the On/Off function for music automatic
play function. In case of automatic play On, after entering into [file manager],
it will automatically play music; in case of automatic play Off, the user is required to
select the file to be played manually, and press [Play] to start playing.
3.Movie
It provides the On/Off function for music automatic play function. In case of automatic
play On, after entering into [file manager], it will automatically play video
and movie; in case of automatic play Off, the user is required to select the file to be
played manually, and press [Play] to start playing.
76
Page 6

Operation instructions
Operation instructions
3. Display Setup
1.TFT brightness
This is used for setting the brightness of the interface
displayed among the seven level ranging -3~0~+3.
The larger number means the higher brightness.
2.TFT contrast
This is used for setting the contrast of the interface
displayed among the seven level ranging -3~0~+3.
The larger number means the higher contrast.
3.TFT Saturation
This is used for setting the saturation of the interface displayed among the seven level
ranging -3~0~+3. The larger number means the higher saturation.
4. Custom Setup
1.OSD Language
This is used for selecting language used for OSD
After select it, press “ ” to enter the submenu
and press “ ” and “ ” to choose the language
you desire and press OK to confirm. Press “MENU”
to return.
2.Style
This provides the style options for user, and totally
four options available.
3.Repeat Mode
This is used for setting the repeat mode, and there
are four options including Off, One, Folder, and All.
Off: Release repeat mode;
One: Repeat the file being played;
Folder: Repeat the file folder being played;
All: Repeat playing all the files saved in the media.
4.Media
This is used for selecting the multi-media device to
connect by the user.
5.Default
This is used for returning to the default values. After setting this preset value, all the
set values will be back to initial setting of the system.
5. Exit
Confirm the SETUP item, return back to the main menu.
Calender
After selecting [Calendar] from the main menu, press
[Play] key to enter into date setting mode as shown in
the figure.
1.Display
Select this item to enter into date dialogue box
(As shown in the following figure):
If to browse the date of other time section, use
/ key to change month and / key to change
year.
2.Set Date
After selecting this item, press [OK] key to change
date. Use / key to change item, and / to
change date.
3.Exit
After completion of setting, it is for exiting from the
date setting menu.
Clock
Clock
After selecting [Clock] from the main menu, press
[OK] key to enter into time setting mode menu:
1. Display: This is to display the desired [Time] or
[Time & Calendar].
Select [Time], press [Play] key;
Select [Time & Calendar], press [Play] key;
2. Set time
This is used for setting the
system time (The method
is the same as setting the
date.)
3. Exit
Exit from time setting mode,
return to the main menu.
9988
Page 7

Operation instructions
Specifications and Troubleshooting
Alarm
After selecting [Alarm] from the main menu, press
[Play] key to enter into the alarm setting mode menu.
1.Enable
This is for setting alarm function On/Off. Select [ON],
press [Play] key for enabling the alarm; while [Off]
for disabling the alarm.
2.Set Time
This is for setting alarm time (The method is the same as setting the date.).
3.Exit
Exit from alarm setting mode, return back to the main menu.
Specifications
Compatible format: JPEG/MP3/WMA, etc.
Panel size: 7 inch
Frequency Response: 20Hz to 20 Khz
USB: support USB1.1 (It identifies USB 2.0, but can read it only in way of USB1.1)
Maximum pixel for single image: 7 mega pixel (In case of over 7 mega pixel, it
reads slowly.)
Power supply: DC 9V~12V
Power Consumption: 10W
Operation temperature: 5~40
Weight: 0.52 KG
Dimensions (LxWxH): 255x195x38mm
Troubleshooting
PROBLEM
No sound or
distorted sound
Can not advance
through a movie
The icon
appears on
screen
Picture is distorted
SOLUTION
Make sure the file format is MP3/WMA
You can not advance through the opening credits and
warning information that appears at the beginning of
movies because the file is programmed to prohibit that
action
The feature or action cannot be completed at this time because:
1. The file's software restricts it.
2. The file's software doesn't support the feature
3. The feature is not available at the moment.
The file might be damaged. Try another file;
It is normal for some distortion to appear during forward or
reverse scan.
10
Owing to continuous improvement, no prior notice will be given regarding changes on above
feature and spec.
11
 Loading...