

Page 1
The lightning flash and
arrowhead within the
triangle is a warning sign
alerting you of “dangerous
voltage” inside the
product.
WARNING: TO REDUCE THE RISK OF
ELECTRIC SHOCK, DO NOT REMOVE
COVER (OR BACK) NO USERSERVICEABLE PARTS INSIDE. REFER
SERVICING TO QUALIFIED SERVICE
PERSONNEL.
The exclamation point
within the triangle is a
warning sign alerting you
of important instructions
accompanying the product.
WARNING: To reduce the risk of fire or electric shock, do not expose this appliance to rain or
moisture.
This product contains a low power laser device.
Std-Eng-12HR.p65 3/22/02, 5:45 PM2
E-2
Page 2
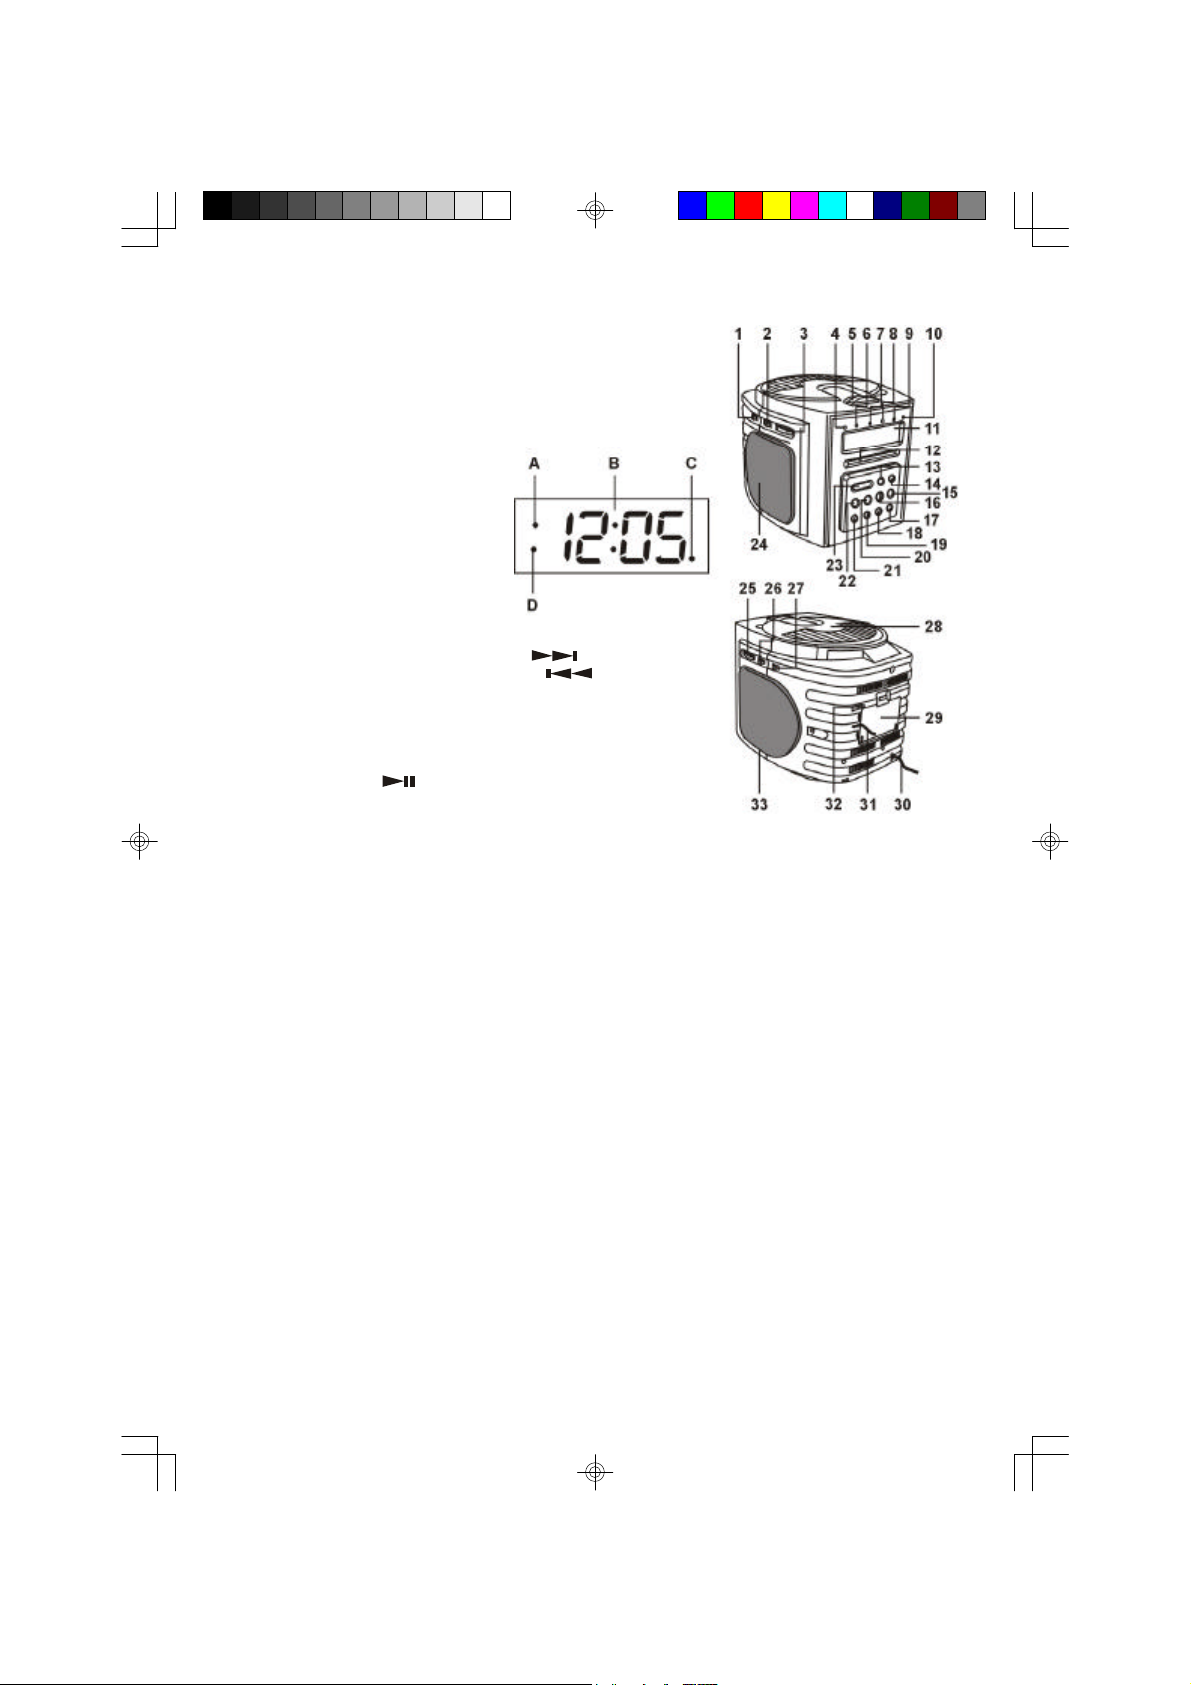
LOCATION OF CONTROLS
1. ALARM 1 SET / ON / OFF switch
2. ALARM 2 SET / ON / OFF switch
3. VOLUME control
4. STANDBY / ON indicator
5. SNOOZE button
6. FM STEREO indicator
7. SLEEP indicator
8. REPEAT indicator
9. PROGRAM indicator
10. RANDOM indicator
11. Display
A. PM indicator
B. Clock Display
C. ALARM 2 indicator
D. ALARM 1 indicator
12. Dial Scale
13. SLEEP button
14. CLOCK ADJ button
15. SKIP / SEARCH / TIME SET HOUR ( ) button
16. SKIP / SEARCH / TIME SET MINUTE ( ) button
17. PROGRAM button
18. CD DISPLAY button
19. RANDOM button
20. STOP ( n ) button
21. REPEAT button
22. PLAY / PAUSE ( ) button
23. POWER / ALARM OFF button
24. Left Speaker
25. TUNING control
26. FUNCTION (AM / FM / FM. ST / CD) switch
27. BUZZER / MUSIC switch
28. CD Door
29. Battery Compartment
30. AC Cord
31. FM Antenna wire
32. DIMMER switch
33. Right speaker
Caution:
Usage of controls or adjustments or performance of procedures other than those specified herein may result
in hazardous exposure.
This unit should not be adjusted or repaired by anyone except qualified service personnel.
Important:
Since movement of the CD mechanism and the sensitive circuity may cause interference to the radio tuner
nearby, switch this unit off while operating other radio devices.
E-3
Std-Eng-12HR.p65 3/22/02, 5:45 PM3
Page 3

BACKUP FUNCTION
If the AC power supply is interrupted, the clock display goes off and the alarm setting is canceled. To back
up the clock and alarm, insert a 6F22 battery in the battery compartment on the rear of the unit.
• The backup battery is not for radio reception.
Replacing the battery
Replace the battery with a new one if the clock display flashes or the alarm timer does not work properly
when you connect the AC power cord again.
• When you are not going to use the unit for a long period of time, remove the battery to prevent possible
electrolyte leakage.
SETTING THE CLOCK
• Connect the AC power cord to a wall outlet.
• Figures will appear and begin to flicker on the time display.
1. While holding down CLOCK ADJ button, press HOUR ( ) to set the hour.
2. While holding down CLOCK ADJ button, press MIN ( ) to set the minute.
LISTENING TO THE RADIO
1. Press the POWER button to turn the unit on; the STANDBY / ON indicator will light.
2. Slide the FUNCTION switch to FM or AM position.
3. Turn into a station.
4. Adjust the VOLUME control as desired.
Antennas
FM: Extend the external FM antenna wire.
AM: Turn the unit for better AM reception.
CD PLAYING
1. Open the disc compartment.
2. Place a disc in the center with the label side facing up and close the disc compartment.
3. Press the POWER button to turn the unit on; slide the FUNCTION switch to CD.
• total number of tracks in the disc.
4. Press PLAY / PAUSE ( ) button.
• playback starts from the first track.
BASIC OPERATION
To stop Press STOP ( n ) button
To pause Press PLAY / PAUSE ( ) button.
To search for the beginning of a track Press or button.
To locate a desired passage Keep or pressed.
Notes:
To display the CD operation, press CD DISPLAY button, CD operation is displayed for few seconds.
Std-Eng-12HR.p65 3/22/02, 5:45 PM4
To resume, press it again.
Release the button at the started of desired passage.
E-4
Page 4

•• REPEAT mode
Press the REPEAT button before or during play. A single track or all tracks can repeated.
Each press switches the repeat mode.
•• RANDOM play
1. Press RANDOM button to select random mode, RANDOM LED indicator will light up.
2. To cancel the random mode, press the RANDOM button again.
PROGRAMMED DISC PLAY
You can choose up to 20 tracks in any desired order for programmed play.
1. Set the FUNCTION switch to CD.
2. Press the PROGRAM button.
3. Press the or SKIP / SEARCH button to select the track number.
4. Press the PROGRAM button when the desired track number is displayed.
5. Repeat step 3 and 4 to program more tracks.
6. Press the PLAY / PAUSE ( ) button to start programmed play.
• Disc play will start at the beginning of the first programmed track.
To check the program
• Press the PROGRAM button during stop mode. The track numbers are displayed in programmed order.
To erase the program
• Press the PROGRAM button and the STOP ( n ) button at the same time during stop mode. Opening
the disc compartment also erase the contents of program memory.
WAKE UP TO ALARM (Radio, Buzzer or CD)
The radio, buzzer or CD automatically sounds at the designated time every day. You can set two different
alarm times, one in ALARM 1 and one in ALARM 2, so that the alarm timer operates twice a day.
1. Slide the ALARM 1 or ALARM 2 switch to the set position; the alarm time will blink in the display.
2. Press the HOUR ( ) button to advance the hour and the MIN ( ) button to advance the
min until the desired alarm time is shown on the display.
3. Slide the desired ALARM switch (1 or 2) to the ON (set) or OFF (not set) position.
TO SET THE ALARM TO WAKE TO BUZZER
• Set the alarm time as previously instructed.
1. Slide the BUZZER / MUSIC switch to the BUZZER HI / LOW position, when the actual time matches
one of the selected preset alarm times, the unit automatically turns on.
TO SET THE ALARM TO WAKE TO RADIO OR CD
• Set the alarm time as previously instructed.
1. Slide the AM / FM / CD switch to AM, FM or CD position.
2. Slide the BUZZER / MUSIC switch to the MUSIC position. When the actual time matches the selected
preset alarm times, the unit automatically turns on.
TO SHUT THE ALARM OFF
• To shut the alarm off, press the POWER / ALARM OFF button once and the alarm time will be reset
for the next day.
• Slide the desired ALARM 1 or ALARM 2 switch to the OFF position to turn off the alarm and not set
it for the next day.
SNOOZE
• The alarm can be temporarily turned off manually by pressing the SNOOZE button; the alarm will turn
back on automatically 6 minutes later.
E-5
Std-Eng-12HR.p65 3/22/02, 5:45 PM5
Page 5

TO ACTIVATE THE SLEEP FUNCTION
• Turn the desired radio station or insert a CD as previously instructed.
1. Press the SLEEP button and “– – “ will appear on the clock display and the SLEEP indicator will blink.
2. Repeatedly press the SLEEP button for the desired sleep time of 90, 60 or 30 minutes, the SLEEP
indicator will light to indicate the sleep mode is activated.
•• TO CANCEL SLEEP TIME
Press the SLEEP button repeatedly until “– –” appears on the display.
DIMMER CONTROL
• You can adjust the brightness of the display by the DIMMER switch.
Std-Eng-12HR.p65 3/22/02, 5:45 PM6
E-6
 Loading...