

Page 1
EMPLACEMENT DES FONCTIONS DE
TÉLÉCOMMANDES
1. DÉBUT / ARRÊT (EN FONCTION)
2. ARRÊT / FIN (HORS FONCTION)
3. VOLUME
4. SAUT/ RECHERCHE DÉBUT
5. SAUT / RECHERCHE FIN
6. FONCTION ATTENTE
7. PRISE DE CASQUE D’ÉCOUTE
6
2345
7
1
FONCTIONS DE TÉLÉCOMMANDE AVEC FIL:
Avant d’utiliser :
1. Branchez le casque d’écoute dans la prise du casque d’écoute sur la
télécommande avec fil.
2. Branchez la télécommande avec fil dans la prise du casque d’écoute de l’unité
principale.
3. Mettez la touche de la télécommande avec fil en position d’arrêt.
4. Ajustez le volume de la télécommande avec fil à environ la moitié de la position
maximale.
5. Ajustez le volume principal à la position maximale.
Utilisation :
1. Appuyez sur les 4 touches (PLAY / PAUSE (ON) ; STOP (OFF) ; FF ; FR) pour opérer
(les touches de fonctions sont les mêmes que pour celles de l’unité principale).
2. Ajustez le volume au niveau d’écoute voulu. Vous pouvez ajouter le volume de l’unité
principale, au besoin.
— F-5 —
DIAGNOTIC DES PANNES
Nettoyage du disque
Si un disque est sale, nettoyez-le à l’aide d’un chiffon. Essuyez le disque de l’intérieur vers
l’extérieur.
Remarque : N’utilisez pas de solvants tels que le benzène, les diluants ou tous autres
produits de nettoyage ou sprays anti-statiques disponibles dans le commerce destinés aux
disques analogues.
** Si vous rencontrez des difficultés lors de l’utilisation de ce lecteur CD, veuillez
vous référer au tableau ci-dessous avant de prendre contact avec votre revendeur.
Symptômes Points à vérifier
Le lecteur ne fonctionne pas • Le disque est inséré à l’envers.
Aucun son dans les écouteurs • La fiche des écouteurs n’est pas correctement
Aucun son lorsque l’appareil • Le branchement est mauvais.
est branché à un amplificateur • L’alimentation à l’amplificateur externe est coupée.
externe
Son par intermittence • Le disque est sale ou défectueux.
En cas de difficultés
• Le disque n’est pas correctement positionné
sur l’axe.
• Le disque est sale ou défectueux.
• La tête de lecture est sale.
• Le couvercle du lecteur CD n’est pas fermé.
• Il y a de la condensation dans le lecteur CD.
Laissez-le se réchauffer à température
ambiante pendant 60 minutes.
• L’alimentation AC à laquelle est branché
l’adaptateur est coupée.
• L’appareil s’est éteint automatiquement,
appuyez sur la touche PLAY pour le rallumer.
• Les piles sont usées.
• Le bouton HOLD (verrouillage) est sur la
position ON, mettez-le en position OFF.
branchée à la prise CASQUE.
• La fiche des écouteurs est branchée à la prise
de sortie.
• La tête de lecture est sale.
• Le lecteur est sujet à des vibrations ou des chocs
excessifs.
• Les piles sont usées.
• Les écouteurs sont mal branchés.
— F-6 —
CD182
LECTEUR CD PORTABLE
AVEC SYSTÈME ANTICHOC DE 45 SECONDES
MANUEL D’INSTRUCTIONS
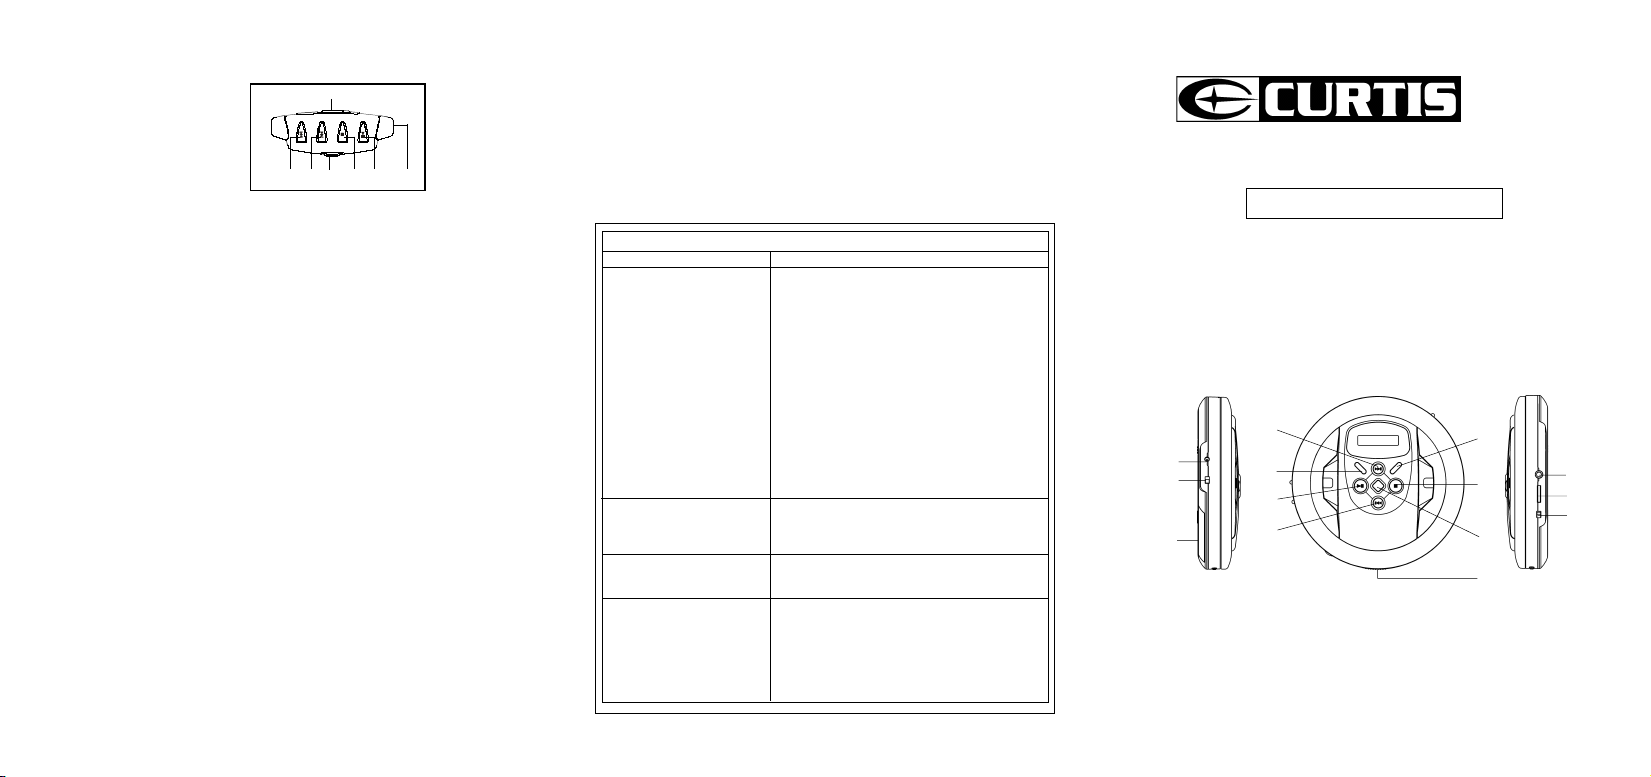
TOUCHES DE COMMANDES
1. Touche Mode
2. Touche Stop/Arret
3. Touche circuit antishock
4. Ouverture/fermeture compartiment CD
5. Touche de recherche/saut avan
6. Touche de programmation
7. Touche de Lecture/Pause
5
12
13
6
7
14
ATTENTION
TOUTES UTILISATION DES COMMANDES, DES REGLAGES OU DE LA
PERFORMANCE AUTRES QUE CELLES SPECIFIEES DANS CE MANUEL PEUVENT
ENTRAINER DES RISQUES D’IRRADIATION.
CET APPAREIL DOIT ETRE REGLE OU REPARE PAR UNE PERSONNE QUALIFIEE
UNIQUEMENT.
8
8. Touche de recherche/saut arriere
9. Prise pour casque
10. Volume
11. Touche de BBS
12. Prise alimentation externe
13. Touche de bloccage des touches
14. Couvercle du compartiment des piles
1
2
3
4
— F-1 —
9
10
11
Page 2

PREPARATIONS AVANT L’UTILISATION
Mise en place des piles
1. Ouvrez le couvercle du compartiment des piles.
2. Insérez deux piles (LR6, type “AA”, ou équivalent)
en respectant les polarités indiquées .(Piles non fournies)
(Il est recommandé d’utiliser des piles grande capacité.)
3. Refermez correctement le couvercle.
Adaptateur d’alimentation secteur
1. Branchez la sortie CC de l’adaptateur sur la prise d’alimentation en CC.
2. Raccordez l’adaptateur (4,5 V / 500 mA) à une prise de courant. Veillez à ce que la tension
corresponde à celle requise par l’appareil.(Adaptateur non fournies)
LECTURE D’UN DISQUE
Ce lecteur CD est conçu pour la lecture de disques compacts de 8 et 12 cm sans utiliser
d’adaptateur.
Bouton de verrouillage (Hold)
Placez le bouton de verrouillage (HOLD) sur la position “ON”. Toutes les touches sont
verrouillées. Avant d’utiliser l’appareil, vérifiez que le bouton est sur la position “OFF” pour
une utilisation normale.
Mise en marche
1. Insérez la fiche du casque / écouteurs dans la PRISE CASQUE.
2. Poussez le bouton OPEN vers la droite pour ouvrir le couvercle du lecteur CD. Placez
un disque, étiquette vers le haut, dans le compartiment de CD.
3. Encliquetez le disque sur l’axe en appuyant légèrement sur la partie centrale du CD.
(Pour enlever le disque : soulevez le disque en le tenant par les bords tout en appuyant
avec précaution sur l’axe.)
4. Refermez le couvercle et appuyez une fois sur la touche PLAY/PAUSE (Lecture/Pause).
5. L’écran digital indique le nombre total de plages sur le disque, puis la lecture du
premier disque commence.
Fonctionnement général
Touche Lecture/Pause — Appuyez une fois pour écouter le disque
dans l’ordre original.
Touche Arrêt — Appuyez une fois pour arrêter la lecture.
Touches Saut /Avance – Arrière — Appuyez une fois sur la touche pour
pour revenir en arrière.
Appuyez une nouvelle fois pour arrêter
temporairement la lecture.
Appuyez une nouvelle fois pour mettre
l’appareil hors tension.
passer à la plage suivante ou sur la touche
pour revenir à la plage précédente.
Appuyez en continu sur la touche pour
avancer votre recherche de plages ou sur
— F-2 — — F-3 — — F-4 —
Différents modes de lecture
Touche MODE — Il existe 3 types de fonctions :
A. Lecture en boucle
En mode LECTURE
• Appuyez une fois sur la touche MODE pour écouter un titre en boucle.
• L’indicateur de lecture en boucle s’affiche à l’écran.
En mode LECTURE
• Appuyez deux fois sur la touche MODE pour écouter en boucle tout le disque.
• L’indicateur de lecture en boucle s’affiche à l’écran.
REMARQUE – Pour annuler la LECTURE EN BOUCLE, appuyez sur la touche MODE
jusqu’à ce que l’indicateur de lecture en boucle disparaisse.
B. Lecture des Introductions
En mode STOP
• Appuyez trois fois sur la touche STOP.
• L’indicateur INTRO s’affiche sur l’écran.
• Appuyez sur la touche PLAY (Lecture) pour écouter les 10 premières secondes de
chaque plage du disque.
REMARQUE - Pour annuler la lecture des introductions, appuyez sur la touche MODE
jusqu’à ce que l’indicateur INTRO disparaisse.
C. Lecture aléatoire
En mode STOP
• Appuyez quatre fois sur la touche MODE.
• L’indicateur SHUF s’affiche à l’écran.
• Appuyez sur la touche PLAY (Lecture) pour écouter au hasard les plages du disque.
REMARQUE - Pour annuler la lecture aléatoire, appuyez sur la touche MODE jusqu’à ce
que l’indicateur SHUF disparaisse.
Lecture programmée
1. Appuyez sur la touche PROG lorsque l’appareil est en mode STOP jusqu’à ce que PGM
s’affiche sur l’écran.
*L’indicateur PGM s’affiche sur l’écran.
2. Appuyez sur les touches ou pour sélectionner la plage souhaitée.
3. Appuyez sur la touche PROG pour mémoriser la plage. Le numéro du programme
s’affiche.
4. Répétez les étapes 2 et 3 pour programmer l’ordre de la lecture des titres. Vous pouvez
programmer .
5. Appuyez sur la touche pour commencer la lecture du programme.
6. Pour effacer le programme, appuyez sur la touche STOP pour mettre l’appareil hors
tension.
ANTI SHOCK
Votre lecteur CD et fournie d’une systeme anti-shock. Le syteme éffectue une lecture prélecture, cela veut dire que le lecteur mémorise 45 secondes d’une plage en-avant. Le
systeme est activé automatiquement quant vous enfoncez la touche de lecture, en
affichant “45 seconds” Le niveau de mémoire (buffer) est affiché avec les symboles .
Pour annuler cette fonction, enfoncez la touche “ASP”.
ENTRETIEN
Nettoyage de la tête de lecture
Si la tête de lecture est sale, nettoyez-la à l’aide d’un gaz dépoussiérant. Faites attention de
ne pas rayer la surface de la tête de lecture
Nettoyage du boîtier
Nettoyez de temps en temps le boîtier à l’aide d’un chiffon sec et doux. Humidifiez
légèrement votre chiffon avec de l’eau ou un produit détergent léger pour enlever les tâches
plus résistantes. N’utilisez jamais de benzène, d’alcool ou de solvants car ils pourraient
détériorer la finition du boîtier.
CARACTERISTIQUES
Puissance de sortie : 20 mW (32 )
Réponse en fréquence : 100 ~ 20000 Hz
Alimentation : DC 4,5V externe et piles du type “AA”, UM-3, HP-7, R6, 1.5V x 2
Dimensions : 142mm (W) x 142mm (D) x 31mm (H)
** Pour des raisons d’améliorations techniques, les caractéristiques et design sont sujets à
des modifications sans préavis.**
Page 3

LOCATION OF REMOTE CONTROLS
1. PLAY / PAUSE (POWER ON)
2. STOP / OFF (POWER OFF)
3. VOLUME
4. SKIP / SEARCH UP
5. SKIP / SEARCH DOWN
6. HOLD BUTTON
7. HEADPHONE JACK
6
2345
1
WIRE REMOTE FUNCTION:
Before operation :
1. Plug the headphone into the headphone jack of the wire remote set.
2. Plug the wire remote set into the main unit headphone jack.
3. Slide the wire remote set hold switch to off position.
4. Adjust the wire remote set volume to about middle position.
5. Adjust main unit volume to about maximum position.
Operation :
1. Press the 4 key (PLAY / PAUSE (ON) ; STOP (OFF) ; FF ; FR) to
operation,The Function is same as the main unit key function.
2. Adjust the volume to desired listening level, You may adjust the
main unit volume if need.
TROUBLE SHOOTING GUIDE
Cleaning the Disc
When a disc becomes dirty, clean it with a cleaning cloth. Wipe the disc from the
center out.
Note - Do not use solvents such as benzine, thinner, commercially available
cleaners or anti-static spray intended for analogue discs.
7
** Should you experience difficulties in the use of this player please refer to
the following chart before contacting your dealer or the place of purchase.
Problem
Player fails to function • The disc may be inserted upside down.
No sound from Earphones
No sound when played through
an external amplifier
Intermittent Sound
Troubleshootin g Guide
• The disc not mounted correctly on the chuck.
• Dirty or a defective disc.
• Dirty pick up lens.
• Player lid not closed.
• Moisture condensation, allow the player to warm up to room
temperature for 60 minutes.
• AC Power to an adaptor switched off.
• Auto power off has occurred, press PLAY button to restore power.
• Weak batteries.
• Hold switches at ON position, switch to OFF position.
• Earphones' plug is not firmly inserted into the Phones socket.
• Earphones have been inserted into the line out socket.
• Connection is incorrect.
• Power to an external amplifier not switched on.
• Dirty or defective disc.
• Dirty pick up lens.
• The player is subject to excessive vibration or shock.
• Low battery power.
• Poor connection.
Points to check
PORTABLE COMPACT DISC PLAYER
WITH 45 SECONDS ANTI-SHOCK SYSTEM
INSTRUCTION MANUAL
LOCATION OF CONTROLS
1. MODE
2. STOP / OFF (POWER OFF)
3. ASP BUTTON
4. OPEN BUTTON
5. SKIP / SEARCH UP
6. PROG (PROGRAM)
7. PLAY / PAUSE (POWER ON)
5
12
13
6
7
14
8
8. SKIP / SEARCH DOWN
9. HEADPHONE JACK
10. VOLUME
11. B.B.S. BUTTON (BASS BOOST BUTTON)
12. DC JACK
13. HOLD BUTTON
14. BATTERY DOOR
CD182
1
2
3
9
10
11
4
CAUTION
USE OF CONTROLS OR ADJUSTMENTS OR PERFORMANCE OF PROCEDURES
OTHER THAN THOSE SPECIFIED HEREIN MAY RESULT IN HAZARDOUS RADIATION
EXPOSURE.
THIS SHOULD NOT BE ADJUSTED OR REPAIRED BY ANYONE EXCEPT QUALIFIED
SERVICE PERSONNEL.
— E-5 —
— E-6 —
— E-1 —
Page 4

PREPARATIONS BEFORE USING
Battery Installation
1. Open Battery Compartment cover.
2. Insert 2 batteries (LR6, “AA” size, or equivalent)
in the correct polarity as indicated.(Batteries not included)
(Heavy duty batteries are recommended.)
3. Close the cover properly.
AC Power Adaptor
1. Plug the DC output of the adaptor to the DC Jack.
2. Connect the adaptor (4.5V/500mA) to a power outlet.(Adaptor not included)
Make sure the voltage is compatible.
DISC PLAYING
This CD player is designed to play the 8cm and 12cm compact disc without using
adaptor.
Hold Switch
Set the HOLD switch to “ON” position, all the buttons will be locked. Before
operation, be sure to set the switch to “OFF” position, for normal operation.
Getting Start
1. Insert the headphone/earphone plug to PHONE JACK.
2. Push the OPEN switch to right side, and then the door open, put a disc into the
CD compartment with label side upward.
3. Push the disc gently around the centre area until it clicks so that the disc fits
into the pivot.
(To remove the disc : Pick up the disc, holding the edge, while pressing the
pivot gently.)
4. Close the door and press the PLAY/PAUSE button once.
5. The Display will show the total number of tracks of the disc, then begin to play
the first track.
General Operation
Play/Pause Buttons — Press once to start playback in the original
Stop Button — Press once to stop playback.
Skip / Search Buttons — Press once to skip to next track or
order.
Press again to stop the disc play
temporarily.
Press again to turn off power.
back to previous track .
— Press continuiously to search forward
or backward .
Various Playing Modes
MODE Button — There are 3 kind of function :
A. Repeat Play
During PLAY mode
• Press the MODE button once to play single track repeatedly.
• The repeat indicator will appear in the display.
During PLAY mode
• Press the MODE button twice to play the entire disc repeatedly.
• The repeat indicator will appear in the display.
NOTE - To cancel REPEAT simply press the MODE button until the repeat indicator
disappears.
B. Intro Scan
In STOP mode
• Press the MODE button three times.
• The INTRO indicator will appear in the display.
• Press the PLAY button to play the first 10 seconds of each track on the disc.
NOTE - To cancel INTRO SCAN simply press the MODE button until the INTRO
indicator disappears.
C. Random Play
In STOP mode
• Press the MODE button four times.
• The SHUF indicator will appear in the display.
• Press the PLAY button, all the tracks on a disc to be played in a random sequence.
NOTE - To cancel RANDOM PLAY simply press the MODE button until the SHUF
indicator disappears.
Program Play
1. Press the PROG button when the unit is in the stop mode until PGM show on the
display.
* The PGM indicator will appears on the display.
2. Press or to select the desired track.
3. Press the PROG button to enter the track into memory. The program numbers
which will be increment one step.
4. Repeat step 2 and 3 to program the order of more tracks can be programmed into
memory.
5. Press to start the program play.
6. To erase the program, simply press the STOP button to turn the power off.
ONE
ALL
DIGITAL ANTI-SHOCK OPERATION
The digital ELECTRONIC SHOCK PROTECTION function uses semiconductor memory to
prevent the second from skipping when the unit is subjected to shocks and vibration during play.
When the PLAY/PAUSE button is pressed and the power turns on, the digital Electronic
Shock Protection function turns on automatically.
The display will show and the function is initialized, when shows in the display,
the data buffer is full.
It will give approximately 45 seconds of protection against interruption of sound output, if the
player is subjected to shocks of more than 45 seconds duration, some interruption of sound
output will occur, this is normal and to be expected, the sound will resume once the player
has stabilized from the shock.
To turn this function off, press ASP button once, the ESP indicator will disappear.
MAINTENANCE
Cleaning the Lens
If the lens becomes dusty, clean it with camera lens blower. Be careful not to scratch the
surface of the lens.
Cleaning the Cabinet
From time to time, clean the cabinet with a soft dry cloth. For more stubborn stains, slightly
moisten the cloth with water or a mild detergent solution. Never use benzene, alcohol or
other solvents as they may damage the finish of the cabinet.
SPECIFICATIONS
Output Power : 20 mW (32 )
Freq. Range : 100 ~ 20000 Hz
Power : DC 4.5V external and size “AA” batteries, UM-3, HP-7, R6,1.5V x 2
Dimensions : 142mm(W) x 142mm(D) x 31mm(H)
** For improvement purposes, specification and design are subject to change without
notice. **
— E-2 — — E-4 —
— E-3 —
 Loading...