

Page 1
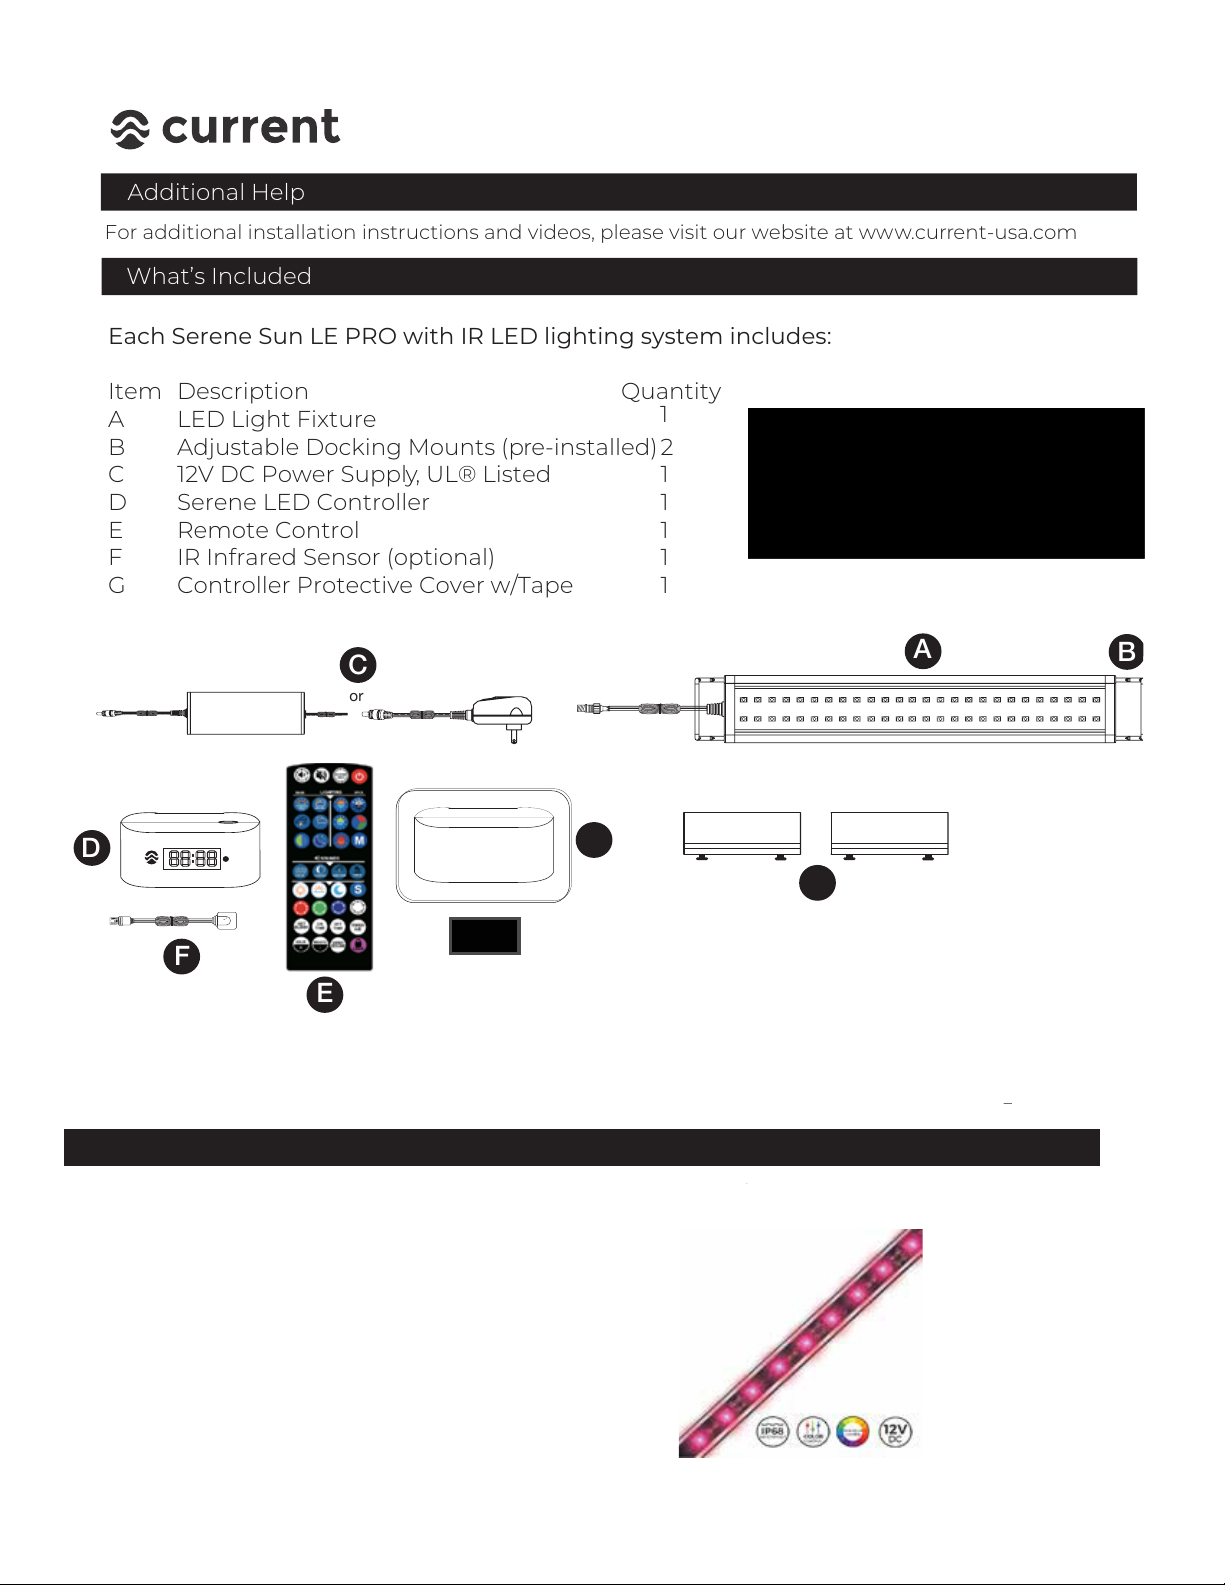
Each Serene Sun LE PRO with IR LED lighting system includes:
Item Quantity
A
1
B 2
C 1
D 1
E 1
F 1
G 1
Description
LED Light Fixture
Adjustable Docking Mounts (pre-installed)
12V DC Power Supply, UL® Listed
Serene LED Controller
Remote Control
IR Infrared Sensor (optional)
Controller Protective Cover w/Tape
Additional Help
,
-
or
A
B
C
D
E
F
Note:
components, please contact us
directly at www.current-usa.com.
DO NOT RETURN TO RETAILER
What’s Included
For additional installation instructions and videos, please visit our website at www.current-usa.com
SERENE SUN LE PRO LED
What’s Included
1
IMPORTANT: READ ALL SAFETY
INSTRUCTIONS ON LAST PAGE
BEFORE INSTALLATION
SAVE THESE INSTRUCTIONS
J 2
Rimless Tank Mounts
G
NOTE: If your LED light is missing any of the above components, please
contact us directly by visiting www.current-usa.com/support.
Optional Accessories
The following optional accessories are compatible with the Serene Sun LE PRO LED light. For
more information, visit www.current-usa.com.
What’s Included
Do not return to your retailer.
J
Serene Background Light Kits
(Connects directly to your Serene LED,
Light & background film included)
Available in 24” - 72” lengths
Page 2
!"
SERENE SUN LE PRO LED
Installation Instructions
STEP 1 - Serene LED Light Installation
2
1. Unpack light fixture and components. Remove any plastic film on light fixture.
2. Slide the adjustable docking legs on the side of the light fixture to match the length
of aquarium. Attach rimless tank bracket (optional) to glass aquarium edges.
3. Set fixture on aquarium and ensure docking legs fit snug on edges of aquarium -or-
slide end of wire mounts into rimless tank brackets until they snap into place.
STEP 2 - Serene LED Controller Installation
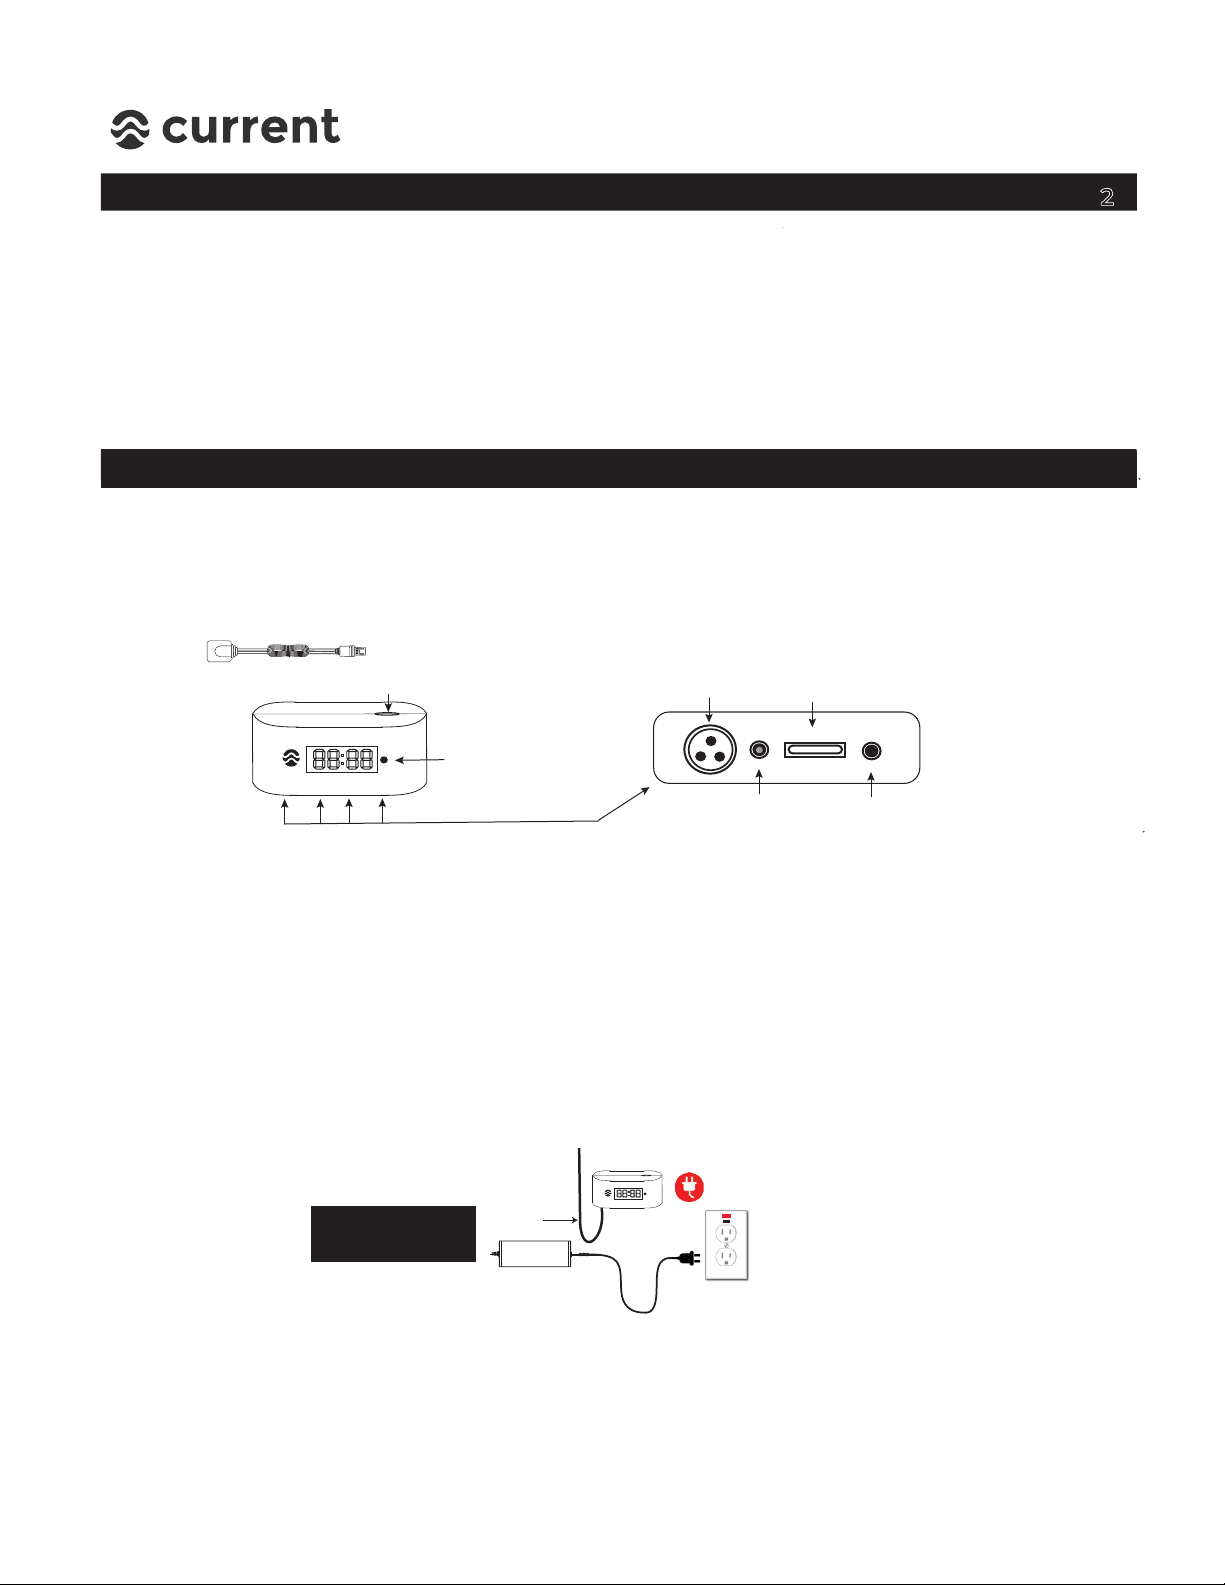
1. Choose a location underneath your aquarium cabinet free of excessive moisture and
allows for direct line of site for IR sensor* to receive signals from remote control.
(NOTE: An additional External IR sensor with 12” cable is included for under cabinet
r
installation.)
Optional External
IR Sensor
Integrated
IR Sensor
Main
LED Light
Background
LED Light
12 VDC
POWER
Speakers
2. IMPORTANT: Plug-in all lighting, power and speaker cables as shown above before
mounting controller.
3. Place Serene controller in clear protective case and mount to stand using 3M adhesive
tape. (If using optional external IR sensor, connect to control and ensure end of sensor
has a clear line of site for remote control.
4. Position audio speakers on each side of stand or attach to sides of stand using the
included Velcro tape.
AC Power
GFCI Outlet
Ensure use of drip
loop for all cables
Drip
Loop
12VDC
Power Supply
5. Plug-in 12VDC power supply into a GFCI approved outlet. Ensure a drip loop is in place
for all cables.
6. Remove plastic cover from remote control and remove plastic battery tab at bottom of
remote. Press the Main power key to ensure controller turns on. Follow programming
instructions on page 6 to begin your Serene Experience!
Page 3
Installation Instructions
r
S
SET
CLOCK
OFF
TIME
ON
TIME
ENTER
HOUR
+
-
MINUTE
STREAM
BACK
MAIN
ENTER
RESUME
TIMER
M
OFF
ON
STARGAZE RAINSTORM
FOREST
TIMER
A/B
ENTER
LOCK
LIGHTING
SOUNDS
RESUME
S
SET
CLOCK
OFF
TIME
ON
TIME
TIMER
A/B
HOUR
+
-
MINUTE
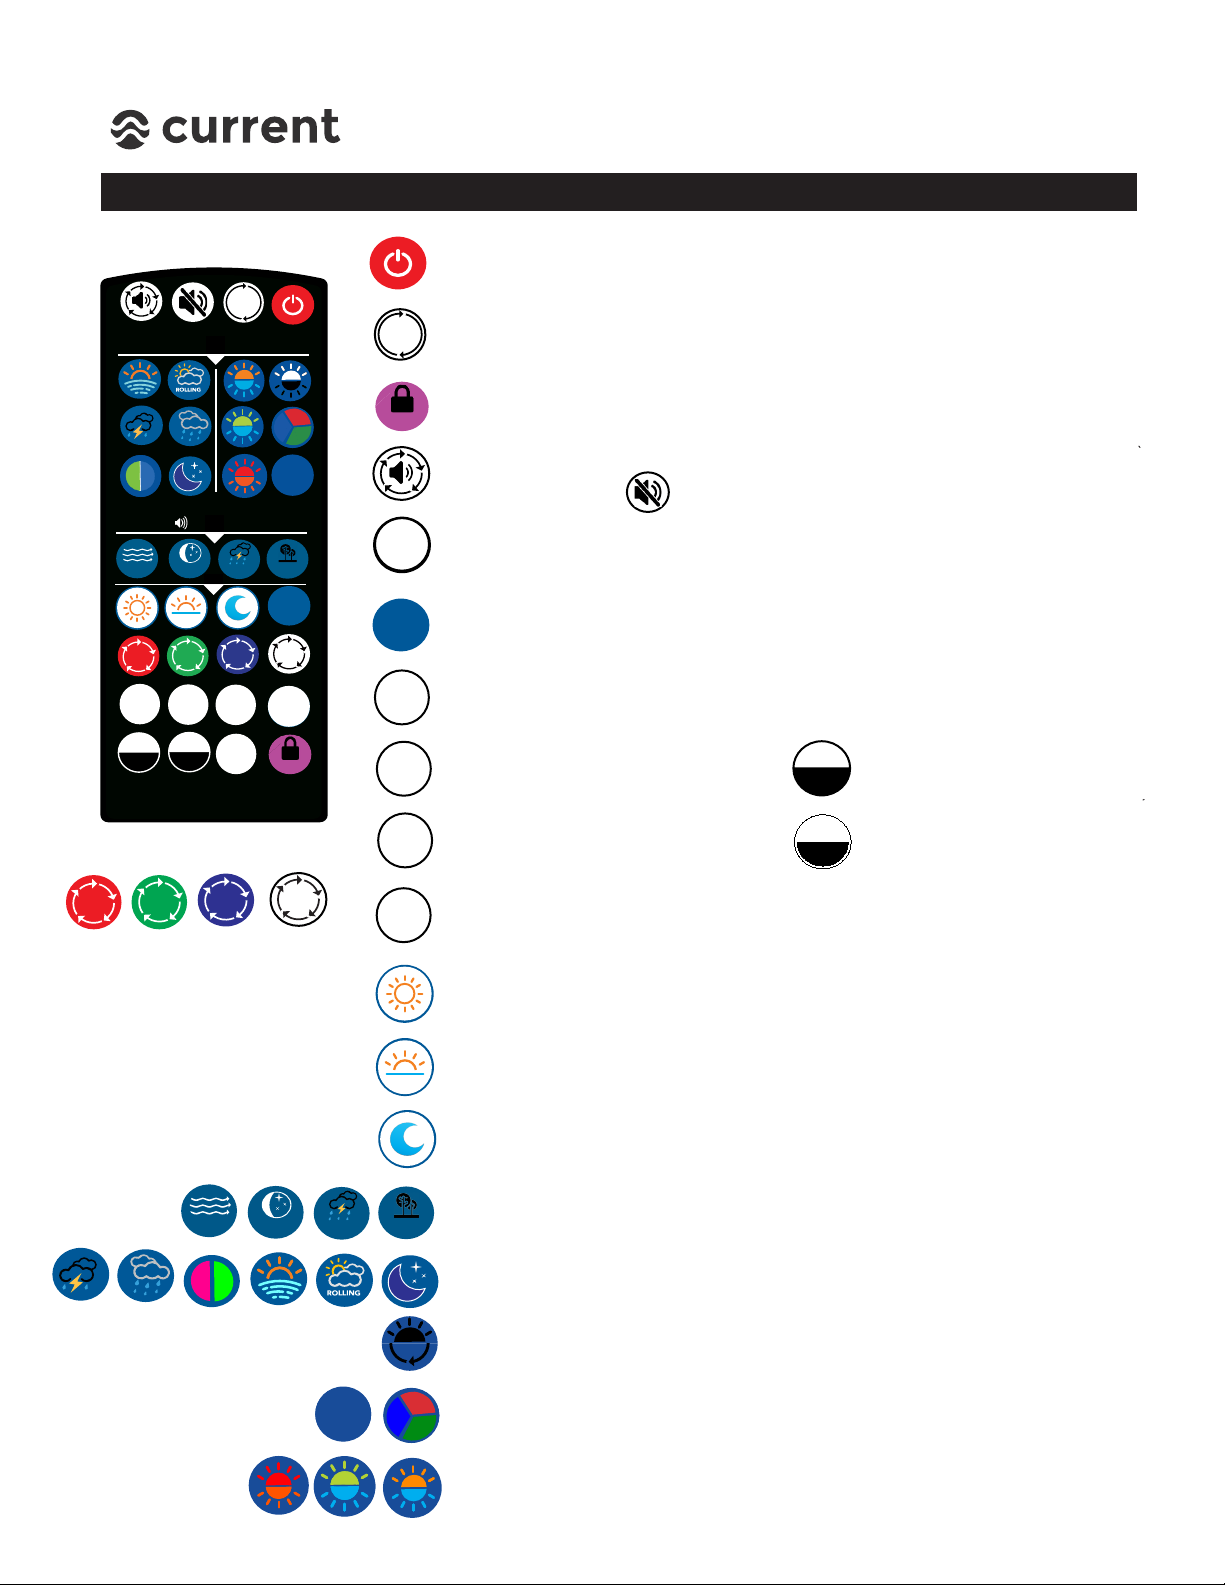
Main Power & Default - Turns controller and components OFF/ON.
Press & hold for 5 seconds to reset controller to factory defaults
RESUME TIMER - Press to turn system/lights back to Timer mode.
(Works in Timer B Mode Only)
LOCK/UNLOCK - Locks settings so other IR signals will not interfere.
Press and holdfor 5 seconds to LOCK/UNLOCK.
Volume - Changes audio volume. Level 0=OFF, press to adjust 1-5
levels (20% each) Press to MUTE.
TIMER A/B - Switches light from Timer A Mode (Daily On/Off Only)
to Timer B Mode (Circadian 24 hr. Timer with slow ramp/dim)
Custom Scene - Press to display custom scene of Main LED Light,
Background LED light and audio sound.
Set Clock/Time of Day - Press once to Set Clock and program
current time of day.
ON Time - Press once to program
ON Time.
OFF Time - Press once to program
OFF Time.
HOUR + - Press to adjust hours.
MINUTE- Press to adjust
minutes.
ENTER
ENTER
RESUME
STARGAZE
STREAM
RAINSTORM FOREST
OFF
TIMER
ENTER - Press enter after any time is programmed or color spectrum
(Daylight, Sunrise, Moonlight, Custom Scene)
DAYLIGHT - Press once to adjust daylight color spectrum, adjust with
RGBW keys. When complete, press ENTER.
SUNRISE - Press once to adjust sunrise color spectrum, adjust with
RGBW keys. When complete, press ENTER.
MOONLIGHT - Press once to adjust moon color spectrum, adjust with
RGBW keys. When complete, press ENTER.
RGBW - Press keys adjust
color spectrums.
Audio - Press to select audio on-demand,
Dynamic Effects - Press to select on-demand dynamic lighting program.
B/G Light - Press to select background lighting fade program,
RGB Fade/Color - Press to select RGB fade, Press again to stop at a static
color and save using M key.
B/G Light ON/OFF - Press to once to toggle background lighting
50% Brightness / 100% Brightness / OFF
M
LOCK
ENTER
RESUME
TIMER
3
SERENE SUN LE PRO LED
STEP 3 - Serene Remote Overview
Page 4
Installation Instructions
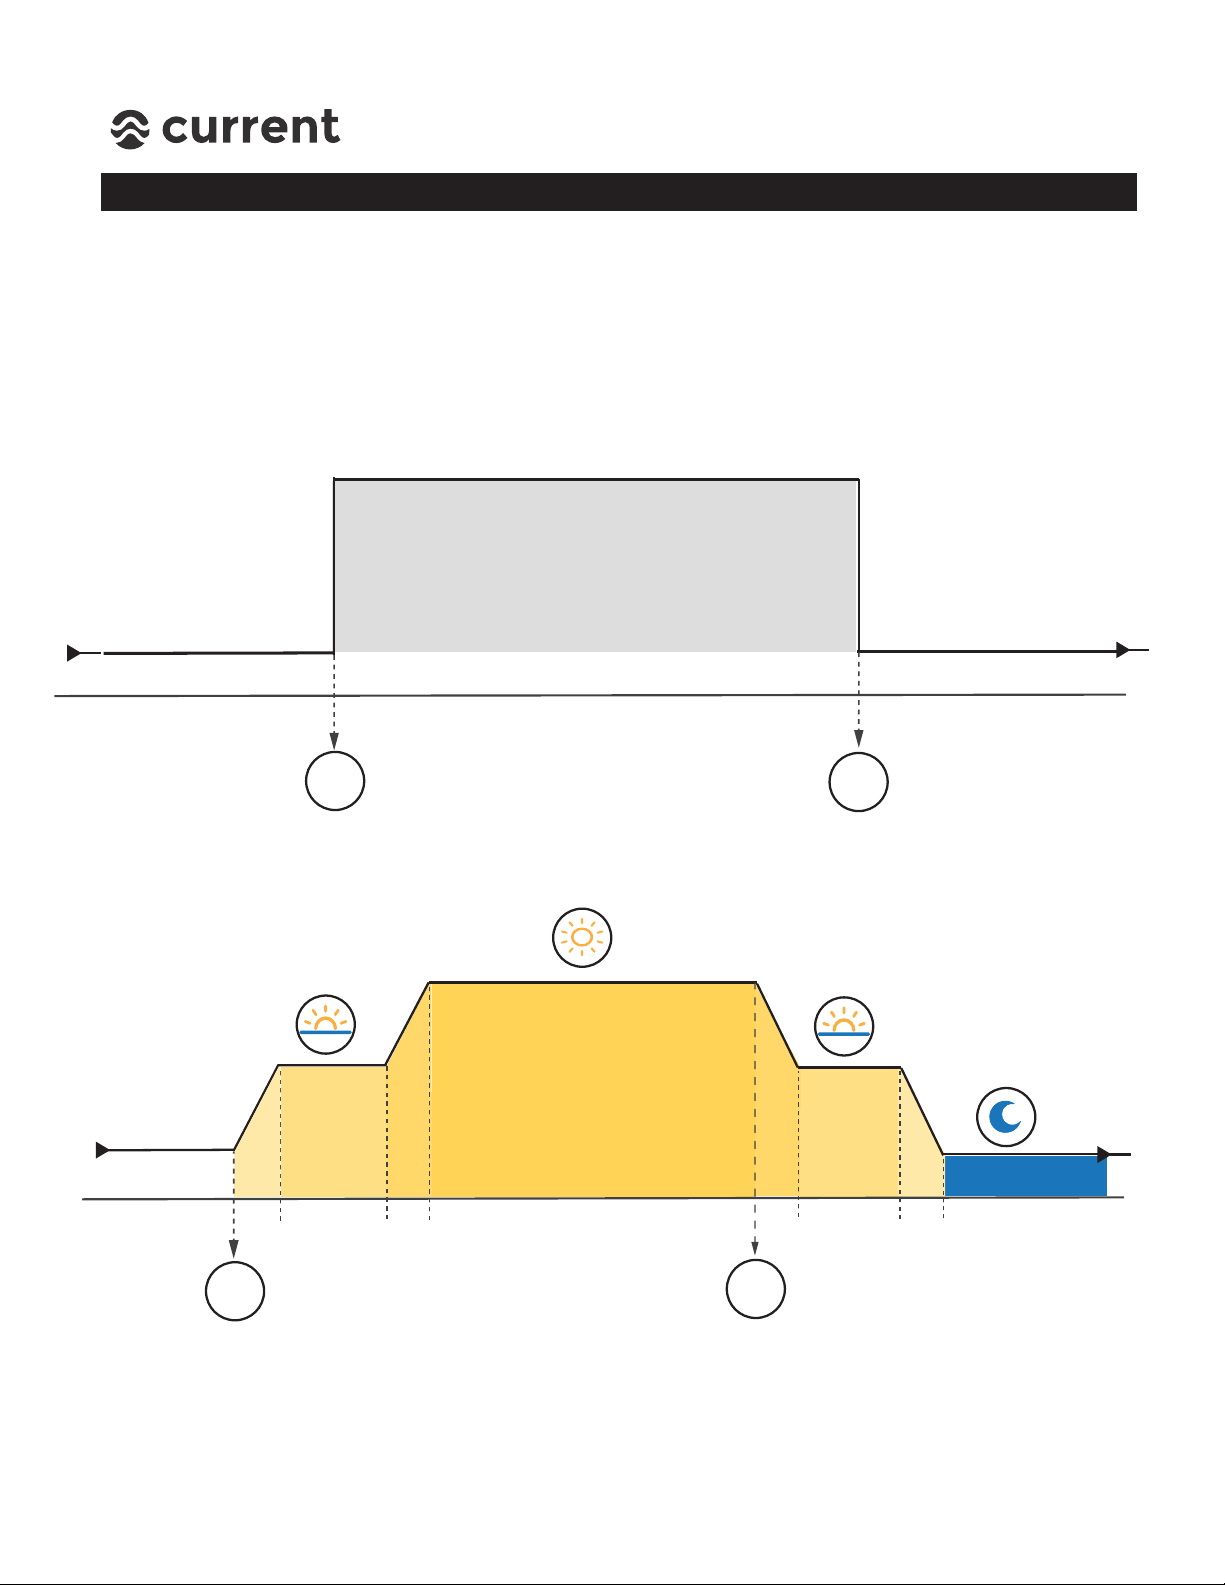
The Serene LED light controller features two timer functions:
1. Timer A - Dynamic On/Off timer for playing a custom scene (main light, background
light and audio) with a simple daily ON/OFF time.
2. Timer B - Circadian 24-Hour mode for running a gradual Sunrise, Daylight, Sunset,
and Moonlight programmed around a daily ON/OFF time.
TIME
ON-DEMAND MODE
ON
TIME
OFF
TIME
Adjustable
ON/OFF Time
Adjustable On-Demand Mode
Main Light
Background Light
Audio Program
TIMER MODE A - Simple Dynamic ON/OFF
OFF
TIME
15m
MOONLIGHT
SUNRISE
DAYLIGHT
SUNSET
ON
TIME
OFF
TIME
1 Hour
15m
15m
1 Hour
15m
Adjustable
ON/OFF Time
Adjustable
Color
Spectrums
TIMER MODE B - 24 Hour Circadian Timer
Default Program:
ON TIME: 07:00am
OFF TIME: 18:00 (5:00 pm)
On-Demand Scene “S”:
Main Light: Sunrays
Background: Blue/Orange Fade
Audio: Stream 50% Volume
Default Program:
ON TIME: 07:00
OFF TIME: 18:00
Daylight Spectrum: W-100%, R-100%, G-100%, B-100%
Sunrise/Sunset Color Spectrum: W-50%, R-75%, G-5%, B-75%
Moonlight Color Spectrum: W-0%, R-50%, G-0%, B-10%
“M”: 100% Red (same as A mode)
SERENE SUN LE PRO LED
STEP 4 - Serene Timer Overview
4
Page 5
Installation Instructions
Main Programming Functions:
Turning Serene ON/OFF
Press the MAIN ON/OFF power key to turn the Serene LED lights, background light
light and controller ON or OFF.
LOCK
LOCK & UNLOCK Settings
The integrated LOCK/UNLOCK feature is designed to ensure other IR signals (e.g.
TV remote) do not intefere with your Serene LED system. To LOCK all settings,
S
SET
CLOCK
OFF
TIME
ON
TIME
ENTER
HOUR
+
-
MINUTE
STREAM
BACK
MAIN
ENTER
RESUME
TIMER
M
OFF
ON
STARGAZE RAINSTORM
FOREST
TIMER
A/B
ENTER
LOCK
LIGHTING
SOUNDS
RESUME
STARGAZE
STREAM
RAINSTORM
FOREST
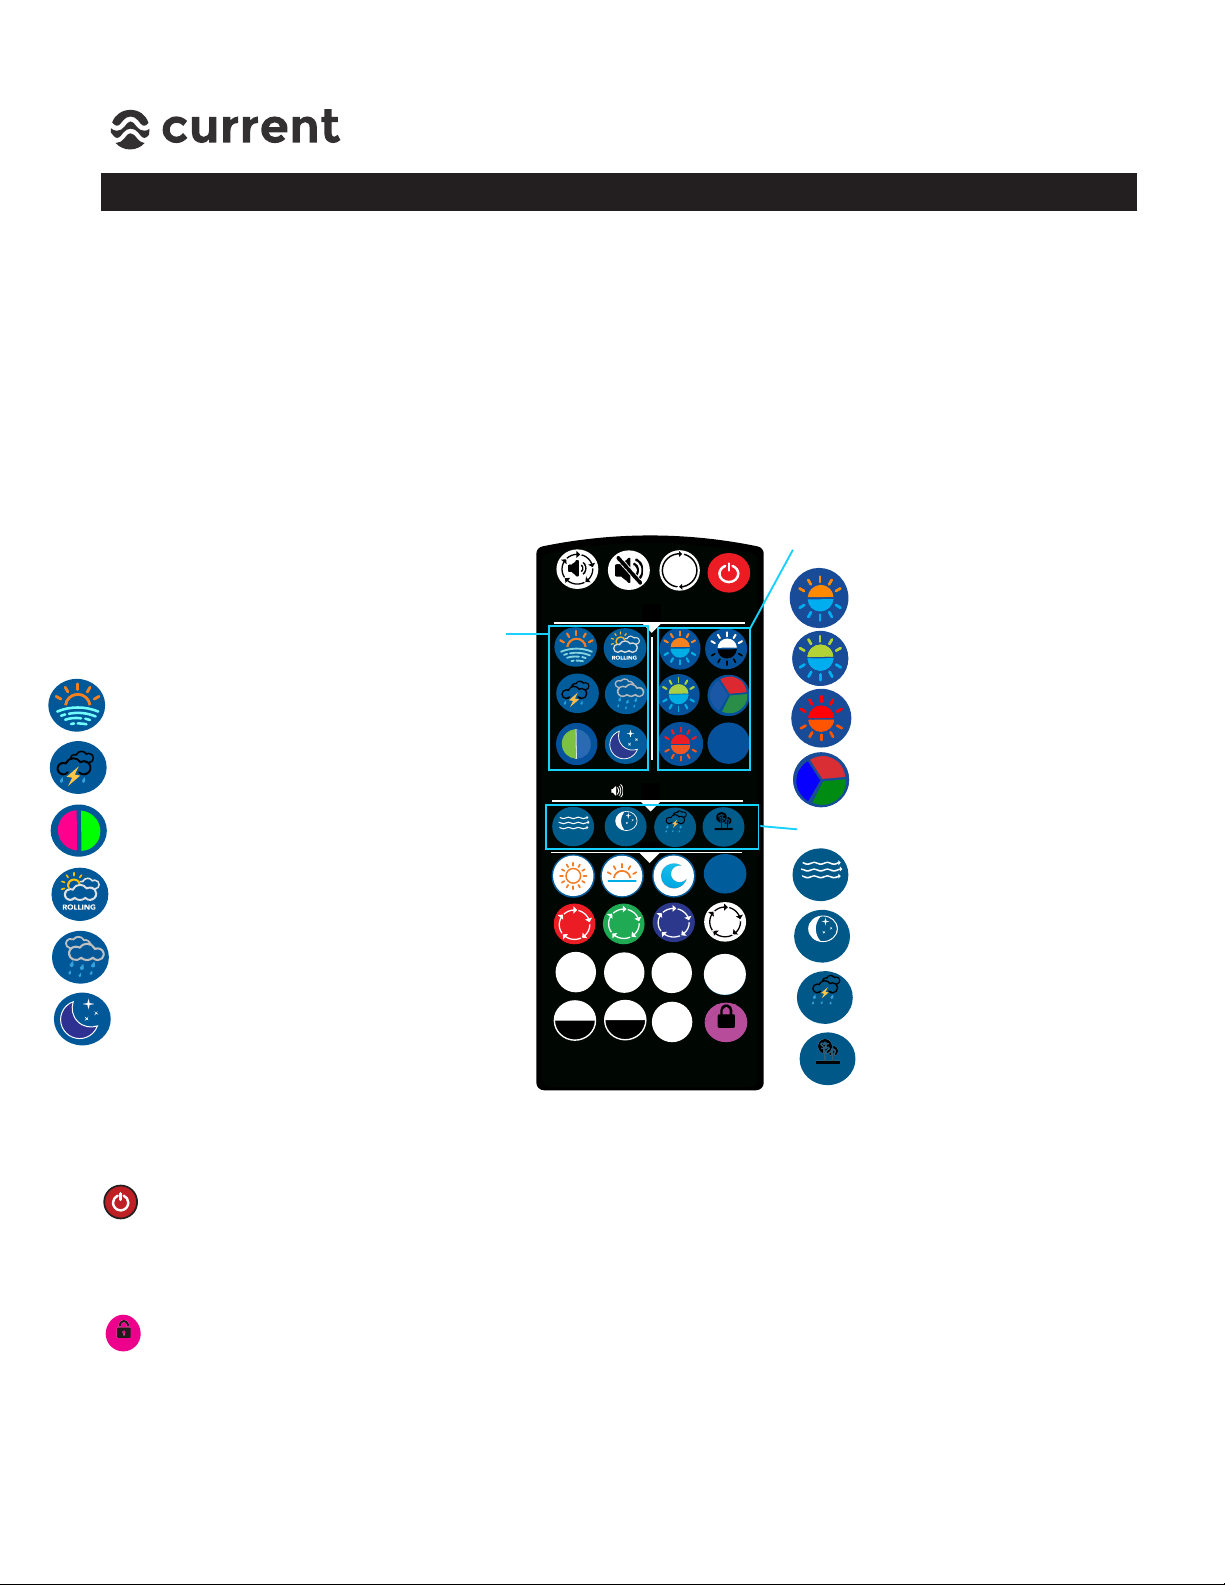
Controls Main Light
(above aquarium)
SUNRISE mimics a fading sunrise/sunset
STORM simulates clouds, rain & random
lightning strikes
GLOW FADE makes fluorescent fish and
aquarium decor pop in amazing colors
ROLLING CLOUDS gently rolls cloud cover
horizontally across your aquarium
RAIN mimics a gradual rain storm and
cloud cover
STARRY NIGHT casts a beautiful blue
moonlight with star light over your scape
Controls Background Light
Blue to Orange Fade
Blue to Green Fade
Red to Orange Fade
Plays audio sound effects
SERENE SUN LE PRO LED
5
DYNAMIC LIGHTING & AUDIO EFFECTS
The Serene LED Kit is designed to be simple and is plug-in-play ready to change your
aquarium experience. To begin and explore Serene, we suggest installing all the lighting
and audio components, turning the controller on and try all of the incredible dynamic
lighting and audio effects on-demand by simply pressing any of the dynamic keys.
Running your Serene LED in a timer mode is not required. You can enjoy the Serene
experience on-demand and simply press the POWER ON/OFF key when you desire.
What’s to experience? Here is a brief overview of the sleek effects Serene has built-in
and ready to play on-demand:
STEP 5 - Dynamic Lighting & Audio
Gently fades entire color
spectrum
Gentle waves and streaming
water w/ binaural focus
Binaural audio stimulating
relaxation, meditation, sleep
Relaxing sounds of an
approaching rain storm
Night time sounds of a
flowing stream in a forest
simply press the LOCK icon, “----” will display.
Page 6

Installation Instructions
2. Set current time of day by pressing SET CLOCK , use the HOUR+ and MINUTE-
to adjust time to the current time in 24:00 hour mode (e.g. 5:00 PM = 17:00) Press the
ENTER/RESUME key to complete.
S
SET
CLOCK
OFF
TIME
ON
TIME
ENTER
HOUR
+
-
MINUTE
TIMER
A/B
ENTER
RESUME
MAIN PROGRAMMING FUNCTIONS
You can adjust the audio level on your Serene LED system by simply pressing the
volume key. There are 6 total levels available, each will show on the display when
pressed. Display will read U0=OFF, U1=20%,..U5=100%. (Volume can also be adjusted
on the speakers (back dial) or muted by pressing the MUTE key.
PROGRAMMING TIMER A MODE:
1. Ensure controller is in TIMER A mode by pressing the TIMER A/B key . Controller will
display A or B indicating current mode.
3. Set time system should turn ON by pressing ON TIME key , use the HOUR+ and
MINUTE- key to adjust ON time (default is 07:00.) Press the ENTER/RESUME key
to complete.
4. Set time system should turn OFF by pressing OFF TIME key , use the HOUR+ and
MINUTE- key to adjust ON time (default is 07:00.) Press the ENTER/RESUME key
to complete.
5. To program the dynamic lighting modes (Custom Scene) to display at ON TIME:
STEP 1 - Press the “S” key, display reads S-CS (Saved Custom Scene).
STEP 2 - Select a MAIN lighting mode ( ), display reads P1-P6.
STEP 3 - Select a BACKGROUND lighting mode ( ), display reads b1-b4.
STEP 4 - Select desired Audio Sound ( ), display reads S1, S2, S3 or S4.
STEP 5 - Select audio volume by pressing , display reads U0, U1, U2, U3, U4, U5.
STEP 6 - Press and hold “S” key, display reads E-CS (Entered Custom Scene.)
At each daily ON time, the custom scene will play until programmed OFF time is
reached.
NOTE: If you wish to view any on-demand dynamic mode, simply press the desired
effects and when completely, press RESUME TIMER key at top . Otherwise, the
dynamic effects will continue until the next ON or OFF time is reached.
M
STARGAZE
STREAM
RAINSTORM FOREST
ENTER
RESUME
TIMER
S
SERENE SUN LE PRO LED
6
STEP 6 - CONTROLLER PROGRAMMING
Audio Volume Control - (for use when speakers are plugged into controller)
Page 7
Installation Instructions
2. Set current time of day by pressing SET CLOCK , use the HOUR+ and MINUTE-
to adjust time to current time in 24:00 hour mode (e.g. 5:00 PM = 17:00) Press the
ENTER/RESUME key to complete.
SET
CLOCK
OFF
TIME
ON
TIME
ENTER
HOUR
+
TIMER
A/B
ENTER
RESUME
PROGRAMMING TIMER B MODE:
1. Ensure controller is in TIMER B mode by pressing the TIMER A/B key . Controller will
display t-A (Timer A) or t-b (Timer B) indicating current mode.
3. Set time system should turn ON by pressing ON TIME key , use the HOUR+ and
MINUTE- key to adjust ON time (default is 07:00.) Press the ENTER/RESUME key
to complete.
4. Set time system should turn OFF by pressing OFF TIME key , use the HOUR+ and
MINUTE- key to adjust ON time (default is 17:00.) Press the ENTER/RESUME key
to complete.
5. To program color spectrums for DAYLIGHT, press and “L1” will display on controller.
Use the RGBW keys to adjust the color spectrum. When desired color
spectrum is acheived, press the ENTER/RESUME key .
6. To program color spectrums for SUNRISE/SUNSET, press and “L2” will display on
controller. Use the RGBW keys to adjust the color spectrum. When
desired colorspectrum is acheived, press the ENTER/RESUME key .
7. To program color spectrums for MOONLIGHT, press and “L3” will display on controller.
Use the RGBW keys to adjust the color spectrum. When desired color
spectrum is acheived, press the ENTER/RESUME key .
HOUR
+
-
MINUTE
ENTER
ENTER
RESUME
ENTER
ENTER
RESUME
HOUR
+
-
MINUTE
ENTER
ENTER
RESUME
-
MINUTE
color spectrum is reached, press the RGB Fade key again, then press and hold “M” key
“bCL” will display on screen and custom color is now saved.
2. To turn Background Light ON/OFF or adjust brightness, simply toggle the background
ON/OFF key . There are 3 settings - OFF (display reads bOFF), 50% brightness (display
reads b50), and 100% brightness (display reads b100).
3. To display any of the background fades on-demand, simply press the fade colors desired,
display will read b1 , b2 , b3 or b4 . Press RESUME TIMER key to exit
and resume 24-hour mode.
ENTER
ENTER
RESUME
ENTER
ENTER
RESUME
M
OFF
TIMER
ENTER
RESUME
TIMER
SERENE SUN LE PRO LED
7
STEP 7 - CONTROLLER PROGRAMMING
NOTE: In TIMER B Mode, the “S” key can only be used on-demand and cannot be
programmed into the daily lighting schedule.
PROGRAMMING BACKGROUND LIGHT - (for use when optional background light is
connected to controller.)
1. To program a custom background color, press the RGB Fade key . When desired
Page 8
Installation Instructions
SAFETY & WARRANTY INFORMATION
D
C
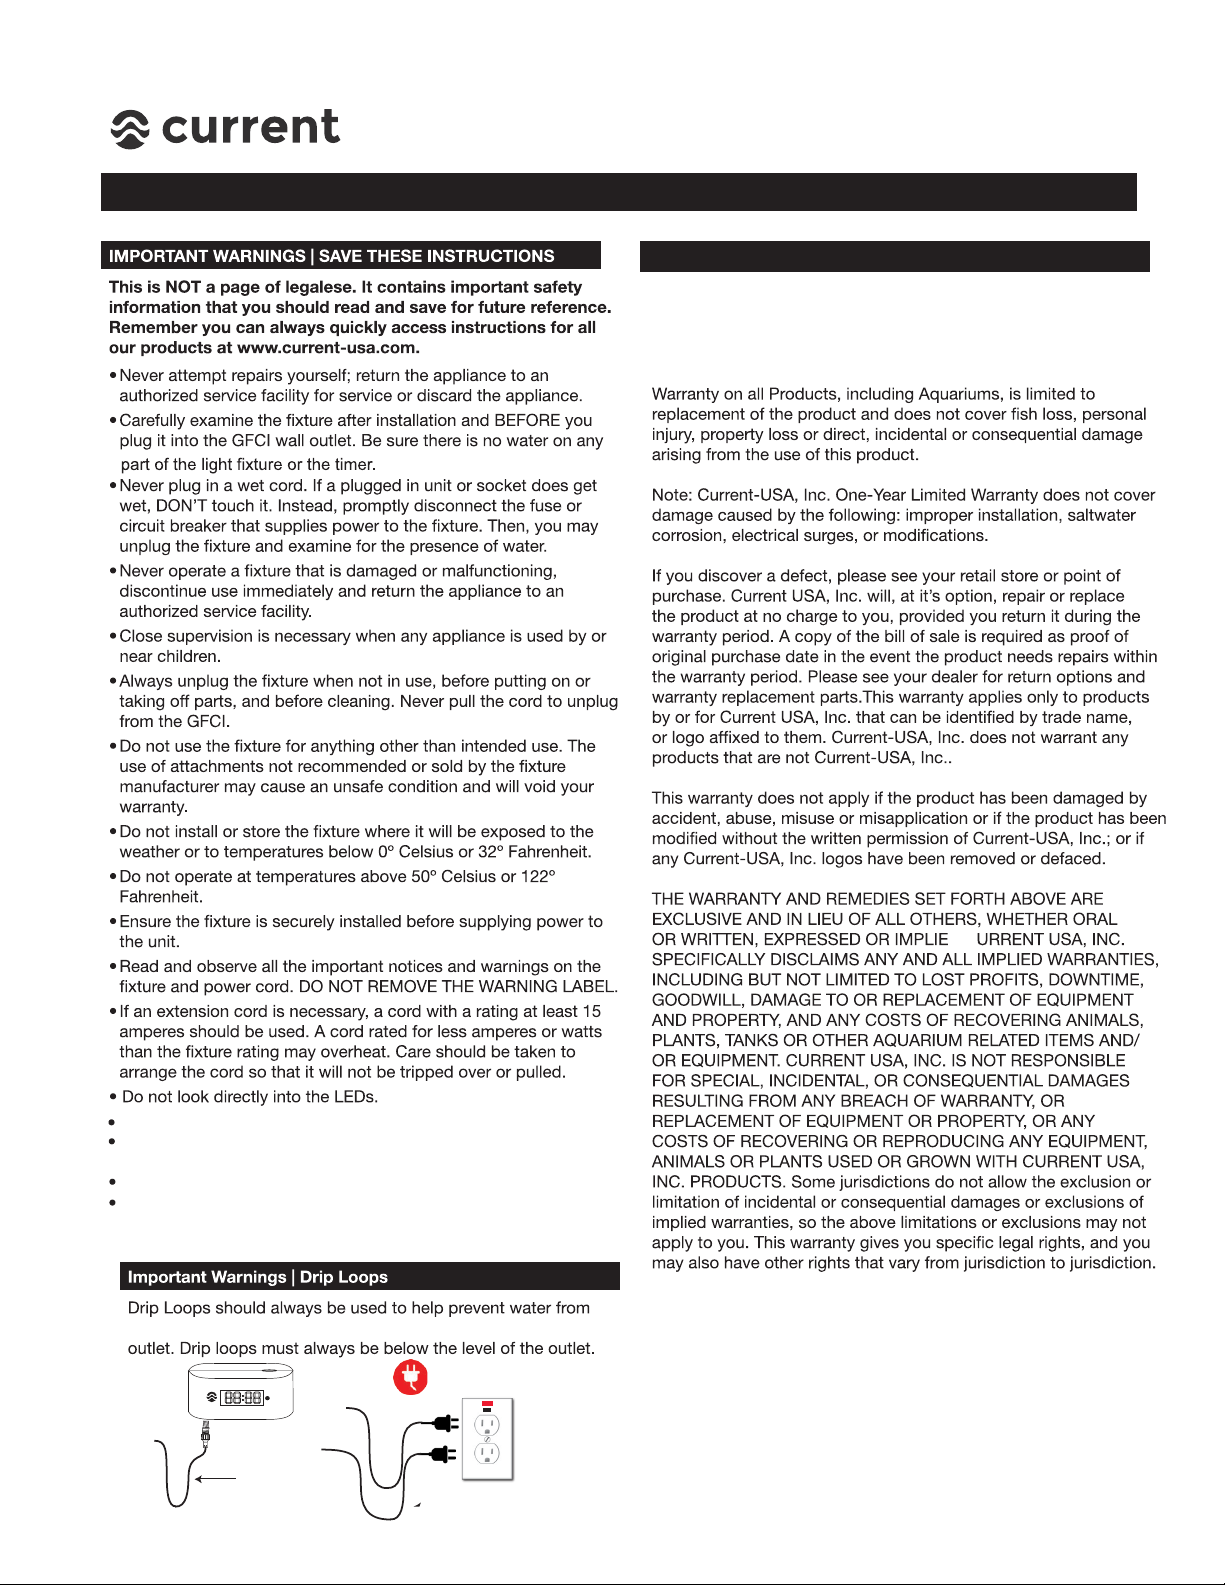
Always unplug with dry hands for maintenance or servicing.
Turn all controllers OFF and disconnect power supply before
performing any service or maintenance.
This product MUST be powered by a UL or ETL listed power supply.
To avoid possible electric shock, power supply MUST be plugged
into a GFCI wall outlet installed by a certified electrician in
accordance with all local codes. All products must have a drip loop.
This product MUST be purchased from an authorized Current-USA
reseller. Visit our website for a list of unauthorized resellers.
Current USA, Inc. warrants this product against defects in
materials and worksmanship for ONE (1) YEAR from the date of
original retail purchase and is none transferable.
Current-USA One Year Limited Warranty
GFCI Outlet
Drip
Loop
Drip
Loop
coming in contact with electrical connections and power
8
 Loading...