

Page 1

Koi chef
Automatic Koi Pond Feeder
Instructions for Koi Pond Model
Warning and Safety Instructions ....... Page 2
Feeder Installation ....... Page 3
Programming Feeder ....... Page 4
Warranty ....... Page 5
™
#8025
EMAIL:INFO@CURRENT-USA .COM
WW W.CURRENT-USA .COM
Page 2

Safety Instructions
WARNING
To guard against injury, basic safety precautions should be observed, including the following:
READ AND FOLLOW ALL SAFETY INSTRUCTIONS
Warning
To avoid possible damage to feeder, ensure the feeder is never submersed or placed into the water.
• Make sure when installing that the feeder can never fall into the water and that it is in a location
that it can be easily refilled.
• If the feeder falls into the water, or water drips inside the unit or timer compartment, remove the
batteries, open all parts and let the unit dry for two days. Replace batteries.
• Always remove batteries and keep in a cool dry place when not in use.
• Make sure the timer cover is always closed, never leave it open after setting the unit or changing
the batteries to prevent water damage.
• Warranty is void if the feeder is ever submersed or falls into the water.
SAVE THESE INSTRUCTIONS
2
WW W.CURRENT-USA .COM
Page 3

Feeder installation
Feeder Preperation:
A. Before Installation
1. Remove the Feeder from the box and inspect thoroughly for any signs of damage, even if the box
does not show damage. If you notice any damage (cracked covers, damaged timer, broken lid,
etc...) please stop and contact your dealer immediately.
2. Remove the lid and fill with koi food. The Koi Chef is designed to operate with pelleted koi food
a minimum of 1/16" in diameter. Replace lid and ensure lid locks tight.
3. Open timer cover and install two (2) C batteries (not included.) Follow programming instructions
listed on page 4.
The koi chef is designed to be installed two ways:
A. POST MOUNTING
1. Using mounting bracket included, screw bracket onto post flat side out. Ensure that the flat edge
faces down and notched edge faces up.
2. Slide feeder onto hanging bracket. Ensure that the bottom of the feeder is located above the
water as feed will drop down vertically from the feeder. See Figure A.
3. Test feeder by pressing the "M" button on the timer and ensure that the feed drops into the water
and not onto the ground.
Ensure feeder is over
waters edge
Figure A
3
WW W.CURRENT-USA .COM
Page 4
Feeder installation
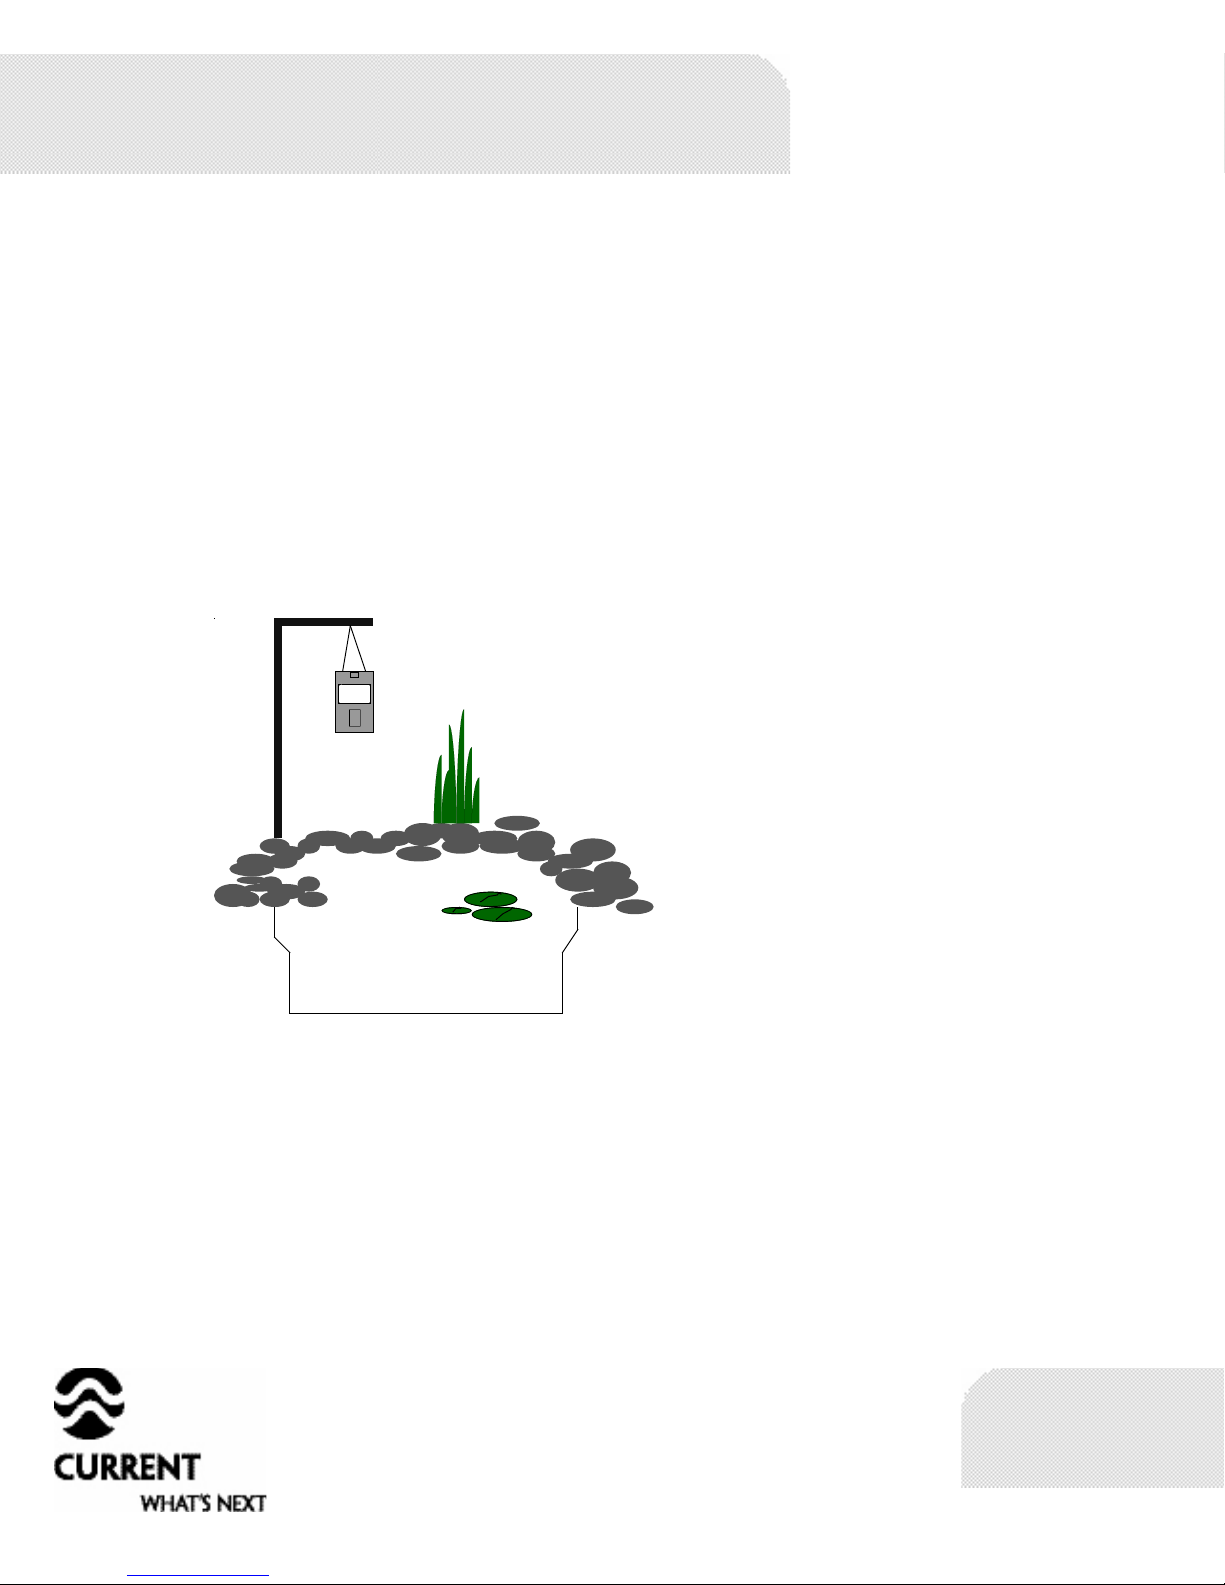
A. Hanging Feeder
1. The feeder can be hanged from any type of vertical structure such as a hanging pole, tree limb
or wooden support frame. The structure must be able to hold approximately 5 lbs. and must be
easy to reach in order to make refilling the feeder easy.
2. The feeder features four hanging holes located at the top of the housing, under the lid. Attach
either wire or chain to hanging holes and hang feeder over waters edge. See Figure B.
3. Test feeder by pressing the "M" button on the timer and ensure that the feed drops into the water
and not onto the ground.
Figure B
4
WW W.CURRENT-USA .COM
Page 5
Programming Timer
Feeder Function
The Koi Chef automatic pond feeder is designed to dispense pelleted koi pond fish food automatically 1-4
times daily, with a fixed quantity at each feeding interval. Regular feeding is the key to a healthy and long
fish life.
Specifications
Timing Range 0.00 to 23.59 hours
Differential Adjustment Approximately 15 gr to 30 gr per feeding
Daily Intervals Up to four times (4x) daily
Display LCD
Enclosure Plastic
Environment 40° F to 120° F, RH 0-95%
Dimensions 6"x8"x14"
Power Two (2) C-Cell batteries
Programming
Button Description:
MODE Button: local time and feeding time are set by this button.
SET Button: After pressing the MODE button, the SET button allows the respectively displayed
times to be changed.
"+" Button: After pressing the SET button, the respectively effected symbol (either time or feeding
mode) blinks and can be set to a higher number with "+" button.
"M" Manual Button: Feeder will automatically dispense one interval of food. Can also be used for
testing the unit.
1. SET THE CLOCK: Press MODE, then press SET, set the hour by pressing the "+" button, confirm
by SET, nonw set the minute and confirm again by SET. The timer operates on a 24.00 hour
cycle, therefore 5 p.m. = 17.00 hours.
2. SET THE FEEDING TIME: Each feeding interval dispenses a fixed amount of pelleted food.
Depending upon the number of fish in the pond, either a single feeding (usually around 15
grams) or a double feeding (usually around 30 grams) can be programmed for each interval.
When the double feeding option is programmed, there is a 60 second delay between each 15 gr
feeding.
Press the MODE, feeding time 1 is displayed with 00:00 and the digit 1 on the upper section of
the LCD.
Press the SET button, hours blink, then press "+" button to set the hours.
Press the SET button, minutes blink, then press "+" button to set the minutes.
Press the SET button, digit 1 blinks, then press "+" button to choose 1 or 2 dispensed feedings
for more or less food.
Press the MODE button to continue to the next feeding time. Keep pressing MODE to exit
program. program
To program feeding times 2 to 4, the repeat procedure above.
5
WW W.CURRENT-USA .COM
Page 6
feeding guidelines
GUIDELINES TO FOOD QUANTITY
1. The amount of food needed to keep your fish healthy is determined by the quantity of fish in the
pond and their size, the season and water temperature of the pond.
In general, the following guidelines should apply:
Winter Time - No Feeding
Late Autumn/Early Spring - One feeding per day
Warmer Periods of Autumn and Spring - Two feedings per day
Summer - Two to four feedings per day
Always feed as much as the fish will eat in 5 minutes, remove left over foods.
The weight of the fish food given is determined by the type of fish food purchased. It is always
advised to purchase a high quality fish food. These foods will give optimum feeding results in
small quantity, stay floating and never cloud the water.
Feeder Amounts:
One feeding equals +/- 15 gr. . The koi Chef can be programmed to dispense as little as 15 gr. (1
feeding, 1x per day) or up to 120 gr. (2 feedings, 4x per day.)
Battery Notes:
Under normal conditions, two C cell batteries will operate the feeder approximately 3 months.
However if low quality batteries are used or the feeder is exposed to high/low outside
temperatures, the operating time may be shortened.
Battery Installation:
Open the timer and battery cover to install the batteries (not included.) See the symbols + and _
for the correct way of installation of the batteries. Use two C size 1.5 V alkaline batteries (do not
use rechargeable batteries.) If the symbol "LO" appears on the left display, it means the batteies
are almost exhausted. The feeding procedure will still be carried out, but batteries will need to
be replaced in 2 days.
WW W.CURRENT-USA .COM
6
Page 7
troubleshooting
Problem
Feeder does not work.
Displays shows but the feeder
does not feed.
Feeder was dropped in water.
To Correct
Check the display. If there is nothing
on the display then replace batteries and
recheck.
Check and replace the batteries. If this
does not help, check to see if the rotor is
blocked by food clogged from moisture.
Disassemble lid, main body, timer cover
and batteries. Allow feeder to dry for 2-3
days. Place new batteries in feeder. If
feeder still does not work, contact your
dealer.
Note: If feeder has been dropped into
the water, warranty is void.
7
WW W.CURRENT-USA .COM
Page 8
Warranty
Current USA, Inc. One-Year Limited Warranty
Current USA, Inc. warrants this product against defects in materials and workmanship of a period of ONE (1)
YEAR from the date of original retail purchase. Light Bulbs carry a 3 month warranty.
Note: Current-USA, Inc. One-Year Limited Warranty does not cover damage caused by the following: Improper
installation, saltwater corrosion, and electrical surges.
If you discover a defect, Current USA, Inc. will, at it’s option, repair or replace the product at no charge to
you, provided you return it during the warranty period. It is required that you present this warranty card and
a copy of the bill of sale as proof of original purchase date, in the event the product needs repairs, within the
warranty period. Please see your dealer for return options. This warranty applies only to products by or for
Current USA, Inc. that can be identified by trade name, or logo affixed to them. Current-USA, Inc. does not
warrant any products that are not Current-USA, Inc. products. This warranty does not apply if the product has
been damaged by accident, abuse, misuse or misapplication or if the product has been modified without the
written permission of Current-USA, Inc.; or if any Current-USA, Inc. logos have been removed or defaced.
THE WARRANTY AND REMEDIES SET FORTH ABOVE ARE EXCLUSIVE AND IN LIEU OF ALL OTHERS,
WHETHER ORAL OR WRITTEN, EXPRESS OR IMPLIED. Current USA, Inc. SPECIFICALLY DISCLAIMS
ANY AND ALL IMPLIED WARRANTIES, INCLUDING BUT NOT LIMITED TO LOST PROFITS, DOWNTIME,
GOODWILL, DAMAGE TO OR REPLACEMENT OF EQUIPMENT AND PROPERTY, AND ANY COSTS OF
RECOVERING ANIMALS, PLANTS, TANKS OR OTHER AQUARIUM RELATED ITEMS AND/OR EQUIPMENT.
Current USA, Inc. IS NOT RESPONSIBLE FOR SPECIAL, INCIDENTAL, OR CONSEQUENTIAL DAMAGES
RESULTING FROM ANY BREACH OF WARRANTY, OR REPLACEMENT OF EQUIPMENT OR PROPERTY,
OR ANY COSTS OF RECOVERING OR REPRODUCING ANY EQUIPMENT, ANIMALS OR PLANTS USED OR
GROWN WITH Current USA, Inc. PRODUCTS.
Some jurisdictions do not allow the exclusion or limitation of incidental or consequential damages or
exclusions of implied warranties, so the above limitations or exclusions may not apply to you. This warranty
gives you specific legal rights, and you may also have other rights that vary form jurisdiction to jurisdiction.
8
WW W.CURRENT-USA .COM
 Loading...