

Page 1
OTHER INFORMATION
USER GUIDE
The C
uprinol P
o
w
er Spr
a
yer
is no
t in
t
ended f
or use with an
y o
ther treatment, either water-based or solvent-based and is not to be used with solvent based
w
ood pr
e
servers, creosote or creosote alternatives. It is not intended to be used with any agrochemicals (insecticides, fungicides, herbicides) or any application
o
ther than the recommended treatments.
It mus
t under no circumstances be used with flammable fluids.
Using the C
uprinol Power Sprayerfor application
o
f pr
oducts o
ther than those lis
t
ed abo
v
e c
ould damage it and wil
l in
validate the guarantee. This guarantee does not affect your statutory rights.
Thank you for purchasing the Cuprinol Power Sprayer. Please read all the instructions
in this user guide before using this product and retain them for future use.
CAUTION: DO NOT LEAVE SPRAYER FILLED WITH
PRODUCT OR WATER WHEN NOT IN USE OR OVERNIGHT.
R
EMOVE BATTERYBEFORE CLEANING.
CLEAN WITH WATER ONLY, DO NOTUSE WHITE SPIRIT
OR OTHER SOLVENTS.
NOZZLE: Remove nozzle retainer and wash
thoroughly all nozzle components including the
nozzle filter (4) under running water using a soft
nail brush to remove any product. Check to see
if nozzle holes are clear of any product. Do not use
wire, pins or similar sharp objects to clean or unblock
the nozzle. This will lead to damage and a poor
spray pattern. Do not allow product to dry as this
will block nozzle components. Remove nozzle
elbow (5) and clean thoroughly under running water.
TANK: Remove tank from pump body by releasing
lock button (22)(see Fig 2). Pour any remaining
product back into the original pack. Rinse out tank
throughly and wipe off any product from the base
and the main pump body with a cloth.
INNER PIPES: Fill the now clean sprayer tank with
5 litres of water and reattach to the pump body.
Do not replace nozzle elbow and nozzle
components back on the lance during this operation.
Switch on the Power Sprayer and allow the liquid
to flow through into an empty container and then
flush down a sink. Do not dispose of washings into
drains or watercourses. Continue pumping water
until the waste water runs clear (this might take
3-5 minutes) refilling the sprayer tank with clean
water if necessary.
SUCTION PIPE ANDINLET FILTER: Remove suction
pipe and inlet filter (25-29) and clean under running
water with a soft brush to ensure all product is
removed especially from the inlet filter (29).
To avoid losing smaller components we recommend
storing the
Power Sprayer fully assembled.
Reassemble the nozzle and attach to the nozzle
elbow and lance before storing.
J STORAGE
CAUTION: ENSURE SPRAYER IS THOROUGHLY
CLEANED AND DRY BEFORE STORAGE.
The C
uprinol Power Sprayer
has been de
signed
to operate with minimum maintenance.
Continuous satisfactory operation depends upon
proper care and cleaning after use.
Retain this user guide for future reference
(new copy may be downloaded from
www.cuprinol.co.uk)
Store the
Power Sprayer and charger in dry
conditions. Do not store the Power Sprayer with
any remaining water in the pump or in extreme
temperatures.
CLEANING AND STORAGE
TM
The Cuprinol Power Sprayer has been specially designed for use with Cuprinol Sprayable Plus
5 Year Fence Treatment, Cuprinol Sprayable Fence Treatment, Cuprinol Sprayable Decking Treatment,
Cuprinol Total Garden Wood Treatment and Cuprinol Garden Shades.
Visit our website
www.cuprinol.co.uk
for a useful step by step
product demonstration
F
ig 2
I CLEANING
J STORAGE
CHARGERS
Only use the rechargeable battery with the charger as supplied.
Never attempt to recharge non rechargeable batteries. Do not
e
xpose t
o w
a
t
er. Do not open the charger.
BATTERIES
Do not attempt to open the battery for any reason. Under extreme
conditions, battery leakage may occur. If you notice liquid on the
battery wipe off using a cloth avoiding skin and eye contact.
Do not re-use battery. Do not incinerate battery. Fire hazard! Do not
short circuit contacts of a detached battery for any reason.
Dispose of batteries at your local recycling centre.
Do not store the battery in any location where
temperatures may exceed 40ºC. Only charge
the battery at ambient temperatures of between
4ºC and 40ºC using the charger provided.
1 YEAR GUARANTEE
The guarantee is valid for 1 year from date of purchase and covers
the c
omple
t
e
C
uprinol P
o
w
er Spr
a
y
er
.
We will repair the Cuprinol Power Sprayer or replace free of charge
if it is f
aulty due t
o a manufacturing or material fault.
The guar
an
t
ee doe
s no
t c
over the application of the
C
uprinol Fenc
e
T
r
e
a
tmen
t
, Decking T
r
e
a
tment, Total Garden Wood Treatment and
Gar
den Shade
s. The following are specifically excluded from the
t
erms and c
onditions o
f this guar
an
t
ee:
•
Damage caused b
y misuse or impr
oper hand
ling o
f the
C
uprinol
P
o
wer Sprayer
or no
t used in ac
cordance with the instructions.
• Normal “wear and tear”
• Damage suffered through negligence, wilful damage, improper
use or accidental damage.
• Any modifications made by the purchaser to the
Cuprinol Power
Sprayer or repairs carried out by an unauthorised service agent.
• Damage caused by immersion in water, damp, fire, natural light
and a
tmospheric c
onditions.
This guarantee does not affect your statutory rights.
TO MAKE A CLAIM UNDER THE GUARANTEE
Return the sprayer to the store where purchased together with proof
of purchase, or call the ICI Customer Advice Centre for further details.
If returning the Cuprinol Power Sprayer, use the original packaging
or a similar box to prevent further damage.
FOR TECHNICAL PRODUCT ADVICE CONTACT:
The C
us
t
omer Advic
e C
en
tr
e
ICI Paints, Wexham Road, Slough, SL2 5DS
T
elephone 0870 444 1111
www
.c
uprinol.c
o
.uk
FOR REPUBLIC OF IRELAND:
Dulux Paints (Ireland) Ltd,
Commons Road, PO Box 45, Cork
Telephone +353 (0)21 422 0222
Cuprinol, the tree device, Cuprinol Power Sprayer,Garden Shades, Cuprinol
Total
and the distinctive livery are trade marks of Imperial Chemical Industries
Plc. © ICI 2006 (11/06)
Page 2
• If the Power Sprayer does not operate for any
other reason, or components of the product have
become damaged, then please contact the ICI
Customer Advice Centre.
A new battery is not fully charged and must
therefore be charged before the sprayer is used
for the first time (approx. 1
1
⁄4 hours). Remove the
battery from the Power Sprayer unit by
simultaneously depressing the battery release
buttons on either side of battery, with thumb
and forefinger and gently pull out the battery from
the battery pack holder. Insert battery into the
charger supplied and place on a dry surface within
1 metre of a 240V socket. Connect and switch
mains on (see picture A). Once the battery is fully
charged, the red indicator on the charger goes out
and the green indicator on the charger lights up.
When re-charging allow 11⁄4 hours for the battery
to become fully charged. Insert the battery back
into sprayer body. One full charge will give up to
30 minutes of continuous spraying (approximately
10 litres of fluid) which is sufficient for approximately
12 fence panels.
Recharge the battery before each use.
CAUTION: DO NOT RUN THE SPRAYER DRY (I.E. WITHOUT
PRODUCT OR WATER)
ON INITIAL USE: The majority of components are
assembled, however you will need to attach the
lance (9) SECURELY to the handle (13) to avoid
leaks during use (see picture B). Ensure all fittings
are tight prior to use but do not use a spanner
or similar tool to tighten.
Test for proper assembly and tightness of hose
by filling with water and doing a test spray.
This is also important to prepare the pump for the
fence treatment fluid. The amount of water in the
tank must be at least 3 litres (to ensure that the
suction pipe is fully immersed guarding against
air locks). Fill by removing the tank cap (21) from
the pump body and use the funnel supplied (32).
The
Power Sprayer is switched on by depressing
the switch on the handle (20). Continuous pressure
must be applied for the Power Sprayer to work
- releasing the switch will stop the sprayer. It is
important to note that the spray may not emerge
immedia
tely as it takes up to a minute for the fluid
to reach the nozzle.
DO NOT LOOK DOWN THE NOZZLE WHILST THE SPRAYER
IS SWITCHED ON.
Onc
e w
a
t
er is r
ele
ased fr
om the nozzle, you only
need t
o t
e
st spray for 1 minute.
ON REUSE AND AFTER STORAGE: Check all component
parts ar
e fr
ee o
f e
x
c
essive wear and tear; worn
parts mus
t no
t be used. Check for damage to unit
and attachments. If damaged do not use.
When r
e
-
as
sembled check the s
ys
tem by spraying
w
a
ter before using
C
uprinolfluid, t
o ensure there
ar
e no le
ak
s (as per ins
tructions f
or initial use).
Ensur
e y
ou ha
ve tested the
P
o
w
er Sprayer
with
water prior to filling the product (see step C above).
SHAKE OR STIR BOTTLE/TIN OF YOUR SELECTED
CUPRINOL FL
UID THOR
OUGHL
Y BEFORE OPENING.
Remove the tank cap (21) from the
Power Sprayer
spout and, using the funnel supplied (32), pour
contents into the Power Sprayer (see picture D).
When filling the Power Sprayer for the first time a
minimum of 3 litres of fluid is needed to allow the
pump to prime effectively. Please note that the
Power Sprayer is designed to hold one 5 litre
bottle/tin of fluid. When refilling take care not to
overfill, as not all product in the tank will have
been sprayed. Wipe any fluid from the screw
thread on the spout and replace cap.
When first using the Power Sprayer with Cuprinol
products, the pump may take up to a minute
to release the fluid from the nozzle. Do not look
down the nozzle whilst the Power Sprayer
is switched on. Place the Power Sprayer shoulder
strap (18) over your head and rest across your
body, placing the tank behind you. For best results
keep the sprayer nozzle approximately 15 to 30cm
(6 to 12”) from the surface to be coated.
Using a slow, sweeping motion, spray horizontally
across the area to be coated by turning at the end
and overlapping approximately half of the previous
pass each time (see picture F). This should ensure
that you achieve an even finish. An alternative
technique for spraying large areas such as sheds
or summerhouses, is to adopt a small circular
motion, rather than spraying in a horizontal line.
As with any sprayer it may take a couple of minutes
to perfect your technique. Vary the distance of the
nozzle from the surface of the wood until you get
the best finish. Begin slowly and increase the pace
as you get used to spraying. Take care not to spray
too quickly as this may result in an uneven finish.
Similarly, spraying too slowly will result in excess
product being applied causing runs. Should this
happen, simply even out with a brush.
The
C
uprinol P
o
w
er Sprayer
has a v
ery c
on
tr
olled
spray pattern, however, as with any spray product
a limited amount of overspray will be created.
This can be minimised b
y avoiding spraying
in windy conditions and by using cardboard
or plastic as a shield. Masking off windows, doors,
patios, brickwork, gutters, downpipes, fascias,
drains, plants etc., is recommended when spraying
outdoor buildings such as sheds and summerhouses.
Any overspray should be cleaned up
immediately,
whilst still wet, with water and household
detergent if necessary. Excessive spillage on plants
should be rinsed off immediately before drying.
If the Power Sprayer stops spraying, check if the
battery needs charging, if the nozzle has become
blocked (see cleaning) or if an airlock has occured
(see troubleshooting).
S
wit
ch off sprayer and refill using procedure in
step D. Take care not to overfill.
CA
UTION: DO NO
T T
AMPER WITH THE SPRA
YER WHEN
IT IS S
WIT
CHED ON AT ANY STAGE.
Any unused fluid can be removed from the
C
uprinol P
o
wer Sprayer
and r
e
tained f
or future
use. Simply unscrew the tank cap (21) from the
pump body and pour the remaining product back
in
t
o the original f
luid container (see picture H).
B
A
D
F
H
HOW TO USE
May take up to one minute to release the fluid from the nozzle on first use
Do not look down the nozzle whilst the sprayer is switched on
NEVER use with solv
ent based products
W
ear eye protection when spraying
Do no
t s
witch on unless filled with product or water
Do not point at self or others whilst in use
K
eep childr
en, b
ys
tanders and pe
ts away during use
Always check and test with water before each use
Read and comply with all instructions and precautions on product labels
Use only with
C
uprinolproducts r
ec
ommended
Do not overfill
Do not immerse pump component fully in water
Store clean and empty
Do no
t modify this unit
Do not connect to an external pressure source
Do no
t use if c
omponen
ts are excessively worn
Use only with batteries supplied, do not connect to external power source
For further advice contact the ICI Customer Advice Centre on 0870 444 1111
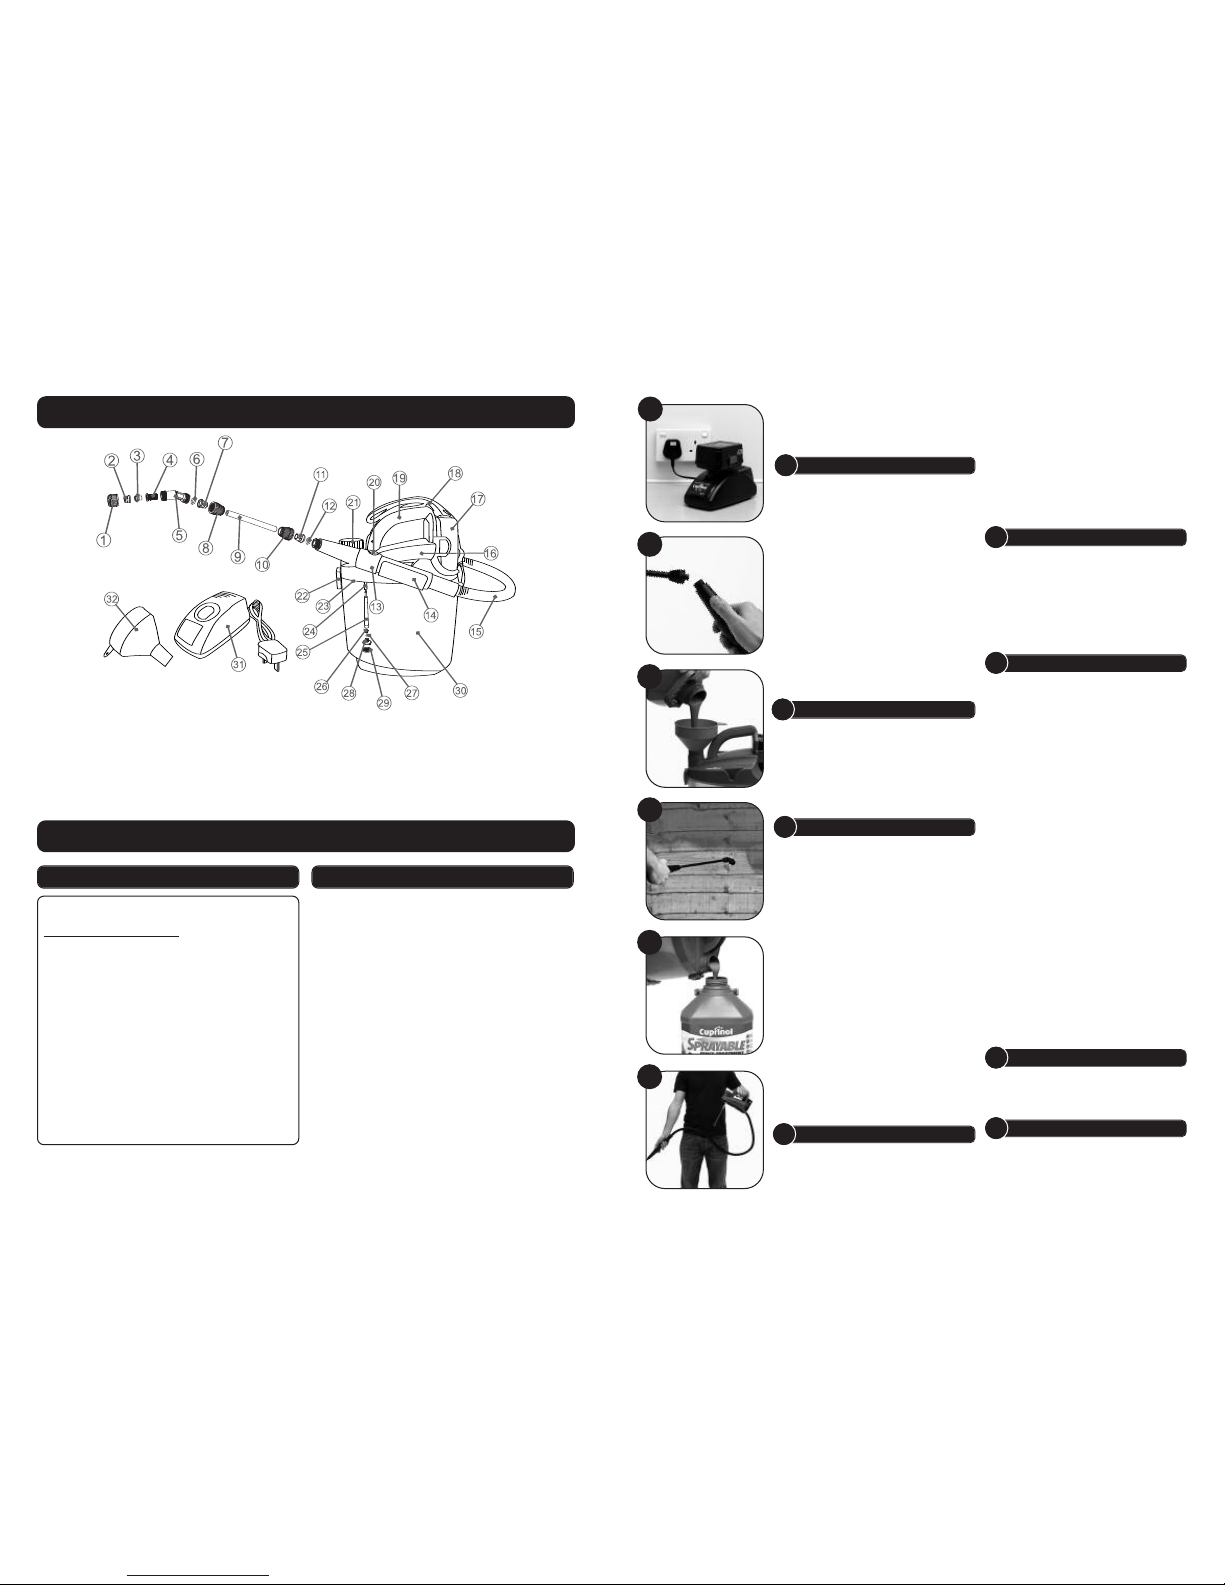
1. Nozzle retainer
2. Nozzle
3. Pre-orifice
4. Nozzle filter
5. Nozzle elbow
6. Round gasket (A)
7. Cone (A)
8. Cone nut (A)
9. Lance
10. Cone nut (B)
11. Cone (B)
12. Round gasket (B)
13. Handle
14. Handle holder
15. Hose
16. Top housing
17. Battery pack
18. Carrying shoulder strap
19. Carrying handle
20. ON/OFF switch
21. Tank cap
22. Lock button
23. Tank cover
24. Suction tube
25. Suction pipe
26. Valve spring
27. Valve ball
28. Suction head
29. Inlet filter
30. Tank
31. Charger
32. Funnel
PARTS LIST
• If the Power Sprayer stops operating, then it is possible that
the battery has run down. This will occur after 30-40 mins.
Please recharge the battery using the battery charger supplied.
•
If the
P
o
w
er Spr
ayer
pr
oduc
e
s a poor quality spr
ay, then either
the nozzle (2) or suction pipe and inlet filter/valve (25-29) may
be blocked. Turn off the
Power Sprayer, remove the nozzle, clean
in w
a
t
er (see cle
aning) and carefully reassemble. Repeat for the
suction pipe and inle
t filt
er (25-
29).
•
If the
P
o
w
er Sprayer
is s
til
l pumping but ther
e is no spray from
the nozzle, it is possible that either:
a) The nozzle is blocked (see cleaning)
b)
An air lock has oc
curred in the pump. This may occur if the
suction pipe is exposed above the level of the fluid in the tank.
Under these circumstances, turn off the
Power Sprayer, unscrew
the no
zzle and dr
ain the contents of the lance back into the
P
o
wer
Sprayer
tank. Hold the main pump unit in one hand and at the
same time hold the lance with the other hand below the level
o
f the pump unit
. Switch on and keep running until no fluid
is sprayed from the lance (see Fig 1). Carefully reassemble the
nozzle, ensuring all the fittings are tight prior to use but do not
use a spanner or similar t
ool to tighten. Reattach to the tank then
restart the
Power Sprayer. Please note, it may take 2-3 minutes
for fluid to be released from the nozzle.
TROUBLESHOOTINGKEY PRECAUTIONS
A CHARGING BATTERY
B
ASSEMBLY OF COMPONENTS
C WATER TESTING
D FILLING WITH FLUID
E SPRAYING
F SPRAYING TECHNIQUE
G REFILLING
H FINISHING
Fig 1
 Loading...