

Page 1
RoadRelay 4 Quick Start and Configuration Guide
RoadRelay 4 - The world’s number one engine and electronic systems
monitor gives you a window into your engine, right from your driver’s seat.
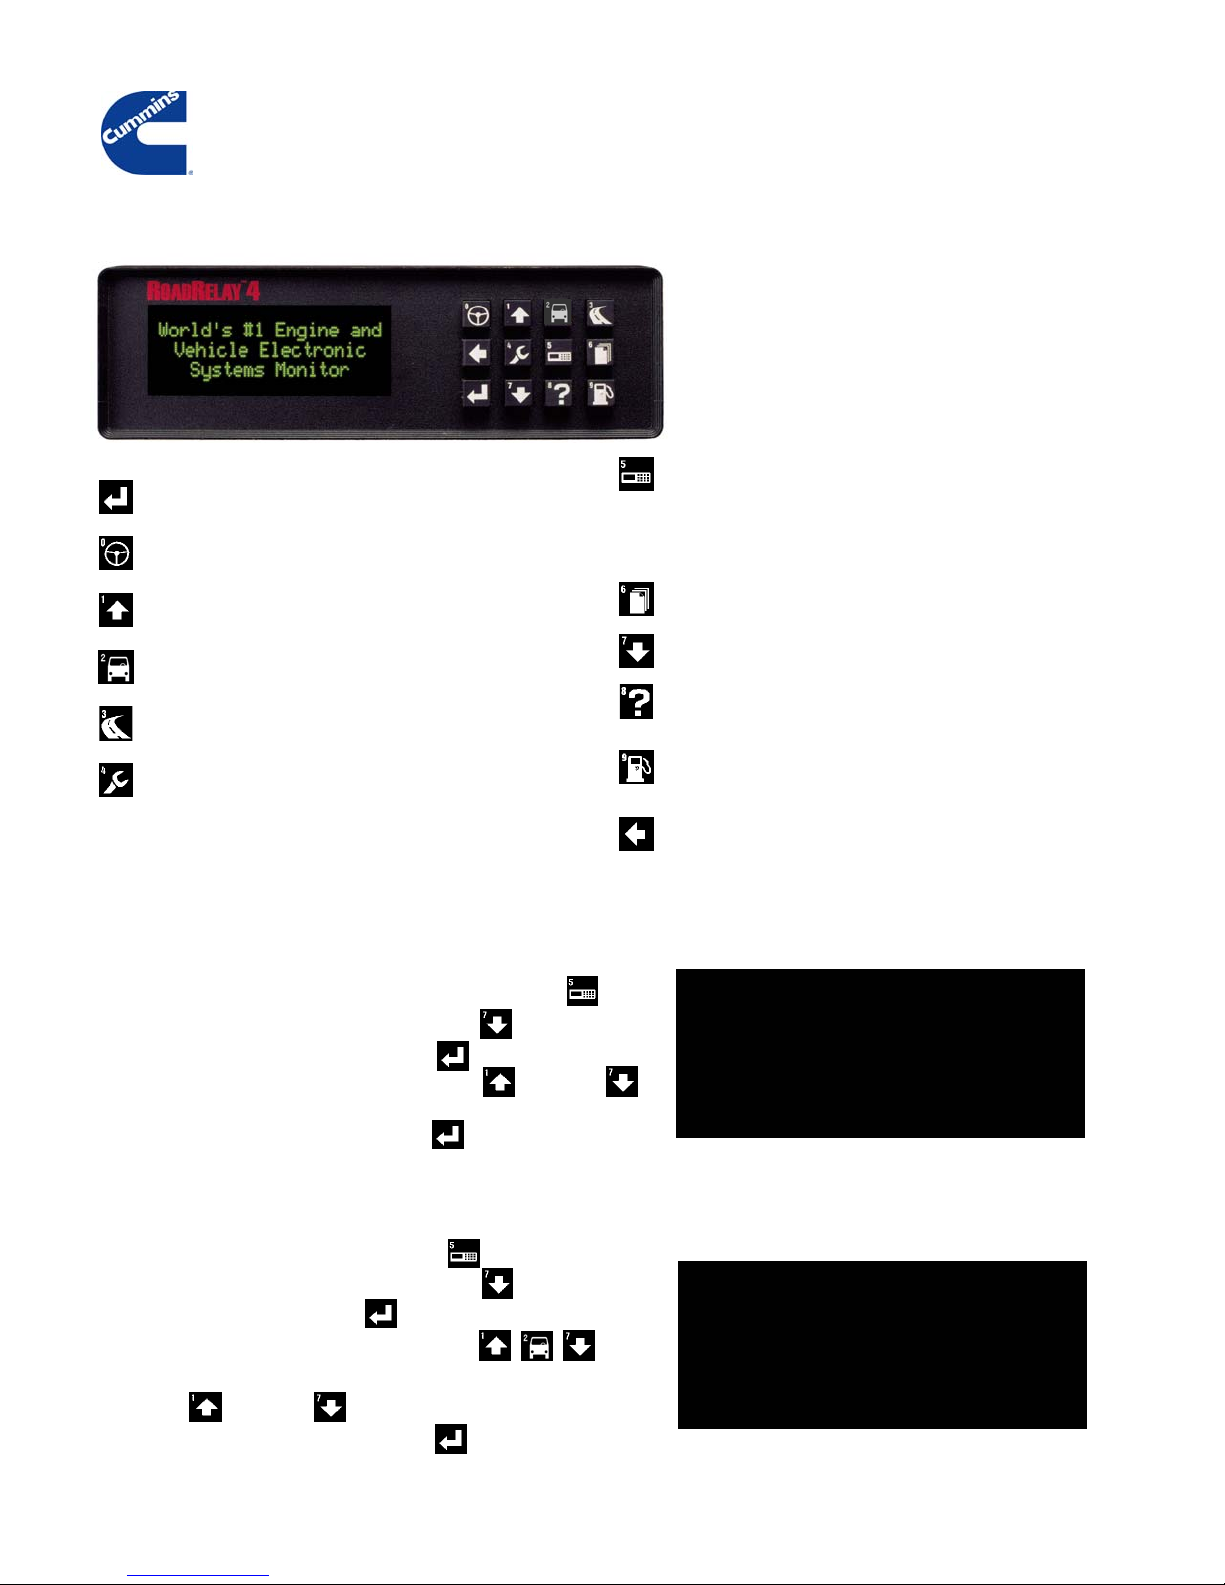
Getting to know the Keypad
Enter Key: Used for entering or accepting value on
screen.
Key 0 Steering Wheel: Used to bring up Estimated Time of Arrival
(ETA) set-up screen and ant-theft lock/unlock (if activated).
Key 1 Up Arrow: Used for moving through menu options and
increasing display brightness when on default screen.
Key 2 Vehicle: Used to bring up leg driving display, idle display,
leg summary, reset leg, operating hours, ETA, and average MPG.
Key 3 Road: Used for recording actual routes traveled, which later
can be compared to desired routes.
Key 4 Wrench: Used to bring up vehicle monitor screens,
including summary screen, fault table, print faults, reset faults,
Preventative Maintenance (PM) schedules, reset PM, and
service history.
The twelve back-lit keys allow you to select the
various menu screens. The up and down arrows
allow you to scroll through the menus.
Key 5 Front Panel: Used to access the configuration for time,
time format, date, alarm enable, alarm time, basic units, volume
units, economy units, ETA speed, driver ID, route enable,
transmission type, shift reminder, over-speed, over-RPM, PM
configuration, vehicle setup, vehicle monitor configuration,
security mode setup, anti-theft password, and software version.
Key 6 Pages: Used to access cumulative totals, trip parameter values,
driver messages, print trip option, and reset trip option.
Key 7 Down Arrow: Used for moving through menu options
and decreasing display brightness when on default screen.
Key 8 Question Mark: Used to provide description of key functions,
bring up language screen for selecting desired language, and give
technical help desk contact information.
Key 9 Fuel Pump: Used to bring up menu selections for fuel
purchases, review of purchases, print fuel log, reset fuel log, and
state-line-crossing information.
Back Key : Used for moving backwards in screens or back to
default driving screen.
Setup and configuration
1. Choosing the Vehicle Application
To set the vehicle application, press the Front Panel key.
Scroll through options using the DOWN arrow.
Select Vehicle Setup using the Enter key.
Select the appropriate application using the UP or DOWN
arrow.
Enter your selection using the Enter key.
2. Setting the Time
To set the time, press the Front Panel key.
Scroll through options using the DOWN arrow.
Select Time using the Enter key.
Enter the time using the numbers on the keys,
followed by the Enter key.
Use the UP or DOWN arrow to select AM or PM.
Enter your selection using the Enter key.
Vehicle Setup:
Vehicle Setup:
Heavy Duty-- <=
Heavy Duty-- <=
RV
RV
Clock Time:
Clock Time:
1:27 PM
1:27 PM
Page 2
3. Setting the Date, Over-speed, Over-RPM, and
Preventative Maintenance Schedules
The Date is set using the Front Panel (#5) key.
Over-speed, Over-RPM, and Preventable Maintenance Schedules
are set using the Pages (#6) key.
Scroll through options using the DOWN arrow.
Select desired option using the Enter key.
Adjust the settings using the UP or DOWN arrow.
Once you have the right selection, make sure you enter it using the
Enter key.
Using RoadRelay 4
The most commonly used screens are the Driving Display, Vehicle
Monitor Summary, and Vehicle Monitor Fault Table
Interval
Interval
Type: Distance
Type: Distance
Range: 15000
Range: 15000
Count: Up
Count: Up
1. Driving Displays (RV Driving Display Screen shown)
The Leg Driving Display screen is also the default screen.
No matter which screen is displayed, pressing the Back
arrow a few times will take you back to this screen.
You can also access this screen using the Vehicle (# 2)
key.
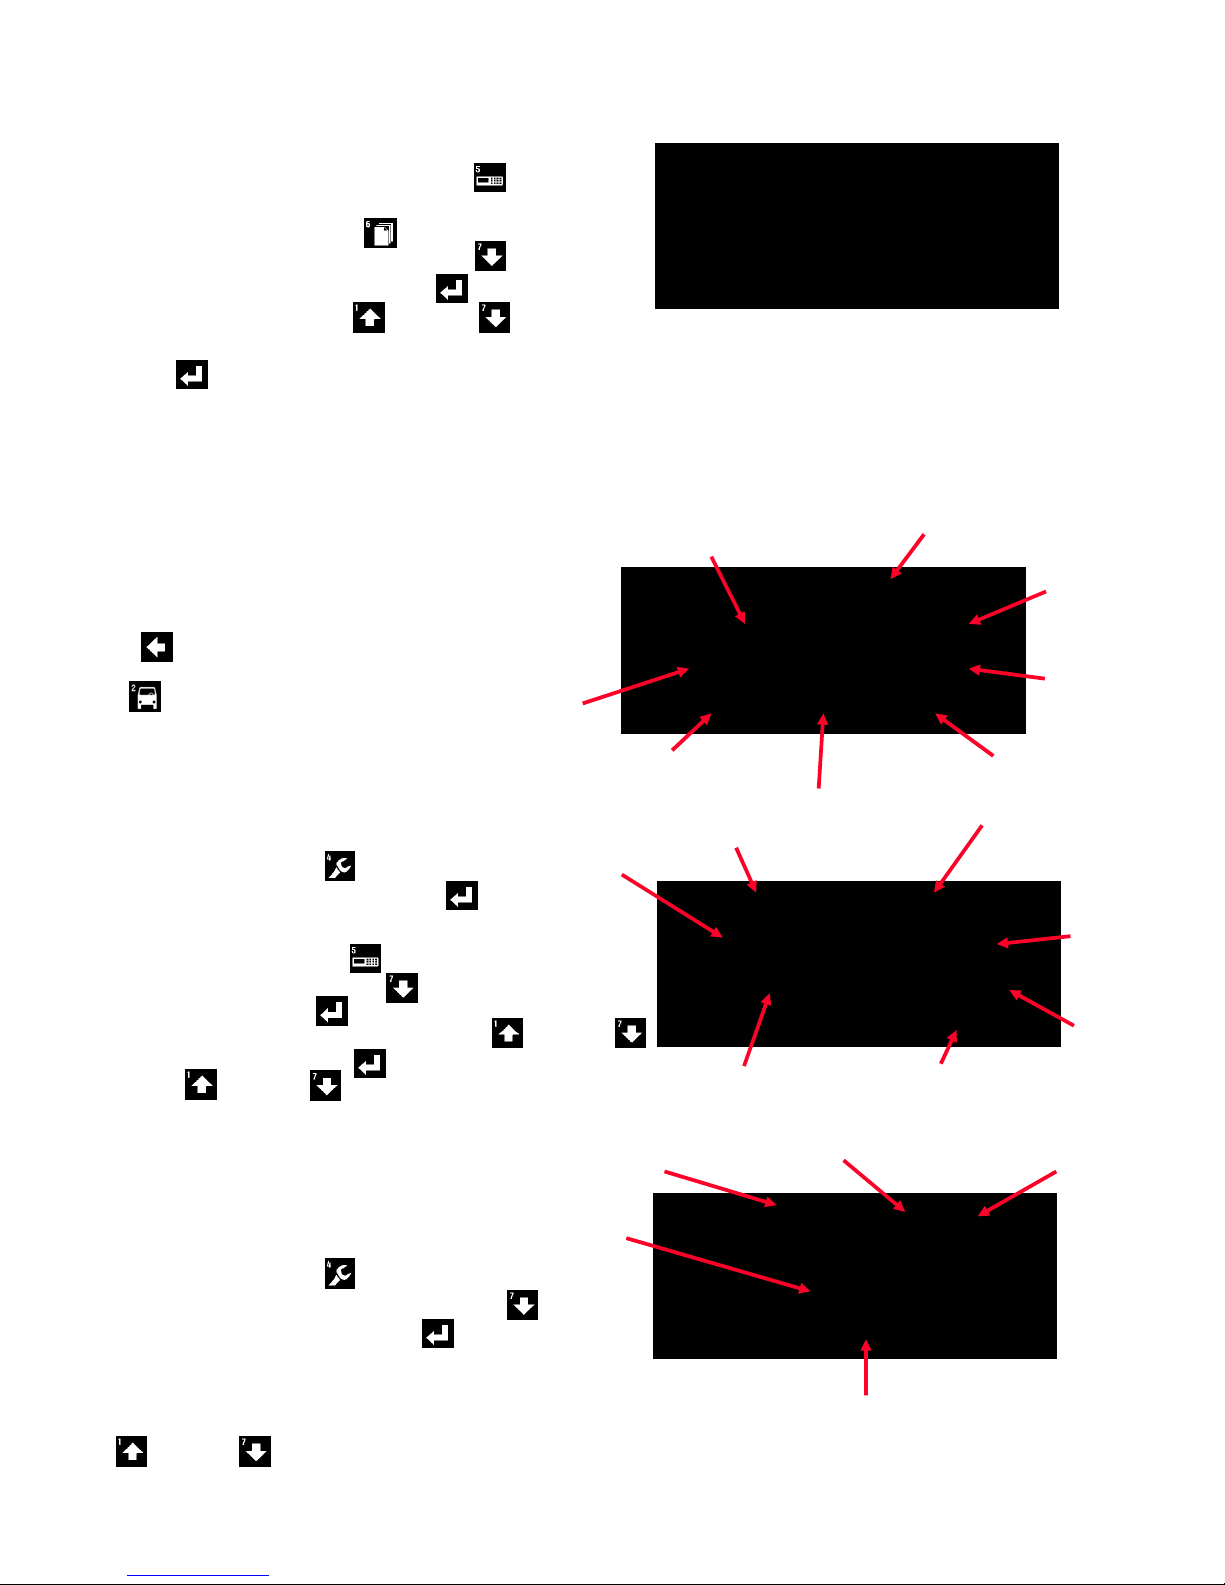
2. Configurable Vehicle Monitor Summary
The Vehicle Monitor Summary screen displays key ‘real time’
engine and transmission information.
To get to the Vehicle Monitor summary screen:
Press the Wrench (# 4) key.
Select Vehicle Monitor using the Enter key.
To customize this screen:
Press the Front Panel (#5) key.
Scroll down using the DOWN arrow and select VMonitor
Config using the Enter key.
Select the field you want to change using the UP or DOWN
arrow, then press the Enter key.
Use the UP or DOWN arrow to choose a parameter. Up to
eight parameters can be displayed on the summary screen.
3. Vehicle Monitor Fault Table
Cruise Set Speed
Gear selected/Gear Actual
Engine
Load %
Fault Code
Cruise Control
Status
1:27 PM
1:27 PM
CruiseOn 7126.5 mi
CruiseOn 7126.5 mi
60.7 mph 9.59 mpg
60.7 mph 9.59 mpg
D3/D3 168 F 198 F
D3/D3 168 F 198 F
Trans. Fluid Temp
Engine
Speed
1560 rpm 23.4 psi
1560 rpm 23.4 psi
85.3% 13.0 V
85.3% 13.0 V
55.8 mph 24.2 psi
55.8 mph 24.2 psi
Vehicle Speed
Fault Status
Time
Trip
Distance
Average
Fuel
Economy
Engine Coolant Temp
Boost
Pressure
198.4 F
198.4 F
Engine
Coolant
Temp
Fault Count
Voltage
Engine
Oil
Press
Fault information can be found on the Vehicle Monitor fault
Table screen.
To get to the Vehicle Monitor Fault Table screen:
Press the Wrench (# 4) key.
Scroll down to Faults Table using the Down arrow.
Select Faults Table using the Enter key.
Changing the Brightness of the display
You increase or decrease the brightness of the display using the
Up and Down arrows when the Leg Driving Display screen is displayed.
Fault
Description
Code 235 Inact. 1
Code 235 Inact. 1
Low Engine Coolant
Low Engine Coolant
Level:
Level:
Add Engine coolant
Add Engine coolant
Recommended Action
Cummins Inc. July 2004
Bulletin Number: 4103527 7/04
 Loading...