

Page 1

Specifications
Pressure Range: 30–125 psi (2.1–8.62 bar)
Temperature Range: 40–100°F (4.4–37.8°C)
Rated Service Flow: 0.75 gpm (2.8 Lpm)
Filter Capacity: 2500 gallons (9460 L)
Turbidity: 5 NTU max
Parts Included:
• Filter head with built-in bracket and compression fittings
• 750R filter cartridge
• Screws for mounting bracket
Technical Support: 1-800-645-5426
(M-F 7:30 am - 5:00 pm CST)
To Drain
Provide an air gap between
end of tube and drain to
prevent contamination
To Water
Dispenser/Icemaker
T-Flush valve is required only when this
unit is used with an icemaker.
Filter Outlet
146481 Rev B 03/04
Easy-Change Water Dispenser/Icemaker Filter
Installation and Operating Instructions
Model IC-750
•Phillips screwdriver
• File (Copper tubing only)
•Pipe cutter or hacksaw (copper tubing only)
•Utility knife (for plastic tubing)
•Towel
•Pencil
•Tape Measure
Tools and Materials Required
•Shut off valve
• Saddle tap valve w/ shut off
•1/4" plastic or copper tubing, or flexible
hose
•Fittings
•T-Flush valve (Model FVK-100*)
Recommended when used with an icemaker
that is not in combination with a water
dispenser. This valve is installed after the
filter, so the filter can be flushed to remove
carbon fines or release pressure before
removing cartridge. See Diagram below.
*Not Performance Tested or Certified by NSF.
Optional Materials
Installation
• For standard installation on 1/4-inch copper, plastic or flexible hose cold water
line.
• Please read all instructions and precautions before installing and using your
IC-750 water dispenser Icemaker Filter
• Numbered diagrams correspond with numbered steps
• Instructions refer to standard installation on existing water line to refrigerator.
Before installation, make sure there is enough slack in existing water line to
allow refrigerator to be moved out from the wall.
Precautions
WARNING: Do not use with water that is microbiologically unsafe or of
unknown quality without adequate disinfection before or after the
system.
CAUTION: This filter must be protected from freezing, which can cause cracking
of the filter and water leakage.
CAUTION: Because of the product’s limited service life and to prevent costly
repairs or possible water damage, we strongly recommend that the
head of the filter be replaced every ten years. If the head of your
filter has been in use for longer than this period, it should be
replaced immediately. Date the top of any new head to indicate the
next recommended replacement date.
CAUTION: Turn off water supply to head without cartridge if it must be left
unattended for an extended period of time.
NOTE:
• For cold water use only.
• Make certain that installation complies with all state and local laws and
regulations.
• The contaminants or other substances removed or reduced by the selected
cartridge are not necessarily in your water. Ask your local water municipality
for a copy of their water analysis, or have your private well tested by a
reputable water testing lab.
• After prolonged periods of non-use (such as during a vacation) it is
recommended that the system be flushed thoroughly. Let water run for 2-3
minutes before using.
• The filter cartridge used with this system has a limited service life. Changes
in taste, odor, color and/or flow of the water being filtered indicate that the
cartridge should be replaced.
The IC-750 with 750R or 1000R replacement cartridge is Tested and Certified by
NSF International to NSF/ANSI Standard 42 for the aesthetic reduction of Taste
and Odor and Chlorine and Particulate Class I*, Standard 53 for the reduction of
Cysts*, Lead*, Lindane*, Atrazine*, and Turbidity*.
*Applies to 1000R replacement cartridge only.
Page 2
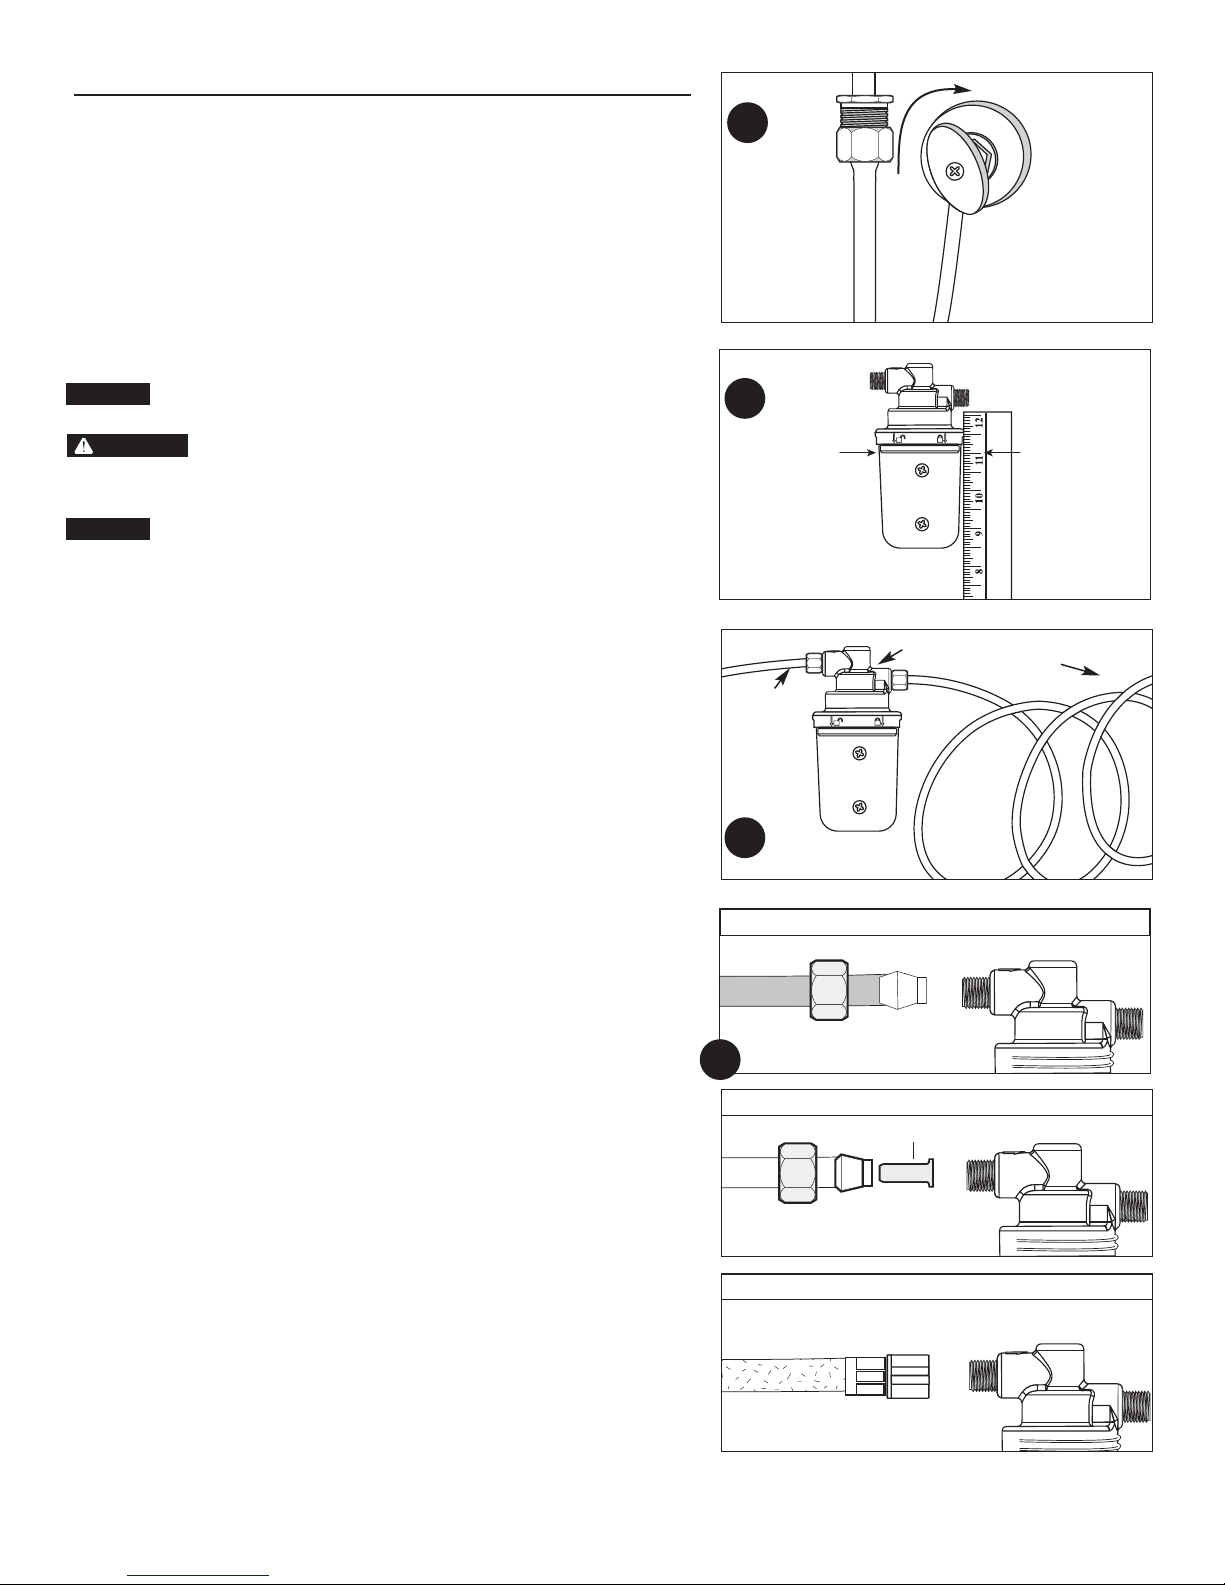
1A
1B
COPPER TUBING Hand tighten, plus 1 to 1-1/2 turns with a wrench
PLASTIC TUBING Hand tighten, plus 1 to 1-1/2 turns with a wrench
FLEX TUBING Wrench tighten, do no over-tighten
3
Nut
Nut
Copper
Ferrule
Insert
Plastic
Ferrule
1/4” Compression Flexible/Braided Hose
2
Inlet
Outlet
To Refrigerator
Installation Continued
1. Mounting the Filter System
(A) Turn off the cold water supply to the refrigerator and dispense the water from the refrigerator
door until water flow stops to release the pressure in the pipes before starting installation.
Place a tray or towels under the cold water line to catch the excess water after the pipes are cut.
NOTE: Before starting installation, turn off the icemaker in the refrigerator and store the
ice cubes in a clean container in the freezer.
(B) Select location under sink, in basement or near refrigerator where filter is to be mounted.
NOTE: Filter should not be more than 3 feet from the appliance.
NOTE: Allow 1-1/2-inches (33 mm) clearance below housing or 11-inches below filter head
to enable filter cartridge changes.
CAUTION: Filter head should be mounted on stud or firm surface. The mounting bracket will
support the weight of the filter and help prevent strain on the cold water line.
WARNING: DO NOT screw mounting bracket directly onto the refrigerator.
(C) Filter head should be mounted in vertical position. Use mounting bracket as a template to
mark screw locations. Mount filter head in marked location using screws.
CAUTION: Water supply to the refrigerator should have a separate shut off valve installed before
filter. If it does not, a separate shutoff should be installed.
2. Cutting or Disconnecting the Tubing
Use a 7 to 8 foot coil (3 coils, approximately 10" diameter) of plastic, copper or flexible hose
between the outlet of the filter and the refrigerator.
Determine the length of plastic, copper or flexible hose needed to connect the inlet and outlet of filter.
Using a pipe cutter or hacksaw for copper tubing or utility knife for plastic; cleanly cut tubing or
disconnect flexible hose from refrigerator. Leave a minimum of 2-inches (51 mm) of pipe after
shut-off valve in case pipe must be re-cut at a later time. Deburr ends of remaining pipe with a file.
3. Connecting the Tubing and Fittings
(A) Connecting the Inlet.
Assemble fittings as shown. Press tubing into fitting until it stops. Hand tighten plus 1 to
1-1/2 turn(s) with a wrench.
(B) Connecting the Outlet.
NOTE: If the water cannot be flushed through an existing water dispenser, install T-Flush
valve first and then connect the outlet of the filter the same as step 3A. See Page 1 for a
T-Flush valve diagram.
Connect outlet of filter the same as step (3A)
4. Installing the Cartridge
(A) Hold cartridge from the bottom when installing or changing the cartridge. Use caution not to
scrape knuckles on bracket when locking the cartridge into place.
(B) Line up the arrow on the cartridge with unlocked padlock on head. Insert cartridge and turn
arrow to locked padlock. See Diagram R4 in Filter Cartridge Replacement on page 3.
5. Putting the Filter into Operation
(A) Turn on water supply to allow filter to fill with water. Check for leaks. If it leaks, see Troubleshooting.
(B) Flush filter for 5 minutes through the water dispenser or if appliance is equipped with only an
icemaker, through the T-Valve, and discard water.
(C) Turn on Icemaker.
(D) Check for leaks before leaving installation. If it leaks, see Troubleshooting.
NOTE: A drinking water cartridge may contain carbon fines (very fine black powder). If your
icemaker contains black carbon fines, discard ice.
(E) Installation is Complete.
2
Page 3

Important Notice: Read this performance data and compare the capabilities of
this system with your actual water treatment needs. It is recommended that, before
installing a water treatment system, you have your water supply tested to
determine your actual water treatment needs.
This system has been tested according to NSF/ANSI 42 for the reduction of the substances listed below. The concentration of the indicated substances in
water entering the system was reduced to a concentration less than or equal to the permissible limit for water leaving the system, as specified in
NSF/ANSI 42.
Model 750R Cartridge
Influent
Challenge Reduction
Substance Concentration Requirements Average
Standard 42 Aesthetic Effects
Chlorine 2.0 mg/L ± 10% ≥ 50% 87.8%
Flow Rate=0.75 gpm (2.8 Lpm) Capacity=2500 gallons (9460 L) or 12 months
Testing was performed under standard laboratory conditions. Actual performance may vary.
This system has been tested according to NSF/ANSI 42 and 53 for the reduction of the substances listed below. The concentration of the indicated
substances in water entering the system was reduced to a concentration less than or equal to the permissible limit for water leaving the system, as
specified in NSF/ANSI 42 and 53.
1000R Cartridges
Substance Influent Challenge Max. Permissible Product Reduction Minimum Average
Concentration Water Concentration Requirements Reduction Reduction
Standard 42 Aesthetic Effects
Chlorine 2.0 mg/L±10% ≥ 50% 99%
Particulates at least 10,000 ≥ 85% 99.8%
(0.5–<1m) particles/mL
Class I
Standard 53 Health Effects
Cysts† Minimum 50,000/L 99.95% 99.99% 99.99%
Turbidity 11± 1 NTU 0.5 NTU 99.6% 99.7%
Lead (pH 6.5) 0.15 mg/L±10% 0.010 mg/L 99.3% 99.3%
Lead (pH 8.5) 0.15 mg/L±10% 0.010 mg/L 98% 98.6%
Atrazine 0.009 mg/L ± 10% 0.003 mg/L 97.7% 97.7%
Lindane 0.002 mg/L ± 10% 0.0002 mg/L 97.5% 97.5%
Flow Rate=0.5 gpm (1.89 Lpm) Capacity=500 gallons (1892 L) or 6 months
† Based on the use of microspheres or Cryptosporidium parvum oocysts.
Testing was performed under standard laboratory conditions, actual performance may vary.
Test Conditions:
Flow Rate = 0.75 gpm
Inlet Pressure = 60 psi (4.1 bar)
pH = 7.5 ± 1
Temperature = 68º F ± 5º F (20º C ± 2.5º C)
Operating Requirements:
Pressure = 30-125 psi (2.1-8.62 bar)
Temperature = 40º-100º F (4.4º-37.7º C)
Turbidity = 5 NTU Max
Do not use with water that is microbiologically unsafe or unknown quality without
adequate disinfection before or after the system.
Troubleshooting
Leaks:
...Between head and cartridge
(1) Turn off the water supply to the filter and dispense water from the refrigerator
door or T-Flush valve until water and airflow stops.
(2) Remove cartridge and inspect o-rings to make sure they are in place and clean.
(3) Install cartridge and turn on water supply, if it still leaks, contact Technical
Support at 1-800-645-5426. M-F 7:30 AM - 5 PM CST. Turn off icemaker if
filtered water goes to icemaker.
...From fittings
Relieve pressure by turning off water supply to the filter and dispense water
through the refrigerator door or T-Flush valve until water and airflow stops. For
copper or plastic tubing, loosen the compression nut and pull the tubing from the
brass fitting. Inspect to see if the ferrule and insert (plastic only) are properly
installed on the tubing. If so, reconnect tubing finger-tight, then tighten nut snug
about 1/2 to 1 turn with a wrench. Open the water supply valve. If the leaks persist,
or if there are other leaks on the unit, turn off the water supply and icemaker, then
call Technical Support at 1-800-645-5426. If the fitting does not leak, turn on the
icemaker.
Maintenance
Contact your area retailer or local water treatment professional for replacement
cartridge pricing.
R3
R4
b
a
a
b
3
R. Filter Cartridge Replacement
NOTE: It is recommended that the filter be replaced every twelve months, or when
you notice a change in taste, odor, or flow of the water being filtered.
(1) Relieve pressure by turning off water supply to the filter and dispense water
from water dispenser or T-flush valve until water flow stops.
(2) Place towel under the system to catch any water drips.
(3) (a) Turn arrow from locked to unlocked position and (b) remove cartridge.
(4) (a) Line up arrow with unlocked position on head and insert cartridge. (b) Turn to
locked position.
(5) Turn on water and check for leaks. If it leaks, see Troubleshooting.
(6) Flush water through water dispenser or T-Flush valve for 5 minutes to remove
carbon fines. Check for leaks before leaving installation.
Performance Data
Model IC-750
Page 4

Replacement Parts
1 155901 750R Filter Cartridge
2 155785 1000R Filter Cartridge
(not for sale in California with the 1000R cartridge)
3 144842 Head Assembly
4 144846 Hardware Kit
5 150541 Model FVK-100 Flush Valve Kit
Not Performance Tested or Certified by NSF.
For replacement parts, contact your nearest
retailer or call Culligan Consumer Services at
1-888-777-7962.
2
1
3
4
2 Year Limited Warranty
This warranty applies to the Filter Head only. It does NOT apply to component parts or any
disposable filter cartridge, which has a life expectancy that varies with the water being filtered.
This warranty covers defects in materials and workmanship only for two full years from original
date of delivery. Culligan will replace any part which in Culligan’s opinion is defective, unless:
(1) any part of the system has been subjected to any type of tampering, alteration, or improper
use after delivery, or (2) any part of the system has been repaired by anyone not approved by
Culligan. Our obligation does not include the cost of shipment of materials. Culligan is not
responsible for damage in transit, and claims for such damage should be presented to the carrier
by the customer.
This product has been designed solely for use as a head for a disposable filter cartridge. It is
NOT warranted against freezing, and neither this product nor its parts is warranted against
defects or deterioration caused by uses for which this product was not expressly intended.
THE FOREGOING WARRANTY IS EXCLUSIVE AND IN LIEU OF ALL OTHER WARRANTIES,
EXPRESSED OR IMPLIED, WHETHER ORAL OR ARISING BY USAGE OF TRADE OR COURSE OF
DEALING, INCLUDING, WITHOUT LIMITATION, ANY WARRANTIES OF FITNESS OR MERCHANTABILITY. THIS WARRANTY IS THE PURCHASER’S SOLE AND EXCLUSIVE REMEDY. IN NO EVENT SHALL
CULLIGAN BE LIABLE FOR ANY ANTICIPATED OR LOST PROFITS, INCIDENTAL DAMAGES, CONSEQUENTIAL CHARGES OR OTHER LOSSES, WHETHER BASED ON BREACH OF CONTRACT, TORTIOUS CONDUCT OR ANY OTHER THEORY, INCURRED IN CONNECTION WITH THE PURCHASE,
INSTALLATION, REPAIR OR OPERATION OF THE OPAQUE FILTER HOUSING. CULLIGAN DOES NOT
AUTHORIZE ANYONE TO ASSUME FOR IT ANY LIABILITY OR MAKE ON ITS BEHALF ANY ADDITIONAL WARRANTIES IN CONNECTION WITH THE FILTER HEAD OR ANY PART THEREOF.
For servicing under this warranty, return any defective part to YOUR RETAILER within the two-year
period referred to above.
IOWA RESIDENTS ONLY:
Store or seller’s name
Address
City State Zip
Telephone
Seller’s signature
Customer’s signature Date
Customer Service
M-F 7:30 a.m – 5:00 p.m. CST
Phone: 1-800-634-1455 Fax: 1-888-749-8826
International: Phone (920) 457-9435 • Fax (920) 457-2417
e-mail: customerservice@culligan.com
Sales & Marketing Correspondence
P.O. Box 1086 • Sheboygan, WI 53082-1086
Fax (847) 291-7632
e-mail: sales-marketing@culligan.com
©2004 Culligan International Company, Printed in U.S.A. 146481 Rev B 03/04
Culligan International Company
One Culligan Parkway
Northbrook, Illinois 60062
www.culligan.com
4
5
 Loading...