

Page 1

Filtro de agua para
sedimento
Instrucciones Para la Instalación y el Funcionamiento
Modelos HF-150 y HF-160
NOTA: este portafiltro no incluye el cartucho filtrante.
Antes de la instalación, tiene que escoger el cartucho apropiado. Instale el cartucho de acuerdo con
las instrucciones como cambiar el cartucho. Mire la guía (página 4) para seleccionar.
Especificaciones
Margen de Presión: 30-125 psi/2.1-8.6 bar
Límite de Temperatura: 40–100˚F / 4.4–37.7˚C
Herramienta Necesaria
Destornillaor Lima
2 Llaves Ajustables Lápiz Sierra de metales o un cortatubos
Materiales Necesarios
(no son incluidos)
Para instalación en la tubería principal de 3/4 y de 1/2 pulgada / 19mm - 13mm.
Juego de artículos para la instalación BF-34:
Adaptadores de Compresión para Tubería de Cobre de 3/4 pulgada / 19mm
Adaptadores de Compresión para Tubería de Cobre de 1/2 pulgada / 13mm
Cinta Teflón
®
NOTA: accesorios galvánicos tienen que usarsen para las instalaciones de tubería galvánica.
Materiales Opcionales
151190 UB-1 Soporte de Montaje
Piezas Incluídas
Portafiltro LLave para el pocillo (con HF-160 solamente)
Precauciones
ADVERTENCIA:
no use con agua que tiene peligro de microbiología, o la calidad del agua es
desconocida sin desinfectarla adecuadamente antes o después del sistema filtrante.
PRECAUCIÓN:
este portafiltro (carcaza) tiene que protegerse contra congelación. Fracaso de
hacerlo puede resultar en grietas en el pocillo causando goteras.
PRECAUCIÓN:
la arandela de caucho provee un sello hermético entre la tapa y el pocillo. Es muy
importante que la arandela se sienta correctamente en la ranura del pocillo o goteras pueden ocurrir.
PRECAUCIÓN:
debido a la duración limitada de este producto y para prevenir reparos costosos o
posibles daños causados por el agua, nosotros recomendamos fuertemente que todos los pocillos
plásticos transparentes de todos los portafiltros (carcazas) se reemplazen cada cinco años y cada diez
años los pocillos opacos. Si el pocillo se ha usado por más de este tiempo, se debe reemplazar
inmediatamente. Cuando reemplaze el pocillo marque la fecha para que le ayude a recordar cuando
lo tiene que volver a reemplazar.
PRECAUCIÓN:
con tiempo, los pocillos transparentes se pueden rajar causando goteras, si están
expuestos a solventes orgánicos, como los que se encuentran en un rociador aerosol para productos
de limpieza o insecticidas.
NOTA:
•
Para uso con agua fria solamente.
•
No instale el sistema filtrante donde esté expuesto a rayos directos del sol.
•
Asegúrese de que la instalación conforma con todas las leyes y regulaciones locales y estatales.
•
Los contaminantes u otras substancias que se quitan o que son reducidas por los cartuchos
filtrantes que usted selecciona no se encuentran en su agua necesariamente. Pregunte por una
copia del análisis del agua de su municipalidad de agua local, u obtenga un análisis de su pozo
privado por un laboratorio respetable de analizar agua.
•
Después de periodos extendidos sin uso (p. ej. durante vacaciones) es recomendado fluir el
sistema completamente. Deje fluir el agua por 5-6 minutos antes de usarla.
•
El cartucho filtrante usado con este sistema tiene una duración útil limitada. Cambios en el sabor,
olor, color y/o flujo del agua que está filtrando indica que el cartucho filtrante se debe reemplazar.
•
Alguna bacteria inocua puede atacar el cartucho hecho con agente celuloso. Si parece que su
cartucho filtrante se desintegra o adquiere un olor a moho, cambie a un cartucho filtrante hecho
con agente sintético o llame al departamento de ayuda técnica en Culligan.
Sediment
Water Filter
Installation and Operating Instructions
Model HF-150 & HF-160
NOTE: This filter housing does not include a filter cartridge.
Choose the appropriate filter cartridge for your needs and install in housing according to the
Cartridge Replacement instructions before proceeding with installation. See cartridge selection
chart.
Operating Specifications
Pressure Range: 30–125 psi (2.1–8.6 bar)
Temperature Range: 40–100°F (4.4–37.7°C)
Tools Required
Screwdriver File
2 Adjustable wrenches Pencil Pipe Cutter or Hacksaw
Materials Required (not included)
For 3/4-inch and 1/2-inch main water line installation:
BF-34 Installation Kit: 3/4-inch compression fittings for copper pipe
1/2-inch adapter fittings for copper pipe
Teflon
®
tape
NOTE: Galvanized fittings must be used for installation on galvanized pipe.
Optional Materials
151190 UB-1 Mounting Bracket
Parts Included
Filter Housing Housing Wrench (with HF-160 ONLY)
Precautions
WARNING: Do not use with water that is microbiologically unsafe or of unknown quality
without adequate disinfection before or after the system.
CAUTION:Filter must be protected against freezing, which can cause cracking of the filter
and water leakage.
CAUTION:The rubber O-ring provides the water-tight seal between the cap and the bottom
of the housing. It is important that the O-ring be properly seated in the groove below the
threads of the housing or a water leak could occur.
CAUTION:Because of the product’s limited service life and to prevent costly repairs or
possible water damage, we strongly recommend that the bottom of all plastic housings be
replaced every five years for clear and every ten years for opaque. If the bottom of your
housing has been in use for longer than this period, it should be replaced immediately. Date
the bottom of any new or replacement housing to indicate the next recommended
replacement date.
CAUTION:Clear housings may crack or craze in time causing failure and leakage if
exposed to organic solvents, such as those found in aerosol sprays for cleaning products and
insecticides.
NOTE:
• For cold water use only.
• Do not install where system will be exposed to direct sunlight.
• Make certain that installation complies with all state and local laws and regulations.
• The contaminants or other substances removed or reduced by the selected cartridge are not
necessarily in your water. Ask your local water municipality for a copy of their water
analysis, or have your water tested by a reputable water testing lab.
• After prolonged periods of non-use (such as during a vacation) it is recommended that the
system be flushed thoroughly. Let water run for 5–6 minutes before using.
• The filter cartridge used with this system has a limited service life. Changes in taste, odor,
color, and/or flow of the water being filtered indicate that the cartridge should be
replaced.
• Some harmless bacteria may attack cellulose media cartridges. If your cartridge seems to
disintegrate or develops a musty or moldy odor, switch to a synthetic media cartridge or
consult the manufacturer.
Technical Support: 1-800-645-5426
(M-F 7:30 am - 5:00 pm CST)
Número Gratis para soporte Técnico: 1-800-645-5426
(lun. - viern. 7:30 am - 5:00 pm hora central civil)
1
Page 2
Installation
NOTE:
• Please read all instructions, specifications, and
precautions before installing and using your HF-150/160
whole house water filter.
• For standard under-sink installation on 1/2-inch or 3/4-
inch main water line.
• Install filter cartridge in filter housing before proceeding
with installation (see Filter Cartridge
Replacementon page 3).
• Install filter after water meter or pressure tank.
• Numbered diagrams correspond with numbered steps.
1. Turn off water supply and open nearest faucet to drain
pipes before starting installation. Apply about 6 inches
(152 mm) of Teflon®tape in clockwise direction to pipe
threads of each adapter. (These items are included in
BF-34 Installation Kit.)
2. If mounting bracket (not supplied) is to be used, first use
bracket as a template to mark screw locations. Then
place bracket over cap and line up with inlet and outlet
ports.
IMPORTANT:Allow 1-1/2 inches (33 mm) clearance
below housing to enable filter cartridge changes.
3. Assemble all fittings. Start adapters into cap by hand.
Use a wrench to tighten firmly. DO NOT OVER-
TIGHTEN. About one thread should remain visible.
Remove compression nuts from fittings.
4. Measure length (shown as X on diagram) across
assembled fittings and subtract 1 inch (25 mm) if you
are installing on 3/4 inch (19 mm) pipe, or 1-1/2 inches
(38 mm) if you are installing on 1/2 inch (13 mm) pipe.
Mark section of pipe to be removed.
NOTE: Approximately 6 inches (152 mm) will be
removed for 3/4-inch (19 mm) pipe and 5-1/4-inches
(133 mm) for 1/2-inch (13 mm) pipe.
5. Using a pipe cutter or hacksaw, remove marked section of
pipe. File or sand sharp edges on remaining pipe.
6. Slip brass compression nut and brass ferrule (from BF-34
kit) onto each end of 3/4-inch (19 mm) pipe. If
installing on 1/2-inch (13 mm) pipe, substitute rubber
ferrule for brass ferrule.
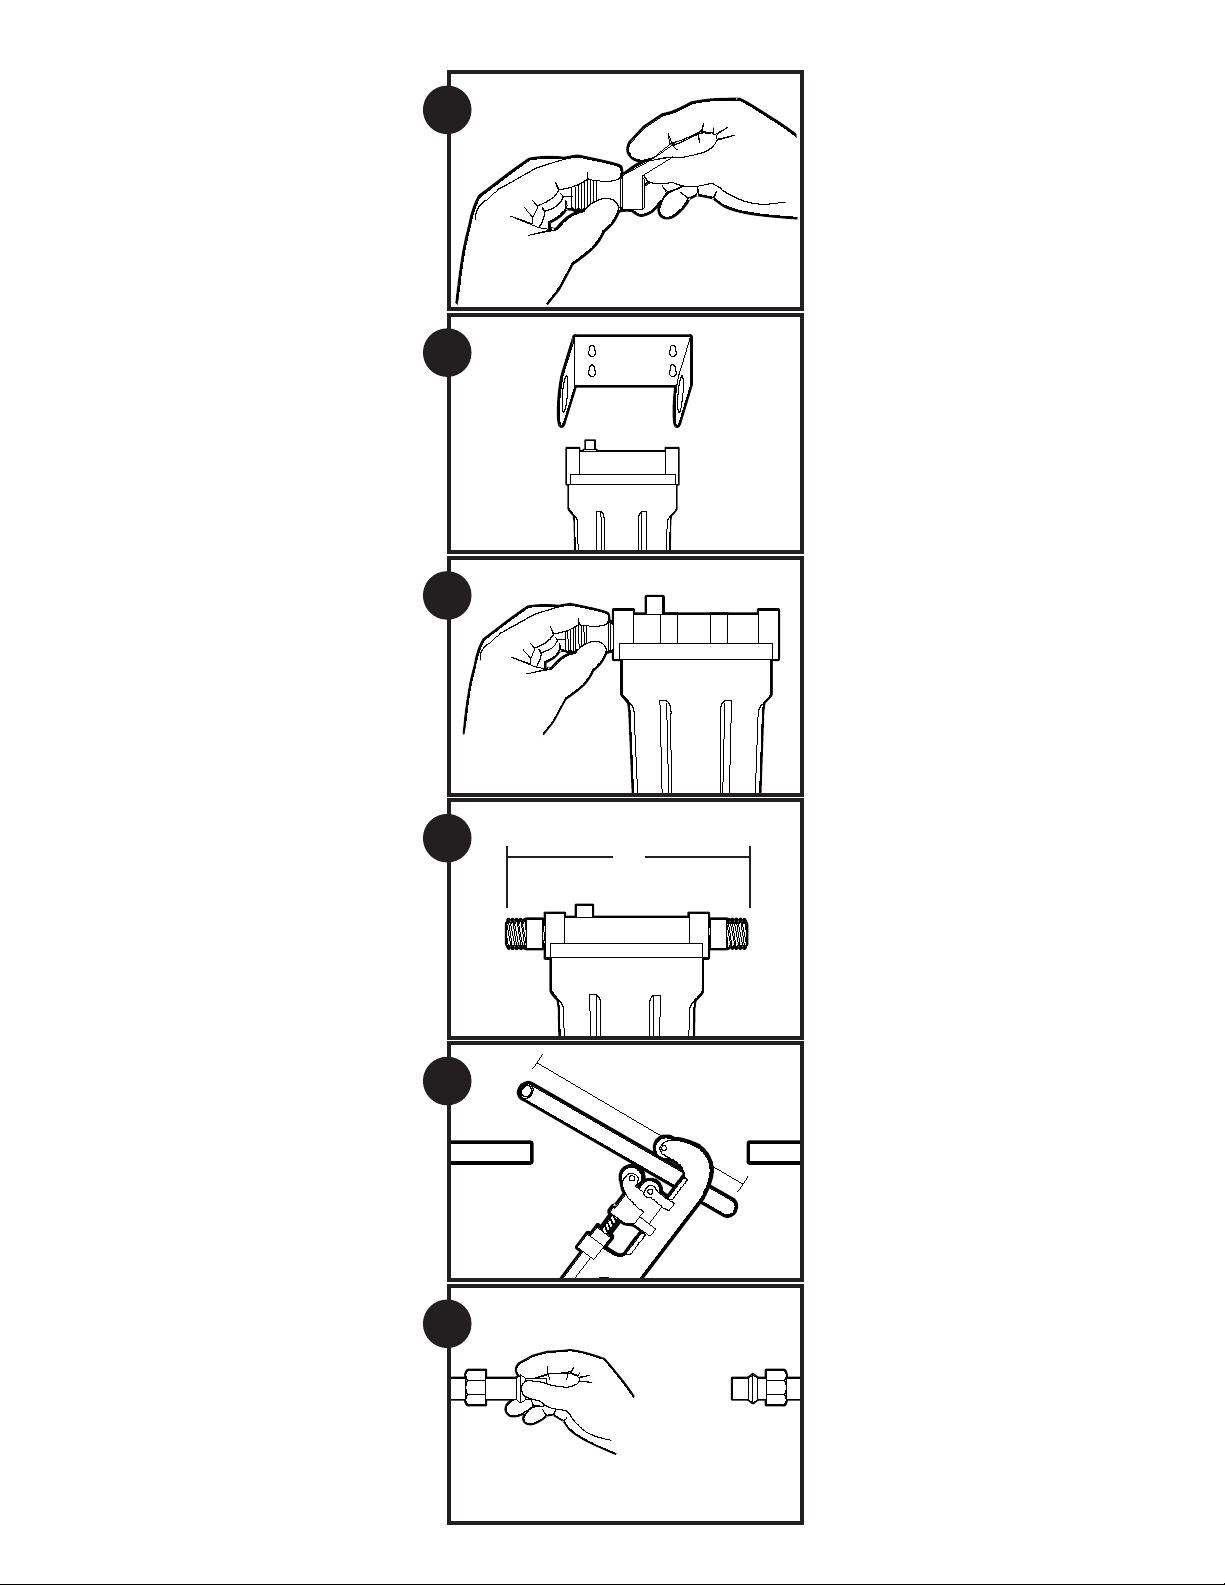
Instalación
NOTA:
•
Por favor lea todas las instrucciones, especificaciones, y
precauciones antes de instalar o de usar el filtro para el
agua HF-150/HF-160 para toda la casa
•
Para una instalación normal debajo del fregadero en
tubería principal de 1/2 y 3/4 de pulgada / 19 mm 13 mm.
•
Inserte el cartucho filtrante dentro del pocillo antes de
proceder con la instalación (mire
“Instrucciones para
reemplazar el cartrucho filtrante”
en la página 3).
•
Instale el filtro después del tanque de presión o del
contador de agua.
•
El número en los diagramas corresponden con el número
del paso.
1. Cierre el abastecimiento de agua y abra el grifo más cerca
a la tubería de desagüe antes de empezar la instalación.
Aplíque más o menos 6 pulgadas / 152 mm de cinta Teflón
en el sentido de las agujas del reloj en las roscas de cada
adaptador. Estos artículos son incluídos con el juego de
artículos BF-34 para la instalación.
2. Si quiere usar el soporte de montaje (no está incluído),
primero úselo como modelo para marcar la localización de
los tornillos. Después ponga el soporte de montaje encima
de la tapa y póngala con alineación en el orificio de
entrada y salida.
IMPORTANTE: deje 1-1/2 pulgada / 33 mm de espacio
debajo del pocillo para facilitar el reemplazo del cartucho
filtrante.
3. Asemble todos los accesorios. Empieze a atornillar los
adaptadores a la tapa manualmente. Usando una llave
ajustable aprietelos firmemente. NO APRIETE CON
EXAGERACIÓN. Más o menos una rosca debe
permanecer visible. Quite las tuercas de compresión de los
accesorios.
4. Mida la tapa ensemblada (como lo demostramos con una
X en el diagrama) sin las tuercas de compresión y tiene que
substraer 1pulgada/25mm de la tubería de 3/4 de
pulgada/19mm o 1-1/2 pulgada/38mm de la tubería de
1/2 pulgada/13mm. Marque la tubería.
NOTA: Tiene que quitar aproximadamente 6
pulgadas/152 mm de la tubería de 3/4 de pulgada/19mm
y 5-1/4 de pulgadas/133mm de la tubería de 1/2
pulgada/13mm.
5. Con una sierra de metales o un cortatubos, corte el pedazo
de tubería marcado. Tiene que pulir el borde de la tubería
sobrante usando una lima.
6. Inserte las tuercas de compresión y las virolas de cobre
amarillo (del juego de artículos BF-34) entre cada punta de
la tubería de 3/4 de pulgada/19mm. Si su instalación es
en tubería de 1/2 pulgada/13mm use la virolas de bronce
amarillo en lugar de las virolas plásticas.
2
1
4
5
6
3
2
x
Page 3

7. Align filter assembly with ends of pipe, making
certain cap opening marked “IN” is facing the
incoming water supply. It will be necessary to
spread ends of pipe apart to install filter assembly.
Using two adjustable wrenches, hold incoming
adapter securely with one wrench and tighten nut
with second wrench. Repeat procedure for outgoing
adapter.
8. CAUTION: If water pipes are used to ground
electrical systems, appliances, or phones, be certain
to install a jumper wire. Contact your local
electrician for more information.
9. Slowly turn on main water supply and depress red
pressure-relief button on cap to release trapped air.
Check for leaks. Open nearest faucet and flush filter
for 15 minutes.
Filter Cartridge
Replacement
A.Turn off water supply to filter. Depress red pressure-
relief button on top of filter. Unscrew bottom of
housing.
B.Locate and remove large O-ring, wipe clean of
lubricant and set aside. Discard used cartridge. Rinse
out bottom of housing and fill about 1/3 full with
water. Add about 2 tablespoons of bleach and scrub
cap and bottom of housing with nonabrasive sponge
or cloth. Rinse thoroughly.
Lubricate O-ring with clean petroleum jelly
(Vaseline®). Insert Oring back into groove and
smooth into place with finger. Insert new cartridge
over standpipe in bottom of housing.
C.Screw bottom of housing onto the cap and hand-
tighten. DO NOT OVER-TIGHTEN. Make certain
cap standpipe slips into cartridge.
Turn on water supply slowly to allow filter to fill with
water. Depress red pressure-relief button to release
trapped air. Flush cartridge for 15 minutes. Check
for leaks before leaving installation.
7. Tiene que alinear la asamblea de filtro entre las puntas de la
tubería asegurándose de que la abertura de la tapa marcada
“IN” está hacia la entrada del abastecimiento de agua. Va hacer
necesario separar las puntas de la tubería para instalar la
asamblea de filtro. Usando dos llaves ajustables, agarre
aseguradamente el adaptador entrante con una llave, y apriete
la tuerca con la otra llave. Repita este procedimiento con el
adaptador de salida.
8. PRECAUCIÓN: si está usando tubería de agua como toma de
tierra, accesorio, o teléfonos, asegúrese de usar un hilo de
puente. Por información adicional póngase en contacto con un
electricisat local.
9. Lentamente abra el abastecimiento de agua y oprima el botón
rojo de aliviar la presión encima de la tapa para dejar escapar
el aire atrapado. Inspeccione por goteras. Abra el grifo más
cerca no y deje fluir el agua por 15 minutos para fluir el filtro.
Instrucciones Para
Reemplazar El Cartucho
A. Cierre el abastecimiento de agua al filtro. Oprima el botón rojo
para aliviar la presión encima de la tapa. Destornille el pocillo.
B. Localice la arandela redonda grande, límpiela y pongala a un
lado.
Deseche el filtro usado. Enjuágue el pocillo y llénelo 1/3 con
agua. Agregue 2 cucharadas de descolorante y restriégue el
pocillo y la tapa usando una esponja o un trapo sin abrasivo.
Enjuáguelo un trapo completamente.
Lubrique la arandela redonda con petrolato (Vaselina®). Inserte
la arandela redonda en la ranura y oprímala entre la ranura
con dos dedos.
Inserte el cartucho filtrante nuevo asegurándose de que caiga
encima del tubo vertical plástico en el fondo del pocillo.
C. Atornille el pocillo entre la tapa y aprételo manualmente. NO
APRIETE CON EXAGERACION. Asegúrese de que el
cartucho filtrante caiga encima de el tubo vertical plástico en el
fondo del pocillo.
Lentamente abra el abastecimiento de agua para dejar que el
filtro se llene con agua. Oprima el botón rojo, para dejar
escapar el aire atrapado. Deje fluir el cartucho filtrante por 15
minutos.
Cuando acabe con la instalación inspeccione por goteras.
3
7
9
A
B
C
8
Page 4

Repuestos
1 151039 Montaje Para Alivio De Presión
2 154102 Tapa Azul (HF-150/HF-160)
3 151120 Arandela Redonda
4 153019 Pocillo Azul (HF-150)
153128 Pocillo Transparente (HF-160)
150295 SW-2 Llave para el pocillo (incluída con el modelo
HF-160) no está demostrada.
Para comprar piezas de reemplazo, póngase en contacto con el minorista
más cercano o llame gratis al Departamento de Servicios para los
consumidores al número 1-888-777-7962.
El sistema HF-150 y el HF-160 estan cubiertos por una garantía limitada de
cinco años. Mire la garantía por detalles.
Cartridge Selection
Select the right cartridge CW-MF S1A CW-F P5
for your water needs. 155187 155001 155186 155014
Scale and rust particles XXXX
Coarse sand XXXX
Sand/dirt/silt X X X
Fine dirt/silt/sand X X
Extra fine dirt/silt/sand X
Filter Life (in months)* 3432
Micron Rating (Nominal)+ 30 20 10 5
Service Flow Rate gpm (lpm)** 4.7 (18) 5.0 (18.9) 4.7 (18) 1.5 (5.6)
*NOTE: Filter cartridge life varies depending on filter type, usage and water conditions
(1 month = approximately 4000 gallons).
**NOTE: Flow rates measured at 60 psi (4.1 bar).
+The smaller the micron rating, the smaller the size particle the cartridge will filter.
For comparison purposes, the human hair has a diameter of approximately 70
microns. Particles smaller than 40 microns are not visible with the human eye.
4
Troubleshooting
Leaks...
between cap and bottom of housing:
1.Turn off water supply and press pressure-relief button.
2.Clean and lubricate O-ring, and screw bottom of housing back on cap securely by
hand. Do not overtighten.
3.Turn on water supply. If leaks persist, or if there are other leaks on the system, turn
off water supply. Call Technical Support at 1-800-645-5426.
on inlet/outlet connections:
1.Turn off water supply. For brass fittings, tighten nut snugly 1/2-turn with wrench.
2.Turn on water supply. If leaks persist, or if there are other leaks on system, turn off
water supply. Call Technical Support at 1-800-645-5426.
Reparaciones
Goteras...
Entre el pocillo y la tapa.
1. Cierre el abastecimiento de agua y oprima el botón rojo de aliviar la presión.
2. Limpie y lubrique la arandela redonda y atornille el pocillo de nuevo a la tapa
aseguradolo manualmente solamente. NO APRIETE CON EXAGERACIÓN.
3. Cierre el abastecimiento de agua. Si continúa goteando, o si tiene otras goteras en el
sistema, cierre el abastecimiento de agua y llame gratis al Departamento de Ayuda Técnica al
1-800-645-5426.
Conexiones en la entrada y salida del sistema
1. Cierre el abastecimiento de agua. Con accesorios de bronce amarillo, apriete la tuerca
ajustada dándole más o menos 1/2 vuelta con una llave.
2. Abra el abastecimiento de agua. Si continúa goteando, o si tiene goteras en otros
lugares en el sistema, cierre el abastecimiento de agua y llame gratis al departamento
de ayuda técnica, al número 1-800-645-5426.
Guía Para Seleccionar Cartuchos
Filtrantes
Seleccione el cartucho apropiado CW-MF S1A CW-F P5
para las condiciones de su agua. 155187 155001 155186 155014
Partículas de Escama y de óxido XXXX
Arena Gruesa XXXX
Arena/Suciedad/Barro X X X
Suciedad Fina/Barro/Arena X X
Suciedad Extra Fina/Barro/Arena X
Duración útil del Filtro (en meses)* 3432
Clasificación de Micra (nominal)+ 30 20 10 5
Velocidad de Circulación GPM/LPM** 4.7/18 5.0/18.9 4.7/18 1.5/5.6
*
NOTA: la duración útil de los filtros depende en su clase, uso y condiciones de su agua.
(1 month = approximately 4000 gallons).
**NOTA: el flujo de agua es medido a 60 psi/4.1 bar
+Entre más pequeña la clasificación de micra, lo más pequeña partículas la cual el filtro
filtrará. Con motivo de comparar, el cabello humano es aproximadamente 70 micras.
Partículas más pequeñas de 40 micras no son visibles a simple vista.
Replacement Parts
1 151039 Pressure-relief Assembly
2 154102 Blue Cap (HF-150/HF-160)
3 151120 Oring
4 153019 Blue Housing (HF-150)
153128 Clear Housing (HF-160)
150295 SW-2 Housing Wrench (included
with HF-160) not shown
For replacement parts, contact your nearest retailer or call Culligan
Consumer Services @ 1-888-777-7962.
The HF-150 and HF-160 are covered by a limited five year warranty. See
warranty for details.
1
2
3
4
Page 5

Warranty
This warranty applies to the Filter Housing. It does NOT apply to any disposable filter cartridge where life
expectancy varies with the water being filtered. This warranty covers defects in material and workmanship
only for 5 full years from the original date of delivery. Culligan will replace any part which in Culligan’s
opinion is defective, unless: (1) any part of the unit has been subjected to any type of tampering,
alteration, or improper use after delivery, or (2) it has been repaired by anyone not approved by Culligan.
Our Obligation does not include the cost of shipment of materials. Culligan is not responsible for damage
in transit, and claims for such damage should be presented to the carrier by the customer.
This product has been designed solely for use as a housing for a disposable filter cartridge. It is NOT
warranted against freezing, and neither this product nor its parts is warranted against defects or
deterioration caused by uses for which this product was not expressly intended.
THE FOREGOING WARRANTY IS EXCLUSIVE AND IN LIEU OF ALL OTHER WARRANTIES, EXPRESSED OR
IMPLIED, WHETHER ORAL OR ARISING BY USAGE OF TRADE OR COURSE OF DEALING, INCLUDING,
WITHOUT LIMITATION, ANY WARRANTIES OF FITNESS OR MERCHANTABILITY. THIS WARRANTY IS THE
PURCHASER’S SOLE AND EXCLUSIVE REMEDY, IN NO EVENT SHALL CULLIGAN BE LIABLE FOR ANY
ANTICIPATED OR LOST PROFITS, INCIDENTAL DAMAGES, CONSEQUENTIAL DAMAGES, COSTS, TIME
CHARGES OR OTHER LOSSES, WHETHER BASED ON BREACH OF CONTRACT, TORTIOUS CONDUCT OR ANY
OTHER THEORY, INCURRED IN CONNECTION WITH THE PURCHASE, INSTALLATION, REPAIR OR OPERATION
OF THE OPAQUE FILTER HOUSING. CULLIGAN DOES NOT AUTHORIZE ANYONE TO ASSUME FOR IT ANY
LIABILITY OR TO MAKE ON ITS BEHALF ANY ADDITIONAL WARRANTIES IN CONNECTION WITH THE
OPAQUE FILTER HOUSING OR ANY PART THEREOF.
For servicing under this warranty, return any defective part to YOUR RETAILER within the 5 year period
referred to above.
Date installed:
Garantía
Esta garantía aplica a los portafiltros. No aplica a ningún cartucho filtrante desechable donde la duración útil varía con el agua
que está filtrando. Esta garantía cubre defectos en los materiales y la fabricación por 5 años desde la fecha de entrega original.
Culligan reemplazará cualquier pieza la cual Culligan considera defectuosa a menos que: (1) cualquier parte del sistema haya
sido expuesto a cualquier clase de manipulación, alteración, o uso inapropiado después de entrega, o (2) ha sido reparado por
personal que no es autorizado por Culligan. Nuestra obligación no incluye el costo de flete de los materiales. Culligan no es
responsable por daños durante tránsito, y esa clase de reclamos se deben hacer por el cliente directamente al portador.
Este producto ha sido diseñado solamente para uso en hogares como una portafiltro para cartuchos filtrantes desechables. No
está garantizado contra congelación, y ni este producto o sus piezas son garantizadas contra defectos o deteriorización causada
por usos los cuales este producto no ha sido expresamente proyectado.
LA GARANTÍA PREVIA ES ESCLUSÍVA Y REEMPLAZA CUALQUIER OTRA GARANTÍA, EXPRESADA O IMPLICITADA, SEA ORAL O
RESULTADO POR USO COMÚN O UN ACUERDO MUTUO, INCLUYENDO, SIN LIMITACIÓN, CUALQUIER GARANTÍA DE
FUNCIONAMIENTO O CONDICIONES VENDIBLES. ESTA GARANTÍA ES EXCLUSÍVA Y ES EL ÚNICO RECURSO LEGAL DEL
COMPRADOR, DE NINGUNA MANERA CULLIGAN SERÁ RESPONSABLE POR NINGUNA PÉRDIDA DE GANANCIAS O
GANANCIAS ANTICIPADAS, DAÑOS CONSECUENTES, GASTOS, GASTOS ACUMULADOS POR EMBARQUE RETRASADO, U
OTRAS PÉRDIDAS, SEA SOBRE UN INCUMPLIMIENTO EN EL CONTRATO, IMCUMPLIMIENTO O ACCIONES SEAN
INTENCIONALES, O NEGLIGENTES LAS CUALES CAUSAN DAÑOS, PERJUICIOS, O CUALQUIER OTRA ESPECULACIÓN, EN
RELACIÓN CON ESTA COMPRA, INSTALACIÓN, REPARACIÓN O FUNCIONAMIENTO DEL. PORTAFILTRO OPACO. CULLIGAN
NO AUTORIZA A NADIE PARA RESUMIR POR ELLA CUALQUIER RESPONSABILIDAD O HACER POR ELLA CUALQUIER
GARANTÍA ADICIONAL EN RELACIÓN CON EL PORTAFILTRO OPACO O CUALQUIERA DE SUS PIEZAS.
Por reparaciones cubiertas por esta garantía, devuelva cualquier pieza defectuosa a SU MINORISTA durante el plazo de 5 años
como le explicamos arriba.
Fecha de Instalación:
Page 6

Customer Service
M-F 7:30 a.m – 5:00 p.m. CST
Phone: 1-800-634-1455 Fax: 1-888-749-8826
International: Phone (920) 457-9435 • Fax (920) 457-2417
e-mail: customerservice@culligan.com
Sales & Marketing Correspondence
P.O. Box 1086 • Sheboygan, WI 53082-1086
Fax (847) 291-7632
e-mail: sales-marketing@culligan.com
©2003 Culligan International Company, Printed in U.S.A. 11/03 145050 Rev F
Culligan International Company
One Culligan Parkway
Northbrook, Illinois 60062
www.culligan.com
 Loading...