

Page 1
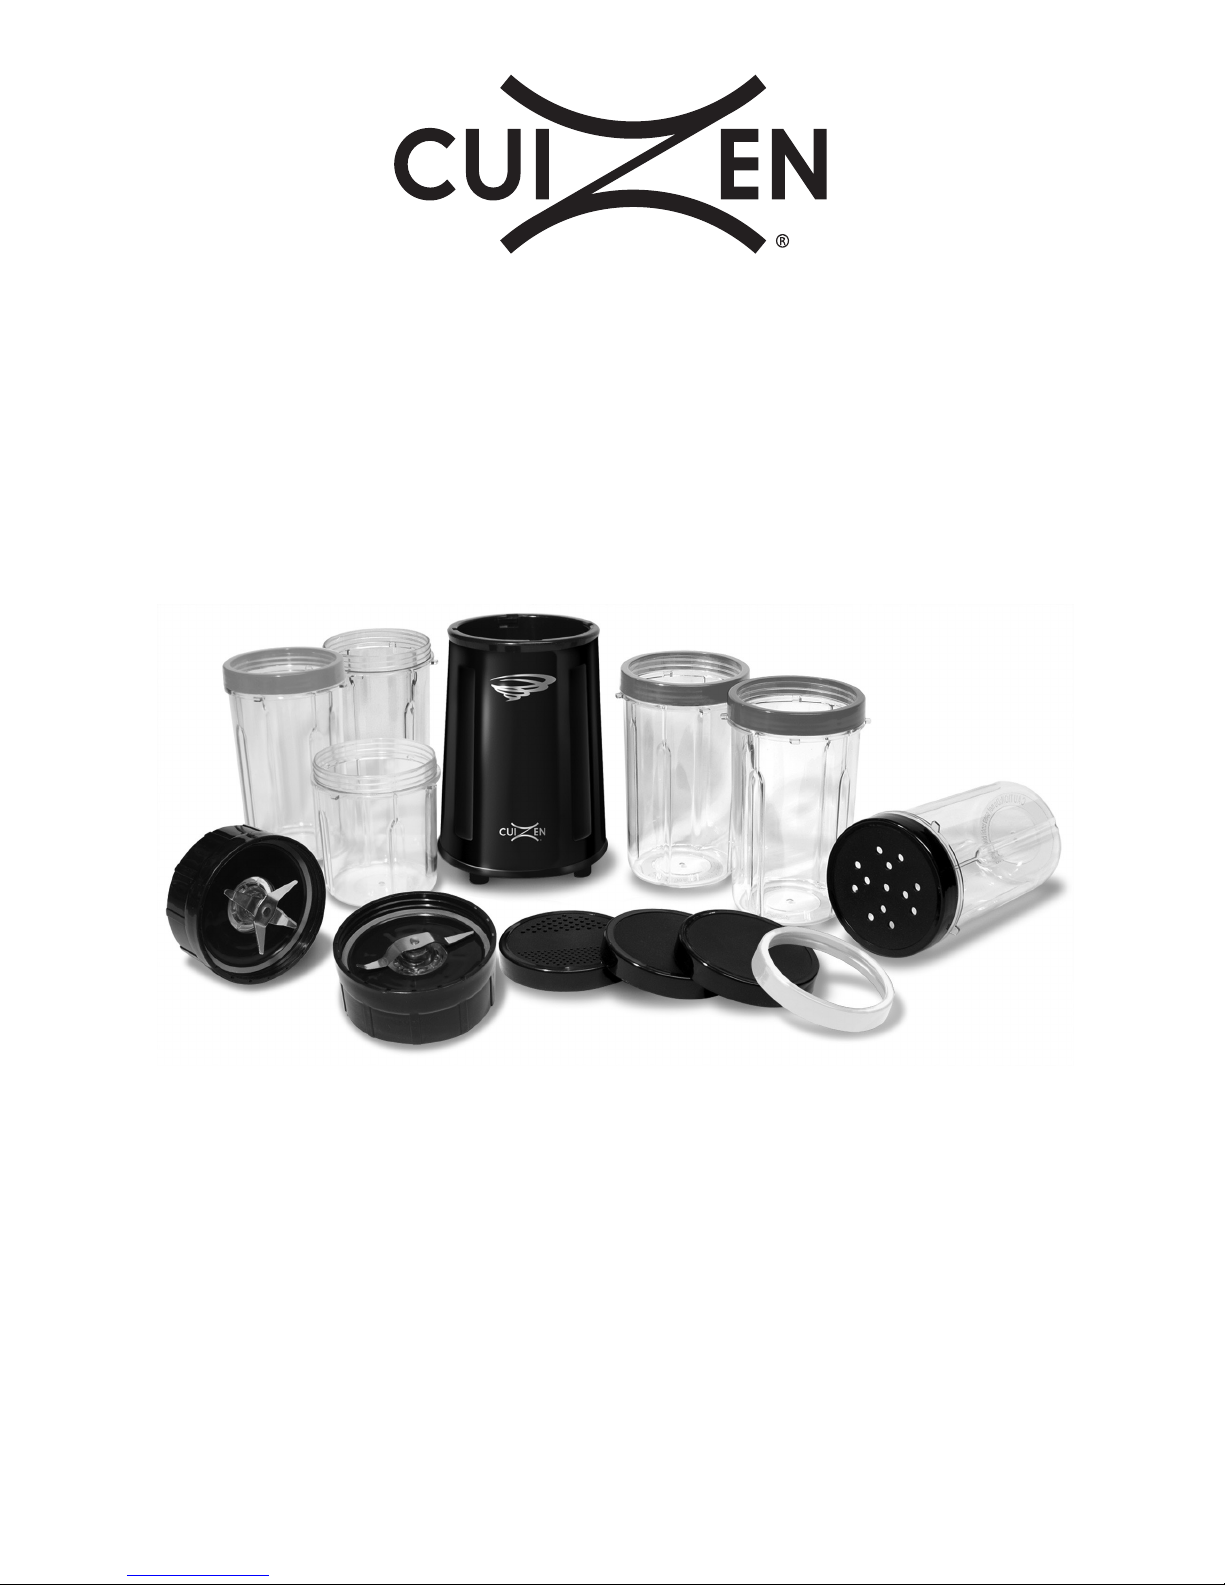
17pc PERSONAL
DRINK BLENDER
Instruction Manual
Item: CPB-1017
120V / 60Hz / 240W
Page 2

2
IMPORTANT SAFEGUARDS
PLEASE READ CAREFULLY ALL INSTRUCTIONS BEFORE USING
YOUR PERSONAL DRINK BLENDER
This product is intended for use in blending food products.
Do not use this appliance for any other purpose other than intended.
WARNING: Toavoidrisksofelectricalshock,burns or injuries, alwaysmakesure the product is
unplugged from the electrical outlet beforedisplacing,servicingorcleaning it.
When using any Blender and toreducetheriskoffire, electricalshock, burns orserious
injury, basic safety precautions should always be followed:
1. Before using this appliance, please check carefully to make sure voltage (AC120V-60Hz) is
compatible with your home and that electrical cord is connected to a properly grounded
electrical outlet of similar voltage. CAUTION: Risk of fire, electric shock, burns or injury if Blender
is not connected as instructed.
2. ALWAYS place appliance on a flat, level and stable surface.
3. Make sure Blender and all controls are in OFF position before inserting plug in electrical outlet.
4. Do not plug/unplug Blender into/from electrical outlet with wet hands.
5. To disconnect Blender from electrical outlet, pull directly on the plug; do not pull on the power
cord.
6. DO NOT let power cord hang over edge of table or counter or touch any hot surfaces.
7. DO NOT place or use the unit or any parts on or near a hot gas or electric burner, in a heated
oven, or on stove top.
8. This appliance should not be used by or near children, or persons with certain disabilities.
9. Close supervision is necessary when any appliance is used near children.
10. Thisproductisequippedwithapolarizedplug(onebladeiswiderthan theother
blade) as a safety feature to reduce theriskofelectricalshock and fire. This plug will fit
intoapolarized outlet only one way. If you are unable toinserttheplugintothe electrical
outlet,tryreversingtheplug. If the plug still does notfit,contact a qualified electrician.
Never use the plug with an extension cord unless the plug canbefully inserted into the
extension cord, making sure the electrical rating of the extension cord is at least as great as
the electrical rating of this appliance (listed on the bottom panel of the unit). Do not alter
plug.Donotattempttodefeatthe safety purpose of the polarizedplug.
11. DO NOT operate this or any other appliance with a damaged cord or plug or after the appliance
malfunctions, has been damaged in any way or Base/Motor has been immersed in water or
other liquid. Send the unit to the nearest Authorized Service Center for inspection, repair or
adjustment. (ONLY qualified technicians should repair the unit).
12. To avoid risk of electrical shock, fire or injuries: DO NOT immerse in or expose Base/Motor,
electrical cord or plug to water or other liquid.
13. A short power-supply cord is provided to reduce the hazards resulting from entanglement or
tripping over a longer cord. An extension cord may be used with care; however, be sure the
marked electrical rating is at least as great as the electrical rating of this appliance (listed on the
bottom panel of the unit). The extension cord should be positioned such that it does not drape
over the counter or table top where it can be pulled on by children or tripped over. DO NOT use
an outlet or extension cord if the plug fits loosely. DO NOT use extension cord if electrical cord
feels hot.
Page 3

14. Keep electrical and extension cords away from appliance and any hot parts and surfaces of the
appliance during use.
15. The use of any accessories or attachments not recommended by the manufacturer may cause
fire, electric shock or injury. Use only the Blade Attachments provided with this Blender.
16. To reduce the risk of injury, never place Blending/Chopping Blades on Base without Cup/Jar
properly attached to Blade Attachment. CAUTION: Always operate Blender with Cup/Jar fully
attached and locked in place to Blade Attachment and before putting Cup/Jar onto Base.
17. Do not blend hot liquids.
18. Always use Control Functions/Buttons to operate unit.
19. Do not attempt to defeat the Pulse/Cup Locking mechanism to turn appliance ON.
20. CAUTION: Keep hands and utensils out of Cup/Jar while blending. DO NOT attempt to
dislodge food when Blender is in operation or plugged in. A spatula/scraper may be used but
ONLY when blender is not running and unplugged.
21. Caution: Exposed sharp metal blades ! Use EXTREME CAUTION when handling and cleaning
metal blades.
22. Avoid contact with moving parts.
23. Make sure Blender is in OFF position and unplugged before adding/removing parts or when
cleaning.
24. Do not attempt to place Cup/Jar onto Base while motor is running. Do not attempt to remove
Cup/Jar from Base while motor is running.
25. After operating continuously for up to one minute, wait at least another minute before
operating the Bender again to help prevent the motor from overheating.
26. Do not run motor while Cup/Jar is empty.
27. Unplug power cord from outlet when not in use. Clean & cover the unit and store in a cool dry
place if not being used for an extended period of time.
28. This appliance is NOT recommended for outdoor use.
29. DO NOT fill Blender more than ¾ full with food or liquid.
30. If Blender malfunctions during use, shut down unit IMMEDIATELY and discontinue use. DO NOT
attempt to open any part of the base. This product has no user-serviceable parts. Always contact
authorized Service Centre if unit malfunctions or for service. DO NOT use or replace with any
unauthorized parts not intended for this unit. All parts for this appliance must be used according
to Instruction Manual. ONLY use manufacturer approved parts from authorized Service Center.
Any other parts or accessories not intended for use with this appliance is strictly prohibited and
will void warranty.
KEEP OUT OF REACH OF CHILDREN. DO NOT LEAVE APPLIANCE UNATTENDED WHEN
IN USE OR WHEN APPLIANCE CONTAINS HOT FOOD OR LIQUID. ALWAYS SUPERVISE
CHILDREN WHEN THEY ARE NEAR APPLIANCE. DO NOT ALLOW CHILDREN TO OPERATE
OR BE NEAR THE APPLIANCE WHEN IN USE.
CAUTION: BURNS, INJURY AND/OR FIRE MAY RESULT FROM NON-COMPLIANCE
WITH ALL OPERATING PROCEDURES DESCRIBED IN INSTRUCTION MANUAL.
FOR HOUSEHOLD USE ONLY • NOT FOR COMMERCIAL USE
SAVE THESE INSTRUCTIONS FOR FUTURE REFERENCE
3
Page 4
4
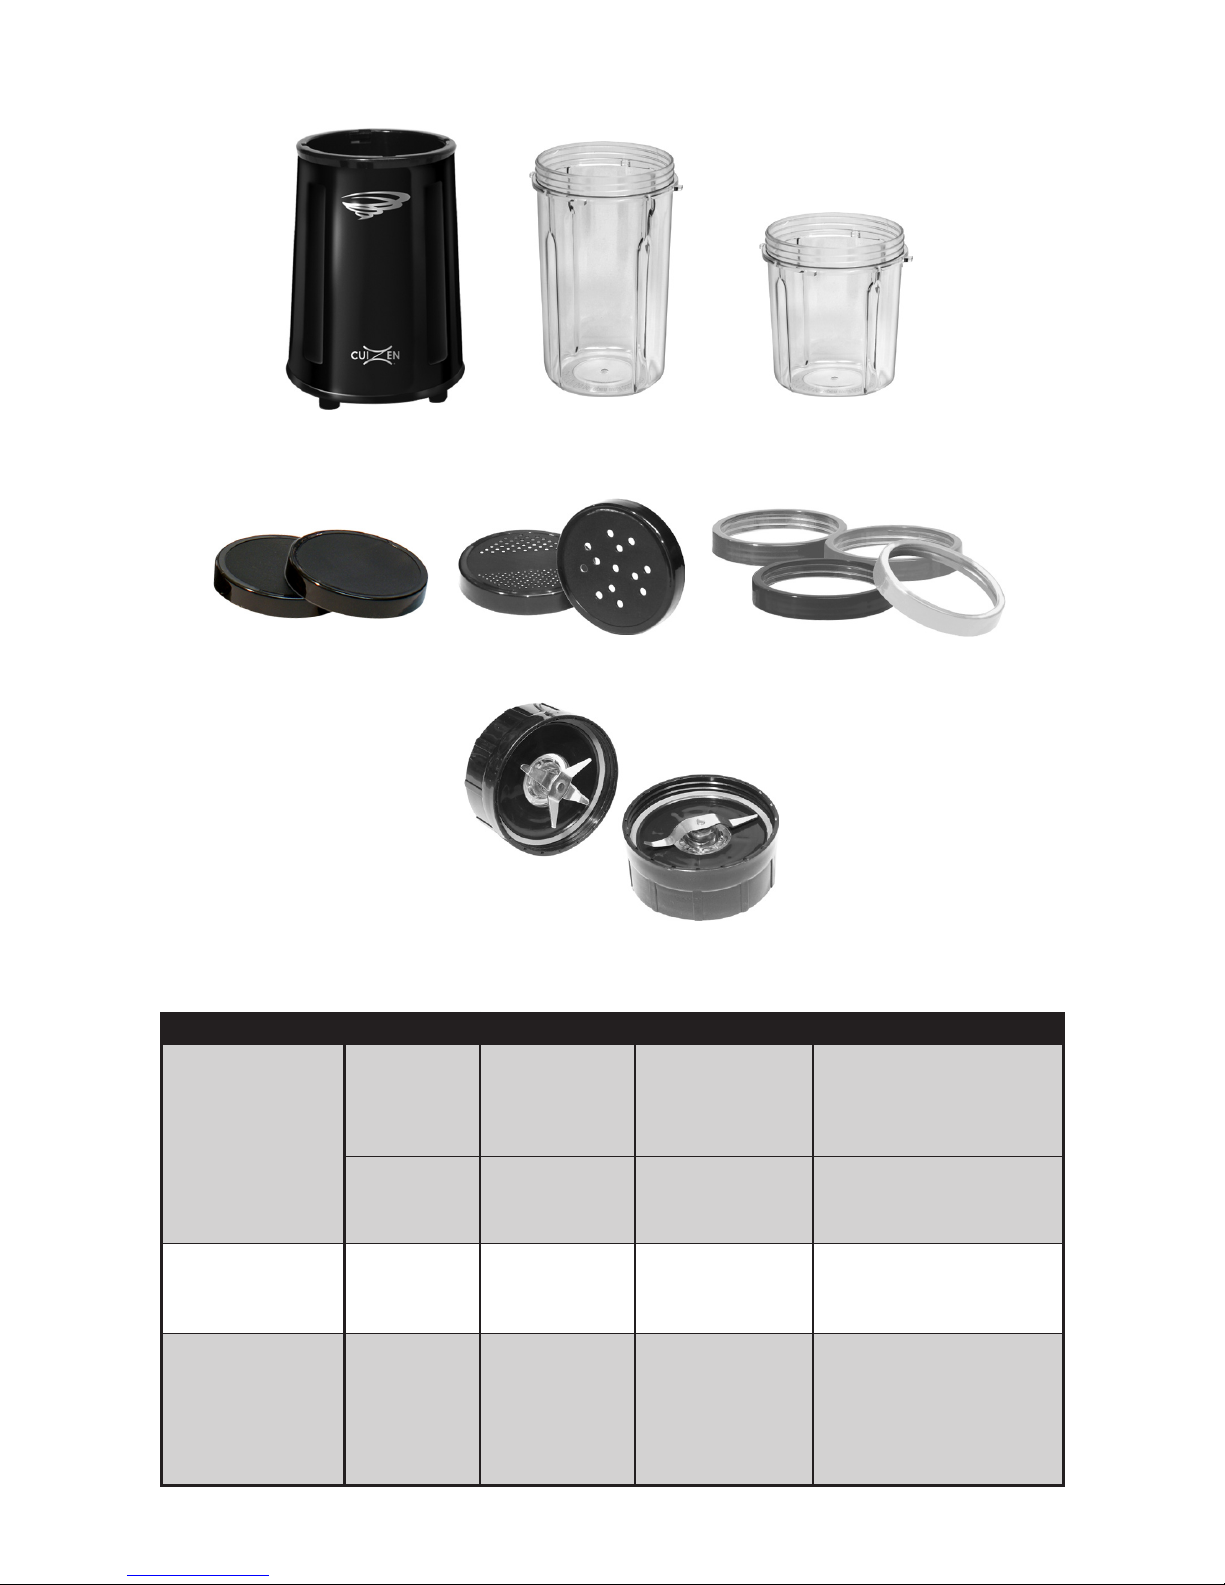
PARTS
FUNCTIONS
Base - Motor
Storage Lids Shaker Tops Color-Coded
Sipping Rings
Large Cup / Jar
16 oz
Small Cup / Jar
8 oz
Cross Blade
Flat Blade
Attachment Function Blade Time Maximum Capacity
Large Cup/Jar Blend Cross Blade Max 1 min ON No more than ¾ full
16 oz Chop 1 min OFF
Grate
Grind Flat Blade 30 sec. ON 50g Coee Beans, etc.
1 min OFF
Small Cup/Jar Grind Flat blade 30 sec. ON 20 g Spices
8 oz 1min OFF
Small Cup / Jar Whip Flat blade 1 min ON 8 oz Heavy Cream
8 oz 1 min OFF or
until cream is
whipped
Page 5

5
OPERATING INSTRUCTIONS
BLENDING & CHOPPING
Before using your Food processors for the first time, wash the Blades, Cups & Jar in hot
soapy water, rinse well and dry thoroughly. DO NOT immerse Base/Motor, electrical
cord or plug in water or other liquid.
CAUTION: Ensure Blender is unplugged from electrical outlet before assembling. Handle
Blade assembly part with care as blades are extremely sharp. Use caution when attaching,
taking off, cleaning or storing Blade assembly part.
1. Ensure Blender Base/Motor is unplugged from the electrical outlet.
2. Place the Base on a flat, level & stable surface.
3. Fill up to ¾ capacity Large Cup or Small Jar with selected foods to blend, mix, chop,
purée, grate or grind.
4. Screw Cross Blade or Flat Blade Attachment part clockwise onto Large Cup or Small
Jar until well locked in place & secure. Caution: Exposed sharp metal blades ! Use
EXTREME CAUTION when handling and cleaning metal blades. NOTE: Ensure Silicone
Gasket, located on the inside bottom edge of the Blade Attachment part is properly in
place. This will prevent leaking.
5. Turn the Large Cup or Small Jar which has been locked in place with Blade Attachment
part upside down so Blade Attachment is on the bottom. Place Assembled Cup/Jar
onto base, aligning the four tabs located on the bottom outside part of the Cup/Jar
with the four grooves on the top inner edge of the Base.
6. Plug the Blender into a standard 120-volt AC electrical outlet.
7. Your Blender is now ready for use. For PULSE MODE, put your hand on top of Cup/
Jar and press down firmly, making sure Cup/Jar tabs go in Base grooves. Release
Cup/Jar to go back up, which will stop Blender from functioning. For CONTINUOUS
BLENDING MODE, align Cup/Jar tabs into Base grooves, press firmly until Blender
starts functioning and turn Cup/Jar counter-clockwise until Cup/Jar is fully locked into
Base. To release, turn Cup/Jar clockwise until tabs are disengaged from grooves. To
prevent product overheating, limit continuous operation to 1 minute at a time. NOTE:
Cup/Jar Assembly must be pushed in firmly or locked into position in order to operate.
CAUTION: Wait until Blades have stopped turning completely before removing Cup/
Jar Assembly.
8. When finished Blending Juice & Drinks, unscrew Blade Attachment from Cup and
screw one of the Color-coded Sipping Rings to Cup. You can now drink directly from
Cup.
9. Unplug Blender from electrical outlet when not in use or if appliance is left
unattended.
Page 6

6
TIPS
1. Blender is not intended for blending hot liquids.
2. Blender is not intended for blending frozen solid ingredients. Chop ingredients into
smaller size chunks before freezing. Allow ingredients to defrost slightly before blending.
Large frozen solid ingredients may damage Cups/Jar. Use crushed ice instead of ice cubes.
3. When chopping meat or other food, use pulse mode. It is best to do in batches, making
sure not to overfill Cup/Jar. If food gets stuck to the side, take Cup/Jar attachment out and
tap on exterior surface of Cup/Jar with your hands to dislodge food from the inside wall of
the Cup/Jar. Put Cup/Jar back in place over Base and continue Pulse until desired result.
4. For liquid ingredients, DO NOT fill Cup/Jar more than ¾ capacity. Overfilling Cups/Jar could
result in spillage and cause permanent damage/malfunction to motor. Spillage into motor
will void warranty and could cause motor to overheat and risk of fire or personal injury.
Your Personal Drink Blender is not only a great drink blender but can also Mix - Chop - Grate Grind - Purée & Whip.
Use Cross Blade (Double Blade) for Blending - Mixing - Chopping - Grating. Use preferably for
wet ingredients.
Use Flat Blade (Low Blade) for Whipping & Grinding. Use preferably for dry ingredients.
Grate Cheese - Chop Nuts - Chop Meat & Vegetables for Salads - Purée fruits - Whip Cream - Mix
Sauces - Blend Fresh Baby Food - Mix Salad Dressing & Dips - Grind Bread Crumbs - Mix Eggs
Ingredients for Scrambled Eggs & Omelets - & Much, Much More...
CARE & MAINTENANCE
WARNING: Toavoidrisksofelectricalshock,burns or injuries, alwaysmakesure the product is
unplugged from the electrical outlet beforedisplacing,servicingorcleaning it.
CAUTION: Exposed sharp metal blades ! Use EXTREME CAUTION when handling and cleaning
metal blades.
1. Always clean Cups/Jar & Blades Attachment after every use.
2. Wash all parts except Base/Motor in warm, soapy water, making sure to clean all residual
food from under the blades (Use a toothbrush or small brush if needed). Rinse & dry
thoroughly. Alternately, mix ½ tsp of liquid soap in Cup/Jar with warm water up to ⁄ full.
Screw Blade. Attachment to be cleaned in place and run Blender for 1 minute. Empty
contents, rinse and dry thoroughly.
3. DO NOT wash any parts in dishwasher.
4. Clean the Base by wiping it with a damp cloth. To avoid damage to appliance and risk of
electrical shock or injury, DO NOT immerse in or expose Base/Motor, electrical cord or
plug to water or other liquid. DO NOT place Base/Motor in dishwasher.
5. Do not use abrasive cleaners or scouring pads to clean any parts of the Blender, Cups/Jars
or Blades.
6. Unplug power cord from outlet when not in use. Reassemble & cover Blender before
storing it in a cool dry place if not being used for an extended period of time.
Page 7

7
RECIPES
YOGURT-BANANA-BERRY SHAKE
¼ Cup each of semi-frozen raspberries & strawberries
1 semi-frozen Banana
½ Cup of Vanilla Yogurt
½ Cup whole milk
Add all ingredients in Large Cup and attach Cross Blade in place. Pulse until smooth.
TRADITIONAL CHOCOLATE SHAKE
1 Cup whole milk
1 Big Scoop Vanilla Ice Cream
3 tbsp Liquid Chocolate
Whipped Cream
Add all ingredients in Large Cup and attach Cross Blade in place. Pulse until smooth.
Add whipped Cream to taste on top of Shake.
BANANA-BERRY SMOOTHIE
¼ Cup each of semi-frozen raspberries & strawberries
1 semi-frozen Banana
½ Cup Orange Juice
Crushed Ice
Add all ingredients in Large Cup and attach Cross Blade in place. Pulse until smooth.
VIRGIN PINA COLADA
1 Cup Pineapple Juice
3 oz Coconut Cream
Splash of Orange Juice
Fresh Pineapple Wedge
Maraschino Cherries
Crushed Ice
Add all ingredients in Large Cup and attach Cross Blade in place. Pulse until smooth.
Garnish with pineapple wedge and two maraschino cherries.
TROPICAL COLADA
1 Cup Pineapple Juice
1 Cup Orange Juice
2 oz Coconut Cream
2 tbsp Grenadine Syrup
Maraschino Cherries
Crushed Ice
Add all ingredients in Large Cup and attach Cross Blade in place. Pulse until smooth.
Garnish with two maraschino cherries.
Page 8

8
HONEY-LIME-MUSTARD-CILANTRO VINAIGRETTE
½ Cup Vegetable Oil 1 minced Garlic Clove
1½ tbsp Honey 1 tbsp Dijon Mustard
1 tbsp fresh Lime Juice 1 tbsp Apple Cider Vinegar
1 tbsp Fresh Chopped Cilantro leaves
Sat & Pepper to taste
Add all ingredients in Large Cup and attach Cross Blade in place.
Pulse until smooth and well blended.
CREAMY CEASAR VINAIGRETTE
½ Cup Vegetable Oil 1 minced Garlic Clove
1 tbsp Dijon Mustard 1 tbsp fresh Lemon Juice
1 tsp Anchovy Paste 1 tsp Worcestershire Sauce
1 Egg Yolk Sat & Pepper to taste
Freshly grated Parmesan to taste
Add all ingredients in Large Cup and attach Cross Blade in place. Pulse until smooth and well
blended. Mix with salad and sprinkle with fresh grated parmesan cheese.
TASTY HAM SALAD
1 Cup Chopped Ham 1 small green onion
¼ stalk Celery 2 tbsp Mayonnaise
1 tsp Sweet Relish 1 tsp Yellow Mustard
Pepper to taste
Add all ingredients in Large Cup and attach Cross Blade in place.
Pulse until smooth and well blended.
EGG SALAD
4 Hard-Boiled Eggs 1 small green onion
¼ stalk Celery 2 tbsp Mayonnaise
Pinch of Paprika ½ tsp Fresh Chopped Chives
Salt & Pepper to taste
Add all ingredients in Large Cup and attach Cross Blade in place. Pulse lightly.
HUMMUS
1 Can of Chickpeas 2 tbsp of Chickpea Water from can
3 Cloves Garlic 2 tbsp Fresh Lemon Juice
2 tbsp Tahini 2 tbsp Olive Oil
Salt & Pepper to taste
Add all ingredients in Large Cup and attach Cross Blade in place.
Pulse until smooth and well blended.
Page 9

9
Distributed by: TelAsia Inc.
Canada H7S 2G2
1-877-895-9995 • www.Cuizen.net
LIMITED ONE (1) YEAR WARRANTY
This appliance is warranted to be free from any manufacturing defects under
normal use and conditions for one (1) year from date of purchase. During that
period, should the appliance fail to operate properly, return the appliance
with your sales receipt to the store where purchased. This product warranty
covers only the original consumer purchase of the product. During the
applicable warranty period, we will repair or replace, at our discretion, any
mechanical or electrical part which proves defective, or replace unit with a
similar or comparable model. This warranty is in lieu of all other warranties and
representation, expressed or implied, and all other obligations or liabilities on
our part.
FOR HOUSEHOLD USE ONLY • NOT FOR COMMERCIAL USE
This limited warranty does not cover normal wear and tear, damages from
improper installation, defects other than manufacturing defects, damages
from misuse, abuse, accident, negligence, alteration, lack of proper care and
maintenance, or incorrect current or voltage. This warranty shall not apply to
any appliance that has been repaired or altered by other than an Authorized
Dealer or Service Center.
If unit malfunctions, do not use the appliance
and contact nearest Authorized Service Center.
 Loading...