

Page 1
INSTRUCTION AND
RECIPE BOOKLET
Classic Waffle Maker
For your safety and continued enjoyment of this product, always read the instruction book carefully before using.
WMR-CA
Page 2

Page 3

TABLE OF CONTENTS
Important Safeguards .................................. 3
Instructions for Use ...................................... 4
Special Features ........................................... 4
Tips and Toppings ....................................... 5
Recipes ......................................................... 5
Cleaning and Maintenance .......................... 8
Storage ......................................................... 8
Warranty ....................................................... 8
IMPORTANT SAFEGUARDS
When using an electrical appliance, basic
safety precautions should always be followed,
including the following:
1. READ ALL INSTRUCTIONS.
2. Do not touch hot surfaces. Use handles
and knobs.
3. To protect against fire, electrical shock,
and injury to persons, DO NOT IMMERSE
CORD, PLUG, OR UNIT in water or other
liquids.
4. Close supervision is necessary when any
appliance is used by or near children.
5. Unplug from outlet when not in use and
before cleaning. Allow to cool before putting on or taking off parts, and before
cleaning appliance.
6. Do not operate any appliance with a
damaged cord or plug or after the appliance malfunctions or has been damaged in
any manner. Return appliance to the nearest Cuisinart Authorized Service Facility for
examination, repair, or adjustment.
7. The use of accessory attachments not
recommended by Cuisinart may result in
fire, electrical shock, or injury to persons.
8. Do not use outdoors.
9. Do not let power cord hang over edge of
table or counter, or touch hot surfaces.
10. Do not place on or near a hot gas or
electric burner, or in a heated oven.
Unplug the unit when finished baking
11.
waffles.
1
2. Do not use appliance for other than intended
use.
13. Always attach plug to appliance first, then
plug cord into the wall outlet. To disconnect,
turn control to setting #1, then remove plug
from the outlet.
14. Extreme caution must be used when moving
an appliance containing hot oil or other hot
liquids.
WARNING: TO REDUCE THE RISK
15.
OF FIRE OR ELECTRIC SHOCK,
REPAIR SHOULD BE DONE ONLY BY
AUTHORIZED PERSONNEL. NO USER
SERVICEABLE PARTS ARE INSIDE.
16.
Do not operate your appliance in an
appliance garage or under a wall cabinet.
When storing in an appliance garage
always unplug the unit from the electri cal outlet. Not doing so could create a risk
of fire, especially if the appliance touches
the walls of the garage or the door touches
the unit as it closes.
SAVE THESE INSTRUCTIONS
FOR HOUSEHOLD USE ONLY
SPECIAL CORD SET
INSTRUCTIONS
A short power-supply cord is provided to
reduce the risks resulting from becoming
entangled in or tripping over a longer cord.
Longer extension cords are available and may
be used if care is exercised in their use.
If a long extension cord is used, the marked
electrical rating of the extension cord should be
at least as great as the electrical rating of
the appliance, and the longer cord should be
arranged so that it will not drape over the countertop or tabletop where it can be pulled on by
children or animals, or tripped over.
NOTICE:
This appliance has a polarized plug (one blade
is wider than the other). To reduce the risk of
electric shock, this plug will fit in a polarized
outlet only one way. If the plug does not fit fully
in the outlet, reverse the plug. If it still does not
fit, contact a qualified electrician. Do not modify
the plug in any way.
3
Page 4
INSTRUCTIONS FOR USE
1. Before using your Cuisinart® Classic Waffle
Maker for the first time, remove any dust
from shipping by wiping the plates with a
damp cloth. Remove all protective paper
and wrapping.
2. Preheat the waffler. Close grids and plug
cord into a 120V AC wall outlet. The red
light will go on to signal power. Allow the
waffle maker to preheat. The green indica
tor light will go on when it is ready to use.
Note: The first time you use your waffle
maker, it may have a slight odor and may
smoke a bit. This is normal, and common to
appliances with a nonstick surface.
3
. Pour batter when green indicator light goes
on. Pour batter onto the center of the lower
waffle grid. Use a heat-proof plastic spatula
to spread batter evenly over the grids. Close
the lid.
4
. The green light will go off and the red light
will once again illuminate. It may take several
seconds for the red light to come on. This is
normal.
5.
Once the waffles are ready to eat, the green
light will again come on.
6. Baking time is determined by browning
level. Choose a setting on the browning
control dial. We recommend using setting
#3 for golden brown waffles.
7. Once the waffle is ready, remove it by gen
tly loosening the edges with a heat-proof
plastic spatula. Never use metal utensils, as
they may damage the nonstick coating.
Always disconnect the plug from the wall
8.
outlet once baking is completed.
-
-
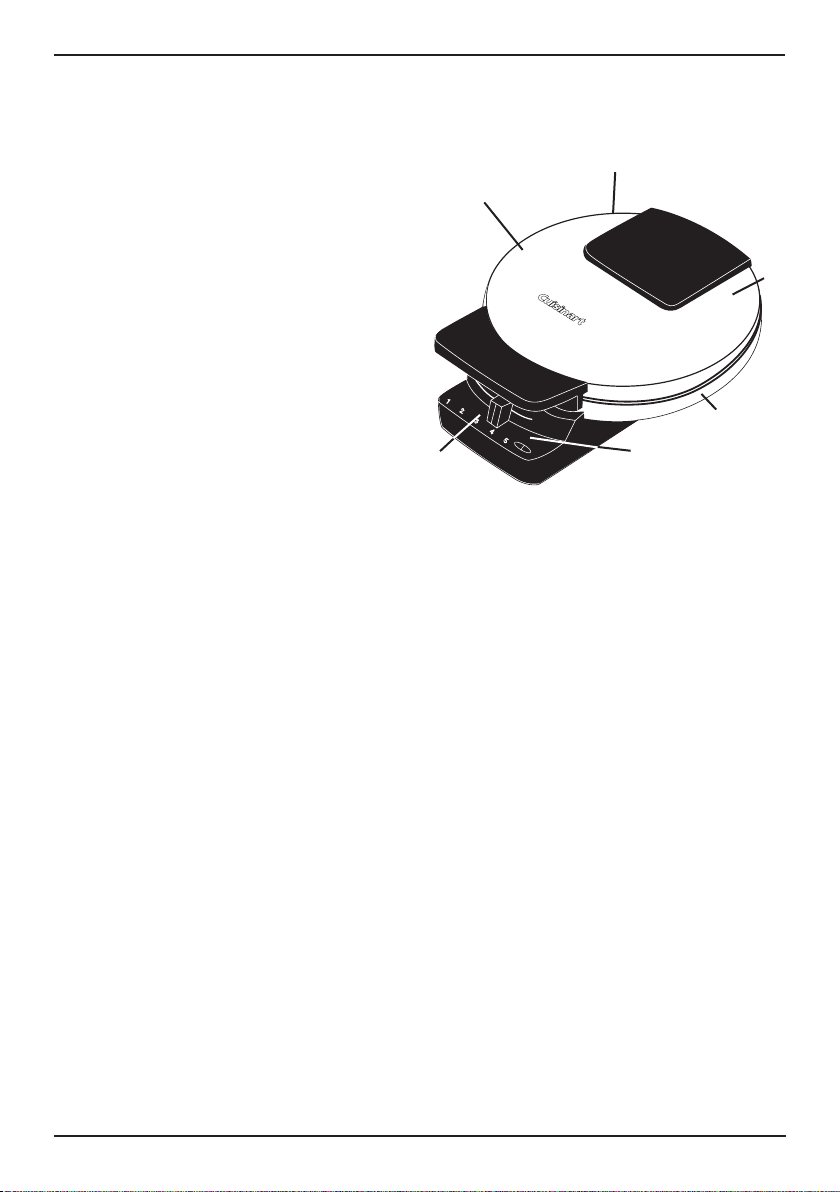
SPECIAL FEATURES
4.
3.
1.
1. Browning Control Adjustment
- five settings to customize waffle maker
from light to deep golden brown
2. Indicator Lights
- signal when waffle maker is ready to bake
- signal when waffles are ready to eat
3. Weighted Lid
- lid will not rise as waffles bake
4. Rubber Feet
- will not mark countertop
- keep unit steady
5. Brushed Stainless Steel Covers
6. Cord Storage
- cord wraps under bottom for easy storage
7. BPA-Free (not shown)
- All parts that come in contact with food
are BPA-Free
The Cuisinart
Note:
has been treated with a special
nonstick coating. Before the first use,
we suggest you season the grids with
cooking spray or flavorless vegetable
oil. If using oil, apply oil with a paper
towel or pastry brush. You may find it
helpful to repeat this process before
each use of the waffle maker.
2.
®
Classic Waffle Maker
5.
6.
4
Page 5

TIPS TO MAKE
PERFECT WAFFLES
We recommend setting #3 for golden
brown waffles.
If you prefer crisper, darker waffles, increase
the browning control to setting #4 or 5.
For evenly filled waffles, pour the batter onto
the center of the lower grid and close the
cover.
We recommend using ½ cup batter per waffle
for evenly filled waffles.
Waffles are best when made to order, but
baked waffles may be kept warm in a 200°F
oven. Place in a baking pan or wrap in foil while
in the oven. Waffles wrapped in foil may lose
their crispiness.
Baked waffles may be frozen. Allow to cool
completely, then place in plastic food storage
bag. Use waxed paper to keep waffles
separated. Reheat in a toaster or toaster oven
when ready to use.
SUGGESTED TOPPINGS
Maple syrup, fruit syrups
Warm fruit compote, fruit sauce
Fresh berries, chopped fruit, chopped nuts
Powdered sugar
Whipped cream, ice cream, sorbet
Chocolate sauce
Fruited yogurt
RECIPES
BASIC WAFFLES
You can’t beat the taste of homemade waffles.
Freeze the extras to use when time is scarce.
Makes eight 6½-inch round waffles
2 cups all-purpose flour
2 tablespoons sugar
1 tablespoon baking powder
½ teaspoon salt
1¾ cups reduced fat milk
6 tablespoons vegetable oil
2 large eggs
Place ingredients in a large mixing bowl and
combine until well blended and smooth. Let
batter sit 5 minutes before using. Preheat your
Cuisinart
*
Pour ½ cup batter onto the center of the lower
grid; spread evenly using a heat-proof spatula.
Close cover of waffle maker. Indicator light will
turn red. When light turns green again, waffle is
ready. Open cover and carefully remove baked
waffle. Repeat with remaining batter. For best
results, serve immediately. However, you may
keep waffles warm in a 200°F oven until ready
to serve.
*
®
Classic Waffle Maker on setting #3
(green indicator light will be illuminated
when preheated).
We recommend using setting #3 to achieve
a golden brown baked waffle. Adjust the
browning control if you prefer lighter or darker
waffles.
Nutritional information per waffle:
Calories 262 (44% from fat) • carb. 30g • pro. 7g
• fat 13g • sat. fat 2g • chol. 57mg • sod. 372mg
For Mini-Chip Waffles:
Add
½
before baking.
5
•
calc. 177mg • fiber 1g
cup mini chocolate morsels to the batter
Page 6

CORNMEAL WAFFLES
These waffles taste like cornbread. Drizzle with
butter and serve with soup, chili or stew. Also
good for brunch or a late night snack served
with syrup or cheese sauce.
Makes eight 6½-inch round waffles
1¼ cups all-purpose flour
3
⁄4
cup yellow cornmeal
2 tablespoons sugar
1 tablespoon baking powder
½ teaspoon salt
3
1
⁄4
cups reduced fat milk
6 tablespoons vegetable oil
2 large eggs
Place ingredients in a large mixing bowl and
combine until well blended and smooth. Let
batter sit 5 minutes before using. Preheat your
Cuisinart
*
®
Classic Waffle Maker on setting #3
(green indicator light will be illuminated
when preheated).
Pour ½ cup batter onto the center of the lower
grid; spread evenly using a heat-proof spatula.
Close cover of waffle maker. Indicator light will
turn red. When light turns green again, waffle is
ready. Open cover and carefully remove baked
waffle. Repeat with remaining batter. For best
results, serve immediately. However, you may
keep waffles warm in a 200°F oven until ready
to serve.
*
We recommend using setting #3 to achieve
a golden brown baked waffle. Adjust the
browning control if you prefer lighter or darker
waffles.
Nutritional information per waffle:
Calories 264 (43% from fat) • carb. 32g • pro. 6g
• fat 13g • sat. fat 2g • chol. 57mg • sod. 372mg
• calc. 173mg • fiber 1g
NUTTY WHOLE WHEAT WAFFLES
Wholesome wheat flavor combined with
crunchy pecans makes a delicious breakfast,
brunch or snack. Top with warm fruit compote
or syrup.
Makes eight 6½-inch round waffles
1½ cups all-purpose flour
½ cup whole wheat flour
2 tablespoons sugar
1 tablespoon baking powder
½ teaspoon salt
2 cups reduced fat milk
6 tablespoons vegetable oil
2 large eggs
½ cup finely chopped pecans, walnuts,
almonds, or hazelnuts
Place ingredients in a large mixing bowl and
combine until well blended and smooth. Let
batter sit 5 minutes before using. Preheat your
Cuisinart
*
®
Classic Waffle Maker on setting #3
(green indicator light will be illuminated
when preheated).
Pour ½ cup batter onto the center of the lower
grid; spread evenly using a heat-proof spatula.
Close cover of waffle maker. Indicator light will
turn red. When light turns green again, waffle is
ready. Open cover and carefully remove baked
waffle. Repeat with remaining batter. For best
results, serve immediately. However, you may
keep waffles warm in a 200°F oven until ready
to serve.
*
We recommend using setting #3 to achieve
a golden brown baked waffle. Adjust the
browning control if you prefer lighter or darker
waffles.
Nutritional information per waffle:
Calories 263 (44% from fat) • carb. 30g • pro. 7g
• fat 13g • sat. fat 2g • chol. 58mg • sod. 376mg
• calc. 187mg • fiber 1g
6
Page 7

FRUITY WAFFLES
Puréed fruit adds lightness and delicate flavor
to baked waffles.
Makes eight 6½-inch round waffles
2 cups all-purpose flour
2 tablespoons sugar
1 tablespoon baking powder
½ teaspoon salt
3
1
⁄4
cups reduced fat milk
6 tablespoons vegetable oil
2 large eggs
½ cup puréed fruit* or applesauce
(use fresh or frozen)
Place ingredients in a large mixing bowl and
combine until well blended and smooth. Let
batter sit 5 minutes before using. Preheat your
Cuisinart
*
®
Classic Waffle Maker on setting #3
(green indicator light will be illuminated
when preheated).
Pour a scant ½ cup batter onto the center of
the lower grid; spread evenly using a heatproof spatula. Close cover of waffle maker.
Indicator light will turn red. When light turns
green again, waffle is ready. Open cover and
carefully remove baked waffle. Repeat with
remaining batter. For best results, serve imme
diately. However, you may keep waffles warm
in a 200°F oven until ready to serve.
* We recommend using setting #3 to achieve a
golden brown baked waffle. Adjust the browning control if you prefer lighter or darker
waffles.
Nutritional information per waffle:
Calories 268 (43% from fat) • carb. 32g • pro. 7g
• fat 13g • sat. fat 2g • chol. 57mg • sod. 371mg
• calc. 175mg • fiber 1g
* May use puréed apricots, peaches, pears,
plums, or strawberries.
BANANA CHIP WAFFLES
Sprinkle with powdered sugar for breakfast or
top with a scoop of ice cream for an afternoon
snack.
Makes eight 6½-inch round waffles
2 cups all-purpose flour
2 tablespoons sugar
1 tablespoon baking powder
½ teaspoon salt
2
1
⁄3
cups reduced fat milk
1 medium banana, mashed (1/2 cup)
6 tablespoons vegetable oil
2 large eggs
½ cup mini chocolate chips
Place ingredients (except chocolate chips) in a
large mixing bowl and combine until well blended and smooth. Let batter sit 5 minutes before
using. Preheat your Cuisinart
®
Classic Waffle
Maker on setting #3 *(green indicator light will
be illuminated when preheated).
Pour ½ cup batter onto the center of the lower
grid; spread evenly using a heat-proof spatula.
Sprinkle 1 tablespoon of minichips over batter.
Allow batter to bubble for 5-10 seconds, then
close cover of waffle maker. Indicator light will
turn red. When light turns green again, waffle is
ready. Open cover and carefully remove baked
waffle. Repeat with remaining batter. For best
results, serve immediately. However, you may
keep waffles warm in a 200°F oven until ready
to serve.
*
We recommend using setting #3 to achieve
a golden brown baked waffle. Adjust the
browning control if you prefer lighter or darker
waffles.
Nutritional information per waffle:
Calories 334 (45% from fat) • carb. 39g • pro. 6g
• fat 17g • sat. fat 4g • chol. 57mg • sod. 371mg
• calc. 174mg • fiber 3g
* For Banana Nut Waffles:
Omit mini chocolate morsels. Add 1/2 cup
chopped nuts (walnuts, pecans, almonds) to
batter before baking.
7
Page 8
CLEANING AND
MAINTENANCE
Once you have finished baking, remove plug
from electrical outlet. Leave top lid open so
grids begin to cool.
Never take your waffle maker apart for cleaning.
Simply brush crumbs from grooves, and absorb
any excess cooking oil by wiping with a dry cloth
or paper towel.
You may clean the grids by wiping with a damp
cloth to prevent staining and sticking from
batter or oil buildup.
cooled completely before cleaning. If batter
adheres to plates, simply pour a little cooking
oil onto the baked batter and let stand approxi
mately 5 minutes, thus allowing it to soften for
easy removal.
To clean exterior, wipe with a soft dry cloth.
Never use an abrasive cleanser or harsh pad.
NEVER IMMERSE CORD, PLUG OR UNIT IN
WATER OR OTHER LIQUID.
Any other servicing should be performed by an
authorized service representative
Be certain grids have
-
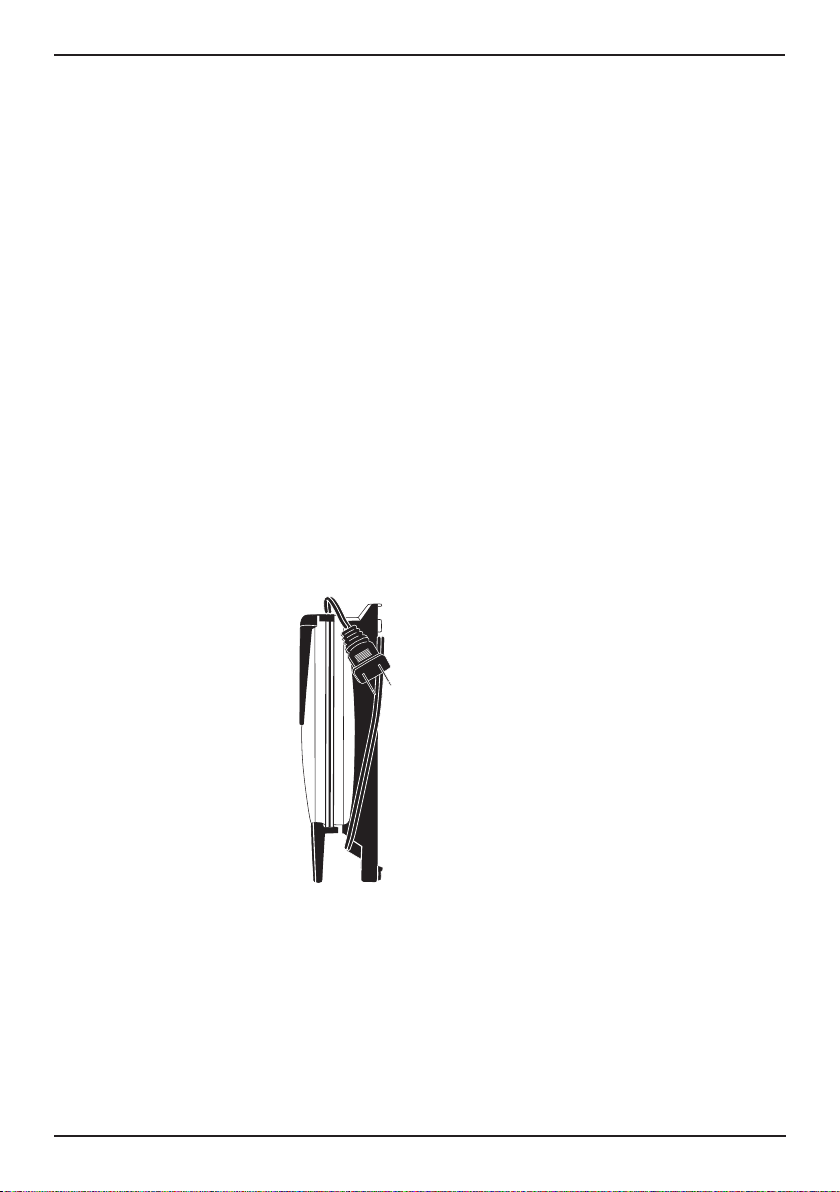
STORAGE
Store with cord wrapped
securely around base. Plug
prongs fit into the special
grooves on the side of the
waffle maker. For compact
storage, stand waffle maker on
opening end so Cuisinart logo
is facing you. The waffle maker
has been designed with a spe
cial latching feature so the lid
stays closed during storage.
-
WARRANTY
Limited Three-Year Warranty
This warranty is available to consumers only.
You are a consumer if you own a Cuisinart
Classic Waffle Maker which was purchased
at retail for personal, family or household use.
Except as otherwise required under applicable
law, this warranty is not available to retailers or
other commercial purchasers or owners.
We warrant that your Cuisinart
Maker will be free of defects in materials and
workmanship under normal home use for 3
years from the date of original purchase.
We recommend that you visit our website,
www.cuisinart.com for a fast, efficient way to
complete your product registration. However,
product registration does not eliminate the
need for the consumer to maintain the original
proof of purchase in order to obtain the war
ranty benefits. In the event that you do not
have proof of purchase date, the purchase date
for purposes of this warranty will be the date of
manufacture.
If your Cuisinart
prove to be defective within the warranty
period, we will repair (or, if we think necessary,
replace) it without charge to you. To obtain
warranty service, please call our Customer
Service Center toll-free at 1-800-726-0190 or
write to: Cuisinart, 7475 North Glen Harbor Blvd.,
Glendale, AZ 85307.
To facilitate the speed and accuracy of your
return, enclose $10.00 for shipping and handling. (California residents need only supply a
proof of purchase and should call 1-800-7260190 for shipping instructions.) Please be sure
to include your return address, description of
the product’s defect, product serial number,
and any other information pertinent to the
return. Please pay by check or money order.
®
Classic Waffle Maker should
®
Classic Waffle
®
-
CALIFORNIA RESIDENTS ONLY
California law provides that for In-Warranty
Service, California residents have the option of
returning a nonconforming product (A) to the
store where it was purchased or (B) to another
retail store that sells Cuisinart
same type. The retail store shall then, according to its preference, either repair the product,
refer the consumer to an independent repair
8
®
products of the
Page 9

facility, replace the product, or refund the purchase price less the amount directly attributable
to the consumer’s prior usage of the product. If
neither of the above two options results in the
appropriate relief to the consumer, the consumer
may then take the product to an independent
repair facility, if service or repair can be eco
nomically accomplished. Cuisinart and not the
consumer will be responsible for the reasonable
cost of such service, repair, replacement, or
refund for nonconforming products under war
ranty. California residents may also, according to
their preference, return nonconforming products
directly to Cuisinart for repair or, if necessary,
replacement by calling our Consumer Service
Center toll-free at 800-726-0190. Cuisinart
will be responsible for the cost of the repair,
replacement, and shipping and handling for such
nonconforming products under warranty.
well as use with accessories, replacement parts
or repair service other than those authorized
by Cuisinart. This warranty does not cover any
damage caused by accident, misuse, shipment
or other than ordinary household use. This war
ranty excludes all incidental or consequential
damages. Some states do not allow the exclusion or limitation of these damages, so these
exclusions may not apply to you. You may also
have other rights, which vary from state to state.
-
Important:
be serviced by someone other than Cuisinart’s
Authorized Service Center, please remind the
servicer to call our Consumer Service Center at
1-800-726-0190 to ensure that the problem is
properly diagnosed, the product is serviced with
the correct parts, and to ensure that the product
is still under warranty.
-
If the nonconforming product is to
BEFORE RETURNING YOUR
CUISINART
If your Cuisinart
®
PRODUCT
®
Classic Waffle Maker should
prove to be defective within the warranty period,
we will repair or, if we think necessary, replace
it. To obtain warranty service, please call our
Customer Service Center toll-free at 1-800-7260190 or write to: Cuisinart, 7475 North Glen
Harbor Blvd. Glendale, AZ 85307. To facilitate
the speed and accuracy of your return, enclose
$10.00 for shipping and handling. (California res
idents need only supply a proof of purchase and
should call 1-800-726-0190 for shipping instructions.) Please be sure to include your return
address, description of the product’s defect,
product serial number, and any other informa
tion pertinent to the return. Please pay by check
or money order. NOTE: For added protection
and secure handling of any Cuisinart
®
product
that is being returned, we recommend you use
a traceable, insured delivery service. Cuisinart
cannot be held responsible for in-transit dam
age or for packages that are not delivered to us.
Lost and/or damaged products are not covered
under warranty.
Your Cuisinart
®
Classic Waffle Maker has been
manufactured to the strictest specifications
and has been designed for use only in 120 volt
outlets and only with authorized accessories
and replacement parts. This warranty expressly
excludes any defects or damages caused by
attempted use of this unit with a converter, as
9
Page 10

NOTES
10
Page 11

NOTES
11
Page 12

©2013 Cuisinart
150 Milford Road
East Windsor, NJ 08520
Printed in China
Any other trademarks or service marks referred to herein are
the trademarks or service marks of their respective owners.
13CE145360
E IB-4006-ESP
Page 13

E IB-4006-ESP
13CE145360
Impreso en la China
East Windsor, NJ 08520
150 Milford Road
©2013 Cuisinart
respectivos.
mencionadas en ésta pertenecen a sus titulares
Todas marcas registradas o marcas de comercio
Page 14

11
NOTES
Page 15

10
válida en caso de daños causados por mal uso,
institucional o comercial del producto, y no es
de voltaje. Esta garantía no cubre el uso
daños causados por el uso de un convertidor
no autorizados por Cuisinart, así como los
causados por accesorios, piezas o reparaciones
Esta garantía excluye expresamente los daños
y piezas de repuesto autorizados solamente.
sobre corriente de 120V, usando accesorios
de fabricación y ha sido diseñado para uso
Este aparato satisface las más altas exigencias
bajo esta garantía.
lastimados durante el envío no serán cubiertos
equivocada. Los productos perdidos y/o
o por los paquetes mandados a una dirección
por los daños ocurridos durante el transporte
y seguimiento. Cuisinart no será responsable
paquete por un método de entrega con seguro
mayor seguridad, le aconsejamos que mande su
aceptar otras formas de pago. NOTA: Para
información pertinente. Sentimos no poder
descripción del problema, así como cualquier
incluir su nombre, dirección y teléfono, la
para recibir instrucciones de envío. Recuerde
de compra y deben llamar al 1-800-726-0190
de California sólo necesitan dar una prueba
por gastos de manejo y envío. Los residentes
compra y un cheque o giro postal de US$10.00
el aparato defectuoso, junto con su recibo de
Harbor Blvd., Glendale, AZ 85307. Regrese
defectuoso a: Cuisinart, 7475 North Glen
gratuita al 1-800-726-0190 o regrese el aparato
esta garantía, llame a nuestra línea directa
(a nuestra opción). Para obtener servicio bajo
producto esté bajo garantía.
correctas para repararlo y asegurarse de que el
problema correctamente, usar las piezas
al 1-800-726-0190 a fin de diagnosticar el
de garantía, lo reparemos o reemplazaremos
materiales o fabricación durante el período
Si este aparato presentara algún defecto de
ANTES DE HACER REPARAR SU APARATO
deberían llamar al servicio posventa de Cuisinart
informe al personal del centro de servicio que
a un centro de servicio no autorizado, por favor
Importante: si debe llevar el aparato defectuoso
garantía.
productos defectuosos durante el período de
reparación, reemplazo, manejo y envío de los
Cuisinart será responsable por los gastos de
Estado a otro.
puede tener otros derechos que varían de un
mencionadas pueden no regir para usted. Usted
o consecuentes, de modo que las limitaciones
la exclusión o limitación de daños incidentales
consecuentes. Algunos Estados no permiten
expresamente todos los daños incidentales o
negligencia o accidente. Esta garantía excluye
nuestra línea directa gratuita al 1-800-726-0190
Para obtener servicio bajo esta garantía, llame a
1-800-726-0190.
se debe llamar a nuestro servicio posventa al
para que lo reparen o lo cambien. Para esto,
producto defectuoso directamente a Cuisinart
también pueden, si lo desean, mandar el
período de garantía. Los residentes de California
Page 16

9
de
®
de los productos defectuosos durante el
servicio, reparación, reemplazo o reembolso
Cuisinart será responsable por los gastos de
o reparar el aparato de manera económica.
independiente, siempre que se pueda ajustar
podrá llevar el aparato a un centro de servicio
dos opciones no satisfacen al consumidor,
consumidor hasta que éste se dañe. Si estas
cantidad imputable al uso del producto por el
por el precio original del producto, menos la
el producto o reembolsará el consumidor
centro de servicio independiente, cambiará
el producto, referirá el consumidor a un
este tipo. La tienda, a su opción, reparará
tienda que venda productos Cuisinart
tienda donde lo compraron o (B) a otra
(A) regresar el producto defectuoso a la
residentes del estado de California pueden
opciones bajo el período de garantía. Los
La ley del estado de California ofrece dos
RESIDENTES DE CALIFORNIA SOLAMENTE
poder aceptar otras formas de pago.
cualquier información pertinente. Sentimos no
teléfono, la descripción del problema, así como
envío. Recuerde incluir su nombre, dirección y
1-800-726-0190 para recibir instrucciones de
dar una prueba de compra y deben llamar al
Los residentes de California sólo necesitan
de US$10.00 por gastos de manejo y envío.
recibo de compra y un cheque o giro postal
Regrese el aparato defectuoso, junto con su
Harbor Blvd. Glendale, AZ 85307.
defectuoso a: Cuisinart, 7475 North Glen
gratuita al 1-800-726-0190 o regrese el aparato
esta garantía, llame a nuestra línea directa
(a nuestra opción). Para obtener servicio bajo
de garantía, la reparemos o reemplazaremos
materiales o fabricación durante el período
Si este aparato presentara algún defecto de
la fecha de fabricación.
período de garantía será calculado a partir de
garantía. En ausencia del recibo de compra, el
no es necesario para recibir servicio bajo esta
original. Sin embargo, registrar el producto
de facilitar la verificación de la fecha de compra
registro disponible en www.cuisinart.com a fin
Le aconsejamos que llene el formulario de
uso doméstico y según las instrucciones.
siempre que el aparato haya sido utilizado para
años después de la fecha de compra original,
defecto de materiales o fabricación durante 3
Cuisinart garantiza este aparato contra todo
en una tienda, para uso
®
para los detallistas u otros comerciantes.
donde la ley lo permita, esta garantía no es
personal o casero. A excepción de los estados
aparato Cuisinart
Usted es un consumidor si ha comprado su
solamente.
Esta garantía es para los consumidores
de tres años
Garantía limitada
GARANTÍA
bien cerradas.
cubierta mantendrá las placas
espacio. Un cierre en la
posición vertical para ahorrar
aparato. Guarde el aparato en
especiales en el costado del
clavija encajan en las ranuras
aparato. Las patas de la
Enrolle el cable debajo del
ALMACENAJE
por un técnico autorizado.
Cualquier otro servicio debe ser realizado
APARATO EN AGUA U OTRO LÍQUIDO.
SUMERJA EL CABLE, LA CLAVIJA O EL
abrasivos ni estropajos metálicos. NUNCA
suave seco. Nunca utilice limpiadores
Limpie el cuerpo del aparato con un paño
mezcla seca para facilitar la limpieza.
aproximadamente 5 minutos. Esto remojará la
un poco de aceite encima y espere durante
Si hay mezcla pegada sobre las placas, vierta
completamente frías antes de limpiarlas.
Compruebe que las placas están
las manchas y los residuos pegajosos.
húmedo, si desea, para eliminar y prevenir
Limpie las placas con un paño ligeramente
papel absorbente o un paño seco.
con una brocha y absorbe el aceite con un
Simplemente elimine los residuos de las placas
Nunca desarme el aparato para limpiarlo.
cubierta abierta para permitir que se enfríe.
Desenchufe el aparato después del uso. Deje la
MANTENIMIENTO
LIMPIEZA Y
Page 17

8
cocer.
pacanas, almendras) a la mezcla antes de
⁄2
taza (50 g) de nueces picadas (nueces,
1
Omitir las mini-chispas de chocolate. Agregar
nueces:
* Para preparar gofres/wafles de banano con
• Calcio 174mg • Fibra 3g
• Colesterol 57mg • Sodio 371mg
• Proteínas 6g • Grasa 17g • Grasa saturada 4g
Calorías 334 (45% de grasa) • Carbohidratos 39g
Información nutricional por gofre/wafle:
sean más cocidos y crujientes.
cocido o un nivel más alto para que los gofres
nivel más bajo para que los gofres sean menos
aconsejamos que utilice el nivel 3. Escoja un
* Para preparar gofres/wafles bien dorados, le
momento de servir.
el horno (precalentado en 100°C/200°F) hasta el
Page 18

7
⁄2
taza (120 ml) de la mezcla en el
1
CHOCOLATE
GOFRES/WAFLES DE BANANO Y
• Calcio 175mg • Fibra 1g
• Colesterol 57mg • Sodio 371mg
Información nutricional por gofre/wafle:
puede mantener los gofres/wafles calientes en
de la mezcla. Servir inmediatamente. También
gofres/wafles con cuidado. Repetir con el resto
aparato está listo. Abrir la cubierta y sacar los
encenderá. Cuando la luz verde se enciende, el
cerrar la cubierta. El indicador luminoso rojo se
aparezcan burbujas en la mezcla, antes de
la mezcla. Esperar 5–10 segundos, hasta que
cucharada de mini-chispas de chocolate sobre
una espátula a prueba de calor. Esparcir 1
centro de la placa inferior, y esparcirla con
Verter
llegue a la temperatura deseada.
luminoso verde se encenderá cuando el aparato
⁄2
taza (120 ml) de la mezcla en el
al nivel de temperatura no. 3.*El indicador
5 minutos antes de usar. Precalentar el aparato
una mezcla homogénea. Dejar reposar durante
en un tazón grande y revolver hasta obtener
Combinar los ingredientes, excepto el chocolate,
⁄2
taza (85 g) de mini-chispas de chocolate
1
2 huevos grandes
6 cucharadas de aceite vegetal
1 banano mediano, aplastado
⁄3
taza (415 ml) de leche baja en grasa
1
2
⁄2
cucharadita de sal
1
1 cucharada de polvo de hornear
2 cucharadas de azúcar granulado
2 tazas (250 g) de harina común
Cantidad: 8 gofres/wafles
con una cucharada de helado para la merienda.
Sírvalos con azúcar glasé para el desayuno o
o fresas.
** Por ej. albaricoques, duraznos, peras, ciruelas
• Proteínas 7g • Grasa 13g • Grasa saturada 2g
Calorías 268 (43% de grasa) • Carbohidratos 32g
sean más cocidos y crujientes.
• Calcio 187mg • Fibra 1g
• Colesterol 58mg • Sodio 376mg
Información nutricional por gofre/wafle:
cocido o un nivel más alto para que los gofres
nivel más bajo para que los gofres sean menos
aconsejamos que utilice el nivel 3. Escoja un
* Para preparar gofres/wafles bien dorados, le
momento de servir.
horno (precalentado en 100°C/200°F) hasta el
mantener los gofres/wafles calientes en el
mezcla. Servir inmediatamente. También puede
wafles con cuidado. Repetir con el resto de la
está listo. Abrir la cubierta y sacar los gofres/
Cuando la luz verde se enciende, el aparato
El indicador luminoso rojo se encenderá.
espátula a prueba de calor. Cerrar la cubierta.
centro de la placa inferior, y esparcirla con una
Verter
1
deseada.
cuando el aparato llegue a la temperatura
El indicador luminoso verde se encenderá
*
no. 3.
Precalentar el aparato al nivel de temperatura
Dejar reposar durante 5 minutos antes de usar.
revolver hasta obtener una mezcla homogénea.
Combinar los ingredientes en un tazón grande y
congeladas) o de compota de manzana
(preparado con frutas frescas o
⁄2
taza (120 ml) de puré de frutas**
1
2 huevos grandes
6 cucharadas de aceite vegetal
⁄4
taza (415 ml) de leche baja en grasa
1
3
⁄2
cucharadita de sal
1
1 cucharada de polvo de hornear
2 cucharadas de azúcar granulado
2 tazas (250 g) de harina común
Cantidad: 8 gofres/wafles
estén más ligeros y le da un sabor delicado.
El puré de frutas hace que los gofres/wafles
GOFRES/WAFLES CON SABOR A FRUTAS
• Proteínas 7g • Grasa 13g • Grasa saturada 2g
Calorías 263 (44% de grasa) • Carbohidratos 30g
gofres sean más cocidos y crujientes.
menos cocido o un nivel más alto para que los
Page 19

6
un nivel más bajo para que los gofres sean
le aconsejamos que utilice el nivel 3. Escoja
* Para preparar gofres/wafles bien dorados,
momento de servir.
horno (precalentado en 100°C/200°F) hasta el
mantener los gofres/wafles calientes en el
mezcla. Servir inmediatamente. También puede
wafles con cuidado. Repetir con el resto de la
está listo. Abrir la cubierta y sacar los gofres/
Cuando la luz verde se enciende, el aparato
El indicador luminoso rojo se encenderá.
espátula a prueba de calor. Cerrar la cubierta.
centro de la placa inferior, y esparcirla con una
⁄2
taza (120 ml) de la mezcla en el
Verter
1
deseada.
cuando el aparato llegue a la temperatura
El indicador luminoso verde se encenderá
*
y precalentar la gofrera.
antes de usar. Elegir nivel de temperatura no. 3
homogénea. Dejar reposar durante 5 minutos
grande y revolver hasta obtener una mezcla
Combinar los ingredientes en un tazón
almendras o avellanas finamente picadas
½ taza (200 g) de pacanas, nueces,
2 huevos grandes
6 cucharadas de aceite vegetal
2 tazas (475 ml) de leche baja en grasa
1/2 cucharadita de sal
1 cucharada de polvo de hornear
2 cucharadas de azúcar granulado
½ taza (60 g) de harina de trigo integral
1½ taza (185 g) de harina común
Cantidad: 8 gofres/wafles
o compota de fruta caliente.
cualquier momento del día. Sírvalos con jarabe
para el desayuno, el desayuno-almuerzo o en
trigo integral son muy saludables y perfectos
Estos crujientes gofres/wafles con sabor a
GOFRES DE TRIGO INTEGRAL Y NUECES
los gofres sean más cocidos y crujientes.
menos cocido o un nivel más alto para que
un nivel más bajo para que los gofres sean
le aconsejamos que utilice el nivel 3. Escoja
* Para preparar gofres/wafles bien dorados,
momento de servir.
horno (precalentado en 100°C/200°F) hasta el
mantener los gofres/wafles calientes en el
mezcla. Servir inmediatamente. También puede
wafles con cuidado. Repetir con el resto de la
está listo. Abrir la cubierta y sacar los gofres/
Cuando la luz verde se enciende, el aparato
El indicador luminoso rojo se encenderá.
espátula a prueba de calor. Cerrar la cubierta.
centro de la placa inferior, y esparcirla con una
⁄2
taza (120 ml) de la mezcla en el
Verter
1
deseada.
cuando el aparato llegue a la temperatura
El indicador luminoso verde se encenderá
*
temperatura no. 3.
antes de usar. Precalentar el aparato al nivel de
homogénea. Dejar reposar durante 5 minutos
grande y revolver hasta obtener una mezcla
Combinar los ingredientes en un tazón
2 huevos grandes
6 cucharadas de aceite vegetal
⁄4
taza (415 ml) de leche baja en grasa
1
3
⁄2
cucharadita de sal
1
1 cucharada de polvo de hornear
2 cucharadas de azúcar granulado
⁄4
taza (90 g) de harina de maíz amarilla
3
1¼ taza (155 g) de harina común
Cantidad: 8 gofres/wafles
con jarabe o salsa de queso.
el desayuno almuerzo o un bocadillo nocturno,
chile o guisado. También son perfectos para
Úntelos con mantequilla y sírvalos con sopa,
Estos gofres/wafles saben a pan de maíz.
GOFRES/WAFLES DE HARINA DE MAÍZ
• Calcio 109 mg • Fibra 1g
• Colesterol 57mg • Sodio 372mg
• Proteínas 6g • Grasa 13g • Grasa saturada 2g
Calorías 264 (43% de grasa) • Carbohidratos 32g
Información nutricional por gofre/wafle:
⁄2
taza (85 g) de mini-chispas de
1
Agregar
de chocolate:
Para preparar gofres/wafles con mini-chispas
chocolate a la mezcla antes de cocer.
Page 20

5
• Calcio 177mg • Fibra 1g
• Colesterol 57mg • Sodio 372mg
• Proteínas 7g • Grasa 13g • Grasa saturada 2g
Calorías 262 (44% de grasa) • Carbohidratos 30g
Información nutricional por gofre/wafle:
los gofres sean más cocidos y crujientes.
menos cocido o un nivel más alto para que
un nivel más bajo para que los gofres sean
le aconsejamos que utilice el nivel 3. Escoja
* Para preparar gofres/wafles bien dorados,
momento de servir.
horno (precalentado en 100°C/200°F) hasta el
mantener los gofres/wafles calientes en el
mezcla. Servir inmediatamente. También puede
wafles con cuidado. Repetir con el resto de la
está listo. Abrir la cubierta y sacar los gofres/
Cuando la luz verde se enciende, el aparato
El indicador luminoso rojo se encenderá.
espátula a prueba de calor. Cerrar la cubierta.
centro de la placa inferior, y esparcirla con una
⁄2
taza (120 ml) de la mezcla en el
Verter
1
deseada.
cuando el aparato llegue a la temperatura
El indicador luminoso verde se encenderá
*
temperatura no. 3.
antes de usar. Precalentar el aparato al nivel de
homogénea. Dejar reposar durante 5 minutos
grande y revolver hasta obtener una mezcla
Combinar los ingredientes en un tazón
2 huevos grandes
6 cucharadas de aceite vegetal
⁄4
taza (415 ml) de leche baja en grasa
1
3
⁄2
cucharadita de sal
1
1 cucharadita de polvo de hornear
2 cucharadas de azúcar granulado
2 tazas (250 g) de harina común
Cantidad: 8 gofres/wafles
de prisa.
incomparable. Congele las sobras para los días
El sabor de los gofres/wafles caseros es
GOFRES/WAFLES BÁSICOS
RECETAS
⁄2
taza (120 ml) de
1
Yogur de fruta
Salsa de chocolate
Crema batida, helado, sorbete
Azúcar glasé
picados
Frutas del bosque, frutas picadas, frutos secos
Compota o salsa de fruta tibia
Jarabe de arce o de fruta
ADEREZOS
Recaliéntelos en el horno o en la tostadora.
hermética, entre hojas de papel encerado.
que se enfríen, luego póngalos en una bolsa
Los gofres se congelan muy bien. Permita
de aluminio serán menos crujientes.
aluminio. Nota: los gofres envueltos en papel
adentro de un molde o envueltos en papel de
en un horno precalentado en 100°C (200°F),
Sin embargo, podrá mantenerlos calientes
Los gofres/wafles son mejores recién hechos.
wafles bien rellenos.
mezcla por gofre/wafle para conseguir gofres/
Le aconsejamos que utilice
placas inmediatamente.
la mezcla en el centro de la placa y cierre las
Para conseguir resultados homogéneos, vierta
y cocidos, escoja un ajuste más alto.
Para que los gofres/wafles sean más crujientes
aconsejamos que utilice el nivel 3.
Para preparar gofres/wafles bien dorados, le
GOFRES PERFECTOS
PREPARAR
CONSEJOS PARA
Page 21

4
Haga lo mismo antes de cada uso.
vegetal con papel absorbente o una brocha.
placas, vaporice spray vegetal o aplique aceite
placas antes del primer uso, Para engrasar las
Sin embargo, le aconsejamos que engrase las
cuentan con un revestimiento antiadherente.
®
2.
6.
5.
4.
Nota: Las placas de su gofrera Cuisinart
alimentos contiene bisfenol A (BPA).
- ninguna de las piezas en contacto con los
7. Sin BPA (no ilustrado)
un almacenaje fácil
- el cable se enrolla debajo de la base para
6. Espacio para guardar el cable
cepillado
5. Acabado de acero inoxidable
- mantienen el aparato estable
- no dejan marcas sobre la encimera
4. Pies de goma
- no se abrirá durante la cocción.
3. Cubierta ponderada
listos para comer
- indican cuando los gofres/wafles están
cocer
- indican cuando el aparato está listo para
2. Indicadores luminosos
gustan, desde suaves hasta crujientes
prepara gofres/wafles como a usted le
- cinco ajustes de temperatura permiten
1. Control de temperatura variable
1.
3.
CARACTERÍSTICAS
8. Desconecte el aparato después de terminar.
antiadherente de las placas.
metal. Esto podría dañar el revestimiento
prueba de calor. Nunca utilice utensilios de
soltando los bordes con una espátula a
7. Cuando el gofre/wafle esté listo, retírelo,
utilice el ajuste no. 3.
wafles bien dorados, le aconsejamos que
temperatura deseado Para preparar gofres/
el tiempo de cocción. Elija el nivel de
6. El ajuste de temperatura elegido determinará
verde se iluminará.
5. Cuando los gofres/wafles estén listos, la luz
Esto es normal.
segundos para que la luz roja se enciende.
se encenderá otra vez. Puede tomar varios
4. La luz verde se apagará, pero la luz roja
Cierre la cubierta.
placa, usando una espátula a prueba de calor.
Esparza la mezcla uniformemente sobre la
la mezcla en el centro de la placa inferior.
3. Cuando la luz verde se enciende, vierta
use. Esto es normal.
un ligero olor a quemado la primera vez que lo
Nota: Puede que el aparato produzca humo y
se encenderá cuando esté listo.
que las placas calienten. La luz verde de listo
indica que el aparato está calentando. Permita
de 120V C.A. La luz roja se encenderá, lo que
enchufe en cable en una toma de corriente
2. Precaliente el aparato. Cierre las placas y
embalaje y protección.
durante el transporte. Retire el material de
húmedo para quitar el polvo acumulado
limpie las placas con un paño ligeramente
1. Antes de usar el aparato por primera vez,
INSTRUCCIONES DE USO
Page 22

3
electricista. No intente modificarla.
entrara completamente, comuníquese con un
en la toma de corriente, inviértela. Si aún no
toma de corriente polarizada. Si no entrara
podrá enchufar de una sola manera en la
que otra). Como medida de seguridad, se
clavija polarizada (una pata es más ancha
El cable de este aparato está dotado de una
AVISO:
jalarla o tropezar con ella.
de tal forma que niños o animales no puedan
colocar la extensión sobre la encimera o la mesa
por lo menos igual a la del aparato. Es importante
La clasificación nominal de la extensión debe ser
que respete las precauciones siguientes.
Se podrá usar una extensión eléctrica, siempre
tropiece con un cable más largo.
reducir el peligro de que alguien se enganche o
El cable provisto con este aparato es corto para
USO DE EXTENSIONES
SOLAMENTE
PARA USO DOMÉSTICO
GUARDE ESTAS INSTRUCCIONES
la puerta del armario cuando cierra.
incendio, especialmente si éste toca las paredes o
el aparato conectado presenta un riesgo de
antes de guardarlo en un armario. Dejar
de un armario. Siempre desconecte el aparato
16. No haga funcionar el aparato bajo o adentro
USUARIO.
PUEDAN SER REPARADAS POR EL
APARATO NO CONTIENE PIEZAS QUE
POR UN TÉCNICO CALIFICADO. EL
REPARACIONES DEBEN SER REALIZADAS
DE INCENDIO O ELECTROCUCIÓN, LAS
15. ADVERTENCIA: PARA REDUCIR EL RIESGO
contenga aceite u otros líquidos calientes.
14. Tenga sumo cuidado al mover un aparato que
aparato.
en la posición no.1 antes de desconectar el
Siempre ponga el control de temperatura
de enchufar éste en la toma de corriente.
13. Siempre conecte el cable al aparato antes
no sea el indicado.
12. No utilice el aparato para ningún otro fin que
usarlo.
11. Siempre desconecte el aparato después de
caliente, ni en un horno caliente.
un quemador a gas o una hornilla eléctrica
10. No coloque el aparato sobre o cerca de
contacto con superficies calientes.
de la encimera o de la mesa, ni que haga
9. No permita que el cable cuelgue del borde
8. No lo utilice en exteriores.
electrocución o herida.
Cuisinart presenta un riesgo de incendio,
7. El uso de accesorios no recomendados por
reparación o ajuste.
centro de servicio autorizado para su revisión,
estuviese dañado. Regrese el aparato a un
funcionado mal o se hubiese caído o si
estuviesen dañados, después de que hubiese
6. No utilice este aparato si el cable o la clavija
limpiarlo.
antes de instalar o remover piezas y antes de
y antes de limpiarlo. Permita que se enfríe
5. Desconecte el aparato cuando no esté en uso
de ellos.
cuando esté siendo usado por niños o cerca
4. Supervise de cerca el uso de este aparato
u otro líquido.
CABLE, LA CLAVIJA O EL APARATO en agua
electrocución o herida, NO SUMERJA EL
3. Para reducir el riesgo de incendio,
mango y los botones o perillas.
2. No toque las superficies calientes. Utilice el
1. LEA TODAS LAS INSTRUCCIONES.
siguientes:
precauciones básicas de seguridad, incluidas las
Siempre que use aparatos eléctricos, debe tomar
IMPORTANTES
MEDIDAS DE SEGURIDAD
Garantía .............................................................. 8
Almacenaje ........................................................ 8
Limpieza y mantenimiento ................................ 8
Recetas ............................................................. 5
Consejos y coberturas ....................................... 5
Características....................................................4
Instrucciones de uso .......................................... 4
Medidas de seguridad importantes ................... 3
ÍNDICE
Page 23

Page 24

antes de usarlo.
cuidadosamente
Para su seguridad y para disfrutar plenamente de este producto, siempre lea las instrucciones
WMR-CA
Gofrera/Waflera clásica
LIBRO DE RECETAS
INSTRUCCIONES &
Page 25

13
 Loading...