

Cuisinart WCH-950 User Manual 2
INSTRUCTION
BOOKLET
Cuisinart
Countertop Filtration System
For your safety and continued enjoyment of this product, always read the instruction book carefully before using.
®
WCH-950
IMPORTANT
SAFEGUARDS
When using an electrical appliance, basic
precautions should always be followed to
reduce the risk of fire, electric shock, and
personal injury, including the following:
1. Use this appliance only as described in this
manual. Other uses not recommended may
cause fire, electric shock or personal injury.
2. This product is intended for household use
only.
3. To protect against electric shock, do not
immerse unit, plug or cord in water or spray
with liquids.
4. Close supervision is necessary when any
appliance is used by or near children.
5. Unplug from the outlet when not in use or
when moving from one location to another,
and before cleaning.
6. To disconnect the appliance, grip the plug
and pull it from the wall outlet. Never pull
by the cord.
7. Do not operate the appliance in the
presence of explosive and/or flammable
fumes.
8. Do not place the appliance or any of its
parts near an open flame, cooking or other
heating appliance.
9. Do not operate the appliance with a
damaged cord or plug, if the product
malfunctions, or if it is dropped or damaged
in any manner.
10. The use of attachments not recommended
by the manufacturer may be hazardous.
11. Place the unit on a dry level surface.
12. Do not operate if the housing is removed or
damaged.
13. A loose fit between the AC outlet
(receptacle) and plug may cause
overheating and a distortion of the plug.
Contact a qualified electrician to replace
loose or worn outlet.
14. This appliance is designed to be
freestanding only, and should not be
recessed or built in (fully recessed).
15. Locate the unit away from direct sunlight
and sources of heat (stove, heater, radiator,
etc.). Direct sunlight will affect/alter the
outside color of the appliance.
16. Do not use with water that is
microbiologically unsafe or of unknown
quality without adequate disinfection before
or after the system. Individuals requiring
water of specific microbiological purity
should consult their physician.
NOTE: The system and installation of this
product needs to comply with state and local
laws and regulations.
WARNING: To reduce the risk of fire,
electric shock or personal injury, unplug or
disconnect the appliance from the power
supply before servicing.
SAVE THESE
INSTRUCTIONS
FOR HOUSEHOLD
USE ONLY
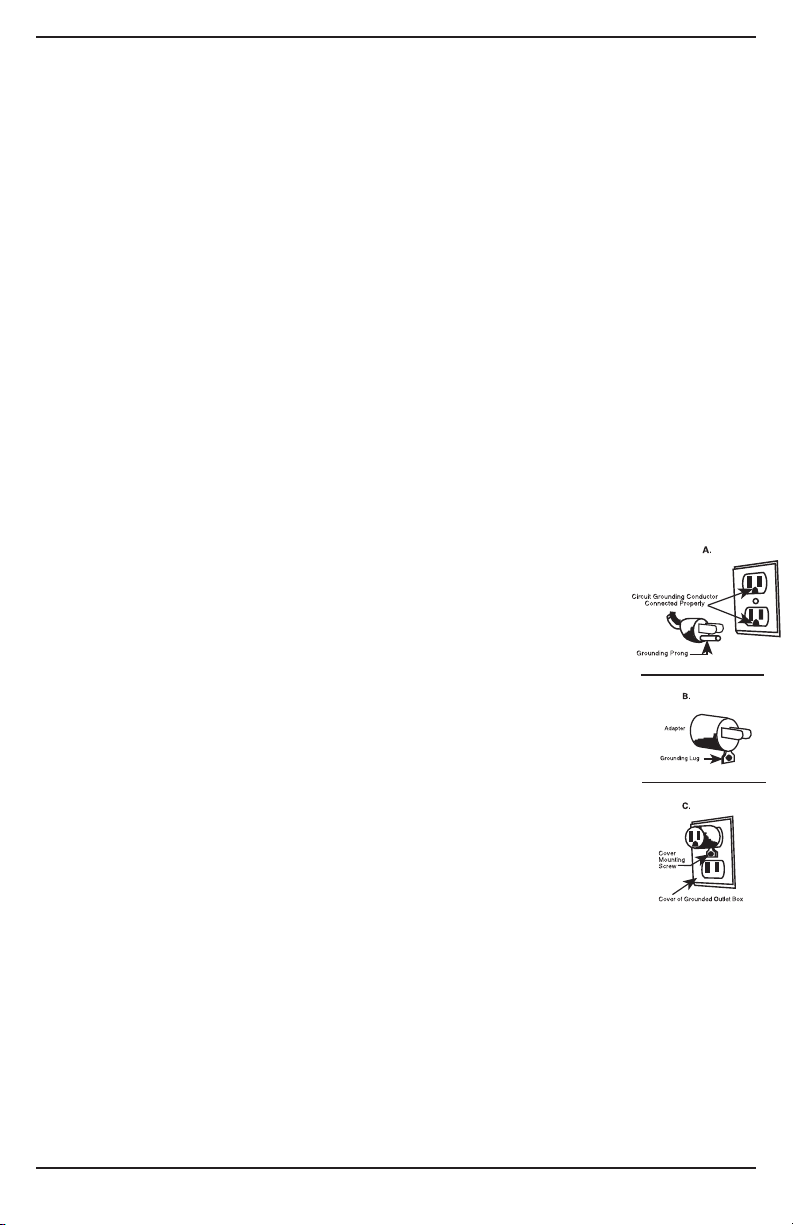
SPECIAL CORD SET
INSTRUCTIONS
For your protection, this unit
is equipped with a
3-conductor cordset that has
a molded 3-prong
grounding-type plug,
and should be used in
combination with a properly
connected grounding-type
outlet as shown in figure A. If
a grounding-type outlet is
not available, an adapter,
shown in Figure B, may be
obtained so that a
2-slot wall outlet can be used
with a 3-prong plug. As
shown in Figure C, the
adapter must be grounded
by attaching its grounding
lug under the screw of the
outlet cover plate.
NOTE: Do not remove the
grounding prong.
CAUTION: Before using an adapter, it must be
determined that the outlet cover plate screw is
properly grounded. If in doubt, consult a
licensed electrician. Never use an adapter
unless you are sure it is properly grounded.
Use of an adapter is not permitted
NOTE:
in Canada.
2

CONTENTS
Important Safeguards.............2
Special Cord Set Instructions ...... 2
Introduction .................... 3
Parts and Features............... 3
Setting Up ..................... 4
Before First Use ................. 4
Operating Instructions ............ 4
Tips and Hints .................. 5
Cleaning and Care ...............5
Troubleshooting ................. 6
Storing the Unit ................. 7
Technical Specifications ..........7
Performance Data Sheet .......... 8
California Certification ............ 9
Warranty ...................... 10
9. Temperature Indicator Lights
Red/blue LEDs light up when water has
reached hot/cold temperatures.
10. Spigots
11. Brushed Stainless Steel Base
Durable stainless steel construction
complements any décor. (Approx. ½
gallon total capacity in hot and cold
tanks combined).
12. Drainage Plugs
(not shown)
Two removable plastic plugs are located
on bottom of unit.
13. Replacement Water Filter
(Model GF-80)
The Cuisinart water filter has an
optimum filter life of 3 to 4 months
or 80 gallons.
INTRODUCTION
Pour yourself a glass of fresh, clean, filtered
water for a refreshing drink without opening
the refrigerator or a bottle.
Your
Countertop Filtration
System is Cuisinart at its most convenient.
Drink healthy!
PARTS AND FEATURES
1. 12-Week Filter Timer
Lets you know when to change your
water filter.
2. Cover
Filp-top lid for easy filling.
3. Unfiltered/Upper Water Tank
(Approx. ½ gallon capacity)
4. Filtered/Lower Water Tank
(Approx. 1 gallon capacity)
5. On/Off Power Button
Press to power on. This will activate the
chilling and heating functions.
6. Hot Water Button with
Child Lock
Move safety lock up, then press to
dispense hot water.
7. Room/Ambient Water Button
Press to dispense room temperature
water.
8. Cold Water Button
Press to dispense chilled water.
1
2
3
4
5
6
7
8
9
10
11
12
13
3

BEFORE FIRST USE
SETTING UP
1. Remove your Cuisinart
Countertop Filtration System carefully
from the box. You may wish to store the
packaging for future use.
2. Position the unit on a stable flat surface,
close to a main power outlet, not in direct
sunlight, and out of the reach of children.
3. Make sure that there is sufficient space
around the water dispenser to allow the
heat extracted during the chilling process
to dissipate. Allow at least 3" of space
around the sides and rear of the unit for air
circulation.
4. Remove filter from upper tank and follow the
below filter preparation instructions.
®
OPERATING
INSTRUCTIONS
NOTE: Do NOT plug the unit in or install the
filter yet.
Installing the Water Filter
1. Remove the water filter from its packaging
(it is normal for the filter to appear moist
during storage). DO NOT WASH FILTER
ELEMENT WITH SOAP AND WATER.
2. Place water filter in
bowl in upright position
with Cuisinart logo facing
up. Then slowly fill bowl
with water. Do not pour
water directly on the filter.
3. Add enough cold water to
ensure that filter is fully
submerged when pushed
down. Hold filter upright,
under water, and agitate
it for 1 or 2 minutes or
until bubbles stop rising
to surface. Continue to
soak filter for at least 15 minutes.
NOTE: Filter may not sink to the bottom.
4. While the filter is soaking, remove the
unfiltered/upper water tank and filtered/lower
water tank. NOTE: Carefully remove filter
timer before washing cover by flipping the
cover and pressing on plastic tab to loosen
timer. Filter timer is not immersible. Wash
both tanks and plastic lid in mild, soapy
water, and rinse.
5. When filter is thoroughly soaked, lift it from
bowl and allow water to drain.
4
empty
NOTE: The filter contains a small amount of
loose carbon dust, which may make water
appear dark during soaking – once the
preparation process is complete, dust will be
rinsed out of filter.
6. Insert the water filter (in upright position
with Cuisinart logo facing up) into the upper
water tank and push firmly into place.
7. Hold the upper water tank with the filter in
it under cold running tap water for 15
seconds to flush out the carbon dust.
8. Place upper water
tank on a pitcher or
bowl to drain water
from upper tank.
May take
approximately 5
minutes.
9. Fit the unfiltered/upper water tank onto the
filtered/lower water tank and place cover
on top. NOTE: The indent on the upper
water tank must face the back of unit when
in place.
10. Place the reassembled tanks on the base.
Setting Up Your Cuisinart
Countertop Filtration System
1. Lift the flip top lid, and using a clean pitcher,
pour cold tap water into the unfiltered/
upper water tank to FILL line shown below.
Continue pouring water into upper tank until
bottom tank is full.
NOTE: Only cold tap water is to be poured
into the unit.
®
 Loading...