

Page 1
INSTRUCTION AND RECIPE BOOKLET
Rotisserie Convection Toaster Oven
TOB-200
Page 2

IMPORTANT SAFEGUARDS
When using an electrical appliance, basic safety precautions should always
be followed, including the following:
1. Read all instructions.
2. UNPLUG FROM OUTLET WHEN NOT IN USE, before putting on or
taking off parts and before cleaning. Allow to cool before cleaning or
handling.
3. Do not touch hot surfaces. Use handles or knobs.
4. To protect against electrical shock, do not immerse cord or plug, or place
any part of the oven in water or other liquids. See instructions for
cleaning on page 14.
5. Close supervision is necessary when any appliance is used by or near
children.
6. Do not operate any appliance with a damaged cord or plug or after the
appliance has malfunctioned or has been dropped or damaged in any
way or is not operating properly. Return the oven to the nearest Cuisinart
Repair Center for examination, repair, or mechanical or electrical
adjustment.
7. The use of accessory attachments not recommended by Cuisinart may
cause injury.
8. Do not use outdoors.
9. Do not let cord hang over the edge of the table or countertop where it
could be pulled on inadvertently by children or pets. Do not let cord touch
hot surfaces, which could damage it.
10. Do not place oven on or near a hot gas or electric burner or in a heated
oven.
11. Do not use this oven for anything other than its intended purpose.
12. Do not place sealed or airtight containers in the oven.
13. Extreme caution should be exercised when using containers constructed
of materials other than metal, glass or ceramic in the oven.
14. To avoid burns, use extreme caution when removing trays, pans, racks,
accessories or disposing of hot grease.
15. When not in use, always unplug the unit. Do not store any materials other
than manufacturer’s recommended accessories in this oven.
16. Do not place paper, cardboard, plastic or similar products in the oven.
17. Do not cover crumb tray or any part of the oven except the baking pan
with metal foil. This will cause overheating of the oven.
18. Do not block the top of the oven, steam vents, or any other openings
while in use.
19. Oversize foods, metal foil packages and utensils must not be inserted in
the oven, as they may involve a risk of fire or electric shock.
20. A fire may occur if the oven is covered or touching flammable materials
such as curtains, draperies, walls and the like when in operation. Do not
store any items on top of the appliance when in operation. Do not operate
under wall cabinets.
21. Do not clean with metal scouring pads. Pieces can break off the pad and
touch electrical parts, involving a risk of electric shock.
22. Do not attempt to dislodge food when the oven is plugged into an
electrical outlet.
23. CAUTION: To avoid possibility of fire, never leave oven unattended
during use.
24. Do not rest cooking utensils or baking dishes on glass door.
25. Where applicable, always attach plug to appliance and check that the
cooking cycle is stopped before plugging cord into wall outlet. To
disconnect, press the Start/Stop button to stop the cooking cycle, then
remove plug from wall outlet.
26. Do not operate your appliance in an appliance garage or under a wall
cabinet. When storing in an appliance garage always unplug the unit from
the electrical outlet. Not doing so could create a risk of fire, especially if
the appliance touches the walls of the garage or the door touches the unit
as it closes.
27. Extreme caution must be used when moving an appliance containing hot
oil or other hot liquids.
28. Press the Start/Stop button to begin or stop cooking function.
2
Page 3

SPECIAL CORD SET INSTRUCTIONS
A short power supply cord is provided to reduce the risks resulting from
becoming entangled in or tripping over a longer cord.
Extension cords may be used if care is exercised in their use.
If an extension cord is used, the marked electrical rating of the extension
cord must be at least as great as the electrical rating of the appliance, and
the longer cord should be arranged so that it will not drape over the
countertop or tabletop where it can be tripped over unintentionally or pulled
on by children.
NOTICE
This appliance has a polarized plug (one blade is wider than the other). As a
safety feature, this plug will fit in a polarized outlet only one way. If the plug
does not fit fully in the outlet, reverse the plug. If it still does not fit, contact
a qualified electrician. Do not attempt to defeat this safety feature.
UNPACKING INSTRUCTIONS
1. Place the box on a large, sturdy, flat surface.
2. Open the box and remove the instruction book and any other literature.
3. Lift the packing materials, oven and accessories out of the box.
4. Remove all other parts packed in pulp mold and remove packing
materials surrounding those parts. Be sure to check all packing materials
for all parts listed in the Features and Benefits section on page 4 before
discarding.
5. Remove any protective or promotional labels from your oven and
other parts.
FOR HOUSEHOLD USE ONLY
BEFORE THE FIRST USE
Before using your Cuisinart® Rotisserie Convection Toaster Oven for the first
time, remove any dust from shipping by wiping the base, cover and controls
with a damp cloth. Be sure to thoroughly clean all accessories before first
use. The oven rack, baking pan, broiling rack, the rotisserie spit and crumb
tray should be hand washed in hot sudsy water. Be sure to thoroughly clean
all accessories before each use.
®
Before using your Cuisinart
it is 2 to 4 inches away from the wall or from any items on the countertop.
Do not use on heat-sensitive surfaces. DO NOT STORE ITEMS ON TOP OF
THE OVEN. IF YOU DO, REMOVE THEM BEFORE YOU TURN YOUR OVEN
ON. THE EXTERIOR WALLS GET VERY HOT WHEN IN USE. KEEP OUT OF
REACH OF CHILDREN.
Rotisserie Convection Toaster Oven, make sure
TABLE OF CONTENTS
Important Safeguards. . . . . . . . . . . . . . . . . . . . . . . . . . . . . . . . . . . . . . . . . . . . .2
Unpacking Instructions . . . . . . . . . . . . . . . . . . . . . . . . . . . . . . . . . . . . . . . . . . .3
Before the First Use . . . . . . . . . . . . . . . . . . . . . . . . . . . . . . . . . . . . . . . . . . . . . .3
Features and Benefits . . . . . . . . . . . . . . . . . . . . . . . . . . . . . . . . . . . . . . . . . . . .4
Getting to Know Your Control Panel . . . . . . . . . . . . . . . . . . . . . . . . . . . . . . . . .5
Set Your Clock . . . . . . . . . . . . . . . . . . . . . . . . . . . . . . . . . . . . . . . . . . . . . . . . . .6
Oven Rack Position Guide. . . . . . . . . . . . . . . . . . . . . . . . . . . . . . . . . . . . . . . . .6
Oven Functions . . . . . . . . . . . . . . . . . . . . . . . . . . . . . . . . . . . . . . . . . . . . . . . . .7
Operation . . . . . . . . . . . . . . . . . . . . . . . . . . . . . . . . . . . . . . . . . . . . . . . . . . . . . .9
Cleaning and Maintenance . . . . . . . . . . . . . . . . . . . . . . . . . . . . . . . . . . . . . . .14
Warranty. . . . . . . . . . . . . . . . . . . . . . . . . . . . . . . . . . . . . . . . . . . . . . . . . . . . . .15
Recipes. . . . . . . . . . . . . . . . . . . . . . . . . . . . . . . . . . . . . . . . . . . . . . . . . . . . . . .16
SAVE THESE INSTRUCTIONS
3
Page 4
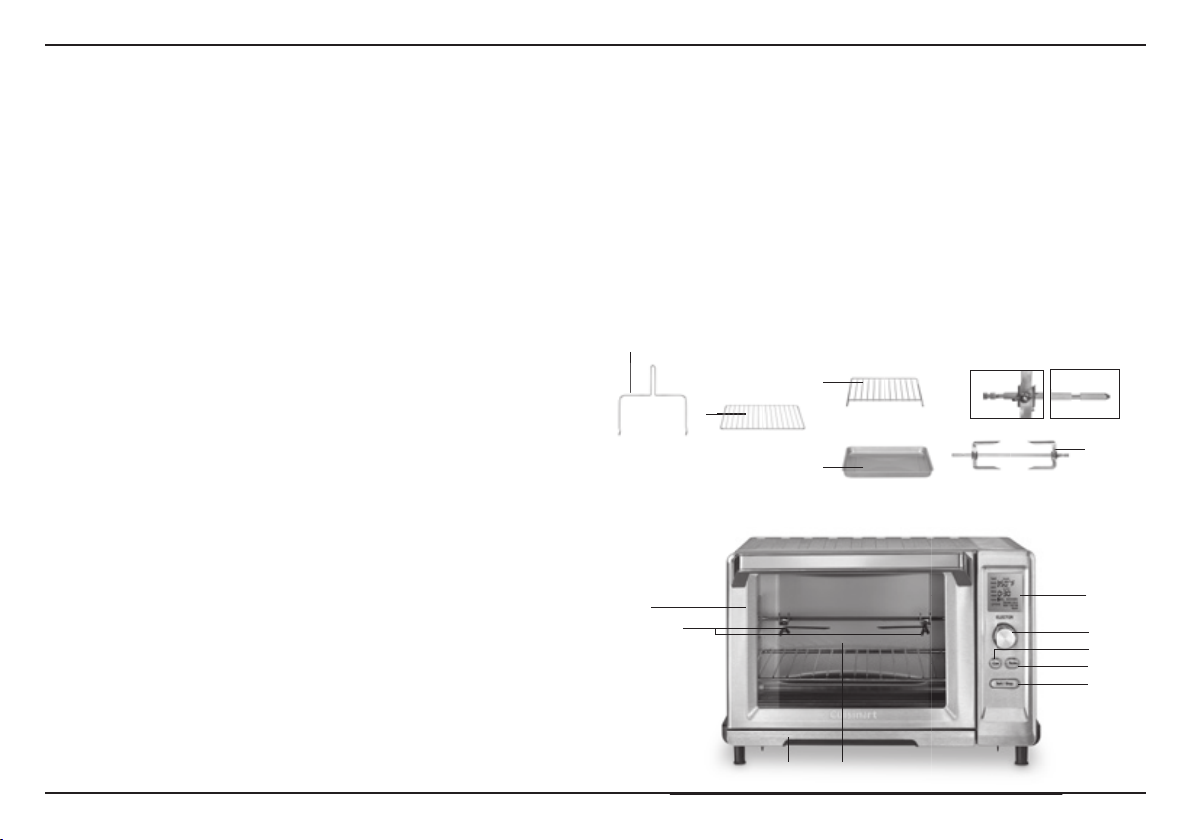
FEATURES AND BENEFITS
1. Blue Backlit LCD Digital Display
Shows selected function, shade setting, temperature, and cooking time.
Includes PREHEAT and READY readouts.
2. Selector Dial/Button
Lets you choose cooking functions and set baking time, clock,
temperature, and toast shade.
3. Convection Button (Conv)
Starts convection fan for most cooking functions.
4. Rotisserie Button (Rotis)
Activates rotisserie function options.
5. Start/Stop Button
Starts or stops a cooking function. It also activates the oven when it is
in the dormant mode (plugged in, but not lit).
6. Front Pull-Out Crumb Tray
The crumb tray slides out from the front of the Rotisserie Convection
Toaster Oven for easy cleaning.
7. Easy-Clean Interior
The sides of the oven are specially coated, making it easier to wipe and
clean the interior of the oven.
8. Wire Rack
Your oven includes one cooking rack. There are four positions to insert
the rack into the oven. The upper and middle positions have a stop
feature so the rack stops halfway out of the oven. The rack can be
removed by lifting the front of the rack and sliding it out.
9. Baking/Drip Pan
A baking/drip pan is included for your convenience. Use with the
broiling pan when broiling. Use alone when baking or roasting.
10. Broiling Rack
Fits into the baking/drip pan to use when broiling.
11. Rotisserie Spit
Food item for rotisserie should be put onto the rotisserie spit.
12. Rotisserie Skewers
The rotisserie skewers can be used for larger items such as chicken or
large pieces of meat. The skewers secure the food item into position.
13. Handgrip
To be used for removing rotisserie items from the oven.
14. Rotisserie Sockets
The rotisserie sockets are located on the left and right wall in the center
of the oven. The spit fits into these sockets.
15. Cord Storage (not shown)
Takes up excess cord and keeps countertop neat.
16. BPA Free (not shown)
All materials that come in contact with food are BPA free.
13
14
11 and 12
10
8
Wire RackHandgrip
67
Broiling Rack
9
Baking/Drip Pan
Spit & Skewers
LEFT
Rotisserie
14
RIGHT
11 and 12
1
2
3
4
5
4
Page 5

Getting to Know Your Control Panel
LCD Display
The large blue-backlit LCD screen is easy to read, and clearly displays the function, time, temperature,
and toast shade you have selected. When oven is plugged in and not in use, clock will be displayed.
Selector Dial/Button
Use to select cook function, change preset time or temperature, and choose toast shade.
Turn selector dial to scroll through functions, time and temperature. Press the dial to select
desired option.
Convection
The Conv button can be pressed at any time to add convection technology to most of the cooking functions. Convection provides faster and more even baking and cooking.
Rotisserie
The Rotis button can be pressed to scroll through options: Chicken, Duck, Meat and Custom.
Start/Stop
Press to start oven after selecting function, temperature and time. Press to stop any cooking function.
5
Page 6
Set Your Clock
Plug the oven into a 120 volt AC outlet. The LCD display will be illuminated blue. Clock will read 12:00. To set clock, press and hold the Selector button until
the time starts flashing. Turn the Selector dial to set hour and then press it to select. To select “PM” scroll through past “11” until “PM” displays. Turn the
dial for minutes and then press to set.
Oven Sounds
You have the option of turning off the beeping sounds or making the beeps louder. To change the beep setting, press the ROTIS button and the Conv
button simultaneously for two seconds. The number “1” (default setting) will display. To deactivate all beeps, turn the Selector dial to 0 (zero), then press
Selector button to hold this setting. To change the beeps to a louder sound, turn the dial to “2”, then press the button to hold this setting. If you unplug the
oven, all beeps will go back to the default “1” setting.
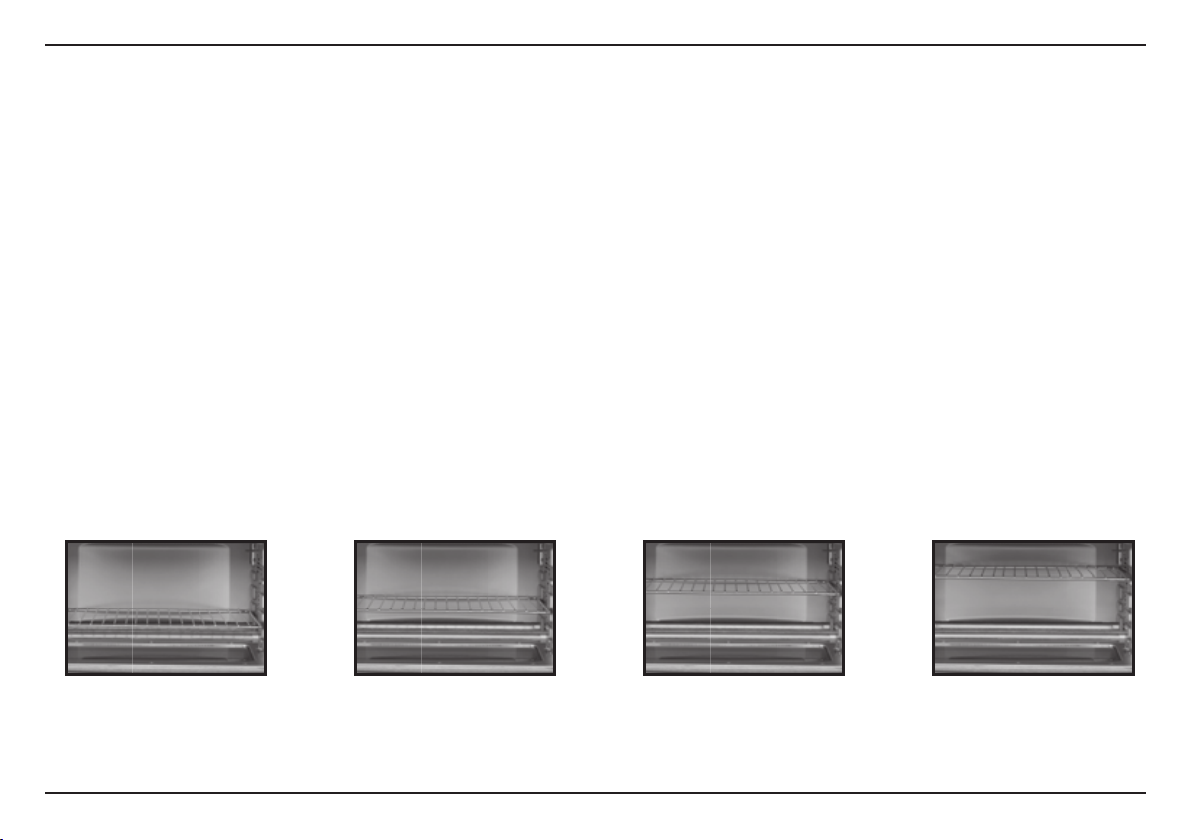
OVEN RACK POSITION GUIDE
All our recipes give you step-by-step directions and indicate where to
position the oven rack for best results. Please refer to the diagrams
below.
Baking and roasting: Use rack in position 1 or 2.
Toasting: Toasting should always be done in position 3. WARNING:
Placing the rack in position 1 or 4 while toasting may result in a fire.
Pizza: Rack should always be in position 3.
Broiling: Use rack in position 4.
Position 1 Position 2 Position 3
1
Crumb Tray
The crumb tray is located in the front of the toaster oven. It can easily be removed for cleaning with its built-in pull-out handle. The crumb tray
should never be covered with foil.
2
6
3
Position 4
4
Page 7

OVEN FUNCTIONS
Toasting functions – All toasting functions offer a built-in defrost option. Turn the Selector dial to select the snowflake
Toasting Function Rack Position Preset Shade Shade Range Preset Slices Possible slices
Toast 3 4 1 to 7 3 – 4 1–2, 3–4, 5–6
Bagel 3 4 1 to 7 3 – 4 1–2, 3–4, 5–6
Cooking functions – Below is a guide to the cooking functions. For more detailed information about each function see pages 9-12.
Cooking
Function
Bake 1, 2 350°F 150°F to 450°F 30 minutes Yes Baked goods,
Broil 4 500°F Fixed
Roast 1, 2 400°F 150°F to 450°F 30 minutes Yes Larger cuts of meat,
Pizza 3 450°F 350°F to 450°F 14 minutes =
Keep Warm 1, 2, 3 175°F 150°F to 300°F 30 minutes Yes Holds food at serving
Leftovers 1, 2, 3 325°F 150°F to 450°F 20 minutes Yes Reheats leftovers to
Rack
Position
Default
Temp
Temp
Range
temperature
Preset
Time
10 minutes Yes Steaks, chops,
12-inch fresh pizza
Convection option Recommended
Yes Pizza – both fresh
for toasting frozen items.
Foods
casseroles, bread
burgers, sh, sea-
food, top browning
vegetables, chicken
and frozen
temperature
serving temperature
7
Page 8

ROTISSERIE FUNCTIONS
Cooking
Function
Chicken 1* 450°F 150°F to 450°F 60 minutes Yes Chicken, other poultry
Duck 1* 325°F 150°F to 450°F 1 hour 30 minutes Yes Duck
Meat 1* 425°F 150°F to 450°F 40 minutes Yes Beef, Lamb, Pork
Custom 1* 350°F 150°F to 450°F 30 minutes Yes Fish, Fruit, Vegetables
*Baking pan in Position 1 to catch any grease.
Rack
Position
Default
Temp
Temp
Range
Preset
Time
Convection
Option
Recommended Foods
8
Page 9

OPERATION
TOAST
Adjust rack to position 3.
Put bread in the toaster oven.
Turn Selector dial to toast and press. “Shade” will flash –
scroll and press to select desired shade from 1 to 7.
“Slices” will begin to flash – scroll and press to select
number of slices.
Snowflake will flash – turn Selector dial to select this if using frozen bread.
Otherwise just press Start/Stop to begin toasting.
Toasting tips
Toasting times vary based on thickness and temperature of bread. For thinly
sliced bread, a lighter setting might be needed, as it will toast more quickly.
Refrigerated bread will take longer to toast than room temperature bread.
Shade guide
Light . . . . . . . . . . . . . . . . . . . . . . . . . . . . . . . . . . . . . . . .Setting 1 or 2
Medium . . . . . . . . . . . . . . . . . . . . . . . . . . . . . . . . . . Setting 3, 4, or 5
Dark . . . . . . . . . . . . . . . . . . . . . . . . . . . . . . . . . . . . . . . .Setting 6 or 7
BAGEL
Adjust rack to position 3.
Put bagels in the toaster oven with cut sides facing up.
Turn Selector dial to bagel and press. “Shade” will flash – scroll and press to
select desired shade from 1 to 7.
“Slices” will begin to flash – scroll and press to select
number of bagel halves.
Snowflake will flash – turn Selector dial to select this if
using frozen bagels. Otherwise, just press Start/Stop to
begin toasting.
Bagel Tip
This function provides full heat on the top and half heat on the bottom. For
best results, put your bagels on the rack with the cut sides facing up.
BAKE
Adjust rack to desired position either
1 or 2. Turn Selector dial to Bake and
press. Baking temperature will flash.
Turn Selector dial to select the
temperature and press. Time will flash.
Turn the dial to adjust time and press.
Convection can be selected at any time before or after you press Start/Stop.
Press Start/Stop to allow the oven to preheat (display will read PREHEAT).
When oven reaches set temperature, the oven will beep and display will read
READY. Put food in the oven. The timer will begin counting down. It will
beep again when cooking time has expired. The oven will shut off and the
display will revert to the clock.
Bake Tips
Select Bake for more delicate baked goods like custards, lighter cakes and
eggs. Select Convection Bake for most other baked goods that require even
browning like scones, cookies, and bread.
When using Convection, cooking times may need to be reduced – start
checking foods about 5 to 10 minutes before the recommended
conventional cooking time.
Foods that contain orange, lemon or other fruit with citric acid may
damage the nish of the baking pan. So when cooking such foods, we
suggest that you line the pan with baking parchment paper or aluminum
foil.
9
Page 10
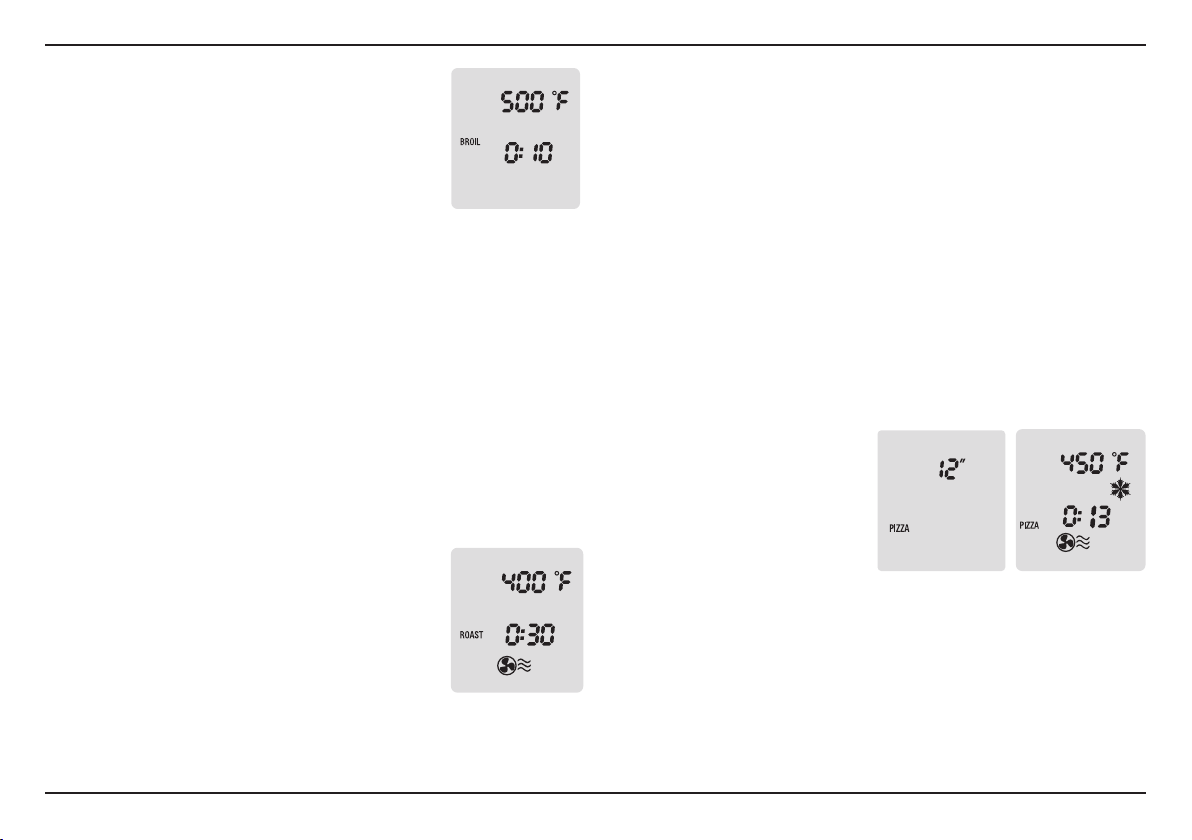
BROIL
Adjust rack to position 4.
Turn Selector dial to Broil and press.
Broil temperature is fixed at 500ºF. It cannot be changed.
Time will flash. Turn the selector dial to adjust time and
press.
Convection can be selected at any time before or after
you press Start/Stop.
Put food in oven and press Start/Stop to begin broiling. There is no preheat
during the Broil function.
The timer will begin counting down. It will beep again when cooking time has
expired. The oven will turn off and the display will revert to the clock.
Broil Tips
Use regular Broil for top browning casseroles, sandwiches, etc.
Convection is best for meats and fish. For best results, use the provided
broiling rack nested in the baking pan.
or other fruit with citric acid may damage the nish of the baking pan.
So when cooking such foods, we suggest that you line the pan with
baking parchment paper or aluminum foil.
Be sure to keep an eye on food – items can get dark quickly while broiling.
Foods that contain orange, lemon
Adding
ROAST
Adjust rack to position 1 or 2.
Turn Selector dial to Roast and press.
Roast temperature will flash. Turn the dial to select the
temperature and press.
Time will flash. Turn the Selector dial to adjust time and
press Start/Stop to allow the oven to preheat
(display will read PREHEAT).
When oven reaches set temperature, the oven will beep and display will read
READY. Put food in the oven. The timer will begin counting down. It will beep
again when cooking time has expired. The oven will shut off and the display
will revert to the clock.
after you press Start/Stop.
Roast Tips
Convection works well with Roast – roasting time is cut significantly and
results in meat and poultry that are browned and crispy with juicy interiors.
Dress up vegetables by roasting them. As they caramelize, they become
sweet and delicious.
Foods that contain orange, lemon or other fruit with citric acid may
damage the nish of the baking pan. So when cooking such foods, we
suggest that you line the pan with baking parchment paper or aluminum
foil.
PIZZA
Adjust rack to position 3.
Turn Selector dial to Pizza and press.
Pizza temperature will flash. Turn
the dial to select the temperature
and press.
Pizza size will begin to flash. Turn the
dial to select size and then press.
If cooking frozen pizza, turn the dial to select the Snowflake and press;
otherwise, press the dial to hide the Snowflake for fresh pizza.
Time will flash. Turn the dial to adjust time and press. Press Start/Stop to
begin preheating.
If preparing fresh pizza, make sure pizza is ready to bake on a pizza screen
or fit into the baking pan.
Once oven indicates it is ready, put the pizza in the oven. The timer will
begin counting down. It will beep again when cooking time has expired.
The oven will shut off and the display will
Convection can be selected at any time before or
revert to the clock
.
10
Page 11
Pizza Tips
For fresh pizza, use a pizza screen or fit it into the baking pan. Be sure either
pan or screen is well oiled.
All pizza times correspond with size and are suggestions – they can
be adjusted according to personal preference. If using frozen pizza,
use package instructions as a guide, as times can vary based on
pizza thickness.
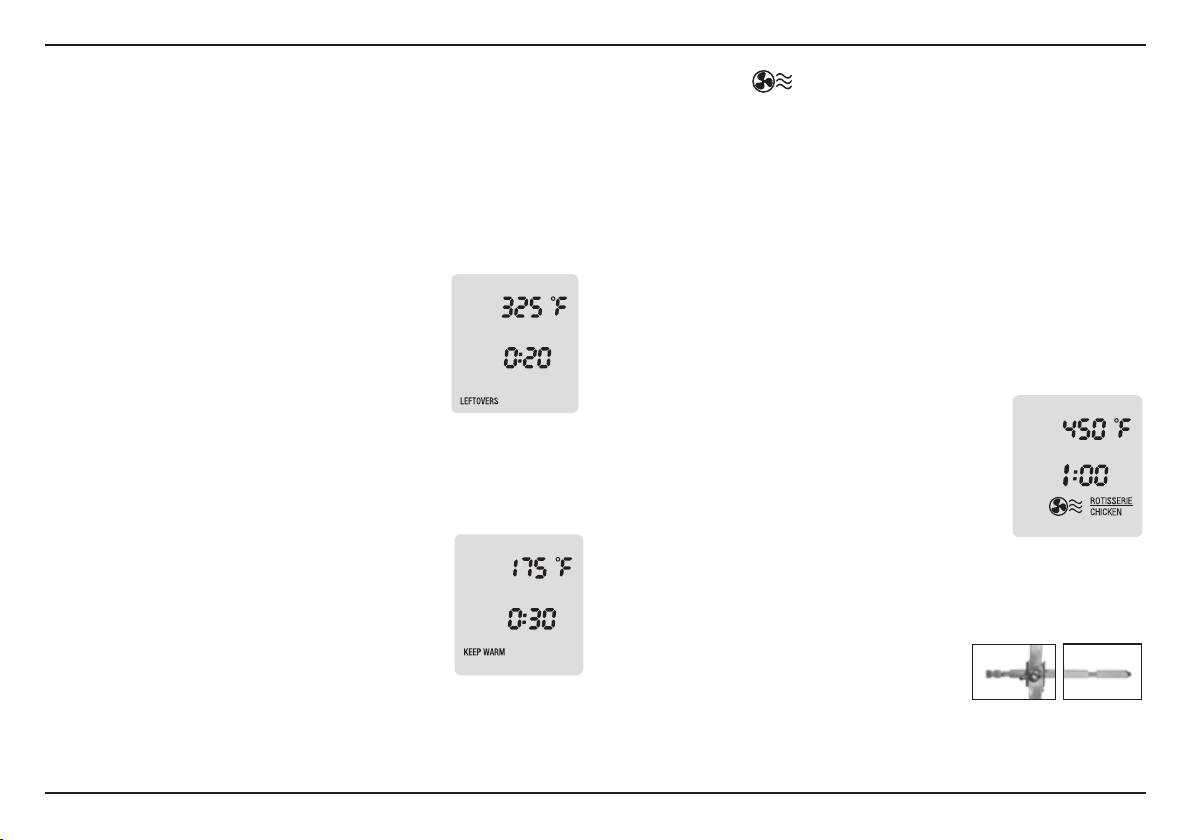
LEFTOVERS
Adjust rack to position 1, 2 or 3.
Turn Selector dial to Leftovers, and press.
Temperature will flash. Turn the Selector dial to select the
temperature and press.
Time will flash. Turn the dial to adjust time and press.
Put food in oven and press Start/Stop to begin heating.
There is no preheat during the Leftovers function.
The timer will begin counting down. It will beep again when time has
expired. The oven will shut off and the display will
revert to the clock
.
KEEP WARM
Adjust rack to position 1, 2 or 3.
Turn Selector dial to Keep Warm and press.
Keep Warm temperature will flash. Turn the Selector
dial to select the temperature and press.
Time will flash. Turn the dial to adjust time and press.
Put food in oven and press Start/Stop to begin warming.
There is no preheat during the Keepwarm function.
The timer will begin counting down. It will beep again when time has
expired. The oven will shut off and the display will
revert to the clock
.
CONVECTION
Convection uses a fan to circulate heated air around food as it cooks.
Convection cooking cooks food faster and more evenly. Most recipes
recommend reducing temperatures by 25ºF or reducing cooking time using
convection.
You may select Convection with most cooking functions: Bake, Broil, Roast,
Pizza, Rotisserie, Keep Warm or Leftovers. First select the function and set
the oven temperature and time. Then press the Conv button to activate the
convection fan. The oven will display the Convection icon. You may turn on
Convection at any time as you are setting the function during preheating or
during cooking. You may turn off Convection at any time by pressing the
Conv button again.
ROTISSERIE
Put the baking pan on the rack in position 1.
When using the Rotisserie function always begin with a
cold oven and always have the baking pan in place to
catch any grease.
Press the Rotisserie button (Rotis). Select either Chicken,
Duck, Meat or Custom by turning the Selector dial and
then pressing the dial. Bake temperature will flash. Turn
Selector dial to select the temperature and press. Time
will flash. Turn the dial to adjust the time and press. Convection is preset in
all Rotisserie settings. It can be turned off at any time before or after you
press Start/Stop by pressing the Conv button. Press Start/Stop to begin the
cooking cycle and the timer will begin counting down.
Insert the food, on rotisserie spit, into the oven
before selecting the Rotisserie function. For
instruction on how to attach and truss poultry see
following page. Be sure to position the spit correctly
inside the oven. The right side has 1 notch and a slightly rounded tip. The
left side has 2 notches and a flat end. Once the spit is inserted into the
oven, press Start/Stop.
LEFT
RIGHT
11
Page 12
Note that for each type of food (Chicken, Duck or Meat) the oven has a
specialized cooking program. For the first 10 minutes of every cycle, all 4
heating elements will turn on for rapid preheating. After 10 minutes and for
remainder of the cycle only the top 2 heating elements will be cycling on and
off according to the program to maintain the set oven temperature and cook
the rotisserie food to perfection. During the final phase of the programs for
Chicken, Duck and Meat, the oven temperature will be automatically
increased to enhance and crisp the poultry skin or outer surface of the food.
Use the Custom Rotisserie option to set any desired temperature and time
for other types of food such as fish, vegetables, or fruit.
The oven will beep when the cooking time has expired. The oven will shut off
and the display will revert to the clock.
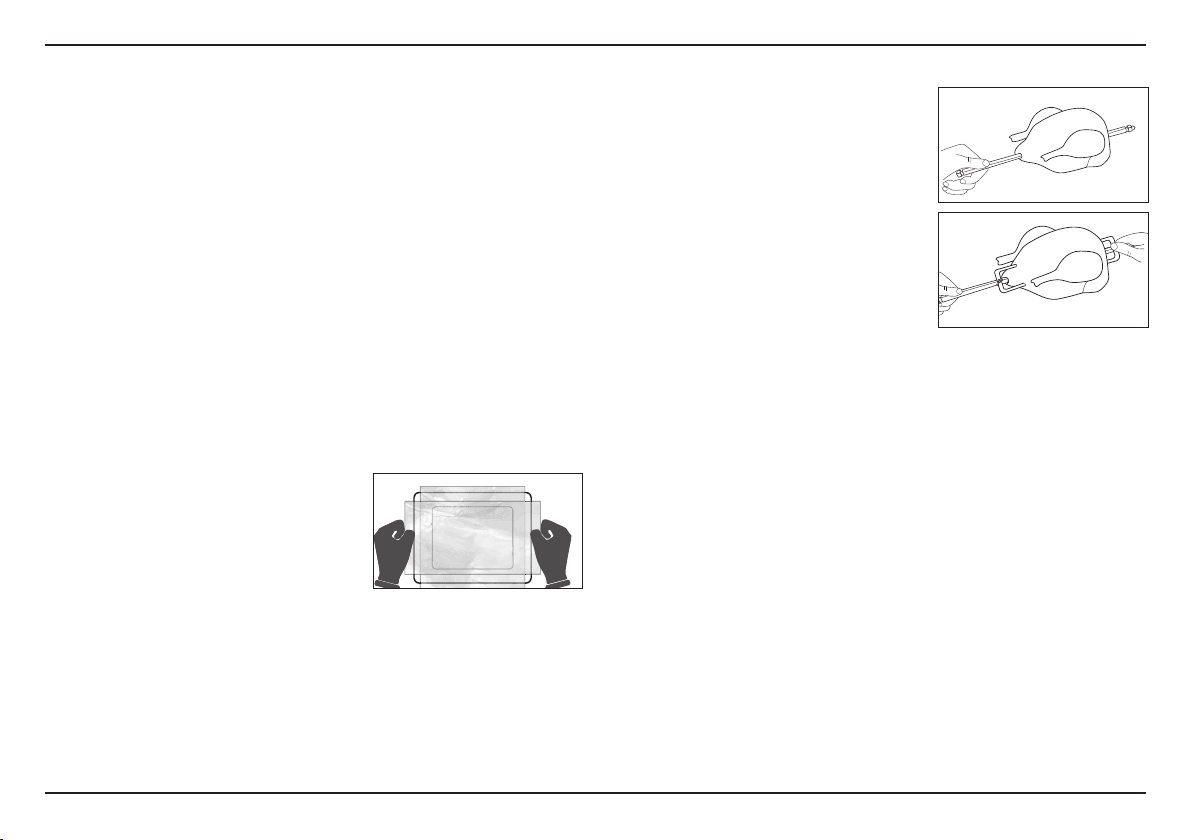
Tips for cooking duck:
When using the rotisserie duck function, line the baking pan with two clean
pieces of aluminum foil, one positioned left to right and the other front to
back. The edges of the foil should be raised about ½ -inch over the pan walls
around all four edges (see the picture below). This will help reduce excess
duck grease from splattering and dripping.
Do not open the door during the last 15
minutes of the duck cooking cycle to avoid
contact with hot grease. Once the cooking
cycle has finished and the oven has turned
off, take care that the duck grease is not
bubbling in the pan or splattering when you
remove the duck. Do not remove the baking
pan until the oven and pan are fully cool.
Trussing Poultry
Tying meats ensures even cooking. It is
important to use butcher’s twine to tie items
that are to be prepared for the Rotisserie
function. First truss the item and then secure
it onto the rotisserie spit and skewers.
1. First insert the rotisserie spit into the food
for rotisserie (Fig. 1).
2. Insert the skewers at different angles to
hold the food more firmly (Fig. 2).
3. Next, install the fixing screws to secure the
meat or poultry to the rotisserie spit.
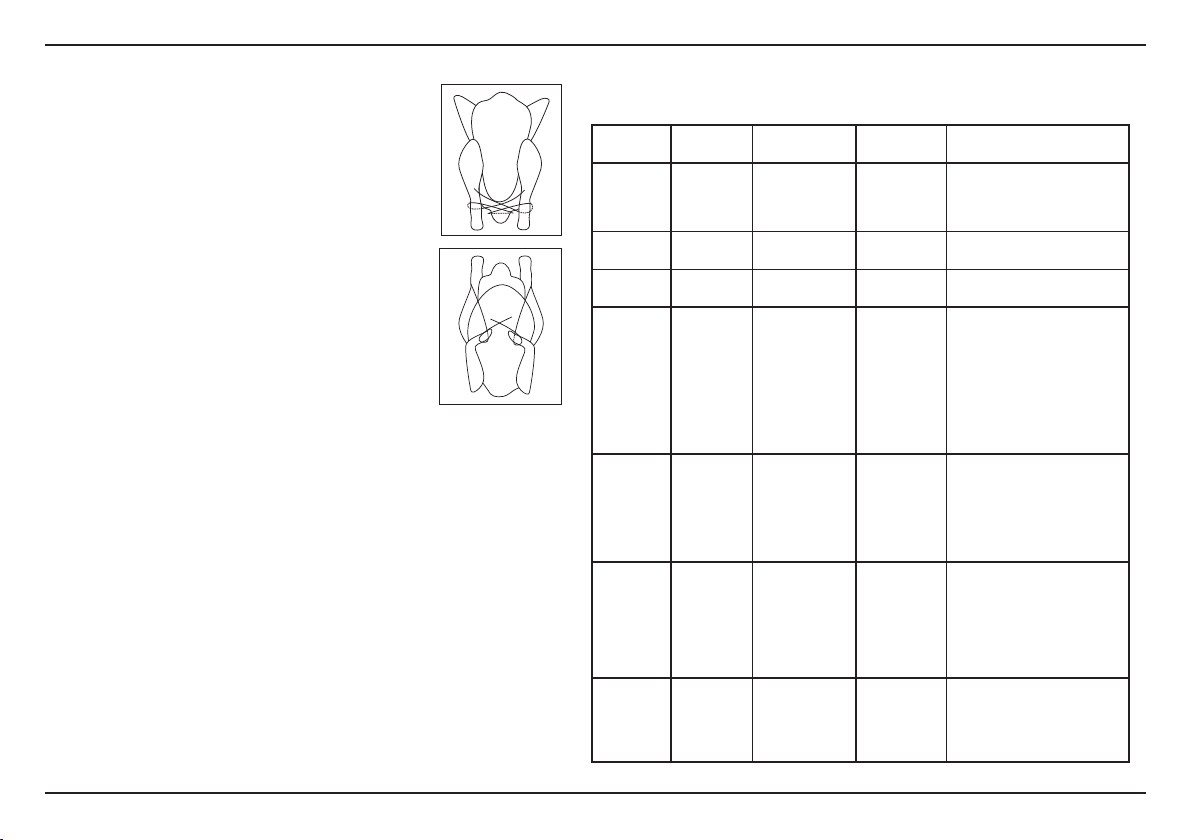
There are different methods of trussing, but all aim to achieve the same
results. Tuck the wings underneath the chicken to secure them. For trussing,
use a length of butcher’s twine that is approximately 4 or 5 times the length
of the chicken. Place the middle of the twine under the tail, bring both sides
up and cross over the top of the tail. Wrap ends of the twine around the end
of each drumstick and pull to draw the legs together, crossing ends over
each other again. Turn the bird over. Pull ends of twine up over the thighs
and wrap around the upper wings, catching the tips of the wings in the loop.
The twine is wrapped around the wing close to the body, and then both
ends are brought to the upper side. If there is a flap of skin at the neck, it is
folded up and the two ends of twine are tied over it.
Fig. 1
Fig. 2
12
Page 13
Brining
Brining leaner cuts of meat such as poultry, turkey,
and pork in a saltwater solution produces juicier
roasts. The difference between brined and non-brined
meats is very noticeable. If you have the time it is
definitely recommended.
The rule to follow is to use a cup of table salt or 1½
cups kosher salt for every gallon of water.
Or, for smaller cuts of meat, ½ cup kosher salt for
every quart of water.
Simply mix salt and water together. Place item to be
brined in a non-reactive container or sealable plastic
bag large enough to completely immerse the meat.
Pour in the brine, cover, and refrigerate.
The amount of time needed to brine depends on how big the roast is.
Following is a simple guideline:
Whole chicken 3–8 hours
Chicken parts 1–2 hours
Turkey breast 4–6 hours
Game hens 1–2 hours
Pork chops 2–6 hours
Pork tenderloin 2–6 hours
Pork loin 24 hours
It is important to thoroughly rinse and dry the meat once you remove it
from the brine, so when it roasts it will be juicy, not salty.
FINISHED COOKING TEMPERATURES
Always check internal temperature using an instant-read thermometer.
Food Setting
Chicken,
Whole
Chicken,
parts
Duck Rotisserie,
Beef,
Lamb
Pork Rotisserie,
Fish
(whole)
Fish fillets Bake,
Options
Rotisserie,
Roast,
Convection
Bake,
Convection
Convection
Rotisserie,
Roast,
Convection
Roast,
Convection
Rotisserie,
Roast,
Convection
Convection
Cooking
Temperature
450°F – rotisserie (Chicken
function)
425°F – Roast
400°F – Bake,
convection
325°F – 425°F
(Duck function)
425°F – rotisserie (Meat
function)
425°F – Roast
425°F – rotisserie (Meat
function)
425°F – Roast
400°F – rotisserie
(custom setting)
400°F – Roast,
Convection
400°F 10 to 20
Time Internal Temperature
50 to 75
minutes
30 to 45
minutes
90 minutes 170°F to 175°F for thigh
15 minutes/
pound
20 minutes/
pound
15 to 20
minutes
minutes
(depending
on thickness)
165°F – breast
170°F to 175°F for thigh
165°F – breast
170°F to 175°F for thigh
Rare – 125°F
Medium – Rare – 130°F to
135°F
Medium – 135°F to 140°F
Medium Well – 140°F to
150°F
Well Done – 155°F
* All internal temperatures
are based on a 5 minute rest
Medium rare – 145°F
Medium – 150°F
Well Done – 160°F
* All internal temperatures
are based on a 5 minute rest
145°F
145°F
13
Page 14

To change functions, time or temperature mid-cycle
during cooking
To change temperature: During the cooking process, the LCD screen will
display the countdown timer. Press the Selector button, beep will sound and
the LCD screen will display the previously selected temperature, flashing.
Turn the Selector dial to desired temperature. Press to set new temperature.
A beep will sound.
To change time: Press the Selector button and the set temperature will
flash. Press button again. The countdown timer will begin flashing and the
current remaining time will be displayed. Turn the Selector dial to select new
time and press it to set that time. The new countdown time will be displayed,
and cooking process will continue.
To change function: You must press Start/Stop to stop the current program.
Then turn the Selector dial to select another function.
CLEANING AND MAINTENANCE
Always allow the oven to cool completely before cleaning.
1. Always unplug the oven from the electrical outlet.
2. Do not use abrasive cleaners, as they will damage the finish.
3. To clean interior walls, use a damp cloth and a mild liquid soap
4. To remove crumbs, slide out the crumb tray and discard crumbs.
Heaters
Please note that the oven’s four heaters are programmed to turn on and off
and run at different powers for each of the functions, so you may not always
see all of the heaters glowing red. For some functions the heaters are
programmed to run at a lower power and they will not glow as bright red as
the other heaters. For example, the Bagel function uses full power on the top
heaters and half power on the bottom heaters.
5. Wire rack, baking/drip pan, broiling rack, spit, skewers and crumb
6. Never wrap the cord around the outside of the oven. Use the
7. Any other servicing should be performed by an authorized service
Simply wipe the exterior with a clean, damp cloth and dry
thoroughly. Apply the cleaning agent to a cloth, not to the toaster
oven, before cleaning.
solution or a spray solution on a sponge. Never use harsh
abrasives or corrosive products. These could damage the oven
surface. Never use metal scouring pads on interior of oven.
Wipe clean and replace. To remove baked-on grease, soak the
tray in hot, sudsy water with nonabrasive cleaners. Never operate
the oven without the crumb tray in place.
tray should be hand-washed in hot, sudsy water or use a nylon
scouring pad or nylon brush. To extend the life of your
accessories, we do not recommend that these be placed in the
dishwasher.
cord storage cleats on the back of the oven.
representative.
IMPORTANT: After cooking greasy foods and after your oven has
cooled, always clean top interior of oven. If this is done on a
regular basis, your oven will perform like new and help to keep
toasting consistent, cycle after cycle.
14
Page 15

WARRANTY
Limited Three-Year Warranty
This warranty is available to U.S. consumers only. You are a consumer if you
own a
Cuisinart® Rotisserie Convection Toaster Oven
retail for personal, family or household use. Except as otherwise required
under applicable law, this warranty is not available to retailers or other
commercial purchasers or owners. We warrant that your
Convection Toaster Oven
under normal home use for 3 years from the date of original purchase.
We recommend that you visit our website, www.cuisinart.com for a fast,
efficient way to complete your product registration. However, product
registration does not eliminate the need for the consumer to maintain the
original proof of purchase in order to obtain the warranty benefits. In the event
that you do not have proof of purchase date, the purchase date for purposes
of this warranty will be the date of manufacture.
CALIFORNIA RESIDENTS ONLY
California law provides that for In-Warranty Service, California residents
have the option of returning a nonconforming product (A) to the store where it
was purchased or (B) to another retail store that sells Cuisinart products of the
same type. The retail store shall then, according to its preference, either repair
the product, refer the consumer to an independent repair facility, replace the
product, or refund the purchase price less the amount directly attributable to
the consumer’s prior usage of the product. If neither of the above two options
results in the appropriate relief to the consumer, the consumer may then take
the product to an independent repair facility, if service or repair can be
economically accomplished. Cuisinart and not the consumer will be
responsible for the reasonable cost of such service, repair, replacement, or
refund of nonconforming products under warranty. California residents may
also, according to their preference, return nonconforming products directly to
Cuisinart for repair or, if necessary, replacement by calling our Consumer
Service Center toll-free at 1-800-726-0190. Cuisinart will be responsible for
the cost of the repair, replacement, and shipping and handling of such
nonconforming products under warranty.
BEFORE RETURNING YOUR CUISINART PRODUCT
If your
Cuisinart® Rotisserie Convection Toaster Oven
defective within the warranty period, we will repair or, if we think necessary,
will be free of defects in materials and workmanship
that was purchased at
Cuisinart® Rotisserie
should prove to be
replace it. To obtain warranty service, please call our Consumer Service
Center toll-free at 1-800-726-0190 or write to: Cuisinart, 7475 North Glen
Harbor Blvd., Glendale, AZ 85307. To facilitate the speed and accuracy of
your return, enclose $10.00 for shipping and handling. (California residents
need only supply a proof of purchase and should call 1-800-726-0190 for
shipping instructions.) Be sure to include your return address, description of
the product’s defect, product serial number, and any other information
pertinent to the return. Please pay by check or money order.
added protection and secure handling of any Cuisinart product that is being
returned, we recommend you use a traceable, insured delivery service.
Cuisinart cannot be held responsible for in-transit damage or for packages
that are not delivered to us. Lost and/or damaged products are not covered
under warranty.
Your
Cuisinart® Rotisserie Convection Toaster Oven
to the strictest specifications and has been designed for use only in 120 volt
outlets and only with authorized accessories and replacement parts. This
warranty expressly excludes any defects or damages caused by accessories,
replacement parts or repair service other than those authorized by Cuisinart.
This warranty does not cover any damage caused by accident, misuse,
shipment or other than ordinary household use. This warranty excludes all
incidental or consequential damages. Some states do not allow the exclusion
or limitation of these damages, so these exclusions may not apply to you. You
may also have other rights, which vary from state to state.
Important: If the nonconforming product is to be serviced by someone other
than Cuisinart’s Authorized Service Center, please remind the servicer to call
our Consumer Service Center at 1-800-726-0190 to ensure that the problem
is properly diagnosed, the product is serviced with the correct parts, and to
ensure that the product is still under warranty.
Any other trademarks or service marks
referred to herein are the trademarks or
service marks of their respective owners.
has been manufactured
NOTE:
For
©2014 Cuisinart
150 Milford Road
East Windsor, NJ 08520
Printed in China
www.cuisinart.com
14CE002665
G IB-12740-ESP-A
15
Page 16

RECIPES
Brunch/Appetizers:
Blueberry Crumb Cake ........................................................................17
Mushroom & Leek Quiche with Gruyère .............................................18
Pâte Brisée ..........................................................................................18
Spinach, Gorgonzola & Artichoke Dip ................................................19
Ultimate Layered Nachos ....................................................................20
Potato Skins ........................................................................................20
Entrees:
Classic Herb-Roasted Chicken ...........................................................21
Jamaican Jerk Chicken .......................................................................21
Roasted Simple Duck .........................................................................22
Ginger Glazed Duck ............................................................................22
Middle Eastern Leg of Lamb with Yogurt-Tahini Sauce ......................23
Rosemary-Sage Pork Roast ................................................................24
Roast Beef with Horseradish Sauce ...................................................25
Roasted Whole Branzino .....................................................................26
Hoisin-Glazed Cornish Hens ...............................................................26
Broiled Beef Burgers ...........................................................................27
Pizza:
Basic Pizza Dough ..............................................................................27
Gluten-Free Pizza Dough ....................................................................28
White Pizza with Olives, Grape Tomatoes & Bacon ...........................28
Spinach & Garlic Pizza ........................................................................29
Sides:
Roasted Fennel with Orange & Olives ................................................30
Savory Stuffed Acorn Squash .............................................................30
Twice-Baked Potatoes ........................................................................31
Mixed Root Vegetable Roast ..............................................................32
Bread/Dessert:
Buttery Dinner Rolls ............................................................................32
Bittersweet Espresso Brownies with Ganache ...................................33
Strawberry-Rhubarb Crisp ..................................................................34
Roasted Pineapple ..............................................................................34
16
Page 17

Blueberry Crumb Cake
This moist cake makes for the perfect hostess gift —
Makes one 9-inch cake (12 servings)
Nonstick cooking spray
Crumb topping:
¾ cup unbleached, all-purpose flour
¼ cup packed light brown sugar
¼ cup granulated sugar
1 teaspoon ground cinnamon
Pinch kosher salt
½ teaspoon pure vanilla extract
6 tablespoons unsalted butter, melted and slightly cooled
Cake batter:
1
1
⁄3 cups unbleached, all-purpose flour
¾ teaspoon baking soda
¼ teaspoon kosher salt
1
⁄3 cup unsalted butter, cut into 1-inch pieces and room
temperature
½ cup plus 3 tablespoons granulated sugar
1 large egg
½ teaspoon pure vanilla extract
1
⁄3 cup buttermilk
1 cup fresh blueberries
it is beautiful when sliced.
and stir with a fork or use your fingers to bring together into large
clumps. Reserve.
3. Prepare cake batter. In a small bowl, whisk together the flour, baking
soda, and salt. Reserve. Put the butter and sugar in a medium bowl
and mix with a Cuisinart
until light and fluffy, about 1 minute. Add the egg and vanilla and beat
until fully combined. Add
®
Hand Mixer fitted with the mixing beaters
1
⁄3 of the dry ingredients, and stir until almost
incorporated. Follow with ½ of the buttermilk, and then alternate in that
pattern, ending with the dry ingredients, until mixture is just combined.
4. Spread the batter into the prepared pan. Make a layer of the
blueberries on top of the batter, slightly pressing them down so that
they are still showing. Cover evenly with the reserved crumb topping.
5. Adjust the rack to position 2. Set the oven to Bake with Convection at
350°F for 25 minutes. Once preheated, place the pan on the rack and
bake for the allotted time or until a cake tester inserted into the cake
comes out clean. Allow to cool slightly before slicing and serving.
Nutritional inform ation per ser ving:
Calories 207 (35% from fat) • carb. 37g • pro. 3g
• fat 5g • sat. fat • 3g • chol. 29mg • sod. 148mg
• calc. 13mg • fiber 1g
1. Lightly coat a 9-inch square baking pan with nonstick cooking spray.
Reserve.
2. Prepare crumb topping. Put the dry ingredients of the crumb topping
into a small bowl. Whisk to combine. Add the vanilla and melted butter
17
Page 18

Mushroom & Leek Quiche with Gruyère
Great for a Sunday brunch, this quiche will please any crowd.
Allow to bake until the custard is just set.
5. If desired, broil for 2 to 3 minutes to brown the top of the quiche.
6. Allow to cool for about 5 minutes before slicing and serving.
Makes one 9-inch quiche, 8 to 12 servings
1 blind-baked 9-inch tart shell based on ½ of the Pâte Brisée
recipe that follows
Filling:
1½ teaspoons unsalted butter, or olive oil
1 small leek, white and light green parts only, thinly sliced
4 ounces sliced mushrooms (about 1½ to 2 cups), white button
or cremini work well
½ teaspoon kosher salt
¼ teaspoon freshly ground black pepper
¼ teaspoon fresh thyme
½ cup whole milk
½ cup heavy cream
4 large eggs
½ cup shredded Gruyère or Swiss cheese
1. Prepare the filling: Put the butter into a large skillet over medium heat.
Once the butter melts, add the leek with a pinch of salt and pepper and
sauté until just softened, about 2 to 3 minutes. Add the mushrooms
and thyme and sauté until softened and lightly browned, add additional
butter or oil if the pan seems to dry. Reserve.
2. In a medium mixing bowl, whisk together the milk, heavy cream and
eggs with the remaining salt and pepper.
3. Scatter the leek and mushroom mixture evenly in the blind-baked shell.
Pour the egg/cream mixture over to fill the tart shell and then scatter
the shredded cheese evenly on top.
4. Adjust the rack to position 2. Set the oven to Bake at 350°F for 16
minutes. Once preheated, carefully put the filled quiche into the oven.
Nutritional information per ser ving (based on 12 servings):
Calories 194 (70% from fat) • carb. 9g • pro. 5g • fat 15g • sat. fat 9g
• chol. 102mg • sod. 232mg • calc. 73mg • fiber 0g
Pâte Brisée
This versatile dough can be used for sweet or savory treats.
Makes two single-crust 9-inch tarts/pies, or one double-crust pie
2 cups unbleached, all-purpose flour
1 teaspoon kosher salt
½ pound (2 sticks) unsalted butter, cold and cubed
4 tablespoons ice water
1. Put flour and salt into a Cuisinart® Food Processor fitted with the
chopping blade. Process for 10 seconds. Add butter to work bowl and
pulse until the mixture resembles coarse crumbs. Pour in water, 1
tablespoon at a time, and pulse until a dough just forms. Divide dough
into 2 flat discs; wrap in plastic and refrigerate until ready to use.*
2. To roll and blind-bake: On a lightly floured surface, roll out one of the
pastry discs into an 11-inch circle that is about
the dough onto the rolling pin and unroll it evenly over a 9-inch tart
pan. Press the dough lightly into the pan, lifting the edges and working
it gently down into the corners of the pan. Trim off excess dough by
rolling the pin over the top of the pan.
1
⁄8-inch thick. Reverse
18
Page 19

3. With your thumbs, push the dough
1
⁄8 inch above the edge of the mold,
to make an even, rounded rim of dough around the inside
circumference of the mold. You can then press a decorative edge
around the rim of the pastry with the dull edge of a knife. Chill in
refrigerator for about 30 minutes.
4. Adjust the rack to position 2. Set the oven to Bake with Convection at
350°F for 25 minutes. Using a fork, prick the dough evenly all over, but
make sure not to go entirely through the dough. Line the shell with
parchment and weigh it down with dried beans or rice. Once
preheated, place into oven. Bake for about 20 minutes, or until the
dough under the parchment is no longer wet. Remove the beans/rice
and parchment and continue baking for the remaining 5 minutes, until
the shell is golden brown.
Nutritional information per ser ving:
Calories 101(67% from fat) • carb. 7g • pro. 1g • fat 7g • sat. fat 5g
• chol. 20mg • sod. 89mg • calc. 0mg • fiber 0g
*Extra dough can be stored in the refrigerator for up to 1 week and in the
freezer for up to 2 months.
Spinach, Gorgonzola & Artichoke Dip
.
Hot out of the oven, serve this timeless dip with crusty bread or alongside
a basket of pita chips.
1 small shallot, halved
1 pound (2 standard, 8-ounce packages) plain cream cheese,
room temperature and cut into 1-inch pieces
¼ cup heavy cream
1 pound frozen spinach, thawed, drained and dried thoroughly
1 cup crumbled Gorgonzola (about 4 ounces), divided
2 cans (15 ounces each) artichoke hearts, drained and
dried thoroughly
½ teaspoon crushed red pepper
1. Lightly coat a 2-quart ceramic baking dish with nonstick cooking spray.
Reserve.
®
2. Fit a Cuisinart
Food Processor with the metal chopping blade. With
the machine running, first drop the cheese through the feed tube and
process until finely chopped. Add the garlic and shallot to finely chop.
Add the cream cheese and heavy cream; process until creamy and
smooth. Crumble the spinach over the cream cheese mixture. Add half
of the Gorgonzola and pulse about 10 times, or until well blended.
Scrape the work bowl. Add the reserved artichoke hearts and crushed
red pepper; pulse another 10 times. Transfer the mixture to the
prepared dish and then top with the remaining Gorgonzola.
3. Adjust the rack to position 2. Set the oven to Bake at 375°F for 25
minutes. Once preheated, put the filled dish into the oven and bake for
the allotted time, or until just browned on top.
4. Serve immediately.
Makes about 6 cups
Nonstick cooking spray
2 ounces Parmesan, cut into ½-inch cubes
1 garlic clove
Nutritional inform ation per ser ving (¼ cup):
Calories 90 (79% from fat) • carb. 3g • pro. 4g
• fat 7g • sat. fat 5g • chol. 22mg • sod. 243mg
• calc. 57mg • fiber 1g
19
Page 20

Ultimate Layered Nachos
The key to these nachos is to layer the cheese between the chips. This
way everyone gets a bit of cheese with every bite!
Nutritional inform ation per ser ving (based on 10 servings):
Calories 168 (50% from fat) • carb. 14g • pro. 7g • fat 9g • sat. fat 4g
• chol. 15g • sod. 345mg • calc. 166mg • fiber 2g
Makes 8 to 10 servings
6 cups tortilla chips (this is an estimate – you need enough
to cover the bottom of the baking tray, but can
have more or less depending on how many mouths you
need to feed), divided
1½ to 2 cups shredded Cheddar and/or Monterey Jack, divided
¾ cup refried beans (about half of a 15.5-ounce can)
1 small to medium tomato, seeded and chopped
1 jalapeño, halved, seeded and thinly sliced
4 scallions, thinly sliced
1 can (4.5 ounces) chopped green chiles
1 cup sliced black olives (These can be purchased pre-sliced
in a 2.25-ounce can. Be sure to drain them first.)
Salsa, guacamole and sour cream for serving
Lime wedges, for serving
1. Line the baking pan with foil. Evenly distribute half of the chips in the
prepared pan. Cover with about ½ cup of the cheese, then the
remaining chips. Top with the remaining ingredients, as evenly as
possible, finishing with the remaining cheese.
2. Adjust the rack to position 4 and place the filled tray in the oven. Set
oven to Broil for 10 minutes. Keep an eye on the nachos while they are
cooking – some cheeses melt and brown more quickly than others.
3. Serve immediately with salsa, guacamole sour cream, and lime
wedges.
Potato Skins
We use the leftover potato skin tops from our Twice-Baked Potatoes on
page 31, but if you want to skip that and go straight to the skins, bake the
potatoes as instructed in the first step of the Twice-Baked Potatoes, and
then reserve those for another use.
Makes 6 servings
6 potato skin tops (from Twice-Baked Potatoes, page 31)
2 tablespoons unsalted butter, melted and kept warm
Pinch kosher salt
Pinch freshly ground black pepper
1 cup shredded Cheddar
4 slices bacon, cooked and crumbled
Sour cream, to taste
2 tablespoons chopped chives
1. Line the baking pan with foil. Set the potato skins on the prepared
baking pan and brush the tops of with the melted butter and season
with salt and pepper. Evenly distribute the cheese on top of each half,
and then top with the bacon.
2. Adjust the rack to position 4 and place the potatoes in the oven. Set to
Broil for 8 minutes. Allow to cook until cheese is melted and just
browned.
3. Top with the sour cream and chopped chives. Serve immediately.
Nutritional inform ation per ser ving:
Calories 293 (56% from fat) • carb. 21g • pro. 12g • fat 18g • sat. fat 11g
• chol. 55mg • sod. 313mg • calc. 254mg • fiber 3g
20
Page 21

Classic Herb-Roasted Chicken
Jamaican Jerk Chicken
A combination of dried and fresh herbs dress up this classic bird.
Makes 4 to 6 servings
1 whole chicken (3½ to 4 pounds)
1 tablespoon olive oil
1 tablespoon chopped fresh rosemary
1 teaspoon dried basil
1 teaspoon dried thyme
1 teaspoon kosher salt
1 teaspoon freshly ground black pepper
1 lemon, halved
2 garlic cloves, smashed
1. Coat the chicken with the olive oil, and then rub with the herbs, salt
and pepper. Squeeze the lemon all over the chicken and then stuff in
the cavity of the bird along with the garlic cloves. Truss the chicken well
with butcher’s twine and then fit onto the spit so the chicken is in the
middle of the spit. Secure well with the skewers.
2. Adjust the rack to position 1 and place the baking pan on top of it. Fit
the spit into the oven and set to the Chicken setting on the Rotisserie
function at 450°F for 60 minutes.
3. Cook the chicken for the allotted time, or until the juices run clear when
the thigh is pierced (internal temperature should be 165˚F in the breast
and 170°F in the thigh. It may take more or less time depending on the
size of the chicken).
4. Using the rotisserie grip, remove the chicken from the oven. Allow the
chicken to rest for at least 5 to 10 minutes before carving .
Nutritional information per ser ving (based on 6 ser vings):
Calories 208 (32% from fat) • c arb. 2g • pro. 32g • fat 17g • sat. fat 1g
• chol. 106mg • sod. 535mg • calc. 25mg • fiber 1g
The flavors of Jerk Seasoning are perfect for chicken, but use it on other
proteins such as pork and shrimp as well.
Makes 4 to 6 servings
Jerk Marinade:
¼ cup orange juice
2 tablespoons white vinegar
2 tablespoons soy sauce, reduced sodium
2 tablespoons olive oil
Juice of ½ lime
3 garlic cloves
2 green onions, trimmed and cut into 2-inch pieces
1 Scotch Bonnet pepper, seeded and halved (or 2 jalapeños,
seeded and halved)
1 tablespoon ground allspice
2 teaspoons light brown sugar
1 teaspoon fresh thyme
½ teaspoon freshly ground black pepper
1 whole chicken (3½ to 4 pounds)
1 teaspoon kosher salt
1. Prepare the marinade. Put marinade ingredients, in order listed, into a
Cuisinart® Blender. Blend on High and process until homogenous,
about 1 minute.
2. Pour marinade over the chicken and refrigerate in a sealable plastic
bag for 2 hours, up to overnight.
3. Once chicken has marinated, remove and allow any excess marinade
to drain off. Season the chicken all over with the teaspoon of salt.
4. Truss the chicken well with butcher’s twine and then fit onto the spit so
the chicken is in the middle of the spit. Secure well with the skewers.
21
Page 22

5. Adjust the rack to position 1 and place the baking pan on top of it. Fit
the spit into the oven and set to the Chicken setting on the Rotisserie
function at 400°F for 60 minutes.
6. Cook the chicken for the allotted time, or until the juices run clear when
the thigh is pierced (internal temperature should be 165˚F in the breast
and 170˚F in the thigh. It may take more or less time depending on the
size of the chicken).
7. Using the rotisserie grip, remove the chicken from the oven. Allow to
rest for at least 5 to 10 minutes before carving.
Nutritional information per ser ving (based on 6 ser vings):
Calories 210 (42% from fat) • carb. 8g • pro. 23g • fat 10g • sat. fat 2g
• chol. 80mg • sod. 668mg • calc. 28mg • fiber 1g
the spit into the oven and set to the Duck setting on the Rotisserie
function at 325°F for 90 minutes.
3. After 40 minutes of cooking, open the door of the oven and while the
duck is turning, carefully prick the duck all over with the tip of a paring
knife. Close the door and let the duck finish cooking for the allotted
time, or until the juices run clear when the thigh is pierced (internal
temperature should be 165˚F in the breast and 170˚F in the thigh. It may
take more or less time depending on the size of the duck).
4. Using the rotisserie grip, remove the duck from the oven. Allow to rest
for at least 5 to 10 minutes before carving.
NOTE: Scoring and pricking the duck releases the fat (renderings), resulting in the crispiest skin.
Roasted Simple Duck
The rotisserie makes for a simple, easy way to roast a whole duck,
ensuring a crispy exterior and juicy meat.
Makes 4 to 6 servings
1 whole duck (3½ to 4 pounds), wings removed
1 tablespoon olive oil
1½ teaspoons kosher salt
½ teaspoon freshly ground black pepper
1. Coat the duck with the olive oil, and then rub with the salt and pepper.
Score the breasts in a crosshatch manner, cutting through the skin and
fat, but not into the flesh. Prick the duck all over with the tip of a paring
knife. Truss the duck well with butcher’s twine and then fit onto the
spit. Secure well with the skewers.
2. Adjust the rack to position 1 and place the baking pan on top of it. Fit
Nutritional information per ser ving (based on 6 ser vings):
Calories 157 (49% from fat) • carb. 1g • pro. 18g • fat 8g • sat. fat 3g
• chol. 78mg • sod. 645mg • calc. 12mg • fiber 0g
Ginger Glazed Duck
This recipe is a nod to the traditional Asian flavors that are common when
preparing duck.
Makes 4 to 6 servings
Marinade:
1 cup chicken broth, low sodium
½ cup soy sauce, reduced sodium
1 1-inch piece fresh ginger, peeled and thinly sliced
2 garlic cloves, thinly sliced
1 tablespoon light brown sugar
22
Page 23

2 whole star anise
1 tablespoon black peppercorns
1 whole duck (3½ to 4 pounds)
1. Mix all of the marinade ingredients together in a small mixing bowl. Put
the duck in a 2-gallon sealable plastic bag and pour the marinade over
the duck. Seal and refrigerate for a minimum of 2 hours, up to 4 hours.
2. Once the duck has marinated, remove and allow any excess marinade
to drain off. Score the breasts in a crosshatch manner, cutting through
the skin and fat, but not into the flesh. Prick the duck all over with the
tip of a paring knife. Truss the marinated duck* well with butcher’s
twine and then fit onto the spit. Secure well with the skewers.
3. Adjust the rack to position 1 and place the baking pan on top of it. Fit
the spit into the oven and set to the Duck setting on the Rotisserie
function at 325°F for 90 minutes.
4. After 40 minutes of cooking, open the door of the oven and while the
duck is turning, carefully prick the duck all over with the tip of a paring
knife. Close the door and let the duck finish cooking for the allotted
time, or until the juices run clear when the thigh is pierced. The internal
temperature should be 165°F in the breast and 170°F in the thigh. It
may take more or less time depending on the size of the duck.
5. Using the rotisserie grip, remove the duck from the oven. Allow to rest
for at least 5 to 10 minutes before carving.
*Do not discard the marinade. Put into a small saucepan and bring to a
boil over medium-high heat. Let sauce boil for 5 minutes and then
reduce heat to maintain a simmer. Allow to simmer for about 30
minutes – it should thicken to a glaze-like consistency. Brush over
cooked duck, or serve along side the sliced duck.
Note: Scoring and pricking the duck skin releases the fat, resulting in a
delicious, crispy duck.
Nutritional information per ser ving (based on 6 ser vings):
Calories 160 (33% from fat) • carb. 6g • pro. 21g • fat 6g • sat. fat 2g
• chol. 78mg • sod. 817mg • calc. 13mg • fiber 0g
Middle Eastern Leg of Lamb with
Yogurt-Tahini Sauce
It seems as though Middle Eastern spices were created to go with lamb;
this recipe will definitely show you why! Leftover lamb is great sliced for
sandwiches and spread with the Yogur t-Tahini Sauce.
Makes 8 to 10 servings
Marinade:
1 teaspoon cumin seeds
1 teaspoon coriander seeds
3 cinnamon sticks, halved
1½ teaspoons kosher salt, plus more for sprinkling
½ teaspoon freshly ground black pepper, plus more for
sprinkling
4 garlic cloves
4 sprigs oregano, leaves only
½ teaspoon cayenne pepper
¼ cup olive oil
1 boneless leg of lamb, (2½ to 3 pounds)
Yogurt-Tahini Sauce:
1 cup plain yogurt, whole or reduced fat
1 tablespoon tahini
½ teaspoon fresh lemon juice
½ teaspoon kosher salt
¼ teaspoon ground cumin
Pita bread, toasted and kept warm for serving
1. Prepare the marinade for the lamb: Put the cumin and coriander seeds
in a small, dry skillet over medium heat. Cook until seeds are just
toasted and fragrant. Remove. Put the toasted seeds in a Cuisinart®
Spice Grinder or Chopper along with the cinnamon sticks, salt, pepper,
23
Page 24

garlic, oregano and cayenne. Pulse a few times to break up, scraping
down as needed. Add the oil and process until a paste has formed.
2. Rub the paste all over the lamb (remove any butcher’s twine or netting
so the lamb can be evenly coated). Transfer to a large mixing bowl,
covered with plastic, or to a 2-gallon resealable bag. Marinate in the
refrigerator for 2 hours, up to overnight.
3. Once lamb has marinated, remove from bowl/bag and tie tightly with
butcher’s twine in 2-inch intervals. and then fit onto the spit. Secure
well with the skewers.
4. Adjust the rack to position 1 and place the baking pan on the rack. Fit
the spit into the oven and set to the Meat setting on the Rotisserie
function at 400°F for 45 minutes. The lamb is cooked when the internal
temperature reaches 130°F, for medium rare. Allow it to rest for 10
minutes before slicing and serving.
5. While lamb is cooking, prepare the Yogurt-Tahini Sauce. In a small bowl
whisk together all of the sauce ingredients until homogenous. Reserve
in the refrigerator (this can be made in advance and stored in an airtight
container in the refrigerator for up to 1 week).
6. Using the rotisserie grip, remove the lamb from the oven. Allow to rest
for at least 5 to 10 minutes before carving .
7. To serve, thinly slice lamb and serve with the Yogurt-Tahini Sauce and
toasted pita bread.
Nutritional information per ser ving (lamb; based on 10 servings):
•
Calories 208 (52% from fat) • carb. 1g • pro. 23g • fat 12g • sat. fat 3g
•
chol. 73mg • sod. 435mg • calc. 23mg • fiber 1g
Rosemary-Sage Pork Roast
This delicious pork roast is a great and easy main dish for entertaining.
Makes 6 to 10 servings
1 cup kosher salt
1 cup granulated sugar
3 quarts water
1 pork roast, (3 to 4 pounds)
Marinade:
3 garlic cloves
1 tablespoon fresh rosemary
1 tablespoon fresh sage
1 tablespoon Dijon mustard
1 teaspoon kosher salt, plus more for sprinkling
1 teaspoon freshly ground pepper, plus more for sprinkling
2 tablespoons extra virgin olive oil
1. Dissolve salt and sugar with the water by whisking in a large mixing
bowl that will fit into your refrigerator. Submerge the roast in the brine
solution and refrigerate up to 4 hours.
2. While roast is soaking, prepare the marinade. Place the metal chopping
blade into the Cuisinart® Food Processor. With the machine running,
drop the garlic through the feed tube and run until finely chopped. Add
the rosemary and sage and pulse until chopped. Add the mustard, salt
and pepper. Turn the processor on and while running, pour the olive oil
through the feed tube. Reserve until ready to use.
3. Once the roast has soaked, remove from brine, rinse and pat dry with
paper towels. Sprinkle the roast all over with kosher salt and freshly
ground pepper. Evenly rub the marinade all over the roast and allow to
stand at room temperature for 30 minutes.
24
Page 25

4. Tie the roast evenly with butcher’s twine for even roasting and fit onto
the spit. Secure well with the skewers.
5. Adjust the rack to position 1 and place the baking pan on top of it. Fit
the spit into the oven and set to the Meat setting on the Rotisserie
function at 425°F for 60 minutes. The internal temperature should be
145°F for medium.
6. Using the rotisserie grip, remove the pork from the oven. Allow to rest
for at least 5 to 10 minutes before carving.
Nutritional inform ation per ser ving (based on 10 servings):
Calories 292 (51% from fat) • carb. 1g • pro. 34g
• fat 16g • sat. fat 3g • chol. 102mg • sod. 339mg
• calc. 14mg • fiber 0g
Roast Beef with Horseradish Sauce
½ teaspoon kosher salt
½ teaspoon coarsely ground black pepper
1. Coat the roast with the olive oil and sprinkle with the salt and pepper.
Tie the roast evenly with butcher’s twine for even roasting and fit onto
the spit. Secure well with the skewers.
2. Adjust the rack to position 1 and place the baking pan on top of it. Fit
the spit into the oven and set to the Meat setting on the Rotisserie
function at 425°F for 40 minutes. The internal temperature should be
130°F for medium-rare.
3. While the beef is cooking, prepare the Horseradish Sauce. Put all
ingredients into a small mixing bowl and stir well to fully combine. Taste
and adjust seasonings as desired. Reserve. (Horseradish sauce will
keep in the refrigerator for up to one week).
4. Using the rotisserie grip, remove the roast beef from the oven. Allow to
rest for at least 5 to 10 minutes before carving. Thinly slice and serve
with the Horseradish Sauce on the side.
Only a handful of ingredients but this dish packs a lot of flavor. The
Horseradish Sauce yields more than you may need for the full roast, but
keep it on hand for sandwiches for the next day.
Makes 8 to 10 servings
Roast Beef:
1 eye round roast, (2 to 3 pounds)
1½ teaspoons olive oil
1 teaspoon kosher salt
1 teaspoon freshly ground black pepper
Horseradish Sauce:
½ cup mayonnaise
½ cup sour cream
¼ cup prepared horseradish
(based on 10 ser vings , with 1 tablespoon of Hor seradish Sauce):
Nutritional information pe r serving
Calories 248 (58% from fat) • ca rb. 1g • pro. 25g
• fat 15g • sat. fat 5g • chol. 85mg • sod. 388mg
• calc. 29mg • fiber 0g
Nutritional information per ser ving (Horseradish Sauce – 1 table spoon):
Calories 54 (94% from fat) • carb. 1g • pro. 0g
• fat 5g • sat. fat 2g • chol. 8mg • sod. 94mg
• calc. 6mg • fibe r 0g
25
Page 26

Makes 2 servings
Roasted Whole Branzino
Nutritional inform ation per ser ving:
Calories 207 (31% from fat) • carb. 3g • pro. 32g
• fat 7g • sat. fat 1g • chol. 70mg • sod. 507mg
• calc. 32mg • fiber 1g
1 whole branzino, cleaned (if fish is longer than the spit,
remove the head and tail fins)
1½ teaspoons olive oil, divided
½ teaspoon kosher salt, divided
¼ teaspoon freshly ground black pepper
¼ small onion, thinly sliced
1 garlic clove, thinly sliced
2 bay leaves
½ small lemon, thinly sliced
2 sprigs fresh rosemary
2 sprigs fresh thyme
1. Drizzle 1 teaspoon of the olive oil along the inside of the fish. Sprinkle
with ¼ teaspoon of the salt and a pinch of the pepper. Evenly lay the
remaining stuffing ingredients into the fish (depending on the size of the
fish, all ingredients may not fit. Adjust accordingly). Rub the remaining
olive oil on the outside of the first and sprinkle with the remaining salt
and pepper.
2. Tie the fish well with butcher’s twine — every 1 to 2 inches or so —
and fit onto the spit. (You do not need to secure with the skewers.)
3. Adjust the rack to position 1 and place the baking pan on top of it. Fit
the spit into the oven and set to the Custom setting on the Rotisserie
function at 400°F for 18 minutes. Start checking the fish at about 15
minutes — once it stops turning, the fish is fully cooked.
4. Using the rotisserie grip, remove the fish from the oven. Serve
immediately with additional lemon wedges and a side of rice.
Hoisin-Glazed Cornish Hens
This marinade is very versatile. Try it brushed on salmon or chicken pieces
and simply roast in the oven.
Makes 2 to 4 servings
Glaze:
½ cup hoisin sauce
2 tablespoons honey
2 tablespoons soy sauce, reduced sodium
1 tablespoon finely chopped fresh ginger
2 garlic cloves, finely chopped
2 Cornish game hens, (1 to 1¼ pounds each)
1. In a mixing bowl stir together the hoisin, honey, soy sauce, ginger and
garlic.
2. Put the hens in a sealable plastic bag. Pour the marinade over the hens
and refrigerate for at least an hour, up to overnight.
3. Truss the hens well with butcher’s twine and then fit both onto the spit
so they are evenly positioned in the middle of the spit. Secure well with
the skewers.
4. Adjust the rack to position 1 and place the baking pan on top of it. Fit
the spit into the oven and set to the Custom setting on the Rotisserie
function (using Convection) at 425°F for 40 minutes.
5. Hens are cooked when the juices run clear when the thighs are pierced
with the tip of a knife.
26
Page 27

Nutritional information per ser ving (based on 4 ser vings):
Calories 268 (13% from fat) • carb. 34 • pro. 25g
• fat 4g • sat. fat 1g • chol. 104mg
• sod. 1052mg • calc. 17mg
Basic Pizza Dough
This dough can be used for more than just the obvious, although who
doesn’t love homemade pizza? Check our website, www.cuisinart.com, for
additional piz za and calzone recipes.
Broiled Beef Burgers
A good burger doesn’t need much fuss, as long as you have good quality
meat. To turn these into cheeseburgers, a minute or so before the burgers
are cooked, top with a slice of your favorite cheese and allow to broil for
an additional minute, or until cheese is melted and browned.
Makes 4 burgers
1½ pounds ground beef
2 tablespoons olive oil
1½ teaspoons kosher salt
½ teaspoon freshly ground black pepper
½ teaspoon garlic powder
1. Divide the ground beef and form into 4 burgers (6 ounces each) — be
sure not to overwork the meat or the burgers will be tough. Coat each
with olive oil and then sprinkle both sides with the salt, pepper and
garlic powder.
2. Adjust the rack to position 4. Set the burgers on the broiling rack, fitted
into the baking pan. Set oven to Broil with Convection for 12 minutes.
3. Serve immediately on toasted buns topped with your favorite
condiments.
Nutritional information per burger (without bun):
Calories 389 (66% from fat) • carb. 0g • pro. 33g • fat 29g • sat. fat 10g
• chol. 105g • sod. 971mg • calc. 22mg • fiber 0g
Makes 1½ pounds dough (two 12-inch crusts)
2¼ teaspoons (1 standard packet) active dry yeast
1½ teaspoons granulated sugar
1 cup warm water (105°F to 110°F)
3 cups bread flour (you may substitute unbleached,
all-purpose flour)
1½ teaspoons kosher salt
1 tablespoon olive oil, plus more for coating ball of dough
1. In a liquid measuring cup dissolve the yeast and sugar in warm water.
Let stand until foamy, about 5 minutes. (Note: If the yeast does not
foam within 10 minutes, it is not active and you should toss it and start
again.)
2. Insert the dough or metal chopping blade into the work bowl of a
Cuisinart
®
Food Processor. Add the flour, salt and olive oil. Pulse a few
times to combine. With the machine running, pour the liquid yeast
mixture through the feed tube as fast as the flour absorbs it. Process
until the dough cleans the sides of the work bowl and forms a ball.
Continue to process for 30 seconds to knead the dough. Dough should
be slightly sticky.
3. Lightly coat the inside of a large bowl with olive oil. Add dough, turn to
coat in oil and cover bowl with plastic wrap. Let rise in a warm, draftfree place for about 1 hour; dough should double in size.
4. Place dough on a lightly floured surface and gently fold over to “punch”
down. Form into desired crust size(s) as directed by recipe.
27
Page 28

Nutritional information per ser ving (based on 12 servings for 2 pies):
Calories 114 (9% from fat) • carb. 23g • pro. 3g • fat 1g • sat. fat 0g
• chol. 0g • sod. 286mg • calc. 1mg • fiber 1g
Gluten-Free Pizza Dough
Finally! Pizza that folks with allergies can cheer about.
Makes about 1 pound dough (about two 10-inch crusts)
¾ cup tapioca flour
¾ cup white rice flour, plus additional for dusting and rolling
1
⁄3 cup quinoa flour
1
⁄3 cup arrowroot flour
1 teaspoon xanthan gum
1 teaspoon kosher salt
2 teaspoons granulated sugar
½ cup rice milk
¼ cup water
2 tablespoons extra virgin olive oil
Extra rice flour for dusting and rolling
time until dough reaches a smooth consistency).
3. When ready to roll, dust a large surface with rice flour. Divide the dough
into 2 equal pieces. Roll dough out into about a 10-inch circle.
4. Liberally dust a pizza peel with or the bottom of a sheet tray with rice
flour. Transfer pizza dough to well-floured surface and add desired
pizza toppings before baking.
Nutritional information per ser ving (based on 12 servings total for 2 crusts):
Calories 114 (22% from fat) · • carb. 22g • pro. 9g • fat 3g • sat. fat 0g
• chol. 0mg • sod. 209mg • calc. 23 mg • fiber 1g
White Pizza with Olives,
Grape Tomatoes & Bacon
If you are averse to ricotta, replace it with
the toppings will be sure to please.
Makes one 10 to 12-inch pizza
1
⁄3 cup of pizza sauce; either way
1. Put the flours, xanthan gum, salt and sugar into the bowl of a
Cuisinart® Stand Mixer fitted with the dough hook. Mix on speed 3 to
combine. Stir the rice milk, water and olive oil together in a liquid
measuring cup.
2. With the stand mixer running on speed 3, slowly add the liquid
ingredients. Once a dough ball is formed, knead the dough for about 1
to 2 minutes between speeds 4 and 5. Should dough seem dry, add 1
tablespoon of additional water to the bowl at a time while mixing until
the dough ball is able to clean the sides of the bowl. Be sure the water
is fully incorporated before adding the next tablespoon (alternatively,
should the dough be too sticky, add white rice flour 1 tablespoon at a
½ recipe, Basic or Gluten Free Pizza Dough (preceded recipes)
1½ teaspoons olive oil
¼ cup ricotta, strained if especially wet
1 garlic clove, finely chopped
¼ teaspoon kosher salt
Pinch freshly ground black pepper
½ cup pitted kalamata olives
½ cup grape tomatoes, halved
¼ cup grated or shredded Pecorino Romano
4 slices bacon, cooked and crumbled
28
Page 29

Pinch crushed red pepper, optional
6 Medium to large fresh basil leaves, torn
1. Stretch or roll the dough to a 10 or 12-inch round and fit onto an oiled
pizza screen or into the provided baking pan (oiled). Brush the top of
the dough with the olive oil and then dollop the ricotta across the
surface, leaving about 1 inch around the edges for a crust. Evenly
distribute the remaining ingredients, in the order listed, except for the
basil.
2. Adjust the rack to position 3. Set to Pizza, 12-inch fresh at 450°F for 14
minutes. Once is preheated, slide pizza into the oven. Check a few
minutes before cooking time is finished so that the pizza is not too
dark.
3. Top with the torn basil leaves and slice and serve.
Nutritional information per ser ving (based on 6 ser vings):
Calories 193 (35% from fat) • car b. 24g · pro. 9g • fat 7g • sat. fat 2g
• chol. 13mg • sod. 575mg • calc. 20mg • fiber 1g
Spinach & Garlic Pizza
One of our favorite combinations, and it is simple to prepare and
sure to please all.
Makes one 10 to 12-inch pizza
1
⁄3 cup prepared pizza sauce
4 ounces fresh mozzarella, sliced or cubed
Pinch crushed red pepper, optional
1. Put 1 teaspoon of the oil into a medium skillet set over medium-low
heat. Once hot, add the garlic and sauté until softened, but not
browned. Add the spinach along with the salt and pepper. Sauté until
just wilted, but still bright green. Remove and cool slightly.
2. Stretch or roll the dough to a 10 or 12-inch round and fit onto an oiled
pizza screen or into the provided baking pan (oiled). Brush the top of
the dough with the olive oil and then spread the sauce across the
surface, leaving about 1 inch around the edges for a crust. Evenly
distribute the sautéed spinach and garlic and then top with the
mozzarella and crushed red pepper, if using.
3. Adjust the rack to position 3. Set to Pizza, 12-inch fresh at 450°F for 14
minutes. Once the oven is preheated, slide pizza into the oven. Check
a few minutes before cooking time is finished so that the pizza is not
too dark.
4. Slice and serve.
Calories 196 (32% from fat) • carb. 25g • pro. 8g • fat 7g • sat. fat 2g
Nutritional inform ation per ser ving:
• chol. 9mg • sod. 468 mg • calc. 49mg • fiber 1g
2 teaspoons olive oil, divided
1 garlic clove, thinly sliced
2 cups packed fresh spinach
¼ teaspoon kosher salt
Pinch freshly ground black pepper
½ recipe Basic or Gluten Free (page 27 and 28) Pizza Dough
29
Page 30

Roasted Fennel with Orange & Olives
The sweetness of tender, roasted fennel is complemented with orange zest
and briny oil-cured olives in this dish, which tastes equally delicious ser ved
warm, cold or at room temperature.
Savory Stuffed Acorn Squash
Not only are the flavors rich and delicious,
but the var ying textures in this dish stand out at any dinner table.
Makes 4 servings
Makes 2 cups
1 medium to large fennel bulb (about 1 to 1¼ pounds total),
trimmed and cut into ¼-inch slices
1 tablespoon olive oil
¼ teaspoon kosher salt
¼ teaspoon freshly ground black pepper
¼ cup chicken broth, low sodium
2 tablespoons white wine
¼ cup oil-cured black olives, pitted and halved
½ teaspoon grated orange zest
1. Adjust the rack to position 2. Set the oven to Roast with Convection at
400°F for 35 minutes. Line the baking pan with parchment paper.
2. In a medium bowl toss the fennel slices with the oil, salt and pepper
until the fennel has been evenly coated. Arrange the slices in a single
layer on the pan. Pour the chicken broth and wine directly on the
fennel.
3. Put the fennel in the preheated oven and bake until softened and lightly
browned. During the last 10 minutes of cooking, stir in the olives and
orange zest and finish cooking.
Nutritional information per ½-cup ser ving:
Calories 99 (45% from fat) • carb. 11g • pro. 2g • fat 5g • sat. fat 1g
• chol. 0mg • sod. 293mg • calc. 72mg • fibe r 4g
2 acorn squashes (about 1¼ to 2 pounds each), halved length
wise and seeded
2½ teaspoons olive oil, divided
1 teaspoon kosher salt, divided
½ teaspoon freshly ground black pepper, divided
1 small to medium shallot, finely chopped
1 cup Israeli (pearl) couscous
1 cup chickpeas, drained and rinsed
½ teaspoon ground cumin
½ teaspoon ground cinnamon
2¼ cups chicken broth, low sodium
½ cup chopped, dried apricots
¼ cup shelled pistachios, toasted
1. Adjust the rack to position 2. Set the oven to Bake at 350°F for 35
minutes.
2. Line the baking pan with foil and put the squash halves, cut side up, on
top. Brush the inside of each squash with oil, about ½ teaspoon per
half, and sprinkle each with salt and pepper, about a pinch per half.
Bake in the preheated oven for the allotted time, or until the flesh of the
squash is just fork tender. Remove and set aside.
3. While squash is baking, put the remaining olive oil in a sauté pan set
over medium heat. Once hot, add the shallot and sauté until softened,
about 5 minutes. Add the couscous, chickpeas, cumin, cinnamon and
remaining salt and pepper. Sauté for about 1 to 2 minutes to toast the
couscous. Add the broth and increase heat to bring the liquid to a
30
Page 31

strong simmer. Once simmering, cook partially covered, stirring
occasionally for about 10 to 15 minutes, until almost all the liquid is
absorbed by the couscous and the filling has a creamy consistency.
Remove the pan from the heat, stir in the apricots and pistachios and
cover. Let sit for 5 minutes.
4. Evenly divide the couscous mixture among the squash halves. Return
squash to the oven and bake at 350°F for 10 minutes, or until just
golden on top.
Nutritional inform ation per ser ving:
Calories 388 (16% from fat) • carb. 72g • pro. 11g • fat 8g • sat. fat 1g
• chol. 14mg • sod. 618mg • calc.108mg • fiber 8g
Twice-B aked Potatoes
sides of the potatoes. Divide the oil evenly over the potatoes and rub
into the skins. Once oven is preheated, place the potatoes directly on
the rack and bake for allotted time, or until cooked through. Remove
and set aside until potatoes are cool enough to handle. Line the baking
pan with foil and set aside.
3. Slice off the top quarter of each potato* and scoop out the warm,
cooked flesh into a large bowl, leaving an
1
⁄8-inch-thick border of shell.
To the potato flesh, add the milk and butter. Using a potato masher,
mix together until smooth. Add the crème fraîche, chives, pepper and
salt. Continue to mash until completely combined. Divide the potato
mixture evenly to fill all the shells.
4. Set the oven to Bake with Convection at 350°F for 25 minutes. Set the
filled potatoes on the prepared baking pan and place into the oven, still
in position 3. Bake for the allotted time or until the tops are golden.
Here we give you the groundwork for the classic twice-baked potato, but
you can top them with just about anything from shredded cheese and
chopped broccoli to salsa and sliced avocado.
Makes 6 servings
6 medium russet potatoes, scrubbed
1½ teaspoons olive oil
¼ cup plus 2 tablespoons whole milk
4 tablespoons unsalted butter, cut into 1-inch pieces
¼ cup crème fraîche
2 tablespoons chopped fresh chives
¾ teaspoon kosher salt
½ teaspoon freshly ground black pepper
1. Adjust the rack to position 3. Set the oven to Convection Bake at 400°F
for 40 minutes.
2. Using the tines of a fork, evenly prick each potato 6 to 8 times, on all
Note: Potatoes may be prepared a day ahead through step 3. Cover and
refrigerate. Bring to room temperature before baking.
*Do not toss the potato skin tops. They can be used for our to-die-for
Potato Skins on page 20.
Nutritional information pe r potato:
Calories 271 (38% from fat) • carb. 38g • pro. 5g • fat 11g • sat. fat 7g
• chol. 29mg • sod. 309mg • calc. 53mg • fiber 5g
31
Page 32

Mixed Root Vegetable Roast
The list of vegetables is merely a suggestion — choose a colorful variety
from whatever is available.
Calories 147 (42% from fat) • carb. 20g • pro. 3g • fat 7g • sat. fat 1g
Nutritional inform ation per ser ving:
• chol. 0mg • sod. 244mg • calc. 40mg • fiber 4g
Makes 6 servings
2 garlic cloves, smashed
½ large red onion, cut on the root into 6 wedges
½ medium to large fennel bulb, cut into ½-inch slices
1 medium beet, scrubbed and cut into ½ to 1-inch pieces
½ medium to large turnip, peeled and cut into ½ to 1-inch
pieces
1 small to medium sweet potato, peeled and cut into ½ to
1-inch pieces
2 small red potatoes, quartered
1 cup Brussels sprouts, halved
2 sprigs fresh rosemary
2 sprigs fresh thyme
3 tablespoons olive oil
½ teaspoon kosher salt
¼ teaspoon freshly ground black pepper
1. Set the oven to Roast at 450°F for 25 minutes with the rack in position
2. Line the baking pan with foil.
2. While the oven is preheating, gently toss all of the ingredients into a
large bowl to coat with the olive oil, salt and pepper. Transfer to the
prepared baking pan.
3. Once preheated, place the pan into the oven. Bake for the allotted
time, or until the vegetables are browned and tender.
4. Transfer to a platter and serve.
Buttery Dinner Rolls
After your first bite, you will never go back to store-bought rolls again.
Makes 12 rolls
1
⁄3 cup whole milk, plus 1 tablespoon for brushing
6 tablespoons unsalted butter, plus 1 tablespoon for brushing
3 tablespoons granulated sugar
1¾ teaspoons active dry yeast
3 tablespoons warm water (105°F–110°F)
3 cups bread flour
¾ teaspoon kosher salt
1 egg, lightly beaten
1. In a small saucepan combine the milk, butter and sugar. Warm over low
heat until the butter is melted. Remove from heat and set aside until
cooled to room temperature.
2. Dissolve the yeast in the warm water in a large measuring cup. Let
stand 5 minutes, or until mixture is foamy. Put the flour and salt in the
work bowl of a Cuisinart® Food Processor fitted with the dough or
metal chopping blade and process for 10 seconds. Add the melted
butter mixture and egg to the yeast/water mixture. With the machine
running, slowly add the liquids through the feed tube and process until
a dough ball forms. Continue processing for 45 seconds to knead the
dough. Shape the dough into a smooth ball, put it in a clean mixing
bowl and cover with plastic wrap. Let rise in a warm place until the
dough has doubled in size, about 60 minutes.
32
Page 33

3. Lightly butter a 9-inch round baking pan. Punch down the dough and
divide into 12 equal pieces (about 1½ to 1¾ ounces each). Roll into
smooth rounds and arrange in the prepared pan. Cover with plastic
wrap and let rise until doubled in size, about 30 to 40 minutes.
4. Adjust the rack to position 2. Set the oven to Bake with Convection at
375°F for 15 minutes. While the oven is heating, melt the remaining
tablespoon of butter and combine with the remaining tablespoon of
milk in a small bowl. Gently brush the tops of the rolls with butter/milk
mixture. Once preheated, put pan into the oven and bake rolls for the
allotted time, or until golden brown and an internal temperature of
190°F is reached.
5. Remove rolls from the pan and cool slightly before serving .
Nutritional information pe r roll:
Calories 183 (35% from fat) • carb. 26g • pro. 4g • fat 7g • sat. fat 5g
• chol. 34mg • sod. 153mg • calc. 13mg • fiber 1g
Bittersweet Espresso Brownies with Ganache
Whether topped with our indulgent Ganache or not, these sinful brownies
are impossible to resist.
Makes 16 brownies
Brownies:
Nonstick cooking spray
¾ cup (1½ sticks) unsalted butter, cubed
4 ounces unsweetened chocolate, chopped
4 ounces bittersweet chocolate, chopped
2 tablespoons cocoa powder
2 teaspoons espresso powder
½ cup unbleached, all-purpose flour
¾ teaspoon kosher salt
3 large eggs
1½ cups granulated sugar
2 teaspoons pure vanilla extract
Ganache:
2 ounces bittersweet chocolate, roughly chopped
½ teaspoon espresso powder
Pinch kosher salt
¼ cup heavy cream
1. Lightly coat a 9-inch square baking pan with nonstick cooking spray
and line with parchment paper.
2. Put the butter and both chocolates into a heatproof bowl and place
over a pot of simmering water. Once the butter/chocolate mixture is
almost completely melted, stir in cocoa powder and espresso powder.
Once chocolate is completely melted, stir in flour and salt; set aside to
cool to room temperature.
3. Using a Cuisinart
®
Hand Mixer fitted with the mixing beaters, beat the
eggs to break them slightly, then gradually add the sugar. Mix until light
and thickened, about 1 to 2 minutes. Add vanilla and beat until well
combined. Fold the cooled chocolate mixture into the egg mixture until
the batter is no longer streaky. Pour the batter into prepared pan. Tap
pan on the counter a few times to remove any air bubbles.
4. Adjust the rack to position 2. Set the oven to Bake with Convection at
350°F for 20 minutes. Once preheated, place the pan in the oven and
bake for the allotted time, or until edges are just dry. Cool completely
and chill in the refrigerator overnight before frosting.
5. To make Ganache: Put the chopped chocolate, espresso powder and
salt in a small, heatproof mixing bowl. Set aside. Put the cream in a
small saucepan and bring to just a boil. Once heated, pour over
chocolate mixture and allow to sit for a few minutes. After a few
minutes have passed, whisk mixture until completely smooth. Allow to
33
Page 34

cool to body temperature, where the ganache is no longer hot, but still
spreadable. Spread over the top of the brownies. Chill in refrigerator for
1 to 2 hours. Slice with a sharp knife and serve.
Nutritional inform ation per brownie:
Calories 281 (50% from fat) • carb. 30g • pro. 3g • fat 19g • sat. fat 11g
• chol. 62mg • sod. 124mg • calc. 29mg • fiber 2g
Strawberry-Rhubarb Crisp
This dessert highlights the tartness of the rhubarb, which is mellowed out
by the sweet strawberries. Be sure to get ripe, in-season ingredients for
the best results.
Makes 8 servings
6 tablespoons (3 ounces) unsalted butter, cold and cubed
1. Put the rhubarb, sugar, salt, vanilla and lemon juice in a large mixing
bowl; toss to fully combine. Add the strawberries and tapioca starch,
and stir to coat well. Transfer to a 9-inch square baking pan; reserve.
2. Prepare the topping: Put all the topping ingredients except the butter
into a mixing bowl and combine. Add the butter and either with a
pastry blender or with your fingers, work the butter into the dry
ingredients. Once the butter is evenly distributed, sprinkle over the top
of the filling.
3. Adjust the rack to position 2. Set the oven to Bake at 350°F for 30
minutes. Once the oven is preheated, bake the crisp for the allotted
time, or until the filling is bubbling and the top is browned.
4. Remove and allow to cool for a few minutes before serving. This is
delicious when paired with freshly whipped cream or vanilla ice cream.
Filling:
1 pound rhubarb, trimmed and cut into ½-inch thick slices
2
⁄3 cup granulated sugar
Pinch kosher salt
¼ teaspoon pure vanilla extract
¼ teaspoon fresh lemon juice
3 cups (about ¾ pound) strawberries, hulled and quartered
(halved if strawberries are small)
4½ teaspoons tapioca starch
Top ping:
1 cup rolled oats (not quick cooking)
2
⁄3 cup unbleached, all-purpose flour
2
⁄3 cup packed light brown sugar
¼ teaspoon ground cinnamon
¼ teaspoon ground ginger
¼ teaspoon kosher salt
Calories 301 (27% from fat) • carb. 54g • pro. 3g • fat 9g • sat. fat 5g
Nutritional inform ation per ser ving:
• chol. 23mg • sod. 92mg • calc. 57mg • fiber 3g
Roasted Pineapple
This can be the base for a variety of desserts. Our favorites are topped
with vanilla ice cream, chopped nuts or toasted coconut.
1 whole pineapple, trimmed and peeled
1 tablespoon unsalted butter, softened
2 teaspoons granulated sugar
½ teaspoon ground cinnamon
1 to 2 pinches kosher salt
34
Page 35

1. Fit the pineapple onto the spit. Secure ends with the skewers.
2. Brush the pineapple with the softened butter and evenly coat with
the remaining ingredients.
3. Adjust the rack to position 1 and place the baking pan on top of it.
Fit the spit into the oven and set to the Custom setting on the
Rotisserie function at 400°F for 40 minutes.
4. Using the rotisserie grip, remove the pineapple from the oven.
Allow to cool slightly before removing from the spit. To serve,
halve, core and slice into 1-inch pieces.
Nutritional inform ation per ser ving:
Calories 58 (21% from fat) • carb. 12g • pro. 0g
• fat 1g • sat. fat 1g • chol. 4mg • sod. 19mg
• calc. 12mg • fiber 1g
35
Page 36

NOTES:
36
Page 37

Información nutricional por porción:
Piña asada
36
• Grasa saturada 1g • Colesterol 4mg • Sodio 19mg • Calcio 12mg • Fibra 1g
Calorías 58 (21% de grasa) • Carbohidratos 12g • proteínas 0g • Grasa 1g
quitar el corazón y cortar en cubos.
ligeramente antes de retirar del espetón. Para servir, partir a la mitad,
4. Retirar la piña del horno, usando la agarradera. Dejar enfriar
tiempo en 40 minutos.
programa CUSTOM, ajustar a temperatura a 400°F (200°C) y fijar el
rejilla. Meter el espetón al horno. Elegir la función ROTISSERIE, con el
3. Colocar la rejilla en la posición 1 y colocar la bandeja sobre la
ingredientes.
2. Cepillar la piña con la mantequilla y rociar con el resto de los
1. Ensartar la piña sobre el espetón. Asegurar con los pinchos.
1–2 pizcas de sal kosher
½ cucharadita de canela en polvo
2 cucharaditas de azúcar granulada
ambiente
1 cucharada (15 g) de mantequilla sin sal, a temperatura
1 piña, pelada
también incluyen helado de vainilla y nueces picadas o coco tostado.
Esto puede servir de base para una variedad de postre. Nuestros favoritos
Información nutricional por porción:
• Grasa saturada 5g • Colesterol 23mg • Sodio 92mg • Calcio 57mg • Fibra 3g
Calorías 301 (27% de grasa) • Carbohidratos 54g • proteínas 3g • Grasa 9g
batida o helado de vainilla para una deliciosa combinación.
4. Dejar enfriar durante unos minutos antes de servir. Servir con crema
dorado.
Una vez caliente, meter al horno hasta que el relleno esté hirviendo y
ajustar la temperatura a 350°F (180°C) y fijar el tiempo en 30 minutos.
3. Colocar la rejilla del horno en la posición 2. Elegir la función BAKE,
encima del relleno.
Una vez que la mantequilla está distribuida uniformemente, esparcir
combinar con la mezcla, usando un mezclador de masas o sus dedos.
excepto la mantequilla, en un tazón mediano. Agregar la mantequilla y
2. Preparar la cobertura: combinar todos los ingredientes de la cobertura,
pulgadas (22 x 22 cm); reservar.
revolver para cubrir. Colocar la mezcla en una bandeja de 9 x 9
un tazón grande; revolver. Agregar las fresas y la fécula de tapioca y
1. Combinar el ruibarbo, el azúcar, la sal, la vainilla y el jugo de limón en
6 cucharadas (85 g) de mantequilla sin sal, en pedacitos
¼ cucharadita de sal kosher
¼ cucharadita de jengibre en polvo
¼ cucharadita de canela en polvo
⁄3 taza (65 g) de azúcar rubio
2
⁄3 taza (95 g) de harina común
2
1 taza (80 g) de copos de avena (no utilice avena instantánea)
Cobertura:
Page 38

35
4½ cucharadas de almidón/fécula de tapioca
partidas en dos si las fresas son pequeñas)
3 tazas (aproximadamente 350 g) de fresas, en cuartos (o
¼ cucharadita de jugo de limón fresco
¼ cucharadita de extracto natural de vainilla
1 pizca de sal kosher
⁄3 taza (135 g) de azúcar granulada
2
1 libra (455 g) de ruibarbo, en rodajas medianas
Relleno:
Rinde 8 porciones
fresas. Para mejores resultados, utilice fresas maduras en temporada.
Este postre destaca la acidez del ruibarbo, suavizado por la dulzura de las
"Tarta" crujiente de ruibarbo y fresas
• Grasa saturada 11g • Colesterol 62mg • Sodio 124mg • Calcio 29mg • Fibra 2g
Información nutricional por "brownie":
Calorías 281 (50% de grasa) • Carbohidratos 30g • proteínas 3g • Grasa 19g
Cortar con un cuchillo afilado y servir.
parte de encima de los "brownies". Refrigerar durante 1–2 horas.
mezcla muy suave. Dejar entibiar a temperatura ambiente. Glasear la
durante varios minutos. Revolver con un batidor hasta conseguir una
empiece a hervir. Agregar la mezcla de chocolate y dejar reposar
Colocar la crema en una cacerola mediana y calentar justo hasta que
instantáneo y la sal en un tazón pequeño a prueba de calor. Reservar.
5. Para preparar la "ganache": colocar el chocolate picado, el expreso
durante 8–12 horas antes de cubrir/glasear.
equipada con batidores, batir
®
orillas se sequen ligeramente. Dejar enfriar completamente. Refrigerar
minutos. Una vez caliente, meter al horno y hornear hasta que las
CONV, ajustar la temperatura a 350°F (190°C) y fijar el tiempo en 20
4. Colocar la rejilla del horno en la posición 2. Elegir la función BAKE +
eliminar las burbujas de aire.
molde. Dar unos golpecitos sobre la encimera varias veces para
revolver hasta obtener una mezcla homogénea. Echar la mezcla en el
Incorporar la mezcla de chocolate enfriada a la mezcla de huevo, y
Agregar la vainilla y seguir batiendo, hasta combinar los ingredientes.
durante 1–2 minutos, hasta obtener una mezcla suave y espesa.
ligeramente los huevos y agregar poco a poco el azúcar. Mezclar
3. Usando una batidora de mano Cuisinart
la sal y dejar enfriar a temperatura ambiente.
Cuando el chocolate esté completamente derretido, agregar la harina y
chocolate esté casi derretido, agregar el cacao y el café expreso.
2. Derretir la mantequilla y el chocolate picado a baño María. Cuando el
con spray vegetal. Forrar con papel sulfurizado.
1. Engrasar levemente un molde cuadrado de 9 x 9 pulgadas (22 x 22 cm)
¼ taza (60 ml) de crema líquida para batir ("heavy cream")
1 pizca de sal kosher
½ cucharadita de café expreso instantáneo
grueso
2 onzas (55 g) de chocolate semi-amargo ("bittersweet"), picado
"Ganache" (cobertura de chocolate):
2 cucharaditas de extracto natural de vainilla
1½ taza (300 g) de azúcar granulada
3 huevos grandes
¾ cucharadita de sal kosher
½ taza (60 g) de harina común
2 cucharaditas de café expreso instantáneo
2 cucharadas de cacao en polvo
picado
Page 39

34
"ganache" tentador.
expreso con "ganache"
"Brownies" de chocolate semi-amargos y
Calorías 183 (35% de grasa) • Carbohidratos 26g • proteínas 4g • Grasa 7g
Información nutricional por pancito:
4 onzas (115 g) de chocolate semi-amargo ("bittersweet"),
4 onzas (115 g) de chocolate amargo, picado
¾ taza (170 g) de mantequilla sin sal, en cubitos
spray vegetal
"Brownies":
Rinde 16 "brownies"
®
Es imposible resistir estas galletas "pecaminosas", con o sin nuestro
• Grasa saturada 5g • Colesterol 34mg • Sodio 153mg • Calcio 13mg • Fibra 1g
5. Retirar del molde y dejar enfriar ligeramente antes de servir.
190°F (88°C).
pancitos estén bien dorados y que la temperatura interna alcance
los pancitos con la mezcla. Meter al horno y hornear hasta que los
remanente y combinar con la cucharada de leche remanente. Cepillar
minutos. Mientras el horno está calentando, derretir la mantequilla
CONV, ajustar la temperatura a 375°F (190°C) y fijar el tiempo en 15
4. Colocar la rejilla del horno en la posición 2. Elegir la función BAKE +
30–40 minutos.
Cubrir sin apretar con una película de plástico y dejar leudar durante
en 12 porciones iguales. Formar bolitas suaves y disponer en el molde.
diámetro con mantequilla. Aplastar la masa para desinflarla y dividirla
3. Engrasar levemente un molde redondo de 9 pulgadas (22 cm) de
Información nutricional por porción:
leudar al doble de su volumen, durante aproximadamente 60 minutos.
suave, colocar la bola en un tazón limpio y cubrir con plástico. Dejar
Procesar durante 45 segundos adicionales. Formar una bola de masa
boca de llenado. Procesar justo hasta formarse una bola de masa.
levadura. Encender la máquina y echar los ingredientes líquidos en la
Combinar la mezcla de mantequilla y el huevo con la mezcla de
equipado con cuchilla amasadora y procesar durante 10 segundos.
Colocar la harina en el bol de una procesadora de alimentos Cuisinart
2. Disolver la levadura en agua tibia. Dejar fermentar durante 5 minutos.
del fuego y dejar enfriar.
Calentar a fuego lento hasta que la mantequilla esté derretida. Retirar
1. Combinar la leche, la mantequilla y el azúcar en una cacerola pequeña.
1 huevo, ligeramente batido
¾ cucharadita de sal kosher
3 tazas (375 g) de harina para hacer pan
3 cucharadas de agua tibia
1¾ cucharadita de levadura seca activa
3 cucharadas de azúcar granulada
para cepillar
6 cucharadas (85 g) de mantequilla sin sal + 1 cucharada (15 g)
⁄3 taza (80 ml) de leche entera + 1 cucharada para cepillar
1
Rinde 12 pancitos
Nunca más comprará pancitos después de probar éstos.
Pancitos con sabor a mantequilla
• Grasa saturada 1g • Colesterol 0mg • Sodio 244mg • Calcio 40mg • Fibra 4g
Calorías 147 (42% de grasa) • Carbohidratos 20g • proteínas 3g • Grasa 7g
Page 40

33
4. Poner en una fuente y servir.
vegetales estén tiernos y dorados.
3. Una vez caliente, meter la bandeja al horno. Hornear hasta que los
Echar la mezcla en la bandeja.
tazón grande y combinar con el aceite de oliva, la sal y la pimienta.
2. Mientras el horno está calentando, colocar todos los vegetales en un
Forrar la bandeja con papel de aluminio.
el tiempo en 25 minutos. Colocar la rejilla del horno en la posición 2.
1. Elegir la función ROAST, ajustar la temperatura a 450°F (230°C) y fijar
Información nutricional por patata:
• Grasa saturada 7g • Colesterol 29mg • Sodio 309mg • Calcio 53mg • Fibra 5g
Calorías 271 (38% de grasa) • Carbohidratos 38g • proteínas 5g • Grasa 11g
"Potato skins" ("peladuras" de patata al horno con tocino) en la página 20.
*No tire las peladuras. Puede usarlas para preparar nuestra receta de
Dejar entibiar a temperatura ambiente antes de hornear.
Nota: los pasos 1–3 pueden realizarse el día anterior. Cubrir y refrigerar.
¼ cucharadita de pimienta negra recién molida
½ cucharadita de sal kosher
3 cucharadas de aceite de oliva
2 ramitas de tomillo fresco
2 ramitas de romero fresco
1 taza (200 g) de coles de Bruselas, partidos a la mitad
2 patatas nuevas rojas pequeñas, en cuartos
1 camote/batata pequeña a mediana, pelada y cortado en cubos
½ chirivía mediana a grande, pelada y cortada en cubos
1 remolacha mediana, restregada y cortada en cubos
½ bulbo mediano a grande de hinojo, en 8 rodajas gruesas
½ cebolla roja grande, cortada en 6 pedazos sobre la raíz
2 dientes de ajo, machacados
Rinde 6 porciones
una variedad de tubérculos para preparar esta receta.
La lista de ingredientes a continuación sólo es una sugestión. Puede usar
Tubérculos mixtos asados
Hornear hasta que la parte de encima esté dorada.
rellenas en la bandeja y meter al horno, con la rejilla en la posición 3.
350°F (180°C) y fijar el tiempo en 25 minutos. Disponer las patatas
4. Otra vez, elegir la función BAKE + CONV, ajustar la temperatura a
sal y la pimienta. Combinar. Llenar las patatas con la mezcla.
hasta conseguir una mezcla suave. Agregar la crema, los cebollinos, la
de las patatas con la leche y la mantequilla. Aplastar con un majador
⁄8 pulgada (3 mm) de piel/carne. Combinar la carne
1
cuchara, dejando
3. Cortar el cuarto superior de cada patata y sacar la carne con una
Forrar la bandeja con papel de aluminio.
hornear hasta que estén cocidas. Retirar del horno y dejar enfriar.
Cuando el horno esté caliente, colocar las patatas sobre la rejilla y
2. Pinchar cada patata 6–8 veces con un tenedor. Restregar con aceite.
minutos.
CONV, ajustar la temperatura a 400°F (200°C) y fijar el tiempo en 40
1. Colocar la rejilla del horno en la posición 3. Elegir la función BAKE +
½ cucharadita de pimienta negra recién molida
¾ cucharadita de sal kosher
2 cucharadas de cebollinos ("chives") picados
Page 41

32
¼ taza (60 ml) de "crème fraîche" (crema fresca)
4 cucharadas (55 g) de mantequilla sin sal, en pedazos
¼ taza + 2 cucharadas (75 ml) de leche entera
1½ cucharadita de aceite de oliva
6 patatas Russet medianas, restregadas
Rinde 6 porciones
desde queso rallado y brécol picado hasta aguacate y salsa picante.
Esta receta es muy básica. Si desea, puede añadir lo que se le antoje,
Patatas asadas dos veces
• Grasa saturada 1g • Colesterol 14mg • Sodio 618mg • Fibra 8g
Calorías 388 (16% de grasa) • Carbohidratos 72g • proteínas 11g • Grasa 8g
Información nutricional por porción:
durante 10 minutos, hasta dorarse.
4. Rellenar las calabazas con la mezcla. Regresar las calabazas al horno
Tapar. Dejar reposar durante 5 minutos.
cremosa. Retirar del fuego y agregar los albaricoques y los pistachos.
el cuscús haya absorbido casi todo el líquido y tenga una consistencia
cocer durante 10–15 minutos, revolviendo de vez en cuando, hasta que
que hierva. Cuando la mezcla empiece a hervir, tapar parcialmente y
minutos para tostar el cuscús. Agregar el caldo y subir el fuego hasta
el comino, la canela y la sal/pimienta remanente. Saltear durante 1–
chalote y saltear durante 5 minutos. Agregar el cuscús, los garbanzos,
calentar a fuego medio, en una salteadora. Una vez caliente, agregar el
3. Mientras la calabaza está cociendo, poner el resto del aceite de oliva a
que la calabaza esté tierna. Retirar del horno y reservar.
calabaza con aceite y sazonar con sal y pimienta. Meter al horno hasta
el lado cortado apuntando hacia arriba. Cepillar el interior de cada
2. Forrar la bandeja con papel de aluminio y colocar la calabaza adentro,
ajustar la temperatura a 350°F (180°C) y fijar el tiempo en 35 minutos.
1. Colocar la rejilla del horno en la posición 2. Elegir la función BAKE,
¼ taza (50 g) de pistachos picados, tostados
picados
½ taza (100 g) de albaricoques/chabacanos/damascos secos
2¼ tazas (590 ml) de caldo de pollo bajo en sodio
½ cucharadita de canela en polvo
½ cucharadita de comino en polvo
1 taza (250 g) de garbanzos, enjuagados y escurridos
1 taza (175 g) de cuscús israelí
1 cebolla pequeña a mediana, finamente picada
½ cucharadita de pimienta negra recién molida
1 cucharadita de sal kosher
2½ cucharaditas de aceite de oliva
longitudinalmente a la mitad y sin semillas
2 calabazas de bellota ("acorn squash"), cortadas
Rinde 4 porciones
se destacará sobre su mesa.
Este delicioso plato lleno de sabor y textura
Calabaza de bellota rellena
• Grasa saturada 1g • Colesterol 0mg • Sodio 293mg • Calcio 72mg • Fibra 4g
Calorías 99 (45% de grasa) • Carbohidratos 11g • proteínas 2g • Grasa 5g
Información nutricional por porción (½ taza):
aceitunas.
Diez minutos antes del final, agregar la ralladura de naranja y las
3. Meter al horno hasta que el hinojo esté suave y ligeramente dorado.
Page 42

31
Agregar el caldo de pollo y el vino.
Disponer las rodajas en el fondo de la bandeja, sin superponerlas.
2. Combinar el hinojo, el aceite, la sal y la pimienta, en un tazón mediano.
Forrar la bandeja con papel sulfurizado.
ajustar la temperatura a 400°F (200°C) y fijar el tiempo en 35 minutos.
1. Colocar la rejilla del horno en la posición 2. Elegir la función ROAST,
½ cucharadita de ralladura de naranja
cortadas a la mitad
¼ taza (75 g) de aceitunas negras en aceite, deshuesadas y
2 cucharadas de vino blanco
¼ taza (60 ml) de caldo de pollo bajo en sodio
¼ cucharadita de pimienta negra recién molida
¼ cucharadita de sal kosher
1 cucharada de aceite de oliva
1 bulbo mediano a grande de hinojo, en rodajas gruesas
Rinde 2 tazas
plato que sabe igualmente sabroso caliente, frío o a tibio.
aceite complementan deliciosamente la dulzura del hinojo asado en este
La ralladura de naranja y el sabor salado de las aceitunas curtidas en
Hinojo asado con naranja y aceitunas
4. Cortar y servir inmediatamente.
minutos antes del final de la cocción para evitar que se queme.
Una vez caliente, meter al horno. Averiguar si la pizza está hecha unos
ajustar la temperatura a 450°F (230°C) y fijar el tiempo en 14 minutos.
3. Colocar la rejilla del horno en la posición 3. Elegir la función PIZZA,
y agregar la Mozzarella y las hojuelas de pimiento rojo (opcional).
queso todo alrededor. Cubrir uniformemente con la espinaca salteada
esparcir la salsa encima, dejando un borde de 1 pulgada (2.5 cm) sin
la bandeja (aceitada). Cepillar el disco con aceite de oliva, y luego
30 cm) y colocar éste sobre una placa perforada aceitada o adentro de
2. Estirar la masa para formar un disco redondo de 10–12 pulgadas (25–
color. Retirar del fuego y dejar enfriar ligeramente.
pimienta. Saltear hasta que se marchite ligeramente, sin perder su
esté suave, pero sin permitir que dore. Agregar la espinaca, la sal y la
sartén mediano. Una vez caliente, agregar el ajo y saltear hasta que
1. Poner una cucharadita del aceite a calentar a fuego medio-lento, en un
1 pizca de hojuelas de pimiento rojo (opcional)
4 onzas (115 g) de queso Mozzarella fresco, en rodajas o cubitos
⁄3 taza (80 ml) de salsa de pizza preparada
1
½ receta de masa de pizza básica o sin gluten (página 27)
1 pizca de pimienta negra recién molida
¼ cucharadita de sal kosher
2 tazas llenas (60 g) de espinaca fresca
1 diente de ajo, en rodajas finas
2 cucharaditas de aceite de oliva
• Grasa saturada 2g • Colesterol 9mg • Sodio 468mg • Calcio 49mg • Fibra 1g
Calorías 196 (32% de grasa) • Carbohidratos 25g • proteínas 8g • Grasa 7g
Información nutricional por porción:
Rinde una pizza de 10–12 pulgadas (25–30 cm)
¡Le encanta a todo el mundo!
Esta pizza fácil de preparar es una de nuestras combinaciones favoritas.
Pizza de espinaca con ajo
Page 43

30
¼ taza (60 g) de queso Ricotta, escurrido si está muy húmedo
1½ cucharadita de aceite de oliva
anteriores)
1 receta de masa de pizza básica o sin gluten (recetas
Rinde una pizza de 10–12 pulgadas (25–30 cm)
• Grasa saturada 2g • Colesterol 13mg • Sodio 575mg • Calcio 20mg • Fibra 1g
Calorías 193 (35% de grasa) • Carbohidratos 24g • proteínas 9g • Grasa 7g
Información nutricional por porción (basada en 6 porciones):
3. Esparcir la albahaca encima, cortar y servir.
minutos antes del final de la cocción para evitar que se queme.
Una vez caliente, meter al horno. Averiguar si la pizza está hecha unos
ajustar la temperatura a 450°F (230°C) y fijar el tiempo en 14 minutos.
2. Colocar la rejilla del horno en la posición 3. Elegir la función PIZZA,
los ingredientes remanentes, en orden, excepto la albahaca.
1 pulgada (2.5 cm) sin queso todo alrededor. Distribuir uniformemente
esparcir una cucharada de queso Ricotta encima, dejando un borde de
la bandeja (aceitada). Cepillar el disco con aceite de oliva, y luego
30 cm) y colocar éste sobre una placa perforada aceitada o adentro de
1. Estirar la masa para formar un disco redondo de 10–12 pulgadas (25–
6 hojas medianas a grandes de albahaca fresca, en tiras
1 pizca de pimiento rojo triturado (opcional)
4 lonjas de tocino, cocidas y picadas
¼ taza (20 g) de queso Pecorino Romano rallado
½ taza (75 g) de tomates de pera, partidas
½ taza (60 g) de aceitunas negras deshuesadas
1 pizca de pimienta negra recién molida
¼ cucharadita de sal kosher
1 diente de ajo, finamente picado
⁄3 taza (80 ml) de salsa para
1
pizza. Sea como sea, esta pizza será un gran éxito.
Si no le gusta el queso Ricotta, sustitúyalo por
de pera y tocino
Pizza blanca con aceitunas, tomates
• Grasa saturada 0g • Colesterol 0mg • Sodio 209mg • Calcio 23mg • Fibra 1g
Calorías 114 (22% de grasa) • Carbohidratos 22g • proteínas 9g • Grasa 3g
Información nutricional por porción (basada en 12 porciones/2 pizzas):
agregar la cobertura deseada y meter al horno.
con harina de arroz. Trasladar la masa sobre la superficie enharinada,
4. Enharinar generosamente una pala para pizza o una placa para horno
pulgadas (25 cm) con cada porción.
en 2 porciones iguales. Estirar la masa, formando un disco de 10
3. Espolvorear una superficie amplia con harina de arroz. Dividir la masa
seguir procesando hasta obtener una consistencia homogénea.
parece muy pegajosa, agregar harina de arroz, 1 cucharada a la vez, y
Cerciorarse de incorporar toda el agua antes de añadir más. Si la masa
la masa forme una bola que deje las paredes del tazón limpios.
añadir una cucharada de agua a la vez, y seguir amasando hasta que
4–5 durante 1–2 minutos adicionales. Si la masa parece muy seca,
Page 44

29
líquidos. Después de que la masa forme una bola, amasar a velocidad
agua y el aceite de oliva en una taza de medir.
Mezclar a velocidad 3 para combinar. Combinar la leche de arroz, el
equipada con gancho amasador.
®
una batidora de pie Cuisinart
¡Por fin! Una pizza que las personas con alergia puedan disfrutar.
Masa de pizza sin gluten
• Grasa saturada 0g • Colesterol 0g • Sodio 286mg • Calcio 1mg • Fibra 1g
Calorías 114 (9% de grasa) • Carbohidratos 23g • proteínas 3g • Grasa 1g
Información nutricional por porción (basada en 12 porciones):
para desinflar. Estirar y seguir la receta.
2. Encender la batidora a la velocidad 3 y agregar los ingredientes
1. Colocar las harinas, la goma xantana, la sal y el azúcar en el tazón de
harina de arroz para espolvorear y estirar la masa
2 cucharadas de aceite de oliva virgen extra
¼ taza (60 ml) de agua
½ taza (120 ml) de leche de arroz
2 cucharaditas de azúcar granulada
. Agregar la harina, la sal y el
®
1 cucharadita de sal kosher
1 cucharadita de goma xantana
⁄3 taza (40 g) de harina de arrurruz
1
⁄3 taza (40 g) de harina de quinua
1
y estirar la masa
¾ taza (95 g) de harina de arroz + un poco más para espolvorear
¾ taza (95 g) de harina de tapioca
pizzas de 10 pulgadas (25cm)
Rinde aproximadamente 1 libra (455 g) de masa, suficiente para dos
pizza y "calzone".
4. Poner la masa sobre una superficie ligeramente enharinada y aplastar
Masa de pizza básica
volumen en un lugar templado durante aproximadamente 1 hora.
Luego, cubrir con una película de plástico. Dejar leudar al doble de su
Colocar la masa en el tazón, volteándola para cubrirla con aceite.
3. Cepillar levemente el interior de un tazón grande con aceite de oliva.
pegajosa.
30 segundos adicionales para amasar. La masa estará ligeramente
echar más. Cuando la masa llegue a formar una bola, procesar durante
llenado, asegurándose de que la harina absorba el líquido antes de
máquina y agregar lentamente la mezcla de levadura por la boca de
aceite de oliva. Pulsar varias veces para combinar. Encender la
procesadora de alimentos Cuisinart
2. Instalar la cuchilla amasadora o picadora en el tazón de una
con nueva levadura.
espuma dentro de 10 minutos, no está activa; tirarla y volver a empezar
durante aproximadamente 5 minutos. Nota: si la levadura no hace
1. Disolver la levadura y el azúcar en el agua tibia. Dejar fermentar
bola de masa
1 cucharada de aceite de oliva + un poco más para cubrir la
1½ cucharaditas de sal kosher
3 tazas (375 g) de harina para hacer pan o harina común
1 taza (235 ml) de agua tibia
1½ cucharadita de azúcar granulada
2¼ cucharaditas de levadura seca activa
(30 cm)
Rinde 1½ libra (680 g) de masa, suficiente para dos pizzas de 12 pulgadas
pizza casera? Visite www.cuisinart.com para conseguir más recetas de
Esta masa puede usarse para otras recetas. ¿Pero a quién no le gusta la
Page 45

28
dorado.
• Grasa saturada 10g • Colesterol 105g • Sodio 971mg • Calcio 22mg • Fibra 0g
Calorías 389 (66% de grasa) • Carbohidratos 0g • proteínas 33g • Grasa 29g
Información nutricional por hamburguesa (sin pancito):
favoritos.
3. Servir inmediatamente sobre pancitos calientes, con sus condimentos
minutos, usando la función BROIL + CONV.
sobre la rejilla para asar, puesta adentro de la bandeja. Asar durante 12
2. Colocar la rejilla del horno en la posición 4. Colocar las hamburguesas
y ajo en polvo.
resultarán duras, Rociar con aceite de oliva y sazonar con sal, pimienta
onzas (170 g), sin manosear mucho la carne o las hamburguesas
1. Dividir la carne en porciones iguales y formar 4 hamburguesas de 6
½ cucharadita de ajo en polvo
½ cucharadita de pimienta negra recién molida
1½ cucharaditas de sal kosher
2 cucharadas de aceite de oliva
1½ libra (680 g) de carne de res molida
Rinde 4 hamburguesas
final de la cocción y seguir asando hasta que el queso esté derretido y
de su queso favorito encima de cada hamburguesa un minuto antes del
buena calidad. Si desea añadir queso, simplemente coloque una rebanada
Una buena hamburguesa no requiere muchos ingredientes; sólo carne de
Hamburguesas asadas
cuchillo, las gallinas están listas.
5. Cuando el jugo salga claro al pinchar los muslos con la punta de un
tiempo en 40 minutos.
programa CUSTOM, ajustar a temperatura a 425°F (220°C) y fijar el
Meter el espetón al horno. Elegir la función ROTISSERIE, con el
4. Colocar la rejilla en la posición 1 y colocar la bandeja sobre la rejilla.
Asegurar con los pinchos.
3. Atar las gallinas con hilo de cocina e insertarlas sobre el espetón.
marinada y refrigerar durante por 1–12 horas.
2. Colocar las gallinas en una bolsa de plástico hermética. Agregar la
en un tazón pequeño.
1. Combinar la salsa Hoisin, la miel, la salsa de soya, el jengibre y el ajo
2 gallinas de Cornualles de 1–1¼ libra (455–570 g)
2 dientes de ajo, finamente picados
1 cucharada de jengibre fresco finamente picado
2 cucharadas de salsa de soya baja en sodio
2 cucharadas de miel
½ taza (120 ml) de salsa Hoisin
Glaseado:
Rinde 2–4 porciones
asado.
Este aliño muy versátil también puede usarse para preparar salmón o pollo
en salsa Hoisin
Gallinas de Cornualles glaseadas
• Grasa saturada 1g • Colesterol 104mg • Sodio 1 g • Calcio 17mg
Calorías 268 (13% de grasa) • Carbohidratos 34 • Proteínas 25g • Grasa 4g
Información nutricional por porción (basada en 4 porciones):
• Grasa saturada 1g • Colesterol 70mg • Sodio 507mg • Calcio 32mg • Fibra 1g
Calorías 207 (31% de grasa) • Carbohidratos 3g • proteínas 32g • Grasa 7g
Información nutricional por porción:
Page 46

27
inmediatamente, con pedazos de limón y arroz.
4. Retirar el pescado del horno, usando la agarradera. Servir
después de 15 minutos.
tiempo en 18 minutos. Empezar a averiguar si el pescado está cocido
programa CUSTOM, ajustar a temperatura a 400°F (200°C) y fijar el
Meter el espetón al horno. Elegir la función ROTISSERIE, con el
3. Colocar la rejilla en la posición 1 y colocar la bandeja sobre la rejilla.
pinchos.
2.5 cm) e insertar sobre el espetón. Nota: no es necesario usar los
2. Atar el pescado con hilo de cocina a intervalos de 1–2 pulgadas (1.5–
sal/pimienta.
pescado con el aceite de oliva remanente y sazonar con el resto de la
cantidad de ingredientes si es necesario. Restregar el exterior del
tamaño del pescado puede que sobren ingredientes. Ajustar la
resto de los ingredientes adentro del pescado. Nota: dependiendo del
Sazonar con ¼ cucharadita de sal y una pizca de pimienta. Meter el
1. Rociar el interior del pescado con 1 cucharadita del aceite de oliva.
2 ramitas de tomillo fresco
2 ramitas de romero fresco
½ cebolla pequeña, en rodajas finas
2 hojas de laurel
1 diente de ajo, en rodajas finas
¼ cebolla pequeña, en rodajas finas
¼ cucharadita de pimienta negra recién molida
½ cucharadita de sal kosher
1½ cucharadita de aceite de oliva
largo que el espetón, cortar la cabeza y la aleta caudal).
1 lubina (también llamado róbalo), limpia (si el pescado es más
Información nutricional por porción
• Grasa saturada 2g • Colesterol 8mg • Sodio 94mg • Calcio 6mg • Fibra 0g
Calorías 54 (94% de grasa) • Carbohidratos 1g • proteínas 0g • Grasa 5g
Información nutricional por porción (1 cucharada de salsa de rábano picante):
• Grasa saturada 5g • Colesterol 85mg • Sodio 388mg • Calcio 29mg • Fibra 0g
Calorías 248 (58% de grasa) • Carbohidratos 1g • proteínas 25g • Grasa 15g
(basada en 10 porciones, con 1 cucharadas de salsa de rábano picante)
con salsa de rábano picante al lado.
durante 5–10 minutos antes de trinchar. Cortar en tajadas finas y servir
4. Retirar la carne del horno, usando la agarradera. Dejar descansar
refrigerador durante hasta una semana).
al gusto. Reservar. (la salsa de rábano picante podrá conservarse en el
Combinar todos los ingredientes en un tazón pequeño. Ajustar la sazón
3. Mientras la res está cociendo, preparar la salsa de rábano picante.
alcanzar 130°F (54°C).
en 40 minutos. Para carne poco hecha, la temperatura interna debería
programa MEAT, ajustar a temperatura a 425°F (220°C) y fijar el tiempo
Meter el espetón al horno. Elegir la función ROTISSERIE, con el
2. Colocar la rejilla en la posición 1 y colocar la bandeja sobre la rejilla.
con los pinchos.
Atar la carne con hilo de cocina e insertarla sobre el espetón. Asegurar
1. Cubrir la carne con el aceite de oliva y sazonar con la sal y la pimienta.
Lubina asada
Rinde 2 porciones
½ cucharadita de pimienta negra molida gruesa
½ cucharadita de sal kosher
¼ taza (60 g) de salsa de rábano picante
Page 47

26
½ taza (120 ml) de crema agria
½ taza (120 ml) de mayonesa
Salsa de rábano picante:
1 cucharadita de pimienta negra recién molida
1 cucharadita de sal kosher
1½ cucharadita de aceite de oliva
1 cuete de res de 2–3 libras (910 g–1.3 kg)
Carne asada:
Rinde 8–10 porciones
sándwiches al día siguiente.
de sabor. Sobrará salsa de rábano picante; resérvela para preparar
Esta receta no requiere muchos ingredientes, pero el resultado está lleno
Carne asada con salsa de rábano picante
• Grasa saturada 3g • Colesterol 102mg • Sodio 339mg • Calcio 14mg • Fibra 0g
Calorías 292 (51% de grasa) • Carbohidratos 1g • proteínas 34g • Grasa 16g
Información nutricional por porción (basada en 10 porciones):
durante 5–10 minutos antes de trinchar.
6. Retirar el cerdo del horno, usando la agarradera. Dejar descansar
debería alcanzar 145°F (63°C).
en 60 minutos. Para carne no muy hecha, la temperatura interna
programa MEAT, ajustar a temperatura a 425°F (220°C) y fijar el tiempo
Meter el espetón al horno. Elegir la función ROTISSERIE, con el
5. Colocar la rejilla en la posición 1 y colocar la bandeja sobre la rejilla.
con los pinchos.
4. Atar la carne con hilo de cocina e insertarla sobre el espetón. Asegurar
a temperatura ambiente por 30 minutos.
. Encender la máquina y echar
®
pimienta. Restregar uniformemente con la marinada y dejar descansar
cuidadosamente y secar con papel absorbente. Sazonar con sal y
3. Antes de hornear, retirar la carne de la salmuera, enjuagar
la boca de llenado. Reservar.
la sal y la pimienta. Encender la máquina y echar el aceite de oliva por
Agregar el romero y la salvia; procesar para picar. Agregar la mostaza,
el ajo en la boca de llenado. Procesar hasta que esté finamente picado.
una procesadora de alimentos Cuisinart
2. Mientras tanto, preparar la marinada. Instalar la cuchilla picadora en
refrigerar durante hasta 4 horas.
en su refrigerador y batir para disolver. Meter la carne en la salmuera y
1. Combinar la sal y el azúcar con el agua en un tazón grande que quepa
2 cucharadas de aceite de oliva virgen extra
para rociar
1 cucharadita de pimienta negra recién molida + un poco más
1 cucharadita de sal kosher + un poco más para rociar
1 cucharada de mostaza de Dijon
1 cucharada de salvia fresca
1 cucharada de romero fresco
3 dientes de ajo
Marinada:
1 paleta de cerdo de 3–4 libras (1.3–1.8 kg)
3 cuartos de galón (2.8 L) de agua
1 taza (200 g) de azúcar granulada
1 taza (200 g) de sal kosher
Rinde 6–10 porciones
Plato fácil y delicioso, perfecto cuando tiene invitados.
Cerdo asado con romero y salvia
Page 48

25
•
•
•
•
Fibra 1g
Calcio 23mg
Sodio 435mg
•
Carbohidratos 1g • Proteínas 23g • Grasa 12g
Información nutricional por porción (basada en 10 porciones):
Grasa saturada 3g • Colesterol 73mg
•
Calorías 208 (52% de grasa)
tostado.
7. Cortar en tajadas finas y servir con la salsa de yogur-Tahini y pan pita
durante 5–10 minutos antes de trinchar.
6. Retirar el cordero del horno, usando la agarradera. Dejar descansar
refrigerador durante hasta 1 semana, en un recipiente hermético.
Nota: la salsa puede prepararse por adelantado y conservarse en el
del fuego. Colocar las semillas tostadas, los palitos de canela, la sal, la
hasta que las semillas estén ligeramente tostadas y fragantes. Retirar
semillas de comino y de cilantro, en un sartén seco pequeño. Cocer
1. Preparar la marinada para el cordero: calentar a fuego medio las
pan pita, tostado y mantenido caliente para servir
¼ cucharadita de comino en polvo
½ cucharadita de sal kosher
½ cucharadita de jugo de limón fresco
1 cucharada de salsa Tahini
1 taza (235 ml) de yogur natural entero o bajo en grasa
Salsa de yogur-Tahini:
obtener una mezcla homogénea. Refrigerar hasta el momento de usar.
Colocar todos los ingredientes de la salsa en un tazón y batir hasta
5. Mientras el cordero está cociendo, preparar la salsa de yogur-Tahini.
rebanar y servir.
debe alcanzar 130°F (54°C). Dejar reposar durante 10 minutos antes de
tiempo en 45 minutos. Para carne poco hecha, la temperatura interna
el programa MEAT, ajustar a temperatura a 400°F (200°C) y fijar el
la rejilla. Meter el espetón al horno. Elegir la función ROTISSERIE, con
4. Colocar la rejilla del horno en la posición 1 y colocar la bandeja sobre
espetón. Asegurar con los pinchos.
hilo de cocina a intervalos de 2 pulgadas (5 cm) e insertar sobre el
3. Antes de hornear, retirar el cordero del tazón o de la bolsa, atar con
2–12 horas.
plástico, o colocar en una bolsa hermética grande. Refrigerar durante
restregar uniformemente). Colocar en un tazón grande y cubrir con
2. Restregar el cordero con la pasta (quitar el hilo de cocina para
preparar sándwiches, junto con la salsa de yogur-Tahini.
1 pierna de cordero de 2½–3 libras (1.1–1.4 kg), deshuesada
¼ taza (60 ml) de aceite de oliva
½ cucharadita de pimienta de Cayena
4 ramitas de orégano (hojas solamente)
4 dientes de ajo
para rociar
½ cucharadita de pimienta negra recién molida + un poco más
1½ cucharadita de sal kosher + un poco más para rociar
3 palitos de canela, partidos a la mitad
1 cucharadita de semillas de cilantro
1 cucharadita de semillas de comino
Marinada:
Rinde 8–10 porciones
receta le mostrará por qué! Las sobras de cordero son perfectas para
Pareciera que las especias orientales fueron hechas para el cordero. ¡Esta
procesar hasta obtener una pasta.
. Pulsar varias veces
®
para romper, raspando el bol si es necesario. Agregar el aceite y
especias o en el bol de una picadora Cuisinart
pimienta, el ajo, el orégano y la pimienta de Cayena en un molinillo de
con salsa de yogur-Tahini
Pierna de cordero al estilo oriental
Page 49

24
• Grasa saturada 2g • Colesterol 78mg • Sodio 817mg • Calcio 13mg • Fibra 0g
Calorías 160 (33% de grasa) • Carbohidratos 6g • Proteínas 21g • Grasa 6g
Información nutricional por porción (basada en 6 porciones):
resultando en una piel más crujiente y un pato aún más sabroso.
Nota: cortar la parte de encima y pinchar el pato suelta la grasa,
servir al lado de las tajadas de pato.
consistencia de un glaseado. Cepillar el pato asado con el glaseado o
lento por 30 minutos, hasta que se vuelva espesa y adquiera la
reducir el fuego para que siga hirviendo a fuego lento. Hervir a fuego
en una cacerola pequeña. Dejar hervir durante 5 minutos, y luego
*No tirar la marinada. Calentarla a fuego medio-alto hasta que hierva, ,
durante 5–10 minutos antes de trinchar.
5. Retirar el pato del horno, usando la agarradera. Dejar descansar
en menos tiempo, según su tamaño.
170°F/77°C (carne oscura/muslos). Nota: puede que el pato esté listo
interna debería alcanzar 165°F/74°C (carne blanca/pechuga) y
claro al pinchar el muslo con la punta de un cuchillo. La temperatura
de pelar. Cerrar la puerta y seguir horneando hasta que el jugo esté
cuidadosamente el pato por todas partes con la punta de un cuchillo
4. Después de 40 minutos, abrir la puerta del horno y pinchar
en 90 minutos.
programa DUCK, ajustar a temperatura a 325°F (160°C) y fijar el tiempo
Meter el espetón al horno. Elegir la función ROTISSERIE, con el
3. Colocar la rejilla en la posición 1 y colocar la bandeja sobre la rejilla.
Asegurar con los pinchos.
pelar. Atar el pato con hilo de cocina e insertarlo sobre el espetón.
piel. Pinchar el pato por todas partes con la punta de un cuchillo de
pechugas en líneas cruzadas, cruzando la piel y la grasa, pero no la
2. Antes de hornear, escurrir el pato*. Cortar la parte de encima de las
Cerrar y refrigerar durante 2–4 horas.
Colocar el pato en una bolsa hermética grande y agregar la marinada.
1. Combinar los ingredientes de la marinada en un tazón pequeño.
1 pato de 3½–4 libras (1.6–1.8 kg)
1 cucharada de granos de pimienta
2 estrellas de anís estrellado (badiana)
1 cucharada de azúcar rubia
2 dientes de ajo, en rodajas finas
rodajas finas
1 trozo de 1 pulgada (2.5 cm) de jengibre fresco, pelado y en
½ taza (120 ml) de salsa de soya baja en sodio
1 taza (235 ml) de caldo de pollo bajo en sodio
Marinada:
Rinde 4–6 porciones
usarse para preparar pato.
Esta receta es un guiño a las especias asiáticas tradicionales que suelen
Pato glaseado en jengibre
saturada 3g • Colesterol 78mg • Sodio 645mg • Calcio 12mg • Fibra 0g
Calorías 157 (49% de grasa) • Carbohidratos 1g • Proteínas 18g • Grasa 8g • Grasa
Información nutricional por porción (basada en 6 porciones):
resultando en una piel más crujiente.
NOTA: Cortar la parte de encima y pinchar el pato suelta la grasa,
Page 50

dentro.
Pato asado
23
durante 5–10 minutos antes de trinchar.
4. Retirar el pato del horno, usando la agarradera. Dejar descansar
en menos tiempo, según su tamaño.
170°F/77°C (carne oscura/muslos). Nota: puede que el pato esté listo
interna debería alcanzar 165°F/74°C (carne blanca/pechuga) y
claro al pinchar el muslo con la punta de un cuchillo. La temperatura
de pelar. Cerrar la puerta y seguir horneando hasta que el jugo salga
cuidadosamente el pato por todas partes con la punta de un cuchillo
3. Después de 40 minutos, abrir la puerta del horno y pinchar
en 90 minutos.
programa DUCK, ajustar a temperatura a 325°F (160°C) y fijar el tiempo
Meter el espetón al horno. Elegir la función ROTISSERIE, con el
2. Colocar la rejilla en la posición 1 y colocar la bandeja sobre la rejilla.
hilo de cocina e insertarlo sobre el espetón. Asegurar con los pinchos.
por todas partes con la punta de un cuchillo de pelar. Atar el pato con
cruzadas, cruzando la piel y la grasa, pero no la piel. Pinchar el pato
pimienta. Cortar la parte de encima de las pechugas en líneas
1. Cepillar el pato con el aceite de oliva y restregar con la sal y la
½ cucharadita de pimienta negra recién molida
1½ cucharaditas de sal kosher
1 cucharada de aceite de oliva
1 pato de 3½–4 libras (1.6–1.8 kg)
Rinde 4–6 porciones
, en el orden indicado. Licuar a velocidad alta
®
fácilmente, con sabrosos resultados, crujiente por fuera y jugoso por
Gracias a la función ROTISSERIE de su horno, puede asar un pato entero
Información nutricional por porción (basada en 6 porciones):
• Grasa saturada 2g • Colesterol 80mg • Sodio 668mg • Calcio 28mg • Fibra 1g
Calorías 210 (42% de grasa) • Carbohidratos 8g • Proteínas 23g • Grasa 10g
durante 5–10 minutos antes de trinchar.
7. Retirar el pollo del horno, usando la agarradera. Dejar descansar
puede que el pollo esté listo en menos tiempo, según su tamaño.
(carne blanca/pechuga) y 170°F/77°C (carne oscura/muslos). Nota:
de un cuchillo. La temperatura interna debería alcanzar 165°F/74°C
6. Hornear hasta que el jugo salga claro al pinchar el muslo con la punta
tiempo en 60 minutos.
programa CHICKEN, ajustar a temperatura a 400°F (200°C) y fijar el
Meter el espetón al horno. Elegir la función ROTISSERIE, con el
5. Colocar la rejilla en la posición 1 y colocar la bandeja sobre la rejilla.
con los pinchos.
4. Atar el pollo con hilo de cocina e insertarlo sobre el espetón. Asegurar
sal.
3. Antes de hornear, escurrir el pollo y sazonar con una cucharadita de
refrigerar durante 2–12 horas.
2. Colocar el pollo en una bolsa hermética grande, agregar la marinada y
homogénea.
durante aproximadamente 1 minuto, hasta obtener una mezcla
licuadora Cuisinart
1. Preparar la marinada: colocar todos los ingredientes en la jarra de una
1 cucharadita de sal kosher
1 pollo de 3½–4 libras (1.6–1.8 kg)
½ cucharadita de pimienta negra recién molida
1 cucharadita de tomillo fresco
Page 51

22
camarones.
Pollo jamaiquino
2 cucharaditas de azúcar rubia
1 cucharada de pimienta de Jamaica en polvo
a la mitad
1 pimiento Scotch Bonnet (o 2 jalapeños), sin semillas y partido
2 cebolletas ("green onions"), en trocitos
3 dientes de ajo
jugo de ½ lima/limón verde
2 cucharadas de aceite de oliva
2 cucharadas de salsa de soya baja en sodio
2 cucharadas de vinagre blanco
¼ taza (60 ml) de jugo de naranja
Marinada jamaiquina:
Rinde 4–6 porciones
El adobo jamaiquino es perfecto para adobar pollo, pero también cerdo y
• Grasa saturada 1g • Colesterol 106mg • Sodio 535mg • Calcio 25mg • Fibra 1g
Calorías 208 (32% de grasa) • Carbohidratos 2g • Proteínas 32g • Grasa 17g
Información nutricional por porción (basada en 6 porciones):
durante 5–10 minutos antes de trinchar.
4. Retirar el pollo del horno, usando la agarradera. Dejar descansar
puede que el pollo esté listo en menos tiempo, según su tamaño.
(carne blanca/pechuga) y 170°F/77°C (carne oscura/muslos). Nota:
de un cuchillo. La temperatura interna debería alcanzar 165°F/74°C
3. Hornear hasta que el jugo salga claro al pinchar el muslo con la punta
tiempo en 60 minutos.
programa CHICKEN, ajustar a temperatura a 450°F (230°C) y fijar el
Meter el espetón al horno. Elegir la función ROTISSERIE, con el
2. Colocar la rejilla en la posición 1 y colocar la bandeja sobre la rejilla.
el espetón. Asegurar con los pinchos.
y el ajo en la cavidad. Atar el pollo con hilo de cocina e insertarlo sobre
pimienta. Rociar el pollo con jugo de limón y colocar el limón exprimido
1. Cepillar el pollo con el aceite de oliva y restregar con las hierbas, sal y
2 dientes de ajo, machacados
1 limón, cortado a la mitad
1 cucharadita de pimienta negra recién molida
1 cucharadita de sal kosher
1 cucharadita de tomillo seco
1 cucharadita de albahaca seca
1 cucharada de romero fresco picado
1 cucharada de aceite de oliva
1 pollo de 3½–4 libras (1.6–1.8 kg)
Rinde 4–6 porciones
particularmente delicioso.
La combinación de hierbas secas y frescas hace que este plato clásico sea
Pollo asado con hierbas clásico
• Grasa saturada 11g • Colesterol 55mg • Sodio 313mg • Calcio 254mg • Fibra 3g
Calorías 293 (56% de grasa) • Carbohidratos 21g • Proteínas 12g • Grasa 18g
Información nutricional por porción:
3. Agregar la crema agria y los cebollinos picados. Servir inmediatamente.
queso esté derretido y ligeramente dorado.
Gratinar durante 8 minutos, usando la función BROIL, hasta que el
2. Colocar la rejilla del horno en la posición 4 y meter la bandeja al horno.
de cada una.
derretida y sazonar con sal y pimienta. Esparcir queso y tocino encima
fondo de la bandeja, cepillar la parte superior con la mantequilla
Page 52

21
para otro uso.
"Potato skins"
1. Forrar la bandeja con papel de aluminio. Disponer las peladuras en el
2 cucharadas de cebollinos ("chives") picados
crema agria, al gusto
4 lonjas de tocino, cocidas y picadas
1 taza (120 g) de queso Cheddar rallado
1 pizca de pimienta negra recién molida
1 pizca de sal kosher
2 cucharadas (30g) de mantequilla sin sal, derretida
peladuras de 6 patatas
Rinde 6 porciones
pero si desea puede pelar patatas, usar las peladuras y reservar las patatas
Usamos las peladuras de nuestras "patatas asadas dos veces" (página 31)
(peladuras de patata al horno con tocino)
• Grasa saturada 4g • Colesterol 15g • Sodio 345mg • Calcio 166mg • Fibra 2g
Calorías 168 (50% de grasa) • Carbohidratos 14g • Proteínas 7g • Grasa 9g
Información nutricional por porción (basada en 10 porciones):
pedazos de limón.
3. Servir inmediatamente con salsa picante, guacamole, crema agria y
rápido que otros.
cocción, ya que algunos tipos de queso se derriten y se doran más
Gratinar durante 10 minutos, usando la función BROIL. Vigilar la
2. Colocar la rejilla del horno en la posición 4 y meter la bandeja al horno.
resto de los ingredientes, terminando con el queso.
esparcir los chips remanente encima. Cubrir de manera uniforme con el
en el fondo de la bandeja. Cubrir con ½ taza (60 g) del queso, y luego
1. Forrar la bandeja con papel de aluminio. Disponer la mitad de los chips
pedazos de lima/limón verde para servir
salsa picante, guacamole y crema agria para servir
1 taza (65 g) de aceitunas negras en rodajas (escurridas)
1 lata de 4.5 onzas (130 g) de chiles verdes picados
4 cebolletas ("scallions"), finamente picadas
1 jalapeño, sin semillas, en rodajas finas
1 tomate pequeño a medio, sin semillas, picado
de 15.5 onzas/465 g)
¾ taza (190 g) de frijoles refritos enlatados (la mitad de una lata
rallado
1½–2 tazas (180–240 g) de queso Cheddar y/o Monterey Jack
la bandeja, pero puede usar más/menos)
necesita suficientemente chips como para cubrir el fondo de
6 tazas (500 g) de chips de maíz (esto es un estimado –
Rinde 8–10 porciones
manera, todo el mundo tiene queso en cada bocado!
El secreto de estos nachos es la capa de queso entre los chips. ¡De esta
Últimos nachos
• Grasa saturada 5g • Colesterol 22mg • Sodio 243mg • Calcio 57mg • Fibra 1g
Calorías 90 (79% de grasa) • Carbohidratos 3g • Proteínas 4g • Grasa 7g
Información nutricional por porción (¼ taza/60 ml):
4. Servir inmediatamente.
Una vez caliente, meter al horno y hornear hasta dorarse ligeramente.
ajustar la temperatura a 375°F (190°C) y fijar el tiempo en 25 minutos.
3. Colocar la rejilla del horno en la posición 2. Elegir la función BAKE,
Page 53

20
mezcla en la fuente y esparcir el resto del queso encima.
alcachofa y las hojuelas de pimiento y pulsar 10 veces más. Colocar la
pulsar 10 veces para combinar. Raspar el bol. Agregar los corazones de
la espinaca y agregar a la mezcla. Agregar la mitad del Gorgonzola y
seguir procesando hasta obtener una mezcla suave y cremosa. Romper
esté finamente picado. Agregar el queso crema y la crema líquida y
hasta que esté finamente picado. Agregar el ajo y procesar hasta que
Encender la máquina y echar el queso en la boca de llenado. Procesar
2.
.
®
Instalar la cuchilla picadora en su procesadora de alimentos Cuisinart
vegetal. Reservar.
Información nutricional por porción:
1. Engrasar levemente una fuente de horno de cerámica de 2 L con spray
semana, o en el congelador durante hasta 2 meses.
*La masa cruda se podrá conservar en el refrigerador durante hasta una
• Grasa saturada 5g • Colesterol 20mg • Sodio 89mg • Calcio 0mg • Fibra 0g
Calorías 101 (67% de grasa) • Carbohidratos 7g • Proteínas 1g • Grasa 7g
el papel sulfurizado, y regresar el fondo de tarta al horno hasta dorarse.
hasta que la masa esté seca. Retirar el arroz crudo/los frijoles secos y
precalentamiento, meter al horno. Hornear durante 15–20 minutos, o
parcialmente el molde con arroz crudo o frijoles secos. Después del
Poner una hoja de papel sulfurizado encima de la masa y llenar
tenedor, teniendo cuidado de no perforar completamente la masa.
minutos. Pinchar el fondo de tarta varias veces con los dientes de un
CONV, ajustar la temperatura a 350°F (180°C) y fijar el tiempo en 25
4. Colocar la rejilla del horno en la posición 2. Elegir la función BAKE +
aproximadamente 30 minutos.
del molde. Acanalar el borde de la masa si desea. Refrigerar durante
redondeado de aproximadamente
3. Presionar el borde de la masa con el pulgar para formar un borde
de masa con el rodillo.
fondo y las esquinas del molde, alzando los bordes. Cortar el exceso
9 pulgadas (23 cm de diámetro). Presionar la masa suavemente en el
pulgada (3 mm) de espesor. Colocar la masa en un molde de tartas de
disco de aproximadamente 11 pulgadas (28 cm) de diámetro y
enharinada, estirar con un rodillo una porción de masa hasta formar un
2. Para pre-cocer el fondo de tarta: sobre una superficie ligeramente
película de plástico y refrigerar hasta el momento de usar.
Formar un disco plano con cada porción. Envolver los discos en una
pulsar hasta obtener una masa. Dividir la masa en dos porciones iguales.
alcachofa
½ cucharadita de hojuelas de pimiento rojo
escurridos y secados
2 latas de 15 onzas (450 g) de corazones de alcachofa,
1 taza (120 g) de queso Gorgonzola desmenuzado
secada
1 libra (455 g) de espinaca congelada, descongelada, escurrida y
¼ taza (60 ml) de crema líquida para batir ("heavy cream")
cubos
1 libra (455 g) de queso crema a temperatura ambiente, en
1 chalote pequeño, partido a la mitad
⁄8 pulgada (3 mm) todo alrededor
1
1 diente de ajo
2 onzas (55 g) de queso Parmesano, en cubitos
spray vegetal
Rinde aproximadamente 6 tazas (1.4 L)
⁄8
1
Sirva esta crema clásica caliente, con pan crujiente o chips de pan pita.
.
Crema para mojar de espinaca, Gorgonzola y
Page 54

19
formen migajas grandes. Agregar el agua, una cucharada a la vez y
segundos. Agregar la mantequilla y seguir procesando hasta que se
, equipada con cuchilla picadora. Procesar durante 10
®
Cuisinart
1. Colocar la harina y la sal en el tazón de una procesadora de alimentos
4 cucharadas de agua helada
½ libra (225 g) de mantequilla sin sal fría, en pedacitos
1 cucharadita de sal kosher
2 tazas (250 g) de harina común
Rinde 2 fondos de tarta de 9 pulgadas (22 cm)
Esta masa versátil es perfecta para preparar recetas saladas o dulces.
"Pâte brisée" (masa quebrada)
• Grasa saturada 9g • Colesterol 102mg • Sodio 232mg • Calcio 73mg • Fibra 0g
Calorías 194 (70% de grasa) • Carbohidratos 9g • Proteínas 5g • Grasa 15g
Información nutricional por porción (basada en 12 porciones):
servir.
6. Dejar enfriar durante aproximadamente 5 minutos antes de cortar y
ligeramente dorado.
5. Si desea, gratinar durante 2–3 minutos o hasta que el queso esté
Hornear hasta que el relleno esté ligeramente cuajado.
Una vez caliente, meter la "quiche" al horno.
ajustar la temperatura a 350°F (180°C) y fijar el tiempo en 16 minutos.
4. Colocar la rejilla del horno en la posición 2. Elegir la función BAKE,
rallado encima.
precocido. Agregar la mezcla de huevo/crema y esparcir el queso
3. Esparcir la mezcla de puerro/champiñones sobre el fondo de tarta
un tazón mediano y batir la mezcla.
2. Colocar la leche, la crema, los huevos y el resto de la sal/pimienta en
aceite si es necesario. Reservar.
hasta que estén ligeramente dorados. Agregar más mantequilla o
suavizarse ligeramente. Agregar los champiñones y el tomillo y saltear
pizca de sal/pimienta sal y saltear durante 2–3 minutos, hasta
grande. Cuando la mantequilla esté derretida, agregar el puerro y una
1. Preparar el relleno: derretir la mantequilla a fuego medio, en un sartén
½ taza (60 g) de queso Gruyère o suizo rallado
4 huevos grandes
½ taza (120 ml) de crema líquida para batir ("heavy cream")
½ taza (120 ml) de leche entera
1 cucharadita de tomillo fresco
¼ cucharadita de pimienta negra recién molida
½ cucharadita de sal kosher
rodajas
4 onzas (115 g) de champiñones blancos o cremini cortados en
rebanado
1 puerro pequeño (parte verde claro y blanca), finamente
ambiente, o de aceite de oliva
1½ cucharadita (15 g) de mantequilla sin sal a temperatura
Relleno:
de la masa)
con masa quebrada (receta a continuación – utilizar la mitad
1 fondo de tarta pre-cocido de 9 pulgadas (22 cm), preparado
Rinde 8–12 porciones (una "quiche" grande)
Perfecta para un desayuno-almuerzo, esta "quiche" les encantará a todos.
Gruyère
"Quiche" de champiñones y puerro con queso
Page 55

⁄3 de los
1
durante
®
18
• Grasa saturada 3g • Colesterol 29mg • Sodio 148mg • Calcio 13mg • Fibra 1g
Calorías 207 (35% de grasa) • Carbohidratos 37g • Proteínas 3g • Grasa 5g
Información nutricional por porción:
servir.
probador salga limpio. Dejar enfriar ligeramente antes de cortar y
minutos. Una vez caliente, meter al horno y hornear hasta que un
CONV, ajustar la temperatura a 350°F (180°C) y fijar el tiempo en 25
5. Colocar la rejilla del horno en la posición 2. Elegir la función BAKE +
cobertura crujiente remanente encima.
presionando ligeramente para que queden medio hundidos. Esparcir la
4. Echar la mezcla en el molde. Esparcir los arándanos encima,
homogénea.
terminando con los ingredientes secos, hasta obtener una mezcla
mitad del suero de mantequilla y seguir alternando los ingredientes,
ingredientes secos y revolver para incorporar parcialmente. Agregar la
ingredientes estén completamente combinados. Agregar
Agregar el huevo y la vainilla. Seguir batiendo hasta que los
aproximadamente 1 minuto, hasta obtener una mezcla suave y ligera.
tazón mediano y batir con una batidora de mano Cuisinart
tazón pequeño. Reservar. Colocar la mantequilla y el azúcar en un
3. Prepare la mezcla: Combinar la harina, el bicarbonato y la sal en un
Reservar.
Revolver con un tenedor o sus dedos para formar grumos grandes.
mantequilla derretida.
un tazón pequeño. Combinar, batiendo. Agregar la vainilla y la
2. Preparar la cobertura crujiente: colocar todos los ingredientes secos en
spray vegetal; reservar.
⁄3 taza (165 g) de harina común
1
hermoso una vez cortado.
Pastel crujiente de arándanos azules
1. Engrasar levemente un molde de 9 x 9 pulgadas (22 x 22 cm) con
1 taza (140 g) de arándanos azules frescos
⁄3 taza (80 g) de suero de mantequilla ("buttermilk")
1
½ cucharadita de extracto natural de vainilla
1 huevo grande
½ taza + 3 cucharadas (110 g) de azúcar granulada
pedacitos
⁄3 taza (75 g) de mantequilla sin sal a temperatura ambiente, en
1
¼ cucharadita de sal kosher
¾ cucharadita de bicarbonato de sodio
1
Mezcla:
ligeramente enfriada
6 cucharadas (85 g) de mantequilla sin sal, derretida y
½ cucharadita de extracto natural de vainilla
1 pizca de sal kosher
1 cucharadita de canela en polvo
¼ taza (50 g) de azúcar granulada
¼ taza (50 g) de azúcar rubia
¾ taza (95 g) de harina común
Cobertura crujiente:
spray vegetal
Rinde 12 porciones (un pastel de 9 pulgadas/22 cm de diámetro)
Este pastel jugoso es perfecto para traer un detalle a quien le invite – y es
Page 56

17
Piña asada ...........................................................................................36
"Tarta" crujiente de ruibarbo y fresas .................................................35
"Brownies" de chocolate semi-amargos y expreso con "ganache" ..34
Pancitos con sabor a mantequilla .......................................................34
Panes/Postres:
Tubérculos mixtos asados ..................................................................33
Patatas asadas dos veces .................................................................32
Calabaza de bellota rellena .................................................................32
Hinojo asado con naranja y aceitunas ................................................31
Platos de acompañamiento:
Pizza de espinaca con ajo ..................................................................31
Pizza blanca con aceitunas, tomates de pera y tocino ......................30
Masa de pizza sin gluten ....................................................................29
Masa de pizza básica..........................................................................29
Pizza:
Hamburguesas asadas .......................................................................28
Gallinas de Cornualles glaseadas en salsa Hoisin .............................28
Lubina asada .......................................................................................27
Carne asada con salsa de rábano picante .........................................26
Cerdo asado con romero y salvia .......................................................26
Pierna de cordero al estilo oriental con salsa de yogur-Tahini ..........25
Pato glaseado en jengibre ..................................................................24
Pato asado simple ..............................................................................23
Pollo jamaiquino ..................................................................................22
Pollo asado con hierbas clásico .........................................................22
Platos principales:
"Potato skins" ("peladuras" de patata al horno con tocino) ...............21
Últimos nachos ...................................................................................21
Crema para mojar de espinaca, Gorgonzola y alcachofa ..................20
"Pâte brisée" (masa quebrada) ...........................................................19
"Quiche" de champiñones y puerro con queso Gruyère ....................19
Pastel crujiente de arándanos azules .................................................18
Desayunos-almuerzos/Entradas:
RECETAS
Page 57

16
sus titulares respectivos.
G IB-12740-ESP-A
14CE002665
www.cuisinart.com
Impreso en China
East Windsor, NJ 08520
150 Milford Road
©2014 Cuisinart
comercio mencionadas en ésta pertenecen a
Todas marcas registradas o marcas de
NOTA:
para más
repararlo y asegurarse de que el producto esté bajo garantía.
diagnosticar el problema correctamente, usar las piezas correctas para
llamar al servicio posventa de Cuisinart al 1-800-726-0190 a fin de
autorizado, por favor informe al personal del centro de servicio que deberían
Importante: si debe llevar el aparato defectuoso a un centro de servicio no
otros derechos que varían de un Estado a otro.
limitaciones mencionadas pueden no regir para usted. Usted puede tener
limitación de daños incidentales o consecuentes, de modo que las
incidentales o consecuentes. Algunos Estados no permiten la exclusión o
negligencia o accidente. Esta garantía excluye expresamente todos los daños
producto, y no es válida en caso de daños causados por mal uso,
Cuisinart. Esta garantía no cubre el uso institucional o comercial del
daños causados por accesorios, piezas o reparaciones no autorizados por
repuesto autorizados solamente. Esta garantía excluye expresamente los
diseñado para uso sobre corriente de 120V, usando accesorios y piezas de
Este aparato satisface las más altas exigencias de fabricación y ha sido
serán cubiertos bajo esta garantía.
equivocada. Los productos perdidos y/o lastimados durante el envío no
ocurridos durante el transporte o por los paquetes mandados a una dirección
con seguro y seguimiento. Cuisinart no será responsable por los daños
seguridad, le aconsejamos que mande su paquete por un método de entrega
Sentimos no poder aceptar otras formas de pago.
descripción del problema, así como cualquier información pertinente.
instrucciones de envío. Recuerde incluir su nombre, dirección y teléfono, la
prueba de compra y deben llamar al 1-800-726-0190 para recibir
de manejo y envío. Los residentes de California sólo necesitan dar una
con su recibo de compra y un cheque o giro postal de US$10.00 por gastos
Glen Harbor Blvd. Glendale, AZ 85307. Regrese el aparato defectuoso, junto
al 1-800-726-0190 o regrese el aparato defectuoso a: Cuisinart, 7475 North
Para obtener servicio bajo esta garantía, llame a nuestra línea directa gratuita
el período de garantía, la reparemos o reemplazaremos (a nuestra opción).
Si este aparato presentara algún defecto de materiales o fabricación durante
ANTES DE HACER REPARAR SU APARATO
Page 58

15
en una tienda,
®
productos defectuosos durante el período de garantía.
responsable por los gastos de reparación, reemplazo, manejo y envío de los
llamar a nuestro servicio posventa al 1-800-726-0190. Cuisinart será
directamente a Cuisinart para que lo reparen o lo cambien. Para esto, se debe
California también pueden, si lo desean, mandar el aparato defectuoso
los productos defectuosos durante el período de garantía. Los residentes de
responsable por los gastos de servicio, reparación, reemplazo o reembolso de
pueda ajustar o reparar el aparato de manera económica. Cuisinart será
podrá llevar el aparato a un centro de servicio independiente, siempre que se
hasta que éste se dañe. Si estas dos opciones no satisfacen al consumidor,
producto, menos la cantidad imputable al uso del producto por el consumidor
cambiará el producto o reembolsará el consumidor por el precio original del
producto, referirá el consumidor a un centro de servicio independiente,
venda productos Cuisinart® de este tipo. La tienda, a su opción, reparará el
producto defectuoso a la tienda donde lo compraron o (B) a otra tienda que
garantía. Los residentes del estado de California pueden (A) regresar el
La ley del estado de California ofrece dos opciones bajo el período de
RESIDENTES DE CALIFORNIA SOLAMENTE
garantía será calculado a partir de la fecha de fabricación.
servicio bajo esta garantía. En ausencia del recibo de compra, el período de
original. Sin embargo, registrar el producto no es necesario para recibir
www cuisinart.com a fin de facilitar la verificación de la fecha de compra
Le aconsejamos que llene el formulario de registro disponible en
instrucciones.
que el aparato haya sido utilizado para uso doméstico y según las
fabricación durante 3 años después de la fecha de compra original, siempre
Cuisinart garantiza este aparato contra todo defecto de materiales o
permita, esta garantía no es para los detallistas u otros comerciantes.
para uso personal o casero. A excepción de los estados donde la ley lo
Usted es un consumidor si ha comprado su aparato Cuisinart
Esta garantía es para los consumidores que residen en los EE.UU. solamente.
Garantía limitada de tres años
GARANTÍA
tostado consistente, ciclo tras ciclo.
regularmente mantendrá en horno como nuevo y asegurará un
el aparato se enfríe y limpie el interior del horno. Hacer esto
IMPORTANTE: después de cocinar alimentos grasos, permita que
autorizado.
7. Cualquier otro servicio debe ser realizado por un técnico
para guardar el cable, ubicado en la parte trasera del horno.
6. Nunca enrolle el cable alrededor del aparato; utilice el espacio
lavavajillas.
útil de los accesorios, recomendamos que no los meta al
usando un estropajo o un cepillo de nailón. Para extender la vida
los pinchos y la bandeja recogemigas en agua jabonosa caliente,
5. Lave la rejilla del horno, la bandeja, la rejilla para asar, el espetón,
bandeja recogemigas.
use un limpiador no abrasivo. Nunca utilice el aparato sin la
grasa de cocción, remoje la bandeja en agua jabonosa caliente o
fuera. Limpie la bandeja y regrésela en su puesto. Para eliminar la
4. Para eliminar las migajas, deslice la bandeja recogemigas hacia
horno. Nunca use estropajos de metal para limpiar el horno.
químicos fuertes o abrasivos; esto podría dañar la superficie del
humedecida con agua jabonosa. Nunca utilice productos
3. Para limpiar el interior del horno, utilice una esponja ligeramente
aplique éste sobre el paño, no sobre el horno.
ligeramente humedecido y séquelo bien. Si desea usar limpiador,
Simplemente limpie el cuerpo del aparato con un paño
2. No utilice limpiadores abrasivos. Esto podría dañar el acabado.
1. Desconecte el cable de la toma de corriente.
Permita que el aparato se enfríe completamente antes de limpiarlo.
LIMPIEZA Y MANTENIMIENTO
Page 59

14
145°F (65°C)
145°F (65°C)
grosor)
(según el
minutos
minutos
15–20
CONV
400°F – ROAST,
CUSTOM)
(programa
ROTISSERIE
400°F –
BAKE, CONV 400°F 10–20
CONV
ROAST,
ROTISSERIE,
(filetes)
Pescado
(entero)
Pescado
coger la temperatura
durante 5 minutos antes de
potencia y los elementos inferiores a media potencia.
la función BAGEL (panecillos) enciende los elementos superiores a plena
que algunos elementos no se pongan tan calientes como otros. Por ejemplo,
dependiendo de la función usada. Dependiendo de la función usada, puede
para encenderse/apagarse a intervalos y alcanzar temperaturas distintas
Tenga presente que las cuatro resistencias del horno están programadas
Resistencias (elementos calefactores)
deseada, y luego presiónelo para confirmar.
horno y desactivar la función usada. Gire el SELECTOR para elegir la función
Para cambiar la función: presione el botón START/STOP para apagar el
*Dejar descansar la carne
Bien hecha – 160°F (71°C)
No muy hecha – 150°F (65°C)
Poco hecha – 145°F (63°C)
coger la temperatura
durante 5 minutos antes de
*Dejar descansar la carne
Bien hecha – 155 °F (68°C)
(60–65°C)
Al punto – 140–150°F
(57–60°C)
No muy hecha – 135–140°F
(54–57°C)
Poco hecha – 130–135°F
Vuelta y vuelta – 125°F (52°C)
libra (455 g)
20 minutos/
libra (455 g)
15 minutos/
de cocción aparecerá en la pantalla y la cocción continuará.
para elegir el tiempo deseado, y presiónelo para confirmar. El nuevo tiempo
parpadear y el tiempo remanente aparecerá en la pantalla. Gire el SELECTOR
empezará a parpadear. Presione el botón otra vez. El tiempo empezará a
Para cambiar el tiempo: presione el SELECTOR otra vez; la temperatura
170°F–175°F (muslos)
165°F (pechuga)
90 minutos 170°F–175°F (muslos)
minutos
30–45
confirmar. Escuchará un pitido.
Gire el SELECTOR para elegir la temperatura deseada. Presiónelo para
escuche un pitido y que la temperatura programada empiece a parpadear.
170°F–175°F (muslos)
165°F (pechuga)
minutos
50–75
durante la cocción. Presione y mantenga oprimido el SELECTOR hasta que
Para cambiar la temperatura: el tiempo remanente aparece en la pantalla
el medio de un ciclo, siga los pasos siguientes.
Para cambiar la función, el tiempo o la temperatura en
425°F – ROAST
MEAT)
(programa
ROTISSERIE
425°F –
425°F – ROAST
MEAT)
(programa
ROTISSERIE
425°F –
DUCK)
(programa
325°F – 425°F
CONV
425°F – ROAST
CHICKEN)
(programa
ROTISSERIE
450°F –
CONV
ROAST,
CONV
ROAST,
ROTISSERIE,
CONV
BAKE, CONV 400°F – BAKE,
CONV
ROAST
ROTISSERIE
Cerdo ROTISSERIE,
cordero
Res,
Pato ROTISSERIE,
(presas)
Pollo
(entero)
Pollo
Alimento Función Temperatura Tiempo Temperatura interna
cocina.
Siempre averigüe la temperatura interna de la carne con un termómetro de
TEMPERATURA INTERNA
Page 60

13
séquela. Nota: si no enjuaga bien la carne, saldrá muy salada.
Después de este tiempo, enjuague cuidadosamente la carne, y luego
Lomo de cerdo 24 horas
Filetes de cerdo 2–6 horas
Chuletas de cerdo 2–6 horas
Gallinas salvajes 1–2 horas
Pechuga de pava 4–6 horas
Presas de pollo 1–2 horas
Pollo entero 3–8 horas
El tiempo de refrigeración dependerá del tipo de alimento. Por ejemplo:
refrigerar.
bolsa hermética grande. Eche la salmuera encima, cubrir (o cerrar la bolsa) y
para disolver la sal. Coloque los alimentos en un recipiente de plástico o una
Fig. 2
Fig. 1
pollo sobre el espetón.
ángulos para sujetar los alimentos (Fig. 2).
Simplemente combine el agua con la sal, mezclando
de agua, o 115 g de sal por cada litro de agua.
Utilice 1½ taza (435 g) de sal kosher por galón (3.8 L)
lo permita.
le aconsejamos que siempre lo haga cuando el tiempo
resultados más jugosos. Se nota tanto la diferencia que
salmuera (una solución de agua con sal) produce
Poner carne magra como pollo, pavo y cerdo en
Salmuera
hilo por encima.
piel cuelga del cuello, doble la piel hacia arriba y ate el
cuerpo, y luego jale las extremidades hacia arriba. Si
Enrolle el hilo primero alrededor del ala, cerca del
alas, agarrando la punta de las mismas en la vuelta.
el pollo. Jale el hilo por encima de los muslos y enróllelo alrededor de las
muslos y jale para juntar las piernas, cruzando el hilo una y otra vez. Voltee
Enrolle las extremidades del hilo alrededor de las extremidades de los
del rabo y alce las dos extremidades, cruzándolas por encima del rabo.
4–5 veces más largo que lo largo del pollo. Coloque el medio del hilo debajo
propósito. Meta las alas debajo de pollo. Corte un pedazo de hilo de cocino
Existen varios métodos para atar los alimentos, pero todos tienen el mismo
3. Apriete los pernos para asegurar la carne o el
2. Si es necesario, instale los pinchos a distintos
1. Inserte los alimentos sobre el espetón (Fig. 1).
antes de insertarlos sobre el espetón.
función ROTISSERIE. Nota: ate los alimentos
con hilo de cocina antes de asarlos con la
uniforme. Es imprescindible atar los alimentos
Atar las aves como el pollo asegura una cocción
Cómo atar las aves
Page 61

12
de sacarla del horno.
retirar el pato del horno. Permita que la bandeja enfríe completamente antes
espere hasta que la grasa deje de hervir/burbujear/chisporrotear antes de
los últimos 15 minutos del ciclo de cocción. Al final del ciclo de cocción,
A fin de evitar el contacto con la grasa caliente, no abra la puerta durante
salpicaduras.
⁄2
pulgada (1.5 cm) más arriba
1
de la bandeja (véase la ilustración). Esto reducirá el chisporroteo y las
aproximadamente
alrededor de manera que el aluminio quede
a la parte de atrás. Levante las orillas todo
una de la izquierda a la derecha y otra del frente
la bandeja con dos hojas de papel de aluminio,
Cuando usa la función ROTISSERIE /DUCK, forre
pantalla mostrará la hora.
Al final del tiempo, el horno emitirá un pitido. El horno se apagará y la
tiempo de cocción manualmente.
pescado, vegetales o frutas. Nota: deberá programar la temperatura y el
Utilice el programa CUSTOM si desea asar otros tipos de alimentos, como
para producir resultados crujientes/dorados.
pollo, pato y carne, el programa aumentará automáticamente la temperatura
alimentos a la perfección. Durante la etapa final del programa para asar
programa elegido) para mantener la temperatura del horno y asar los
superiores estarán funcionando de manera intermitente (dependiendo del
calentamiento rápido. Después de 10 minutos, solamente las 2 resistencias
10 minutos del ciclo de cocción, las 4 resistencias se encenderán, para un
El programa de cocción empezará automáticamente. Durante los primeros
el horno, presione el botón START/STOP.
con 2 muescas y una extremidad plana. Después de colocar el espetón en
muesca y una extremidad ligeramente redondeada. El lado izquierdo cuenta
colocar el espetón correctamente en el horno. El lado derecho cuenta con 1
acerca de cómo atar e insertar las aves sobre el espetón. Cerciórese de
DERECHA
IZQUIERDA
Véase la página siguiente para instrucciones
al horno antes de elegir la función ROTISSERIE.
Ensarte los alimentos sobre el espetón y métalos
START/STOP; el temporizador empezará su cuenta regresiva.
antes o después de presionar el botón START/STOP. Presione el botón
desactivar la convección, presione el botón CONV en cualquier momento,
confirmar. La función ROTISSERIE trabaja con convección por defecto. Para
a parpadear. Gire el SELECTOR para ajustar el tiempo y presiónelo para
para ajustar la temperatura y presiónelo para confirmar. El tiempo empezará
temperatura empezará a parpadear. Gire el SELECTOR
MEAT (carne) o CUSTOM (personalizado). La
el programa deseado: CHICKEN (pollo), DUCK (pato),
Oprima el botón ROTIS. Gire el SELECTOR para elegir
horno.
para recoger la grasa. No es necesario precalentar el
bandeja sobre la rejilla. Cerciórese de usar la bandeja
Coloque la rejilla del horno en la posición 1 y coloque la
ROTISSERIE (asado giratorio)
botón CONV otra vez.
Puede desactivar la función CONV en cualquier momento, presionando el
CONV en cualquier momento durante el precalentamiento o la cocción.
convección. El ventilador aparecerá en la pantalla. Puede elegir la función
Luego, presione el botón CONV para activar el ventilador de cocción por
Primero, seleccione la función deseada y fije la temperatura y el tiempo.
(asado giratorio), KEEP WARM (mantener caliente) o LEFTOVERS (sobras).
(horneado), BROIL (gratinado), ROAST (asado), PIZZA (pizza), ROTISSERIE
Puede usar la función CONV con la mayoría de las funciones: BAKE
bien reducir el tiempo de cocción cuando utiliza la función CONV.
rápidos y uniformes. Por lo general, deberá reducir la temperatura en 25°F, o
alrededor de los alimentos mientras se cocinan. Logra resultados más
La función CONV (convección) utiliza un ventilador que hace circular el aire
CONV
(convección)
Page 62

11
El horno se apagará y la pantalla mostrará la hora.
El temporizador se pondrá en marcha. Al final del tiempo, emitirá un pitido.
encender el horno. El horno no necesita precalentar.
Coloque los alimentos en el horno y presione el botón START/STOP para
para ajustar el tiempo y presiónelo para confirmar.
El tiempo empezará a parpadear. Gire el SELECTOR
para confirmar.
SELECTOR para ajustar la temperatura y presiónelo
La temperatura empezará a parpadear. Gire el
WARM y presiónelo para confirmar.
Gire el SELECTOR para seleccionar la función KEEP
Coloque la rejilla en la posición 1, 2 ó 3.
KEEP WARM (mantener caliente)
El horno se apagará y la pantalla mostrará la hora.
El temporizador se pondrá en marcha. Al final del tiempo, emitirá un pitido.
El horno no necesita precalentar.
encender el horno.
Coloque los alimentos en el horno y presione el botón START/STOP para
presiónelo para confirmar.
El tiempo empezará a parpadear. Gire el SELECTOR para ajustar el tiempo y
para confirmar.
SELECTOR para ajustar la temperatura y presiónelo
La temperatura empezará a parpadear. Gire el
LEFTOVERS y presiónelo para confirmar.
Gire el SELECTOR para seleccionar la función
Coloque la rejilla en la posición 1, 2 ó 3.
LEFTOVERS (sobras)
tiempo de cocción puede variar dependiendo del grosor de la pizza.
puede ajustarse al gusto. Si usa pizza congelada, siga las instrucciones; el
El tiempo de cocción de la pizza varía dependiendo del tamaño de la pizza y
bandeja. Cerciórese de bien aceitar la placa/bandeja antes de usarla.
Coloque la pizza fresca sobre una placa perforada para pizza o en la
Consejos para hornear pizza
El horno se apagará y la pantalla mostrará la hora.
temporizador se pondrá en marcha. Al final del tiempo, emitirá un pitido.
Cuando el horno alcance la temperatura deseada, meta la pizza al horno. El
bandeja.
Coloque la pizza fresca sobre una placa perforada para pizza o en la
el horno.
presiónelo para confirmar. Presione el botón START/STOP para precalentar
El tiempo empezará a parpadear. Gire el SELECTOR para ajustar el tiempo y
apagar el copo de nieve.
presiónelo para confirmar. Si la pizza está fresca, gire el SELECTOR para
Si la pizza está congelada, gire el SELECTOR para elegir el copo de nieve y
SELECTOR para ajustar el tamaño y presiónelo para confirmar.
El indicador del tamaño de la pizza empezará a parpadear. Gire el
ajustar la temperatura y presiónelo para confirmar.
parpadear. Gire el SELECTOR para
La temperatura empezará a
confirmar.
la función PIZZA y presiónelo para
Gire el SELECTOR para seleccionar
Coloque la rejilla en la posición 3.
PIZZA (pizza)
Page 63

Puede elegir la función CONV
10
Alimentos a base de naranja, limón u otra fruta que contenga
de aluminio para cocer este tipo de alimentos.
aconsejamos que forre la bandeja/parrilla con papel sulfurizado o papel
cítrico pueden dañar el acabado esmaltado de la bandeja. Le
Alimentos a base de naranja, limón u otra fruta que contenga ácido
dulces y sabrosos.
Utilice la función ROAST para asar vegetales; se caramelizarán, volviéndose
rápidamente, sin secar la carne.
Active también la función CONV para asar la carne y el pollo más
Consejos para asar
STOP.
(convección) en cualquier momento antes de presionar el botón START/
apagará y la pantalla mostrará la hora.
se pondrá en marcha. Al final del tiempo, emitirá un pitido. El horno se
(listo) aparecerá en la pantalla. Meta los alimentos al horno. El temporizador
Cuando el horno alcance la temperatura programada, el mensaje "READY"
precaliente. El mensaje "PREHEAT" (precalentando) aparecerá en la pantalla.
para fijar el tiempo, presione el botón START/STOP y permita que el horno
El tiempo empezará a parpadear. Gire el SELECTOR
para confirmar.
SELECTOR para ajustar la temperatura y presiónelo
La temperatura empezará a parpadear. Gire el
presiónelo para confirmar.
Gire el SELECTOR para seleccionar la función ROAST y
Coloque la rejilla en la posición 1 ó 2.
ROAST (asado)
Vigile la cocción para asegurarse de que los alimentos no se quemen.
de aluminio para cocer este tipo de alimentos.
aconsejamos que forre la bandeja/parrilla con papel sulfurizado o papel
ácido cítrico pueden dañar el acabado esmaltado de la bandeja. Le
de goteo.
resultados, utilice la rejilla para asar, puesta adentro de la bandeja/bandeja
Active la función CONV para carne y pescado. Para lograr mejores
Utilice la función BROIL para dorar/gratinar cazuelas, sándwiches, etc.
Consejos para gratinar
El horno se apagará y la pantalla mostrará la hora.
El temporizador se pondrá en marcha. Al final del tiempo, emitirá un pitido.
encender el horno. El horno no necesita precalentar.
Coloque los alimentos en el horno y presione el botón START/STOP para
presionar el botón START/STOP.
Puede elegir la función CONV (convección) en cualquier momento antes de
ajustar el tiempo y presiónelo para confirmar.
El tiempo empezará a parpadear. Gire el SELECTOR para
500°F (260°C) y no puede ajustarse.
La temperatura por defecto de la función BROIL es
presiónelo para confirmar.
Gire el SELECTOR para seleccionar la función BROIL y
Coloque la rejilla en la posición 4.
BROIL (gratinado)
de aluminio para cocer este tipo de alimentos.
aconsejamos que forre la bandeja/parrilla con papel sulfurizado o papel
cítrico pueden dañar el acabado esmaltado de la bandeja. Le
Alimentos a base de naranja, limón u otra fruta que contenga ácido
tiempo recomendado.
averiguar si los alimentos están hechos 5–10 minutos antes del final del
Por lo general, el horneado por convección será más rápido. Empiece a
("scones"), galletas y panes..
alimentos que necesitan dorarse uniformemente tales como bollos ingleses
pasteles ligeros y huevos. Utilice la función BAKE + CONV para hornear
Utilice la función BAKE para hornear alimentos delicados como natillas,
Consejos para hornear
Page 64

9
y la pantalla mostrará la hora.
pondrá en marcha. Al final del tiempo, emitirá un pitido. El horno se apagará
aparecerá en la pantalla. Meta los alimentos al horno. El temporizador se
horno alcance la temperatura programada, el mensaje "READY" (listo)
mensaje "PREHEAT" (precalentando) aparecerá en la pantalla. Cuando el
Presione el botón START/STOP y permita que el horno precaliente. El
presionar el botón START/STOP.
Puede elegir la función CONV (convección) en cualquier momento antes de
Gire el SELECTOR para ajustar el tiempo y presiónelo para confirmar.
temperatura y presiónelo para confirmar. El tiempo empezará a parpadear.
Gire el SELECTOR para ajustar la
parpadear.
confirmar. La temperatura empezará a
función "BAKE" y presiónelo para
Gire el SELECTOR para seleccionar la
Coloque la rejilla en la posición 1 ó 2.
BAKE (horneado)
apunte hacia arriba.
disponga los panecillos sobre la rejilla de tal manera que la parte cortada
elementos inferiores a media potencia. Para lograr resultados óptimos,
La función BAGEL enciende los elementos superiores a plena potencia y los
Consejos para tostar panecillos
START/STOP para empezar a tostar.
los panecillos están congelados. Si no, simplemente presione el botón
El copo de nieve empezará a parpadear – gire el SELECTOR para elegirlo si
presiónelo para confirmar.
el SELECTOR para ajustar la cantidad de mitades de panecillos, y
El mensaje "SLICES" (cantidad de rebanadas) empezará a parpadear – gire
desde 1 hasta 7, y presiónelo para confirmar.
empezará a parpadear – gire el SELECTOR para ajustar el grado de tostado,
presiónelo para confirmar. El mensaje "SHADE" (grado de tostado)
Gire el SELECTOR para seleccionar la función "BAGEL" y
apuntando hacia arriba.
Disponga los panecillos sobre la rejilla, el lado cortado
Coloque la rejilla en la posición 3.
BAGEL (panecillos)
Oscuro . . . . . . . . . . . . . . . . . . . . . . . . . . . . . . . . . . . . . . . . . . . . .6 ó 7
Medio . . . . . . . . . . . . . . . . . . . . . . . . . . . . . . . . . . . . . . . . . . 3, 4 ó 5
Claro . . . . . . . . . . . . . . . . . . . . . . . . . . . . . . . . . . . . . . . . . . . . . .1 ó 2
Grados de tostado
pan a temperatura ambiente.
de lo normal. Necesitará tostar el pan refrigerado durante más tiempo que el
temperatura del pan. Si las rebanadas están finas, utilice un ajuste más bajo
El tiempo de tostado puede variar dependiendo del grosor y de la
Consejos para tostar
para empezar a tostar.
el pan está congelado. Si no, simplemente presione el botón START/STOP
El copo de nieve empezará a parpadear – gire el SELECTOR para elegirlo si
confirmar.
el SELECTOR para ajustar la cantidad de rebanadas, y presiónelo para
El mensaje "SLICES" (cantidad de rebanadas) empezará a parpadear – gire
para confirmar.
ajustar el grado de tostado, desde 1 hasta 7, y presiónelo
tostado) empezará a parpadear – gire el SELECTOR para
presiónelo para confirmar. El mensaje "SHADE" (grado de
Gire el SELECTOR para seleccionar la función "TOAST" y
Disponga las rebanadas de pan sobre la rejilla.
Coloque la rejilla en la posición 3.
TOAST (tostado)
FUNCIONAMIENTO
Page 65

convección
Alimentos recomendados
Opción
8
defecto
Tiempo de cocción por
temperatura
Ajustes de
1* 350°F 150–450°F 30 minutos Sí Pescado, frutas, vegetales
1* 425°F 150–450°F 40 minutos Sí Res, cordero, cerdo
1* 325°F 150–450°F 1 hora y 30 minutos Sí Pato
1* 450°F 150–450°F 60 minutos Sí Pollo y aves
por defecto
Temperatura
*Coloque la bandeja sobre la rejilla del horno, puesta en la posición 1, para recoger la grasa
(personalizado)
CUSTOM
(carne)
MEAT
(pato)
DUCK
(pollo)
CHICKEN
de la rejilla
Función Posición
OPCIONES PARA ROSTIZAR
Page 66

calientes
congelada
pollo
grandes, vegetales,
alimentos al gratén
pescado, mariscos,
hamburguesas,
cazuelas, panes
recomendados
Alimentos
rebanadas
Sí Pizza fresca o
opción
Ajustes de cantidad de
defecto
7
(30 cm)
10 minutos Sí Bistecs, chuletas,
Cantidad de rebanadas por
pizza fresca de 12 pulgadas
Tiempo de cocción por defecto Convección en
de tostado
Ajustes de grado
fija
temperatura
Ajustes de
por defecto
Grado de tostado
1, 2, 3 325°F 150–450°F 20 minutos Sí Recalienta las sobras
1, 2, 3 175°F 150–300°F 30 minutos Sí Mantiene los alimentos
3 450°F 350–450°F 14 minutos =
1, 2 400°F 150–450°F 30 minutos Sí Presas de carne
4 500°F Temperatura
1, 2 350°F 150–450°F 30 minutos Sí Alimentos horneados,
rejilla
por defecto
Temperatura
de la
rejilla
(sobras)
LEFTOVERS
caliente)
(mantener
KEEP WARM
(pizza)
PIZZA
(asado)
ROAST
(gratinado)
BROIL
(horneado)
BAKE
Función Posición
Encontrará a continuación una guía de las funciones. Para más información acerca de cada función, véase las páginas 9–12.
Funciones –
BAGEL (panecillos) 3 4 1–7 3–4 1–2, 3–4, 5–6
TOAST (tostado) 3 4 1–7 3–4 1–2, 3–4, 5–6
Función de tostado Posición de la
.
–
Todas las funciones para tostar cuentan con una opción de descongelación. Para tostar artículos congelados, gire el
SELECTOR para seleccionar el copo de nieve
Funciones de tostado
FUNCIONES (MODOS DE COCCIÓN)
Page 67

6
por el asa y jálela. Nunca cubra la bandeja recogemigas con papel de aluminio.
La bandeja recogemigas se desliza hacia afuera, desde el frente del horno. Se retira fácilmente, para facilitar la limpieza. Simplemente agárrela
Bandeja recogemigas
3
2
4
Posición 4
Función BROIL (gratinado): coloque la rejilla en la posición 4.
Función PIZZA (pizza): siempre coloque la rejilla en la posición 3.
puede causar un incendio.
para tostar. ADVERTENCIA: colocar la rejilla en la posición 1 ó 4
Función TOAST (tostado): siempre coloque la rejilla en la posición 3
posición 1 ó 2.
Función BAKE (horneado) o ROAST (asado): coloque la rejilla en la
1
Posición 1 Posición 2 Posición 3
continuación.
obtener los mejores resultados. Por favor consulte las imágenes a
paso a paso, e indica en qué nivel colocar la rejilla del horno para
Cada una de nuestras recetas provee instrucciones de preparación
POSICIONES DE LA REJILLA
defecto ("1") al desconectar el horno.
SELECTOR hasta que "2" aparezca en la pantalla, y luego presiónelo para confirmar. Nota: el sonido regresará automáticamente al ajuste de volumen por
sonoras, gire el SELECTOR hasta que "0" aparezca en la pantalla, y luego presiónelo para confirmar. Para subir el volumen de las señales sonoras, gire el
ROTIS y el botón CONV durante dos segundos. El número "1" (el ajuste de volumen por defecto) aparecerá en la pantalla. Para desactivar las señales
Su horno le da la opción de desactivar las señales sonoras o de subir el volumen. Para cambiar las señales sonoras, presione simultáneamente el botón
Señales sonoras
pasos para fijar los minutos.
para confirmar su selección. Para fijar una hora de tarde/noche, desplácese por las horas hasta que el indicador "PM" aparezca en la pantalla. Repita estos
oprimido el SELECTOR hasta que la hora empiece a parpadear. Gire el SELECTOR hasta que la hora deseada aparezca en la pantalla, y luego presiónelo
Conecte el horno a una toma de corriente de 120V AC La pantalla LCD se encenderá (color azul) y mostrará 12:00. Para fijar la hora, presione y mantenga
Cómo fijar la hora
Page 68

5
y el tiempo. Presione el botón para apagar el horno.
Presione el botón START/STOP para encender el horno después de haber elegido la función, la temperatura
Botón START/STOP (encendido/apagado)
(carne) y CUSTOM (personalizado).
Presione el botón ROTIS para activar el programa deseado: CHICKEN (pollo), DUCK (pato), MEAT
Botón ROTIS (asado giratorio)
cuece y hornea los alimentos más rápida y uniformemente.
convección y reducir el tiempo de cocción con la mayoría de las funciones. La cocción por convección
El botón CONV puede oprimirse en cualquier momento para encender el ventilador de cocción por
Botón CONV (convección)
disponibles. Presiónela para confirmar la opción deseada.
tostado deseado. Gire la perilla para desplazarse por las funciones, los tiempos y las temperaturas
Permite elegir el modo de cocción, fijar el tiempo de cocción o la temperatura, y elegir el grado de
SELECTOR (selector de función)
hora.
hora, la temperatura y el grado de tostado programados. Cuando el horno está apagado, muestra la
La pantalla digital grande con retroiluminación azul es fácil de leer y muestra claramente la función, la
Pantalla digital LCD
PANEL DE CONTROL
Page 69

4
5
4
3
2
1
11 y 12
DERECHA
67
Úsela conjuntamente con la bandeja/bandeja de goteo para asar.
10. Rejilla para asar a la parrilla
gratinar.
la bandeja conjuntamente con la parrilla, o sola para hornear o asar/
Para su comodidad, una bandeja/bandeja de goteo está incluida. Utilice
9. Bandeja/Bandeja de goteo
11 y 12
14
jalarse. Para deslizarla fuera del horno, deberá alzar la parte delantera.
maneras. En la posición superior, la rejilla se detiene a medio camino al
8. Rejilla del horno La rejilla del horno puede posicionarse de cuatro
facilita la limpieza del interior del horno.
Las paredes del horno cuentan con un revestimiento especial que
para rostizar
pinchos
Espetón y
IZQUIERDA
14
de goteo
Bandeja/Bandeja
Rejilla para asar
9
Rejilla del horno
8
10
Agarradera
13
A (BPA).
Ninguna de las piezas en contacto con los alimentos contiene bisfenol
16. Sin bisfenol A (BPA)
Mantiene la encimera ordenada.
15. Espacio para guardar el cable (no ilustrado)
Ubicados en ambos lados del horno. Introduzca el espetón en ellos.
14. Encajes para el espetón
Sirve para retirar los alimentos asados sobre el espetón del horno.
13. Agarradera
los alimentos firmemente sobre el espetón.
Perfectos para rostizar pollo o presas grandes. Los pinchos mantienen
12. Pinchos
Hace girar los alimentos, para un asado uniforme.
11. Espetón
7. Interior fácil de limpiar
limpieza.
Se desliza hacia afuera, desde el frente del horno, para facilitar la
6. Bandeja recogemigas removible
modo de espera (conectado, pero no encendido).
Enciende/apaga el aparato. También activa el horno cuando está en el
5. Botón START/STOP (encendido/apagado)
MEAT (carne) y CUSTOM (personalizado).
Activa los programas para rostizar: CHICKEN (pollo), DUCK (pato),
4. Botón ROTIS (asado giratorio)
Enciende el ventilador para la cocción por convección.
3. Botón CONV (convección)
la temperatura y el grado de tostado.
Permite elegir el modo de cocción y fijar el tiempo de cocción, la hora,
2. SELECTOR (selector de función)
"LISTO" (listo).
cocción. Cuenta con los indicadores "PREHEAT" (precalentando) y
Muestra la función, el grado de tostado, la temperatura y el tiempo de
1. Pantalla digital con retroiluminación azul
PIEZAS Y CARACTERÍSTICAS
Page 70

3
Recetas . . . . . . . . . . . . . . . . . . . . . . . . . . . . . . . . . . . . . . . . . . . . . . . . . . . . . 17
Garantía . . . . . . . . . . . . . . . . . . . . . . . . . . . . . . . . . . . . . . . . . . . . . . . . . . . . . .15
Limpieza y mantenimiento . . . . . . . . . . . . . . . . . . . . . . . . . . . . . . . . . . . . . . . 15
Funcionamiento . . . . . . . . . . . . . . . . . . . . . . . . . . . . . . . . . . . . . . . . . . . . . . . . .9
Funciones. . . . . . . . . . . . . . . . . . . . . . . . . . . . . . . . . . . . . . . . . . . . . . . . . . . . . .7
Posiciones de la rejilla . . . . . . . . . . . . . . . . . . . . . . . . . . . . . . . . . . . . . . . . . . . .6
Cómo fijar la hora. . . . . . . . . . . . . . . . . . . . . . . . . . . . . . . . . . . . . . . . . . . . . . . .6
Panel de control . . . . . . . . . . . . . . . . . . . . . . . . . . . . . . . . . . . . . . . . . . . . . . . . .5
Piezas y características . . . . . . . . . . . . . . . . . . . . . . . . . . . . . . . . . . . . . . . . . . 4
Antes del primer uso . . . . . . . . . . . . . . . . . . . . . . . . . . . . . . . . . . . . . . . . . . . . .3
Instrucciones de desembalaje . . . . . . . . . . . . . . . . . . . . . . . . . . . . . . . . . . . . . 3
Medidas de seguridad importantes . . . . . . . . . . . . . . . . . . . . . . . . . . . . . . . . . .2
ÍNDICE
USO. MANTÉNGALO FUERA DEL ALCANCE DE LOS NIÑOS.
EL EXTERIOR DEL APARATO SE PONE MUY CALIENTE DURANTE EL
ENCIMA DEL HORNO. SI LO HACE, QUÍTELOS ANTES DE ENCENDERLO.
sobre una superficie sensible al calor. NO GUARDE NINGÚN OBJETO
permitir que el aire circule libremente alrededor de éste. No lo coloque
Deje un espacio libre de 2–4 pulgadas (5–10 cm) alrededor del aparato para
cuidadosamente antes de cada uso.
recogemigas en agua jabonosa caliente. Lave todos los accesorios
del horno, la bandeja, la rejilla para asar, el espetón y la bandeja
todos los accesorios cuidadosamente antes del primer uso. Lave la rejilla
humedecido para remover el polvo acumulado durante el transporte. Lave
Antes de usar el aparato por primera vez, límpielo con un paño ligeramente
ANTES DEL PRIMER USO
GUARDE ESTAS INSTRUCCIONES
aparato y otras partes.
5. Quite las etiquetas protectoras o promocionales pegadas al cuerpo del
antes de tirar el material de embalaje.
piezas descritas en la sección "Piezas y características" estén incluidas
el material de embalaje que las envuelve. Asegúrese de que todas las
4. Retire todas las piezas metidas en moldes de pulpa de celulosa y quite
3. Retire el material de embalaje, el aparato y los accesorios de la caja.
2. Abra la caja y retire el manual de instrucciones y otros folletos de la caja.
1. Coloque la caja sobre una superficie espaciosa, plana y segura.
DESEMBALAJE
seguridad.
comuníquese con un electricista. No intente ir en contra de esta función de
toma de corriente, inviértala. Si aún no entrara completamente,
una sola manera en la toma de corriente polarizada. Si no entrara en la
más ancha que otra). Como medida de seguridad, se podrá enchufar de
El cable de este aparato está dotado de una clavija polarizada (una pata es
AVISO
tal forma que niños no puedan jalarla o tropezar con ella.
aparato. Es importante colocar la extensión sobre la encimera o la mesa de
La clasificación nominal de la extensión debe ser por lo menos igual a la del
Puede usarse una extensión eléctrica con cuidado.
alguien se enganche o tropiece con un cable más largo.
El cable proveído con este aparato es corto, para reducir el peligro de que
USO DE EXTENSIONES
SOLAMENTE
PARA USO DOMÉSTICO
28. Presione el botón START/STOP para encender/apagar el horno.
líquidos calientes.
27. Tenga sumo cuidado al mover un aparato que contenga aceite u otros
Page 71

2
éste toca las paredes o la puerta del armario cuando cierra.
aparato conectado presenta un riesgo de incendio, especialmente si
desconecte el aparato antes de guardarlo en un armario. Dejar el
26. No haga funcionar el aparato bajo o adentro de un armario. Siempre
Presione el botón START/STOP antes de desconectar el aparato.
aparato esté apagado antes de conectar el cable a la toma de corriente.
25. Si corresponde, conecte el cable al aparato y asegúrese de que el
24. No apoye utensilios de cocina o fuentes contra la puerta de vidrio.
descuide ni abandone el aparato mientras esté funcionando.
23. PRECAUCIÓN: a fin de prevenir los riesgos de incendio, nunca
conectado.
22. No intente desalojar alimentos atascados mientras el aparato está
riesgo de electrocución.
podrían depositarse sobre los componentes eléctricos, presentando un
21. No use estropajos metálicos para limpiar el aparato; partículas de metal
un armario.
encendido o mientras esté caliente. No haga funcionar el aparato bajo
o paredes. No guarde ningún artículo sobre el aparato cuando esté
encontrase cerca de materiales inflamables, como cortinas, colgaduras
20. Podría ocurrir un incendio si el aparato estuviese cubierto, tocase, o se
eléctrica.
metal al horno.; esto podría provocar un incendio o una descarga
19. No meta alimentos muy grandes, bandejas de aluminio ni utensilios de
ventilaciones ni cualquier otra abertura durante el funcionamiento.
18. No coloque ningún objeto encima del aparato ni obstruya las
sobrecalentamiento.
(excepto la bandeja) con papel de aluminio; esto puede provocar un
17. No cubra la bandeja recogemigas ni ninguna otra pieza del horno
16. No coloque papel, cartón, plástico o materiales similares en el horno.
accesorios recomendados por el fabricante adentro del horno.
15. Desenchufe el aparato cuando no lo está usando. Solamente guarde los
tirar la grasa caliente.
14. Tenga sumo cuidado al sacar bandejas, fuentes o rejillas del horno o
cerámica adentro del horno.
13. Tenga sumo cuidado al usar fuentes que no sean de metal, vidrio o
12. No coloque recipientes cerrados o herméticos en el horno.
11. No utilice el aparato para ningún otro fin que no sea el indicado.
hornilla eléctrica caliente, ni en un horno caliente.
10. No coloque el aparato sobre o cerca de un quemador a gas o una
con superficies calientes.
donde niños o animales lo puedan jalar o tropezar, ni que haga contacto
9. No permita que el cable cuelgue del borde de la encimera o de la mesa,
8. No lo utilice en exteriores.
heridas.
7. El uso de accesorios no recomendados por Cuisinart puede provocar
revisión, reparación o ajuste.
estuviese dañado; regréselo a un centro de servicio autorizado para su
después de que hubiese funcionado mal o que se hubiese caído o si
6. No utilice este aparato si el cable o la clavija estuviesen dañados,
usado por o cerca de niños.
5. Supervise el uso de este aparato cuidadosamente cuando esté siendo
limpieza en la página 14.
el cuerpo del aparato en agua u otro líquido. Véase las instrucciones de
4. Para reducir el riesgo de electrocución, no sumerja el cable, la clavija o
perillas.
3. No toque las superficies calientes; utilice el mango y los botones o
limpiarlo o manipularlo.
piezas y antes de limpiarlo. Permita que el aparato se enfríe antes de
2. Desconecte el aparato cuando no esté en uso, antes de instalar/sacar
1. Lea todas las instrucciones.
incluso las siguientes:
seguridad,
Siempre que use aparatos eléctricos, debe tomar precauciones básicas de
IMPORTANTES
MEDIDAS DE SEGURIDAD
Page 72

TOB-200
Horno tostador/rostizador de convección
INSTRUCCIONES Y LIBRO DE RECETAS
Page 73

Version no :
Fold Size
Material:
IB-12740-ESP-A
:
148X210mm Number of Pages: 72PP
105gsm gloss art paper for whole book
Coating:
Color (front):
(back):
Date:
PDF version :
Hugo Code :
Color Series:
Remark:
Gloss varnishing in cover
4C(CMYK)+1C(BK)
1C(BK)+1C(BK)
AUG-21-2014
Co-ordinator:
Hugo Description
IB-12740-ESP-A(0.0) BOOK
SIL1737IB-1A1
Non
Quality request (1)
Scias
Operator : HUAN
IRP : AAJ
 Loading...