

Page 1
INSTRUCTION
NST
BOOKLET
BC
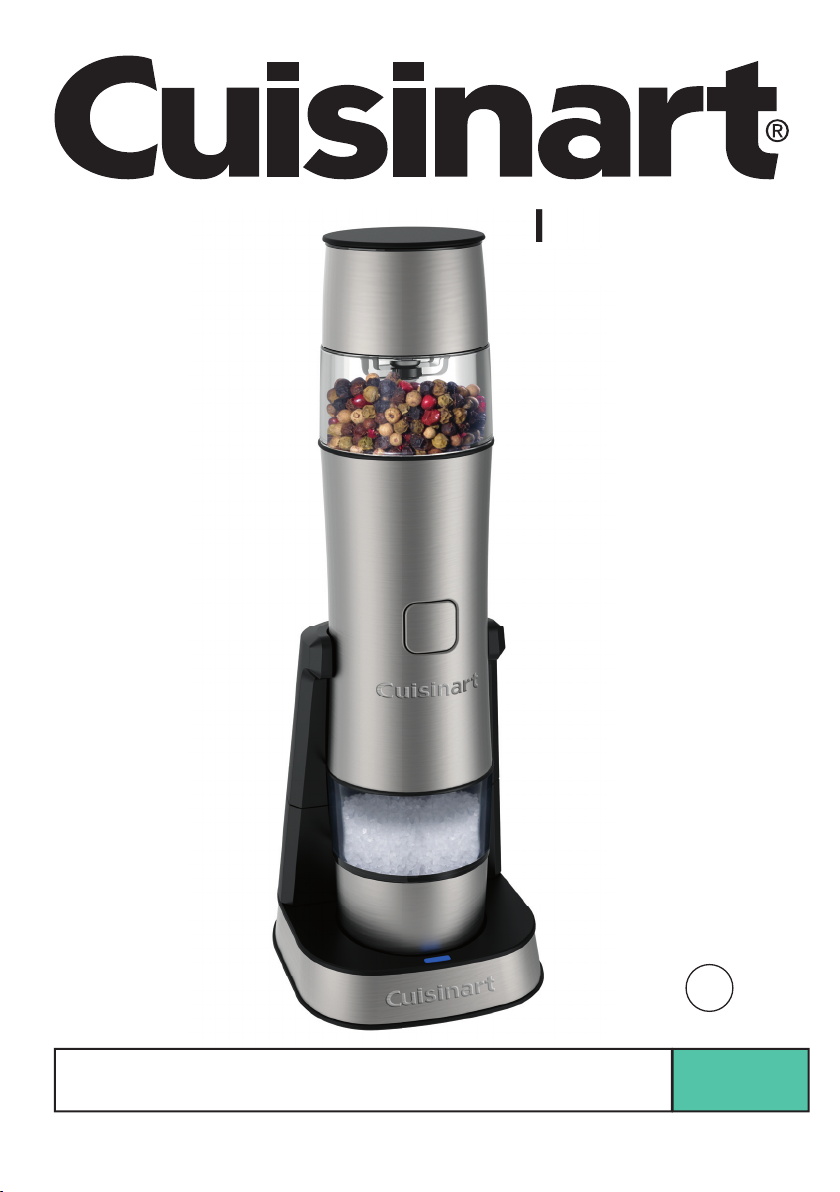
Salt, Pepper and Spice Mill
For your safety and continued enjoyment of this product, always read the instruction book carefully before using.
SG-3
Page 2

IMPORTANT
SAFEGUARDS
When using an electrical appliance, basic safety
precautions should always be followed, including the following:
1. READ ALL INSTRUCTIONS.
2. To protect against electrical shock, do not
put the charger base or motor body of this
appliance in water or other liquid. Never
submerge any other portion of this unit. If
any part falls into liquid, remove immediately. Carefully remove, clean and dry unit
thoroughly before continuing.
3. Do not operate in the presence of explosive and/or flammable fumes.
4. Unplug charger base from outlet before
cleaning.
5.
Charger base should be plugged into an electrical outlet away from sink or hot surfaces.
6. Do not use an extension cord. Plug charger base adapter directly into an electrical
outlet.
7. Do not use appliance for other than intended use.
8. Do not operate any appliance with a
damaged cord or plug, or after the
appliance has malfunctioned or has
been dropped or damaged in any way,
or is not operating properly. Return the
appliance to the nearest Cuisinart
Repair Center for examination, repair,
or mechanical or electrical adjustment.
9.
The use of attachments or accessories not
recommended by Cuisinart may cause fire,
electrical shock or risk of injury.
10. This appliance is intended for household
use only and not for commercial or industrial use.
11. Do not operate a damaged charger. Have
damaged charger replaced immediately.
12 Use only with the charger provided with
the appliance. Do not attempt to use this
charger with any other product. Likewise,
do not attempt to charge this appliance
with any other charger.
13. Do not incinerate the mill, even if it is
damaged. Severe injury can occur if the
batteries are placed in a fire.
14. This product contains, nickel-metal hydride
(NiMH) batteries, which must be recycled
at the end of the life of the product and
disposed of properly. (See Disposal/
Recycling of Batteries, page 6.) Do not
incinerate or compost batteries, as risk
of severe injury can occur at high temperatures.
15. Leaks from battery cells can occur under
extreme conditions. If the liquid, which is a
20–35% solution of potassium hydroxide,
gets on the skin, (1) wash quickly with
soap and water or (2) neutralize with a mild
acid such as lemon juice or vinegar. If the
liquid gets into eyes, flush them immediately with clean water for a minimum of 10
minutes. Seek medical attention.
16. Close supervision is necessary when any
appliance is used by or near children.
17. Avoid contacting moving parts.
18. Do not use outdoors.
19. Do not let cord hang over edge of table or
counter.
20. Do not operate your appliance in an appliance garage or under a wall cabinet. When
storing in an appliance garage always
unplug the unit from the electrical outlet. Not doing so could create a risk of fire,
especially if the appliance touches the
walls of the garage or the door touches the
unit as it closes.
SAVE THESE
INSTRUCTIONS
FOR HOUSEHOLD
USE ONLY
CONTENTS
Important Safeguards . . . . . . . . . . . . . . . . . .2
Parts and Features . . . . . . . . . . . . . . . . . . . . .3
Assembly . . . . . . . . . . . . . . . . . . . . . . . . . . . .4
Operation . . . . . . . . . . . . . . . . . . . . . . . . . . . .5
Quick Tips . . . . . . . . . . . . . . . . . . . . . . . . . . .6
Charging & Battery Life . . . . . . . . . . . . . . . . .6
Cleaning and Maintenance . . . . . . . . . . . . . .6
Disposal/Recycling of Batteries . . . . . . . . . . .6
Warranty . . . . . . . . . . . . . . . . . . . . . . . . . . . . .7
2
Page 3
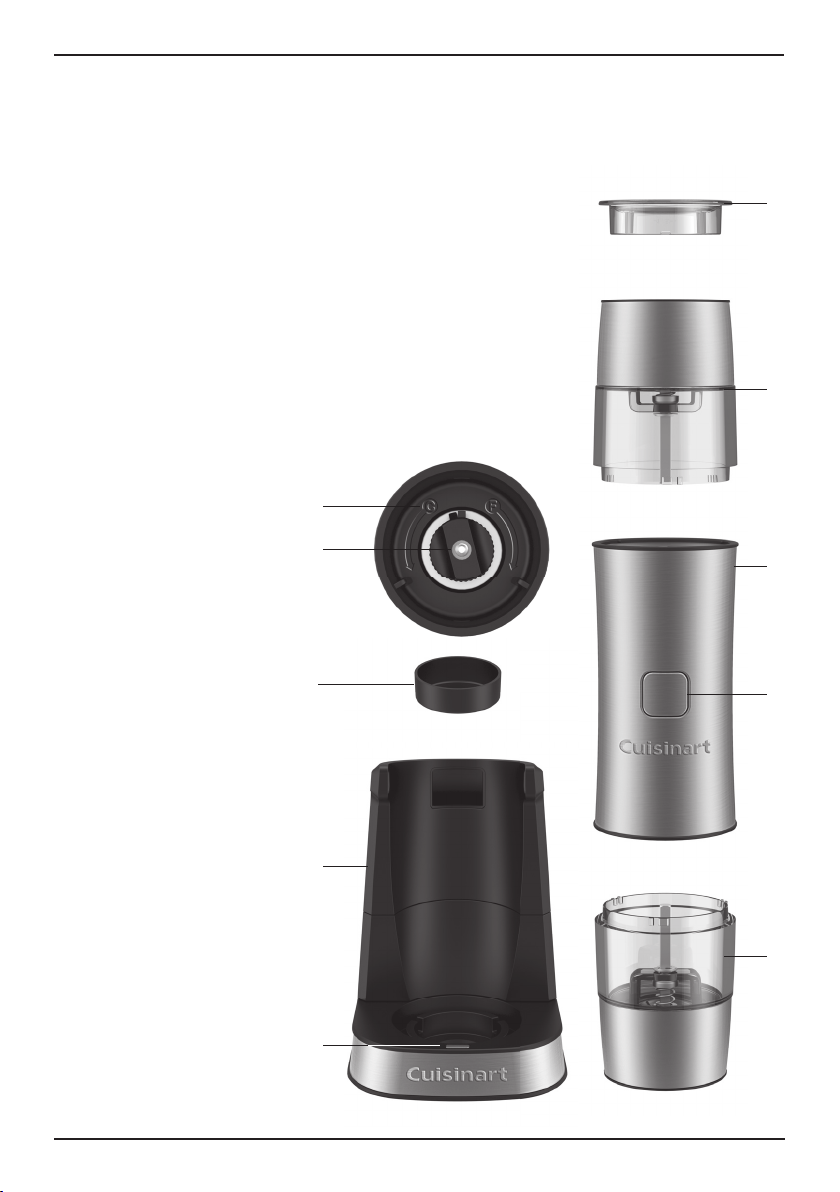
PARTS AND FEATURES
1. Measuring Cap
1 teaspoon capacity
2. Removable Grinding Containers
Clear for easy viewing, and hold
large portions for less refills
3. Rechargeable Batteries (Not Shown)
4. Comfort Grip Housing
Ergonomically designed for comfort
and ease of use
5. On/Off Button
Operates mill when pressed
6. Charging Base
Plugs into outlet and
brings unit to full
recharge
7. Spice Catcher
Removable tray easily
discards leftover spices
8. Charge/Ready Light
Illuminates red when
charging and blue
when fully charged.
9. Adjustable Grind Dial
Choose from 5 set
positions from coarse
to fine
10. Grind Directional
Arrows
Indicates which
direction to turn the
adjustable grind dial
for desired setting
11. Cord Storage
(not shown)
12. BPA Free (not shown)
All materials that come
in contact with food
are BPA free.
10
9
7
6
1
2
4
5
2
8
3
Page 4
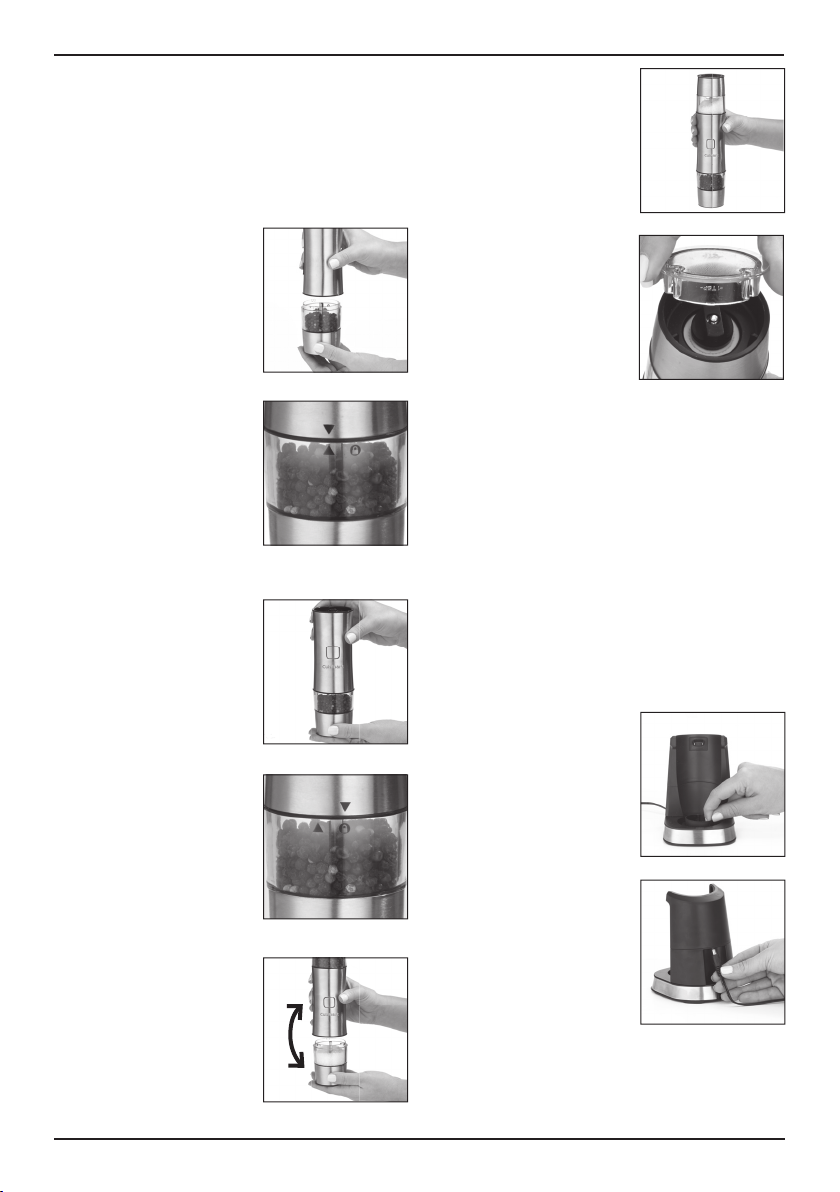
ASSEMBLY
To assemble your Cuisinart® Salt,
Pepper and Spice Mill for use:
1. Place housing and all removable parts
on a clean, flat surface. Make sure that
all parts have been cleaned and dried
thoroughly before assembling.
2. Attach grinding
container(s) to the
unit housing. NOTE:
It is best to attach the
grinding container
from the bottom
while holding the unit
upright.
See fig.1.
3. Line up the arrow
on the grinding container with the arrow
on the unit housing.
NOTE: Both arrows
should face each
other. This will indicate the grinding
container and unit
are properly aligned.
See fig.2.
4. Gently push the
grinding container
and unit housing
together. The grinding
container will fit
together comfortably
with the unit housing.
See fig.3.
5. Secure the grinding
container in place by
twisting the grinding
container clockwise
so that the arrow on
the unit housing is
now aligned with the
lock symbol on the
grinding container.
NOTE: The two pieces will click together
indicating proper
assembly.
See fig.4.
6. To attach the second
grinding container,
flip the unit housing
over and repeat
assembly instructions.
See fig.5.
fig.1
fig.2
fig.3
fig.4
fig.5
7. Your Cuisinart® Salt,
Pepper and Spice
fig.6
Mill is now assembled.
See fig.6.
For use with
measuring cap:
1. To use the measuring
cap on either grinding
container, grasp the
measuring cap and
fig.7
connect to grinding
container by aligning
the grooves on the
measuring cap with
the ridges in the
grinding container.
See fig.7.
2. Press together until the ridge of the
measuring cap rests flat against the
grinding container. NOTE: When not in
use, the measuring cap should remain
in the uppermost grinding container,
as the unit housing will not fit into the
charging base if the measuring cap is
on the lower container.
To assemble charging base for use:
1. Place housing, charging base and all
removable parts on a clean, flat surface.
Make sure that all parts have been
cleaned and dried thoroughly before
assembling.
2. Place the removable
spice catcher into the
fig.8
charging base so
that it fits securely.
NOTE: The spice
catcher will only fit
into the charging
base one way.
fig.8.
3. Connect power
adapter to the charging base by grasping
See
fig.
9
the pin on the power
adapter and inserting
it vertically into the
back of the charging
base until secure.
NOTE: Do not insert
power adapter into the charging base
while power adapter is plugged into a
power source.
See fig.9.
4
Page 5
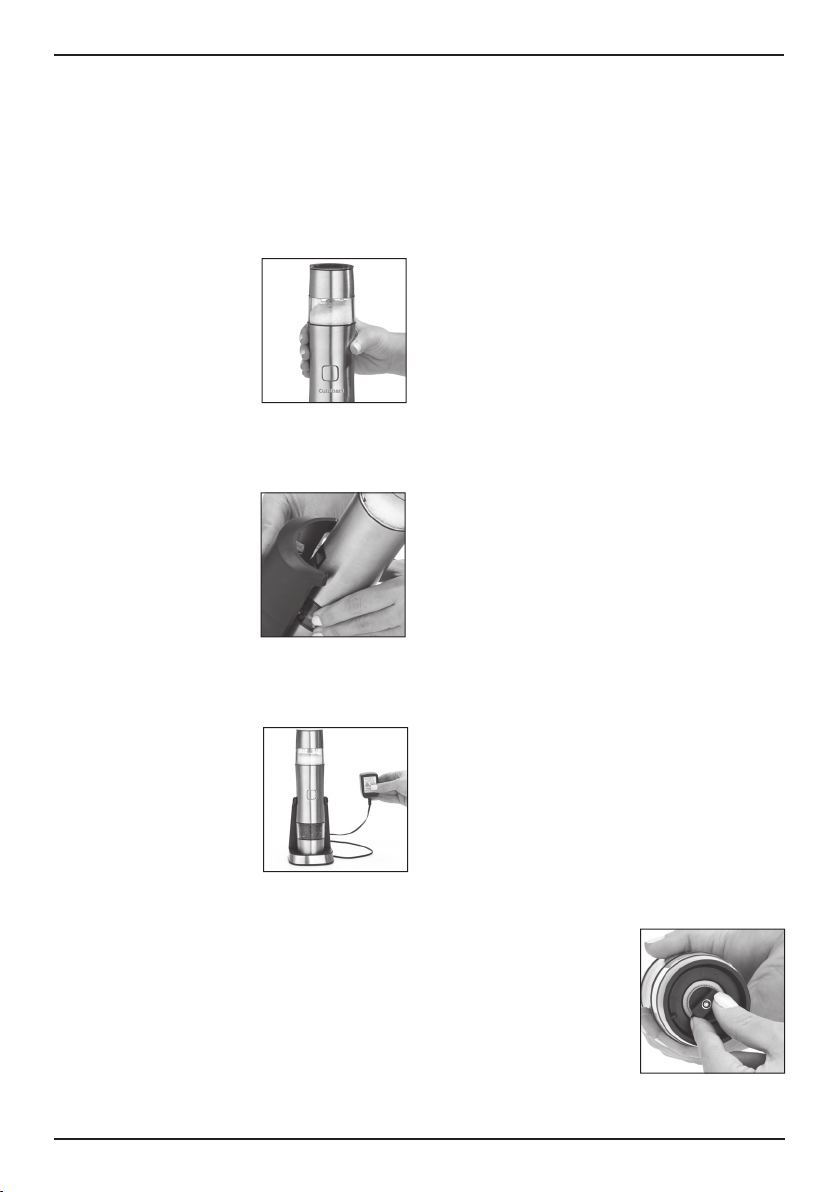
CHARGING
INSTRUCTIONS
To charge your Cuisinart® Salt, Pepper
and Spice Mill for use:
1. Follow assembly instructions for the
Cuisinart
and charging base on page 4 to properly
assemble for charging.
2. Grasp assembled unit
securely and make
sure it is facing
upright. The Salt,
Pepper and Spice
Mill is facing upright
when the Cuisinart
logo on the front of
the unit is in proper
reading orientation
(easy to read and
horizontal.)
3. Place the fully
assembled Salt,
Pepper and Spice
Mill in the charging
base so that the
recessed area on the
back of the unit
housing fits
comfortably with the
protrusion on the
charging base.
See fig.11.
4. Plug charging base
into a 120v power
outlet. Your unit is
now charging for
use. NOTE: Unit is
properly charging if
red LED illuminates
from charging base.
See fig.12.
®
Salt, Pepper and Spice Mill
fig.10
®
See fig.10.
fig.11
fig.
12
OPERATION
INSTRUCTIONS
1. Place housing and all removable parts
on a clean, flat surface. Make sure that
all parts have been cleaned and dried
thoroughly and properly assembled
before use.
2. Attach grinding container(s) to the unit
housing with sea salt, peppercorns, or
desired dried spice. NOTE: It is best to
attach the grinding container from the
bottom while holding the unit upright.
3. Line up the arrow on the grinding
container with the arrow on the unit
housing. NOTE: Both arrows should face
each other. This will indicate the grinding
container and unit are properly aligned.
4. Gently push the grinding container
and unit housing together. The grinding
container will fit together comfortably
with the unit housing.
5. Twist the grinding container clockwise
so that the arrow on the unit housing
is now aligned with the lock symbol on
the grinding container. NOTE: The two
pieces will click together indicating
proper assembly.
6. To attach the second grinding container,
flip the unit housing over and repeat
operating instructions.
7. Press the On/Off button in the center
of the unit housing to begin grinding.
NOTE: Only the bottom container will
yield any grinding results. Even though
the grinding container facing upward will
rotate, no grinding will actually take place.
For use with measuring cap:
To use the measuring cap on either grinding
container, grasp the measuring cap and
connect to grinding container by aligning the
grooves on the measuring cap with the ridges
in the grinding container. Press together until
the ridge of the measuring cap rests flat
against the grinding container. NOTE:
The measuring cap can be used on either
container during operation only. When not
in use, the measuring cap should remain in
the uppermost grinding container as the unit
housing will not fit into the charging base if
the measuring cap is on the lower container.
ADJUSTING THE GRIND
To adjust the grind from
fine to coarse, use the
adjustment dial on the
underside of the mill.
Clockwise for a finer grind
and counterclockwise for
a coarser grind.
5
Page 6

QUICK TIPS
•
Before first use, the batteries must be charged
for 13 hours.
•
To clear a peppercorn that is stuck in the
grinding wheel you may either:
1. Turn the mill upside down and shake gently
while pressing the On/Off power button.
2.
Turn the mill upside down and position the
grind selector to coarse, then hold over a
plate and grind until peppercorn is dislodged.
•
Never use moist or wet spices in the mill. This
will clog the grinding mechanism. We recommend using only store-bought dried spices.
•
To improve battery performance, it is recom-
mended that you occasionally unplug the
charging base and run the mill until its battery
is fully discharged and it stops operating. Once
discharged, plug the charging base back into
the electrical outlet and recharge the mill for 13
hours. This procedure improves battery capacity
and should be repeated every 2–3 months.
•
Clean the mill and base by simply wiping
all parts with a damp cloth and thoroughly
drying. Do not place in the dishwasher.
Avoid wetting battery contacts.
CHARGING & BATTERY LIFE
Your Cuisinart® Salt, Pepper and Spice Mill
is equipped with NiMH batteries. We have selected these batteries to give you maximum battery
life and long running times.
If batteries should run down completely, it will
take between 8 and 13 hours to fully recharge
them. Normally, you won’t run batteries down
completely, since the running time with a full
charge is up to 20 minutes. It varies depending
on your usage, but most grinding tasks take only
about 5 seconds. If your battery is no longer
charging, it is time to replace the battery. Please
call our Consumer Service Center at 1-800-7260190 for instructions on returning your unit for
battery replacement.
CONTINUOUS CHARGING
The unit is designed so that the batteries may
remain on continuous charge. It is recommended
that the Salt, Pepper and Spice Mill charger be
kept plugged into a wall socket, so that the mill
will always be ready to use. Leaving the unit on
continuous charge is inexpensive in terms of the
amount of electricity being used.
Use only with the charger provided with the
appliance. Do not attempt to use this charger
with any other product. Likewise, do not attempt
to charge this appliance with any other charger.
HOLDING THE CHARGE
The batteries hold most of their charge even
when not plugged in and charging, losing only
about 30% of total charge per month.
SHORT RUN TIMES
If, after repeated use, the run time seems to get
shorter and the Salt, Pepper and Spice Mill has
less power, remove the plug from the wall outlet
and continue to use mill until it is fully discharged and stops operating. Plug base back
into wall outlet and recharge the unit for 13
hours or overnight for a full new charge. This
procedure improves battery capacity and should
be repeated once every 2 –3 months to ensure
optimum performance.
CLEANING AND
MAINTENANCE
Simply wipe all parts with a damp cloth then
dry thoroughly. Do not place in the dishwasher.
Avoid wetting battery contacts. Any other servicing should be performed by an authorized
service representative.
DISPOSAL/RECYCLING
OF BATTERIES
This product uses four NiMH rechargeable and
recyclable batteries. At the end of the batteries’
useful life, they should be recycled. These batteries must not be incinerated or composted.
NiMH batteries should not be put in municipal
waste systems. Contact your local waste collection agency for proper recycling and disposal
information for your area.
Please do not attempt to dismantle the mill to
replace these batteries on your own. Damage
could result to the unit.
When it is time to replace and/or recycle the batteries, or to receive additional instructions for disposing of old batteries, call toll-free 1-800-7260190 for instructions on how to ship your Salt,
Pepper and Spice Mill back to Cuisinart. Or send
the Salt, Pepper and Spice Mill to: Cuisinart,
7475 North Glen Harbor Blvd., Glendale, AZ
85307.
6
Page 7

WARRANTY
Limited Three-Year
Warranty
This warranty is available to consumers only.
You are a consumer if you own a Cuisinart® Salt,
Pepper and Spice Mill that was purchased at
retail for personal, family or household use.
Except as otherwise required under applicable
law, this warranty is not available to retailers or
other commercial purchasers or owners. We
warrant that your Cuisinart® Salt, Pepper and
Spice Mill will be free of defects in materials and
workmanship under normal home use for 3 years
from the date of original purchase.
We recommend that you visit our website, www.
cuisinart.com for a fast, efficient way to complete
your product registration. However, product
registration does not eliminate the need for the
consumer to maintain the original proof of
purchase in order to obtain the warranty benefits.
In the event that you do not have proof of
purchase date, the purchase date for purposes of
this warranty will be the date of manufacture.
If your Cuisinart® Salt, Pepper and Spice Mill
should prove to be defective within the warranty
period, we will repair it, or if we think necessary,
replace it. To obtain warranty service, simply call
our toll-free number 1-800-726-0190 for additional
information from our Customer Service
Representatives, or send the defective product to
Customer Service at
Harbor Blvd., Glendale, AZ 85307
To facilitate the speed and accuracy of your
return, please enclose $10.00 for shipping and
handling of the product.
Please pay by check or money order (California
residents need only supply proof of purchase and
should call 1-800-726-0190 for shipping
instructions).
NOTE: For added protection and secure handling
of any Cuisinart® product that is being returned,
we recommend you use a traceable, insured
delivery service. Cuisinart cannot be held
responsible for in-transit damage or for packages
that are not delivered to us. Lost and/or damaged
products are not covered under warranty. Please
be sure to include your return address, daytime
phone number, description of the product defect,
product model number (located on bottom of
product), original date of purchase, and any other
information pertinent to the product’s return.
CALIFORNIA RESIDENTS ONLY:
California law provides that for In-Warranty
Service, California residents have the option of
returning a nonconforming product (A) to the store
where it was purchased or (B) to another retail
Cuisinart, 7475 North Glen
.
store that sells Cuisinart
type. The retail store shall then, at its discretion,
either repair the product, refer the consumer to an
independent repair facility, replace the product, or
refund the purchase price less the amount directly
attributable to the consumer’s prior usage of the
product. If the above two options do not result in
the appropriate relief to the consumer, the
consumer may then take the product to an
independent repair facility if service or repair can
be economically accomplished. Cuisinart and not
the consumer will be responsible for the
reasonable cost of such service, repair,
replacement, or refund for nonconforming
products under warranty.
California residents may also, according to their
preference, return nonconforming products
directly to Cuisinart for repair, or if necessary,
replacement, by calling our Consumer Service
Center toll-free at 1-800-726-0190.
Cuisinart will be responsible for the cost of the
repair, replacement, and shipping and handling for
such products under warranty.
BEFORE RETURNING YOUR CUISINART®
PRODUCT
If you are experiencing problems with your
Cuisinart® product, we suggest that you call our
Cuisinart® Service Center at 1-800-726-0190
before returning the product to be serviced. If
servicing is needed, a representative can confirm
whether the product is under warranty and direct
you to the nearest service location.
Your Cuisinart® Salt, Pepper and Spice Mill has
been manufactured to the strictest specifications
and has been designed for use only in 120 volt
outlets and only with authorized accessories and
replacement parts. This warranty expressly
excludes any defects or damages caused by
attempted use of this unit with a converter, as well
as use with accessories, replacement parts or
repair service other than those authorized by
Cuisinart. This warranty does not cover any
damage caused by accident, misuse, shipment or
other than ordinary household use. This warranty
excludes all incidental or consequential damages.
Some states do not allow the exclusion or
limitation of these damages, so these exclusions
may not apply to you. You may also have other
rights, which vary from state to state.
Important: If the nonconforming product is to be
serviced by someone other than Cuisinart’s
Authorized Service Center, please remind the
servicer to call our Consumer Service Center at
1-800-726-0190 to ensure that the problem is
properly diagnosed, the product is serviced with
the correct parts, and the product is still under
warranty.
®
products of the same
7
Page 8

©2014 Cuisinart
150 Milford Road
East Windsor, NJ 08520
Printed in China
14CE004502
G IB-12261-ESP
Trademarks or service marks referred to herein are the
trademarks or service marks of their respective owners.
Page 9

respectivos.
G IB-12261-ESP
14CE004502
Impreso en la China
150 Milford Road
©2014 Cuisinart
mencionadas en ésta pertenecen a sus titulares
Todas marcas registradas o marcas de comercio
East Windsor, NJ 08520
Page 10

7
bajo garantía.
repararlo y asegurarse de que el producto esté
correctamente, usar las piezas correctas para
1-800-726-0190 a fin de diagnosticar el problema
deberían llamar al servicio posventa de Cuisinart al
informe al personal del centro de servicio que
un centro de servicio no autorizado, por favor
Importante: si debe llevar el aparato defectuoso a
Estado a otro.
puede tener otros derechos que varían de un
mencionadas pueden no regir para usted. Usted
consecuentes, de modo que las limitaciones
exclusión o limitación de daños incidentales o
consecuentes. Algunos Estados no permiten la
expresamente todos los daños incidentales o
uso, negligencia o accidente. Esta garantía excluye
y no es válida en caso de daños causados por mal
cubre el uso institucional o comercial del producto,
uso de un convertidor de voltaje. Esta garantía no
por Cuisinart, así como los daños causados por el
accesorios, piezas o reparaciones no autorizados
excluye expresamente los daños causados por
repuesto autorizados solamente. Esta garantía
corriente de 120V, usando accesorios y piezas de
fabricación y ha sido diseñado para uso sobre
Este aparato satisface las más altas exigencias de
dirección del centro de servicio más cercano.
si su aparato sigue bajo garantía y le indicará la
aparato a Cuisinart. Un representante le confirmará
posventa al 1-800-726-0190 antes de regresar el
recomendamos que llame a nuestro servicio
Si su aparato tiene algún problema, le
ANTES DE HACER REPARAR SU APARATO
garantía.
productos defectuosos durante el período de
reparación, reemplazo, manejo y envío de los
Cuisinart será responsable por los gastos de
servicio posventa al 1-800-726-0190.
cambien. Para esto, se debe llamar a nuestro
directamente a Cuisinart para que lo reparen o lo
desean, mandar el aparato defectuoso
Los residentes de California también pueden, si lo
el período de garantía.
reembolso de los productos defectuosos durante
gastos de servicio, reparación, reemplazo o
económica. Cuisinart será responsable por los
se pueda ajustar o reparar el producto de manera
a un centro de servicio independiente, siempre que
satisfacen al consumidor, podrá llevar el producto
hasta que éste se dañe. Si estas dos opciones no
imputable al uso del producto por el consumidor
precio original del producto, menos la cantidad
producto o reembolsará el consumidor por el
centro de servicio independiente, cambiará el
reparará el producto, referirá el consumidor a un
.
en una tienda, para uso personal
®
de este tipo. La tienda, a su opción,
®
Cuisinart
compraron o (B) a otra tienda que venda productos
producto defectuoso a la tienda donde lo
estado de California pueden (A) regresar el
bajo el período de garantía. Los residentes del
La ley del estado de California ofrece dos opciones
RESIDENTES DE CALIFORNIA SOLAMENTE
así como cualquier información pertinente.
dirección y teléfono, la descripción del problema,
esta garantía. Recuerde incluir su nombre,
lastimados durante el envío no serán cubiertos bajo
dirección equivocada. Los productos perdidos y/o
transporte o por los paquetes mandados a una
responsable por los daños ocurridos durante el
seguro y seguimiento. Cuisinart no será
mande su paquete por un método de entrega con
NOTA: para mayor seguridad, le aconsejamos que
0190 para recibir instrucciones de envío.
prueba de compra y deben llamar al 1-800-726Los residentes de California sólo necesitan dar una
por gastos de manejo y envío.
de compra y un cheque o giro postal de US$10.00
Regrese el aparato defectuoso, junto con su recibo
Harbor Blvd., Glendale, AZ 85307
Cuisinart, Service Department, 7475 North Glen
1-800-726-0190 o regrese el aparato defectuoso a:
garantía, llame a nuestra línea directa gratuita al
nuestra opción). Para obtener servicio bajo esta
garantía, la reparemos o reemplazaremos (a
materiales o fabricación durante el período de
Si este aparato presentara algún defecto de
calculado a partir de la fecha de fabricación.
del recibo de compra, el período de garantía será
para recibir servicio bajo esta garantía. En ausencia
embargo, registrar el producto no es necesario
la verificación de la fecha de compra original. Sin
disponible en www.cuisinart.com a fin de facilitar
Le aconsejamos que llene el formulario de registro
instrucciones.
utilizado para uso doméstico y según las
compra original, siempre que el aparato haya sido
fabricación durante 3 años después de la fecha de
aparato contra todo defecto de materiales o
otros comerciantes. Cuisinart garantiza este
lo permita, esta garantía no es para los detallistas u
o casero. A excepción de los estados donde la ley
aparato Cuisinart
Usted es un consumidor si ha comprado su
Esta garantía es para los consumidores solamente.
años
Garantía limitada de tres
GARANTÍA
Page 11

6
Harbor Blvd. Glendale, AZ 85307.
mande el molinillo a: Cuisinart, 7475 North Glen
unidad, la cual contiene nuevas baterías. O
llame al 1-800-726-0190 para pedir una nueva
Cuando es tiempo de cambiar las baterías,
baterías. Esto podría dañar el aparato.
No intente desarmar la unidad para cambiar las
eliminación de desechos.
autoridades locales en materia de reciclaje y
reciclaje de las baterías, comuníquese con las
de la basura. Para más información acerca del
Tampoco se debe tirar las baterías con el resto
las baterías, ni las coloque en un compostador.
ser recicladas al final de su vida útil. No queme
recargables y reciclables. Las baterías deben
Este producto utiliza cuatro baterías NiMH
BATERÍAS
RECICLAJE DE LAS
un técnico autorizado.
Cualquier otro servicio debe ser realizado por
Evite mojar los contactos de las baterías.
No meta ninguna de las piezas al lavavajillas.
paño ligeramente humedecido y séquelo bien.
Simplemente limpie todas las piezas con un
MANTENIMIENTO
está equipado con baterías
®
LIMPIEZA Y
aconsejamos que haga esto cada 2–3 meses.
capacidad de carga de las baterías, le
el molinillo durante 13 horas. Para mejorar la
base de carga a la toma de corriente y cargue
descargado. Después, vuelva a conectar la
el molinillo hasta que esté completamente
desconecte la base de carga y haga funcionar
corto y el molinillo tiene menos potencia,
el tiempo de funcionamiento parece ser más
Si, después de usar el aparato repetidamente,
REDUCIDO
FUNCIONAMIENTO
TIEMPO DE
carga total por mes.
perdiendo aproximadamente el 30% de la
aparato no está enchufado y cargando,
Las baterías mantienen la carga aunque el
CARGA
MANTENIMIENTO DE LA
cargar este producto con otra base de carga.
de carga con otro producto. Tampoco intente
proveídos únicamente. No intente utilizar la base
Utilice el adaptador sector y la base de carga
diferencia en su factura eléctrica.
consume mucha electricidad y no notará una
siempre estará listo. La base de carga no
toma de corriente; de esta manera, el molinillo
siempre deje la base de carga conectada a la
mantenerse cargando. Le aconsejamos que
Este aparato ha sido diseñado para poder
CARGA CONTINUA
servicio a fin de reemplazar las baterías.
0190, para regresar la unidad a nuestro centro de
de atención al cliente, llamando al 1-800-726de cambiarla. Comuníquese con nuestro servicio
segundos. Si la batería ya no se carga, es tiempo
Moler sal o pimienta requiere tan sólo 5
las baterías tienen una autonomía de 20 minutos.
recargarse completamente. Una vez cargadas,
deberán poner a cargar durante 8–13 horas para
Si las baterías se descargan completamente, se
vida útil y autonomía.
Hemos seleccionado estas baterías por su larga
recargables de níquel e hidruro metálico (NiMH).
recargable Cuisinart
Su molinillo de sal, pimienta y especias
DE LAS BATERÍAS
CARGA Y VIDA ÚTIL
Evite mojar los contactos de las baterías.
séquelos bien. No los meta al lavavajillas.
limpiar los molinillos y la base de carga, y
• Utilice un paño ligeramente humedecido para
cada 2–3 meses.
las baterías, le aconsejamos que haga esto
horas. Para mejorar la capacidad de carga de
y vuelva a cargar los molinillos durante 13
conecte la base de carga a la toma de corriente
completamente descargadas. Después,
cada molinillo hasta que las baterías estén
cuando, desconecte la base de carga y utilice
recargables, le aconsejamos que de vez en
• Para mejorar el rendimiento de las baterías
utilice especias secas compradas en tienda.
mecanismo de molienda. Le aconsejamos que
húmedas o mojadas. Esto obstruirá el
• Nunca llene el recipiente con especias
pimienta.
molinillo hasta desalojar el grano de
Page 12

5
"molienda gruesa" y haga funcionar el
el selector del grado de molienda sobre
2. Sostenga el molinillo boca abajo, coloque
botón de encendido.
sacúdalo suavemente mientras oprime el
1. Sostenga el molinillo boca abajo y
en la rueda de moler:
• Para desalojar granos de pimienta trabados
baterías durante 13 horas.
ar las
• Antes del primer uso, deberá carg
CONSEJOS RÁPIDOS
una molienda más fina.
antihorario para obtener
gruesa, o en sentido
obtener una molienda más
sentido horario para
molinillo. Gire el dial en
ubicado debajo de cada
gruesa, utilice el dial
molienda, desde fina hasta
Para ajustar el grado de la
GRADO DE MOLIENDA
(Fig. 12).
CÓMO AJUSTAR EL
abajo.
de carga con la tapa medidora puesta
unidad, ya que ésta no cabrá en la base
Cuando no la usa, guárdela arriba de la
recipientes, durante el uso solamente.
instalarse sobre cualquiera de los
recipiente. NOTA: la tapa medidora puede
medidora quede ajustada sobre el
piezas una hacia otra hasta que la tapa
resaltos del recipiente. Presione ambas
las ranuras de la tapa medidora con los
debajo del recipiente deseado, alineando
8. Para usar la tapa medidora, conéctela
hacia arriba gira, no molerá.
NOTA: aunque el recipiente que apunta
hacia abajo molerá sal/pimienta/especias.
NOTA: solamente el recipiente que apunta
7. Presione el botón de encendido/apagado.
ensamblaje.
la unidad y repita las instrucciones de
6. Para instalar el segundo recipiente, voltee
ensambladas.
que las piezas están debidamente
NOTA: escuchará un "clic", lo que indica
con el candado cerrado del recipiente.
que la flecha de la unidad quede alineada
5. Gire el recipiente en sentido horario hasta
12
fig.
fig.11
fig.10
encontrar resistencia.
unidad uno hacia otro. No debería
4. Presione suavemente el recipiente y la
alineados.
recipiente y la unidad están debidamente
apuntar hacia la otra; esto indica que el
de la base. NOTA: cada flecha debe
3. Alinee la flecha del recipiente con la flecha
recto al instalarlo.
unidad. NOTA: sostenga el recipiente
secas deseadas e instálelo sobre la
marina, granos de pimienta o las especias
2. Llene el recipiente deseado con sal
ensambladas.
están limpias, secas y debidamente
y segura. Cerciórese que todas las piezas
extraíbles sobre una superficie plana, seca
1. Coloque la base y todas las piezas
OPERACIÓN
INSTRUCCIONES DE
cargando
120V. La unidad está
toma de corriente de
4. Conecte el cable a una
(Fig. 11).
debidamente alineadas
carga están
unidad y la base de
ocurrir cuando la
carga. Esto sólo puede
conector de la base de
debidamente sobre el
unidad encaje
el conector de la
asegurándose de que
sobre la base de carga,
3. Coloque el molinillo
(Fig. 10).
Cuisinart puede leerse)
recta (el logotipo
manera que quede
seguramente, de
2. Agarre la unidad
según se describió en la página anterior.
1. Ensamble el molinillo y la base de carga
especias:
Para cargar el molinillo de sal, pimienta y
CARGA
INSTRUCCIONES DE
Page 13

4
9
fig.
fig.8
fig.7
fig.6
(Fig. 9).
(Fig. 8).
está listo
®
de carga
conectado a la base
después de haberlo
corriente hasta
sector a la toma de
conecte el adaptador
base. NOTA: no
parte trasera de la
fig.5
(Fig. 4).
verticalmente en la
las patas
carga, introduciendo
sector a la base de
3. Conecte el adaptador
manera
solamente de una
base de carga
fig.4
instalarse sobre la
bandeja puede
carga. NOTA: la
sobre la base de
residuos removible
2. Instale la bandeja de
todas las piezas están limpias y secas.
plana, seca y segura. Cerciórese que
y las piezas extraíbles sobre una superficie
fig.3
1. Coloque el bloque-motor, la base de carga
Para ensamblar la base de carga:
carga con la tapa medidora puesta abajo.
la unidad, ya que no cabrá en la base de
cuando no la usa, guarde la tapa arriba de
ajustada sobre el recipiente. NOTA:
hasta que la tapa medidora quede
2. Presione ambas piezas una hacia otra
(Fig. 7).
fig.2
resaltos del recipiente
medidora con los
las ranuras de la tapa
deseado, alineando
debajo del recipiente
medidora, conéctela
1. Para usar la tapa
Para usar la tapa medidora:
(Fig. 6).
fig.1
Cuisinart
pimienta y especias
7. Su molinillo de sal,
(Fig. 5).
(Fig. 2).
ensamblaje
las instrucciones de
voltee la base y repita
segundo recipiente,
6. Para instalar el
ensambladas
debidamente
piezas están
lo que indica que las
escuchará un "clic",
recipiente. NOTA:
candado cerrado del
alineada con el
unidad quede
que la flecha de la
sentido horario hasta
5. Gire el recipiente en
(Fig. 3).
encontrar resistencia
otro. No debería
unidad uno hacia
el recipiente y la
4. Presione suavemente
alineados
debidamente
unidad están
el recipiente y la
otra; esto indica que
debe apuntar hacia la
NOTA: cada flecha
flecha de la base.
recipiente con la
3. Alinee la flecha del
(Fig. 1).
de la misma
recipiente abajo
recta e instalando el
sosteniendo la unidad
cada recipiente
hará más fácil instalar
base. NOTA: se le
recipiente sobre la
2. Instale el primer
están limpias y secas.
y segura. Cerciórese que todas las piezas
extraíbles sobre una superficie plana, seca
1. Coloque la base y todas las piezas
Para ensamblar el molinillo:
ENSAMBLAJE
Page 14

3
8
bisfenol A (BPA).
alimentos contiene
2
6
5
7
4
9
10
2
1
en contacto con los
Ninguna de las piezas
11. Sin BPA (no ilustrado)
de molienda deseado
para conseguir el grado
molienda
girar el control de
Indica en qué dirección
10. Indicador de dirección
desde grueso hasta fino
grados de molienda,
Permite elegir entre 5
9. Control de molienda
completamente cargado
indica que está
cargando, una luz azul
el molinillo está
Una luz roja indica que
8. Luz de carga/listo
fácilmente
residuos de especias
permite tirar los
Bandeja removible que
7. Bandeja de residuos
la unidad
corriente para recargar
Se conecta a la toma de
6. Base de carga
toque de un botón
Enciende el molinillo al
5. Botón de encendido/apagado
máxima comodidad y facilidad de uso
Ergonómicamente diseñado para
4. Cuerpo de agarre cómodo
3. Baterías recargables (no ilustradas)
requieren llenarse con menos frecuencia
Guardan porciones más grandes;
2. Recipientes removibles transparentes
con capacidad de 1 cucharadita
1. Tapa medidora
CARACTERÍSTICAS
PIEZAS Y
Page 15

2
Garantía . . . . . . . . . . . . . . . . . . . . . . . . . . . . . . .7
Reciclaje de las baterías . . . . . . . . . . . . . . . . . . 6
Limpieza y mantenimiento. . . . . . . . . . . . . . . . 6
Instrucciones de carga . . . . . . . . . . . . . . . . . . .6
Consejos rápidos. . . . . . . . . . . . . . . . . . . . . . . .5
Funcionamiento . . . . . . . . . . . . . . . . . . . . . . . . .5
Ensamblaje. . . . . . . . . . . . . . . . . . . . . . . . . . . . .4
Piezas y características . . . . . . . . . . . . . . . . . . .3
Medidas de seguridad importantes . . . . . . . . .2
ÍNDICE
SOLAMENTE
DOMÉSTICO
PARA USO
INSTRUCCIONES
GUARDE ESTAS
cuando cierra.
toca las paredes o la puerta del armario
riesgo de incendio, especialmente si éste
Dejar el aparato conectado presenta un
aparato antes de guardarlo en un armario.
de un armario. Siempre desconecte el
20. No haga funcionar el aparato bajo o adentro
la mesa o de la encimera.
19. No permita que el cable cuelgue del borde de
18. No lo utilice en exteriores.
17. Evite el contacto con las piezas móviles.
por o cerca de niños.
cuidadosamente cuando esté siendo usado
16. Supervise el uso de este aparato
Busque atención médica.
abundante agua durante 10 minutos o más.
los ojos, enjuáguelos inmediatamente con
vinagre. Si el líquido entrara en contacto con
la acidez de la piel con jugo de limón o
rápidamente con agua y jabón y (2) neutralice
contacto con la piel, (1) lave la piel
20–35% de hidróxido de potasio) entrara en
de las baterías (el cual es una solución de
condiciones extremas. Si el líquido adentro
15. Las baterías pueden tener fugas bajo
causar heridas muy graves.
ya que pueden explotar por el calor y
coloque las baterías en un compostador,
baterías" en la página 6. No queme ni
aparato. Véase la sección "Reciclaje de las
leyes vigentes al final de la vida útil del
(NiMH), las cuales deben reciclarse según las
recargables de níquel e hidruro metálico
14. Este aparato está equipado con baterías
puede causar graves heridas.
gravemente dañado. Incinerar la batería
13. No queme el molinillo, aunque esté
de carga.
intente cargar este producto con otra base
base de carga con otro producto. Tampoco
proveídos únicamente. No intente utilizar la
12. Utilice el adaptador sector y la base de carga
Reemplace el cargador inmediatamente.
11. No utilice el cargador si está dañado.
para uso comercial o industrial.
10. Para uso doméstico solamente. No aprobado
electrocución o herida.
Cuisinart presenta un riesgo de incendio,
9.
El uso de accesorios no recomendados por
para su revisión, reparación o ajuste.
aparato a un centro de servicio autorizado
caído o si estuviese dañado. Regrese el
hubiese funcionado mal o que se hubiese
clavija estuviesen dañados, después de que
8.
No utilice este aparato si el cable o la
no sea el indicado.
7. No utilice el aparato para ningún otro fin que
carga directamente en una toma de corriente.
6. No utilice una extensión. Enchufe la base de
alejada del fregadero o de superficies calientes.
5. Conecte la base en una toma de corriente
corriente antes de limpiarla.
4. Desconecte la base de carga de la toma de
de vapores explosivos o inflamables.
3. No haga funcionar el aparato en la presencia
cuidadosamente la unidad antes de continuar.
luego retírelo del líquido. Limpie y seque
aparato cayera en líquido, desconéctelo y
parte del aparato en agua u otro líquido. Si el
agua u otro líquido. No sumerja ninguna otra
ponga la base de carga o el bloque-motor en
2.
Para reducir el riesgo de electrocución, no
1. LEA TODAS LAS INSTRUCCIONES.
siguientes:
precauciones básicas de seguridad, incluso las
Siempre que use aparatos eléctricos, debe tomar
IMPORTANTES
SEGURIDAD
MEDIDAS DE
Page 16

siempre lea las instrucciones cuidadosamente antes de usarlo.
M
INSTR
Para su seguridad y para disfrutar plenamente de este producto,
SG-3
BC
Molinillo de sal, pimienta y especias
INSTRUCCIONES
MANUAL DE
Page 17

Version no :
Fold Size
Material (Cover):
Coating:
Color (Cover):
(Inside):
Date:
PDF version :
Hugo Code :
Color Series:
Remark:
IB-12261-ESP
:
210X148mm Saddle Stitched 16 pp
105gsm art paper for whole book
(Inside):
Gloss varnishing in cover
4C(CMYK)+1C(BK)
1C(BK)+1C(BK)
APR-18-2014
Co-ordinator:
Andy Ws Chan
Hugo Description
IB-12261-ESP(1.1) BOOK
GHI0388IB-1-1
Non
Quality request (1)
Operator : WEI
IRP : AAJ
 Loading...