

Page 1
Balance électronique
Electronic scales
Instructions - Hinweise - Instructies - Istruzioni - Instrucciones
SCA5CE
Page 2

SOMMAIRE
1. Introduction . . . . . . . . . . . . . . . . . . . . . . . . . . . . . . . . . . . . . . . . . . . . . . . . . . . . . . . . . . . . . . . . . . . . . . . . . . . . . . . . . . . . . . . . . .4
2. Caractéristiques produit . . . . . . . . . . . . . . . . . . . . . . . . . . . . . . . . . . . . . . . . . . . . . . . . . . . . . . . . . . . . . . . . . . . . . . . . . . . . . . . . .4
3. Utilisation . . . . . . . . . . . . . . . . . . . . . . . . . . . . . . . . . . . . . . . . . . . . . . . . . . . . . . . . . . . . . . . . . . . . . . . . . . . . . . . . . . . . . . . . . . .5
A. Assemblage - Installation des piles . . . . . . . . . . . . . . . . . . . . . . . . . . . . . . . . . . . . . . . . . . . . . . . . . . . . . . . . . . . . . . . . . . . . . . .5
B. Conseils d’utilisation - Le pesage - La fonction tare . . . . . . . . . . . . . . . . . . . . . . . . . . . . . . . . . . . . . . . . . . . . . . . . . . . . . . . . . . .5
Mes sages sur l’éc ran num ériqu e . . . . . . . . . . . . . . . . . . . . . . . . . . . . . . . . . . . . . . . . . . . . . . . . . . . . . . . . . . . . . . . . . . . . . . . . . . .6
4. L’avis des Chefs . . . . . . . . . . . . . . . . . . . . . . . . . . . . . . . . . . . . . . . . . . . . . . . . . . . . . . . . . . . . . . . . . . . . . . . . . . . . . . . . . . . . . . .6
5. Questions / Réponses . . . . . . . . . . . . . . . . . . . . . . . . . . . . . . . . . . . . . . . . . . . . . . . . . . . . . . . . . . . . . . . . . . . . . . . . . . . . . . . . . . .7
6. Nettoyage et rangement . . . . . . . . . . . . . . . . . . . . . . . . . . . . . . . . . . . . . . . . . . . . . . . . . . . . . . . . . . . . . . . . . . . . . . . . . . . . . . . .7
7. Consignes de sécurité . . . . . . . . . . . . . . . . . . . . . . . . . . . . . . . . . . . . . . . . . . . . . . . . . . . . . . . . . . . . . . . . . . . . . . . . . . . . . . . . . .7
CONTENTS
1. Introduction . . . . . . . . . . . . . . . . . . . . . . . . . . . . . . . . . . . . . . . . . . . . . . . . . . . . . . . . . . . . . . . . . . . . . . . . . . . . . . . . . . . . . . . . . .8
2. Description . . . . . . . . . . . . . . . . . . . . . . . . . . . . . . . . . . . . . . . . . . . . . . . . . . . . . . . . . . . . . . . . . . . . . . . . . . . . . . . . . . . . . . . . . .8
3. Use of the appliance . . . . . . . . . . . . . . . . . . . . . . . . . . . . . . . . . . . . . . . . . . . . . . . . . . . . . . . . . . . . . . . . . . . . . . . . . . . . . . . . . . .9
A. Assembly - Installing the batteries . . . . . . . . . . . . . . . . . . . . . . . . . . . . . . . . . . . . . . . . . . . . . . . . . . . . . . . . . . . . . . . . . . . . . . . .9
B. Operating the appliance - Measuring - The tare feature . . . . . . . . . . . . . . . . . . . . . . . . . . . . . . . . . . . . . . . . . . . . . . . . . . . . . . .9
Mes sages on t he di gi tal scr een . . . . . . . . . . . . . . . . . . . . . . . . . . . . . . . . . . . . . . . . . . . . . . . . . . . . . . . . . . . . . . . . . . . . . . . . . . .10
4. Chefs’ tips and hints . . . . . . . . . . . . . . . . . . . . . . . . . . . . . . . . . . . . . . . . . . . . . . . . . . . . . . . . . . . . . . . . . . . . . . . . . . . . . . . . . .10
5. Questions / Answers . . . . . . . . . . . . . . . . . . . . . . . . . . . . . . . . . . . . . . . . . . . . . . . . . . . . . . . . . . . . . . . . . . . . . . . . . . . . . . . . . . .11
6. Cleaning and storage . . . . . . . . . . . . . . . . . . . . . . . . . . . . . . . . . . . . . . . . . . . . . . . . . . . . . . . . . . . . . . . . . . . . . . . . . . . . . . . . .11
7. Safety cautions . . . . . . . . . . . . . . . . . . . . . . . . . . . . . . . . . . . . . . . . . . . . . . . . . . . . . . . . . . . . . . . . . . . . . . . . . . . . . . . . . . . . . .11
INHALTSVERZEICHNIS
1. Einleitung . . . . . . . . . . . . . . . . . . . . . . . . . . . . . . . . . . . . . . . . . . . . . . . . . . . . . . . . . . . . . . . . . . . . . . . . . . . . . . . . . . . . . . . . . .12
2. Eigenschaften des Produkts . . . . . . . . . . . . . . . . . . . . . . . . . . . . . . . . . . . . . . . . . . . . . . . . . . . . . . . . . . . . . . . . . . . . . . . . . . . . .12
3. Gebrauch . . . . . . . . . . . . . . . . . . . . . . . . . . . . . . . . . . . . . . . . . . . . . . . . . . . . . . . . . . . . . . . . . . . . . . . . . . . . . . . . . . . . . . . . . .13
A. Zusammensetzen - Einlegen der Batterien . . . . . . . . . . . . . . . . . . . . . . . . . . . . . . . . . . . . . . . . . . . . . . . . . . . . . . . . . . . . . . . . .13
B. Gebrauchshinweise - Wiegen - Die Funktion Tare . . . . . . . . . . . . . . . . . . . . . . . . . . . . . . . . . . . . . . . . . . . . . . . . . . . . . . . . . . .13
Anzeigen auf dem Digitalschirm . . . . . . . . . . . . . . . . . . . . . . . . . . . . . . . . . . . . . . . . . . . . . . . . . . . . . . . . . . . . . . . . . . . . . . . . . .14
4. Die Ratschläge der Chefs . . . . . . . . . . . . . . . . . . . . . . . . . . . . . . . . . . . . . . . . . . . . . . . . . . . . . . . . . . . . . . . . . . . . . . . . . . . . . . .14
5. Fragen / Antworten . . . . . . . . . . . . . . . . . . . . . . . . . . . . . . . . . . . . . . . . . . . . . . . . . . . . . . . . . . . . . . . . . . . . . . . . . . . . . . . . . . .15
6. Reinigen und Verstauen . . . . . . . . . . . . . . . . . . . . . . . . . . . . . . . . . . . . . . . . . . . . . . . . . . . . . . . . . . . . . . . . . . . . . . . . . . . . . . . .15
7. Sicherheitshinweise . . . . . . . . . . . . . . . . . . . . . . . . . . . . . . . . . . . . . . . . . . . . . . . . . . . . . . . . . . . . . . . . . . . . . . . . . . . . . . . . . . .15
2
Page 3

INHOUD
1. Inleiding . . . . . . . . . . . . . . . . . . . . . . . . . . . . . . . . . . . . . . . . . . . . . . . . . . . . . . . . . . . . . . . . . . . . . . . . . . . . . . . . . . . . . . . . . . .16
2. Onderdelen . . . . . . . . . . . . . . . . . . . . . . . . . . . . . . . . . . . . . . . . . . . . . . . . . . . . . . . . . . . . . . . . . . . . . . . . . . . . . . . . . . . . . . . . .16
3. Gebruik . . . . . . . . . . . . . . . . . . . . . . . . . . . . . . . . . . . . . . . . . . . . . . . . . . . . . . . . . . . . . . . . . . . . . . . . . . . . . . . . . . . . . . . . . . .17
A. Monteren - Aanbrengen van de batterijen . . . . . . . . . . . . . . . . . . . . . . . . . . . . . . . . . . . . . . . . . . . . . . . . . . . . . . . . . . . . . . . .17
B. Bediening - Het wegen - De tarrafunctie . . . . . . . . . . . . . . . . . . . . . . . . . . . . . . . . . . . . . . . . . . . . . . . . . . . . . . . . . . . . . . . . .17
Boodschappen op het digitale scherm . . . . . . . . . . . . . . . . . . . . . . . . . . . . . . . . . . . . . . . . . . . . . . . . . . . . . . . . . . . . . . . . . . . . . .18
4. De mening van de chefs . . . . . . . . . . . . . . . . . . . . . . . . . . . . . . . . . . . . . . . . . . . . . . . . . . . . . . . . . . . . . . . . . . . . . . . . . . . . . . .18
5. Vragen en antwoorden . . . . . . . . . . . . . . . . . . . . . . . . . . . . . . . . . . . . . . . . . . . . . . . . . . . . . . . . . . . . . . . . . . . . . . . . . . . . . . . .19
6. Schoonmaken en opbergen . . . . . . . . . . . . . . . . . . . . . . . . . . . . . . . . . . . . . . . . . . . . . . . . . . . . . . . . . . . . . . . . . . . . . . . . . . . . .19
7. Veiligheidsinstructies . . . . . . . . . . . . . . . . . . . . . . . . . . . . . . . . . . . . . . . . . . . . . . . . . . . . . . . . . . . . . . . . . . . . . . . . . . . . . . . . . .19
CONTENUTO
1. Introduzione . . . . . . . . . . . . . . . . . . . . . . . . . . . . . . . . . . . . . . . . . . . . . . . . . . . . . . . . . . . . . . . . . . . . . . . . . . . . . . . . . . . . . . . .20
2. Caratteristiche . . . . . . . . . . . . . . . . . . . . . . . . . . . . . . . . . . . . . . . . . . . . . . . . . . . . . . . . . . . . . . . . . . . . . . . . . . . . . . . . . . . . . . .20
3. Utilizzo . . . . . . . . . . . . . . . . . . . . . . . . . . . . . . . . . . . . . . . . . . . . . . . . . . . . . . . . . . . . . . . . . . . . . . . . . . . . . . . . . . . . . . . . . . . .21
A. Montaggio - Inserimento delle pile . . . . . . . . . . . . . . . . . . . . . . . . . . . . . . . . . . . . . . . . . . . . . . . . . . . . . . . . . . . . . . . . . . . . . .21
B. Consigli di utilizzo - La pesatura - La funzione tara . . . . . . . . . . . . . . . . . . . . . . . . . . . . . . . . . . . . . . . . . . . . . . . . . . . . . . . .21
Mes saggi visual izzati s ullo scher mo di gi tale . . . . . . . . . . . . . . . . . . . . . . . . . . . . . . . . . . . . . . . . . . . . . . . . . . . . . . . . . . . . . . . . .22
4. Il parere dello chef . . . . . . . . . . . . . . . . . . . . . . . . . . . . . . . . . . . . . . . . . . . . . . . . . . . . . . . . . . . . . . . . . . . . . . . . . . . . . . . . . . .22
5. Doman de / risposte . . . . . . . . . . . . . . . . . . . . . . . . . . . . . . . . . . . . . . . . . . . . . . . . . . . . . . . . . . . . . . . . . . . . . . . . . . . . . . . . . . . .23
6. Pulizia e manutenzione . . . . . . . . . . . . . . . . . . . . . . . . . . . . . . . . . . . . . . . . . . . . . . . . . . . . . . . . . . . . . . . . . . . . . . . . . . . . . . . .23
7. Istruzioni di sicurezza . . . . . . . . . . . . . . . . . . . . . . . . . . . . . . . . . . . . . . . . . . . . . . . . . . . . . . . . . . . . . . . . . . . . . . . . . . . . . . . . .23
CONTENIDO
1. Introducción . . . . . . . . . . . . . . . . . . . . . . . . . . . . . . . . . . . . . . . . . . . . . . . . . . . . . . . . . . . . . . . . . . . . . . . . . . . . . . . . . . . . . . . .24
2. Características del producto . . . . . . . . . . . . . . . . . . . . . . . . . . . . . . . . . . . . . . . . . . . . . . . . . . . . . . . . . . . . . . . . . . . . . . . . . . . . .24
3. Utilización . . . . . . . . . . . . . . . . . . . . . . . . . . . . . . . . . . . . . . . . . . . . . . . . . . . . . . . . . . . . . . . . . . . . . . . . . . . . . . . . . . . . . . . . . .25
A. Montaje - Instalación de las pilas . . . . . . . . . . . . . . . . . . . . . . . . . . . . . . . . . . . . . . . . . . . . . . . . . . . . . . . . . . . . . . . . . . . . . . .25
B. Consejos de utilización - Pesado - Función tara . . . . . . . . . . . . . . . . . . . . . . . . . . . . . . . . . . . . . . . . . . . . . . . . . . . . . . . . . . . .25
Men sajes en la panta lla di gi tal . . . . . . . . . . . . . . . . . . . . . . . . . . . . . . . . . . . . . . . . . . . . . . . . . . . . . . . . . . . . . . . . . . . . . . . . . . .26
4. Sugerenci as de los chefs . . . . . . . . . . . . . . . . . . . . . . . . . . . . . . . . . . . . . . . . . . . . . . . . . . . . . . . . . . . . . . . . . . . . . . . . . . . . . . .26
5. Preguntas y respuestas . . . . . . . . . . . . . . . . . . . . . . . . . . . . . . . . . . . . . . . . . . . . . . . . . . . . . . . . . . . . . . . . . . . . . . . . . . . . . . . .27
6. Limpiar y guardar . . . . . . . . . . . . . . . . . . . . . . . . . . . . . . . . . . . . . . . . . . . . . . . . . . . . . . . . . . . . . . . . . . . . . . . . . . . . . . . . . . . .27
7. Consignas de seguridad . . . . . . . . . . . . . . . . . . . . . . . . . . . . . . . . . . . . . . . . . . . . . . . . . . . . . . . . . . . . . . . . . . . . . . . . . . . . . . .27
3
Page 4
1. INTRODUCTION
Vou s ven ez de f ai re l ’acqu isiti on d’une balance élect roni que
Cuisinart®. La recherche constante dans l’innovation et le soin
apporté à l’élaboration de ce produit vous garantissent un
appareil de qualité. Simple d’utilisation et d’entretien.
La balance culinaire Cuisinart® est compacte et légère. D’une
capacité de 1g à 5 kg, elle permet de peser les aliments au
gramme près. Elle offre deux modes de pesée, en grammes ou
en décilitres. Sa fonction « tare » permet de peser plusieurs
ingrédients dans un seul récipient.
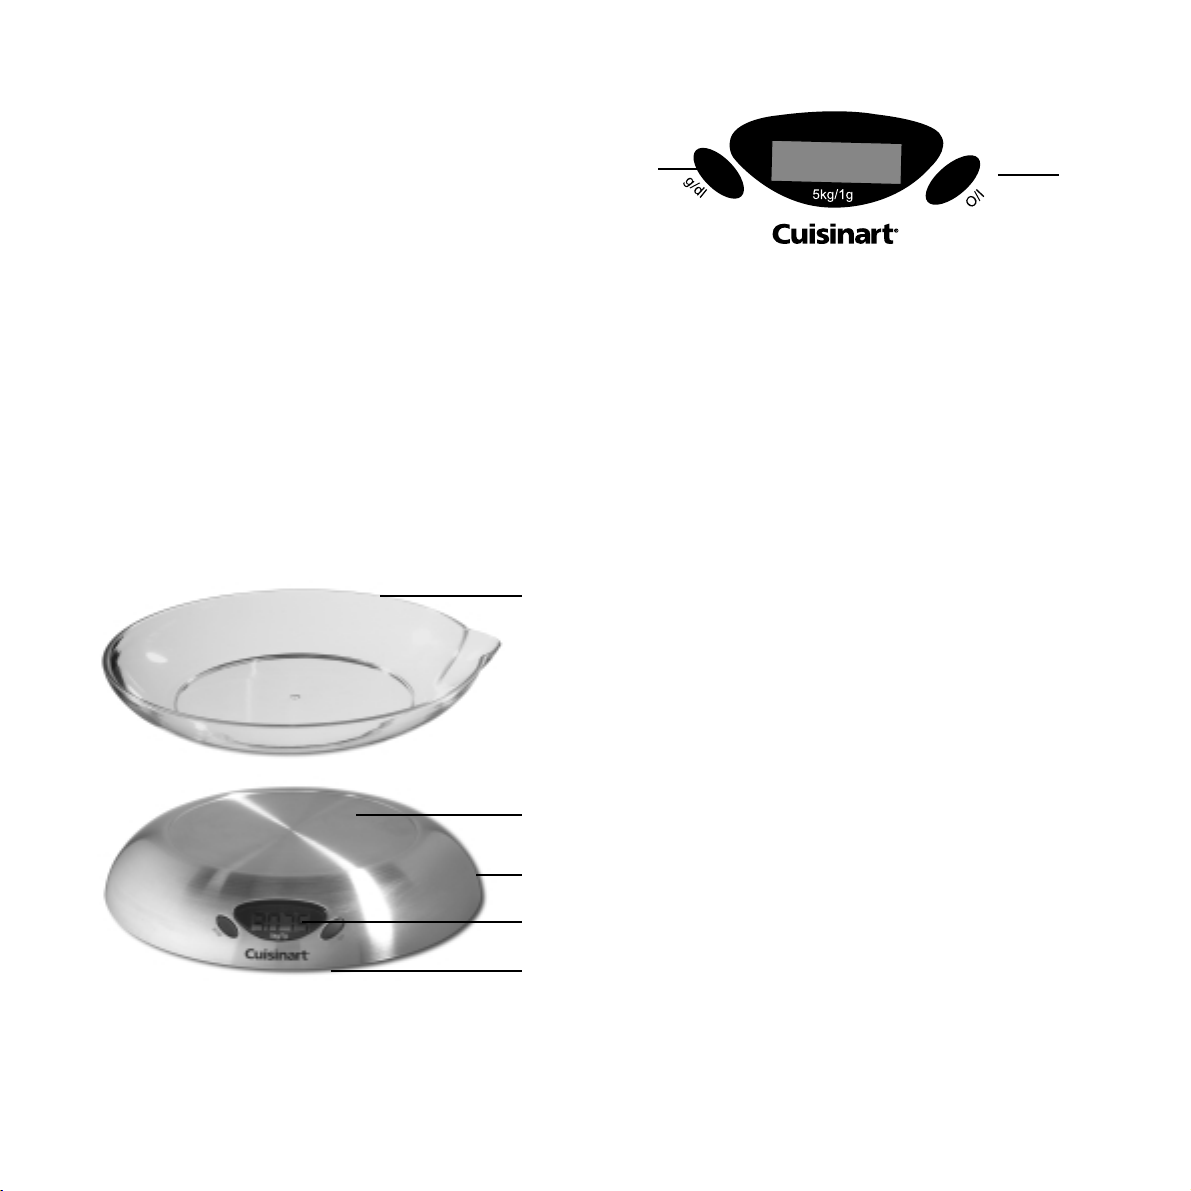
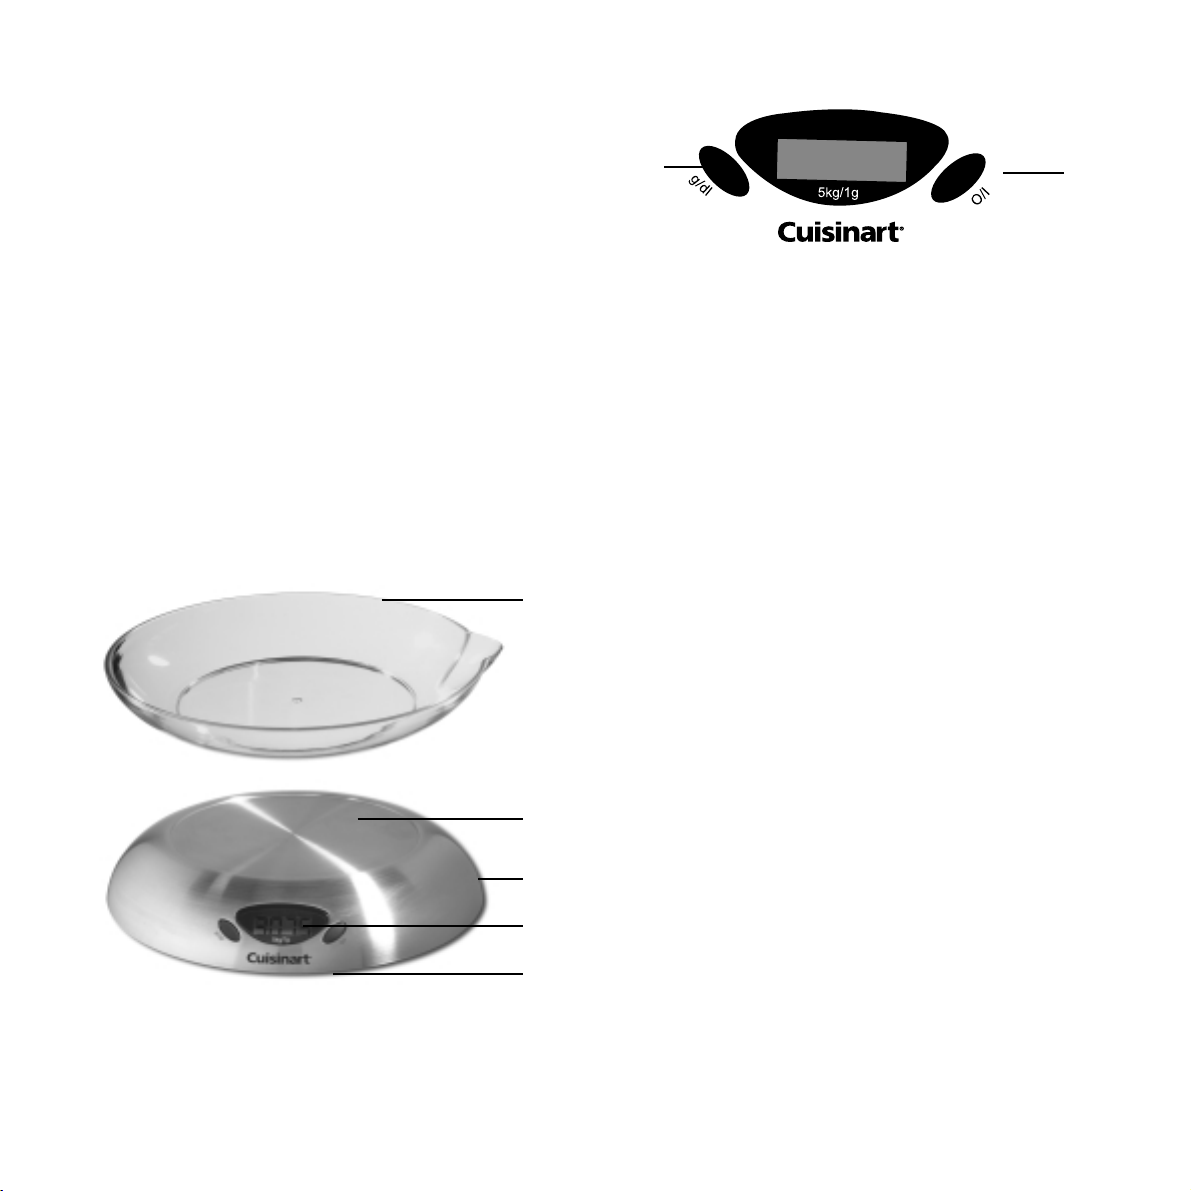
2. CARACTERISTIQUES PRODUIT
1. Bol malin avec bec verseur. Ce bol en polycarbonate fourni
avec la balance peut être confié au lave- vaisselle et utilisé
au four à micro-ondes. Il peut contenir des liquides, des
solides ou des aliments en cours de préparation. Il s’ajuste
à la perfection sur la surface de pesage de la balance.
2. Surface de pesage. Surface circulaire pouvant accueillir
tout type de contenant, outre le bol malin s’adaptant
parfaitement à son diamètre.
3. Affichage numérique à cristaux liquides. L’écran affiche les
données de poids allant de 1 g à 5 kg.
4. Touche 0/I. Cette touche sert à allumer ou à
éteindre la balance, à remettre l’affichage à zéro et à peser
un récipient vide (en utilisant la fonction « tare »).
5. Touche g / dl. Cette touche permet d’afficher le poids soit en
grammes, soit en décilitres. Pour changer l’affichage de
l’unité de mesure, il suffit d’appuyer une fois sur la touche
g / dl. Quand on allume la balance, le poids en grammes
s’affiche par défaut.
6. Pieds antidérapants (non illustrés).
7. Compartiment des piles (non illustré). Retirer le couvercle en
enfonçant légèrement l’encoche rectangulaire en direction
du couvercle. L’espace est destiné à recevoir 2 piles
alcalines de 1,5 volts chacune.
4
1
4
5
2
7
3
6
Page 5

3. UTILISATION
A. ASSEMBLAGE
INSTALLATION DE S PILES
La balance fonctionne au moyen de 2 piles alcalines de
1,5 volts chacune. Ne jamais utiliser de piles
défectueuses ou fuyantes qui pourraient endommager
l’appareil. Pour insérer les piles, retirer le couvercle du
compartiment des piles en enfonçant légèrement l’encoche
rectangulaire en direction du couvercle. Introduire les piles en
s’assurant que les bornes positive (+) et négative (-)
correspondent respectivement aux bornes + et – indiquées à
l’intérieur du compartiment. Replacer le couvercle en
l’enfonçant dans les deux encoches prévues à cet effet et
appuyer légèrement jusqu’à ce qu’un clic confirme sa
fermeture.
« Lo » qui apparaît sur l’écran numérique indique que les piles
sont faibles et qu’elles doivent être remplacées.
IMPORTANT ! Utiliser des piles ALCALINES uniquement.
B. UTILISATION
LE PESAGE
Placer la balance sur une surface plane et uniforme. Si le bol
malin ou un autre récipient sont utilisés pour peser les
ingrédients, le placer sur le plateau avant d’allumer la
balance. Cela évitera de devoir réappuyer sur la touche
«0/I» pour remettre la balance à zéro.
Appuyer sur la touche «0/I». «8888» s’affiche
automatiquement. Attendre quelques secondes, «0 » apparaît
sur l‘écran numérique. Placer alors l’aliment à peser dans le
bol malin, dans un autre récipient ou directement sur le
plateau. Le poids s’affiche sur l’écran numérique.
Pour convertir l’unité de mesure, autrement dit pour passer
d’un mode de pesée en grammes à un mode de pesée en
décilitres, il suffit d’appuyer sur la touche g / dl.
La balance a une capacité de 1g à 5 kg.
REMARQUE : la capacité de pesage maximale de la balance
est réduite en fonction du poids du bol ou du récipient utilisé.
Les aliments sont pesés au gramme près.
LA FONCTION TARE
Cette fonction permet de peser séparément des ingrédients
incorporés l’un à la suite de l’autre. En suivant ces directives,
on utilise les quantités précises pour chaque ingrédient
qu’exige une recette.
1. Allumer la balance comme indiqué ci-dessus.
2. Quand le « 0» est affiché sur l’écran numérique, placer le
récipient vide destiné à contenir les aliments à peser.
3. Appuyer sur la touche « 0/I ». Attendre que le
«0» apparaisse sur l’écran numérique. Cette fonction a
pour but de soustraire le poids du bol vide du poids total du
bol et des ingrédients.
4. Peser le premier ingrédient. Le poids désiré s’affiche.
5. Appuyer sur la touche «0/I» pour annuler le poids du
premier ingrédient pesé. Attendre que le «0 » apparaisse
sur l’écran numérique.
6. Peser l’ingrédient suivant. Son poids apparaît sur l’écran
numérique.
On peut procéder ainsi de suite avec plusieurs ingrédients.
REMARQUE : Au cas où le poids total de la préparation
excéderait 5 kg ou 50 dl sur la balance (autrement dit, sa
capacité maximale), « E--- » s’affiche sur l’écran numérique.
Pour éteindre l’appareil, appuyer sur la touche «0/I » pendant
quelques secondes. Si on la laisse allumée, la
balance s’éteint automatiquement au bout de 90 secondes de
non-utilisation, ceci afin d’épargner les piles.
5
Page 6
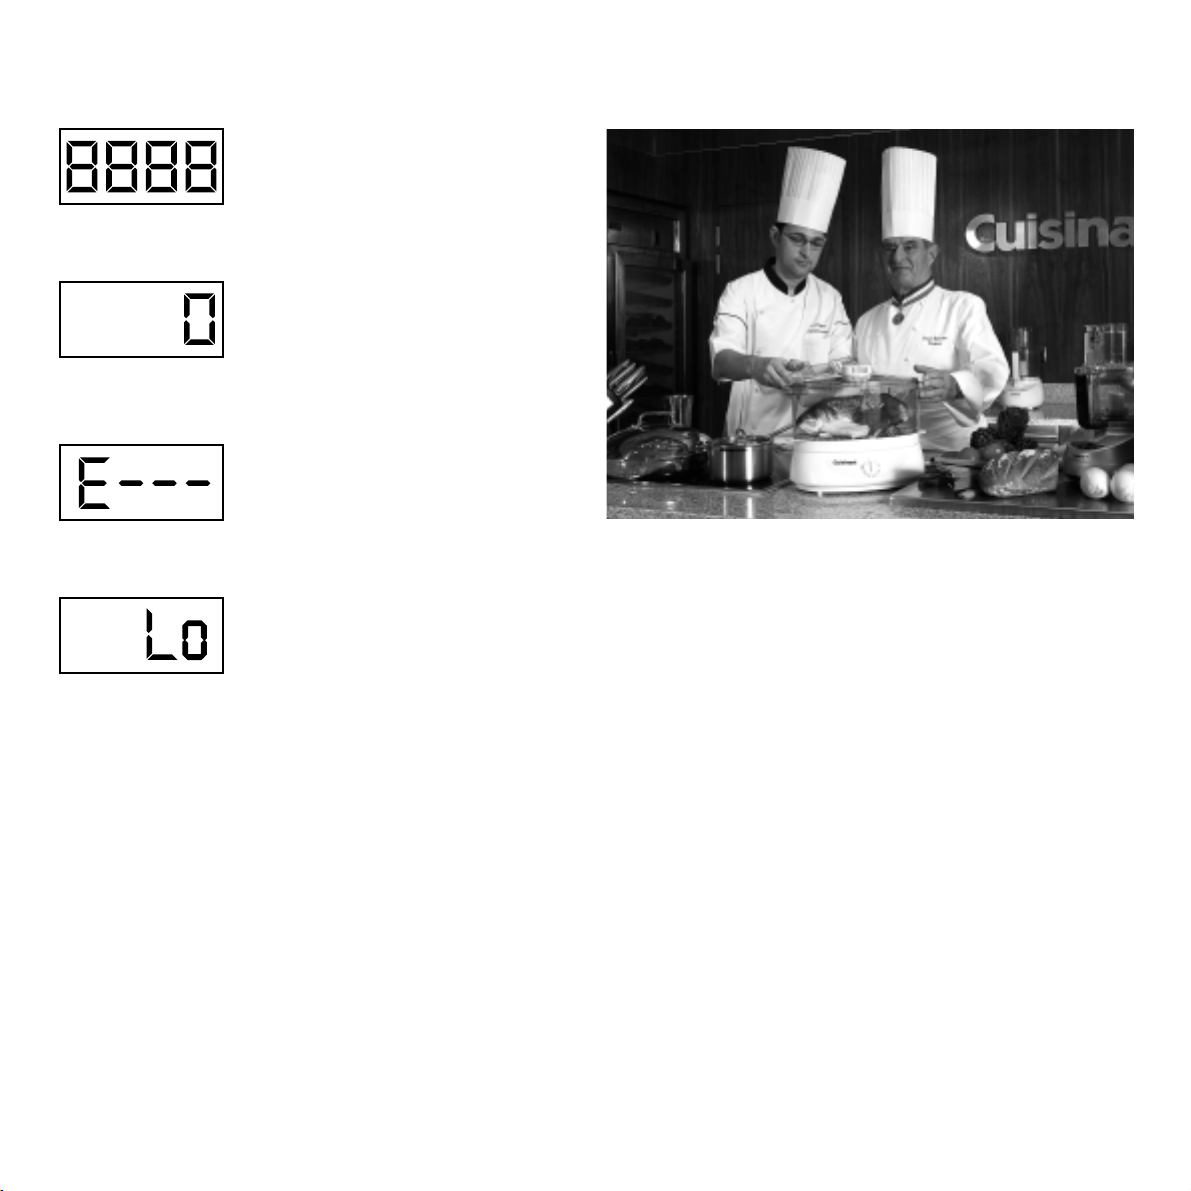
MESSAGES SUR L’ECRAN NUMERIQUE
Paraît quand on allume la balance.
Attendre que « 0» apparaisse avant
de commencer à peser.
Paraît lorsque la balance est prête à
peser.
Paraît quand la balance est surchargée. Enlever le poids excédent de la
balance.
Paraît quand les piles sont faibles. Les
remplacer par 2 nouvelles piles
alcalines de 1,5 volts.
4. L’AVIS DES CHEFS
• L a b a l a n c e é l e c t r o n i q u e C u i s i n a r t ® e s t c o m p a c t e , l é g è r e e t
facile à utiliser. Le fonctionnement et le nettoyage sont
également faciles et rapides. Son design en acier brossé la
rend robuste et résistante.
• G r â c e à s o n s y s t è m e d e g r a d u a t i o n a u g r a m m e p r è s , l a
balance permet de respecter à la lettre les quantités exigées par
une recette.
• L e b o l m a l i n e s t m u n i d ’ u n b e c v e r s e u r t r è s p r a t i q u e . C e b o l
peut servir à réchauffer ou à faire fondre des ingrédients au
four à micro-ondes. Une fois propre, il peut être retourné sur
la balance pour la protéger quand elle n’est pas utilisée ou
pour la ranger.
• A u c o u r s d ’ u n e m ê m e r e c e t t e , l a b a l a n c e c u l i n a i r e o f f r e l a
possibilité de peser des liquides et des solides, il suffit pour
cela de pousser sur la touche g / dl, l’affichage numérique
passe automatiquement d’une pesée en grammes à une
pesée en décilitres.
6
Page 7
7
5. QUESTIONS- REPONSES
6. NETTOYAGE ET RANGEMENT
Mettre la balan ce hors tens ion avant de la nett oyer.
Utiliser un chiffon humide imprégné d’un peu de savon ou de
détergent pour nettoyer la surface apparente de la balance.
Eviter de laisser sécher des dépôts sur la balance, qui
pourraient l’endommager.
Ne pas utiliser d’éponge abrasive ou de produits nettoyants
abrasifs.
Rincer à l’aide d’un chiffon légèrement humide et sécher
soigneusement après chaque nettoyage.
La balance électronique Cuisinart® peut être laissée sur le plan
de travail de la cuisine pour autant qu’elle ne soit pas mise en
contact avec une source de chaleur ou de vibration.
7. CONSIGNES DE SECURITE
• N e p a s i m m e r g e r l a b a l a n c e d a n s l ’ e a u o u t o u t a u t r e l i q u i d e .
• N e p a s l a p l a c e r s o u s u n j e t d ’ e a u .
• P l a c e r l a b a l a n c e s u r u n e s u r f a c e p l a n e e t r é g u l i è r e q u i n e
soit pas mise en contact avec une source de chaleur ou de
vibration.
• N e p a s m e t t r e l a b a l a n c e e n c o n t a c t a v e c d e s s u r f a c e s
chaudes ou des appareils chauffants.
• N e r i e n r a n g e r s u r l a b a l a n c e .
• R a n g e r l a b a l a n c e h o r s d e p o r t é e d e s e n f a n t s . N e p a s
laisser les enfants utiliser seuls la balance électronique.
• N e p a s l a i s s e r l a b a l a n c e d a n s u n e n v i r o n n e m e n t h u m i d e .
• N e p a s u t i l i s e r l a b a l a n c e s i e l l e e s t t o m b é e o u s i e l l e
présente des traces apparentes de dommage.
• N e p a s i n t r o d u i r e d e p i l e s d é f e c t u e u s e s o u f u y a n t e s d a n s l a
balance.
• N e p a s i n t r o d u i r e l e s m a i n s h u m i d e s d a n s l e c o m p a r t i m e n t
pour piles.
• N ’ u t i l i s e r q u e d e s p i l e s a l c a l i n e s t o t a l i s a n t 3 v o l t s .
• Cet appareil satisfait aux exigences essentielles des
directives 89/336/CEE (compatibilité électromagnétique) et
73/23/CEE (sécurité des appareils électro-domestiques),
amendées par la directive 93/68/CEE (marquage CE).
• A u s a g e d o m e s t i q u e u n i q u e m e n t .
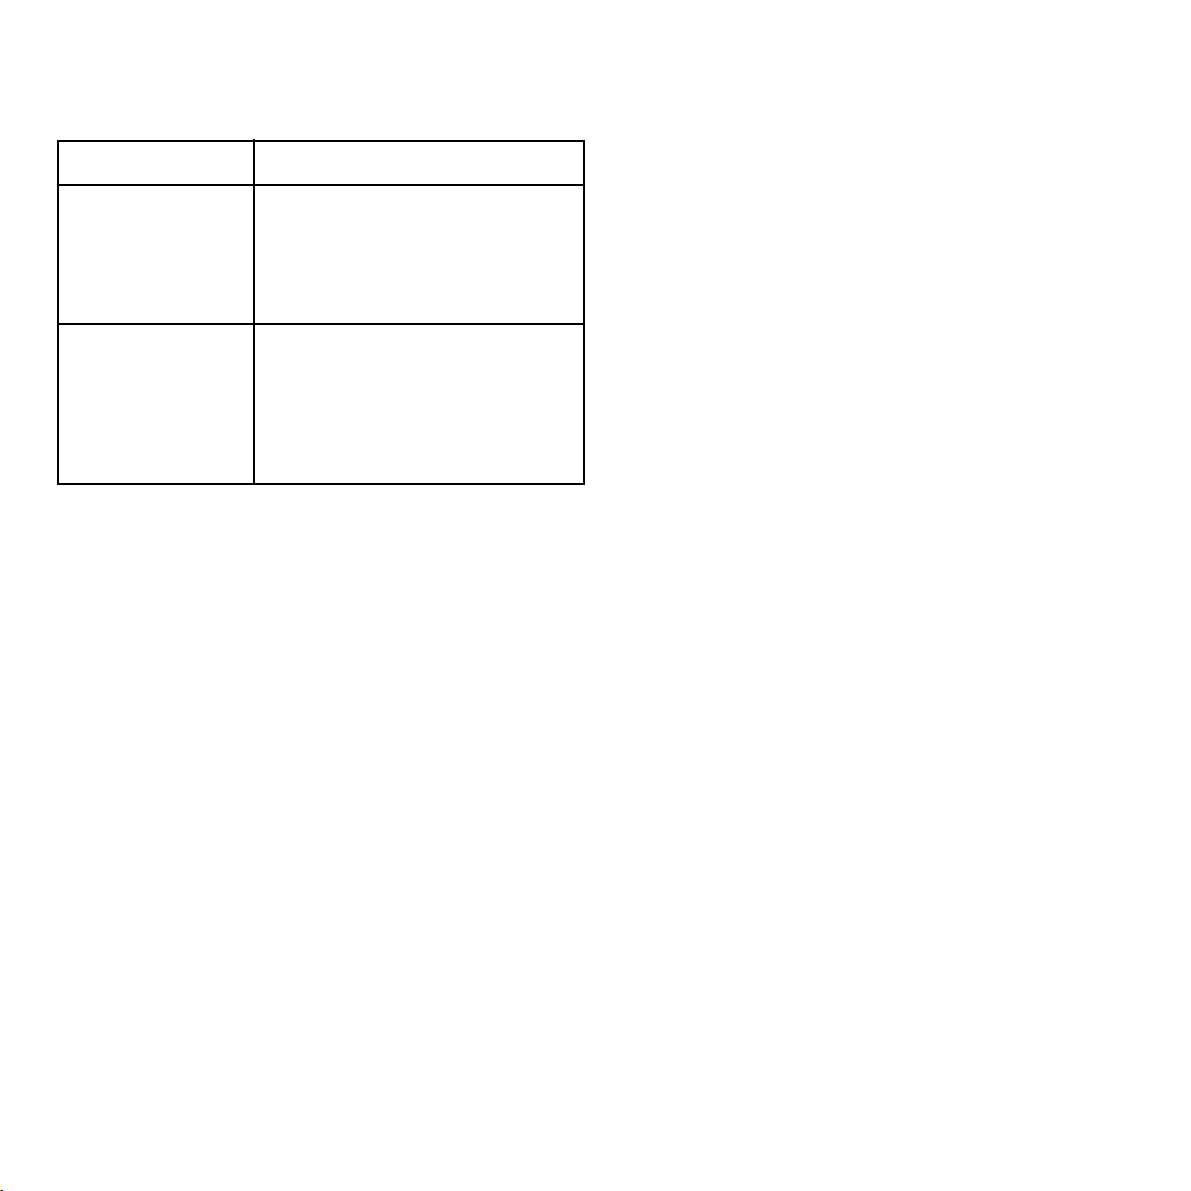
Que faire si Réponses :
ma balance ne •Vérifier que les piles sont bien en
fonctionne pas ? place.
•N e p a s o u b l i e r d e c h a n g e r l e s
piles quand elles sont déchargées.
les ingrédients pesés •Ne pas oublier de changer le
ne correspondent pas mode de pesée en fonction des
à ma recette ? aliments pesés, soit des solides en
g., soit des liquides en dl.
Page 8
1. INTRODUCTION
You have j us t acqui red a Cu is inart ® electroni c scale. Constan t
research into improvements and the care taken in developing
this product guarantee you a quality appliance. The scale is
easy to use and clean.
The Cuisinart® kitchen scale is compact and light. With a
capacity of 1g to 5 kg, food can be weighed to the
nearest gram. It can measure food in either grams or decilitres.
Its ‘tare’ feature allows you to measure several ingredients in a
single container.
2. DESCRIPTION
1. Handy bowl with pouring spout. This polycarbonate bowl,
which comes with the scale, is dishwasher and microwave
oven safe. It can hold liquids, solids, or foods that are being
prepared. It fits perfectly on the weighing platform.
2. Weighing platform. Circular surface on which you can
place any type of container; in addition, the handy bowl fits
perfectly on the platform diameter.
3. Digital liquid crystal display. The screen displays weights
from 1g to 5kg.
4. 0/I button. Use this button to turn the scale on or off, reset
the display to zero and weigh empty containers (by using
the tare feature).
5. The g/dl button. This button allows you to display the unit of
measure in either grams or decilitres. To change the display
of the unit of measure, you need only press the g/dl button
once. Grams are the default unit of measure that lights up
when the scale is turned on.
6. Anti- slip feet (not shown).
7. Battery compartment (not shown). Remove the cover by
gently pushing the rectangular notch towards the cover. The
compartment holds two 1.5- volt alkaline batteries.
8
1
2
7
3
6
4
5
Page 9

3. USE OF THE APPLIANCE
A. ASSEMBLY
INSTALLING THE BATTERIES
The scale operates on two 1.5-volt alkaline batteries. Never use
defective or leaking batteries as these can damage the
appliance. To install the batteries, remove the battery
compartment cover by gently pushing the rectangular notch
towards the cover. Install the batteries, making sure that the
positive (+) and negative (- ) terminals on the batteries
correspond to the positive (+) and negative (-) terminals inside
the compartment. Replace the cover by pushing the two
notches intended for this and gently press until you hear a click
indicating it has been locked in place.
“Lo” will appear on the digital display when the batteries are
low and should be replaced.
IMPORTANT! Use ALKALINE batteries only.
B. OPER ATING THE APPLIANCE
MEASURING
Place the scale on a level and even surface. If you use the
handy bowl or other container for weighing the ingredients,
place it on the platform before turning the scale on. This will
prevent the need to press the 0/I button to reset the scale to
zero.
Press the 0/I button. “8888” will be displayed
automatically. After a few seconds, “0” will appear on the
digital screen. Now place the food you want to weigh into the
bowl or other container, or directly onto the platform. The
weight will be displayed on the digital screen.
To change th e un it of m easure, i e to ch an ge fr om m easuri ng i n
grams to measuring in decilitres, you need only press the g/dl
button.
The scale has a capacity of 1g to 5kg.
NOTE: the maximum capacity of the scale is reduced
depending on the weight of the bowl or container you use.
The food is weighed to the nearest gram.
THE TARE FEATURE
This feature lets you weigh the ingredients separately as they
are added to the mixture in the bowl or other container. By
following these instructions, you use the amounts of each
ingredient specified in the recipe.
1. Turn the scale on as described above.
2. When “0” is displayed on the digital screen, place the
empty container into which the ingredients are to be
measured on the platform.
3. Press the 0/I button. Wait until the “0” appears on the
digital screen. The aim of this feature is to substract the
weight of the empty container from the total weight of the
bowl and the ingredients.
4. Measure the first ingredient. The desired weight or amount
will be displayed.
5. Press the 0/I button so that the weight of the first
ingredient is substracted. Wait until the “0” appears on the
digital screen.
6. Weigh the next ingredient. Its weight will appear on the
digital screen.
You can rep eat the proces s for sever al i ng redi en ts .
NOTE: If the total weight of the preparation exceeds 5kg or
50dl on the scale (ie, its maximum capacity),
“E- - - ” will be displayed on the screen.
To turn th e m ach ine of f, press th e 0/ I bu tt on f or a f ew seconds.
If the appliance is left on, it will turn off automatically after 90
seconds of non-use to save battery power.
9
Page 10

MESSAGES ON THE DIGITAL SCREEN
Appears when the scale is turned on.
Wai t until “0” appears before
weighing ingredients.
Appears once the scale is ready to
measure.
Appears when the scale is overloaded. Remove excess weight from the
scale.
Appears when the batteries are low.
Replace them with two new 1.5 volt
alkaline batteries.
4. CHEFS’ ADVICE
• T h e C u i s i n a r t ® e l e c t r o n i c s c a l e i s c o m p a c t , l i g h t a n d e a s y t o
use. Operating and cleaning it is also quick and easy. Its
brushed stainless steel design makes it robust and durable.
• T h a n k s t o i t s m e a s u r e m e n t t o t h e n e a r e s t g r a m , t h e s c a l e l e t s
you use the exact amounts called for in recipes.
• T h e h a n d y b o w l h a s a v e r y p r a c t i c a l p o u r i n g s p o u t . T h i s
bowl can be used to heat up or melt ingredients in the
microwave. Once it is clean, it can be put upside down on
the scale to protect the scale when it is not in use or for
storage.
• W h i l e m a k i n g a r e c i p e , t h e k i t c h e n s c a l e l e t s y o u w e i g h
liquids and solids. All you need to do is press the g/dl
button and the digital display will automatically change from
grams to decilitres.
10
Page 11

5. QUESTIONS/ANSWERS
6. CLEANING AND STORAGE
Turn the s cale of f bef or e clea ni ng it.
Use a damp cloth with a bit of soap or detergent to clean the
visible surfaces of the scale.
Avoid letting deposits dry on the scale as this could damage
the scale.
Don’t use an abrasive sponge or abrasive cleaning products.
Rinse with a damp cloth and dry carefully every time after
cleaning it.
The Cuisinart® electronic scale may be left on the kitchen
counter, but ensure that it does not come into contact with heat
or vibration.
7. SAFETY CAUTIONS
• D o n o t i m m e r s e t h e s c a l e i n w a t e r o r a n y o t h e r l i q u i d .
• D o n o t p l a c e u n d e r r u n n i n g w a t e r .
• P l a c e t h e s c a l e o n a n e v e n , l e v e l s u r f a c e t h a t d o e s n o t c o m e
in contact with heat or vibration.
• D o n o t l e t t h e s c a l e t o u c h h o t s u r f a c e s o r h e a t i n g a p p l i a n c e s .
• D o n o t s t o r e a n y t h i n g o n t h e s c a l e .
• S t o r e t h e s c a l e o u t o f t h e r e a c h o f c h i l d r e n . D o n o t a l l o w
children to use the electronic scale unsupervised.
• D o n o t u s e t h e s c a l e i n d a m p o r h u m i d c o n d i t i o n s .
• D o n o t u s e t h e s c a l e i f i t h a s f a l l e n o r i f i t a p p e a r s t o b e
damaged.
• D o n o t i n s e r t d e f e c t i v e o r l e a k i n g b a t t e r i e s i n t o t h e s c a l e .
• D o n o t h a n d l e t h e b a t t e r y c o m p a r t m e n t w i t h w e t h a n d s .
• O n l y u s e a l k a l i n e b a t t e r i e s t o t a l l i n g 3 v o l t s .
• T h i s a p p l i a n c e m e e t s t h e b a s i c r e q u i r e m e n t s o f D i r e c t i v e s
89/336/EEC (electromagnetic compatibility) and
73/23/EEC (safety of domestic electrical equipment), as
amended by Directive 93/68/EEC (CE marking).
• F o r d o m e s t i c u s e o n l y .
11
What do I do if Answers:
my scale doesn’t •Make sure the batteries are prowork? perly installed.
•D o n ’ t f o r g e t t o c h a n g e t h e b a t t e r i e s
when they are dead.
the weighed ingredients •Don’t forget to change the unit of
don’t correspond to my measure according to the food
recipe? being measured, either solids in
g., or liquids in dl.
Page 12

1. EINLEITUNG
Sie haben gerade eine elektronische Küchenwaage von
Cuisinart® erstanden. Die konstante Suche nach Neuerungen
und eine sorgfältige Produktverarbeitung gewährleisten die
hochwertige Qualität dieses Geräts. Es ist leicht zu benutzen
und zu pflegen.
Die elektronische Küchenwaage von Cuisinart® ist kompakt
und leichtgewichtig. Mit einer Kapazität von 1g bis 5 kg wiegt
sie die Nahrungsmittel bis aufs Gramm genau. Sie bietet die
Wahl zwischen zwei Gewichtsangaben, Gramm oder Dezi liter.
Mit der F unktion « Tare” können verschi eden e Zut aten im
selben Gefäß gewogen werden.
2. EIGENSCHAFTEN DES PRODUKTS
1. Schlaue Schale mit Gießschnabel. Die mit der Waage
gelieferte Polykarbonatschale kann dem Geschirrspüler
anvertraut und im Mikrowellenherd verwendet werden. Sie
kann Flüssigkeiten, Feststoffe oder Nahrungsmittel
aufnehmen, während sie zubereitet werden. Sie passt
perfekt auf die Wiegefläche der Waage.
2. Wiegefläche. Runde Fläche, um alle Arten von Gefäßen
aufnehmen zu können, und natürlich die schlaue Schale, die
perfekt an den Durchmesser der Wiegefläche angepasst ist.
3. Digitale Flüssigkristallanzeige. Der Schirm zeigt das
Gewicht zwischen 1 g und 5 kg an.
4. Taste 0/I. Mit dieser Taste wird die Waage ein- und
ausgeschaltet, die Anzeige auf Null zurückgesetzt und das
Leergewicht eines Gefäßes gewogen (dazu die Funktion
«Tare” verwenden).
5. Taste g/dl . Mit dieser Taste wird das Gewicht in Gramm
oder in Dezilitern angegeben. Um die Gewichtseinheit zu
ändern, einfach die Taste g/dl ein Mal betätigen. Nach dem
Einschalten zeigt die Waage das Gewicht immer in Gramm
an.
6. Rutschfeste Füße (nicht abgebildet).
7. Batteriefach (nicht abgebildet). Den Deckel abnehmen,
indem die rechteckige Einkerbung leicht in Richtung Deckel
gedrückt wird. Das Fach ist für 2 alkalische Batterien von je
1,5 Volt vorgesehen.
12
1
2
7
3
6
4
5
Page 13

3. GEBRAUCH
A. ZUSAMMENSETZEN
EINLEGEN DER BATTERIEN
Die Waage wird mit 2 alkalischen Batterien von je 1,5 Volt
betrieben. Nie defekte oder auslaufende Batterien verwenden,
die das Gerät beschädigen könnten. Zum Einlegen der
Batterien den Deckel des Batteriefachs abnehmen und dazu die
rechteckige Einkerbung leicht in Richtung Deckel drücken. Die
Batterien einlegen und dabei beachten, dass die Markierungen
Positiv (+) und Negativ (-) auf den Batterien mit den
Mar ki erun gen + un d – i m Batt erief ach übereinstimmen . Den
Deckel wieder befestigen, indem er in die beiden dafür
vorgesehenen Kerben gedrückt wird, bis ein Klickgeräusch
anzeigt, dass er korrekt verschlossen ist.
« Lo » als Anzeige auf dem Digitalschirm zeigt an, dass die
Batterien schwach sind und ersetzt werden müssen.
WICHTIG! Ausschließlich ALKALISCHE Batterien verwenden.
B. GEBRAUCHSHINWEISE
WIEGEN
Die Waage auf eine ebene und glatte Oberfläche stellen.
Wenn die schlaue Schale oder ein anderes Gefäß zum
Wiegen der Zutaten verwendet wird, dieses vor dem
Einschalten der Waage auf die Wiegfläche stellen. So muss
nicht erneut die Taste « 0/I » betätigt werden, um die Waage
auf Null zu stellen.
Die Taste « 0/I » betätigen. « 8888 » erscheint automatisch.
Nach einigen Sekunden Wartezeit erscheint «0» auf dem
Digitalschirm. Nun die zu wiegenden Nahrungsmittel in die
schlaue Schale, in ein anderes Gefäß oder direkt auf die
Wiegfläche geben. Das Gewicht erscheint auf dem
Digitalschirm.
Zum Ändern der Maßeinheit, das heißt um vom Wiegen in
Gramm zum Wiegen in Dezilitern zu wechseln, einfach die
Taste g/ dl betäti gen.
Die Waage ist für Gewichte zwischen 1g und 5 kg geeignet.
ANMERKUNG: Die Höchstgewichtsmenge der Waage
verringert sich um das Gewicht des gebrauchten Gefäßes.
Die Nahrungsmittel werden auf das Gramm genau gemessen.
DIE FUNKTION TARE
Mit dieser Funktion können nachei nander hinzugefügte
Zutaten einzeln gewogen werden. Wenn die untenstehenden
Anweisungen eingehalten werden, kann genau die Menge
jeder Zutat hinzugefügt werden, die im Rezept vorgegeben ist.
1. Die Waage wie oben beschrieben einschalten.
2. Wenn « 0» auf dem Digitalschirm zu sehen ist, das leere
Gefäß, das die Zutaten aufnehmen soll, auf die Wiegfläche
stellen.
3. Die Taste « 0/I » betätigen. Warten, bis wieder «0» auf dem
Digitalschirm erscheint. Durch diese Funktion wird das
Leergewicht des Gefäßes vom Gesamtgewicht von Gefäß
und Inhalt abgezogen.
4. Die erste Zutat wiegen. Das gewünschte Gewicht wird angezeigt.
5. Die Taste « 0/I » betätigen, um das Gewicht der ersten
gewogenen Zutat zu annullieren. Warten, bis wieder «0»
auf dem Digitalschirm erscheint.
6. Die nächste Zutat wiegen. Ihr Gewicht erscheint auf dem
Digitalschirm.
Diese Vorgangsweise kann für beliebig viele Zutaten
wiederholt werden.
ANMERKUNG: In dem Fall, dass das Gesamtgewicht auf der
Waage 5 kg oder 50 dl (mit anderen Worten, das
Höchstgewicht) übersteigt, erscheint « E-- - » auf dem
Digitalschirm.
Zum Ausschalten des Geräts die Taste « 0/I » einige Sekunden
lang betätigen. Wenn die Waage nicht von Hand
13
Page 14

ausgeschaltet, aber nicht gebraucht wird, schaltet sie sich
selbst nach 90 Sekunden Inaktivität aus, um Batterien zu
sparen.
ANZEIGEN AUF DEM DIGITALSCHIRM
Erscheint, wenn die Waage eingeschaltet wird. Vor dem Wiegen warten, bis «0» erscheint.
Erscheint, wenn die Waage bereit ist
zu wiegen.
Erscheint, wenn das Höchstgewicht
überschritten ist. Das überzählige
Gewicht von der Waage entfernen.
Erscheint wenn die Batterien
schwach sind. Diese durch 2 neue
alkalische Batterien von 1,5 Volt
ersetzen.
4. DIE RATSCHLÄGE DER CHEFS
• D i e e l e k t r o n i s c h e K ü c h e n w a a g e v o n C u i s i n a r t ® i s t k o m p a k t ,
leichtgewichtig und einfach zu benutzen. Betrieb und
Reinigung sind ebenso einfach und schnell. Das Design aus
gebürstetem Stahl macht sie robust und widerstandsfähig.
• D a n k I h r e r b i s a u f s G r a m m g e n a u e n M a ß ei n t e i l u n g w i r d e s
mit dieser Waage möglich, die in einem Rezept
vorgegebenen Mengen exakt einzuhalten.
• Die schlaue Schale ist mit einem sehr praktischen
Gießschnabel ausgestattet. Dieses Gefäß kann auch
eingesetzt werden, um Zutaten im Mikrowellenherd zu
wärmen oder zu schmelzen. Sobald sie wieder sauber ist,
kann sie wieder auf die Waage gesetzt werden, um diese zu
schützen, wenn sie nicht verwendet wird oder verstaut
werden soll.
• W ä h r e n d e i n e s R e z e p t e b i e t e t d i e K ü c h e n w a a g e d i e
Mögli chkei t, Flüs si gkei ten u nd f este Zutaten zu wi egen. Dazu
einfach die Taste g/dl betätigen, die Digitalanzeige
wechselt automatisch vom Wiegen in Gramm zum Wiegen
in Dezilitern.
14
Page 15

5. FRAGEN/ANTWORTEN
6. REINIGEN UND VERSTAUEN
Die Waage vor dem Reinigen ausschalten.
Die sichtbaren Oberflächen der Waage mit einem feuchten
Tuch u nd e twas S ei fe nl au ge oder mi ld em H aus ha lt sr ei ni ger
abwischen.
Ver mei den Si e es , Rückstände auf der Waage antrockn en zu
lassen, denn sie könnte hierdurch beschädigt werden.
Keine Scheuerschwämme oder scheuernde Reinigungsmittel
verwenden.
Nach jeder Reinigung mit einem leicht feuchten Tuch
abwischen und sorgfältig abtrocknen.
Die elektronische Küchenwaage von Cuisinart® kann auf der
Arbeitsfläche der Küche stehen bleiben, solange sie nicht mit
einer Hitze- oder Vibrationsquelle in Berührung gerät.
7. SICHERHEITSHINWEISE
• D i e W a a g e n i c h t i n W a s s e r o d e r a n d e r e F l ü s s i g k e i t e n
tauchen.
• N i c h t u n t e r e i n e n W a s s e r s t r a h l h a l t e n .
• D i e W a a g e a u f e i n e f l a c h e , e b e n e O b e r f l ä c h e s t e l l e n u n d
nicht mit einer Hitze- oder Vibrationsquelle in Berührung
kommen lassen.
• J e d e B e r ü h r u n g d e r W a a g e m i t h e i ß e n O b e r f l ä c h e n o d e r
Heizgeräten vermeiden.
• N i c h t s a u f d e r W a a g e l a g e r n .
• Die Waage außerhalb der Reichweite von Kindern
verstauen. Kinder die Elektrowaage nicht allein benutzen
lassen.
• D i e W a a g e n i c h t l ä n g e r e Z e i t e i n e r f e u c h t e n U m g e b u n g
aussetzen.
• D i e W a a g e n i c h t b e n u t z e n , w e n n s i e h e r u n t e r g e f a l l e n i s t
oder offensichtliche Spuren einer Beschädigung aufweist.
• K e i n e d e f e k t e n o d e r a u s l a u f e n d e n B a t t e r i e n i n d i e W a a g e
einlegen.
• N i c h t m i t f e u c h t e n H ä n d e n i n d a s B a t t e r i e f a c h g r e i f e n .
• A u s s c h l i e ß l i c h a l k a l i s c h e B a t t e r i e n v o n i n s g e s a m t 3 V o l t
verwenden.
• D i e s e s G e r ä t e n t s p r i c h t d e n g r u n d l e g e n d e n A n f o r d e r u n g e n
der Richtlinien 89/336/EWG (elektromagnetische
Kompatibilität) und 73/23/EWG (Sicherheit von
Haushaltsgeräten), abgeändert durch die Richtlinie
93/68/EWG (CE-Markierung).
• N u r f ü r d e n H a u s g e b r a u c h b e s t i m m t .
15
Was tun wenn Antworten :
meine Waage nicht •Überprüfen, dass die Batterien korfunktioniert ? rekt platziert sind.
•N i c h t v e r g e s s e n , d i e B a t t e r i e n z u
wechseln, wenn sie leer sind.
die gewogenen Zutaten •Vergessen Sie nicht, die Gewichtsnicht meinem Rezept einheit für die gewogenen Zutaten
entsprechen ? zu verändern: entweder feste Stoffe
in g, oder aber Flüssigkeiten in dl.
Page 16

1. INLEIDING
U heeft net een elektronische keukenweegschaal van
Cuisinart® gekocht. Het constante streven naar vernieuwing,
en de zorg die wordt besteed aan de uitwerking van dit
product waarborgen u een kwaliteitsapparaat dat eenvoudig
in gebruik en onderhoud is.
De keukenweegschaal van Cuisinart® is compact en licht. Ze
kan van 1 gr tot 5 kg en tot op de gram na voedingsmiddelen
wegen. Zij biedt twee manieren van wegen aan, in gram of in
deciliter. Met haar “tarra” functie kunnen verschillende
ingrediënten in één schaal worden gewogen.
2. ONDERDELEN
1. Kom met schenktuit. Deze meegeleverde kom van
polycarbonaat is vaatwasser- en microgolfovenbestendig.
Ze is geschikt voor vloeistoffen en vaste stoffen en voor de
bereiding van spijzen. Ze past perfect op het weegvlak van de
weegschaal.
2. Weegvlak. Rond oppervlak waarop alle soorten schalen
kunnen worden geplaatst, waaronder de handige kom die
perfect aan de diameter van het vlak is aangepast.
3. LCD- display. Op het scherm verschijnen de gewichtgegevens van 1 gr tot 5 kg.
4. Toets 0/I. Deze toets dient om de weegschaal aan of uit te
zetten, om de nulstand in te stellen en om een lege schaal te
wegen (met behulp van de “tarra” functie).
5. Toets gr/dl. Met deze toets kan het gewicht in gram of in
deciliter worden weergegeven. Om de weergave van de
maateenheid te wijzigen, volstaat het dat u een keer op de
toets gr/dl drukt. Bij het aanzetten van de weegschaal wordt
het gewicht standaard in gram weergegeven.
6. Antislipvoetjes (niet afgebeeld).
7. Batterijenvak (niet afgebeeld). Om het deksel te
verwijderen, drukt u zacht op de rechthoekige inkeping in
de richting van het deksel. In het vak kunnen 2 alkalinebatterijen van elk 1,5 volt worden ondergebracht.
16
1
2
7
3
6
4
5
Page 17

3. GEBRUIK
A. MONTEREN
AANBRENGEN VAN DE BATTERIJEN
De weegschaal werkt met behulp van 2 alkalinebatterijen van
elk 1,5 volt. Gebruik nooit beschadigde of lekkende batterijen,
aangezien die het apparaat kunnen beschadigen. Om de
batterijen aan te brengen, verwijdert u het deksel van het
batterijenvak door lichtjes te drukken op de rechthoekige
inkeping in de richting van het deksel. Breng de batterijen aan
en vergewis u ervan dat de positieve (+) en negatieve (- ) polen
respectievelijk overeenkomen met de + en – klemmen die in het
vak aangeduid zijn. Om het deksel opnieuw aan te brengen,
drukt u het zacht in de twee daartoe voorziene inkepingen,
totdat u een klik hoort die erop wijst dat het deksel vastzit.
Als op het digitale scherm “Lo” verschijnt, betekent dit dat de
batterijen zwak zijn en dat ze moeten worden vervangen.
BELANGRIJK! Uitsluitend ALKALINE batterijen gebruiken.
B. BEDIENING
HET WEGEN
Plaats de weegschaal op een vlak en gelijkmatig oppervlak.
Als de meegeleverde kom of een andere schaal worden
gebruikt om de ingrediënten te wegen, zet die dan op het
weegvlak voordat u de weegschaal inschakelt. Dan hoeft u niet
opnieuw op de toets “0/I” te drukken om de weegschaal in
nulstand te zetten.
Druk op de toets “0/I”. Automatisch verschijnt “8888”. Wacht
enkele seconden. Op het digitale scherm verschijnt “0”. Breng
het te wegen voedingsmiddel in de meegeleverde kom, in een
andere schaal of rechtstreeks op het weegvlak. Het gewicht
wordt op het digitale scherm weergegeven.
Om de maateenheid te veranderen, dus om van gram naar
deciliter over te schakelen, volstaat het dat u op de toets gr/dl
drukt.
De weegschaal kan van 1 gr tot 5 kg wegen.
OPMERKING: het maximale weegvermogen van de
weegschaal hangt af van het gewicht van de meegeleverde
kom of van de gebruikte schaal. De voedingsmiddelen worden
tot op de gram nauwkeurig gewogen.
DE TARRAFUNCTIE
Met deze functie kunnen ingr edi ënten die na el kaar worden
toegevoegd, apart worden gewogen. Volg deze richtlijnen om
van elk ingrediënt van een recept de juiste hoeveelheid te krijgen.
1. Schakel de weegschaal in zoals hierboven uiteengezet.
2. Verschijnt “0” op het digitale scherm, breng dan de lege
schaal aan waarin u de voedingsmiddelen gaat wegen.
3. Druk op de toets “0/I”. Wacht tot “0” op het digitale scherm
verschijnt. Met deze functie wordt het gewicht van de lege
kom afgetrokken van het totale gewicht van de kom en de
ingrediënten samen.
4. Weeg het eerste ingrediënt. Het gewenste gewicht
verschijnt.
5. Druk op de toets “0/I” om het gewicht van het eerste
gewogen ingrediënt te annuleren. Wacht tot “0” verschijnt
op het digitale scherm.
6. Weeg het volgende ingrediënt. Het gewicht ervan verschijnt
op het digitale scherm.
U kunt op dezelfde manier te werk gaan met verschillende
ingrediënten.
OPMERKING : Indien het totale gewicht van de bereiding meer
dan 5 kg of 50 dl is op de weegschaal (haar maximumvermogen), verschijnt er “E- - - ” op het digitale scherm.
Om het apparaat uit te schakelen, drukt u gedurende enkele
seconden op de toets “0/I”. Laat u de weegschaal
ingeschakeld zonder ze te gebruiken, dan gaat ze automatisch
na 90 seconden uit, om de batterijen te sparen.
17
Page 18

BOODSCHAPPEN OP HET DIGITALE SCHERM
Ver schi jnt wanneer u de weegschaa l
inschakelt. Wacht tot “0” verschijnt,
om te beginnen wegen.
Ver schi jnt als de weegs chaal klaar i s
om te beginnen wegen.
Ver schi jnt als de weegs chaal te
zwaar beladen is. Verwijder het
overtollige gewicht van de
weegschaal.
Ver schi jnt wan neer de batterij en
zwak zijn. Vervang ze door 2 nieuwe alkalinebatterijen van 1,5 volt.
4. DE MENING VAN DE CHEFS
• D e e l e k t r o n i s c h e k e u k e n w e e g s c h a a l v a n C u i s i n a r t ® i s
compact, licht en makkelijk te gebruiken. Ze is makkelijk en
snel te bedienen en te reinigen. Door haar design van
geborsteld staal is ze sterk en duurzaam.
• D a n k z i j h a a r s c h a a l v e r d e l i n g i n g r a m k u n t u m e t d e z e
weegschaal de benodigde hoeveelheden voor een recept tot
op de gram nauwkeurig wegen.
• D e m e e g e l e v er d e k o m h e e f t e e n z e e r p r a k t i s c h e s c h e n k t u i t .
In deze kom kunnen ingrediënten in de microgolfoven
worden opgewarmd of gesmolten. Na reiniging kan ze
omgekeerd op de weegschaal worden gezet, om deze
laatste te beschermen wanneer ze niet wordt gebruikt of
wordt opgeborgen.
• M e t d e z e k e u k e n w e e g s c h a a l k u n n e n t i j d e n s h e t b e r e i d e n
van een en hetzelfde recept vloeistoffen en vaste stoffen
worden gewogen. Het volstaat dat u op de toets gr/dl drukt,
om de digitale display automatisch te laten overschakelen van
een weging in gram naar een weging in deciliter.
18
Page 19

5. VRAGEN EN ANTWOORDEN
6. REINIGING EN OPBERGING
Trek de s tekker uit h et stopcon tact voordat u de weegschaal
gaat reinigen.
Gebruik een vochtige doek die doordrenkt is met een beetje
zeep of detergent om de buitenkant van de weegschaal te
reinigen.
Laat geen resten opdrogen op de weegschaal. Die zouden
haar kunnen beschadigen.
Gebruik geen schuurspons of schurende reinigingsproducten.
Spoel de weegschaal af met een licht bevochtigde doek en
droog ze steeds zorgvuldig af.
De elektronische weegschaal van Cuisinart® kan op het
werkvlak blijven staan voor zover ze niet in contact komt met
een warmte- of trillingsbron.
7. VEILIGHEIDSVOORSCHRIFTEN
• D o m p e l d e w e e g s c h a a l n i e t o n d e r i n w a t e r o f e e n a n d e r e
vloeistof.
• P l a a t s z e n i e t o n d e r e e n w a t e r s t r a a l .
• P l a a t s d e w e e g s c h a a l o p e e n v l a k e n g e l i j k m a t i g o p p e r v l a k
dat niet in contact komt met een warmte- of trillingsbron.
• Breng de weegschaal niet in contact met warme
oppervlakken of met verwarmingsapparaten.
• Z e t n i e t s o p d e w e e g s c h a a l .
• B e r g d e w e e g s c h a a l o p b u i t e n h e t b e r e i k v a n k i n d e r e n . L a a t
kinderen de elektronische weegschaal niet alleen gebruiken.
• Z e t d e w e e g s c h a a l n i e t i n e e n v o c h t i g e o m g e v i n g .
• G e b r u i k d e w e e g s c h a a l n i e t a l s z e g e v a l l e n i s o f a l s z e
zichtbare sporen van beschadiging vertoont.
• B r e n g g e e n b e s c h a d i g d e o f l e k k e n d e b a t t e r i j e n i n d e
weegschaal.
• K o m n i e t i n h e t b a t t e r i j e n v a k m e t v o c h t i g e h a n d e n .
• G e b r u i k u i t s l u i t e n d a l k a l i n e b a t t e r i j e n v a n i n t o t a a l 3 v o l t .
• D i t a p p a r a a t b e a n t w o o r d t a a n d e h o o f d v e r e i s t e n v a n d e
richtlijnen 89/336/EEG (elektromagnetische compatibiliteit)
en 73/23/EEG (veiligheid van huishoudelijke elektrische
apparaten), gewijzigd door richtlijn 93/68/EEG
(CE- markering).
• U i t s l u i t e n d v o o r h u i s h o u d e l i j k g e b r u i k .
19
Wat moet ik doen als Antwoorden :
mijn weegschaal niet •Controleer of de batterijen goed
werkt ? zitten.
•Ve r g e e t n i e t o m d e b a t t e r i j e n t e
vervangen als ze leeg zijn.
de gewogen ingrediën- •Vergeet niet om de weegmodus te
ten niet overeenkomen wijzigen afhankelijk van de gewomet mijn recept? gen voedingsmiddelen, namelijk
vaste stoffen in gr, vloeistoffen in dl.
Page 20

1. INTRODUZIONE
Avete acquistato una bilancia elettronica Cuisinart®. La
ricerca costante dell’innovazione e l’attenzione
nell’elaborazione del prodotto garantiscono un apparecchio di
qualità. Facile da utilizzare e pulire.
La bilancia da cucina Cuisinart® è compatta e leggera. Con
una portata massima di 5 kg, permette di pesare gli alimenti
con precisione al grammo. È dotata di due modalità di
pesata: grammi o decilitri. La funzione «tara» permette di
pesare ingredienti diversi in un solo recipiente.
2. CARATTERISTICHE
1. Recipiente universale intelligente con beccuccio dosatore, in
policarbonato, in dotazione con la bilancia. Può essere
lavato in lavastoviglie e utilizzato nel forno a microonde.
Può contenere liquidi, solidi o alimenti durante la
preparazione. Si incastra perfettamente sul piatto della
bilancia.
2. Piatto della bilancia. La superficie circolare può accogliere
qualsiasi tipo di contenitore, oltre al recipiente universale in
dotazione, dello stesso diametro.
3. Visualizzazione digitale a cristalli liquidi. Lo schermo
visualizza i dati relativi al peso fino a 5 kg.
4. Tasto 0/I. Con questo tasto è possibile accendere o
spegnere la bilancia, azzerare lo schermo e pesare un
recipiente vuoto (utilizzando la funzione «tara»).
5. Tasto g/dl. Con questo tasto è possibile visualizzare il peso
in grammi o in decilitri. Per modificare l’unità di misura,
basta premere una volta il tasto g/dl. Quando si accende la
bilancia, viene visualizzato automaticamente il peso in
grammi.
6. Piedini antiscivolo (non riportati in figura).
7. Vano pile (non riportato in figura). Togliere il coperchio
spingendo leggermente l’apposita tacca rettangolare verso
lo stesso. Nell’apposito vano è possibile inserire 2 pile
alcaline da 1,5 volt ciascuna.
20
1
2
7
3
6
4
5
Page 21

3. UTILIZZO
A. MONTAGGIO
INSERIMENTO DELLE PILE
La bilancia funziona con 2 pile alcaline da 1,5 volt ciascuna.
Non utilizzare mai pile difettose o che presentano perdite.
Potrebbero danneggiare l’apparecchio. Per inserire le pile,
togliere il coperchio dall'apposito vano premendo
leggermente la tacca rettangolare verso il coperchio. Inserire le
pile verificando che le polarità indicate sulle batterie
corrispondano a quelle riportate nell’apposito vano.
Riposizionare il coperchio inserendolo nelle apposite tacche e
premere leggermente fino a sentire uno scatto.
Se lo schermo visualizza la scritta «Lo» significa che le pile
sono scariche e che devono essere sostituite.
IMPORTANTE! Utilizzare esclusivamente pile ALCALINE.
B. CONSIGLI DI UTILIZZO
LA PESATURA
Posizionare la bilancia su una superficie piana e uniforme.
Prima di accendere la bilancia, posizionare sul piatto il
recipiente in dotazione o un altro recipiente. In questo modo
non dovrete spingere nuovamente il tasto «0/I» per azzerare
la bilancia. Premere il tasto «0/I». La scritta « 8888 » sarà
visualizzata automaticamente. Attendere qualche secondo, lo
schermo visualizzerà «0». Posizionare l’alimento da pesare
nel recipiente in dotazione, in un altro recipiente o
direttamente sul piatto della bilancia. Il peso viene
visualizzato sullo schermo digitale. Per cambiare unità di
misura (da grammi a decilitri), basta premere il tasto g/dl.
La bilancia ha una portata massima di 5 kg.
NOTA: la portata massima della bilancia si riduce in funzione
del peso del recipiente utilizzato. Gli alimenti vengono pesati
con precisione al grammo.
LA FUNZIONE TARA
Questa funzione permette di pesare separatamente
ingredienti aggiunti successivamente. Di seguito viene
descritto come pesare le quantità precise di ogni singolo
ingrediente previsto da una ricetta.
1. Accendere la bilancia come descritto in precedenza.
2. Quando lo schermo digitale visualizza «0», posizionare il
recipiente in cui saranno posti gli alimenti da pesare.
3. Spingere il tasto «0/I». Attendere che lo schermo digitale
visualizzi «0». Questa funzione permette di sottrarre il peso
del recipiente vuoto dal peso totale del recipiente con gli
ingredienti.
4. Pesare il primo ingrediente. Viene visualizzato il peso
desiderato.
5. Premere il tasto «0/I» per annullare il peso del primo
ingrediente pesato. Attendere che lo schermo digitale
visualizzi «0».
6. Pesare l’ingrediente successivo. Il peso viene visualizzato
sullo schermo digitale.
È possibile ripetere la procedura descritta aggiungendo altri
ingredienti.
NOTA: nel caso in cui il peso totale della preparazione superi
i 5 kg o i 50 dl (portata massima della bilancia), lo schermo
numerico visualizzerà la scritta « E--- ». Per spegnere
l’apparecchio, tenere premuto il tasto «0/I» per qualche
secondo. Se lasciata accesa e non utilizzata per più di 90
secondi, la bilancia si spegne automaticamente per ragioni di
risparmio energetico.
21
Page 22

MESSAGGI VISUALIZZATI SULLO SCHERMO DIGITALE
Appare quando si accende la bilan
cia. Attendere che lo schermo visua
lizzi «0» prima di cominciare a
pesare.
Appare quando la bilancia è pronta
a pesare.
Appare quando la bilancia è sovrac
carica. Togliere il peso in eccesso.
Appare quando le pile sono scari
che. Sostituirle con 2 pile alcaline da
1,5 volt nuove.
4. IL PARERE DELLO CHEF
• L a b i l a n c i a e l et t r o n i c a C u i s i n a r t ® è c o m p a t t a , l e g g e r a e
facile da utilizzare. Anche il funzionamento e la pulizia sono
facili e rapidi. La struttura in acciaio spazzolato la rende
robusta e resistente.
• G r a z i e a l s i s t e m a d i d i v i s i o n e a l g r a m m o , l a b i l a n c i a
permette di rispettare in modo preciso le quantità previste
dalla ricetta.
• I l r e c i p i e n t e u n i v e r s a l e è d o t a t o d i u n p r a t i c o b e c c u c c i o
dosatore e può essere utilizzato per riscaldare o far
fondere gli ingredienti nel forno a microonde. Una volta
pulito, il recipiente può essere riutilizzato come coperchio
per proteggere la bilancia una volta riposta.
• D u r a n t e l a p r e p a r a z i o n e d i u n a r i c e t t a , l a b i l a n c i a d a
cucina permette di pesare liquidi e solidi. Semplicemente
spingendo il tasto g/dl, la visualizzazione digitale passa
automaticamente dai grammi ai decilitri.
22
Page 23

5. DOMANDE-RISPOSTE
6. PULIZIA E MANUTENZIONE
Tog li ere l e pi le pri ma di pu li re la bi lanci a. Pul ir e l a s uperf ici e
della bilancia con un panno inumidito con un po’ di sapone o
di detersivo.
Non lasciar seccare eventuali impurità sulla bilancia.
Potrebbero danneggiarla.
Non utilizzare spugne o detersivi abrasivi.
Dopo la pulizia sciacquare con un panno umido e asciugare
accuratamente.
La bilancia elettronica Cuisinart® può essere lasciata sul piano
di lavoro della cucina. Verificare che sia lontana da fonti di
calore o vibrazioni.
7. ISTRUZIONI DI SICUREZZA
• N o n i m m e r g e r e l a b i l a n c i a i n a c q u a o a l t r o l i q u i d o .
• E v i t a r e d i t e n e r e l a b i l a n c i a s o t t o l ’ a c q u a c o r r e n t e .
• P o s i z i o n a r e l a b i l a n c i a s u u n a s u p e r f i c i e p i a n a e r e g o l a r e ,
lontana da fonti di calore o vibrazioni.
• Evitare il contatto con superfici calde o apparecchi
emananti calore.
• N o n r i p o r r e n u l l a s u l l a b i l a n c i a .
• R i p o r r e l a b i l a n c i a f u o r i d e l l a p o r t a t a d e i b a m b i n i . N o n
lasciare che i bambini utilizzino da soli la bilancia
elettronica.
• N o n r i p o r r e l a b i l a n c i a i n a m b i e n t e u m i d o .
• N o n u t i l i z z a r e l a b i l a n c i a s e c a d u t a o s e p r e s e n t a d a n n i
evidenti.
• N o n i n s e r i r e p i l e d i f e t t o s e o c h e p r e s e n t a n o p e r d i t e .
• N o n i n t r o d u r r e l e m a n i u m i d e n e l v a n o p i l e .
• U t i l i z z a r e e s c l u s i v a m e n t e p i l e a l c a l i n e p e r u n t o t a l e d i 3 v o l t .
• Q u e s t o a p p a r e c c h i o è c o n f o r m e a l l e n o r m e d e l l e d i r e t t i v e
89/336/CEE (compatibilità elettromagnetica) e 73/23/CEE
(sicurezza degli elettrodomestici), modificate dalla direttiva
93/68/CEE (marcatura CE).
• A d e s c l u s i v o u s o d o m e s t i c o .
23
Che fare se Risposte:
la bilancia non •Verificare che le pile siano posifunziona? zionate correttamente.
•C a m b i a r e l e p i l e s c a r i c h e .
gli alimenti pesati non •Non dimenticare di cambiare la
corrispondono a quelli modalità di pesata a seconda
riportati nella ricetta? degli alimenti, da solidi in grammi
a liquidi in dl.
Page 24

1. INTRODUCCIÓN
Acaba de adquirir una balanza electrónica Cuisinart®. La
investigación constante, buscando la innovación, y el esmero
con el que se elabora este producto le garantizan un
electrodoméstico de calidad. Es sencillo de utilizar y de
mantener.
La balanza de cocina Cuisinart® es compacta y ligera. De una
capacidad de 1 g a 5 kg, permite pesar los alimentos con una
precisión de un gramo. Ofrece dos sistemas de pesada, en
gramos o en decilitros. Su función “tara” permite pesar varios
ingredientes en un solo recipiente.
2. CARACTERÍSTICAS DEL PRODUCTO
1. Práctico recipiente con pico vertedor El recipiente de
policarbonato que lleva incluida la balanza es adecuado
para lavavajillas y microondas. Puede contener líquidos,
sólidos o alimentos en proceso de preparación. Se ajusta a
la perfección sobre la plataforma de pesado de la balanza.
2. Plataforma de pesado. Superficie circular sobre la que
puede depositar todo tipo de recipiente, además del
recipiente incluido, que se adapta perfectamente a su
diámetro.
3. Pantalla digital de cristal líquido. La pantalla presenta
información sobre el peso de 1 g a 5 kg.
4. Tecla 0/I. Esta tecla sirve para encender o apagar la
balanza, poner a cero la pantalla y pesar un recipiente
vacío (utilizando la función “tara”).
5. Tecla g/dl. Esta tecla permite presentar el peso en gramos
o en decilitros. Para cambiar la unidad de medida, sólo
tiene que pulsar una vez la tecla g/dl. Cuando enciende la
balanza, aparece el peso en gramos por defecto.
6. Patas antiderrapantes (no aparecen en la ilustración).
7. Compartimento de las pilas (no aparece en la ilustración).
Retire la tapadera presionando ligeramente la muesca
rectangular en dirección de la tapadera. Puede incluir 2
pilas alcalinas de 1,5 voltios cada una.
24
1
2
7
3
6
4
5
Page 25

3. UTILIZACIÓN
A. MONTAJE
INSTALACIÓN DE LAS PILAS
La balanza funciona por medio de 2 pilas alcalinas de
1,5 voltios cada una. No utilice nunca pilas defectuosas o con
fugas, que podrían dañar la balanza. Para insertar las pilas,
retire la tapadera del compartimento presionando
ligeramente la muesca rectangular en dirección de la
tapadera. Coloque las pilas, verificando que sus bornes
positivo (+) y negativo (-) se corresponden respectivamente con
los bornes + y – indicados en el interior del compartimento.
Coloque de nuevo la tapadera, empujando las dos muescas
previstas para ello y presione ligeramente hasta que un clic
confirme que está bien cerrada.
La indicación “Lo” en la pantalla digital significa que las pilas
están gastadas y debe sustituirlas. ¡IMPORTANTE! Utilice
únicamente pilas ALCALINAS.
B. UTILIZACIÓN
PESADO
Coloque la balanza sobre una superficie plana y uniforme. Si
utiliza el recipiente incluido o cualquier otro recipiente para
pesar los alimentos, colóquelo sobre la base antes de
encender la balanza. De esta forma no necesitará volver a
pulsar la tecla 0/I para poner la pantalla en cero.
Pulse la tecla “0/I”. Aparecerá automáticamente en la
pantalla “8888”. Espere unos segundos y la pantalla digital
indicará “0”. Coloque los alimentos que vaya a pesar en el
recipiente incluido, en cualquier otro recipiente o
directamente sobre la base. Su peso se reflejará en la
pantalla digital.
Para cambiar de unidad de medida, es decir, para pasar de
la pesada en gramos a la pesada en decilitros, sólo tiene que
pulsar la tecla g/dl.
La balanza tiene una capacidad de 1 g a 5 kg.
OBSERVACIÓN: la capacidad de pesada máxima de la
balanza se reduce en función del peso del recipiente utilizado.
Los alimentos se pesan con una precisión de un gramo.
FUNCIÓN “TARA”
Esta función permite pesar por separado ingredientes
incorporados sucesivamente. Siguiendo estas directrices puede
utilizar las cantidades precisas para cada ingrediente que
exija una receta.
1. Encienda la balanza tal y como se indica más arriba.
2. Cuando aparezca “0” en la pantalla digital, coloque el
recipiente vacío destinado a contener los alimentos que
vaya a pesar.
3. Pulse la tecla “0/I”. Espere unos segundos a que la
pantalla digital indique “0”. De esta forma, el peso del
recipiente vacío se deducirá del peso total del recipiente
más los ingredientes.
4. Pese el primer ingrediente. Aparecerá su peso en la pantalla.
5. Pulse la tecla “0/I” para anular el peso del primer
ingrediente pesado. Espere a que la pantalla digital indique “0”.
6. Pese el siguiente ingrediente. Aparecerá su peso en la
pantalla digital.
Puede proceder de esta forma con varios ingredientes.
OBSERVACIÓN: En caso de que el peso total de la
preparación supere los 5 kg o los 50 dl sobre la balanza (es
decir, su capacidad máxima) aparecerá “E--- ” en la
pantalla digital.
Para apagar la balanza, pulse la tecla “0/I” durante unos
segundos. Si deja la balanza encendida, se apagará
automáticamente cuando lleve 90 segundos inactiva, con el fin
de economizar pilas.
25
Page 26

MENSAJES EN LA PANTALLA DIGITAL
Aparece cuando se enciende la
balanza. Espere a que aparezca “0”
antes de empezar a pesar.
Aparece cuando la balanza está
lista para pesar.
Aparece cuando la balanza está
sobrecargada. Retire el peso exce
dentario de la balanza.
Aparece cuando las pilas están gas
tadas. Sustitúyalas por 2 nuevas
pilas alcalinas de 1,5 voltios.
4. SUGERENCIAS DE LOS CHEFS
• L a b a l a n z a e l e c t r ó n i c a C u i s i n a r t ® e s c o m p a c t a , l i g e r a y
fácil de utilizar. Su funcionamiento y su limpieza son
también fáciles y rápidos. Por su diseño en acero pulido es
un instrumento robusto y resistente.
• G r a c i a s a s u s i s t e m a d e g r a d u a c i ó n c o n u n a p r e c i s i ó n d e u n
gramo, la balanza permite respetar con precisión las
cantidades que requiere una receta.
• E l r e c i p i e n t e i n c l u i d o e s t á p r o v i s t o d e u n p i c o v e r t e d o r m u y
práctico. Este recipiente puede servir para calentar o fundir
ingredientes en el microondas. Una vez limpio, puede
colocarse boca abajo sobre la balanza para protegerla
cuando no se utiliza o cuando está guardada.
• M i e n t r a s p r e p a r a u n a r e c e t a , l a b a l a n z a d e c o c i n a l e
ofrece la posibilidad de pesar líquidos y sólidos. Para ello
sólo tiene que pulsar la tecla g/dl y la pantalla alternará la
presentación en gramos y en decilitros.
26
Page 27

5. PREGUNTAS Y RESPUESTAS
6. LIMPIAR Y GUARDAR
Apague la balanza antes de limpiarla.
Utilice un paño húmedo impregnado con un poco de jabón o
detergente para limpiar la superficie aparente de la balanza.
No deje que se sequen restos de comida sobre la balanza,
pues se podría dañar.
No utilice esponjas abrasivas o productos limpiadores
abrasivos.
Limpie con un trapo ligeramente humedecido y seque
cuidadosamente después de limpiar.
Puede dejar la balanza electrónica Cuisinart® sobre el
mostrador de la cocina, siempre que no entre en contacto con
una fuente de calor o de vibración.
7. CONSIGNAS DE SEGURIDAD
• N o s u m e r j a l a b a l a n z a e n a g u a o e n c u a l q u i e r o t r o l í q u i d o .
• N o l a c o l o q u e b a j o u n c h o r r o d e a g u a .
• S i t ú e l a b a l a n z a s o b r e u n a s u p e r f i c i e p l a n a y r e g u l a r q u e n o
esté en contacto con una fuente de calor o de vibración.
• N o c o l o q u e l a b a l a n z a e n c o n t a c t o c o n s u p e r f i c i e s c a l i e n t e s
o aparatos calentadores.
• N o d e j e o b j e t o s s o b r e l a b a l a n z a .
• G u a r d e l a b a l a n z a f u e r a d e l a l c a n c e d e l o s n i ñ o s . N o d e j e
que los niños utilicen solos la balanza electrónica.
• N o d e j e l a b a l a n z a e n u n a m b i e n t e h ú m e d o .
• N o u t i l i c e l a b a l a n z a s i h a r e c i b i d o u n g o l p e o p r e s e n t a
señales aparentes de deterioro.
• N o u t i l i c e p i l a s d e f e c t u o s a s o c o n f u g a s e n l a b a l a n z a .
• No toque con las manos húmedas el interior del
compartimento de las pilas.
• U t i l i c e ú n i c a m e n t e p i l a s a l c a l i n a s q u e t o t a l i c e n 3 v o l t i o s .
• E s t e a p a r a t o c u m p l e c o n l a s e x i g e n c i a s e s e n c i a l e s d e l a s
directivas 89/336/CEE (compatibilidad electromagnética) y
73/23/CEE (seguridad de los electrodomésticos),
modificadas por la directiva 93/68/CEE (etiquetado CE).
• Ú n i c a m e n t e p a r a u s o d o m é s t i c o .
27
¿Qué hacer si Respuestas:
la balanza no •Verifique que las pilas están bien
funciona ? colocadas.
•N o o l v i d e c a m b i a r l a s c u a n d o
estén gastadas.
Los ingredientes pesa- •No olvide cambiar la presentación
dos no se corresponden en función de los alimentos que
con mi receta? vaya a pesar, sólidos en gramos
o líquidos en dl.
 Loading...