

Page 1
EVOLUTIONX
CORDLESS
INSTRUCTION +
RECIPE BOOKLET
CORDLESS/
RECHARGEABLE
COMPACT
BLENDER
™
For your safety and continued enjoyment of this product, always read the instruction book carefully before using.
Page 2

IMPORTANT SAFEGUARDS
When using an electrical appliance, especially when children are
present, basic safety precautions should always be taken, including
the following:
WARNING: Read all safety warnings and instructions. Failure to
follow the warnings and instructions may result in electric
shock, fire and/or serious injury.
1. READ ALL INSTRUCTIONS.
2. To protect against electric shock, do not put the body of this
EvolutionX™ Cordless Rechargeable Compact Blender in water
or other liquids while unit is charging. Other than the blending/
mixing blade, never submerge any other portion of this unit in
liquids. If the compact blender base falls into liquid, remove
immediately. Carefully remove, clean and dry unit thoroughly
before continuing.
3. This appliance should not be used by children. To avoid
possible accidental injury, close supervision is necessary when
any appliance is used by or near children or individuals with
certain disabilities.
4. Do not operate in the presence of explosive and/or flammable
fumes.
5. To avoid the possibility of personal injury, always unplug the
unit from the USB cable and USB power adapter before attaching
or removing blades and/or attachments for cleaning or any
other purpose.
6. Illuminated lights indicate unit is ready to operate.
7. Once blender is unlocked and/or powered on, avoid any contact
with blades or movable parts.
8. Keep hands, hair, clothing, as well as spatulas and other utensils
away from attachments and mixing container during operation to
reduce risk of injury to persons, and/or damage to the appliance.
A spatula may be used, but must be used only when the unit is
not operating.
9. BLADES ARE SHARP. HANDLE CAREFULLY.
To reduce the risk of injury, never place blending blade on base
unless the blender jar is properly attached. Never leave your
blender unattended while it is running. Twist removable blade
assembly firmly onto travel cup. Injury can result if moving blade
accidentally becomes exposed.
10. When mixing liquids, use a tall container or mix small quantities at
a time to reduce spillage and possibility of injury.
11. USB power adapter and USB cable should be plugged into an
electrical outlet away from sink or hot surface.
12. Do not use an extension cord. Plug USB power adapter directly
into an electrical outlet.
13. Do not attempt to use this USB power adapter and USB cable
with any other product. Also, do not attempt to charge the
batteries with any other USB power adapter.
14. Do not charge batteries with charger plugged into an outdoor
outlet.
15. Do not operate any appliance with a damaged cord or plug, or
after the appliance has malfunctioned or has been dropped or
damaged in any way, or is not operating properly. Return the
appliance to the nearest Cuisinart Repair Center for examination,
repair, or mechanical or electrical adjustment.
16. The use of attachments or accessories not recommended by
Cuisinart may cause fire, electric shock or risk of injury.
17. Make sure the appliance is off and the motor/blade attachment
has stopped completely before putting on or taking off
attachments, and before cleaning.
18. This appliance is intended for household use only and is not for
commercial or outdoor use.
19. Do not use this blender for other than its intended use of
preparing foods and beverages.
20. To reduce the risk of fire or electric shock, do not operate any
heating appliance beneath or near the mounted charging handle
unit.
2
Page 3

21. Do not mount or store unit over or near a portion of a heating or
cooking appliance, or a sink or washbasin.
22. Unplug the USB power adapter from the outlet before
attempting any routine cleaning of the charger.
23. Do not operate with a damaged USB power adapter. Have
damaged USB power adapter replaced immediately.
24. Do not incinerate the blender, even if it is severely damaged.
The batteries can explode in a fire.
25. This product contains lithium batteries which must be recycled
at the end of the life of the blender and disposed of properly. Do
not incinerate or compost batteries, as they will explode at high
temperatures.
26. Leaks from battery cells can occur under extreme conditions. If
the liquid gets on the skin, (1) wash quickly with soap and water
or (2) neutralize with mild acid such as lemon juice or vinegar. If
the liquid gets into eyes, flush them immediately with clean
water for a minimum of 10 minutes. Seek medical attention.
27. Recharge only with the USB power adapter specified by the
manufacturer. A USB power adapter (10.0VDC/1000mA output)
that is suitable for one type of battery pack may create a risk of
fire when used with another battery pack.
28. Use appliances only with specifically designated battery packs.
Use of any other battery packs may create a risk of injury and
fire.
29. Under abusive conditions, liquid may be ejected from the
battery. Avoid contact with such liquid. If contact accidentally
occurs, flush with water. If liquid contacts eyes, seek medical
help. Liquid ejected from the battery may cause irritation or
burns.
30. Do not use a battery pack or appliance that is damaged or
modified. Damaged or modified batteries may exhibit
unpredictable behavior resulting in fire, explosion or risk of
injury.
31. Do not expose a battery pack or appliance to fire or excessive
heat. Exposure to fire or temperatures above 265°F/130°C may
cause an explosion.
32. Have servicing performed by a qualified repair person using
only identical replacement parts. This will ensure that the safety
of the product is maintained.
33. Recommended ambient charging temperature: 50°F−104°F
(10°C−40°C).
34. Recommended storage temperature: 50°F−104°F (10°C−40°C).
35. Any other servicing should be performed by an authorized
service representative.
36. Do not operate your appliance in an appliance garage or under
a wall cabinet. When storing in an appliance garage, always
unplug the unit from the electrical outlet. Not doing so could
create a risk of fire, especially if the appliance touches the walls
of the garage or the door touches the unit as it closes.
SAVE THESE INSTRUCTIONS
FOR HOUSEHOLD USE ONLY
3
Page 4

UNPACKING INSTRUCTIONS
1. Place the gift box containing your EvolutionX™ Cordless Rechargeable
Compact Blender on a flat, sturdy surface before unpacking.
2. Remove instruction booklet and other printed materials from top of
packaging material.
3. Carefully lift blender base from box and set aside.
4. Remove blender jar and set aside. Before using for the first time: Wash
all parts according to the Cleaning and Maintenance section on page
7 of this booklet to remove any dust or residue.
To assemble the blender, follow the Assembly instructions on page 7 of
this Instruction Booklet. Replace all packaging materials in the box and
save the box for repackaging.
TABLE OF CONTENTS
Important Safeguards...............................2
Unpacking Instructions ............................4
Features and Benefits ..............................5
Before You Begin ......................................6
Charging Your Compact Blender/
Battery Life... .............................................6
Assembly ..................................................6
Operation ..................................................6
Operating and Safety Tips .......................7
Cleaning and Maintenance .......................7
Tips and Hints ...........................................7
Warranty .................................................... 8
Recipes .....................................................9
4
Page 5
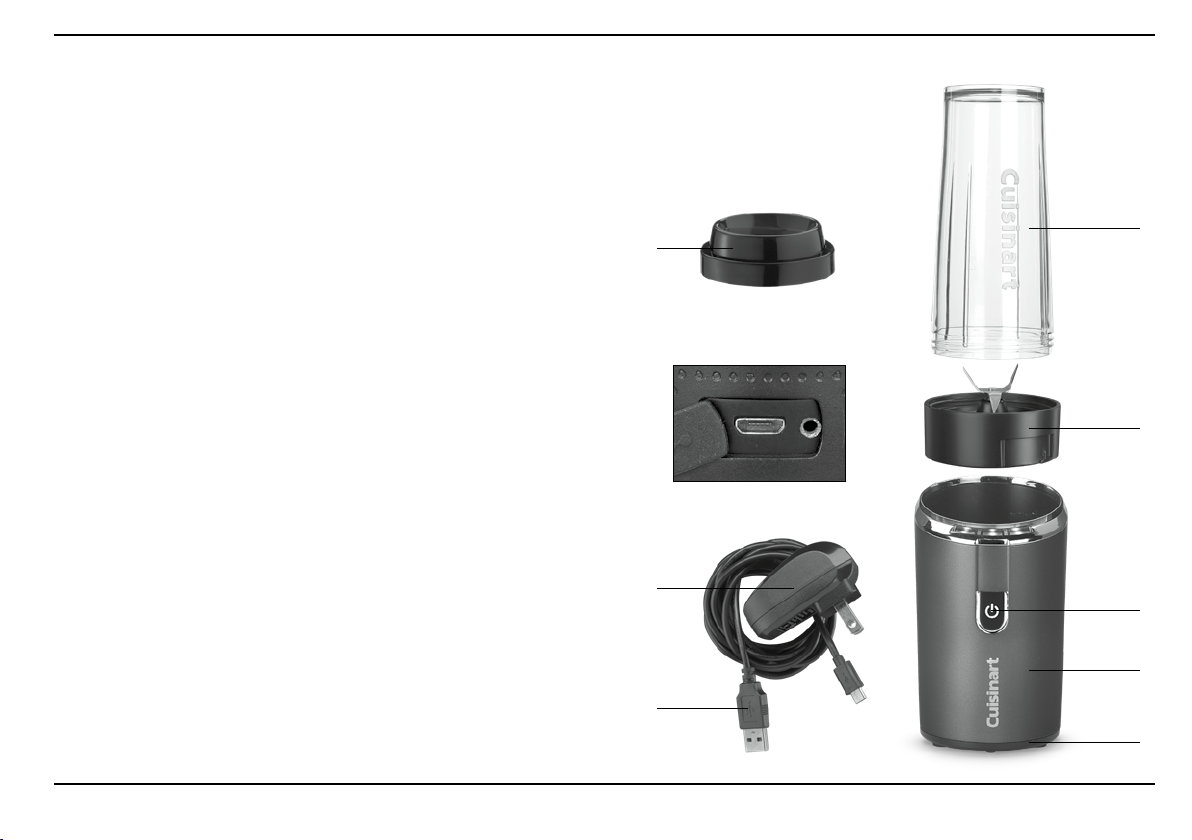
FEATURES AND BENEFITS
1. Single, BPA-free, 20 oz. travel cup with lid
allows you to blend your favorite drinks:
smoothies, protein, health, diet drinks and more!
2. Blending blade assembly
used for blending or making smoothies.
3. Power ON/OFF single-button control
is simple on this single-speed blender
4. Rechargeable blender base
run by 7.4 volts, is sturdy and stable, and is
easy to handle with sculpted, textured housing.
5. Slip-proof feet
prevent movement during use.
6. Charger port
plug USB cable into unit.
7. To charge
plug USB cable into unit.
7a . Charger/Power Adapter
7b. USB Power Cable
1
1
6
2
7a
3
4
7b
5
5
Page 6

BEFORE YOU BEGIN
Read all instructions completely for detailed operating procedures. The
battery in your EvolutionX™ Cordless Rechargeable Compact Blender has
not been fully charged. Before the first use of this appliance, the battery
must be charged until 3 blue LED lights are illuminated. See Charging
Your Compact Blender/Battery Life below.
CHARGING YOUR COMPACT
BLENDER/BATTERY LIFE
The batteries in your EvolutionX™ Cordless Rechargeable Compact
Blender have not been fully charged. Before the first use of this
appliance, the batteries must be charged until all 3 blue battery indicator
lights illuminate. With a full charge, your compact blender will run for
approximately 20 minutes, depending on load. Your compact blender will
be fully charged in approximately 2 hours.
HOW TO READ
THE BATTERY LIFE INDICATOR
• When 1st light is flashing and others are off, battery capacity is 40%.
• When 1st light is solid and 2nd light
is flashing, battery capacity is 40% – 70%.
• When 1st and 2nd lights are solid and 3rd light is flashing, battery
capacity is 70% – 95%.
• When Battery Life Indicator/LED Light Bar displays 3 solid blue power
lights, battery capacity is 95%. (NOTE: A 95% charge for a lithium ion
batter y is considered a full charge.)
QUICK-CHARGE FEATURE
Your Cordless Rechargeable Compact Blender is equipped with a quickcharge feature. If your power handle runs out of power, you can “quick
charge” your unit:
• Charge for 15 minutes to get 25 seconds
of runtime.
• Charge for 30 minutes to get 1 minute
and 45 seconds of runtime.
• Charge for 60 minutes to get 5 minutes
and 45 seconds of runtime.
• Charge for 2 hours for 20 minutes of runtime (full charge)
NOTE: Do not leave your compact blender uncharged for an extended
period of time, as it will affect the life of the rechargeable battery.
ASSEMBLY
After washing all parts, please see below for assembly.
Place base on flat surface and plug in.
1. Place blending cup on at surface.
2. Attach blending blade/mixing assembly on round opening of the cup
and turn clockwise until tightened.
OPERATION
1. Attach blade assembly to blending jar.
2. Put food ingredients into the blending cup, and then attach the blade
assembly.
3. With the base unit stable, place the assembled blending cup onto the
base and turn to lock into place.
4. For continuous operation: Press the power button once, the LEDs are
displayed, then press again to turn unit on. Press once more to turn
unit off.
6
Page 7

5. When you have finished blending, press the Power button to turn
OFF. Remove the travel cup from the base.
6. Turn cup right-side up, turn blade assembly counterclockwise to
remove.
NOTE: Do not fill with ingredients/liquid past the max fill line.
NOTE: Maximum runtime of a single blending cycle is one minute.
OPERATING AND SAFETY TIPS
• Always use the blender on a clean, sturdy and dry surface.
• Always operate the blending cup with blade assembly attached.
Place cover on firmly.
• Don’t remove blending cup while unit is running.
• Don’t place blade onto blender base without the blending cup
attached.
• Make sure blade assembly is tightly attached to blending cup.
• Always remove blade assembly before cleaning.
• Don’t store food or liquids in your blending cup.
• Don’t overload blending cup.
• CAUTION: NEVER use carbonated beverages in the blending cup.
• Don’t blend hot liquids in blending cup.
• Don’t use any container or accessories not recommended
by Cuisinart
• The blending cup is not recommended for microwave use.
®
. Doing so may result in injury.
CLEANING AND MAINTENANCE
The base and parts are made of corrosion-resistant materials that are
easy to clean. Before first use and after every use, clean each part
thoroughly. Periodically check all parts before reassembly. DO NOT USE
if any part is damaged, or the cup is chipped or cracked. To remove
blade assembly, twist off by turning counterclockwise. NEVER TOUCH
THE BLADE ITSELF.
CAUTION: Handle the blade assembly carefully. The blades are SHARP
and may cause injury. DO NOT attempt to remove blades from cutting
assembly.
Wash all par ts in warm, soapy water; rinse and dry thoroughly. All parts
are top rack dishwasher safe.
Tip: You may wish to clean your blade assembly as follows: Squirt a
small amount of dishwashing liquid into travel cup and fill halfway with
warm water. Attach blending blade assembly. Run for 15 seconds.
Repeat, using clean tap water. Carefully disassemble par ts and empty
cup. Rinse and dry all parts thoroughly. Finally, wipe the motor base
clean with a damp cloth to remove any residue, and dr y thoroughly.
Never submerge the motor base in water or other liquids, or place in
a dishwasher.
Any other servicing should be performed by an authorized service
representative.
TIPS AND HINTS
• When using your blending cup, ingredients are put in the following order:
Always put the hardest ingredients into the travel cup rst (ice cubes, frozen
fruit), and nish with the softer ingredients and liquids.
• It is recommended that most foods be cut into ½-inch to 1-inch pieces to
achieve the most uniform result.
• If food sticks to the sides of the cup when blending, stop the blender,
carefully scrape down the food, replace blade assembly and blend again
to combine.
• When blending thicker mixtures, lightly hold down the top of travel cup to
prevent jumping.
• After blending, ip the travel cup over so that the blade assembly is on the
top. Gently tap the travel cup a few times to prevent any spillage. Remove
the blade assembly and replace with lid.
• Some recipes may require more than a minute of blending. Simply start
blender again, once the minute of continuous blending has elapsed.
7
Page 8

WARRANTY
Limited Three-Year Warranty
This warranty is available to U.S. consumers only. You are a consumer if
you own a Cuisinart
Blender that was purchased at retail for personal, family or household
use. Except as otherwise required under applicable law, this warranty is
not available to retailers or other commercial purchasers or owners. We
warrant that your Cuisinart
Compact Blender will be free of defects in materials and workmanship
under normal home use for 3 years from the date of original purchase.
We recommend that you visit our website,
www.cuisinart.com for a fast, efficient way to complete your product
registration. However, product registration does not eliminate the need
for the consumer to maintain the original proof of purchase in order to
obtain the warranty benefits. In the event that you do not have proof of
purchase date, the purchase date for purposes of this warranty will be
the date of manufacture.
CALIFORNIA RESIDENTS ONLY
California law provides that for In-Warranty Service, California residents
have the option of returning a nonconforming product (A) to the store
where it was purchased or (B) to another retail store that sells Cuisinart
products of the same type. The retail store shall then, according to its
preference, either repair the product, refer the consumer to an
independent repair facility, replace the product, or refund the purchase
price less the amount directly attributable to the consumer’s prior usage
of the product. If neither of the above two options results in the
appropriate relief to the consumer, the consumer may then take the
product to an independent repair facility, if service or repair can be
economically accomplished. Cuisinart and not the consumer will be
responsible for the reasonable cost of such service, repair, replacement,
or refund for nonconforming products under warranty. California
residents may also, according to their preference, return nonconforming
products directly to Cuisinart for repair or, if necessary, replacement by
calling our Consumer Service Center toll-free at 800-726-0190. Cuisinart
will be responsible for the cost of the repair, replacement, and shipping
and handling for such nonconforming products under warranty.
®
EvolutionX™ Cordless Rechargeable Compact
®
EvolutionX™ Cordless Rechargeable
HASSLE-FREE REPLACEMENT WARRANTY
Your ultimate satisfaction in Cuisinart products
is our goal, so if your Cuisinart
®
EvolutionX™ Cordless Rechargeable
Compact Blender should fail within the generous warranty period, we will
repair it or, if necessary, replace it at no cost to you. To obtain a return
shipping label, email us at https://www.cuisinart.com/customer-care/
product-return. Or call our toll-free customer service department at
1-800-726-0190 to speak with a representative.
Your Cuisinart
®
EvolutionX™ Cordless Rechargeable Compact Blender
has been manufactured to the strictest specifications and has been
designed for use only in 120-volt outlets and only with authorized
accessories and replacement parts. This warranty expressly excludes
any defects or damages caused by attempted use of this unit with a
converter, as well as use with accessories, replacement parts or repair
service other than those authorized by Cuisinart. This warranty does not
cover any damage caused by accident, misuse, shipment or other than
ordinar y household use. This warranty excludes all incidental or
consequential damages. Some states do not allow the exclusion or
limitation of these damages, so these exclusions may not apply to you.
You may also have other rights, which vary from state to state.
Important: If the nonconforming product is to be serviced by someone
other than Cuisinart’s Authorized Ser vice Center, please remind the
servicer to call our Consumer Ser vice Center at 1-800-726-0190 to
ensure that the problem is properly diagnosed, the product is serviced
with the correct parts, and to ensure that the product is still under
warranty.
8
Page 9

RECIPES
Classic Fruit Smoothie ................................. 9
Tropical C Smoothie ................................... 9
Strawberry Fields Smoothie .............................10
Island Blueberry Smoothie ..............................10
Breakfast Shake for the Road ...........................10
Avocado Power Shake .................................10
Power Blast Protein Shake .............................. 11
Chocolate Nut Butter Protein Shake ...................... 11
Vanilla-Maple Protein Shake ............................ 11
Açai Bowl ............................................ 11
Cold Tea/Cold Brew Lattes ............................. 12
Matcha Latte ......................................... 12
Chocolate Cookies and Cream Shake .................... 12
Basic Vinaigrette ...................................... 12
Creamy Feta & Yogurt Dressing ......................... 13
Whipped Cream ...................................... 13
Classic Fruit Smoothie
This re cipe works great with any type of fruit or juice, and don’t forget
Makes 1 serving
1 cup mixed fruit, fresh or frozen
½ banana, cut into 1-inch pieces
½ cup juice (use your favorite)
1. Put all ingredients, in the order listed, into the blending cup.
Secure the blade assembly.
2. Blend until smooth, about 45 seconds.
3. Serve immediately.
to add your favorite smoothie supplements.
Calor ies 112 (4% from fat) • carb. 28g • pr o. 1g • fat 1g • sat. fat 0g
Nutritional information per serving:
• chol. 0 mg • sod. 6mg • calc. 16mg • fiber 3g
Tropical C Smoothie
Vitamin C-packed fruit plus kale make this smooth ie a delicious winner.
Makes 1 serving
½ cup frozen mango
½ cup baby kale
½ cup fresh pineapple, cut into 1-inch piec es
½ cup orange juice
1. Put all of the ingredients, in the order listed, into the blending cup. Secure the
blade assembly.
2. Blend until smooth, about 45 seconds to 1 minute.
3. Serve immediately.
.
Calor ies 150 (3% from fa t) • carb. 36g • pro. 3g • fat 0g • s at. fat 0g
Nutritional information per serving:
• chol. 0 mg • sod. 22mg • ca lc. 27mg • fiber 3 g
9
Page 10

Strawberry Fields Smoothie
The sweetness of the strawberries makes this green smoothie a real treat.
Makes 1 serving
½ cup frozen strawberr ies
½ cup baby spinach
1 ripe banana, b roken into 2 to 3 piece s
½ cup nondair y milk (e.g., rice, al mond, soy)
1. Put all of the ingredients, in the order listed, into the blending cup. Secure the
blade assembly.
2. Blend until smooth, about 45 seconds to 1 minute.
3. Serve immediately.
.
Calor ies 194 (12% from fat) • c arb. 46g • pro. 3g • fat 2g • sat. fa t 0g
Nutritional information per serving:
• chol. 0 mg • sod. 51mg • calc. 42m g • fiber 5g
Island Blueberry Smoothie
The combination of coconut, lime and ginger gives this smoothie
Makes 1 serving
½ cup frozen blueberries
½ cup baby kale
6 mint leaves
¼ teasp oon lime zest
1 ½-inch piece ginger
1 ripe banana, b roken into 2 to 3 piece s
½ cup coconut milk
1. Put all of the ingredients, in the order listed, into the blending cup.
Secure the blade assembly.
2. Blend until smooth, about 45 seconds to 1 minute.
3. Serve immediately.
Calor ies 189 (21% from fat) • ca rb. 42g • pro. 3g • fat 4g • sat. fat 3g
a true taste of the islands.
Nutritional information per serving:
• chol. 0 mg • sod. 103mg • ca lc. 34mg • fiber 7g
Breakfast Shake for the Road
Nutrition on the go, make this smoothie in the morning for breakfast when time is short.
Makes 1 serving
3 frozen strawberries
½ cup fresh mango, cut into ½ -inch pieces
½ banana
½ cup low-fat yogurt
½ cup juice
1 tablespoon ground flax seeds (optional)
1. Put all ingredients, in the order listed, into the blending cup. Secure the blade assembly.
2. Blend until smooth, about 30 to 45 seconds.
3. Serve immediately.
Calories 258 (18% from fat) • carb. 57g • pro. 7g • fat 1g • sat. fat 1g
Nutritional information per serving:
• chol. 5mg • sod. 67mg • calc. 111mg • fiber 5g
Avocado Power Shake
Packed with nutrients and monounsaturated fats (the good ones – we swear!), this will fill
Makes 1 serving
3 ice cubes
½ ripe banana, cut into 1-inch piec es
1
/3 ripe avocado, p itted , cut into 1-inch pieces
1 cup rice milk
2 teaspoons honey
Pinch ground cinnamon
1. Put all of the ingredients, in the order listed, into the blending cup.
Secure the blade assembly.
2. Blend until smooth, about 45 seconds to 1 minute.
3. Serve immediately over ice.
you up and give you the energy to keep on moving.
Nutritional information per serving:
Calor ies 289 (29% fr om fat) • carb. 51g • pro. 3g • fa t 10g • sat. fat 1g
• chol. 0 mg • sod. 92mg • calc. 313mg • fiber 5g
10
Page 11

Power Blast Protein Shake
Blend this for a post-workout pick-me-up.
Makes 1 serving
1 frozen banana, cut into 1 to 2-inch pieces
2 ice cubes
2 tablespoons almond butter
½ teaspoon ground cinnamon
1 serving protein powder
1 cup oat milk
1. Put all ingredients, in the order listed, into the blending cup.
Secure the blade assembly.
2. Blend until smooth, about 45 seconds to 1 minute.
3. Serve immediately.
Nutritional information per serving:
Calor ies 270 (40% from fat) • carb. 38g • p ro. 6g • fat 13g • sat . fat 11g
• chol. 5m g • sod. 68mg • c alc. 89mg • f iber 4g
Chocolate Nut Butter Protein Shake
Make this tasty shake for a post-workout recovery drink.
Makes 2 servings
1 cup chilled l iquid (water, milk, etc.)
2 tablespoons protein powder
2 teaspoons unsweetened nut butter
1 teaspoon cocoa powder
1 teaspoon liquid sweetener (honey, agave, stevia, or maple syrup)
1. Put all of the ingredients, in the order listed, into the blending cup.
Secure the blade assembly.
2. Blend until smooth, about 45 seconds to 1 minute.
3. Serve over ice.
(with water, peanut butter and vegetable-based protein):
Calor ies 160 (30% fro m fat) • carb. 10g • pro. 20g • fat 6g • sat. fat 1g
Nutritional information per serving
• chol. 0 mg • sod. 234mg • c alc. 44mg • f iber 1g
Vanilla-Maple Protein Shake
Keep it simple and sweet, with this quick shake.
Makes 1 serving
1 cup chill ed liquid (preferably milk – alternative is OK)
2 tablespoons protein powder
1 teaspoon pure maple syrup
½ teaspoon pur e vanilla extract
1. Put all of the ingredients, in the order listed, into the blending cup.
Secure the blade assembly.
2. Blend until smooth, about 45 seconds to 1 minute.
3. Serve over ice.
(with unsweetened rice milk and vegetable-based protein):
Calor ies 194 (12% from fat) • c arb. 23g • pro. 18g • f at 3g • sat. fat 0 g
Nutritional information per serving
• chol. 0 mg • sod. 261mg • calc . 287mg • fiber 0g
Açaí Bowl
Açai is a super antioxidant, giving an extra nutritious punch to this smoothie bowl.
Makes 1 serving
¾ cup frozen mango, divided
¼ cup frozen blueberries
1 ripe banana, broken into 2 to 3 pieces
1 teaspoon açai powder
½ cup rice milk (or a ny nonda iry milk)
½ cup fr esh berries
¼ cup granola and/or mixed nuts and seeds
1. Put ¼ cup frozen mango, frozen blueberries, banana, açaí powder and the rice milk into
the blending cup. Secure the blade assembly.
2. Blend for about 10 to 20 seconds to blend ingredients. Add the remaining mango and
continue to blend for about 45 seconds until smooth.
3. Pour into a bowl and top with fresh berries and granola and/or mixed nuts and seeds.
4. Serve immediately.
Calor ies 397 (15% from fat) • c arb. 85g • pro. 8g • fat 5g • sat. f at 1g
Nutri tional inf ormatio n per ser ving (1 cup):
• chol. 0 mg • sod. 52mg • ca lc. 27mg • fiber 9g
11
Page 12

Cold Tea/Cold Brew Lattes
Skip the coffee shop and make your favorite iced tea latte at home.
Makes 1 cup
½ cup milk (any variety, dairy or nondair y)
½ cup tea concentrate (s uch as chai, turm eric-ginger, yer ba mate, etc.)
or cold brew cof fee
1. Put the milk and concentrate into the blending cup.
2. Blend until frothy, about 30 to 45 seconds.
3. Serve over ice.
Nutri tional inf ormatio n per ser ving (1 cup) based on nonfat milk:
Calor ies 42 (4% from fat) • carb. 6g • pr o. 4g • fat 0g • sat . fat 0g
• chol. 3mg • sod. 64mg • c alc. 305mg • f iber 0g
Matcha Latte
Matcha is a great alternative to coffee to get your energy going in the mornings. Try first
without additional sweetener, because some matcha powders have sweeteners in them.
Makes 1 serving
3 ice cubes
1 cup milk (any variety, dairy or nondair y)
1 teaspoon matcha powder
½ to 1 teaspoon honey or agave, optional
1. Put all ingredients into the blending cup.
2. Blend until frothy, about 45 seconds.
3. Serve over ice.
Nutritional information per serving (1 cup):
Calories 156 (23% from fat) • carb. 20g • pro. 8g • fat 5g • sat. fat 13g
• chol. 20mg • sod. 195mg • calc. 290mg • fiber 2g
Chocolate Cookies and Cream Shake
Super chocolatey and delicious!
Makes about 12 ounces
1 cup chocolate ice cream
3 chocolate sandwich cookies
½ cup low-fat milk
1. Put all of the ingredients, in the order listed, into the blending cup.
Secure the blade assembly.
2. Blend until smooth, about 45 seconds to 1 minute.
3. Serve immediately.
Calor ies 252 (42% from f at) • carb. 33 g • pro. 7g • fat 11g • sat. fat 6g
Nutritional information per serving (6 ounces):
• chol. 25mg • sod. 105mg • ca lc. 50mg • fib er 1g
Basic Vinaigrette
Salad dressing is simple to prepare, and much healthier for you than what you could
purchase at the store. This, as the name suggests, is a basic version. Champagne vinegar
is softer in flavor than other vinegars, but you can substitute with white
or red wine vinegar if you prefer.
Makes 1 cup
¼ cup Champagne vinegar
½ small shallot, peeled and halved
1 teaspoon Dijon mustard
½ teaspoon kosher salt
¼ teaspoon ground white pepper
¾ cup extra virgin olive oil
1. Put all of the ingredients, in the order listed, into the blending cup. Secure the blade
assembly.
2. Blend until smooth, about 1 minute.
3. Taste and adjust seasoning as desired. Serve immediately. Dressing can be stored in
an airtight container in the refrigerator for up to 2 weeks.
Nutritional information per serving (1 tablespoon):
Calor ies 92 (99% fr om fat) • car b. 0g • pro. 0g • fa t 11g • sat. fat 2g
• chol. 0 mg • sod. 74mg • calc . 0mg • fiber 0g
12
Page 13

Creamy Feta & Yogurt Dressing
A great creamy and tangy dressing for all types of salads and vegetables.
Makes 1¼ cups
1 small garlic clove, peeled
1
/3 cup red wine vinegar
1 tablespoon fresh lemon juice
½ teaspoon oregano
¼ teaspoon basil
1 teaspoon honey
4 ounces crumbled feta cheese
¼ cup low-fat, plain yogurt
¼ cup extra virgin olive oil
1. Put all of the ingredients, in the order listed, into the blending cup.
Secure the blade assembly.
2. Blend until smooth, about 45 seconds to 1 minute.
3. Let dressing stand for 20 to 30 minutes to allow flavors to blend.
4. Transfer to a resealable container and refrigerate until ready to use.
Nutritional information per serving (one tablespoon):
Calories 43 (81% from fat) • carb. 1g • pro. 1g • fat. 1g • sat. fat 1g
• chol. 5mg • sod. 65mg • calc. 36mg • fib er 0g
Whipped Cream
Whipped cream in a blender? Yes, please!
1. Put all of the ingredients, in the order listed, into the blending cup. Secure
the blade assembly.
2. Blend until stiff, about 30 seconds.
3. Serve immediately.
Nutritional information per serving (based on 2 tablespoons):
Calories 89 (88% from fat) • carb. 2g • pro. 0g • fat 9g • sat. fat 5g
• chol. 33mg • sod. 38mg • calc. 15mg • fiber 0g
Makes 2/3 cup
½ cup heavy cream
1 tablespoon confectioners’ sugar
¼ teaspoon pure vanilla ex tract
Pinch kosher salt
13
Page 14

NOTES:
14
Page 15

NOTES:
15
Page 16

Trademarks or service marks of third parties referred to herein
are the trademarks or service marks of their respective owners.
©2020 Cuisinart
East Windsor, NJ 08520
Printed in China
20CE070207
IB-16604-ESP
IB-16614-ESP
 Loading...