

Page 1
EVOLUTIONX
CORDLESS
INSTRUCTION +
RECIPE BOOKLET
CORDLESS/
RECHARGEABLE
MINI
CHOPPER
™
For your safety and continued enjoyment of this product, always read the instruction book carefully before using.
Page 2

IMPORTANT SAFEGUARDS
When using an electrical appliance, especially when children
are present, basic safety precautions should always be taken,
including the following:
WARNING: Read all safety warnings and instructions.
Failure to follow the warnings and instructions may result
in electric shock, fire and/or serious injury.
1. READ ALL INSTRUCTIONS.
2. To protect against electric shock, do not put the body of
3. This appliance is not intended for use by children or by persons
4. Do not operate in the presence of explosive and/or flammable
5. To avoid the possibility of personal injury, always unplug
6. Illuminated lights indicate unit is ready to operate.
7. Once chopper is unlocked and/or powered on, avoid any contact
8. Avoid contact with moving parts. Keep hands and utensils away
EvolutionX™ Cordless Rechargeable Mini Chopper in water
this
or other liquids while unit is charging. Other than the blade,
bowl and cover, never submerge any other portion of this unit
in liquids. If the mini chopper base falls into liquid, remove
immediately. Carefully remove, clean and dry unit thoroughly
before continuing.
with reduced physical, sensory, or mental capabilities, or lack of
experience and knowledge. Close supervision is necessary when
any appliance is used near children. Children should be
supervised to ensure that they do not play with the appliance.
fumes.
the unit from the USB cable and USB power adapter before
attaching or removing blades and/or attachments for cleaning
or any other purpose.
with blades or movable parts.
from moving blade while processing, to prevent the risk of severe
injury to persons, or damage to the chopper/grinder. A scraper
may be used, but must only be used when the chopper/grinder
is not running.
9. BLADES ARE SHARP. HANDLE CAREFULLY.
Blade is extremely sharp. Handle carefully when removing,
inserting or cleaning. Always allow blade to stop moving before
removing cover.
10. USB power adapter and USB cable should be plugged into
an electrical outlet away from sink or hot surface.
11. Do not use an extension cord. Plug USB power adapter directly
into an electrical outlet.
12. Do not attempt to use this USB power adapter and USB cable
with any other product. Also, do not attempt to charge the
batteries with any other USB power adapter.
13. Do not charge batteries with charger plugged into an
outdoor outlet.
14. Do not operate any appliance with a damaged cord or plug or
after the appliance malfunctions, or is dropped or damaged in
any manner. Contact the manufacturer at their customer service
telephone number for information on examination, repair, or
adjustment.
15. The use of attachments or accessories not recommended
by Cuisinart may cause fire, electric shock or risk of injury.
16. Make sure the appliance is off and the motor/blade attachment
has stopped completely before putting on or taking off
attachments, and before cleaning.
17. This appliance is intended for household use only and is not
for commercial or outdoor use.
18. Do not use this chopper for other than its intended use
of preparing foods and beverages.
19. Do not mount or store unit over or near a portion of a heating
or cooking appliance, or a sink or washbasin.
20. Unplug the USB power adapter from the outlet before attempting
any routine cleaning of the charger.
2
Page 3

21. Do not operate with a damaged USB power adapter.
Have damaged USB power adapter replaced immediately.
22. Do not incinerate the chopper, even if it is severely damaged. The
batteries can explode in a fire.
23. This product contains lithium batteries which must be
recycled at the end of the life of the mini chopper and disposed
of properly. Do not incinerate or compost batteries, as they will
explode at high temperatures.
24. Leaks from battery cells can occur under extreme conditions.
If the liquid gets on the skin, (1) wash quickly with soap and water
or (2) neutralize with mild acid such as lemon juice or vinegar. If
the liquid gets into eyes, flush them immediately
with clean water for a minimum of 10 minutes. Seek medical
attention.
25. Recharge only with the USB power adapter specified by the
manufacturer. A USB power adapter (5.0VDC/2000mA output)
that is suitable for one type of battery pack may create a risk
of fire when used with another battery pack.
26. Use appliances only with specifically designated battery packs.
Use of any other battery packs may create a risk of injury
and fire.
27. Under abusive conditions, liquid may be ejected from the battery.
Avoid contact with such liquid. If contact accidentally occurs,
flush with water. If liquid contacts eyes, seek medical help. Liquid
ejected from the battery may cause irritation
or burns.
28. Do not use a battery pack or appliance that is damaged
or modified. Damaged or modified batteries may exhibit
unpredictable behavior resulting in fire, explosion or risk
of injury.
29. Do not expose a battery pack or appliance to fire or excessive
heat. Exposure to fire or temperatures above 265°F/130°C
may cause an explosion.
30. Have servicing performed by a qualified repair person using only
identical replacement parts. This will ensure that the safety of the
product is maintained.
31. Recommended ambient charging temperature: 50°F−104°F
(10°C−40°C).
32. Recommended storage temperature: 50°F−104°F (10°C−40°C).
33. Any other servicing should be performed by an authorized
service representative.
34. Do not operate your appliance in an appliance garage or under a
wall cabinet. When storing in an appliance garage, always unplug
the unit from the electrical outlet. Not doing so could
create a risk of fire, especially if the appliance touches the walls
of the garage or the door touches the unit as it closes.
35. Turn the appliance OFF, then unplug from the outlet when not in
use, before assembling or disassembling parts and before
cleaning. To unplug, grasp the adapter and pull from the outlet.
Never pull from the power cord.
36. To reduce the risk of injury, never place cutting blade on base
without first putting bowl properly in place.
37. Be cer tain cover is securely locked in place before operating
appliance.
38. Do not attempt to defeat the cover interlock mechanism.
39. Prevent unintentional starting. Ensure the switch is in the offposition before connecting to battery pack, picking up or
carrying the appliance. Carrying the appliance with your finger on
the switch or energizing appliance that have the switch on invites
accidents.
SAVE THESE INSTRUCTIONS
FOR HOUSEHOLD USE ONLY
3
Page 4

UNPACKING INSTRUCTIONS
1. Place the gift box containing your EvolutionX™ Cordless Rechargeable
Mini Chopper on a flat, sturdy surface before unpacking.
2. Remove instruction booklet and other printed materials from top
of packaging material.
3. Grasping the work bowl cover, lift the unit up and out of the box
and place on the tabletop.
4. Turn the work bowl cover clockwise to unlock it from the unit.
Lift up and remove.
5. Carefully lift the protective cardboard off the chopping/grinding
blade shaft.
6. CAREFULLY REMOVE THE METAL BLADE BY GRASPING THE
CENTER WHITE HUB AND LIFTING IT STRAIGHT UP. NEVER TOUCH
THE BLADE, AS IT IS RAZOR SHARP.
7. Read the instructions thoroughly before using the machine.
NOTE: Remember to return your product registration card with
all information carefully filled out.
TABLE OF CONTENTS
Important Safeguards...............................2
Unpacking Instructions ............................4
Features and Components. ......................5
Before You Begin ......................................6
Charging Your Mini Chopper/
Battery Life... .............................................6
Assembly ..................................................6
Operation ..................................................7
Tips for Food Processing .........................7
Cleaning and Maintenance .......................8
Operating Techniques ..............................8
Warranty .................................................. 11
Recipes ................................................... 12
4
Page 5
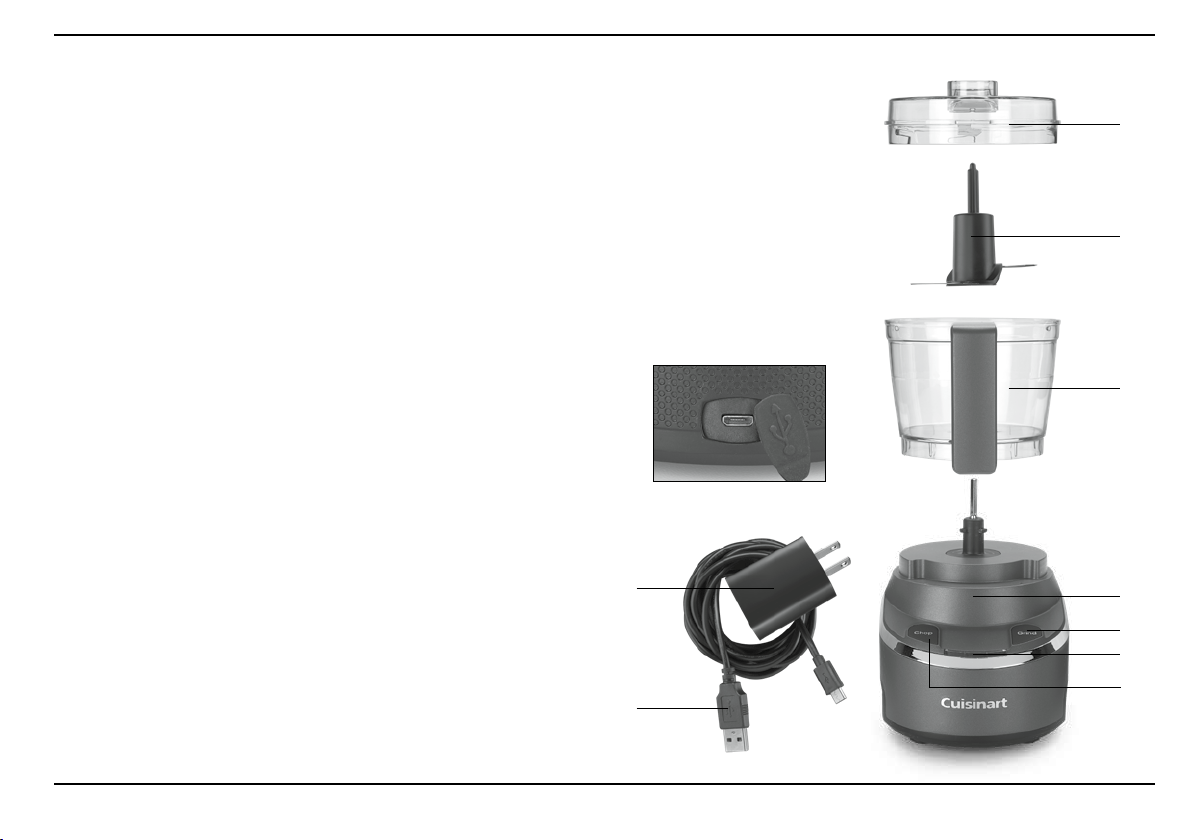
FEATURES AND COMPONENTS
Powerful and Portable
No cord! Operates on 7.4 volt lithium-ion batteries, with both Chop and Grind buttons
within easy reach, this chopper will power through all your chopping and grinding needs!
1. Cover
twist and lock into place
2. Cuisinart Smart Power Blade
double-duty blade for chopping and grinding
3. 4-Cup Work Bowl
for all your chopping and grinding needs
4. Power Base
5. Power ON/Grinding Button
press and hold for continuous operation, or press and release
for pulse
6. Blue LED Indicator Lights
1st LED light flashing – battery capacity < 40%
1st LED solid & 2nd LED flashing – battery capacity at 40%~70%
1st & 2nd LED solid & 3rd LED flashing – battery capacity at 70%~95%
3 LED solid – battery capacity > 95%.*
7. Power ON/Chopping Button
press and hold for continuous chopping, or press and release
for pulse
8. USB Cable Port
located on back of the mini chopper at the base of the unit
9. To charge
plug USB cable into unit
9a. Charger/Power Adapter
9b. USB Power Cable
8
9a
9b
1
2
3
4
5
6
7
5
Page 6

BEFORE YOU BEGIN
Read all instructions completely for detailed operating procedures.
The battery in your EvolutionX™ Cordless Rechargeable Mini Chopper
has not been fully charged. Before the first use of this appliance,
the battery must be charged until 3 blue LED lights are illuminated.
See Charging Your Mini Chopper/Battery Life below.
CHARGING YOUR MINI CHOPPER/
BATTERY LIFE
The batteries in your EvolutionX™ Cordless Rechargeable Mini Chopper
have not been fully charged. Before the first use of this appliance,
the batteries must be charged until all 3 blue battery indicator lights
illuminate. With a full charge, your mini chopper will run for approximately
20 minutes, depending on load. Your mini chopper will be fully charged
in approximately 2 hours (when charged at room temperatures below
30°C/86°F).
HOW TO READ
THE BATTERY LIFE INDICATOR
• When 1st light is flashing and others are off, battery capacity < 40%.
• When 1st light is solid and 2nd light is flashing, battery capacity
is 40% – 70%.
• When 1st and 2nd lights are solid and 3rd light is flashing, battery
capacity is 70% – 95%.
• When Battery Life Indicator/LED Light Bar displays 3 solid blue power
lights, battery capacity is 95%. (NOTE: A 95% charge for a lithium ion
batter y is considered a full charge.)
QUICK-CHARGE FEATURE
Your Cordless Rechargeable Mini Chopper is equipped with a quickcharge feature. If your mini chopper runs out of power, you can “quick
charge” your unit:
• Charge for 15 minutes to get 25 seconds of runtime.
• Charge for 30 minutes to get 1 minute and 45 seconds of runtime.
• Charge for 60 minutes to get 5 minutes and 45 seconds of runtime.
• Charge for 2 hours for 20 minutes of runtime (full charge).
NOTE:
1. Do not leave your mini chopper uncharged for an extended period of
time, as it will affect the life of the rechargeable battery.
2. Do not star t charging unit after use; wait until unit is cool.
3. During charging, if all 3 LEDs are flashing, this indicates that the bat-
tery is overheating and that the unit has entered the battery-protection
mode. Unplug unit and let it cool before recharging.
ASSEMBLY
After washing all parts, please see below for assembly.
Place base on flat surface and plug in.
1. With the base unit on the tabletop, place the work bowl over the center
stem and turn slightly to the right, until bowl drops down to the bottom
of the stem.
2. Turn the work bowl counterclockwise to lock onto base.
3. CAREFULLY pick up the blade by its hub and place on the center
stem until it drops to the bottom of the stem. NEVER TOUCH THE
BLADE ITSELF.
4. Add food ingredients.
5. Place the cover on the work bowl with the long tab to the right
of the rear column.
6. Turn cover counterclockwise to securely lock into locking post.
7. You are ready to CHOP/GRIND.
6
Page 7

OPERATION
1. Place the work bowl firmly on the motor base and insert
the blade assembly. Opening at back of bowl must face column
at back of the mini chopper. Turn counterclockwise to lock in place.
2. Place food in the work bowl. Be sure the food is cut in small pieces,
and the bowl is not overloaded.
3. Lock the cover into position.
NOTE: Due to the powerful motor provided with this unit, Cuisinart
recommends using one hand to support the mini chopper during
operation.
4. Press the appropriate chop or grind control, depending on the food
you are processing.
5. When you have finished processing the food, stop the machine
by releasing the control button.
6. WHEN THE BL ADE STOPS MOVING, remove the cover.
7. Unplug the unit.
8. Carefully remove the blade assembly, holding it by the handle
on the top of the hub. NEVER TOUCH THE BLADE ITSELF.
9. Remove food with a spatula.
NOTE: Do not operate the mini chopper without food contents
in work bowl.
Tip: Process foods in order from dry to wet to avoid having to clean bowl
and blade between each task.
TIPS FOR PROCESSING FOOD
PREPARING THE FOOD
Always cut large pieces of food into smaller pieces of even size –
about ½ inch (12mm) to a side. If you don’t start with pieces that are
small and uniform, you will not get an even chop.
QUANTITY
Do not overload the work bowl. Overloading causes inconsistent results
and it strains the motor. Use the quantities given in the recipe section as
a guide. As a rule of thumb, remember that after being processed, food
should not reach more than two thirds of the way up the central hub of
the blade assembly. NOTE: Due to the powerful motor provided with this
unit, Cuisinart recommends using one hand to support the mini chopper
during operation. This device is equipped with a thermal protection
device that automatically shuts down the motor in case of overheating. If
all three LED lights start flashing during the process and the engine
stops, this means that the overload protection has been activated.
Please, let the unit rest for at least 2 minutes to recover.
SELECTING THE RIGHT OPERATING CONTROL
Use the chop function for chopping, puréeing and mixing. It is the
right choice, for example, for chopping soft, delicate food such as
herbs, celery, onions, garlic and most cheeses. It is also the right
choice for puréeing cooked vegetables, making mayonnaise and mixing
salad dressing.
Pulse action is best when you are using the chop function. 5 to 10
pulses are often enough. Be sure to check the food frequently to prevent
overprocessing. If you overprocess, you are likely to get a watery paste
instead of a fine chop.
Use the grind function for grinding spices, and for chopping hard food
such as peppercorns, seeds, chocolate and nuts. Continuous-hold action
is best when you are using the grind function. You may have to operate
the mini chopper for several seconds with some food to achieve the
desired results – as long as 20 seconds for some seeds.
When you operate the unit for more than 10 seconds, use a pulse action
every 10 seconds or so to allow food to drop to the bottom of the work
bowl. This provides more consistent results.
Never operate the mini chopper continuously for longer than 1 minute
at a time.
NOTE: The work bowl and cover may become scratched when
7
Page 8

you use them for grinding grains and spices. This does not affect
the performance of the mini chopper.
However, you may want to reserve the original bowl for grinding,
and purchase an additional bowl and cover set for other uses.
These are available from the Cuisinart Consumer Service Department,
which you can reach by dialing our toll-free number: 800-726-0190.
ADDING LIQUID
You can add liquids such as water, oil or flavoring while the machine
is running. For example, you might want to add oil when making
mayonnaise or salad dressing.
Pour the liquid through one of the two openings in the cover.
IMPORTANT: Add liquid through only one opening at a time.
The other opening must be left free to allow air to escape. If both
openings are blocked, liquid cannot flow smoothly into the bowl.
REMOVING FOOD FROM THE SIDES OF THE BOWL
Occasionally food will stick to the sides of the bowl as you process.
Stop the machine to clear food away. AFTER THE BLADE
HAS STOPPED.
CLEANING AND MAINTENANCE
The base and parts are made of corrosion-resistant materials that
are easy to clean. Before first use and after every use, clean each
part thoroughly. Periodically check all parts before reassembly.
DO NOT USE if any part is damaged, or the cup is chipped or cracked.
To simplify cleaning, rinse the work bowl, cover, and blade immediately
after each use, so that food won’t dry on them. Wash blade assembly,
work bowl, cover, and spatula in warm, soapy water. Rinse and dry.
Wash the blade carefully.
Avoid leaving blade in soapy water where it may disappear from sight.
If you have a dishwasher, you can wash the work bowl, cover, and blade
assembly on the top rack. Insert the work bowl upside down and the
cover right side up. Put the blade in the cutlery basket. Unload the
dishwasher carefully to avoid contact with the sharp blade. Wipe the
motor base clean with a damp sponge or cloth. Dry it immediately.
Never submerge the motor base in water or other liquid.
The mini chopper stores neatly on the countertop, taking up a minimum
amount of space. When it is not in use, be sure to leave it unplugged.
Store the unit assembled to prevent loss of parts. Store the blades
as you would sharp knives – out of the reach of children.
The mini chopper is intended for HOUSEHOLD USE ONLY. Any service
other than cleaning and normal user maintenance should be performed
by an authorized Cuisinar t
®
Service Representative.
OPERATING TECHNIQUES
With the EvolutionX™ Cordless Rechargeable Mini Chopper you
can chop, grind or purée small amounts of foods. Use this listing of
ingredients and techniques as a basic guide for processing (pages 9–10).
* Surface scratches that may occur will not impair the function of the
EvolutionX™ Cordless Rechargeable Mini Chopper. You may want to
consider purchasing a second work bowl specifically for these tasks.
See Operation/Technique Chart on following pages.
8
Page 9

Food Operation/Technique Comments/Notes
Anchovies Chop. Pulse to desired consistency. Drain first. Cut in half.
Bacon Chop. Pulse to desired consistency. Cook until crispy; drain well. Break into 1-inch pieces.
Baking chocolate/chocolate
chunks/chips
Bread for crumbs
Butter
Celery
Cheese – hard (Parmesan,
Asiago, Romano, etc.)
Cheese – soft
Cinnamon sticks, nutmeg,
other hard spices
Citrus zest
Chop. Pulse on Chop to break up,
then process continuously until desired chop
size is achieved.
Chop. Pulse to break up, then process
continuously until desired crumb size
is reached.
Chop. Process continuously.
Chop. Pulse to desired size.
Chop. Pulse on Chop 10 times, then
process continuously on Chop until desired
consistency.
Chop. Pulse to break up, then process
continuously to “cream.”
Grind. Pulse to break up, about 5 times,
then process continuously until finely
chopped.
Chop. Pulse to break up, then process
continuously until finely chopped.
Process no more than 1
3–5 minutes in freezer before chopping. Cut baking chocolate squares into
pieces to chop.
Use day-old, hard bread for dry crumbs; fresh bread for moist crumbs. Cut or break
into pieces no larger than 1 inch. For buttered crumbs, add 1 teaspoon of melted
butter per slice after crumbs have started to form, and process to combine and coat.
Cut into ½-inch pieces. Best at room temperature. Process up to ¾ cup at a time.
Add freshly chopped citrus zest, garlic, herbs or shallots to create compound butters.
Cut into
½-inch-long pieces.
Remove and discard rind or reserve for another use. Cut into
If possible, remove from refrigerator 20–30 minutes before processing. Up to
4 ounces.
Best at room temperature.
Break cinnamon sticks into 1-inch pieces. Hard spices may cause scratches on the
work bowl and lid.
Use vegetable peeler to remove zest (color only) from citrus; scrape off any white
with sharp knife. Cut strips in half. Adding a small amount of sugar or salt will help
achieve a finer texture.
½ ounces at a time. For best results, chill chocolate for
½-inch
½-inch pieces.
Cookies, graham crackers
for crumbs, hard amaretti or
macaroons
Fruits, cooked; fresh or frozen
thawed berries
Garlic Chop. Peel garlic cloves first. Scrape work bowl sides and bottom as needed.
Chop. Pulse 5 times to break up, then
process continuously until finely chopped.
Chop. Pulse to break up, then process
continuously until desired consistency.
Hard cookies only. Break up into 1-inch or smaller pieces. For buttered crumbs,
add 1 teaspoon of melted butter per graham cracker sheet or for every 3 cookies.
Cooked fruits may be processed to make baby foods or purées; liquid may
be added for consistency. To process fresh or frozen thawed berries for sauce,
pulse to chop, then process until puréed (sugar may be added to taste).
9
Page 10

Food Operation/Technique Comments/Notes
Ginger root, fresh
Green onions,
scallions
Herbs, fresh Chop. Pulse to chop to desired
Horseradish Chop.
Leeks Chop. Trim off root end and tough outer skin. Wash thoroughly to remove sand and grit; dry completely.
Meats Chop. Pulse to chop, or process
Mushrooms Chop. Pulse to chop to desired
Nuts Chop. Pulse to chop to desired
Olives Chop. Pulse to chop to desired
Onions Chop. Pulse 5–10 times to chop
Peppercorns Grind. Pulse first, then process con
Peppers, fresh Chop. Pulse to chop to desired
Seeds, dried berries
Shallots Chop. Pulse 5–10 times to chop to
Vegetables, cooked Chop. Pulse 5–10 times to chop, then
Chop. Pulse to break up, then
process continuously on Chop
to reach desired consistency.
Chop. Pulse to chop to desired
consistency.
consistency.
continuously to purée (add liquid
as needed).
consistency.
consistency.
consistency.
to desired size.
tinuously until desired consistency.
consistency.
Grind. Pulse to break up, then process
continuously to desired consistency.
desired consistency.
process continuously until desired
consistency is reached.
-
Peel first; cut into
4 ounces.
Trim and cut into
Rinse and dry completely. Remove leaves from stems to chop.
Peel first. Cut into
Cut into ½-inch pieces.
Uncooked meats should be cold, but not frozen; cut up to 4 ounces into
of gristle and soft fat; some hard fat may remain. Cooked meats can be cold or warm; cut up to
4 ounces into ½-inch pieces. Add liquid (water, broth or from cooking) as needed to process to
purée consistency.
Choose firm, fresh mushrooms. Cut into quarters or even-sized pieces, no larger than
Toast nuts first for maximum flavor. Allow to cool completely before chopping. Up to ½ cup.
Use only pitted olives. Drain well for best results.
Peel; cut into
Combine peppercorns with dried herbs or spices or coarse salt to create rubs and seasonings.
Hard peppercorns may scratch work bowl and lid.
Core, seed and cut into
Coriander, cumin, dill, fennel, sesame, poppy, and juniper berries.
Peel first; cut into quarters, or pieces no larger than ¾-inch.
Cook vegetables until tender. Process to a smooth purée for baby food or sauces; may need to add
liquid for consistency.
½-inch pieces or slices. Scrape work bowl sides and bottom as needed. Up to
¾-inch pieces.
½-inch pieces. Process up to 4 ounces at a time.
½-inch pieces, trimmed
¾ inch.
¾-inch or smaller pieces of similar size.
½-inch pieces. Do not overprocess.
10
Page 11

WARRANTY
Limited Three-Year Warranty
This warranty is available to U.S. consumers only. You are a consumer
if you own a Cuisinart
Chopper that was purchased at retail for personal, family or household
use. Except as otherwise required under applicable law, this warranty
is not available to retailers or other commercial purchasers or owners.
We warrant that your Cuisinar t
Mini Chopper will be free of defects in materials and workmanship
under normal home use for 3 years from the date of original purchase.
We recommend that you visit our website, www.cuisinart.com for
a fast, efficient way to complete your product registration. However,
product registration does not eliminate the need for the consumer to
maintain the original proof of purchase in order to obtain the warranty
benefits. In the event that you do not have proof of purchase date,
the purchase date for purposes of this warranty will be the date of
manufacture.
CALIFORNIA RESIDENTS ONLY
California law provides that for In-Warranty Service, California residents
have the option of returning a nonconforming product (A) to the store
where it was purchased or (B) to another retail store that sells Cuisinart
products of the same type. The retail store shall then, according to its
preference, either repair the product, refer the consumer to an
independent repair facility, replace the product, or refund the purchase
price less the amount directly attributable to the consumer’s prior usage
of the product. If neither of the above two options results in the
appropriate relief to the consumer, the consumer may then take the
product to an independent repair facility, if service or repair can be
economically accomplished. Cuisinart and not the consumer will be
responsible for the reasonable cost of such service, repair, replacement,
or refund for nonconforming products under warranty. California
residents may also, according to their preference, return nonconforming
products directly to Cuisinart for repair or, if necessary, replacement by
calling our Consumer Service Center toll-free at 800-726-0190. Cuisinart
will be responsible for the cost of the repair, replacement, and shipping
and handling for such nonconforming products under warranty.
®
EvolutionX™ Cordless Rechargeable Mini
®
EvolutionX™ Cordless Rechargeable
HASSLE-FREE REPLACEMENT WARRANTY
Your ultimate satisfaction in Cuisinart products is our goal, so if your
Cuisinart
®
EvolutionX™ Cordless Rechargeable Mini Chopper should
fail within the generous warranty period, we will repair it or, if necessary,
replace it at no cost to you. To obtain a return shipping label, email us
at https://www.cuisinart.com/customer-care/product-assistance/
product-inquiry/. Or call our toll-free customer service department at
1-800-726-0190 to speak with a representative.
Your Cuisinart
®
EvolutionX™ Cordless Rechargeable Mini Chopper
has been manufactured to the strictest specifications and has been
designed for use only in 120-volt outlets and only with authorized
accessories and replacement parts. This warranty expressly excludes
any defects or damages caused by attempted use of this unit with
a converter, as well as use with accessories, replacement parts or repair
service other than those authorized by Cuisinart. This warranty does
not cover any damage caused by accident, misuse, shipment or other
than ordinary household use. This warranty excludes all incidental
or consequential damages. Some states do not allow the exclusion
or limitation of these damages, so these exclusions may not apply
to you. You may also have other rights, which vary from state to state.
Important: If the nonconforming product is to be serviced by
someone other than Cuisinart’s Authorized Service Center, please
remind the servicer to call our Consumer Service Center at 1-800-7260190 to ensure that the problem is properly diagnosed, the product
is serviced with the correct par ts, and to ensure that the product
is still under warranty.
DISPOSAL/RECYCLING OF BATTERIES
This product uses two Li-ion rechargeable and recyclable batteries. At
the end of the batteries’ useful life, they should be recycled. These
batteries must not be incinerated or composted. Li-ion batteries should
not be put in municipal waste systems. Contact your local waste
collection agency for proper recycling and disposal information for your
area. Please do not attempt to dismantle the power handle to replace
these batteries on your own. Damage could result to the unit.
11
Page 12

RECIPES
Hummus................................................ 12
Chunky Guacamole ....................................... 12
Roasted Beet and Walnut Dip...............................13
Tomatillo Salsa Verde .....................................13
Romesco Sauce .........................................14
Cheater’s Caesar Dressing ................................. 14
Peppadew Cheese Spread ................................. 15
Chocolate Avocado Mousse ............................... 15
Berry Fools ............................................. 16
Hummus
Serve this brightly flavored dip with warm pita for a satisfying snack.
Makes about 2 cups
1 garlic clove, peeled
1 can (19 ounces) chickpeas, rinse d and drained (see Tip)
2 tablespoons tahini
2 tablespoons fresh lemon juice
¼ cup water
½ teaspoon ground cumin
½ teasp oon koshe r salt
1
/3 cup loosely packed Ita lian parsley leaves
¼ cup extra virgin olive o il, plus more for se rving
Pinch za’atar for finishing, optional
1. Put the garlic clove in the work bowl. Run on Chop continuously to finely chop,
about 5 seconds. Add chickpeas, tahini, lemon juice, water, cumin, salt and parsley
to the work bowl. Pulse on Chop to start processing ingredients, then run on Chop
continuously until mostly smooth, about 30 to 35 seconds.
2. Scrape down the work bowl. With the machine running, add the olive oil in a steady
stream and process until the mixture is smooth and creamy.
3. Taste and adjust seasoning, if needed. To serve, drizzle with olive oil and sprinkle
with za’atar, if desired.
Tip: For an extra-smooth hummus, boil canned chickpeas with a pinch of baking soda
for 15 minutes, skimming off skins as they come to the surface. Drain and rinse under
cold water. Chickpeas are then ready for processing.
Nutritional information per serving (2 tablespoons):
Calor ies 80 (56% fr om fat) • car b. 6g • pro. 2g • fat 5g • sat. fat 1g
• chol. 0 mg • sod. 60mg • calc. 21mg • fibe r 2g
Chunky Guacamole
Our fresh guaca mole is perfect for the Sunday game or ser ved alongside ques adillas
1
Makes about 1
1 small garlic clove, peeled
½ jalapeño, cut into 1-inch pieces (rib and seeds removed, if desired)
1 green onion, cut into 1-inch pieces
/3 cups
for a festive dinner.
12
Page 13

1 tablespoon fresh cilantro leaves, stems discarded
2 ripe avocados, halved, pitted
2 tablespoons fresh l ime juic e
¾ teaspoon kosher salt
1. Put the garlic clove, jalapeño, green onion and cilantro in the work bowl. Pulse on
Chop to roughly but evenly chop, about 8 to 10 pulses.
2. Scrape down the sides of the bowl. Scoop out the flesh of the avocados, in pieces,
directly into the work bowl; add the lime juice and salt. Pulse on Chop to start
processing, then run on Chop continuously to achieve desired consistency.
Calor ies 118 (74% from fat) • carb. 7g • pro. 1g • fat 10g • sat. fat 1g
Nutritional information per serving (1/3 cup):
• chol. 0 mg • sod. 434m g • calc. 13mg • fi ber 5g
Roasted Beet and Walnut Dip
This jewel-toned dip was inspired by skordalia, a Greek spread traditionally
prepared with potatoes and lots of garlic. We held the garlic, but called upon
Makes 2 cups
¾ pound b eets (about 3 to 4 small), scru bbed
2 large garlic cloves, peeled
½ cup raw walnuts
1 tablespoo n fresh lemon juice
½ teaspoon kosher salt
¼ teaspoon freshly ground black pepper
1
/
to ½ cup extra virgin olive oil
3
Fresh dill leaves for garnish, opt ional
1. Preheat the oven to 350°F. Individually wrap beets in foil and roast on a sheet
pan for 55 to 60 minutes, or until tender enough to be easily pierced with the tip
of a sharp knife. Transfer beets to a dish and let cool in foil. Meanwhile, place the
walnuts on the sheet pan and toast in the preheated oven for 8 to 10 minutes,
until just fragrant. When beets are just cool enough to handle, gently rub off
skins under cool, running water. Quarter beets and reserve.
2. Put the garlic cloves in the work bowl. Run on Chop continuously to finely chop,
about 5 seconds. Add the walnuts and pulse on Chop to start processing,
about 10 to 12 pulses. Add the quartered beets, lemon juice, salt, and pepper,
and run on Chop continuously, until finely chopped and incorporated, about 15
to 20 seconds.
beets for their lovely earthiness.
3. Scrape down the bowl. With the machine running, add the olive oil in a steady
stream and process until the mixture forms a coarse purée. (NOTE: Use ½ cup
of olive oil for a slightly smoother and thinner purée.)
4. Taste and adjust seasoning with more salt and/or lemon juice, if needed. To serve,
garnish with fresh dill leaves, if desired.
Nutritional i nformation per ¼ cup s erving (using ½ cup o live oil):
Calor ies 189 (86% fro m fat) • carb. 5g • pro. 2g • fat 19g • sat . fat 2g
• chol. 0 mg • sod. 103mg • ca lc. 28mg • fib er 1g
Tomatillo Salsa Verde
This acetic green Mexican salsa is perfect thrown into enchiladas or migas,
or simply used as a topping for tacos, nachos, and just about anything.
Makes 1½ cups
1 pound tomatillos, husks removed and rinsed
½ small jalapeño pepper (rib and seeds removed, if desired)
1 garlic clove, peeled
½ small onion, pe eled and cut into 1-i nch pieces
½ teaspoon kosher salt
½ cup packed cilan tro leaves
1 tablespoo n grapeseed oil or anothe r neutr al oil
1. Place the tomatillos, ½ jalapeño, and garlic clove in a saucepan and cover with cold
water. Bring to a boil and reduce to simmer on medium-high heat for 10 minutes,
until tomatillos have turned olive green and are soft. Reserve 2 to 3 tablespoons
of the cooking liquid and drain.
2. Transfer cooked tomatillos, jalapeño, garlic, and reserved cooking liquid to the work
bowl. Pulse on Chop to roughly chop, about 8 to 10 pulses. Scrape down the bowl.
Add the onion, salt, and cilantro and run on Chop continuously until smooth.
3. Put the grapeseed oil in a small saucepan set over medium heat. When the oil
is hot, carefully pour in the salsa and let simmer for 5 to 7 minutes, until slightly
thickened. Remove from heat. Taste and adjust salt, if needed.
4. Let cool to room temperature and serve as desired. (Salsa will keep in the
refrigerator up to 1 week.)
Nutritional information per serving (2 tablespoons):
Calor ies 18 (53% from fat) • carb. 2g • pr o. 0g • fat 1g • sat. fat 0 g
• chol. 0 mg • sod. 36mg • c alc. 6mg • fiber 1g
13
Page 14

Romesco Sauce
You can thank Spain for this smoky, robust sauce. Delicious with grilled meat and fish,
but heaping it atop roasted cauliflower steaks comes highly recommended.
Makes 2 cups
1 dried ancho chile pepper, rinsed, stemmed, and seeded
1 ½-inch slice sourdough or cou ntry-style b read (roughly 2 ou nces)
1 large red bell pepper, stemmed
1 large ripe tomato, or 2 pl um tomatoes, cor ed
½ cup whole, raw almonds, b lanched (see Tip)
1 large garlic clove, peeled
1 teas poon smoked paprika
Pinch crushed red pepper flakes
½ teaspoon kosher salt
2 tablespoons sherry vinegar
¼ cup loosely packed parsl ey leaves
½ cup ext ra virgin olive oi l
1. Place the ancho chile in a bowl and cover with hot water. Let soak for 15 minutes,
until softened.
2. Meanwhile, preheat the broiler on high with a rack positioned in the upper third
of the oven. Place the slice of bread onto the rack and broil 2 to 3 minutes on
each side, using tongs to flip, until toasted. Remove crust and tear into 1-inch
pieces; reserve.
3. Place the pepper and tomato (or tomatoes) on a sheet tray and broil, rotating
frequently with the tongs, until evenly blackened and blistered on all sides.
Place charred tomato and pepper in a bowl; cover with plastic wrap and set
aside for 10 minutes. The steam will help to loosen the skins.
4. Turn off the broiler and preheat the oven to 350°F. Place the almonds on the sheet
pan and toast in the preheated oven for 8 to 10 minutes, until just fragrant.
5. When the bell pepper and tomato are cool enough to handle, peel away skins.
Slice the pepper to remove core and seeds. Use a knife to roughly chop the tomato
and bell pepper, set aside. Then use the knife to gently scrape the softened flesh
of the ancho chile from its papery skin; discard skin.
6. Put the garlic clove in the work bowl. Run on Chop continuously to finely chop,
about 5 seconds. Add the almonds and pulse on Chop to start processing, about 10
to 12 pulses. Add the reserved bell pepper, tomato, ancho chile, and toasted bread,
and continue to pulse on Chop until mostly incorporated.
7. Scrape down the bowl and add the paprika, crushed red pepper, salt, vinegar
and parsley leaves. With the machine running, add the olive oil in a steady stream.
Scrape down the bowl. Run on Grind continuously until desired consistency is
achieved. The final sauce should have some remaining texture from the almonds.
8. Taste and adjust seasoning and/or acidity, if needed. Serve as desired.
Tip: If you cannot find blanched almonds, you can easily blanch your own. Place whole
almonds (with skins) in a bowl, cover with boiling water and let stand for 1 minute.
Drain almonds and immediately rinse under cold water. Gently squeeze almonds
to loosen and slip off skins.
Calor ies 195 (18% from fat) • c arb. 7g • pro. 3g • fat 18g • s at. fat 2g
Nutritional information per serving (¼ cup):
• chol. 0 mg • sod. 75mg • ca lc. 33mg • fiber 2g
Cheater’s Caesar Dressing
Mayonnaise relieves raw egg yolks for a velvety dressing
Makes 1 cup
2 garlic cloves, peeled
1 2-ounce piece Parmesan cheese, cut into ½-inch cubes
6 oil-packed anchovy fillets, drained and halved
2 teaspoons Dijon mustard
¼ cup mayonnaise
2 tablespoons fresh lemon juice
2 teaspoons red wine vinegar
½ teaspoon kosher salt
½ teaspoon freshly ground black pepper
1
/3 cup ex tra vir gin olive oil
1. Put the garlic cloves in the work bowl. Run on Chop continuously to finely chop,
about 5 seconds. Add the cubed Parmesan and pulse on Chop to start processing,
about 10 to 12 pulses. Add the anchovy fillets and the mustard and then run on
Chop continuously until the mixture resembles a very fine crumble. Scrape down
the bowl, then continue to process until the mixture forms a paste, about 30
to 35 seconds.
2. Add the mayonnaise, lemon juice, vinegar, salt, and pepper. With the machine
running, add the olive oil in a steady stream until emulsified. Run on Grind for
an additional 15 seconds. The finished dressing will be quite thick.
3. Taste and adjust seasoning and/or acidity, if needed. Use immediately to dress
salad greens or as desired.
14
that requires no fuss.
Page 15

Nutritional information per serving (2 tablespoons):
Calor ies 160 (90% fr om fat) • carb. 1g • pro. 3g • fat 16g • sat. f at 3g
• chol. 9 mg • sod. 416mg • calc. 104mg • fiber 0g
Peppadew Cheese Spread
A piquant spread that mingles between Southern pimento cheese
and fromage fort – you can always barter some of the cheddar here
for whatever leftover bits of cheese you have on hand.
1
/
Makes 1
1 small garlic clove, peeled
4 ounces, good q ualit y sharp C heddar, cut into 1-in ch cubes
4 ounces goat cheese, softene d
2 tablespoons salted butter, softened
2 ounces (about 8 or 9) drained hot , sweet, pickled peppadew
peppers, halved
2 tab lespoons dry white win e
Pinch kosher salt
Butter crackers, for serving
1. Put the garlic clove in the work bowl. Run on Chop continuously to finely chop,
2. Break up the goat cheese into the work bowl, then add the butter, peppadews,
3. Transfer to a serving bowl and serve immediately with crackers. Alternatively,
Tip: For an impressive presentation, transfer spread into a small plastic wrap-lined
bowl; tap on counter to remove air pockets, and smooth out top with an offset
spatula or butter knife. Cover with plastic wrap and refrigerate to set, at least 2 hours.
Unmold spread onto a serving dish or platter. Let come to room temperature before
serving, 15 to 20 minutes.
cups
3
to 1/2-inch cubes , at room temperature
about 5 seconds. Add the cubed Cheddar and pulse on Chop to start processing,
about 10 to 12 pulses, then run on Chop continuously until finely chopped.
The Cheddar should resemble a coarse crumble.
wine, and pinch of salt. Run on Chop continuously until well blended and mostly
smooth, scraping down the bowl as necessary. The finished spread will be
somewhat chunky, with some visible bits of Cheddar and flecks of peppadew
strewn throughout.
cover bowl and chill for a firmer consistency, at least 1 hour.
Nutritional information per serving (2 tablespoons):
Calor ies 95 (73% fr om fat) • car b. 2g • pro. 4g • fat 8g • sat. fat 5g
• chol. 26 mg • sod. 134mg • ca lc. 78mg • fib er 0g
Chocolate Avocado Mousse
You may find the combination unusual, but the creamy flesh of avocados
magically whip into a decadent chocolate mousse that is also rich
Makes 4 servings
2 ounces bittersweet chocolate chips, preferably 60% cacao
2 ripe avocados
¼ cup pu re maple syrup
2 tablespoons strong-brewed espresso or coffee
1 teaspoon vanilla extract
¼ cup unsweetened cocoa
Pinch sea salt
Raspberries for serving, optional
1. Place the chocolate chips in a heatproof bowl and set over a saucepan of barely
simmering water. Stir chips until thoroughly melted. Remove from heat and let cool.
2. Scoop out the flesh of the avocados, in pieces, directly into the work bowl.
Pulse on Chop to start processing, and then run on Chop continuously until puréed,
about 15 to 20 seconds. Scrape down the bowl and add the melted chocolate along
with the remaining ingredients. Run on Chop continuously until fully incorporated
and smooth.
3. Divide mousse among 4 small dessert glasses or bowls. Cover and chill for at least
1 hour before serving. Serve chilled mousse with raspberries, if desired.
Tip: Use dairy-free chocolate chips to make this vegan friendly.
Calor ies 310 (58% from fa t) • carb. 31g • pro. 4g • fa t 22g • sat. fat 7g
in healthy fat – a no-brainer dessert!
Nutritional information per serving (approximately ½ cup):
• chol. 0 mg • sod. 78mg • c alc. 12mg • fibe r 12g
15
Page 16

Berry Fools
Peak-season berries cannot be beat here – a little tanginess from Greek yogurt
Makes 4 servings
12 ounces mixed berries (about 2 heaping cups), rinsed;
if using strawberries, hulled and quartered
3 tablespoons powdered sugar, divided
½ pint he avy cre am, very cold
1
/
cup pla in Greek yogurt ( preferably whole milk)
3
1 teaspoon vanilla extract
Crus hed cook ies (suc h as lady finge rs or amaretti )
for serving, optional
1. Mix the berries and 2 tablespoons powdered sugar together in a small bowl.
Let sit, stirring occasionally, until berries begin to release their juices, about
15 minutes. Place about ½ cup berries into the work bowl and run on Chop
continuously to purée, about 15 to 20 seconds. To remove seeds, strain purée
through a fine-mesh strainer back into the bowl with remaining berries. Stir mixture
and set aside.
2. Rinse out the work bowl. Add the heavy cream, yogurt, remaining tablespoon
powdered sugar, and vanilla extract and then run on Chop continuously until
very thick, about 45 seconds. Scrape out the whipped cream mixture into
a medium bowl. Gently fold in the berry mixture.
3. Divide the mixture among 4 dessert glasses or bowls, layering with crushed
cookies, if desired. Chill for 30 minutes or up to 2 hours before serving.
Nutritional information per serving (approximately ½ cup):
Calor ies 275 (77% fro m fat) • carb. 15g • pr o. 3g • fat 25g • sat. fat 15g
complements their sweetness.
• chol. 81mg • sod. 27mg • calc. 195mg • fi ber 4g
16
Page 17

NOTES:
17
Page 18

Trademarks or service marks of third parties referred to herein
are the trademarks or service marks of their respective owners.
©2021 Cuisinart
East Windsor, NJ 08520
Printed in China
20 CE07179 0
IB-16735-ESP-B
IB-16614-ESP
 Loading...