

Page 1
INSTRUCTION
BOOKLET
Classic 12-Cup Stainless Percolator
For your safety and continued enjoyment of this product, always read the instruction book carefully before using.
PRC-12 Series
Page 2
IMPORTANT SAFEGUARDS
When using electrical appliances, basic safety precautions should always be followed to reduce the
risk of fire, electric shock and/or injury to persons,
including the following:
1. READ ALL INSTRUCTIONS.
2. Always unplug from outlet when not
in use and before cleaning. Allow to
cool before putting on or taking off
parts and before cleaning the
appliance.
3. Do not touch hot surfaces. Use handles
and knobs.
4. To protect against electric shock, do not
place cord, plug, or base unit in water or
other liquids.
5. This appliance should not be used
by children or individuals with certain
disabilities.
6. Do not operate any appliance with a
damaged cord or plug or after the
appliance malfunctions or has been dropped
or damaged in any manner. Return appliance
to the nearest Cuisinart
examination, repair,
or electrical or mechanical adjustment.
7. The use of accessory attachments
not recommended by Cuisinart may
cause injuries.
8. Do not use outdoors.
9. Do not let cord hang over edge of table
or counter, or touch hot surfaces.
10. Do not place on or near a hot gas or
electric burner, or in a heated oven.
11. Always fill percolator with water first,
then plug cord into the wall outlet. To
disconnect, turn controls to Off, then remove
plug from wall outlet.
12. Do not use appliance for other than
intended use.
13. WARNING: TO REDUCE THE RISK OF
FIRE OR ELECTRIC SHOCK, DO NOT
REMOVE THE BASE PANEL. NO USERSERVICEABLE PARTS ARE INSIDE.
REPAIR SHOULD BE DONE ONLY BY
AUTHORIZED PERSONNEL.
14. Scalding may occur if the lid is removed
during the brewing cycle.
Repair Center for
15. Do not operate your appliance in an appliance
garage or under a wall cabinet. When stor-
ing in an appliance garage, always unplug
the unit from the electrical outlet. Not doing
so could create a risk of fire, especially if the
appliance touches the walls of the garage or
the door touches the unit as it closes.
SAVE THESE
INSTRUCTIONS
FOR HOUSEHOLD
USE ONL
WARNING: RISK OF FIRE
OR ELECTRIC SHOCK
Y
The lightning flash with arrowhead
symbol within an equilateral triangle
is intended to alert the user to the
presence of uninsulated dangerous
voltage within the product’s enclosure
that may be of sufficient magnitude
to constitute a risk of fire or electric
shock to persons.
The exclamation point within an
equilateral triangle is intended to alert
the user to the presence of important
operating and maintenance (servicing)
instructions in the literature
accompanying the appliance.
1
Page 3
SPECIAL CORD SET
INSTRUCTIONS
A short power-supply cord is provided to reduce
the risks resulting from becoming entangled in or
tripping over a longer cord. Extension cords may
be used if care is exercised in their use.
If an extension cord is used, the marked
electrical rating of the extension cord must be
at least as great as the electrical rating of
the appliance, and the longer cord should be
arranged so that it will not drape over the
countertop or tabletop where it can be pulled on
by children or tripped over.
OPERATING NOTICE
Clogging and backing up of water and/or
coffee in the coffee basket can occur under
any or a combination of any of the following
conditions: The use of too finely ground coffee
or not properly cleaning coffee grounds from the
gold-tone filter, or allowing coffee grounds to spill
over the coffee basket.
Caution: Never open the top cover during the
brewing cycle, even if no water is draining
from the coffee basket, since extremely hot
water/coffee can spill out from the coffee
basket and cause injury. If water/coffee is not
draining from the coffee basket during the
brewing cycle, unplug the unit and wait
10 minutes before opening the top cover and
checking the coffee basket.
CONTENTS
Important Safeguards. . . . . . . . . . . . . . . . 1
Unpacking Instructions . . . . . . . . . . . . . . 2
Features and Benefits . . . . . . . . . . . . . . . 3
Using the Percolator. . . . . . . . . . . . . . . . . 4
Cleaning and Maintenance . . . . . . . . . . . 5
Warranty . . . . . . . . . . . . . . . . . . . . . . . . . . 6
IMPORTANT UNPACKING
INSTRUCTIONS
1. Place the box on a large, sturdy, flat surface.
2. Remove the instruction book and any other
literature.
3. Turn the box so that the back side of the
percolator is down and slide the percolator
from the box.
4. After the percolator has been removed, place
the box out of the way and take the pulp
inserts away.
5. Remove the polybag covering the
percolator.
We suggest you save all packing materials
in the event that future shipping of the
machine is needed. Keep all plastic bags
away from children.
WARNING
RISK OF FIRE OR ELECTRIC SHOCK
DO NOT OPEN
WARNING: TO REDUCE THE RISK OF FIRE OR ELECTRIC SHOCK,
DO NOT REMOVE COVER (OR BACK)
NO USER-SERVICEABLE PARTS INSIDE
REPAIR SHOULD BE DONE BY AUTHORIZED SERVICE PERSONNEL ONLY
2
Page 4
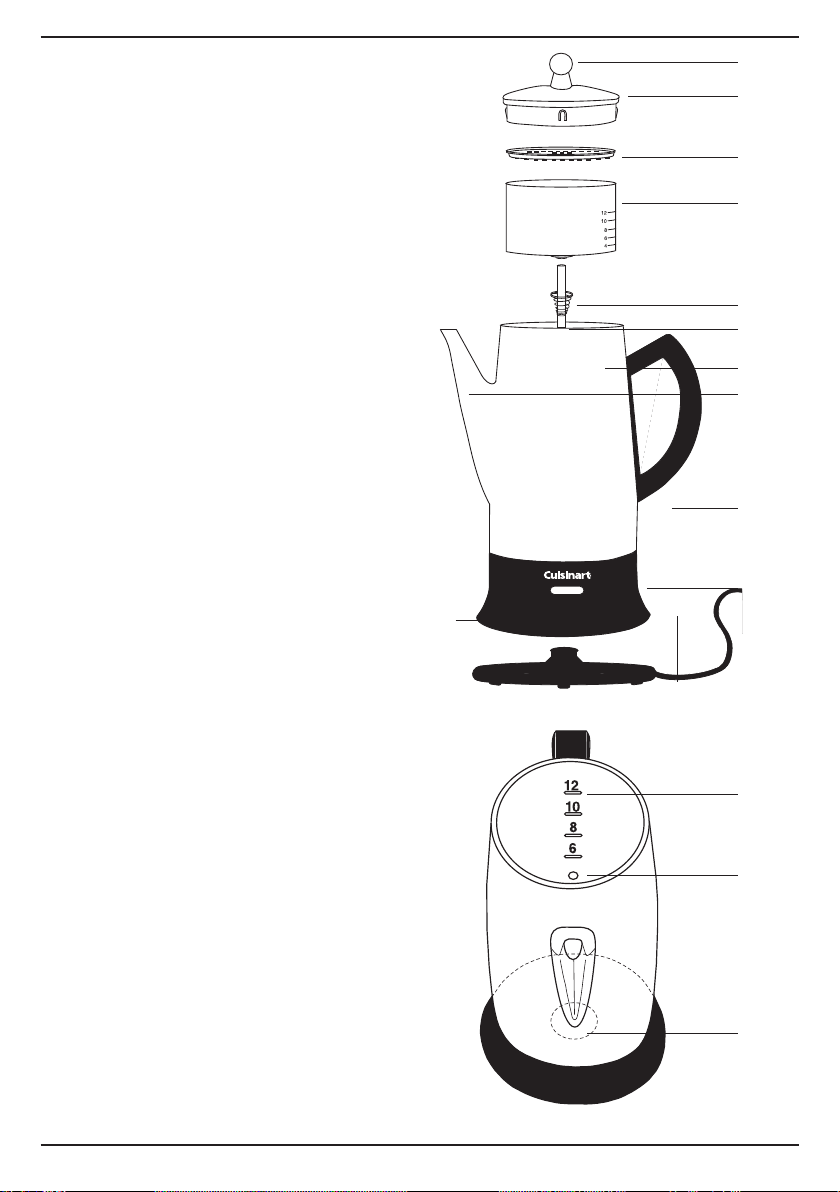
FEATURES AND BENEFITS
The Cuisinart® Classic 12-Cup Percolator has
been designed to increase the pleasure of enjoying a perfectly percolated cup of coffee.
1.
Transparent Percolator Knob
Allows you to see the percolating
process.
2.
Stainless Steel Cover
Lock-down cover ensures safe pouring.
3.
Coffee Basket Lid
4. Coffee Basket
Holds ground coffee for up to 12 cups
of coffee. Convenient measurement
markings take away the guesswork.
5.
Spring
6. Pump Tube
Delivers water automatically from the
carafe to the basket.
7.
Stainless Steel Body
Holds from 4 to 12 cups of coffee.
8.
Tapered Spout
For no-mess, dripless pouring.
9.
Comfort-Grip Handle
Ergonomically designed for
easy pouring.
10.
Stay-Cool Base
Prevents heat damage to tables and
counters. Eliminates the need for a trivet
or other surface protector.
11.
Removable Power Cord
For convenient pouring and serving,
the power cord is removable from unit.
12.
Indicator Light
Illuminates to indicate that the brewing
cycle is complete.
13. Water Level Markings
14. 4-Cup Water Level Mark
15. Well
12
1
2
3
4
5
6
7
8
9
10
11
13
14
15
3
Page 5
USING THE PERCOLATOR
1. Before using for the first time, thoroughly wash
all parts of the percolator. (See the Cleaning and
Maintenance section of this booklet.)
2. Remove cover, basket, lid and pump tube with
spring. Using the measurement markings
(located inside the body) fill the percolator with the
desired amount of water. For best results, be sure
to use cold water when filling the percolator. When
preparing 4 cups, use the small circular marking
as the 4-cup level mark.
3. Run cold water over the coffee basket. Place
basket on top of pump tube. Add desired amount
of coffee according to level markings on basket.
To help keep small coffee grounds from sifting
through the holes in the basket, be certain to use
a grind designed for percolator coffee, or use a
coarse grind. Finer grinds may sift through
the holes.
4. Place basket and pump tube assembly into
percolator so bottom of tube fits into well. Place
basket cover on top of basket and push cover onto
top of percolator.
5. Plug base into standard household 120 volt AC
wall outlet. Brewing begins within seconds, and
continues at a rate of approximately one cup
per minute.
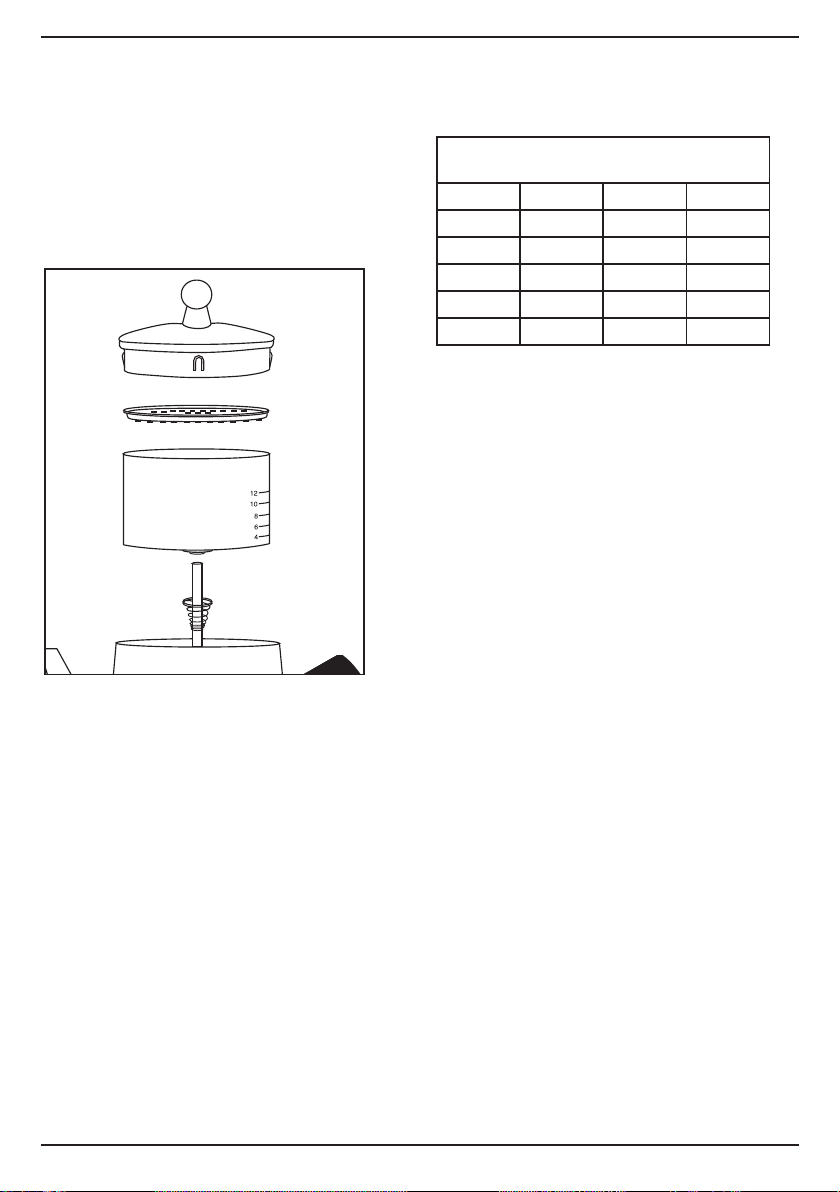
The following chart serves as a guide for preparing various
brew strengths. Amounts can be varied to suit personal taste
and particular coffees.
Brew Strength of Coffee/
Number of Coffee Measures*
#Cups Mild Medium Strong
12 12 16 20
10 10 14 18
8 8 12 16
66812
4468
*1 coffee measure = 1 level tablespoon
6. Once brewing cycle is complete, indicator light will
illuminate to signal your coffee is ready.
Warning:
Be certain the percolating process has stopped
completely before removing cover.
7. Once brewing has completed, remove the
cover carefully and using a mitt or potholder,
remove the basket and pump tube.
Caution: do not touch the stainless steel parts of the
percolator, as they will be hot. Replace cover so it snaps
into place. You are now ready to enjoy a
flavorful cup of coffee.
8. Remove plug from percolator for easy serving.
Replace plug to keep coffee hot.
4
Page 6

CLEANING AND
MAINTENANCE
Always remove the plug from the electrical outlet
before attempting to clean the percolator.
The percolator cover, basket, lid, and pump tube
(with spring) can all be placed in the upper rack
of a dishwasher or washed in warm soapy water
and rinsed thoroughly.
Never wash percolator body or power cord
in dishwasher.
Never immerse the percolator body in water or other liquids.
To clean, simply wipe with a clean, damp cloth and dry
before storing.
Do not use scouring agents or harsh cleaners on any part of
the percolator.
Note: Washer at bottom of pump tube must move
freely. Should coffee grounds become trapped
near the washer, loosen with a toothpick, then
run under tap water to clean.
Storage: Percolator should be stored with cover off.
Maintenance: Any other servicing should be performed by
an authorized service representative.
DECALCIFICATION
Decalcification refers to removing the calcium
deposits that form on the metal parts of the
percolator over time.
For best performance from your percolator, decalcify the
unit from time to time. The frequency depends upon the
hardness of your tap water and how often you use the
percolator. Decalcification will clean the interior of the
unit.
To Decalcify, fill percolator with vinegar to the 3 cup
level then add water to the 12 cup level. Combined mixture should not exceed 12 cups. Be sure that all parts
are in place, and make sure that the lid is securely on.
Plug the power cord connector into the cord insert and
plug the unit into an electrical outlet. Let the unit run
through its normal cycle. Once complete, discard the
vinegar and water mixture .
Run one cycle of fresh, cold water (without vinegar)
through the unit at the completion of decalcification
before using the unit to brew coffee.
5
Page 7

LIMITED THREE-YEAR
WARRANTY (U.S. and Canada Only)
This warranty is available to consumers only. You are a
consumer if you own a Cuisinart
that was purchased at retail for personal, family or household
use. Except as otherwise required under applicable law, this
warranty is not available to retailers or other commercial
purchasers or owners.
We warrant that your Cuisinart
will be free of defects in materials and workmanship under
normal home use for 3 years from the date of original purchase.
We recommend that you visit our website,
www.cuisinart.com for a fast, efficient way to complete
your product registration. However, product registration does
not eliminate the need for the consumer to maintain the
original proof of purchase in order to obtain the
warranty benefits. In the event that you do not have proof of
purchase date, the purchase date for purposes of this warranty will be the date of manufacture.
If your Cuisinart
®
12-Cup Classic Percolator should prove
to be defective within the warranty period, we will repair
it, or if we think necessary, replace it. To obtain warranty
service, simply call our toll-free number, 1-800-726-0190,
for additional information from our Customer Service
Representatives, or send the defective product to Customer
Service at Cuisinart, 7475 North Glen Harbor Blvd., Glendale,
AZ 85307.
To facilitate the speed and accuracy of your return, please
enclose $10.00 for shipping and handling of the product.
Please pay by check or money order (California residents
need only supply proof of purchase and should call
1-800-726-0190 for shipping instructions).
NOTE: For added protection and secure handling of any
Cuisinart product that is being returned, we recommend you
use a traceable, insured delivery service. Cuisinart cannot be
held responsible for in-transit damage or for packages that
are not delivered to us. Lost and/or damaged products are
not covered under warranty. Please be sure to include your
return address, daytime phone number, description of the
product defect, product model number (located on bottom of
product), original date of purchase, and any other information
pertinent to the product’s return.
CALIFORNIA RESIDENTS ONLY:
California law provides that for In-Warranty Service, California
residents have the option of returning a nonconforming product (A) to the store where it was purchased or (B) to another
retail store that sells Cuisinart products of the same type.
The retail store shall then, at its discretion, either repair the
product, refer the consumer to an independent repair
facility, replace the product, or refund the purchase price
less the amount directly attributable to the consumer’s prior
usage of the product. If the above two options do not result
in the appropriate relief to the consumer, the consumer may
then take the product to an independent repair facility if service or repair can be economically accomplished. Cuisinart
and not the consumer will be responsible for the reasonable
®
12-Cup Classic Percolator
®
12-Cup Classic Percolator
cost of such service, repair, replacement, or refund for nonconforming products under warranty.
California residents may also, according to their preference,
return nonconforming products directly to Cuisinart for repair,
or if necessary, replacement, by calling our Consumer Service
Center toll-free at 1-800-726-0190.
Cuisinart will be responsible for the cost of the repair,
replacement, and shipping and handling for such products
under warranty.
BEFORE RETURNING YOUR CUISINART PRODUCT
If you are experiencing problems with your Cuisinart
product, we suggest that you call our Consumer Service
Center at 1-800-726-0190 before returning the product to be
serviced. If servicing is needed, a representative can confirm
whether the product is under warranty and direct you to the
nearest service location.
Important: If the nonconforming product is to be serviced by
someone other than Cuisinart’s Authorized Service Center,
please remind the servicer to call our Consumer Service
Center at 1-800-726-0190 to ensure that the problem is
properly diagnosed, the product serviced with the correct
parts, and the product is still under warranty.
Your Cuisinart
®
12-Cup Percolator has been manufactured
to the strictest specifications and has been designed for use
only in 120 volt outlets and only with authorized accessories
and replacement parts. This warranty expressly excludes any
defects or damages caused by attempted use of this unit
with a converter, as well as use with accessories,
replacement parts or repair service other than those
authorized by Cuisinart. This warranty does not cover any
damage caused by accident, misuse, shipment or other than
ordinary household use. This warranty excludes all incidental
or consequential damages. Some states do not allow the
exclusion or limitation of these damages, so these exclusions
may not apply to you. You may also have other rights, which
vary from state to state.
6
Page 8

Other trademarks or service marks referred to herein are the
trademarks or service marks of their respective owners.
7
©2015 Cuisinart
150 Milford Road
East Windsor, NJ 08520
Printed in China
www.cuisinart.com
15CE016424
F IB-6072-ESP
Page 9

F IB-6072-ESP
15CE016424
www.cuisinart.com
Impreso en China
East Windsor, NJ 08520
150 Milford Road
©2015 Cuisinart
7
aquí pertenecen a sus titulares respectivos.
Todas marcas registradas o marcas de comercio mencionadas
Page 10

6
de este tipo.
®
un Estado a otro.
para usted. Usted puede tener otros derechos que varían de
de modo que las limitaciones mencionadas pueden no regir
exclusión o limitación de daños incidentales o consecuentes,
incidentales o consecuentes. Algunos Estados no permiten la
Esta garantía excluye expresamente todos los daños
de daños causados por mal uso, negligencia o accidente.
institucional o comercial del producto, y no es válida en caso
un convertidor de voltaje. Esta garantía no cubre el uso
Cuisinart, así como los daños causados por el uso de
por accesorios, piezas o reparaciones no autorizados por
Esta garantía excluye expresamente los daños causados
accesorios y piezas de repuesto autorizados solamente.
y ha sido diseñado para uso sobre corriente de 120V, usando
Este aparato satisface las más altas exigencias de fabricación
repararlo y asegurarse de que el producto esté bajo garantía.
problema correctamente, usar las piezas correctas para
de Cuisinart al 1-800-726-0190 a fin de diagnosticar el
centro de servicio que deberían llamar al servicio posventa
de servicio no autorizado, por favor informe al personal del
Importante: si debe llevar el aparato defectuoso a un centro
dirección del centro de servicio más cercano.
confirmará si su aparato sigue bajo garantía y le indicará la
de regresar el aparato a Cuisinart. Un representante le
llame a nuestro servicio posventa al 1-800-726-0190 antes
Si su aparato tiene algún problema, le recomendamos que
ANTES DE HACER REPARAR SU APARATO
durante el período de garantía.
reemplazo, manejo y envío de los productos defectuosos
Cuisinart será responsable por los gastos de reparación,
en
nuestro servicio posventa al 1-800-800-726-0190.
que lo reparen o lo cambien. Para esto, se debe llamar a
mandar el aparato defectuoso directamente a Cuisinart para
Los residentes de California también pueden, si lo desean,
defectuosos durante el período de garantía.
servicio, reparación, reemplazo o reembolso de los productos
®
económica. Cuisinart será responsable por los gastos de
que se pueda ajustar o reparar el producto de manera
el producto a un centro de servicio independiente, siempre
estas dos opciones no satisfacen al consumidor, podrá llevar
del producto por el consumidor hasta que éste se dañe. Si
original del producto, menos la cantidad imputable al uso
el producto o reembolsará al consumidor por el precio
consumidor a un centro de servicio independiente, cambiará
La tienda, a su opción, reparará el producto, referirá al
Cuisinart
donde lo compraron o (B) a otra tienda que venda productos
pueden (A) regresar el producto defectuoso a la tienda
período de garantía. Los residentes del estado de California
La ley del estado de California ofrece dos opciones bajo el
RESIDENTES DE CALIFORNIA SOLAMENTE
pertinente.
descripción del problema, así como cualquier información
Recuerde incluir su nombre, dirección y teléfono, la
durante el envío no serán cubiertos bajo esta garantía.
dirección equivocada. Los productos perdidos y/o lastimados
durante el transporte o por los paquetes mandados a una
Cuisinart no será responsable por los daños ocurridos
paquete por un método de entrega con seguro y seguimiento.
NOTA: para más seguridad, le aconsejamos que mande su
instrucciones de envío.
de compra y deben llamar al 1-800-726-0190 para recibir
Los residentes de California sólo necesitan dar una prueba
manejo y envío.
compra y un cheque o giro postal de US$10.00 por gastos de
Regrese el aparato defectuoso, junto con su recibo de
Glendale, AZ 85307.
Cuisinart, Service Department, 7475 North Glen Harbor Blvd.,
al 1-800-726-0190 o regrese el aparato defectuoso a:
bajo esta garantía, llame a nuestra línea directa gratuita
reemplazaremos (a nuestra opción). Para obtener servicio
fabricación durante el período de garantía, la reparemos o
Si este aparato presentara algún defecto de materiales o
calculado a partir de la fecha de fabricación.
ausencia del recibo de compra, el período de garantía será
no es necesario para recibir servicio bajo esta garantía. En
fecha de compra original. Sin embargo, registrar el producto
en www.cuisinart.com a fin de facilitar la verificación de la
Le aconsejamos que llene el formulario de registro disponible
utilizado para uso doméstico y según las instrucciones.
fecha de compra original, siempre que el aparato haya sido
materiales o fabricación durante 3 años después de la
Cuisinart garantiza este aparato contra todo defecto de
detallistas u otros comerciantes.
estados donde la ley lo permita, esta garantía no es para los
una tienda, para uso personal o casero. A excepción de los
es un consumidor si ha comprado su aparato Cuisinart
Esta garantía es para los consumidores solamente. Usted
CANADÁ SOLAMENTE)
(VÁLIDA EN LOS EE.UU. Y EN
DE TRES AÑOS
GARANTÍA LIMITADA
Page 11

5
para enjuagar.
Repita estos pasos con agua fresca (sin vinagre)
vinagre/agua.
de preparación. Al final del ciclo, tire la mezcla de
de corriente. Deje que la unidad lleve a cabo un ciclo
la tapa está puesta. Conecte el cable a una toma
Cerciórese que todas las piezas están instaladas y que
para 12 tazas (1.75 L). No exceda 12 tazas (1.75 L).
(435 ml) de vinagre blanco y agregue agua hasta la línea
Para eliminar el sarro, llene la percoladora con 3 tazas
interior de la percoladora.
de uso de la percoladora. Eliminar el sarro limpiará el
dependerá de la dureza del agua y de la frecuencia
el sarro regularmente. La frecuencia de la limpieza
Para lograr un desempeño óptimo, deberá limpiar
metálicas internas del aparato.
Depósitos de sarro pueden acumularse sobre las piezas
ELIMINACIÓN DEL SARRO
por un técnico autorizado.
Mantenimiento: cualquier otro servicio debe ser realizado
de guardarlo.
Almacenaje: siempre retire la tapa de la percoladora antes
con agua corriente.
arandela, suéltelos con un palillo y lave el tubo/la arandela
libremente. Si posos de café quedan atrapados cerca de la
Nota: la arandela al pie del tubo de bombeo debe moverse
el aparato.
No utilice productos o materiales abrasivos para limpiar
el aparato.
el cuerpo con un paño húmedo y séquelo antes de guardar
Nunca sumerja la percoladora en agua u otro líquido. Limpie
Nunca meta la percoladora ni el cable al lavavajillas.
(nivel superior solamente). Enjuague bien todas las piezas.
(con el resorte) en agua jabonosa tibia o en el lavavajillas
Lave la tapa, el filtro, la tapa del filtro y el tubo de bombeo
Siempre desconecte el aparato antes de limpiarlo.
MANTENIMIENTO
Page 12

4
café caliente.
percoladora. Vuelva a conectar el cable para mantener el
8. Para servir fácilmente, desconecte el cable de la
taza de café.
la tapa. Ahora está listo/a para disfrutar de una sabrosa
la percoladora; se ponen muy calientes. Vuelva a cerrar
Precaución: no toque las partes de acero inoxidable de
horno.
bombeo, usando agarraderas/manoplas/guantes para el
7. Abra la tapa y retire cuidadosamente el filtro y el tubo de
final del ciclo de preparación.
no abra la tapa de la percoladora antes del
Advertencia:
encenderá, lo que indica que el café está listo.
6. Al final del ciclo de preparación, el indicador luminoso se
continuará a un ritmo de 1 taza (145 ml) por minuto.
ciclo de preparación empezará dentro de segundos y
5. Conecte el cable a una toma de corriente de 120V. El
del percolador.
Coloque la tapa del filtro sobre el mismo y cierre la tapa
introduciendo el tubo en la entrada del depósito interno.
4. Regrese el filtro y el tubo de bombeo en la percoladora,
Usar café molido muy fino puede atascar el filtro.
para evitar que el café se meta en los orificios del filtro.
Nota: le recomendamos que use una molienda gruesa
molido, usando las graduaciones sobre el filtro como guía.
tubo de bombeo. Agregue la cantidad deseada de café
3. Enjuague el filtro con agua fría. Instale el filtro encima del
*Cantidades de café dadas en cucharadas
4 (580ml) 4 6 8
6 (870ml) 6 8 12
8 (1.20l) 8 12 16
10 (1.45l) 10 14 18
12 (1.75l) 12 16 20
Tazas Ligero Normal Fuerte
según la fuerza del café
Cantidad de café*
de sus preferencias personales.
de café deseada. Ajuste la cantidad a gusto, dependiendo
café en polvo usar según la cantidad de café y la fuerza
La tabla a continuación le indica cuántas cucharadas de
con agua hasta la marca redonda.
solamente 4 tazas (580 ml) de café, llene la percoladora
resultados, utilice agua fría. Nota: para preparar
adentro de la percoladora como guía. Para mejores
cantidad deseada de agua, usando las graduaciones
bombeo (con el resorte). Llene la percoladora con la
2. Retire la tapa, el filtro, la tapa del filtro y el tubo de
sección "Limpieza y mantenimiento).
1. Lave todas las piezas antes del primer uso (véase la
INSTRUCCIONES DE USO
Page 13

15
3
14
13
10
9
8
7
6
5
4
3
2
1
11
12
15. Depósito interno
14. Marca para 4 tazas (580 ml)
13. Indicador del nivel de agua
Se enciende al final del ciclo de preparación.
Indicador luminoso
12.
Para máxima comodidad a la hora de servir el café.
Cable removible
11.
de superficies.
de usar un salvamantel u otro tipo de protector
Protege las mesas/encimeras. Elimina la necesidad
Base aislante
10.
Diseño ergonómico, para servir fácilmente.
Cómoda asa
9.
Diseño antigoteo que permite servir sin ensuciar.
Pico vertedor estrecho
8.
de café.
Con capacidad para 4–12 tazas (580 ml a 1.75 L)
Cuerpo de acero inoxidable
7.
Lleva automáticamente el agua del depósito al filtro.
6. Tubo de bombeo
Resorte
5.
permiten añadir la cantidad precisa de café.
preparar 12 tazas (1.75 L) de café. Graduaciones
Con capacidad para suficiente café molido como para
4. Filtro permanente
Tapa del filtro
3.
manera segura.
Con sistema de bloqueo, para servir el café de
Tapa de acero inoxidable
2.
Permite vigilar el proceso de preparación.
Pomo transparente
1.
de café tradicional preparado a la perfección.
ha sido diseñada para
®
maximizar su experiencia al disfrutar de una taza
(1.75 L) Cuisinart
La cafetera percoladora clásica de 12 tazas
CARACTERÍSTICAS
PIEZAS Y
Page 14

2
SER REPARADAS POR EL USUARIO.
ESTE APARATO NO CONTIENE PIEZAS QUE PUEDAN
NO DESARME EL CUERPO DEL APARATO.
ADVERTENCIA: PARA REDUCIR EL RIESGO DE ELECTROCUCIÓN,
NO LO ABRA
RIESGO DE INCENDIO O ELECTROCUCIÓN
ADVERTENCIA
del alcance de los niños.
embalaje. Mantenga las bolsas de plástico fuera
Le aconsejamos que conserve el material de
percoladora.
5. Quite la bolsa protectora que envuelve la
4. Aleje la caja y retire las piezas de cartón.
saque la percoladora.
3. Voltee la caja para que repose en su lado y
folletos de la caja.
2. Retire el manual de instrucciones y otros
plana y segura.
1. Ponga la caja sobre una superficie espaciosa,
DE DESEMBALAJE
INSTRUCCIONES
IMPORTANTES
Garantía . . . . . . . . . . . . . . . . . . . . . . . . . . 6
Limpieza y mantenimiento . . . . . . . . . . . . 5
Instrucciones de uso . . . . . . . . . . . . . . . . . 4
Piezas y características . . . . . . . . . . . . . . 3
Instrucciones de desembalaje . . . . . . . . . 2
Medidas de seguridad importantes . . . . . . 1
ÍNDICE
tapa y examinar el filtro.
el aparato y espere 10 minutos antes de abrir la
debidamente durante la preparación, desenchufe
causar quemaduras. Si el agua/café no escurriera
agua o café muy caliente podrían salir del pico y
preparación, aunque líquido no esté bajando;
Precaución: nunca abra la tapa durante la
el filtro.
cuidadosamente el filtro dorado, y no sobrellene
ocurra, no muela el café demasiado fino, limpie
y provocar un derrame. Para evitar que esto
atascamiento del agua y/o del café en el filtro
Ciertas condiciones pueden producir un
IMPORTANTE
causar tropiezos.
donde puede ser jalado por niños o puede
manera que no cuelgue de la encimera/mesa
importante acomodar el cable más largo de
ser por lo menos igual a la del aparato. Es
La clasificación nominal de la extensión debe
cuidado.
Puede usarse una extensión eléctrica con
enganche o tropiece con un cable más largo.
para reducir el peligro de que alguien se
El cable proveído con este aparato es corto,
USO DE EXTENSIONES
Page 15

1
al equipo.
en la documentación que acompaña
operación y mantenimiento (servicio)
de instrucciones importantes de
fin alertar al usuario de la presencia
un triángulo equilátero tiene como
El signo de exclamación dentro de
incendio o electrocución.
magnitud para constituir un riesgo de
los cuales pueden ser de suficiente
no aislados en el interior del aparato,
la presencia de voltajes peligrosos
tiene como fin alertar al usuario de
dentro de un triángulo equilátero
relámpago con punta de flecha
El símbolo representado por un
ELECTROCUCIÓN
DE INCENDIO O
ADVERTENCIA: RIESGO
SOLAMENTE
PARA USO DOMÉSTICO
INSTRUCCIONES
GUARDE ESTAS
cierra.
puerta del armario/gabinete/gabinete cuando
especialmente si éste toca las paredes o la
conectado presenta un riesgo de incendio,
en un armario/gabinete. Dejar el aparato
desconecte el aparato antes de guardarlo
dentro de un armario/gabinete. Siempre
15. No haga funcionar el aparato debajo o
durante el funcionamiento.
14. Para evitar las quemaduras, no retire la tapa
AUTORIZADO.
SER REALIZADAS POR UN TÉCNICO
USUARIO. LAS REPARACIONES DEBEN
PUEDAN SER REPARADAS POR EL
APARATO NO CONTIENE PIEZAS QUE
EL CUERPO DEL APARATO. ESTE
ELECTROCUCIÓN, NO DESARME
EL RIESGO DE INCENDIO O
13. ADVERTENCIA: PARA REDUCIR
no sea el indicado.
12. No utilice el aparato para ningún otro fin que
desconectarlo.
Siempre apague el aparato (OFF) antes de
de conectar el cable a la toma de corriente.
11. Siempre llene la percoladora con agua antes
caliente, ni en un horno caliente.
un quemador a gas o una hornilla eléctrica
10. No coloque el aparato sobre o cerca de
contacto con superficies calientes.
de la encimera o de la mesa, ni que haga
9. No permita que el cable cuelgue del borde
8. No lo utilice en exteriores.
heridas.
recomendados por Cuisinart puede provocar
7. El uso de accesorios/aditamentos no
reparación o ajuste.
de servicio autorizado para su revisión,
si estuviese dañado; regréselo a un centro
funcionado mal o que se hubiese caído, o
estuviesen dañados, después de que hubiese
6. No utilice este aparato si el cable o la clavija
personas con alguna discapacidad.
5. Este aparato no debe ser usado por niños o
aparato en agua u otro líquido.
sumerja el cable, la clavija o el cuerpo del
4. Para reducir el riesgo de electrocución, no
mango y los botones o perillas.
3. No toque las superficies calientes; utilice el
piezas y antes de limpiarlo.
que se enfríe antes de instalar/sacar
esté en uso y antes de limpiarlo. Permita
2. Siempre desconecte el aparato cuando no
1. LEA TODAS LAS INSTRUCCIONES.
las siguientes:
riesgo de incendio, electrocución o heridas, incluso
precauciones básicas de seguridad para reducir el
Al usar aparatos eléctricos, siempre debe tomar
IMPORTANTES
MEDIDAS DE SEGURIDAD
Page 16

Para su seguridad y para disfrutar plenamente de este producto, siempre lea cuidadosamente las instrucciones antes de usarlo.
PRC-12 Series
inoxidable de 12 tazas (1.75 L)
Cafetera percoladora clásica de acero
INSTRUCCIONES
MANUAL DE
Page 17

Version no.: PRC12 IB-6072-ESP
148 mm(W) x 210 mm(H)
IB Size:
Die Cut: new
Material: 105gsm gloss art paper for whole book
Coating: gloss varnishing in cover
Colors(Cover): 4C+1C(BLACK)
(Inside): 1C+1C(BLACK)
Date:
SEP/01/2015
F PRC12 IB-6072-ESP (0.0)
Tel: 0769-87720314 87886328 Fax: 0769-87720324
E-MAIL: pofatprepress@pofat.com
B C M Y
Co-ordinator:
Astor You / Linda Ouyang
Operator: Revise Ver:
100 95 90 85 80 75 70 65 60 55 50 45 40 35 30 25 20 15 10 5
100 95 90 85 80 75 70 65 60 55 50 45 40 35 30 25 20 15 10 5
100
LIAO
50 45 40 35 30 25 20 15 10 595 90 85 80 75 70 65 60 55
100 95 90 85 80 75 70 65 60 55 50 45 40 35 30 25 20 15 10 5
100 95 90 85 80 75 70 65 60 55 50 45 40 35 30 25 20 15 10 5
 Loading...